Signing Up for a Database Cloud Service
Overview
- Oracle Application Express: Used to develop applications in the cloud
- RESTful Web Services: Used to access data in the cloud
- Packaged applications: Pre-built, easily installed applications for use in the Database Cloud Service.
Purpose
This tutorial covers how to create a Database Cloud Service in the Oracle Cloud.
Time to Complete
Approximately 20 minutes
Introduction
The Oracle Cloud was introduced at Oracle OpenWorld in October 2011. The Oracle Cloud consists of a number of different services but all the services share some common attributes. All the services are self-service meaning that you can sign up for them through the website alone.
The cloud services are divided up into two main categories:
Application services, such as Fusion CRM or Fusion Human Capital
Management (HCM) and Platform services, such as Java Cloud
Service and Database Cloud Service.
For the Database Cloud Service, there are three main components:
In this tutorial, you perform the steps to sign up for a Database Cloud Service free trial.
Prerequisites
Before starting this tutorial, you should have an Oracle.com account.
Background
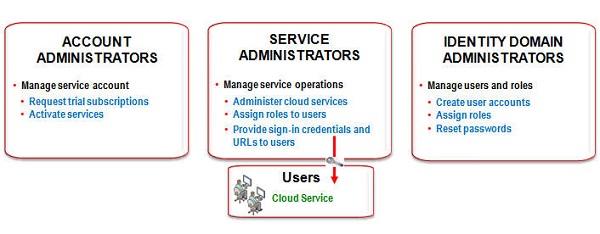
There are 6 steps in requesting, activating, and setting up a trial subscription to an Oracle Cloud Service. This OBE focuses on the first 4 steps:
- You order a free trial subscription to an Oracle Cloud service. Oracle automatically assigns you the roles of Account Administrator for the service.
Unlike a paid subscription, Oracle also assigns you the role of Service Administrator for the service, and Identity Domain Administrator as well.- Account Administrator receives a notification email to activate the service.
- Account Administrator activates the service.
- Identity Domain Administrator manages user accounts, roles, and passwords.
- Service Administrator develops and administers the service, and assigns roles to users.
- Service Administrator provides URLs to Cloud Service users, to access their Cloud Services.
Select the Database Cloud Service
In order to request a Database Cloud Service trial, you need to select the service you want and log in to your oracle.com account. If you do not have an account, you need to create one first. Perform the following steps:
Open a browser and enter the following URL:
http://cloud.oracle.com
Click Free 30-Day Trial.

Under Database, click Try it.

You must have an Oracle.com account. Click Sign In if you already have one or click Create an Account. If you go through the steps to create an account, perform the steps above again and click Sign In on this page.

Enter your Oracle.com credentials and click Sign In.

Submit Your Service Request
In this section, you enter your account information, specify the name of your Database Cloud Service and agree to the terms to submit your Database Cloud Service trial request. Perform the following steps:
Enter your account information. Then click Next.

To verify your identity, you need to
request a verification code to be delivered to your mobile
phone.
After you receive the code, enter it in the Code Received
field and click Next.

An Identity Domain Name and Service Name are automatically assigned when you request a free trial service. (You can customize this name when you purchase an Oracle Database Cloud Service. In a trial, Oracle also automatically assigns you the role of Account Administrator for the service.
Make note of the Service Name and Identity Domain Name assigned to your trial. Use the checkbox to accept Oracle's terms and conditions, and click Request Trial.

Your service request has been submitted. At this point, you will receive an email.

Activate Your Service
In this section, you activate your trial Database Cloud Service so that you can start using it. Perform the following steps:
Open the email you receive and click the Activate order button.

An Oracle Cloud My Account window in your browser is opened with the service information. It indicates that service activation is in progress, and that you will receive another email with service details and sign-in credentials.
Leave this window open in your browser, as you will use it in the next section on logging in to your service.

You will receive the second email once your service is activated. The email provides useful information about your service. In addition, a temporary password is provided for the service you just activated. You will use this password in the next section to log in to your service.

Log In to My Services
You are now ready to log in to My Services.
In the email you just received, click the My Services URL link.

Your browser opens to a sign in dialog. Enter your User ID, temporary password and the Identity Domain for your service and click Sign In.

Change Your Temporary Password
The first time you log in to the Oracle Cloud, you are prompted to change your temporary password. Perform the following steps:
Enter your temporary password for the Old Password and then enter your new password based on the Password Policy for the New and Confirm new password fields. In addition, choose 3 challenge questions and provide answers for each one and click Submit.

Your password and challenge questions were set successfully and you are logged into your service. The My Services window opens in a Dashboard tab. Click the name of your database trial service listed under Active Platform Services.

Launch Your Service
You are now ready to launch your Database Cloud Service. Perform the following step:
The Overview tile provides general information about the service. To open your Database Cloud Service, click Open Service Console.

The main Application Express window appears and you can now begin creating your database applications.

Summary
- Select the Database Cloud Service
- Submit your service request
- Activate your service
- Change your service password
- Log in and launch your service
- Oracle Cloud Home Page
- To learn more about Oracle Application Express, refer to additional OBEs in the Oracle Learning Library
In this tutorial, you have learned how to:
Resources
To help navigate this Oracle by Example, note the following:
- Hiding Header Buttons:
- Click the Title to hide the buttons in the header. To show the buttons again, simply click the Title again.
- Topic List Button:
- A list of all the topics. Click one of the topics to navigate to that section.
- Expand/Collapse All Topics:
- To show/hide all the detail for all the sections. By default, all topics are collapsed
- Show/Hide All Images:
- To show/hide all the screenshots. By default, all images are displayed.
- Print:
- To print the content. The content currently displayed or hidden will be printed.
To navigate to a particular section in this tutorial, select the topic from the list.