Before You Begin
Purpose
This tutorial shows you how to create a REST service in PHP using the Laravel framework and Oracle MySQL Cloud Service. You also learn how to deploy and test your application in Oracle Application Container Cloud Service.
Time to Complete
60 minutes
Background
Laravel is a free, open-source PHP web framework that saves you time and effort and makes web development easier. Laravel depends on a number of external packages for its functionality. To do this, it uses Composer as a dependency manager. Therefore, you need to install Composer to make it easier create a new project and download all the dependencies.
Artisan
Laravel includes a command-line interface called Artisan. It provides a number of helpful commands that can assist you while you are building your application. To view a list of all available Artisan commands, you may use the list command:
php artisan listComposer
Composer is a tool for dependency management in PHP. It allows you to declare the libraries your project depends on and it will manage (install/update) them for you. Composer is used in most of the modern PHP frameworks like Symfony and Laravel.
What Do You Need?
- An Oracle Cloud account with Oracle Application Cloud Container Service
- PuTTY (Windows users)
- An SSH key pair. See Creating SSH Keys for Use with Oracle Cloud Services.
- Laravel
- NetBeans with PHP support.
- employee-client.zip
- freewall.js
Creating an Oracle MySQL Cloud Service Instance
In this section, you create an Oracle MySQL Cloud Service instance using the user interface. When you create your Oracle MySQL Cloud Service instance, you need to provide a secure shell (SSH) public key to establish secure connections. If you don't have one, see the section "What do you need?" of this tutorial.
You need the public key when creating a service
instance, and you need the paired private key when
you access it using the ssh utility.
-
Open the Oracle MySQL Cloud Service console.
-
Click Create Instance.
In the Instance page, enter the following information, and then click Next:
- Instance Name:
TestDB - Description (optional)
- Instance Name:
In the Details page, enter or select the following information, and then click Next:
- Compute Shape: OC3-1.0 OCPU, 7.5GB RAM
- SSH Public Key (Enter the public key that you generated in the previous section.)
- Usable Database Storage(GB):
25 - Administration User:
root - Administration Password
- Confirm Administration Password
- Database Schema Name:
mydatabase - Server Character Set: utf8mb4 - UTF-8 Unicode
- Configure MySQL Enterprise Monitor: No
- Backup Destination: None
- In the Confirmation page, review the details of your instance and click Create.
When you return to the Oracle MySQL Cloud Service console, you will see your new database instance listed. It will have a status of
Creating
                                  service...
until the service creation is completed. Service instance creation will take a number of minutes. -
Click the name of the database.
-
Write down the Public IP value.
Connecting to MySQL Database
This section describes two ways to create a tunnel:
one using a Windows GUI client (PuTTY), and one then
using the ssh utility at the command
line for Linux systems.
To complete this section you need:
- The public IP address of your instance (for example, 192.0.2.1)
- The port of your instance (for example, 3306)
- The private key (.pkk file). The database administrator should provide the SSH private key used for creating the database instance.
Creating an SSH Tunnel Using PuTTY
-
Open the PuTTY program.

Description of the image -
In the Host Name (or IP address) box, enter the public IP address (for example, 192.0.2.1) of the database instance. Leave the port number at the default 22.

Description of the image - Confirm that the Connection type
option is set to SSH.

Description of the image - In the Category tree,
expand Connection if
necessary and then click
Data. -
In Auto-login username field, enter opc.

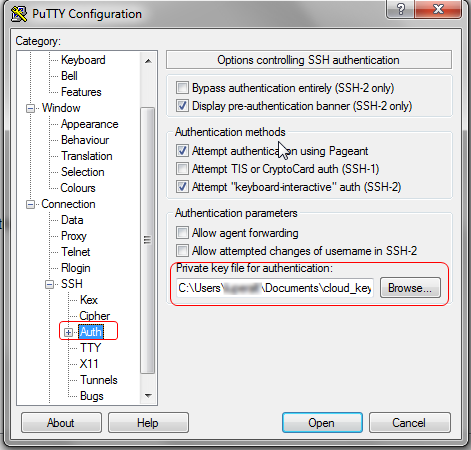
Description of the image - Expand SSH, and then click Auth.
- Under Private key file for authentication, click Browse
- In the Select private key file
window, click PuTTY Private Key Files
(.ppk) to find and open the private
key file that matches the public key used when you created
the instance.
Description of the image - In the Category tree, click Tunnels.
- In the Destination
section:
-
Enter a port number in the Source port field (3306 in this example); this is the port on the local machine you'll connect to. It can be any port number you have available on your local machine.
Note: if you have installed MySQL on your machine, then you probably have the default port 3306 in use, don't use this port.
- In the Destination field enter public_ip_address:port (for example, 192.0.2.1:3306).

Description of the image -
- In the Category tree, click Session to display the Session panel again.
- In the Saved Sessions
field, enter a name for this connection
configuration. For the tutorial, type MySQLDB,
and then click Save. When
you open PuTTY the next time, you can load
this configuration by selecting it and
clicking Load.

Description of the image - Click Open to open the
connection to the virtual machine (VM). If
this is the first time you're connecting to
the VM, then the PuTTY Security Alert window
displays, prompting you to confirm the
public key.
Click Yes to continue connecting.

Description of the image -
When prompted, enter the passphrase for the key, if one was defined.
Using username "opc".
Authenticating with public key "rsa-key-20160107"
Passphrase for key "rsa-key-20160107":
********************************************************************************
*                                 Welcome to                                   *
*                             MySQL Cloud Service                              *
*                                     by                                       *
*                                   Oracle                                     *
*       If you are an unauthorised user please disconnect IMMEDIATELY          *
********************************************************************************
******************************* MySQL Information ******************************
* Status:  RUNNING                                                             *
* Version:   5.7.13                                                            *
********************************************************************************
************************** Storage Volume Information **************************
* Volume      Used             Use%           Available   Size     Mounted on  *
* MySQLlog    6.1G -------- 33%                     13G    20G   /u01/translog *
* bin         2.6G ------- 28%                     6.7G   9.8G   /u01/bin      *
* data        122M -- 1%                            24G    25G   /u01/data     *
********************************************************************************
[opc@testdb2-mysql-1 ~]$ Using username "opc".
********************************************************************************
*                                 Welcome to                                   *
*                             MySQL Cloud Service                              *
*                                     by                                       *
*                                   Oracle                                     *
*       If you are an unauthorised user please disconnect IMMEDIATELY          *
********************************************************************************
******************************* MySQL Information ******************************
* Status:  RUNNING                                                             *
* Version:   5.7.13                                                            *
********************************************************************************
************************** Storage Volume Information **************************
* Volume      Used             Use%           Available   Size     Mounted on  *
* MySQLlog    6.1G -------- 33%                     13G    20G   /u01/translog *
* bin         2.6G ------- 28%                     6.7G   9.8G   /u01/bin      *
* data        122M -- 1%                            24G    25G   /u01/data     *
********************************************************************************
[opc@testdb2-mysql-1 ~]$
The tunnel is now created. Any packets sent to the client's port 3306 will reach the VM's port 3306.
Creating an SSH Tunnel From a Command-Line Shell
- In a command line shell, set the file
permissions of the private key file so that
only you have access to it:
$ chmod 600 private-key-filewhere
private-key-fileis the path to the SSH private key file that matches the public key used when your Oracle Database Cloud Service instance was created. - Run the
sshutility:
where:$ ssh -i private-key-file -L local-port:vm-ip-address:vm-port opc@vm-ip-address -N-
private-key-fileis the path to the SSH private key file that matches the public key used when your instance was created. -
-Lspecifies that the local (client) port forwarded to the remote host and port. This allocates a socket to listen to the local port. Whenever it's a connection to the local port, the connection forwards over a secure channel, and from the remote machine connects to the host port. A connection is made to the host port from the remote machine. - Note: When you use an
SSH client at the command-line, you can't
use a private key saved in PuTTY (
.ppk) format. If the only private key that you have is in PuTTY (.ppk) format, see the PuTTY documentation for instructions on how to convert it to OpenSSH format. -
local-portis the port number on your client. -
vm-ip-addressis the IP address of the VM in x.x.x.x format. For an Oracle Database Cloud Service instance, you can use the public IP address of the instance. -
vm-portis the port number on the VM to which you want to create a tunnel. -
opc@vm-ip-addressis the user account (opc) and the VM's IP address. -
-Nensures that only the SSH tunnel is enabled. You won't be able to use the SSH session to run commands in the command shell.
$ ssh -i keys/id_rsa -L 1523:192.0.2.1:1521 opc@192.0.2.1 -
- If this is the first time you're connecting to the VM, then the ssh utility prompts you to confirm the public key. In response to the prompt, enter yes.
- At the prompt, enter the passphrase for the
SSH key, if one was created.
After you log in, you can use any resources of that server as if it were local.
Creating the MySQL Database Connection in NetBeans
-
Open NetBeans.
-
Click the Services tab.
-
Right click Databases and select New Connection...
-
In the Driver field, select MySQL (connector/ J driver), and click Next.
-
In the New Connection Wizard enter the following information:
- Host:
localhost - Port:
3306 - Database:
mydatabase - User Name:
root - Password:
<enter-your-password> - JDBC URL:
jdbc:mysql://localhost:3306/mysql?zeroDateTimeBehavior=convertToNull

Description of the image - Host:
-
Click Test Connection, verify the connection success, and then click Finish.
Creating the Database Objects
-
Right click to the database connection and select Execute Command...

Description of the image -
Copy and paste the following script and click Run SQL.
CREATE TABLE employees ( id INTEGER NOT NULL AUTO_INCREMENT, firstName VARCHAR(255), lastName VARCHAR(255), email VARCHAR(255), phone VARCHAR(255), birthDate VARCHAR(10), title VARCHAR(255), department VARCHAR(255), PRIMARY KEY (id) ); -
Copy and paste the following script and click Run SQL.
INSERT INTO employees (FIRSTNAME, LASTNAME, EMAIL, PHONE, BIRTHDATE, TITLE, DEPARTMENT) VALUES ('Hugh', 'Jast', 'Hugh.Jast@example.com', '730-715-4446', '1970-11-28' , 'National Data Strategist', 'Mobility');
INSERT INTO employees (FIRSTNAME, LASTNAME, EMAIL, PHONE, BIRTHDATE, TITLE, DEPARTMENT) VALUES ('Toy', 'Herzog', 'Toy.Herzog@example.com', '769-569-1789','1961-08-08', 'Dynamic Operations Manager', 'Paradigm');
INSERT INTO employees (FIRSTNAME, LASTNAME, EMAIL, PHONE, BIRTHDATE, TITLE, DEPARTMENT) VALUES ('Reed', 'Hahn', 'Reed.Hahn@example.com', '429-071-2018', '1977-02-05', 'Future Directives Facilitator', 'Quality');
INSERT INTO employees (FIRSTNAME, LASTNAME, EMAIL, PHONE, BIRTHDATE, TITLE, DEPARTMENT) VALUES ('Novella', 'Bahringer', 'Novella.Bahringer@example.com', '293-596-3547', '1961-07-25' , 'Principal Factors Architect', 'Division');
INSERT INTO employees (FIRSTNAME, LASTNAME, EMAIL, PHONE, BIRTHDATE, TITLE, DEPARTMENT) VALUES ('Zora', 'Sawayn', 'Zora.Sawayn@example.com', '923-814-0502', '1978-03-18' , 'Dynamic Marketing Designer', 'Security');
Creating the REST Service
Creating the Laravel Project
-
Open a command-line window (or terminal in Linux).
-
Go to the directory where the new project should reside.
-
Create a Laravel project.
laravel new employee-service
Creating the Model Class
-
On the command-line, go to the
employee-servicedirectory and execute the following command to create theEmployeeclass.This command generates a model class at
app/Employee.php.php artisan make:model EmployeeThe plural name of the class will be used as the table name unless another name is explicitly specified. In this case, Eloquent will assume the
Employeemodel stores records in theemployeestable. You can specify a custom table by defining a table property on your model:$table = 'employees_corp'; -
Open the
Employeeclass and set the$timestampsproperty tofalse.<?php namespace App; use Illuminate\Database\Eloquent\Model; class Employee extends Model { public $timestamps = false; }By default, Eloquent expects
created_atandupdated_atcolumns exist on your tables. If you don't have these columns in your tables, you must set the$timestampsproperty on your model tofalse.
Creating the Controller
-
In the command-line, execute the following command to create the
EmployeeControllerclass.This command generates a controller at
app/Http/Controllers/EmployeeController.php. The controller will contain a method for each of the available resource operations.php artisan make:controller EmployeeController --resource -
Open the
EmployeeController.phpfile in a text editor and add theEmployeemodel class.use App\Employee; -
Implement the
indexmethod to get all the employees.public function index(){ Log::info('::GET ALL EMPLOYEES::'); $employees = Employee::all(); return json_encode($employees); } -
Implement the
storemethod to save a new employee in the database.public function store(Request $request){ Log::info('::SAVE::'); $employee = new Employee; $employee->firstName = $request->firstName; $employee->lastName = $request->lastName; $employee->email = $request->email; $employee->phone = $request->phone; $employee->birthDate = $request->birthDate; $employee->title = $request->title; $employee->department = $request->dept; if( $employee->save() ){ return response('{"status":"Employee created successfully!"}',201); } } -
Implement the
updatemethod.The
savemethod may also be used to update models that already exist in the database. To update a model, you should retrieve it, set any attributes you want to update, and then call thesavemethod.public function update(Request $request, $id){ Log::info('::UPDATE::'); $employee = Employee::find($id); $employee->firstName = $request->firstName; $employee->lastName = $request->lastName; $employee->email = $request->email; $employee->phone = $request->phone; $employee->birthDate = $request->birthDate; $employee->title = $request->title; $employee->department = $request->dept; if( $employee->save() ){ return response('{"status":"Employee updated successfully!"}',200); } } -
Implement the
destroymethod to delete an employee.public function destroy($id){ Log::info('::DELETE::'); if (Employee::destroy($id)){ return response('{"status":"Employee deleted successfully!"}',200); } } -
Add the
searchmethod.public function search($criteria, $value){ Log::info('::SEARCH::'); if ($criteria=='department'){ $filter = 'DEPARTMENT'; }else if ($criteria=='lastname'){ $filter = 'LASTNAME'; }else if ($criteria=='title'){ $filter = 'TITLE'; }else{ throw new Exception('Filter criteria not valid'); } $employee = Employee::where($filter, '=', $value)->get(); return json_encode($employee); } -
Remove the methods:
show, create,andedit.
Registering the Routes to the Controller
-
Open the
\routes\web.phpfile in a text editor and add the following sentence:Route::resource('employees', 'EmployeeController', ['only'=> ['index','create','store','destroy','update']]);This single route declaration creates multiple routes to handle a variety of actions on the resource.
Actions Handled By Resource Controller
HTTP Method URI Controller method GET /employees index()POST /employees store(Request $request)PUT/PATCH /employees/{employeeID} update(Request $request, $id)DELETE /employees/{employeeID} destroy($id) -
Add the route for the search method.
Route::get('/employees/{filter}/{value}','EmployeeController@search');
Adding the Client Service
-
Extract the content of the
employee-client.zipfile in your local system. -
Copy the
imgdirectory into thepublicdirectory. -
Copy the
employees.blade.phpfile into the\resources\viewsdirectory. -
Copy the
freewall.jsfile (that you downloaded in the "What do you need?" section) in thejsdirectory. -
Open the
routes/web.phpfile, add the following code, and save the file.Route::get('/employees/client', function () { return view('employees'); });
Preparing the Application for Cloud Deployment
When you upload your application to Oracle
Application Container Cloud Service using the user
interface, you must include a file called manifest.json
in the application archive (.zip, .tgz,
.tar.gz file). If you use the REST API to
upload the application, this file is still required
but doesn’t have to be in the archive.
The manifest.json file specifies the
PHP version to use, the command, and optionally, you
can include notes and application-specific release
information.
-
Create the
start.shscript file and add the following content:echo "DB_CONNECTION=mysql" >> ./.env echo "DB_HOST=${MYSQLCS_CONNECT_STRING%:*}" >> ./.env echo "DB_PORT=${MYSQLCS_MYSQL_PORT}" >> ./.env echo "DB_DATABASE=${MYSQLCS_CONNECT_STRING##*/}" >> ./.env echo "DB_USERNAME=${MYSQLCS_USER_NAME}" >> ./.env echo "DB_PASSWORD=${MYSQLCS_USER_PASSWORD}" >> ./.env tail -f storage/logs/laravel.log & apache2-run publicThe
start.shscript updates the.envfile to define the Oracle MySQL Cloud Service credentials using the environment variables created when you add the MySQLCS service binding. The script also includes thetailcommand to show the logs and the Apache command(apache2-run public)to execute the application in Oracle Application Container Cloud Service.Note: By default, the Laravel framework logs errors and messages into the
storage/logs/Laravel.logfile. In order to ensure that errors, should they arise, are visible in Oracle Application Container Cloud Service you need to define thetailcommand in the script file. -
Create the
manifest.jsonand add the following content:{ "runtime": { "majorVersion": "7.0" }, "command": "sh ./start.sh", "notes": "Employees REST PHP Application using MySQL" } -
Compress all the project files including the
manifest.jsonfile into a.zipfile.
Deploying the Application to Oracle Application Container Cloud Service
Open the Oracle Application Container Cloud Service console.
In the Applications list view, click Create Application and select PHP.
In the Application section, enter a name for your application, select Upload Archive, and click Browse.
On the File Upload dialog box, select the
.zipfile you created in the previous section and click Open.If your account has access to Oracle Cloud Infrastructure regions, in the Region field select the same region that you used to create your Oracle Database Cloud Service instance.
Keep the default values in the Topology section and click Create.
Adding the Database Service Binding
-
In the Applications list view, click your application.
-
Click the Deployments tab and in the Service Binding section, click Add.
-
In the Add Service Binding dialog box, select MySQLCS Service in the Service Type field, enter or select values in the Service Name, Username, and Password fields, and click Save.

Description of this image -
In the Deployments dialog box, click Apply Edits.

Description of this image
Testing the Application
-
In the Application tab of the Oracle Application Container Cloud Service console, click the URL of your application.
-
Call the
GETmethod of the employee's service by adding/employeesat the end of the URL. -
Add to the end of the URL:
/client -
Test the Add New, Update, and Delete options.
Getting the logs
-
Open the Oracle Application Container Cloud Service console.
-
Select your application.
-
Click Administration. and then click Logs.
-
Click Get Log.
-
Wait a minute, and click
 .
. -
Click
 , and then click server.out.zip.
 -
Enter your cloud storage credentials, and click OK.
-
Select a location for the zip file and click Save.
-
Unzip the
server.out.zipfile and open theserver.outfile in a text editor.
Want to Learn More?
-
PHP website php.net
-
Laravel website laravel.com