Uploading and Analyzing Data with Oracle Big Data Manager
 Before You
Begin
Before You
Begin
In this 15-minute tutorial, you learn how to use Oracle Big Data Manager to upload a local file to the Hadoop Distributed File System (HDFS) on your cluster. You also learn how to import the file into a new Apache Hive table, create a new Oracle Big Data Manager paragraph from the table, and view the data.
Background
The Oracle Big Data Manager console provides a browser-based GUI to simplify data transfer tasks. You can use the Data explorer feature in Oracle Big Data Manager to upload local files to HDFS.
You can also use Data explorer to view the available Hive databases and tables. You can import local comma-separated-values (csv) files from HDFS to Hive. This provides you with quick access to the data in Apache Hive and it also enables you to query your data.
You can use the Oracle Big Data Manager Notebook feature to load files or Hive tables into a new paragraph in a Notebook where you can view and analyze the data.
What Do You Need?
- The taxidropoff.csv dataset file on your local machine. This dataset was created from several datasets on the NYC Taxi & Limousine Commission website.
- The print-command.txt and hive-query.txt files on your local machine.
- Access to an instance of Oracle Big Data Cloud Service and the required login credentials.
- Access to Oracle Big Data Manager on a non-secure Oracle Big Data Cloud Service instance. A port must be opened to permit access to Oracle Big Data Manager, as decribed in Enabling Oracle Big Data Manager.
- The required login credentials for Oracle Big Data Manager.
- Read/Write privileges to the
/tmpHDFS directory. - Basic familiarity with HDFS, Hive, Spark, and optionally, Apache Zeppelin.
 Access the Big Data Manager Console
- Sign in to Oracle Cloud and open your Big Data Cloud Service console.

Description of the illustration bdcs-console.png - In the row for the cluster, click Manage this service
 , and then click
Big Data Manager console from the context menu to display the Oracle Big Data
Manager Home page.
, and then click
Big Data Manager console from the context menu to display the Oracle Big Data
Manager Home page.

Description of the illustration select-bdm-console.png
 Upload a Local File to HDFS
In this section, you view the local taxidropoff.csv data file, and then upload it to
HDFS using the file upload feature in Data explorer. This .csv file contains many
rows and columns which makes it difficult to view, analyze, and query.
- On the Big Data Manager page, click the Data tab.

Description of the illustration data-tab.png - In the Data explorer section, select HDFS storage (hdfs)
from the Storage drop-down list. Navigate to the
/tmpdirectory, and then click File upload on the toolbar.

Description of the illustration file-upload.png - In the Files upload dialog box, click Choose files
to upload. In the Open dialog box, navigate to your local directory
that contains the
taxidropoff.csvfile, and then select the file. Thetaxidropoff.csvfile is displayed in the Name column. Click Upload.
Description of the illustration upload.png - Drill-down on the Details section in the Files upload
dialog box to display the progress of the file upload operation. When the file is uploaded
successfully to HDFS, the Upload has finished message is displayed. Click
Close to close the dialog box. The
taxidropoff.csvfile is now displayed in the/tmpHDFS directory.
Description of the illustration file-in-hdfs.png
 Import a File from HDFS into an Apache Hive Table
In this section, you import the taxidropoff.csv file from HDFS into a new Apache Hive
table in the default Hive database.
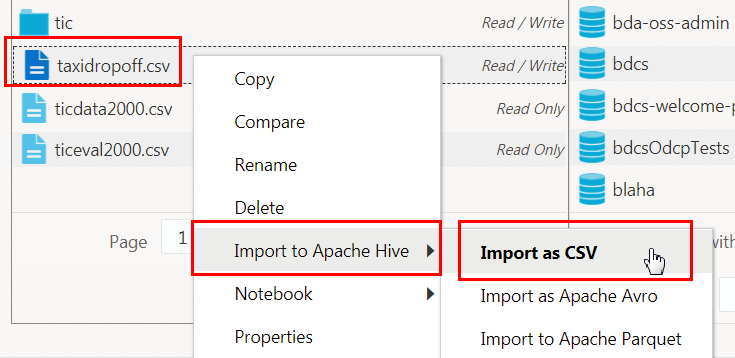
- In the Data explorer section, select HDFS storage (hdfs)
from the Storage drop-down list, if not already selected. Navigate to
the
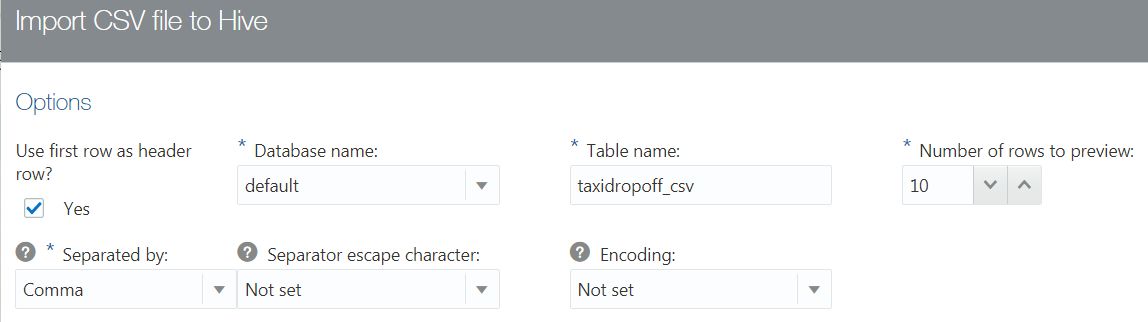
/tmpdirectory, if needed, and then right-click thetaxidropoff.csvfile. From the context menu, select Import to Apache Hive, and then Import as CSV. - In the Options section, accept the default values for all the fields.
- The Preview section displays the Hive SQL command that will be generated when you click Import to Hive. This is a read-only field. Note the names of the Hive database and Hive table that were displayed in the Options section.
- The File preview section previews the first ten rows from the
taxidropoff.csvfile and the names and data types that Oracle Big Data Manager assigned to each column in the file. You can modify the Hive table columns' labels and data types as needed. Change the first column label todropoff_cityand change the column data type toVARCHAR(255). - To view the updated Hive SQL command in the Hive SQL command preview section, click Reload preview. Note the updated column name and data type.
- Click Import to Hive to create the new
taxidropoff_csvHive table in thedefaultHive database. This also loads thetaxidropoff.csvdata into the new table and moves thetaxidropoff.csvfile from the/tmpHDFS directory to the HivewarehouseHDFS directory.
The Import CSV file to Hive dialog box is displayed. It has two main sections: Options and Preview.
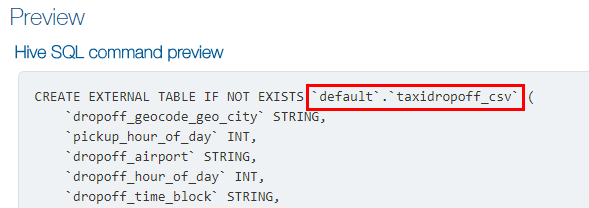
Note: The Hive SQL command uses the backtick characters (`) to enclose the names of the Hive database, table, and columns.


To view the complete Hive SQL command, click the following link create-hive-table.txt.
 Load an Apache Hive Table into a New Oracle Big Data Manager Notebook
In this section, you load the new taxidropoff_csv Hive table into a new Oracle Big Data
Manager Notebook.
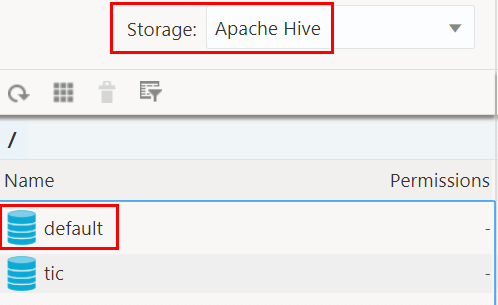
- In the Data explorer section, select Apache Hive
from the Storage drop-down list. In the Name
column, double-click the
defaultdatabase to display the tables in this database. - Right-click the
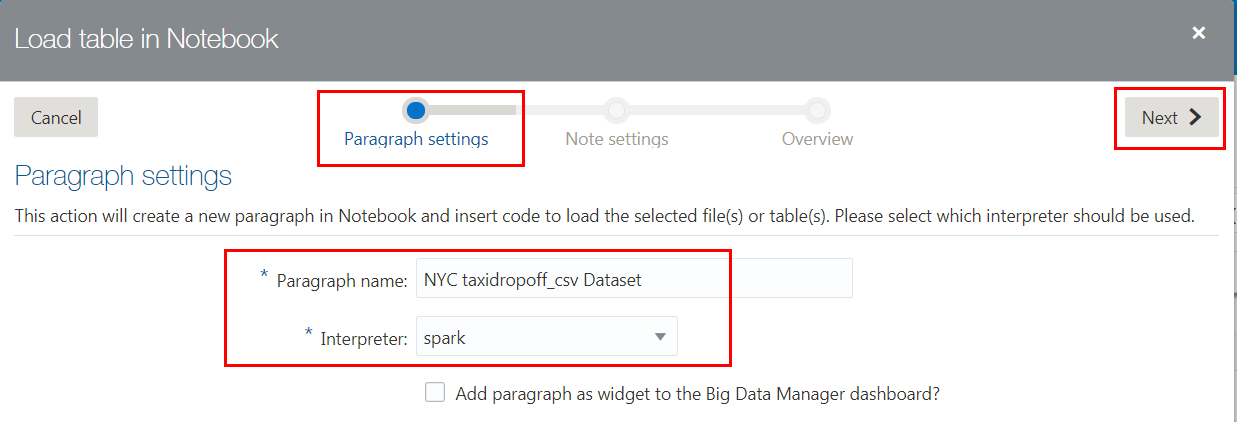
taxidropoff_csvHive table. From the context menu, select Notebook, and then Load Apache Hive table. - In the Paragraph settings wizard page, enter
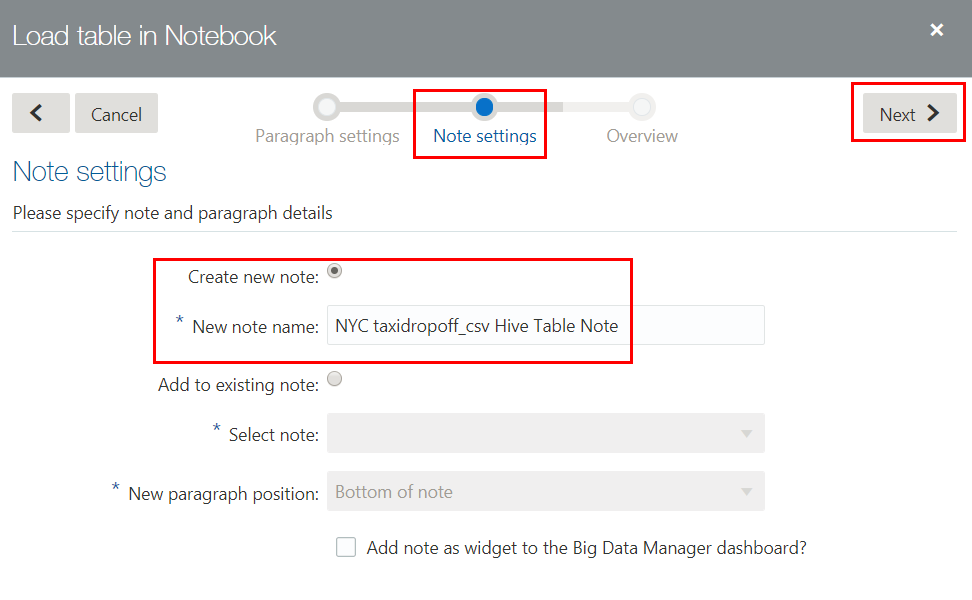
NYC taxidropoff_csv
                                Dataset
in the Paragraph name field. Selectsparkfrom the Interpreter drop-down list, and then click Next. - In the Note settings wizard page, accept the default for Create
new note, enter
NYC taxidropoff_csv Hive Table Notein the New note name field, and then click Next. - In the Overview wizard page, review the settings. If you need to make a
correction, click the back arrow
 . If you are
satisfied with the settings, click Finish to display the note.
. If you are
satisfied with the settings, click Finish to display the note.
- To display the paragraph's title, click Settings
 , and then click Show title from the
context menu.
, and then click Show title from the
context menu.
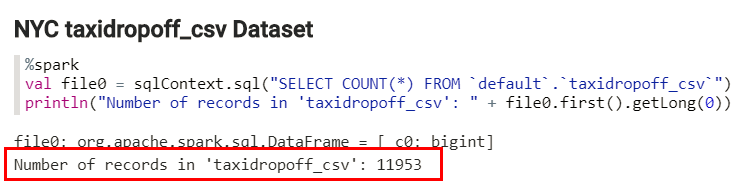
- Place the mouse cursor at the end of line 2, and then press the Enter key to add a new line. Copy the Scala
printlncommand from the print-command.txt file, and then paste at the end of the paragraph to display the number of rows in thetaxidropoff_csvHive table. Click Run this paragraph . The output is displayed at the bottom of
the paragraph.
. The output is displayed at the bottom of
the paragraph.
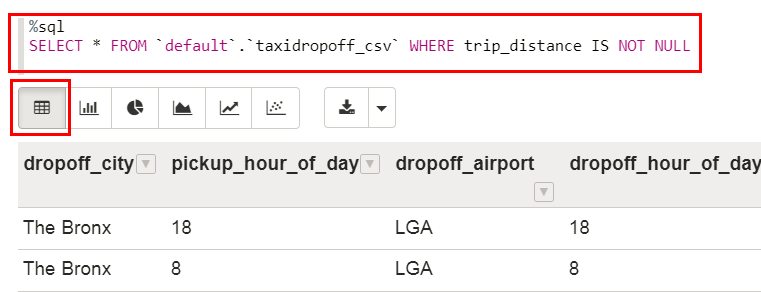
- In the empty paragraph at the bottom of the note, copy the Hive SQL query from the hive-query.txt file, and then paste it in the paragraph. The
%sqlenables you to execute a Spark SQL query. The query displays all rows in thenyc_taxidropoff_csvHive table. Click Run this paragraph.
The following image shows the partial output of the taxidropoff_csvHive table in a table format. - To view the data in a graph format, click any of the available graph icons on the toolbar. Click
Bar Chart
 .
.

Description of the illustration bar-chart.png

The Load table in Notebook wizard is displayed. It has three pages: Paragraph settings, Note settings, and Overview.

The new Oracle Big Data Manager note and paragraph are displayed.

The %spark Spark interpreter
creates a SparkContext and provides you with a Scala environment. In this example, the Spark
interpreter created a dataframe which references the shown SQL query. This SQL query returns the
number of rows in the nyc_taxidropoff_csv Hive table. The dataframe is stored in a
variable named file0. You can reference this variable anywhere in the Note.