Extending the Oracle Application Express Framework with Web 2.0
Purpose
In this hands-on lab, you gained experience incorporating JavaScript and AJAX in your Oracle Application Express Applications.
Time to Complete
Approximately 1 hour
Incorporating JavaScript into your Application
Overview
JavaScript is a scripting language most often used for client-side web development. JavaScript allows you to perform various processing in your application before submitting the page which enhances response time and the user experience of your application.
This tutorial shows you some useful javaScript techniques and how they can be incorporated into your application
Changing the Value of Form Elements
In this section, you will add javaScript that will change the value of a form item based upon user input. Perform the following steps:
| . |
Enter the following URL to log in to Oracle Application Express. http://<hostname>:8080/apex
|
|---|---|
| . |
To log in to Oracle Application Express, enter the following details, and click Login.
|
. |
On the Workspace home page, click Application Builder.
|
. |
Select Project Tasks Application.
|
. |
Click Maintain Employees (page 10).
|
. |
Under Page, select the link for HTML Header.
|
. |
Enter the following code (located in the js_01.txt file) at the end of the HTML Header and click Apply Changes. <script type="text/javascript">
|
. |
You can invoke the JavaScript function you just defined for the P10_COMMISSION_PCT item. Under Items, select the P10_COMMISSION_PCT link.
|
. |
Enter the following commands in the HTML Form Element Attribute field and click Apply Changes. onchange="calcItems();"
|
. |
You need to create a new item called P10_COMM_TOTAL. Under Items, select the Create icon.
|
. |
Select Text and click Next.
|
. |
Select Text Field and click Next.
|
. |
Enter P10_COMM_TOTAL for Item Name, select Employee Details for Region and click Next.
|
. |
Accept the defaults and click Next.
|
. |
Click Create Item.
|
. |
You can now run the page. Click Run.
|
. |
Login to the application as obe/obe and click Login.
|
. |
Your form currently does not have any data. Select the Employee Details breadcrumb.
|
. |
Select the link for employee_id 101.
|
. |
Notice that there is no value for Commission Pct.
|
. |
Enter .7 for Commission Pct and click in the Comm Total field. Notice that the value for Comm Total was calculated when the CalcItems function was called when a Commission Pct was entered on the form.
|


Creating Client-Side JavaScript Validation
In this section, you display an error when a phone number is not entered. This action is performed before the page is submitted for processing. Perform the following steps:
. |
Navigate to the Maintain Employees Page Definition. Under Page, select the link for HTML Header.
|
|---|---|
. |
Enter the following code (located in the js_02.txt file) at the end of the HTML Header and click Apply Changes. <script type="text/javascript">
|
. |
Under Items, select the P10_PHONE_NUMBER item.
|
. |
Enter the following commands in the HTML Form Element Attribute field and click Apply Changes. onblur="notNull(this);"
|
| . |
You can now run the page. Click Run.
|
| . |
Erase the contents of the Phone Number field and press the tab key. Notice the Phone Number item is highlighted in red and a message is displayed.
|


Enabling and Disabling Form Elements
In this section, you enable Commission Pct and Comm Total only for the Sales Department (DEPARTMENT_ID=80). Perform the following steps:
| . |
Navigate to the Maintain Employees Page Definition. Under Page, select the link for HTML Header.
|
|---|---|
. |
Enter the following code (located in the js_03.txt file) at the end of the HTML Header and click the Display Attributes tab. <script type="text/javascript">
|
. |
Select Do Not Focus Cursor for Cursor Focus and click the HTML Body Attribute tab.
|
. |
Enter the following commands in the HTML Body Attribute field and click Apply Changes. When the page is loaded, you want to invoke the function so that the field is enabled or disabled when presented to the user for the first time. onload="disFormItems(); first_field();"
|
. |
Under Items, select the P10_DEPARTMENT_ID item.
|
. |
Enter the following commands in the HTML Form Element Attribute field and click Apply Changes. onchange="disFormItems()"
|
. |
You can now run the page. Click Run.
|
. |
Notice that the Department is not set to 80, therefore the Commision Pct and Comm Total fields are disabled.
|
. |
Change the Department to 80. The Commision Pct and Comm Total fields are now enabled.
|


Showing and Hiding Form Elements
In this section, you only want to show Commission Pct and Comm Total then DEPARTMENT_ID=80. Otherwise, those items should be hidden. Perform the following steps:
| . |
Navigate to the Maintain Employees Page Definition. Under Page, select the link for HTML Header.
|
|---|---|
. |
Enter the following code (located in the js_03.txt file) at the end of the HTML Header and click the HTML Body Attribute tab. <script type="text/javascript">
|
. |
Change disFormItems to sales_test and click Apply Changes.
|
. |
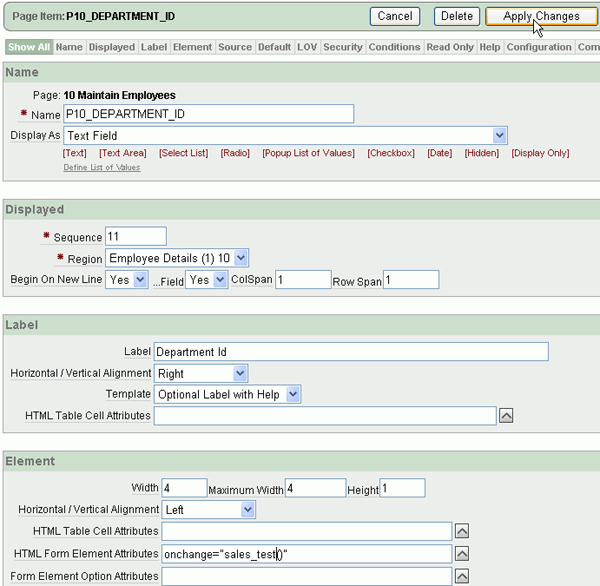
Under Items, select the P10_DEPARTMENT_ID item.
|
. |
Change the HTML Form Element Attribute field to the following and click Apply Changes. onchange="sales_test()"
|
. |
You can now run the page. Click Run.
|
. |
Notice that the Department is not set to 80, therefore the Commision Pct and Comm Total fields are hidden.
|
. |
Change the Department to 80. The Commision Pct and Comm Total fields are now shown.
|


Using AJAX into your Application
Overview
AJAX (Asynchronous JavaScript and XML) uses JavaScript to communicate with the XMLHttpRequest object that communicates with an APEX On Demand process. It can send and receive information in a variety of formats, including XML, HTML, JSON and text content. Because AJAX is “asynchronous”, you can use the content as a data source or you can update portions of the page itself.
JavaScript and AJAX are used throughout the Oracle Application Express product itself. One example of where JavaScript is used is when deleting an object. When you receive the alert to confirm your deletion, this action uses JavaScript. An example of where AJAX is used is when changing the pagination on the Application Builder page. When you change the number of rows to show and then click Go. This action uses AJAX to render the page without submitting the page.
In this tutorial, you use AJAX to incorporate some new capabilities into your application.
Creating a New Page and Region
In this section, you create a page and region which will be used to build the AJAX Examples. Perform the following steps:
| . |
Enter the following URL to log in to Oracle Application Express. http://localhost:8080/apex
|
|---|---|
. |
To log in to Oracle Application Express, enter the following details, and click Login.
|
. |
On the Workspace home page, click Application Builder.
|
. |
Select Project Tasks Application.
|
. |
Create a new blank page. Click Create Page.
|
. |
Select Blank Page for page type and click Next.
|
. |
Click Next.
|
. |
Enter AJAX Examples for Name and click Next.
|
. |
Click Next.
|
. |
Click Finish.
|
. |
Your page has been created successfully. Click Edit Page.
|
. |
Now, you can create an HTML Region. Under Regions, select the Create icon.
Select HTML and click Next.
|
. |
Select HTML again and click Next.
|
. |
Enter AJAX Examples for Name and click Next.
Your page and region were created successfully.
|


Adding a Dependent Select List
In this section, you create two select lists to show a list of departments and then the employees in that department. Perform the following tasks:
| Create Select List Items | |
| Create an On Demand Process | |
| Invoke the On Demand Process When Department Name is Selected |
Create Select List Items
In this section, you create Select List items for DEPARTMENT_NAME and EMPLOYEE_NAME. Perform the following steps:
| . |
From the Page Definition page, under Items, select the Create icon. Select Select List and click Next.
|
|---|---|
. |
Select Select List again and click Next.
|
. |
Enter P6_DEPARTMENT_NAME for the Item Name and click Next. Note that if the number of your page is different from page 6, change the number in the name of the item.
|
. |
Enter the following SQL (located in the ajax_01.txt file) in the List of Values Query area and click Next. select DEPARTMENT_NAME display_value, DEPARTMENT_ID return_value from OEHR_DEPARTMENTS order by 1
|
. |
Accept the defaults and click Next.
|
. |
Click Create Item.
|
. |
You need to create another item for EMPLOYEE_NAME. Under Items, select the Create icon.
Select Select List and click Next.
|
. |
Select Select List again and click Next.
|
. |
Enter P6_EMPLOYEE_NAME for the Item Name and click Next. Note that if the number of your page is different from page 6, change the number in the name of the item.
|
. |
Enter the following SQL (located in the ajax_02.txt file) in the List of Values Query area and click Next. select FIRST_NAME||' '||LAST_NAME display_value, EMPLOYEE_ID return_value from OEHR_EMPLOYEES order by 1
|
. |
Accept the default and click Next.
|
. |
Click Create Item.
The Select List items were created successfully.
|


In this section, you create an on-demand process that dynamically shows the values of another item without submitting the page. Perform the following steps:
| . |
From the Page Definition for AJAX Examples page, select the Shared Components icon.
|
|---|---|
. |
Under Logic, select Application Processes.
|
. |
Click Create.
|
. |
Enter POPULATE_SELECT for the Name and select On Demand: Run this application process when requested by a page process for Point and click Next.
|
. |
Enter the following code (located in the ajax_03.txt file) in the Process Text area and click Next. DECLARE
|
. |
Click Create Process.
|
. |
Your query was created. Click Next.
|


Invoke the On Demand Process When Department Name is Selected
In this section, you add the javascript function that invokes the On Demand process and then invoke the function from the P6_DEPARTMENT_NAME item. Perform the following steps:
| . |
Select the Edit Page Attributes icon.
|
|---|---|
. |
Click the HTML Header tab.
|
. |
Enter the following javascript code (located in the ajax_04.txt file) and click Apply Changes. <script type="text/javascript">
|
. |
Now you want to invoke the get_AJAX_SELECT_XML function from your item. Under Items, select the P6_DEPARTMENT_NAME item.
|
. |
Enter the following code in the HTML Form Element Attribute field and click Apply Changes. onchange="get_AJAX_SELECT_XML(this,'P6_EMPLOYEE_NAME')"
|
. |
You can now run the page. Click Run.
|
. |
If you receive the login window, enter obe/obe and click Login.
|
. |
The page appears. Select the Finance department from the list.
|
. |
Notice that the list of Employees only shows a list of the employees in the Finance department.
|


Setting Multiple Items Based on Another Item
In this section, you select a value from a select list item, which dynamically populates the values of multiple other items on the page. Perform the following tasks:
| Create Text Items | |
| Create an On Demand Process | |
| Invoke the On Demand Process When Employee Name is Selected |
Create Text Items
In this section, you create Text items for EMAIL, PHONE_NUMBER and HIRE_DATE. Perform the following steps:
| . |
From the Page Definition page, under Items, select the Create icon.
|
||||||||
|---|---|---|---|---|---|---|---|---|---|
. |
Select Create multiple items using tabular form.
Enter the following items and click Create Multiple Items.
The Text items were created successfully.
|


In this section, you create an on-demand process that dynamically shows the values of another item without submitting the page. Perform the following steps:
| . |
From the Page Definition for AJAX Examples page, select the Shared Components icon.
|
|---|---|
. |
Under Logic, select Application Processes.
|
. |
Click Create.
|
. |
Enter SET_MULTI_ITEMS for the Name and select On Demand: Run this application process when requested by a page process for Point and click Next.
|
. |
Enter the following code (located in the ajax_05.txt file) in the Process Text area and click Next. DECLARE
|
. |
Click Create Process.
|
. |
The process was created successfully. In the next section, you invoke the process from a javascript function that is called from the P6_EMPLOYEE_NAME item. Click the Edit Page icon.
|


Invoke the On Demand Process When Employee Name is Selected
In this section, you add the javascript function that invokes the On Demand process and then invoke the function from the P6_EMPLOYEE_NAME item. Perform the following steps:
| . |
Under Page, select the link next to HTML Header.
|
|---|---|
. |
Enter the following javascript code (located in the ajax_06.txt file) to the end of the HTML Header code already in this field and click Apply Changes. <script type="text/javascript">
|
. |
Now you want to invoke the f_TestOnDemand function from your item. Under Items, select the P6_EMPLOYEE_NAME item.
|
. |
Enter the following code in the HTML Form Element Attribute field and click Apply Changes. onchange="f_TestOnDemand(this.value)"
|
. |
You can now run the page. Click Run.
|
. |
The page appears. Select the Finance department from the list.
|
. |
Select John Chen from the List of Employees.
|
. |
Notice that the Email, Phone Number and Hire date have been populated.
|


Adding Rollover Item Help
In this section, you enable rollover help text without submitting the page. Perform the following tasks:
| Create an On Demand Process | |
| Invoke On Demand Process from Page | |
| Copy and Modify the Optional Label with Help Template | |
| Add Help Text and Assign New Template |
In this section, you create an on-demand process that prints out the associated help text to be returned to the JavaScript function invoked from the Label template. Perform the following steps:
| . |
From the Page Definition for AJAX Examples page, select the Shared Components icon.
|
|---|---|
. |
Under Logic, select Application Processes.
|
. |
Click Create.
|
. |
Enter AJAX_ITEM_HELP for the Name and select On Demand: Run this application process when requested by a page process for Point and click Next.
|
. |
Enter the following code (located in the ajax_07.txt file)in the Process Text area and click Next. DECLARE
|
. |
Click Create Process.
|
. |
The process was created successfully. In the next section, you define the JavaScript necessary to invoke the process. Click the Edit Page icon.
|


Invoke On Demand Process from Page
In this section, you add the javascript function that invokes the On Demand process. Perform the following steps:
| . |
Under Page, select the link next to HTML Header.
|
|---|---|
. |
Enter the following javascript code (located in the ajax_08.txt file) and click the Header and Footer tab. <script type="text/javascript">
|
. |
To identify how you want the help text to be shown when it appears, enter the following (located in the ajax_09.txt file) in the Footer Text area and click Apply Changes. <div id="rollover" style="display:none;background:#FFF;width:150px;position:absolute;z-index:9999"> <div id="rollover_content" style="padding:4px;border:2px solid #369;"></div> </div>
In the next section you copy and modify the Label template that invoke the javaScript you just added to the page.
|


Copy and Modify the Optional Label with Help Template
In this section, you copy the Optional Label with Help template and change the Before Label to invoke the javascript function AJAX_HELP which will display the rollover text. Perform the following steps:
| . |
On the current page, under Shared Components in the Templates section, select the Copy icon.
|
|---|---|
. |
Select the link for Optional Label with Help.
|
. |
Enter Optional Label with Help Custom for the New template Name and click Copy.
|
. |
Your template was copied. Select the template Optional Label with Help Custom from the list.
|
. |
Enter the following code (located in the ajax_10.txt file)in the Before Label area and click Apply Changes. <label for="#CURRENT_ITEM_NAME#" tabindex="999"> <a class="t200OptionalLabelwithHelp" href="javascript:void(return false);" onmouseover="AJAX_HELP(this,'#CURRENT_ITEM_ID#')" id="#CURRENT_ITEM_ID#_label">
|
. |
The template was update successfully. In the next section, you add the help text for each item and assign the new template.
|


Add Help Text and Assign New Template
In this section, you add help text for Department Name and Employee Name and assign the template you just copied in the previous section. Perform the following steps:
| . |
Under Items, select the P6_DEPARTMENT_NAME item.
|
|---|---|
. |
Under Label, select Optional Label with Help Custom for Template and then click the Help tab.
|
. |
Enter some text in the Help text area and click Apply Changes.
|
. |
Under Items, select the P6_EMPLOYEE_NAME item.
|
. |
Enter some text in the Help text area and click the Label tab.
|
. |
Select Optional Label with Help Custom for Template and then click Apply Changes.
|
. |
You can now run the page. Click Run.
|
. |
Place your cursor over the Department Name Label to see the rollover help.
|


Summary
In this tutorial, you should have learned how to:
- Change the value of form elements
- Create client-side javascript validation
- Enable and disable form elements
- Hide and show form elements
- Add a dependent select list
- Set multiple items based on another item
- Add rollover item help

|
About
Oracle |Oracle and Sun | |