Before You Begin
Purpose
This tutorial covers how to make ODI mappings with Big Data using Apache™ Hadoop®, Hive™, Pig, and Spark™.
(Apache Hadoop, Hadoop, Hive, Spark, Apache, and the Apache feather logo are trademarks of The Apache Software Foundation. Apache Hadoop, Hive, and Spark project logos are either registered trademarks or trademarks of the Apache Software Foundation in the United States and other countries.)
Time to Complete
Approximately 1 hour.
Background
Given a pre-installed environment with data servers and schemas for Hadoop, Hive, Pig, and Spark, create a single mapping that can be used with three different big data engines.
Scenario
Oracle MoviePlex is a fictitious on-line movie streaming company. Customers log into Oracle MoviePlex where they are presented with a targeted list of movies based on their past viewing behavior. Because of this personalized experience and reliable and fast performance, customers spend a lot of money with the company and it has become extremely profitable.
How do you harness big data to create a personalized experience for customers?
What Do You Need?
- Software
- Oracle Enterprise Linux (OEL) 6.4 or higher
- Oracle Database 12c Release 1 Enterprise Edition (12.1.0.2) - including Oracle Big Data SQL-enabled external tables, Oracle Advanced Analytics, Oracle OLAP, Oracle Partitioning, Oracle Spatial and Graph, and more
- Oracle Data Integrator (ODI) 12.2.1 or higher
- Oracle Big Data Connectors 4.0 or higher
- Oracle NoSQL Database Enterprise Edition 12cR1 or higher
- Cloudera 5.1 or higher
- Alternatively, the Oracle Big Data Lite Virtual Machine (the VM, see Prerequisites) contains all of the above pre-installed.
- Hardware
- At least 2 GB RAM for each target (database or ODI)
- At least 6 GB RAM for the VM (if you are using that)
Prerequisites
Before starting this tutorial, you should:
- Have at least 6 GB RAM available if you're using the Oracle Big Data Lite VM, at least version 4.0.1 or higher
- Have access to or have installed the sample lab artifacts
- Have attended ODI 12c training, [D82167GC10] Oracle Data Integrator 12c: Integration and Administration, or equivalent experience.
Typographic Conventions
These are the conventions used throughout this practice to indicate who types what.
-
Filenameor/path/subdirectory/. Often you can navigate to a destination without having to type it. - Command or value that you type, such as gedit .bashrc. Be mindful of periods at the end of sentences that are not part of the command.
- Click this such as or .
- Some variable or
<variable>as something you replace. Often prefixed with "my" such as<myName>or<myHost>. - A Menu Item or dialog Field Prompt or Tab name. For example, "click the Designer tab and select Models > New Model".
- Generally a red rectangle in the graphics is not part of the original image, but added to draw your attention to an item.
1. Hive
![]() From Hive:
From Hive: The
Apache Hive data warehouse software facilitates
querying and managing large datasets residing in
distributed storage. Hive provides a mechanism to
project structure onto this data and query the
data using a SQL-like language called HiveQL. At
the same time this language also allows
traditional map/reduce programmers to plug in
their custom mappers and reducers when it is
inconvenient or inefficient to express this logic
in HiveQL.
1.1 Hive Logical Mapping
-
On the main Linux desktop menu bar, click the ODI launcher shortcut (
 ).
).

Only click it once, do not double-click. If you do double-click, you will get two copies starting and it will run verrrrry slowly. You can close the second copy.
-
Click Connect to Repository and select Login Name: ODI Movie Demo.

The User: SUPERVISOR and Password will be pre-populated for you. Click . (If you are ever prompted for the Wallet password, it is welcome1.)
-
In the navigation panel, on the Topology tab, expand
![[+]](icons/expand.png) Physical Architecture > Technologies
> Hive and review the Hive
dataservers.
Physical Architecture > Technologies
> Hive and review the Hive
dataservers. 
These were added for you before the lab.
-
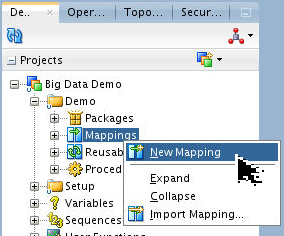
On the Designer tab, expand
Projects
> Big Data Demo > Demo > Mappings,
right-click Mappings and select New
Mapping. Set Name: CalcRatings.

Deselect Create Empy Dataset' and then click .
-
From Designer > Models > HiveMovie, drag and drop the following datastores as sources onto the mapping canvas:
moviemovieapp_log_avro

Do not worry too much about alignment and pretty layout.
-
Create a Filter (
 ) behind
 movieapp_logwith Properties > Condition > Filter Condition:
movieapp_log_avro.activity < 2.
Dragging the
activityattribute to the canvas will create the filter. There are other ways to do it as well. -
Create an AGGREGATE (Σ) dragged from the Component Palette behind FILTER, and drop into it from
movieapp_log_avro:movieidrating

This automatically makes the connection from the output of Filter to the input of Aggregate.
-
Change the Target Expression: for
AGGREGATE.ratingto AVG(movieapp_log_avro.rating).
TheAVGmust be in UPPER CASE for Pig to work.
NOTE: The
AVGmust be in UPPER CASE for Pig to work. The yellow math function keywords such asAVGare hard to see... -
Drop a Join dragged from the Component Palette behind
movieand AGGREGATE components.
-
Drop onto the JOIN component:
movie.movie_idAGGREGATE.movieid
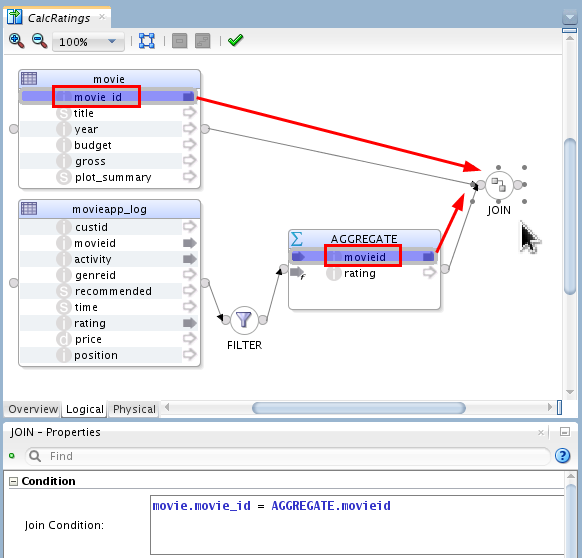
The Join Condition: should now say, movie.movie_id = AGGREGATE.movieid (note one attribute has an underscore and the other does not).
-
Drag and drop the following target from Models > HiveMovie to behind JOIN:
movie_rating.
You may want to change the scale/zoom to something smaller, like 75%.
-
Connect JOIN to
movie_ratingand do Attribute Matching Auto Map.
Click .
-
Drag
AGGREGATE.ratingtomovie_rating.avg_rating.
-
Change the Target Expression: for
movie_rating.avg_ratingto XROUND(AGGREGATE.rating).
NOTE:
XROUNDis a user-defined function that maps to the correct rounding operations for different technologies. Optionally reviewXROUNDby opening Designer > Projects > Beta > User Functions > Numeric >XROUND.
-
For the components
FILTER,AGGREGATE, andJOIN, change the Execute on Hint: to Staging.
Each of the components has the Hint in a slightly different place in Properties.
You have created a Logical mapping for Hive.
1.2 Hive Physical Mapping
-
Switch to the Physical tab. Rename the Physical design to Name: Hive.

As soon as you click away from the Name field, the upper tab will change from "Physical" to "Hive."
-
Select target
MOVIE_RATINGand switch to the Integration Knowledge Module tab. IKM should beIKM Hive Append.GLOBAL.Change
TRUNCATEoption toTrue.
Save (
 )
and close the
)
and close the CalcRatingsmapping tab.
You have created a Physical mapping for Hive.
1.3 Running Hive Mapping
-
Run (
 )
the
)
the CalcRatingsmapping with the following parameters:- Physical Mapping Design: Hive
- Logical Agent: Local

Click . On the Session started Information dialog, click .
-
Wait a few seconds, then go to Operator tab and review the execution results.

They should all be successful (
 ), none
should be errors (
), none
should be errors ( ).
). -
Go to task "
40 - Load MOVIE_RATING -
                                      IKM Hive Append
" and open the Task Editor. Go to the Code tab and review the generated Hive SQL code.
Scroll down to see more of the code you configured.
-
In Models > HiveMovie, right-click target
movie_ratingand review inserted data by selecting View Data.
Close the
Data: movie_ratingtab.
You have successfully run the Hive mapping and
populated the movie_rating table.
You have integrated Big Data Hive with ODI via a mapping.
2. Pig
![]() From Pig:
"Apache Pig is a platform for analyzing large data
sets that consists of a high-level language for
expressing data analysis programs, coupled with
infrastructure for evaluating these programs. The
salient property of Pig programs is that their
structure is amenable to substantial
parallelization, which in turns enables them to
handle very large data sets."
From Pig:
"Apache Pig is a platform for analyzing large data
sets that consists of a high-level language for
expressing data analysis programs, coupled with
infrastructure for evaluating these programs. The
salient property of Pig programs is that their
structure is amenable to substantial
parallelization, which in turns enables them to
handle very large data sets."
2.1 Pig Logical Mapping
-
On the Designer tab, execute the procedure Projects > Big Data Demo > Demo > Procedures > Truncate movie_rating to remove all fields in the target table
movie_rating.
Click . On the Session started Information dialog, click .
-
Review Pig Data Servers in Topology > Physical Architecture: Data Server
Pigexecutes pig scripts inMap Reducemode.
These have been pre-configured for you.
-
Go to Designer > Projects > Beta > Big Data > Mappings and open the mapping editor for
CalcRatings.Select the background of the logical mapping diagram and go to Properties. Set Staging Location Hint: Pig.

It is pretty significant that Hive and Pig are almost identical in the mapping. Very little changes to the configuration when you switch engines.
2.2 Pig Physical Mapping
-
Switch to the Physical tab.
Click the Create a New Physical Design tab (
 ),
rename it in Properties > Name:
to Pig.
),
rename it in Properties > Name:
to Pig. 
As soon as you click away from the Name field, the upper tab will change from "Physical1" to "Pig."
-
Go to
MOVIE_RATINGtarget and change IKM to <default>.
An IKM is not needed for this mode and will lead to warnings.
-
Review Extract Options of physical components such as
JOIN. Note thePARALLEL_NUMBERoption for performance.
Do not change anything, you are just looking.
-
Save (
)
your work, but leave the CalcRatingsmapping tab open for the next step.
You have created a Pig physical diagram.
2.3 Running Pig Mapping
-
Run (
)
the CalcRatingsmapping with the following parameters:- Physical Design: Pig
- Logical Agent: Local


Click . On the Session started Information dialog, click .
-
Go to Operator tab and review the execution results.

They should all be successful (
), none
should be errors (). -
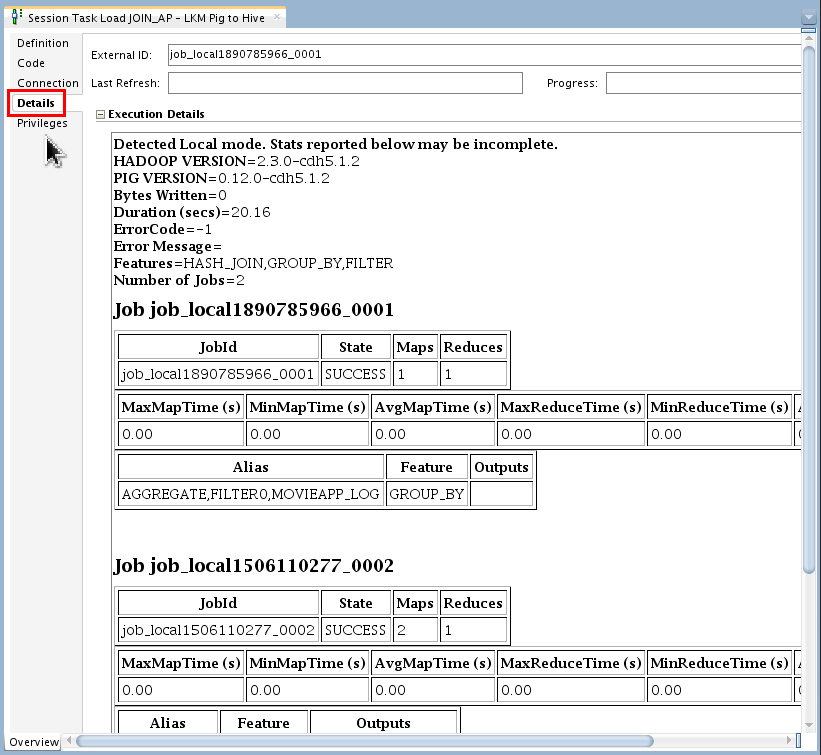
Go to task "
30 - Load JOIN_AP - LKM
                                      Pig to Hive
" and open the Task Editor. Go to the Code tab and review the generated Pig Latin code under Source Code.
-
Click on the Details tab and review the Pig details.
-
Back to Mapping, review inserted data by right-clicking on
movie_ratingand selecting Data from target in Logical View.
Close all open tabs.
You have run a mapping with ODI and Pig and checked the output status on Operator.
You have integrated Big Data Pig with ODI via a mapping.
3. Spark
![]() From Spark FAQ:
"Spark is a fast and general processing engine
compatible with Hadoop data. It can run in Hadoop
clusters through YARN or Spark's standalone mode,
and it can process data in HDFS, HBase, Cassandra,
Hive, and any Hadoop InputFormat. It is designed to
perform both batch processing (similar to MapReduce)
and new workloads like streaming, interactive
queries, and machine learning."
From Spark FAQ:
"Spark is a fast and general processing engine
compatible with Hadoop data. It can run in Hadoop
clusters through YARN or Spark's standalone mode,
and it can process data in HDFS, HBase, Cassandra,
Hive, and any Hadoop InputFormat. It is designed to
perform both batch processing (similar to MapReduce)
and new workloads like streaming, interactive
queries, and machine learning."
3.1 Spark Logical Mapping
-
On the Topology tab, review Spark Data Server physical architecture technologies.

-
On the Designer tab, expand
Projects
> Big Data Demo > Demo > Mapping.
Open CalcRatings, go to the Mapping Editor.
-
Select the background of the logical mapping diagram and go to Properties. Set Staging Location Hint: Spark.

Not SparkLocal, but just plain Spark.
You have configured the logical mapping view for using Spark.
3.2 Spark Physical Mapping
-
Switch to the Physical tab.
Click the Create a New Physical Design tab (
),
rename it in Properties > Name:
to Spark. 
As soon as you click away from the Name field, the upper tab will change from "Physical2" to "Spark."
-
Select
JOIN_APand change the Properties > Loading Knowledge Module > Options:OVERWRITE_TARGET_TABLEto True.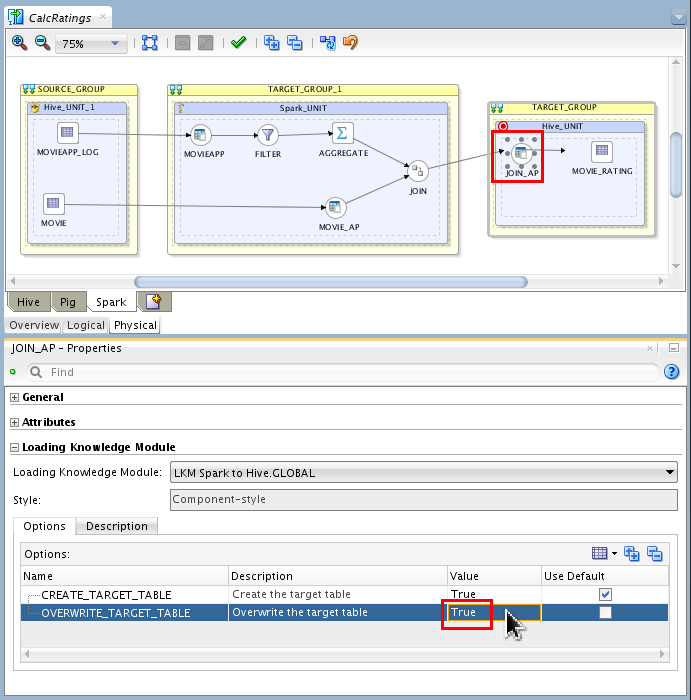
-
Select
MOVIE_RATINGin the TARGET_GROUP and change Integration Knowledge Module: to <Default>.
-
Review Extract Options properties of physical components such as
JOIN.
Note the
CACHE_DATAoption. -
Save (
)
the mapping, but leave the CalcRatingsmapping tab open for the next step.
You have completed the physical mapping of an ODI to Spark transformation.
3.3 Running Spark Mapping
-
Run (
)
the CalcRatingsmapping with the following parameters:- Physical Design: Spark
- Logical Agent: Local

Click . On the Session started Information dialog, click .
-
Wait a minute, then go to the Operator tab and review the execution results.

They should all be successful (
), none
should be errors (). The Warnings ( )
are about a deprecated Java option
)
are about a deprecated Java option SPARK_JAVA_OPTS, and can be safely ignored. -
Go to task "
30 - Load JOIN_AP - LKM
                                      Spark to Hive
" and open the Task Editor. Go to Code tab and review the generated Target PySpark code which is written to file and executed in the subsequent task.
Close the Session Task Load tab.
-
Back to Mapping, review inserted data by right-clicking on
movie_ratingand selecting Data from target in Logical View. Close all open tabs.
You have successfully run the Spark ODI integration and validated the inserted data in the table.
You have integrated Big Data Spark with ODI via a mapping.
Want to Learn More?
The Big Data engines (Hive, Pig, and Spark) are remarkably similar in use when it comes to ODI mappings. They can be wildly different internally, but by making small changes on the physical mapping, you can use all three interchangeably at run-time. The Knowledge Module architecture of ODI insulates you from the complexities of the different technologies.
In this Oracle By Example (OBE) tutorial, you learned how to create an ODI mapping for big data using:
- Hive
- Pig
- Spark
Resources
Conceptual or procedural Help topics relevant to the topic of this tutorial:
- ODI product home page
- Documentation on releases 12.2.1 and 12.1.3
- Training
- [D82167GC10] Oracle Data Integrator 12c: Integration and Administration. 5 days.
- [D87557GC10] Oracle Data Integrator 12c: Advanced Integration and Development. 3 days.
- ODI A-Team Blogs
- The Apache Software Foundation web site, home of Hive, Pig, and Spark, among many other projects.
- To learn more about ODI, refer to additional OBEs in the Oracle Learning Library, perhaps starting with this ODI 12c series.
Credits
As always, a team effort. This is a partial list of the team:
- Lead Curriculum Developer: Alex Kotopoulis
- Other Contributors: Steve Friedberg, Julien Testut, Ayush Ganeriwal