
This document will continue to evolve as existing sections change and new information is added. All updates are logged below, with the most recent updates at the top.
| Date |
What’s Changed |
Notes |
|---|---|---|
| 02 SEP 2016 |
Oracle Fusion Absence Management: Configuration Option for Integration with Time and Labor |
Added new feature information delivered in Update 21 (August). |
| 02 SEP 2016 |
Oracle Fusion Absence Management: Improved Absence Certifications Process |
Added new feature information delivered in Update 15 (March). |
| 02 SEP 2016 |
Oracle Fusion Global Human Resources: Position Synchronization When Using HCM Data Loader to Load Position Changes |
Added new feature information delivered in Update 10 (October 15). |
| 02 SEP 2016 |
Oracle Fusion Absence Management: Provide Additional Flexibility for Accrual Calculations |
Added new feature information delivered in Update 7 (July 15). |
| 02 SEP 2016 |
Oracle Fusion Absence Management: Provide Rolling Forward Periods for Qualification Plans |
Added new feature information delivered in Update 7 (July 15). |
| 02 SEP 2016 |
Oracle Fusion Absence Management: New Attributes for Calculation of Qualified Entitlements |
Added new feature information delivered in Update 7 (July 15). |
| 05 AUG 2016 |
Oracle Fusion Global Payroll: Additional Flow Parameter for Create Batch for an Object |
Added new feature information delivered in Update 20 (August). |
| 05 AUG 2016 |
Oracle Fusion Global Human Resources for the United States: Refined Data Selection for Third-Party Tax Filing Extracts |
Added new feature information delivered in Update 20 (August). |
| 05 AUG 2016 |
Oracle Fusion Global Human Resources for the United States: Set Check Date on Third-Party Periodic Tax Filing Extract |
Added new feature information delivered in Update 20 (August). |
| 05 AUG 2016 |
Oracle Fusion Global Human Resources for the United States: Synchronize Employee Withholding Certificates With HR Data |
Updated documentation delivered in Update 19 (July). |
| 05 AUG 2016 |
Oracle Fusion Global Human Resources: Additional Option for Rehire Recommendation |
Feature information delivered in Update 20 (August). |
| 05 AUG 2016 |
Oracle Fusion Absence Management: View Accrued Entitlements |
Feature information delivered in Update 10 (October). |
| 05 AUG 2016 |
Oracle Fusion Global Human Resources- HCM Data Loader: User-Key Support for Multirow Extensible Key Flexfields |
Feature information delivered in Update 19 (July). |
| 01 JUL 2016 |
Oracle Fusion Global Human Resources: Local Name Support on Edit My Details Page |
Feature information delivered in Update 19 (July). |
| 01 JUL 2016 |
Oracle Fusion Global Human Resources: Worklist Management – Checklist Real Time |
Feature information delivered in Update 19 (July). |
| 01 JUL 2016 |
Oracle Fusion Global Human Resources: Half Day Calendar Events for Elapsed Work Schedules |
Feature information delivered in Update 19 (July). |
| 01 JUL 2016 |
Oracle Fusion Global Human Resources for the United States: Enhanced Employer Matching for 401 (k) Deferred Compensation Plans |
Feature information delivered in Update 19 (July). |
| 01 JUL 2016 |
Oracle Fusion Global Human Resources for the United States: Synchronize Employee Withholding Certificates With HR Data |
Feature information delivered in Update 19 (July). |
| 01 JUL 2016 |
Oracle Fusion Global Human Resources for the United States: Include Resident and Nonresident City and County Tax Balances on Quarterly Tax Filing |
Feature information delivered in Update 19 (July). |
| 01 JUL 2016 |
Oracle HCM Common Features- HCM Data Loader: Simplify Global Transfers Performed by Data Upload |
Feature information delivered in Update 19 (July). |
| 01 JUL 2016 |
Oracle HCM Common Features- HCM Data Loader: Upload of Assignment Records with Effective Dates That Are Later Than the Termination Date |
Feature information delivered in Update 17 (May). |
| 01 JUL 2016 |
Oracle HCM Common Features- HCM Data Loader: Enhanced Validation of Worker Records by HCM Data Loader |
Feature information delivered in Update 17 (May). |
| 03 JUN 2016 |
Oracle Fusion Global Human Resources: Buttons Relocated to Ribbon in Mass Assignment Change Spreadsheet |
Feature information delivered in Update 18 (June). |
| 03 JUN 2016 |
Oracle Fusion Global Payroll: Information Balances in the Payroll Balance Report |
Feature information delivered in Update 18 (June). |
| 03 JUN 2016 |
Oracle Fusion Global Payroll: Person and Payroll Relationship Group Parameters for Run Deduction Report |
Feature information delivered in Update 18 (June). |
| 03 JUN 2016 |
Oracle Fusion Global Human Resources for the United States: Third-Party Involuntary Payment Extract Reports |
Feature information delivered in Update 18 (June). |
| 03 JUN 2016 |
Oracle Fusion Global Human Resources for the United States: Courtesy Tax Implementation |
Feature information delivered in Update 18 (June). |
| 03 JUN 2016 |
Oracle Fusion Global Human Resources for the United States: Support for Resident and Nonresident Balances in Third-Party Quarterly Tax Filing |
Feature information delivered in Update 18 (June). |
| 03 JUN 2016 |
Oracle Fusion Global Payroll: Deduction Category and Deduction Parameters for Run Deduction Report |
Feature information delivered in Update 17 (May). |
| 03 JUN 2016 |
Oracle Fusion Global Human Resources: New Profile Option to Cache Person Images |
Feature information delivered in Update 17 (May). |
| 03 JUN 2016 |
Oracle Fusion Global Human Resources for Australia: Capture Of Non-Specific Gender |
Feature information delivered in Update 17 (May). |
| 03 JUN 2016 |
Oracle HCM Cloud Common - HCM Data Loader: Purge Person Data |
Feature information delivered in Update 17 (May). |
| 03 JUN 2016 |
Oracle Fusion Global Human Resources for Australia: Workplace Gender Equality Profile Report |
Feature information delivered in Update 13 (January). |
| 06 MAY 2016 |
Oracle Fusion Global Payroll: Edit Payroll Period Names |
Feature information delivered in Update 17 (May). |
| 06 MAY 2016 |
Oracle Fusion Global Human Resources for Canada: Involuntary Deductions: Protected Pay Percentage |
Feature information delivered in Update 17 (May). |
| 06 MAY 2016 |
Oracle Fusion Global Human Resources for the United States: Third-Party Tax Filing Interface Support for User-Defined Taxes |
Feature information delivered in Update 17 (May). |
| 06 MAY 2016 |
Oracle Fusion Global Human Resources for the United States: Payroll Payment Date Override |
Feature information delivered in Update 17 (May). |
| 06 MAY 2016 |
Oracle Fusion Global Human Resources for the United States: Payroll Batch Loader Support for Regional Tax Levies |
Feature information delivered in Update 17 (May). |
| 06 MAY 2016 |
Oracle Fusion Global Human Resources for the United States: ACA 1094-c Employer Report |
Feature information delivered in Update 17 (May). |
| 06 MAY 2016 |
Oracle Fusion Global Human Resources for the United States: ACA 1094-c Employer Audit Report |
Feature information delivered in Update 17 (May). |
| 06 MAY 2016 |
Oracle Fusion Global Human Resources for the United States: Payroll Batch Loader Support for School District Codes |
Feature information delivered in Update 17 (May). |
| 06 MAY 2016 |
Oracle Fusion Global Human Resources for the United Kingdom: Override PAYE and NI Calculations for the Period |
Feature information delivered in Update 17 (May). |
| 06 MAY 2016 |
Oracle Fusion Global Human Resources for Sweden: Enhanced Post Number Validation |
Feature information delivered in Update 17 (May). |
| 06 MAY 2016 |
Oracle Fusion Global Human Resources: Directory Management – Incremental Refresh of Manager Hierarchy |
Feature information delivered in Update 17 (May). |
| 01 APR 2016 |
Oracle Fusion Global Payroll: Excel Output Support for Payroll Reports |
Feature information delivered in Update 16 (April). |
| 01 APR 2016 |
Oracle Fusion Global Payroll: Dynamic Payroll Relationship Group Support for Payroll Activity Report |
Feature information delivered in Update 16 (April). |
| 01 APR 2016 |
Oracle Fusion Global Payroll: Void Payment Action in Prepayments |
Feature information delivered in Update 16 (April). |
| 01 APR 2016 |
Oracle Fusion Global Human Resources: Automated Reassigning of Pending Approvals and Correcting Invalid Supervisor Assignments |
Feature information delivered in Update 14 (February). |
| 01 APR 2016 |
Oracle Fusion Human Capital Management for Mexico: National Identifier Validation |
Feature information delivered in Update 14 (February). |
| 01 APR 2016 |
Oracle Fusion Human Capital Management for the United States: PA Act 32 Support for Third-Party Quarterly Tax Filing |
Feature information delivered in Update 16 (April). |
| 04 MAR 2016 |
Oracle Fusion Global Payroll: Value Set Usage in Flow Parameters |
Feature information delivered in Update 15 (March). |
| 04 MAR 2016 |
Oracle Fusion Human Capital Management for the United States: Regional Tax Levy Support |
Feature information delivered in Update 15 (March). |
| 04 MAR 2016 |
Oracle Fusion Human Capital Management for the United States: PA Act 32 Support for Third-Party Periodic Tax Filing |
Feature information delivered in Update 15 (March). |
| 04 MAR 2016 |
Oracle Fusion Global Human Resources: Worker View of Employment Information in Simplified User Interface |
Feature information delivered in Update 13 (January). |
| 04 MAR 2016 |
Oracle Fusion Human Capital Management for Australia: HCM Data Loader Support for Calculation Cards |
Feature information delivered in Update 15 (March). |
| 05 FEB 2016 |
Oracle Fusion Global Payroll: Payment Method Batch Loader Tasks |
Feature information delivered in Update 14 (February). |
| 05 FEB 2016 |
Oracle Fusion Global Payroll: Enhancements to Payment Method Rules |
Feature information delivered in Update 14 (February). |
| 05 FEB 2016 |
Oracle Fusion Global Payroll: Calling a Flow Within a Flow |
Feature information delivered in Update 14 (February). |
| 05 FEB 2016 |
Oracle Fusion Human Capital Management for the United States: Archive End-of-Year ACA Information |
Feature information delivered in Update 14 (February). |
| 05 FEB 2016 |
Oracle Fusion Human Capital Management for the United States: ACA 10-95-C Employee Report |
Feature information delivered in Update 14 (February). |
| 05 FEB 2016 |
Oracle Fusion Human Capital Management for Australia: Workplace Gender Equality Profile Report |
Feature information delivered in Update 11 (November). This update provides more details. |
| 05 FEB 2016 |
Oracle Fusion Human Capital Management for Australia: Capture of Non-Specific Gender |
Feature information delivered in Update 13 (January). This update provides more details. |
| 05 FEB 2016 |
Oracle Fusion Human Capital Management for the United Kingdom: Legislative Changes for Tax Year End 2015 -16 |
Feature information delivered in Update 14 (February). |
| 05 FEB 2016 |
Oracle Fusion Human Capital Management for the United Kingdom: Legislative Changes for Tax Year End 2016 -17 |
Feature information delivered in Update 14 (February). |
| 05 FEB 2016 |
Oracle Fusion Human Capital Management for the United Kingdom: National Insurance Calculations for Apprentices Under 25 |
Feature information delivered in Update 14 (February). |
| 05 FEB 2016 |
Oracle Fusion Human Capital Management for the United Kingdom: Scottish Legislative Changes |
Feature information delivered in Update 14 (February). |
| 05 FEB 2016 |
Oracle Fusion Human Capital Management for the United Kingdom: Legislative Updates to Real Time Information Reporting |
Feature information delivered in Update 14 (February). |
| 05 FEB 2016 |
Oracle Fusion Human Capital Management for the United Kingdom: Court Orders |
Feature information delivered in Update 14 (February). |
| 05 FEB 2016 |
Oracle Fusion Human Capital Management for the United Kingdom: New Student Loan Type |
Feature information delivered in Update 14 (February). |
| 05 FEB 2016 |
Oracle Fusion Human Capital Management for the United Kingdom: EDI Incoming Message File Upload Method Change |
Feature information delivered in Update 14 (February). |
| 05 FEB 2016 |
Oracle Fusion Human Capital Management for Japan: My Number |
Feature information delivered in Update 14 (February). |
| 05 FEB 2016 |
Oracle Fusion Human Capital Management for Romania: National Identifier Validation |
Feature information delivered in Update 12 (December). |
| 05 FEB 2016 |
Oracle Fusion Human Capital Management for Serbia: Value Enabled for Highest Education Level |
Feature information delivered in Update 14 (February). |
| 05 FEB 2016 |
Oracle Fusion Human Capital Management for Spain: National Identifiers Validation |
Feature information delivered in Update 14 (February). |
| 01 JAN 2016 |
Oracle Fusion Human Capital Management for the United Kingdom: PAYE and NI Adjustments |
Feature information delivered in Update 13 (January). |
| 01 JAN 2016 |
Oracle Fusion Human Capital Management for the United Kingdom: Uptake of XML format output for Deductions from earnings order (DEO) |
Feature information delivered in Update 13 (January). |
| 01 JAN 2016 |
Oracle Fusion Human Capital Management for the United Kingdom: HCM Data loader support for calculation cards |
Feature information delivered in Update 13 (January). |
| 01 JAN 2016 |
Oracle Fusion Benefits: Filter Data and Suppress Life Event Triggering |
Feature information delivered in Update 13 (January). |
| 01 JAN 2016 |
Oracle Fusion Benefits: End Date a Benefit Group for the Whole Batch |
Feature information delivered in Update 13 (January). |
| 01 JAN 2016 |
Oracle Fusion Global Payroll: Rolling 12 Month Balance Dimension |
Feature information delivered in Update 13 (January). |
| 01 JAN 2016 |
Oracle Fusion Global Payroll: Display Year-to-Date Hours in Payroll Register Report |
Feature information delivered in Update 13 (January). |
| 01 JAN 2016 |
Oracle Fusion Global Payroll: Corrective Actions Available on Completed Flows |
Feature information delivered in Update 13 (January). |
| 01 JAN 2016 |
Oracle Fusion Human Capital Management Transactional Business Intelligence: Reporting Establishment |
Feature information delivered in Update 13 (January). |
| 01 JAN 2016 |
Oracle Fusion Human Capital Management Transactional Business Intelligence: Worker Legislation - ‘Enabled’, ‘Obsolete’ Flags |
Feature information delivered in Update 13 (January). |
| 01 JAN 2016 |
Oracle Fusion Human Capital Management for Canada: End-of-Year Reporting (T4A Only) |
Feature information delivered in Update 13 (January). |
| 04 DEC 2015 |
Oracle Fusion Human Capital Management for the United Arab Emirates: Abu Dhabi Retirement Pensions and Benefits Fund |
Feature information delivered in Update 12 (December). |
| 04 DEC 2015 |
Oracle Fusion Compensation and Total Compensation Statement: Workforce Compensation Supports Matrix Structures |
Changes were made to the documentation of this feature that was delivered in Release 10. |
| 04 DEC 2015 |
Oracle Fusion Human Capital Management for the United Kingdom: Pensions Automatic Enrolment and Re-enrolment Enhancement |
Feature information delivered in Update 12 (December). |
| 04 DEC 2015 |
Oracle Fusion Human Capital Management for the United Kingdom: Generate Pensions Automatic Enrolment Notification Letters Process |
Feature information delivered in Update 12 (December). |
| 04 DEC 2015 |
Oracle Fusion Human Capital Management for Canada: End-of-Year Reporting (RL-1 Only) |
Feature information delivered in Update 12 (December). |
| 04 DEC 2015 |
Oracle Fusion Human Capital Management for the United States: Batch Loader Support for New Jersey Family Leave Insurance Exemption |
Feature information delivered in Update 12 (December). |
| 04 DEC 2015 |
Oracle Fusion Human Capital Management for the United States: Calculate Federal Income Taxes Based on Period-to-Date Amount |
Feature information delivered in Update 12 (December). |
| 04 DEC 2015 |
HCM Common Features for Payroll: Flows: Multiple Tasks and Task Sequence Deletion |
Feature information delivered in Update 12 (December). |
| 04 DEC 2015 |
Oracle Fusion Global Payroll: Payroll User Interface Configuration |
Revised Documentation of feature information delivered in Update 11 (November). |
| 04 DEC 2015 |
Oracle Fusion Human Capital Management for Canada: End-of-Year Reporting (T4 Only) |
Feature information delivered in Update 11 (November). |
| 04 DEC 2015 |
Oracle Fusion Human Capital Management for the United Kingdom: Year to Date Reconciliation Report |
This feature was delivered in Release 10, but was not documented, now updating the documentation. |
| 04 DEC 2015 |
Oracle Fusion Human Capital Management for the United Kingdom: NI Category Update Process - Young Persons National Insurance Category Assessment |
This feature was delivered in Release 10, but was not documented, now updating the documentation. |
| 30 OCT 2015 |
Oracle Fusion Human Capital Management for the United States: Assignment Enhancements for Affordable Care Act Support |
Feature information delivered in Update 11 (November). |
| 30 OCT 2015 |
Oracle Fusion Human Capital Management for the United States: Legal Employer Enhancement for Affordable Care Act Support |
Feature information delivered in Update 11 (November). |
| 30 OCT 2015 |
Oracle Fusion Human Capital Management for the United States: Tax Reporting Unit Enhancements for Affordable Care Act Support |
Feature information delivered in Update 11 (November). |
| 30 OCT 2015 |
Oracle Fusion Human Capital Management for the United States: Pennsylvania Residency Certificate Form Available from Portrait |
Feature information delivered in Update 11 (November). |
| 30 OCT 2015 |
Oracle Fusion Global Payroll: Payroll User Interface Configuration |
Feature information delivered in Update 11 (November). |
| 30 OCT 2015 |
Oracle Fusion Global Payroll: Display Additional Information on Payslips |
Feature information delivered in Update 10 (October). |
| 30 OCT 2015 |
Oracle Fusion Global Payroll: Enhanced Support for Rate Definitions |
Updated Feature documentation delivered in Update 7 (July). |
| 30 OCT 2015 |
Oracle Fusion Global Human Resources: New Approval Rule for Simplified User Interface Personal Information |
Feature information delivered in Update 11 (November). |
| 30 OCT 2015 |
Oracle Fusion Human Capital Management for Finland: Enabled Value for Marital Status |
Feature information delivered in Update 11 (November). |
| 30 OCT 2015 |
Oracle Fusion Human Capital Management for New Zealand: Enabled Value for Marital Status |
Feature information delivered in Update 11 (November). |
| 30 OCT 2015 |
Oracle Fusion Human Capital Management for Belgium: Added Value for Gender |
Feature information delivered in Update 11 (November). |
| 30 OCT 2015 |
Oracle Fusion Human Capital Management for Australia: Workplace Gender Equality Profile Report |
Feature information delivered in Update 11 (November). |
| 30 OCT 2015 |
Oracle Fusion Human Capital Management for Australia: Capture of Non-Specific Gender |
Feature information delivered in Update 11 (November). |
| 30 OCT 2015 |
Oracle Fusion Human Capital Management for Canada: Ability to Change Display for Province to Full Name |
Feature information delivered in Release 10 base. |
| 30 OCT 2015 |
Oracle Fusion Human Capital Management for Canada: Time and Labor Calculation Component |
Feature information delivered in Release 10 base. |
| 23 SEP 2015 |
Oracle Fusion Compensation: Convert Worker-Level Budget Amounts into Local Currency |
Feature information delivered in Update 9 (September). |
| 23 SEP 2015 |
Oracle Fusion Human Capital Management for the United States: Employee Active Payroll Balance Report |
Feature information delivered in Update 10 (October). |
| 23 SEP 2015 |
Oracle Fusion Human Capital Management for the United States: PA Act 32 Calculation Enhancements |
Feature information delivered in Update 10 (October). |
| 27 AUG 2015 |
Oracle Fusion Global Payroll: Update User Defined Legislations |
Feature information delivered in Release 10 base. |
| 27 AUG 2015 |
Oracle Fusion Global Payroll: New Country Field for Personal Payment Methods to Support International Payments |
Feature information delivered in Update 9 (September). |
| 27 AUG 2015 |
Oracle Fusion Global Payroll: Enhanced Support for Rate Definitions |
Feature information delivered in Update 7 (July). |
| 27 AUG 2015 |
Oracle Fusion Global Payroll: Gross-to-Net Report Based on Process Date |
Feature information delivered in Update 8 (August). |
| 27 AUG 2015 |
Oracle Fusion Global Payroll: Report Year-to-Date Summary |
Feature information delivered in Update 9 (September). |
| 27 AUG 2015 |
Oracle Fusion Global Payroll: Report Payment and Nonpayment Balances |
Feature information delivered in Update 9 (September). |
| 31 JUL 2015 |
Oracle HCM Common Features- HCM Data Loader: Import Local File |
Feature information delivered in Update 8 (August). |
| 31 JUL 2015 |
Oracle Fusion Human Capital Management for India: Nomination Information |
Feature information delivered in Update 8 (August). |
| 31 JUL 2015 |
Oracle Fusion Human Capital Management for Australia: Trade Support Loan Support |
Feature information delivered in Update 8 (August). |
| 31 JUL 2015 |
Oracle Tap (Mobile): Mobile- Language Support Enhancements |
Feature information delivered in Update 8 (August). |
| 31 JUL 2015 |
Oracle Tap (Mobile): Mobile - Security Enhancements |
Feature information delivered in Update 8 (August). |
| 31 JUL 2015 |
Oracle Tap (Mobile): Mobile - Worker Detail and Public Profile |
Feature information delivered in Update 8 (August). |
| 31 JUL 2015 |
Oracle Tap (Mobile): Mobile - Access Worker Social Wall |
Feature information delivered in Update 8 (August). |
| 31 JUL 2015 |
Oracle Tap (Mobile): Mobile - Organization Navigator |
Feature information delivered in Update 8 (August). |
| Oracle Tap (Mobile): Mobile - Schedule Absences |
Feature information delivered in Update 8 (August). |
|
| 31 JUL 2015 |
Oracle Tap (Mobile): Mobile - Update Biological Information |
Feature information delivered in Update 8 (August). |
| 31 JUL 2015 |
Oracle Tap (Mobile): Mobile - View Payslips |
Feature information delivered in Update 8 (August). |
| 31 JUL 2015 |
Oracle Tap (Mobile): Mobile - Worklist and Notifications |
Feature information delivered in Update 8 (August). |
| 31 JUL 2015 |
Oracle Tap (Mobile): Mobile - Manger Self-Service Transactions |
Feature information delivered in Update 8 (August). |
| 31 JUL 2015 |
Oracle Tap (Mobile): Mobile - View Your Analytics |
Feature information delivered in Update 8 (August). |
This document outlines the information you need to know about new or improved functionality in Oracle Global Human Resources Cloud Release 10. Each section includes a brief description of the feature, the steps you need to take to enable or begin using the feature, any tips or considerations that you should keep in mind, and the resources available to help you.
We welcome your comments and suggestions to improve the content. Please send us your feedback at oracle_fusion_applications_help_ww_grp@oracle.com. Please indicate you are inquiring or providing feedback regarding the Global HR Cloud What’s New for Release 10 in the body or title of the email.
Some of the new Release 10 features are automatically available to users after the upgrade and some require action from the user, the company administrator, or Oracle.
The table below offers a quick view of the actions required to enable each of the Release 10 features.
IMPORTANT NOTE: If you are upgrading from an earlier release to Oracle Global Human Resources Cloud Release 10, then the security upgrade must be completed first to enable new Release 10 features. See the document Upgrading Applications Security in Oracle HCM Cloud Release 10 (ID 2023523.1) on My Oracle Support for details.

The following HCM common features include enhancements for Release 10:
HCM Data Loader is a flexible and comprehensive bulk-data-loading solution for business objects across multiple Oracle Fusion Human Capital Management products. You can use it for data-migration, ongoing inbound interfaces, and one-off bulk updates. It supports the bulk load of your configured descriptive and extensible flexfield data, translation data, tree hierarchies, person images, and Document of Record attachments.
You can now select files for HCM Data Loader processing directly from your local machine, removing the need to upload your files first to the Oracle WebCenter Content server.
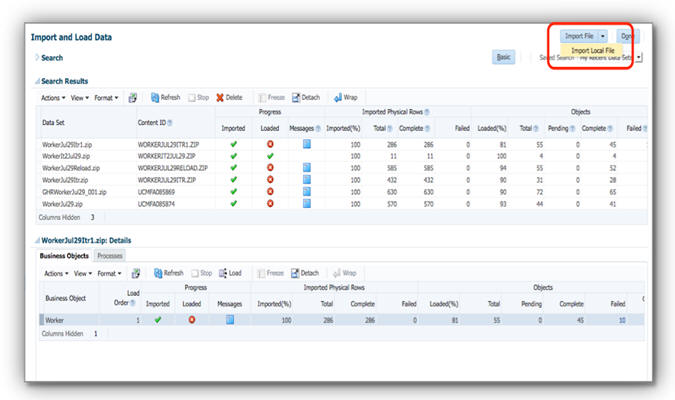
The existing Import File button displays unprocessed files available on the Oracle WebCenter Content server. The new Import Local File option allows you to either browse for a local file or drag and drop a file from your file explorer to the Browse button.

Your selected file is uploaded to the Oracle WebCenter Content server and the Schedule Request page opens. On this page, you can immediately submit your file for processing.
Steps to Enable
There are no steps necessary to enable this feature.
Key Resources
For more information go to My Oracle Support for the following guide:
- HCM Data Loader User’s Guide (Document ID 1664133.1)
Flexible Pipe-Delimited File Format
You can now simplify your inbound integrations by including the business object components and attributes relevant to your use case, whether that be full date-effective history for data migration, or incremental changes for data maintenance. You can supply multiple business object specific files in one compressed zip file and process them together. HCM Data Loader understands the order in which the business object data must be loaded to ensure referenced data is loaded first.
Steps to Enable
There are no steps necessary to enable this feature.
Key Resources
For more information about HCM Data Loader file formats, go to My Oracle Support for the following guide:
- HCM Data Loader User’s Guide, (Document ID: 1664133.1)
You can now optionally deliver encrypted compressed zip files to Oracle’s WebCenter Content server secured by a specific HCM Data Loader account. The compressed zip file is then streamed from the WebCenter Content server and decrypted during import into stage tables before a multithreaded process loads valid objects into Oracle Fusion. You can use either the Oracle Fusion HCM File Import and Export interface, or the WebCenter Content web service to deliver a zip file to the WebCenter Content server.
Your compressed zip file is deleted by default from the WebCenter Content server as soon as HCM Data Loader has finished streaming it. You can change the default behavior by updating the Delete Source File parameter to No on the Configure HCM Data Loader page. Alternatively, you can choose to retain your source files for an individual file by setting the Delete Source File parameter to No on the Schedule Request window.
Steps to Enable
There are no steps necessary to enable this feature.
Key Resources
For more information about delivering data files to the Oracle WebCenter Content server, go to My Oracle Support for the following guide:
- HCM Data Loader User’s Guide, (Document ID: 1664133.1).
Automated or User-Managed Processing
You can now automate inbound interfaces using the WebCenter Content and HCM Data Loader web services, or control the import and loading processes using the new Import and Load Data user interface.
You can use the Import and Load Data user interface to manually initiate the import and optional load of a data set (zip file) and monitor the progress of that data set. The user interface includes a Data Set table and a Business Objects table. The Data Set table displays the data sets or zip files submitted for processing. The Business Objects table displays the business objects that were included in the zip file. On both the Data Set and Business Objects tables the Imported and Loaded Progress columns display the status of import and load.
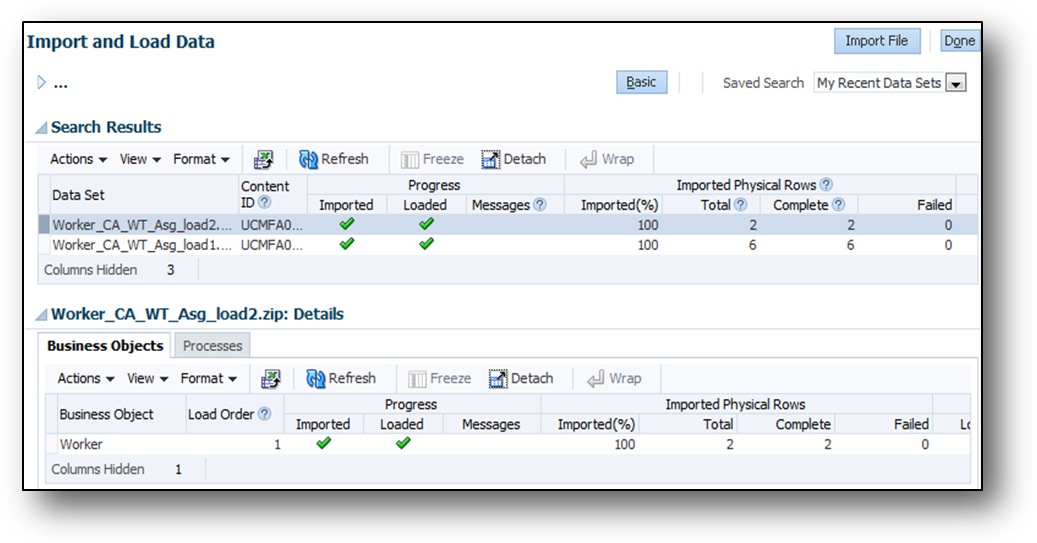
Import and Load Data User Interface
Steps to Enable
There are no steps necessary to enable this feature.
Key Resources
For more information about HCM Data Loader automated or user managed imports, go to My Oracle Support for the following guide:
- HCM Data Loader User’s Guide, (Document ID: 1664133.1).
You can use the following methods to review and monitor the status of your import and load requests:
- Import and Load Data user interface – Allows review of the progress of your files via the Import and Load Data user interface, with comprehensive status and record count information, message summary, and error management that allows you to review the details of failed records.
- HCM Extract - You can monitor the results of your data loading using the new HCM Extract output, which provides machine readable status and error information.
- Data Set Status - You can also diagnose complex errors using the new Data Set Status available from the Diagnostic framework.
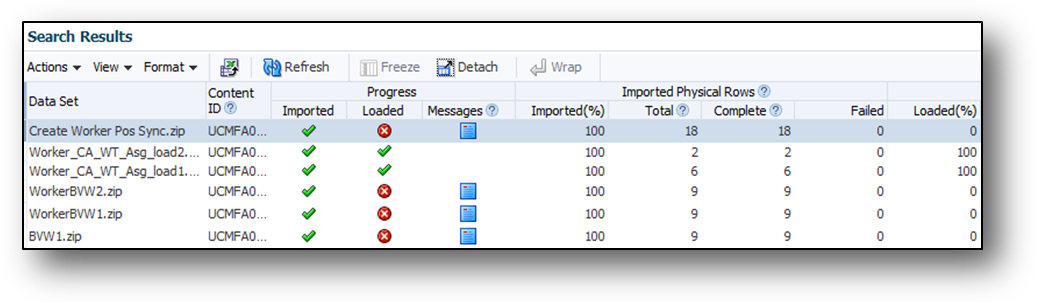
The Data Set Table in the Import and Load Data User Interface
Steps to Enable
There are no steps necessary to enable this feature.
Key Resources
For more information about status and error handling with HCM Data Loader, go to My Oracle Support for the following guide:
- HCM Data Loader User’s Guide (Document ID: 1664133.1).
HCM Data Loader supports the following four key types:
- Oracle Fusion GUID (Globally Unique Identifier)
- Oracle Fusion surrogate ID
- Source Key ID
- User key
You can create new objects specifying your source-system identifier and continue to maintain and reference that data in Oracle Fusion using your Source Key. Alternatively, supply the User Key information, for example Organization Name, Person Number, or Absence Type. In addition Oracle Fusion’s internal surrogate ID and Globally Unique ID (GUID) can be used.
Steps to Enable
There are no steps necessary to enable this feature.
Key Resources
For more information about flexible key support with HCM Data Loader, go to My Oracle Support for the following guide:
- HCM Data Loader User’s Guide (Document ID: 1664133.1)
The Purge Person process, available from the Diagnostic Framework, purges the following person-related data from your stage and test environments:
- Absences
- Benefits
- Compensation
- Documents and Attachments
- Performance Data
- Goals and Performance
- Talent Profile
- Payroll Relationships
- Element Entries
- Calculation Cards
- Addresses
- Assignments (including Extra Information Types )
- Work Relationships
- Contacts and Contact Relationships
- Worker Personal Information (including Passport, Citizenship, E-Mails, Licenses, National Identifiers, and Extra Information Types )
- Roles and User Details
The Purge Person process does not purge data that was created using HCM File-Based Loader, nor does it purge predefined person data.
You can specify which records to purge by supplying comma-delimited person numbers or person IDs. Alternatively, supply a SQL query to return the person IDs for all person records that you want to purge.
Steps to Enable
Raise a service request through My Oracle Support (MOS) to request enablement of the Purge Person process on your stage and test pods.
This process cannot be enabled in production environments.
Tips and Considerations
You can run the Purge Person process without committing the purge so that you can review the results before you delete the data permanently.
Key Resources
For more information on purging person data, see the following document on My Oracle Support (MOS):
- Purging HCM Data from Test and Stage Environments (Document ID 2132109.1)
Upload of Assignment Records with Effective Dates That Are Later Than the Termination Date
Prevent the upload of invalid assignment records using HCM Data Loaders new validation. Prior to this enhancement, it was possible to load an assignment record for a terminated work relationship where:
- The status of the assignment record was set to either ACTIVE or SUSPENDED.
- The effective dates of the assignment record were later than the termination date of the work relationship.
You can continue to load assignment records for a terminated work relationship where the effective dates are later than the work relationship termination date, provided that the assignment status is INACTIVE. No other assignment status is valid.
Steps to Enable
There are no steps necessary to enable this feature.
Simplify Global Transfers Performed by Data Upload
Perform global transfers efficiently. A global transfer involves the termination of an existing work relationship with one legal employer and the creation a new work relationship with a different legal employer. The addition of the GlobalTransferFlag attribute enables you to perform global transfers efficiently in uploaded work relationship records.
To perform a global transfer when the source work relationship is the worker’s primary work relationship, you load:
- The new work relationship record with the GlobalTransferFlag attribute set to Y and an action code from the EMPL_GLB_TRANSFER action type
- The child components of the new work relationship record
HCM Data Loader automatically terminates the existing primary work relationship and sets the termination date to the day before the start date of the new work relationship.
You can perform a global transfer of the primary work relationship only when no active secondary work relationships exist.
To perform a global transfer when the source work relationship is a nonprimary work relationship, you load:
- The new work relationship record with the GlobalTransferFlag attribute set to Y and an action code from the EMPL_GLB_TRANSFER action type
- The existing nonprimary work relationship record without the GlobalTransferFlag attribute
- The child components for the new work relationship record but not for the existing nonprimary work relationship record
- The parent worker record
HCM Data Loader automatically terminates the existing nonprimary work relationship and sets the termination date to the day before the start date of the new work relationship.
Steps to Enable
There are no steps necessary to enable this feature.
Enhanced Validation of Worker Records by HCM Data Loader
Include now only one row for each worker in the data file, when you create workers or update existing workers. As no date-effective attributes are exposed on the worker component, there is no functional reason for storing date-effective history in the PER_ALL_PEOPLE_F table. To correct any attribute of an existing worker record, you must perform a correction.
For new worker records created using HCM Data Loader, the Start Date and Effective Start Date attributes of the worker component must equal the start date of the worker’s earliest work relationship. Any mismatch in these dates now causes an error to be raised.
Steps to Enable
There are no steps necessary to enable this feature.
User-Key Support for Multirow Extensible Key Flexfields
When you configure a multirow extensible key flexfield, you can configure one or more segments as the key that uniquely identifies a single row of the multirow context. HCM Data Loader treats these segments as user-key attributes, which ensures that you can reference a single flexfield record using only user keys.
Steps to Enable
There are no steps necessary to enable this feature.
Key Resources
For more information, go to My Oracle Support for the following guide:
- HCM Data Loader User’s Guide (document ID 1664133.1)
Oracle Fusion Global Human Resources enables your organization to plan, manage and optimize all workforce segments using flexible and extensible best practices to realize extraordinary gains while ensuring compliance and increasing total workforce engagement.
The Manage Features by Country or Territory task, formerly Manage Payroll Product Usage, now includes options for controlling the address style and the level of address validation. The address style determines which address attributes are available and maintained in the application. The address style can also affect validation, for example, if you specify that geography uses an address style to validate specific attributes. For example, in the United States, the address style can be defined to validate the State attribute.
The combination of address style and address validation determines the level of validation. The values you can select depend on the combination of the country or territory and the selected country extension. For example, for Canada, you can change the address style from its original value only when you set the country extension to Human Resources or None, not Payroll or Payroll Interface.
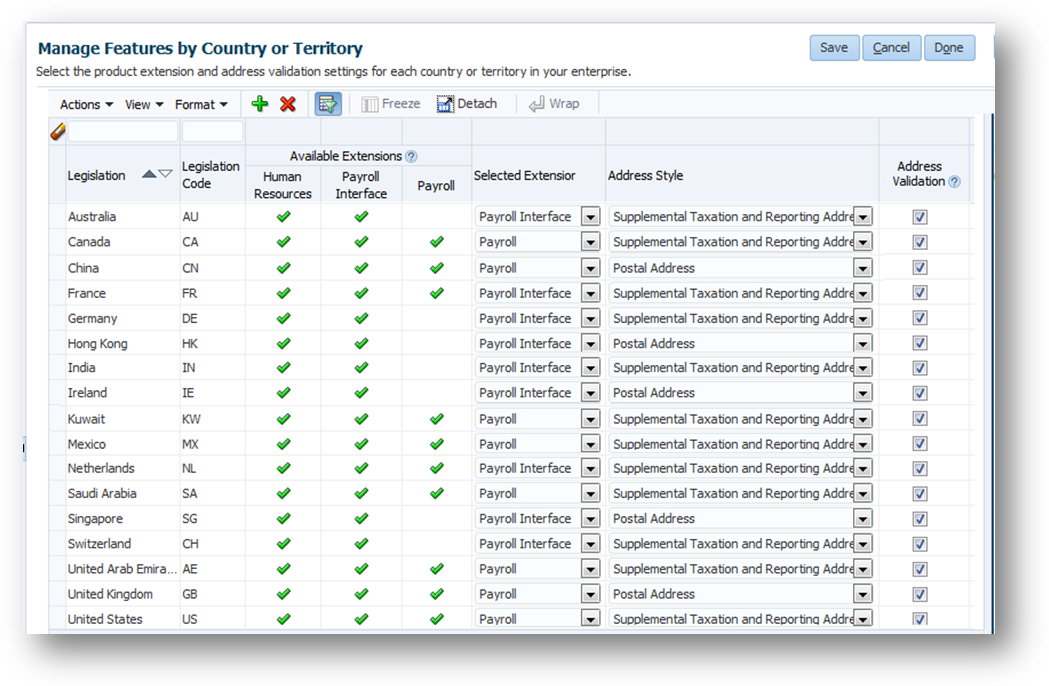
Manage Features by Country or Territory Page
Steps to Enable
There are no steps necessary to enable this feature.
Tips and Considerations
- Changing address styles can affect validation rules and may lead to address data integrity and validation issues. If you provide data to a third party, such as a payroll or benefit provider, statutory recipients, or financial institutions, changes to validation or address styles may result in missing data or unrecognized data. Make sure to test any changes you make to the address style or validation for a country or territory before you implement them in a production environment.
- Disabling address validation disables only any country-specific programmatic validation rules created for a specific country or territory. Disabling address validation on the Manage Features by Country or Territory page does not have any impact on the validation you have set up on the Manage Geographies page.
Key Resources
For more information related to this feature, go to Applications Help for the following topics:
- Selecting Country Extensions: Worked Example
- Changing Address Styles and Address Validation for HCM: Critical Choices
This section describes new features that are relevant if you use features such as elements, formulas, payroll definitions and database items, even if you don’t use Global Payroll. Typical applications using payroll common features are Absence Management, Benefits, Compensation, Global Human Resources, Global Payroll Interface and Time and Labor.
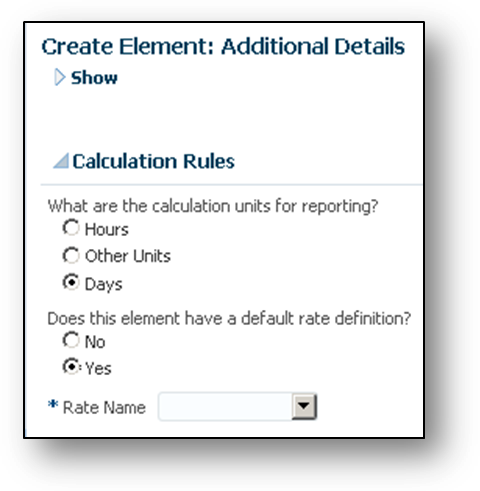
Enhanced Element Template for Absences
You can easily create payroll elements for the plans you create in Oracle Fusion Absence Management. When you create an element, you complete questions that automatically create an absence element and its calculation components, related elements, balances, and formulas. For example, you select the type of information to transfer and the calculation units to use when reporting the absence. If you transfer accrual balances, you decide whether to:
- Calculate absence liability
- Enable partial payment of a balance
- Enable balance payments when enrollment ends
You can also select a method to reduce regular earnings if employees don’t complete a time card. You determine rates for your payments either in Absence Management or when you complete the element template questions. When processing absence entries in a payroll run, the formula associated to the absence element uses the global formula Rate Converter to convert rates.

Absences Element Template Questions
You associate the absence element to a plan in Absence Management, assign the plan to a person and decide whether to automatically transfer the absence information as it’s recorded and approved, or run a batch process. The daily breakdown and summary information transferred to the person’s calculation card is processed in the next payroll run. You can then view the person’s absence accrual balance, absence payments, and deductions on their statement of earnings and payslip.
Steps to Enable
There are no steps necessary to enable this feature.
Tips and Considerations
Select the rate to use for an absence element in your absence plan or in the element template. If you select the rate on both pages, ensure you select the same rate.
Key Resources
For more information about absence elements, go to Applications Help for the following topic:
- Creating Payroll Elements for Processing Absences: Procedure
Enhanced Element Template for Time Cards
This feature only applies to user-defined legislations and predefined country extensions that have enabled the feature in this release.
You can create nonrecurring elements using the new Time Card category to process pay based on time card entries, such as elements for regular, overtime, and shift pay. Creating a time card element automatically generates all the related elements, balances, formulas, and calculation components required to calculate and process payments for reported time. When you create an element, you select a primary classification of standard or supplemental earnings and select the Time Card category. You can select the units to use to report calculated time, and also select a rate definition the formula uses to calculate time. After you submit the element definition, you create element eligibility records for the base, results, calculation, and retroactive elements generated by the element template.
Important: Do not create elements using the Time Card category if you are operating in a country where Oracle provides an HR, Payroll Interface, or Payroll Extension, as indicated on the Manage Features by Country or Territory page in the Setup and Maintenance work area.
Time Card Template Questions
Submit this process to convert a standard or supplemental element to a time card element only if you created the element. You only submit this process to convert standard and supplemental elements to time card elements if either of the following conditions applies. You created the element:
- Before this release and you didn’t submit the Create Time Card Calculation Components process to convert the element
- After upgrading to this release but without selecting the Time Card category
These elements must have a calculation rule of hours multiplied by rate. After running the process, you perform the following steps:
- Create element eligibility records for the elements generated by the process, typically the base element and the related elements: retroactive and results elements, and elements ending with a suffix of CIR.
- Compile the formulas used to calculate the time card element.
Steps to Enable
There are no steps necessary to enable this feature.
Key Resources
For more information about time card elements, go to Applications Help for the following topic:
- Creating Elements for Time Card Entries: Explained
A new page for creating bank account information is now available that works with a new profile option to control whether employees and professional users can create bank and branch data. You can choose to use either the original page or the new page. You can enable the new page at the site, country, or legislative data group level.
The following screen captures show a comparison between the original and new versions of the Create Bank Account page. For each version, there are two screen captures of the page:
- When bank data is preloaded
- When the user can create bank and branch details
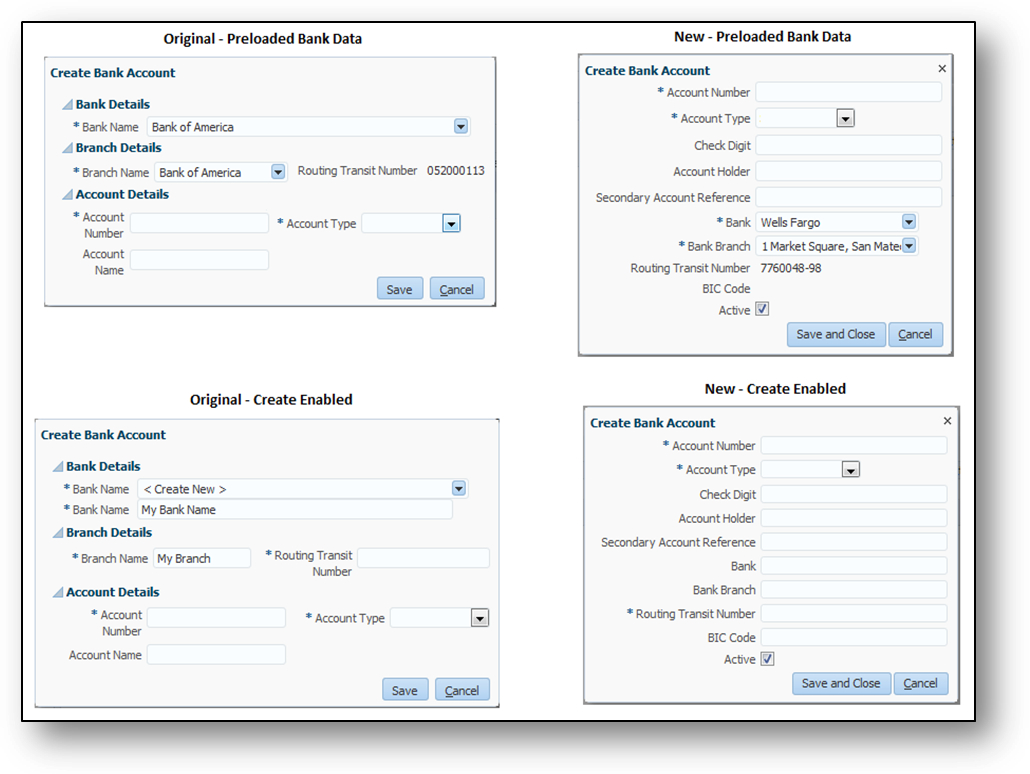
Comparison of Original and New Create Bank Account Pages
Differences between the original and new page are highlighted in the following table:
| Queries |
Original Page |
New Page |
| Can users enter different variations of the same bank and branch details? |
No |
Yes. There is no bank and branch details validation across personal payment methods |
| What controls user access to create bank and branch information? |
The Manage Bank and Manage Bank Branch privileges |
The Use Existing Banks and Branches profile option (at site or user level) By default, it's set to No at the site level, which enables employees or professional users to enter bank and branch data directly rather than selecting from a list of values. |
| Which global fields are required when Create is enabled? |
Account Number, Account Type, Bank Name, Branch Name, and Routing Transit Number |
Option of country-specific required fields. |
| Does bank and branch data entered by users on the Create Bank Account page appear on the Manage Bank and Manage Branch pages in Cash Management? |
Yes |
No |
Steps to Enable
NOTE: If you choose to use the original Create Bank Account page, you don’t need to enable this feature.
- Enable the simplified bank account page using the Payroll User Interface Configuration formula and the Show Simplified Bank Account preference in a user-defined table. For detailed steps, refer to the Payroll User Interface Configuration feature described elsewhere in this document.
NOTE: If you want users to select only the preloaded banks and branches ensure that you set the Use Existing Banks and Branches profile option to Yes. Refer to the next section for details.
- If you set the Use Existing Banks and Branches profile option to No, which enables employees or other roles to create banks and branches, provide guidance to use unique names and follow appropriate naming conventions.
- This profile option works with the new Create Bank Account page that employees and professional users see when creating personal payment methods. This profile option does not affect the original version of the Create Bank Account page.
Key Resources
For more information about banks information related to personal payment methods, go to Applications Help for the following topics:
- Entering Bank Information For Personal Payment Methods: Critical Choices
- Payroll Batch Loader Workbooks for Bank Data
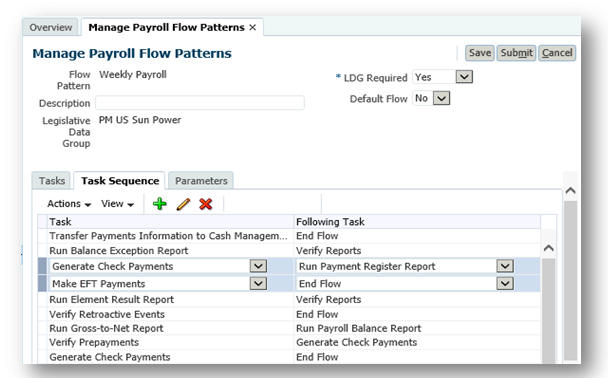
Support for BI Report Submission in Payroll Flows
If you create or customize a BI Publisher report, you can run your report from a payroll flow by adding the Run BI Publisher Report task to your payroll flow pattern. When you submit the flow, the reporting automatically generates an output file that you can view. The output file is based on the template used for the BI Publisher report, such as an HTML template. Add single or multiple BI Publisher reports to your copied or user-defined flow pattern.
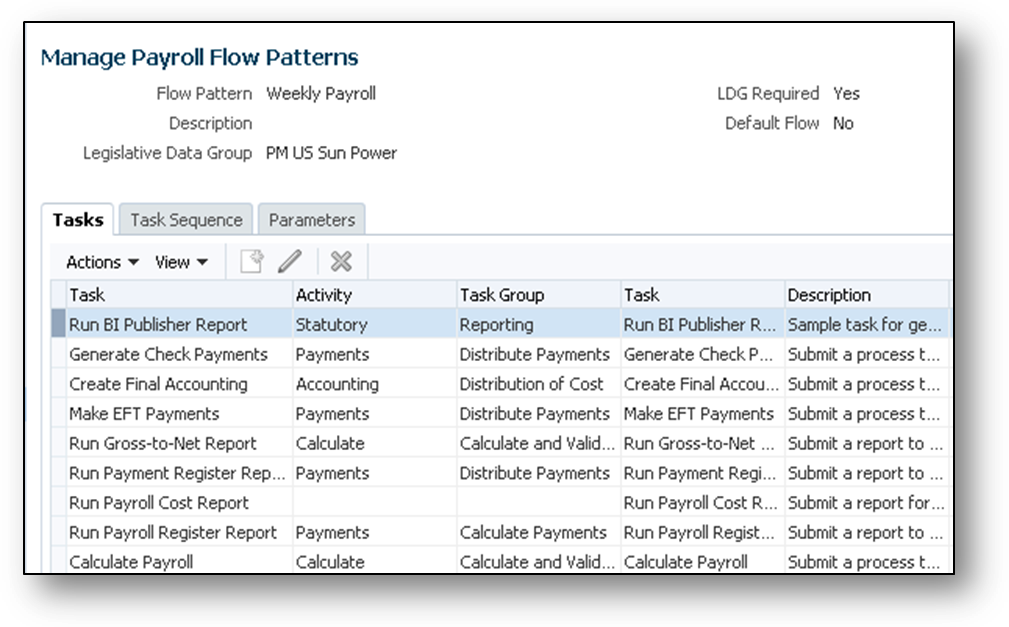
BI Publisher Reporting Task Added to the Weekly Payroll Flow Pattern
Steps to Enable
Follow these steps to add the task to a new flow pattern:
- Create a flow pattern on the Manage Payroll Flow Patterns page in the Payroll Checklist work area.
- Complete on the Create Payroll Flow Pattern page the basic information. Select the Statutory activity, and the run BI Publisher Report task.
- Edit on the Task page the selected task as required.
- Confirm on the Task Sequence page the sequence is correct.
- Add a required parameter for the first argument of the BI Publisher report on the Flow Parameter page. The flow parameters map to the BI Publisher arguments. For example, the first argument is the first bind variable of a SQL query data model. Optionally, rename the parameter to a more meaningful name.
- Confirm and specify in the Parameter Details section of the Task Parameters page the following:
- Confirm that the Parameter Basis for the First Argument value is Bind to Flow.
- Specify values for other arguments if required.
- Specify a value for the Report Name and Report Path parameters.
- Review the flow and submit it
Quick Report, Process, and Flow Submission
Submit your HCM extract reports, payroll processes, and flows directly from the Enter Parameters page by clicking the Submit button. This method skips the remaining flow submission pages. You might choose this method to speed up submission, if you don’t want to:
- Connect other flows to the current flow
- Schedule a flow
- Review the flow before submitting it
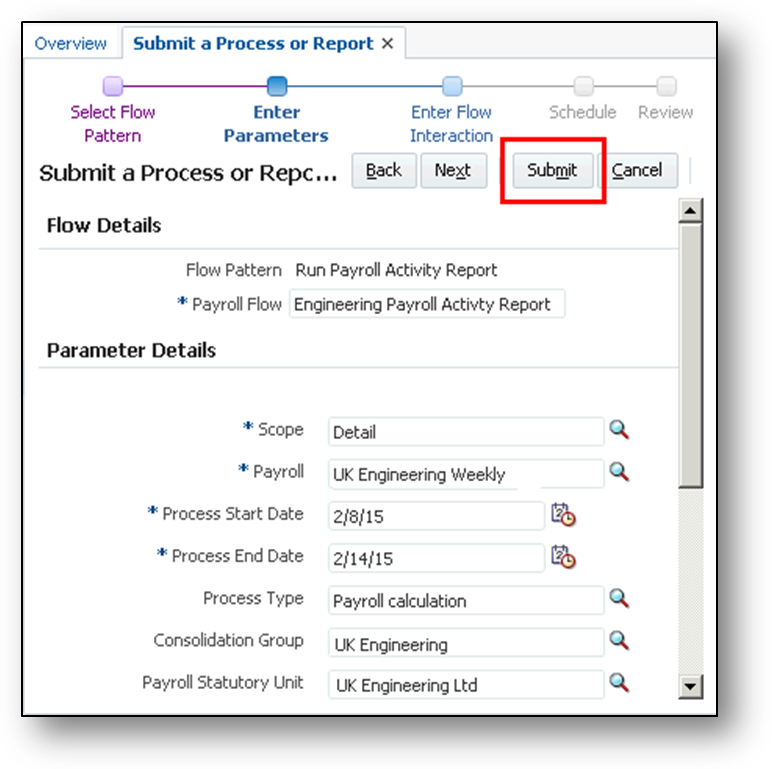
Submit Button on the Enter Parameters Page
Steps to Enable
There are no steps necessary to enable this feature.
Flows: Multiple Tasks and Task Sequence Deletion
Previously you could only delete a single task or task sequence. Now when you create or edit a flow pattern, you can select contiguous or noncontiguous rows. Delete tasks in the Tasks or Task Sequence tab, and rearrange tasks in the Task Sequence tab. Review tasks by sorting them by task group before deciding which ones to delete.
For example, you might create a separate flow pattern for accounting tasks and delete those tasks from your weekly payroll.

Shows the Tasks Sorted by Task Group and the Selected Rows to Delete
Task Sequence Tab Showing the Selected Tasks to Reorder
Steps to Enable
There are no steps necessary to enable this feature.
This section describes new features that are relevant if you use Oracle Tap for HCM Mobile applications. Oracle Tap works on smart devises that have a web browser, such as smart phones and tablets.
Mobile - Language Support Enhancements
Oracle Tap mobile solutions supports the same languages available in Fusion HCM Cloud with the exception of languages that read from right to left.
Steps to Enable
There are no steps necessary to enable this feature.
Mobile - Access Worker Social Wall
Within Oracle Tap, you can start an Oracle Social Network (OSN) conversation with a worker that you have selected. This feature requires that the OSN app is installed on the device because Oracle Tap uses punch-out integration with OSN to connect.
Steps to Enable
To connect with OSN, you need to install OSN on your mobile device and setup an appropriate OSN account. If you have an active account in both Fusion and OSN, then you can use this feature.
Mobile - Worklist and Notifications
You can view and act on workflow tasks on the Notification/Approvals page on your mobile device. As a manager, you can approve or reject a task and access the details task page. The details task page is a web view of the detail task view. Actions can only be done within the list view of the Notification page.
Steps to Enable
There are no steps necessary to enable this feature.
Role definitions for the security reference implementation are simplified. Many roles beneath the job level are eliminated. The privileges that are defined are assigned to job or abstract roles, either directly or as aggregate privileges (which are new to Release10). This reduces the complexity of role administration and customization. Some things to consider with the role simplification are:
- An aggregate privilege combines the functional privilege for an individual task or duty with the relevant data privileges. Oracle defines and delivers aggregate privileges, these cannot be customized.
- Privileges or aggregate privileges can be assigned directly to job or abstract roles. (In Release 9, privileges could be assigned only to duty roles.)
Every job or abstract role that existed in Release 9 also exists in the simplified role hierarchy for Release 10. Each of these job or abstract roles authorizes the same privileges in Release 10 as it did in Release 9. Release 10 adds some new job roles. The nodes in the hierarchy between a job and its privileges are reduced and simplified.
Release 10 will include both the hierarchy you are used to and the new simplified hierarchy. On upgrade, users will be members of the old hierarchy. You can move users to the new hierarchy at your discretion. Note that new functionality will exist under the new hierarchy.
Simplified Reference Role Model
Every job or abstract role that existed in Release 9 also exists in the simplified role hierarchy for Release 10. Each of these job or abstract roles authorizes the same privileges in Release 10, as it did in Release 9. Release 10 although, adds some new job roles. The nodes in the hierarchy between a job and its privileges are reduced and simplified.
Release 10 will include both the hierarchy you are used to and the new simplified hierarchy. On upgrade, users will be members of the old hierarchy. You can move users to the new hierarchy at your discretion. Note that new functionality will exist under the new hierarchy.
Steps to Enable
There are no steps necessary to enable this feature.
For existing customers who upgrade to Release 10, you can choose to move your users to the simplified hierarchy at your own discretion. Before beginning the move to the simplified hierarchy, please be sure to review the white papers on My Oracle Support to understand what is involved and how it will work.
Oracle Fusion Applications Security provides a single console in which security managers and security administrators can review, design, and modify roles in Oracle Fusion Applications. It enables users to visualize the relationship among roles, and to model applications-menu and task-pane entries for any role. Users can also manage certificates and review a set of security reports.
Copy Role and Inherited Hierarchy
You may create a new role by copying an existing role, then editing the copy. You have the option of copying only the "top" role (the role itself) or the top role and its inherited roles.
If you choose to copy only the top role, your copy shares its role hierarchy with the source role. That is, the source role inherits subordinate roles, and your copy inherits the same roles. Subsequent changes to those inherited roles will affect not only the source role, but also your copy.
If you choose to copy the top role and its inherited roles, the copied top role inherits new copies of all subordinate roles. This option insulates the copied role from any changes to the original versions of the inherited roles.

Copy Options for a Role Selected
There are no steps necessary to enable this feature.
Tips and Considerations
Enter the role name suffix to use during role copy in the Administration tab. This suffix will be used every time you copy inherited roles.
Analyze Roles by Role Category
A role belongs to a category, which describes the purpose the role shares in common with other roles. Typically a category contains a type of role configured for an application, such as "Financials — Duty Roles." You can review statistics about the categories themselves: the number of roles in each, the number of role memberships (roles belonging to other roles within the category), and the number of function and data security policies created for those roles. (Roles by Category pie chart compare the number of roles in each category with those in other categories.)
You can select a category and list the roles belonging to it. For each role, you can review its role memberships, function and data security policies, and users assigned to it.

The Security Console Analytics Page
Steps to Enable
There are no steps necessary to enable this feature.
Aggregate privileges are new in this release. Each aggregate privilege combines the functional privilege for an individual task or duty with the relevant data privileges. Oracle defines aggregate privileges, which cannot be customized. You can however, include them within job hierarchies that you define. When a job hierarchy uses aggregate privileges and you depict that hierarchy in the Security Console visualization, the aggregate privileges appear as distinct elements of the hierarchy.

Security Console Visualization of a Role Hierarchy with Aggregate Privileges, Which are Labeled “A”
Steps to Enable
There are no steps necessary to enable this feature.
A digital certificate establishes public and private keys for encrypting and decrypting data that Oracle Cloud applications exchange with other applications. You can now generate certificates in the X.509 format and/or continue to generate PGP formatted certificates. You can also export saved X.509 certificates for signing by a certifying authority or for use in other certificate systems.
Steps to Enable
There are no steps necessary to enable this feature.
Generate Certificate Signing Request for X.509 Certificate
When you generate an X.509 certificate it exists initially at a self-signed state. You transform it to a trusted state by having it digitally signed by a certificate authority. The Security Console enables you to create a Certificate Signing Request (CSR), a file that you would then send to a certificate authority. You would then import the response as a trusted certificate.
Steps to Enable
There are no steps necessary to enable this feature.
Tips and Considerations
Although the Security Console creates the CSR, you are expected to follow a process established by your organization to forward the CSR to a certificate authority. This process does not apply to PGP certificates.
Import Certificates From Keystore
You can import an X.509 certificate, typically belonging to an external source with which your system is to communicate. One or more X.509 certificates may be contained within a keystore and you have the option of importing certificates from a keystore. (Alternatively, you may import a certificate file on its own.)

Keystore Option Selected During X.509 Certificate Import
There are no steps necessary to enable this feature.
The Privilege Discoverer Report lists every secured action a user is authorized to within a work area.
Steps to Enable
There are no steps necessary to enable this feature.
The User Role Membership Report lists each user's job roles.
Steps to Enable
There are no steps necessary to enable this feature.
Mobile - Security Enhancements
To meet our customer’s needs related to security, Oracle Tap is providing support the following types of security capabilities:
- Federated SSO with a Customer’s External IDP
- Configured with IP addresses to allow and/or block access (i.e., blacklist or whitelist)
- A connection from a mobile device can utilize VPN from the device
- Supports 2-way authentication (NOTE: This functionality is only supported with iOS)
- App Containerization Support:
- Oracle Tap can be deployed with MDM solutions to secure the mobile device and/or the mobile applications on a device
- You will need to use the security archive that is posted on OTN: http://www.oracle.com/technetwork/topics/cloud/downloads/index.html. The company will need to define and implement a process to download the latest security archive, wrap it, re-deploy it via the enterprise app store and notify users. (NOTE: This functionality is only supported with iOS)
Steps to Enable
Each security capability requires specific information and steps to enable. Have your Administrator refer to the key resources section for more details.
Key Resources
For more information about configuring these security capabilities, go to My Oracle Support for the following documents:
- Oracle Tap User Authentication (Security) Approaches (Document ID 2025696.1)
- How To Prepare App for 2-Way Authentication – (Document ID 1955314.1)
- TECH NOTE - Oracle Tap for iOS - Wrapping with Good Technologies
 (Document ID 1928088.1)
Oracle Fusion Absence Management is a configurable and flexible global solution that enables organizations to manage absences of their workforce. The framework provides ability to define both complex and diverse absence plans. It integrates with the Oracle Fusion Global Payroll and Oracle Fusion Time and Labor products and provides dedicated work areas for the roles of Administrator and Employees. You can extract absence data for use with third-party payroll providers.
Audit Framework Includes Absence Record Data
The audit framework includes absence records. If you have the Internal Auditor job role assigned, you can view audit reports for absence management.
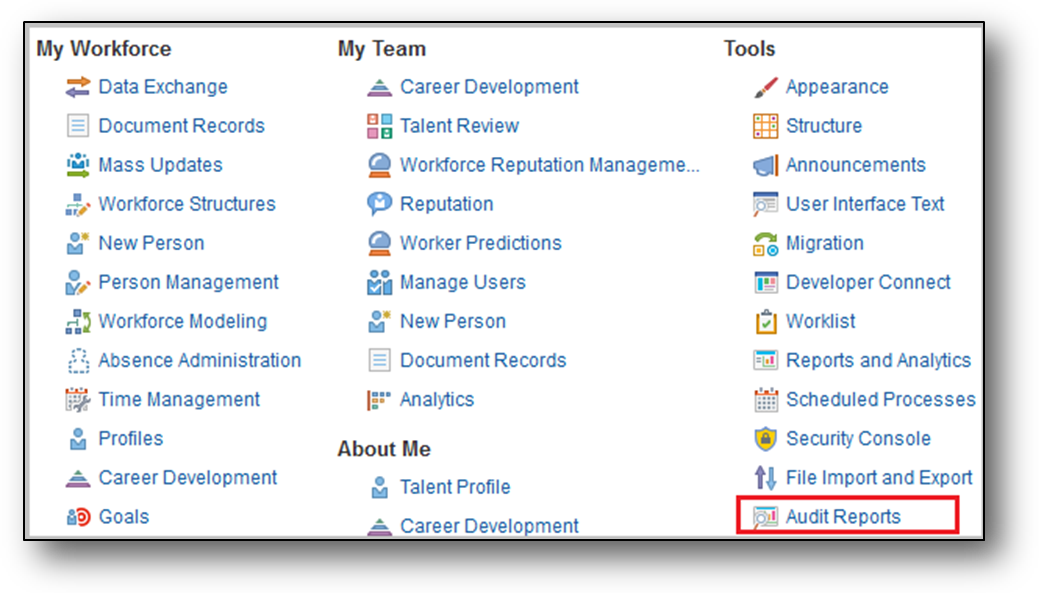
Audit Reports Option on the Navigator

Audit Reports Page
Steps to Enable
To enable audits for absence management, use the Manage Audit Policies task in the Setup and Maintenance work area.
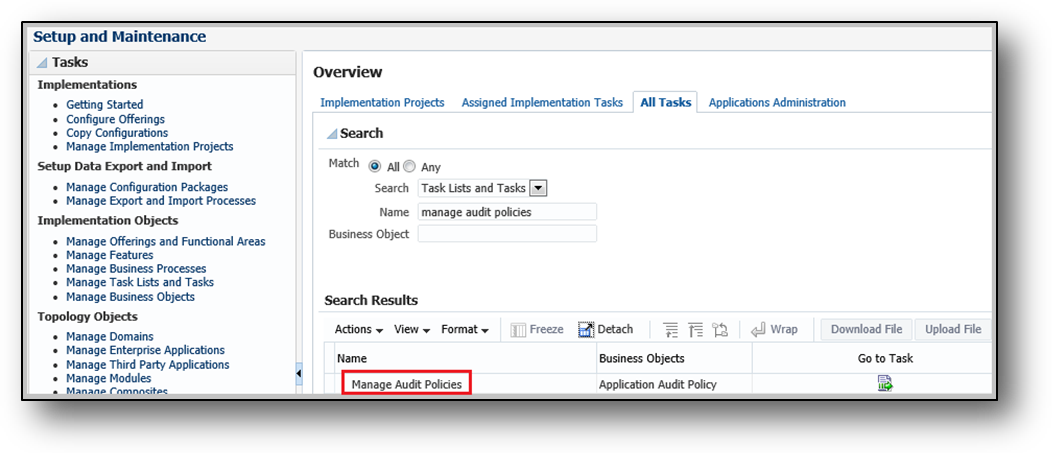
Manage Audit Policies Task
HCM Extracts Includes Absence Record Data and Accrual Balances
HCM Extracts now includes absence records, use of entitlements, and accrual plan balances. The user entities added to integrate absence records, entitlement information, and accruals with third-party service providers and payrolls are:
- PER_EXT_SEC_PERSON_UE
- ABS_EXT_ABSENCE_ENTRY_UE
- ABS_EXT_ACCRUAL_UE
Steps to Enable
There are no steps necessary to enable this feature.
Key Resources
For more information, go to Applications Help for the following topics:
- Extracting Absence Data Using HCM Extracts: Points to Consider
- Defining an Extract: Worked Example
Approval Framework Enhancements
To expand the capabilities for approval business rules, you now have an optional, configurable Additional Payload attribute field to help you configure the absence approval flow according to your organization needs. This allows more flexibility in routing approvals within your organization.
The absence approvals task also has two new delivered functions:
The GetManager function automatically approves an absence if the requestor has no manager assigned in the hierarchy. This function is applicable in cases when the employee is a CEO or head of an organization.
- The GetRepresentative function automatically approves an absence if the requestor has no HR Representative assigned in the hierarchy.
Steps to Enable
Users with the Administrator role can configure approval rules. To enable the Additional Payload attribute rule:
- Click Manage Absence Types in the Absence Administration work area.
- Click Display Features on the Create Absence Type page.
- Select Specified in the Additional Payload attribute row in the Approval and Processing Rules section.
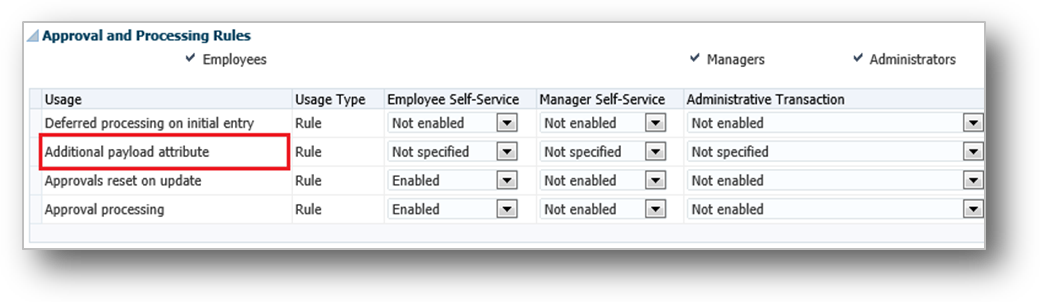
Additional Payload Attribute
Assignment Hours as Work Schedule Option
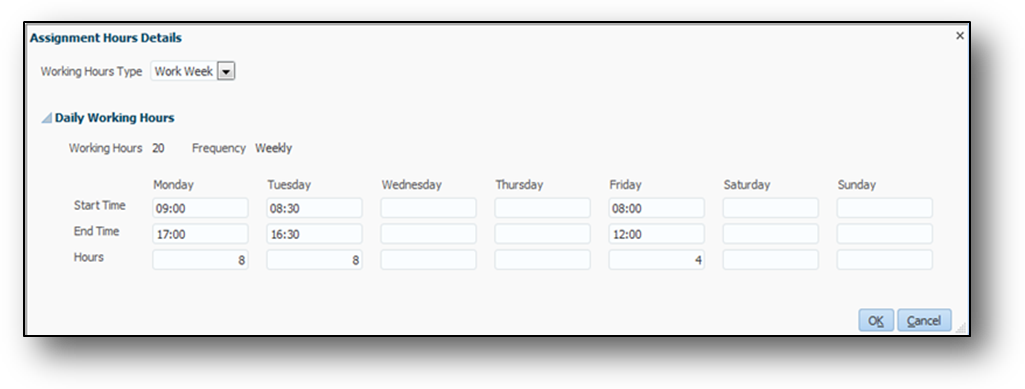
You can now specify a worker’s daily assignment hours where the start time, end time, and hours vary in the new Assignment Hours Details dialog box. Click the Assignment Hours Details button after the Working Hours field in assignment details to open the Assignment Hours Details dialog box. You can define the daily working hours for a worker. The availability calculation uses this work week schedule to calculate the worker’s availability by day.
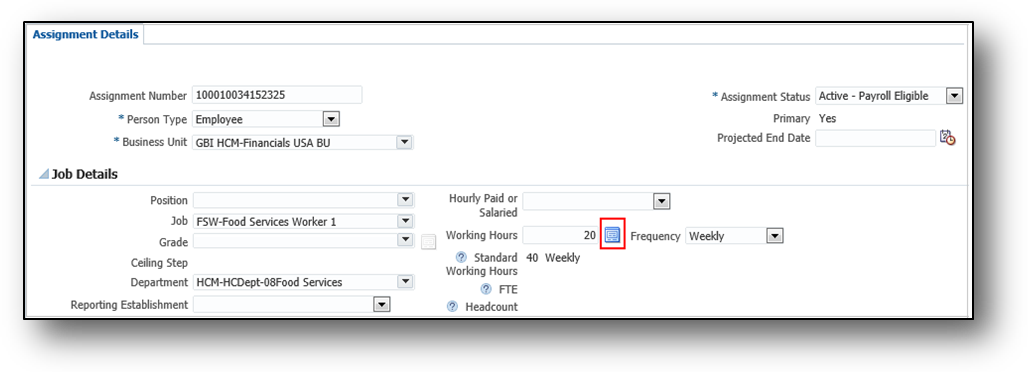
Assignment Details Page Showing the Assignment Hours Details Button after the Working Hours Field
Assignment Hours Details
In Absence Management, when a worker schedules an absence, the work schedule timings and number of hours for that particular day are reflected on the absence request page.
For Example: A worker’s assignment hours are from 08:00 to 12:00 every Friday. When you schedule an absence for the worker on a Friday, the availability calculation uses the worker’s start and end times to determine the worker’s availability by day. So the total absence time calculated for the worker is four hours.
This feature is available in Global Human Resources. When a worker schedules an absence in Absence Management, the application automatically calculates the worker’s absence hours based on the work schedule.
Steps to Enable
There are no steps necessary to enable this feature.
Schedule Half Days for Absences Measured in Calendar Days
You can now schedule a half day absence for absence types measured in calendar days.
To use this feature, when you schedule an absence, select the Advanced Mode.
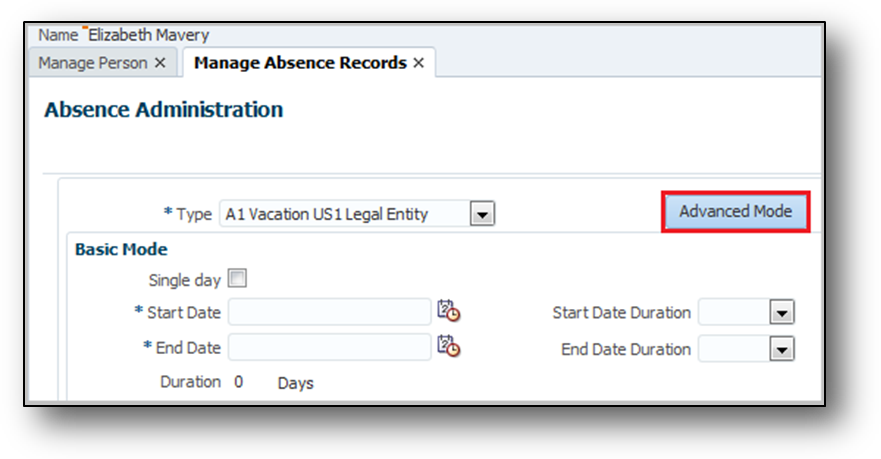
Select Advanced Mode on the Manage Absence Records Page to Schedule a Half Day Absence
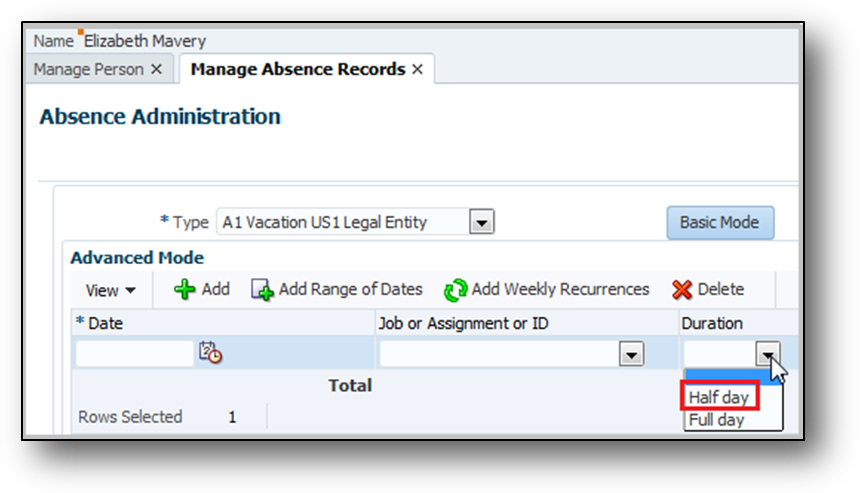
Select Half day in the Duration Field to Schedule a Half Day Absence
Steps to Enable
There are no steps necessary to enable this feature.
Override Payment Percentages for Calculated Entitlements
HR Specialists can now easily handle exception cases when processing employee leave transactions by changing the payment percentages for calculated qualified entitlements for a qualification absence.
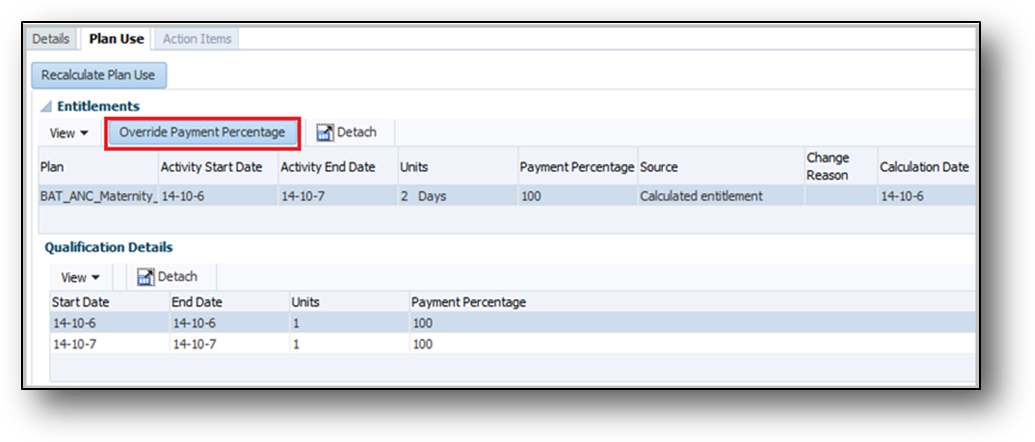
Select the Override Payment Percentage Button on the Plan Use Tab
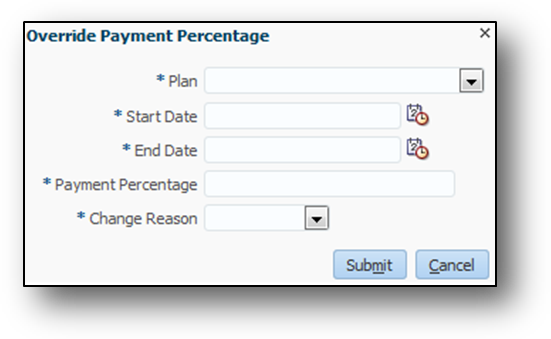
The Override Payment Percentage Dialog Box
Steps to Enable
There are no steps necessary to enable this feature.
Absence Records for Contingent Workers
Absence Management now supports absences for contingent workers. You can add the absences for contingent workers the same way as for employees and through the same user interfaces.
However, you may want to process your contingent worker absences differently from those of employees, and have separate absence types and absence plans for them. You can define the absence plans for contingent workers so that their absence information does not transfer to payroll for processing. Use eligibility profiles to restrict these Absence types for contingent workers.
Steps to Enable
There are no steps necessary to enable this feature.
Attachments for Absence Records
The Attachments feature enables an Administrator, Manager, or Employee to attach files when recording an absence. An employee may need to submit documents for absence requests where proof is required, such as medical certificates for an extended sick leave. Attachments include files and links.
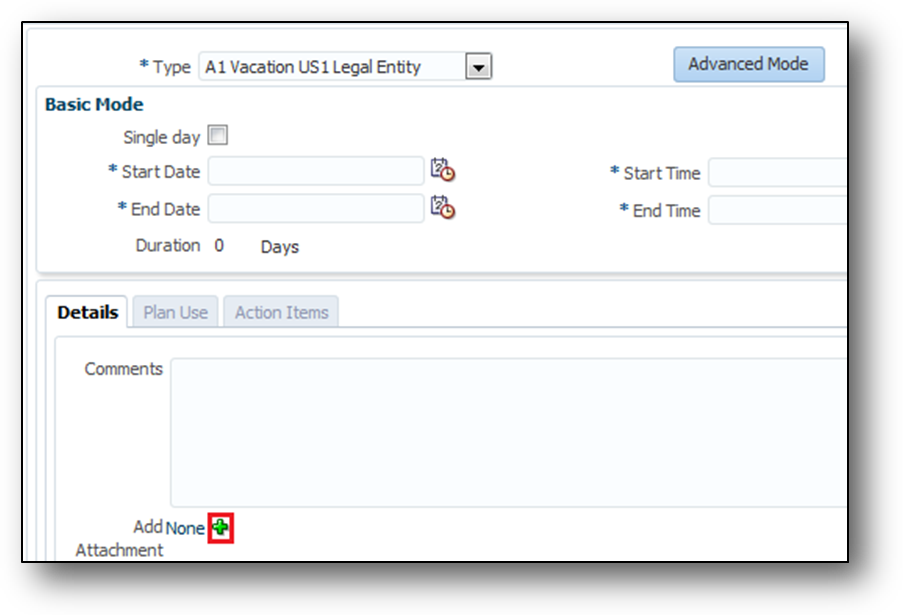
Select the Add Attachment Button on the Schedule Absences Page
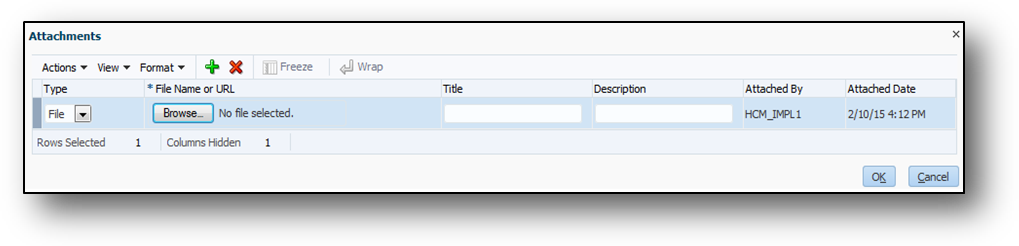
Attachments Dialog Box
Steps to Enable
To enable the attachments feature on the absence recording pages for an employee, manager, or administrator:
- Click Manage Absence Types in the Absence Administration work area.
- Click Display Features on the Create Absence Type page.
- Select Enabled in the Attachments row, in the Primary Absence Details section.
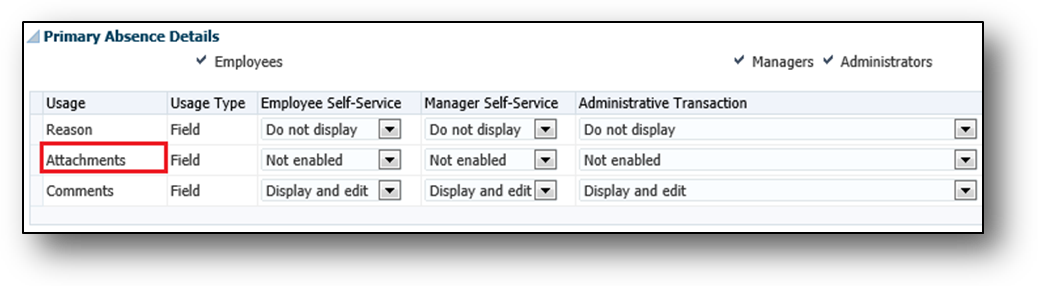
Attachments
Tips and Considerations
You can attach any number of files. However, the combined file size must not exceed the maximum limit of 2 MB for an absence record.
You can now view current, historic, and projected accrual details at different points in the worker's history.
To view accrued entitlements:
- In the Person Management work area, select the worker whose entitlements you want to view.
- Click Manage Absence Records to open the Manage Absences and Entitlements page.
- In the Plan Participation section Accrual Plans subsection, click the accrual plan for which you want to view details to open the Accrual Plan Balance dialog box.
- Change the Balance Calculation Date to view the details of current, past or future-dated absences. The details displayed in the Summary and Details tab change according to the selected date.

View Absence Details by Changing the Balance Calculation Date
There are no steps necessary to enable this feature.
Provide Additional Flexibility for Accrual Calculations
Using the Global Absence Accrual Matrix fast formula, you can now define the hours worked to determine the paid time eligible workers accrue over the course of an accrual term.
Steps to Enable
To enable the accrual rate, use the Accrual Formula choice list in the Create or Edit Absence Plan page, Accruals tab to associate the appropriate formula with the absence plan.

Example Accrual Formula that you can Associate with Accrual Absence Plans
Provide Rolling Forward Periods for Qualification Plans
Absence Management now provides the option to track plan entitlements under a rolling forward period definition. A rolling forward period calculates the start date from the first date a worker's absence begins and calculates the end date by adding the term duration to the start date.
For example, if the term duration is 365 days and the absence start date is 10 Feb, then the end date will be 09 Feb of the following year. The rolling forward option evaluates absences between this start date and end date to track plan entitlements for that period.
To use the rolling forward option:
- In the Absence Administration work area, click Manage Absence Plans to open the Manage Absence Plans page.
- On the Search Results section toolbar, click Create to open the Create Absence Plan dialog box.
- In the Plan Type field, select Qualification.
- Click Continue.
On the Create Absence Plan page Plan Attributes tab Plan Term section, select Rolling Forward as the type.

Rolling Forward Plan Term Type for Qualification Plans
New Attributes for Calculation of Qualified Entitlements
When creating a qualification plan, you can now use the absence type and absence reason attributes and reference them in matrix-based calculations of entitlements.
To use these attributes:
- In the Absence Administration work area, click Manage Absence Plans to open the Manage Absence Plans page.
- On the Search Results section toolbar, click Create to open the Create Absence Plan dialog box.
- In the Plan Type field, select Qualification.
- Click Continue.
- On the Create Absence Plan page Plan Attributes tab, enter the required fields.
- Select the Entitlements tab.
- In the Qualification Band Matrix section, click Add to enter a new row.
- Enter the Sequence.
- Click Expression Builder. The Expression Builder dialog box appears.
- Click Entities.
- Expand the Absence folder to select an attribute.
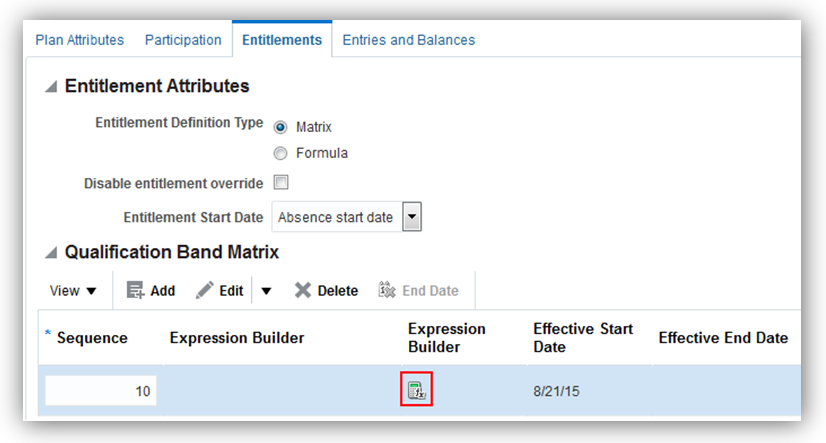
Expression Builder in the Qualification Band Matrix Section
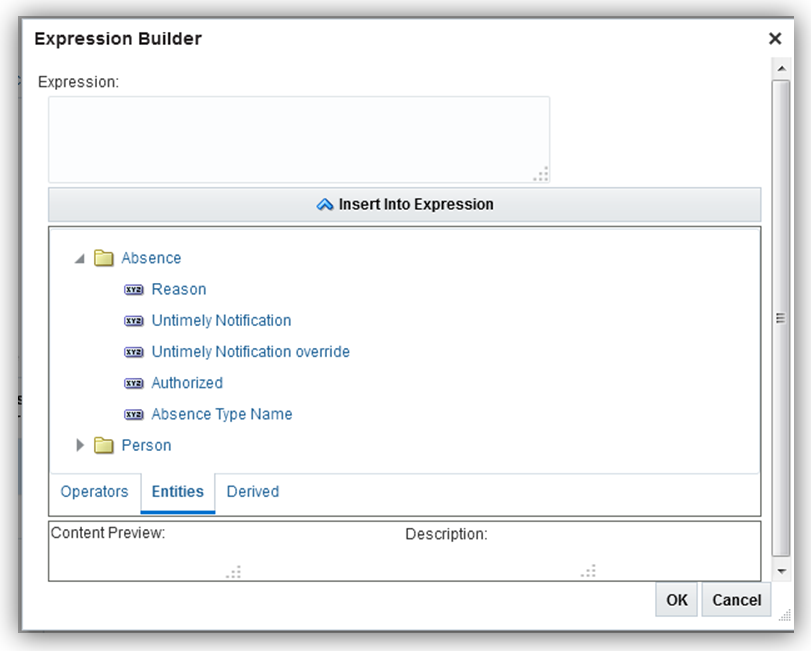
Select an Attribute from the Absence Folder
Steps to Enable
There are no steps necessary to enable this feature.
Configuration Option for Integration with Time and Labor
You can now enhance the performance of Absence Management by changing the default configuration for integration with the time repository. By default, the configuration option is enabled. However, you can now disable the option for customers who are not using Time and Labor.
To change the option, you can use the Integration to Time Repository option in the Manage Job Configuration page of the Absence Administration work area.
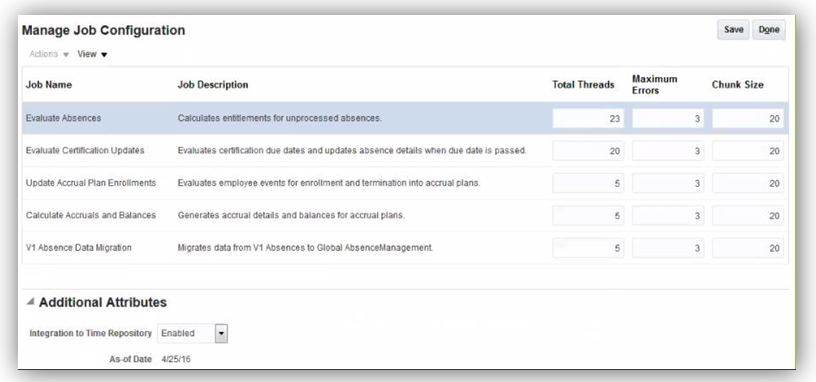
Configure Option for Integration with Time Repository
Improved Absence Certifications Process
In order to streamline the documentation aspect, you can now use the Documentation feature to track documentation related to a worker’s absence.
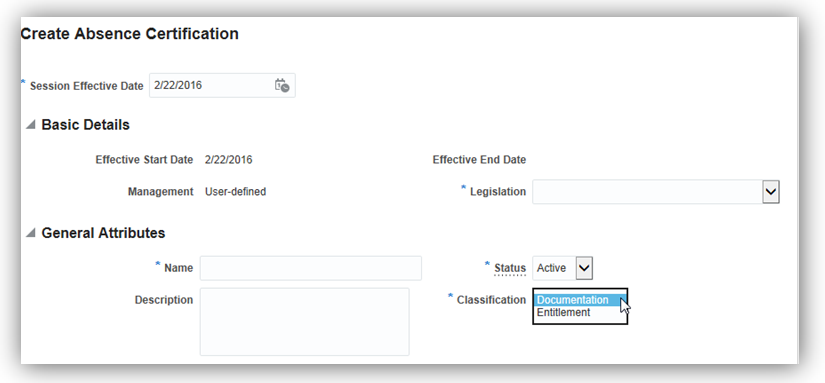
Documentation Feature
Steps to Enable
There are no steps necessary to enable this feature.
You can view a list of the employee’s available balances and planned absences for the different absence types. Employees can also request an absence from the different absence types and frequencies.
Steps to Enable
There are no steps necessary to enable this feature.
Oracle Fusion Benefits is a complete, configurable and flexible global solution that enables organizations to successfully evolve and adapt to the unique needs of their workforce. The solution enables setup of traditional 'one-size fits all' plans to highly complex plans that selectively target different workforce segments with different benefit packages. Self-service capabilities present the user with an out of the box intuitive guided enrollment process with contextual information and embedded analytics.
Control the rate start date based on the date of the first pay check on or after the enrollment start date without using a rate periodization formula.
You use the new Pay Period Start, Before First Check, on or After Coverage Start rule for plans with waiting periods or flexible spending accounts, for biweekly, weekly, or semi-monthly payroll participants.
You select the rule in the Coverage and Rate Date Ranges section of the Enrollment step in the Create or Edit Plan or Program page of the Plan Configuration work area.
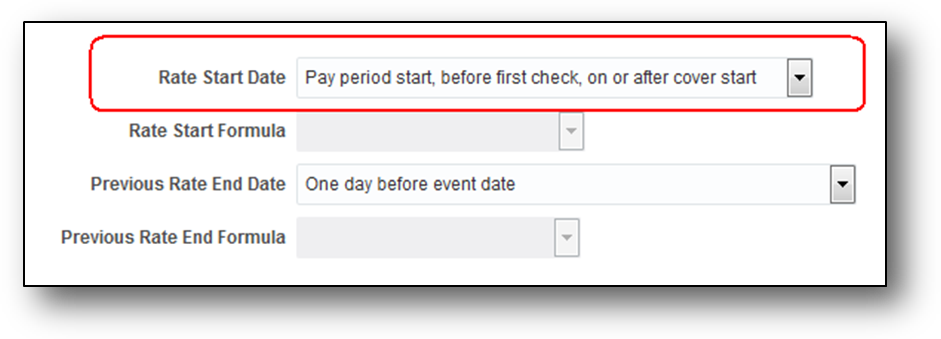
The Rate Start Date field in the Plan Configuration Work Area
For example, your enterprise enforces a waiting period of 30 days for enrolling new hires on biweekly payrolls into a flexible spending plan. You want the flexible spending account rate to start on the first day of the pay period that precedes the date of the first pay check on or after the enrollment start date.
You hire a worker on November 1, 2014. The worker makes elections on November 12, 2014. In this case, the enrollment start date is December 1, 2014. The first check date after the enrollment start date is December 13, 2014. If you use this date rule, the rate starts November 30, 2014, which is the start of the pay period, in time for the next check date on December 13, 2014.
Steps to Enable
There are no steps necessary to enable this feature.
Key Resources
For more information about the new rate start date rule, go to Applications Help for the following topic:
- Rate Start Date for Flexible Spending Account Plans: Critical Choices.
Extracting Benefits Data Using HCM Extracts
You now have an additional way of extracting benefits data. The existing Benefits Extract functionality produces an HR-XML standard formatted file of enrollment data for onward transmission to third-party benefits carriers. In addition to using the Benefits Extract for reporting purposes, you can also use the generic HCM Extracts functionality to extract benefits data using the available Benefits database items. Use HCM Extracts to create your own reports and extracts in different formats.
You create extracts using the Manage HCM Extracts page in the Data Exchange work area.
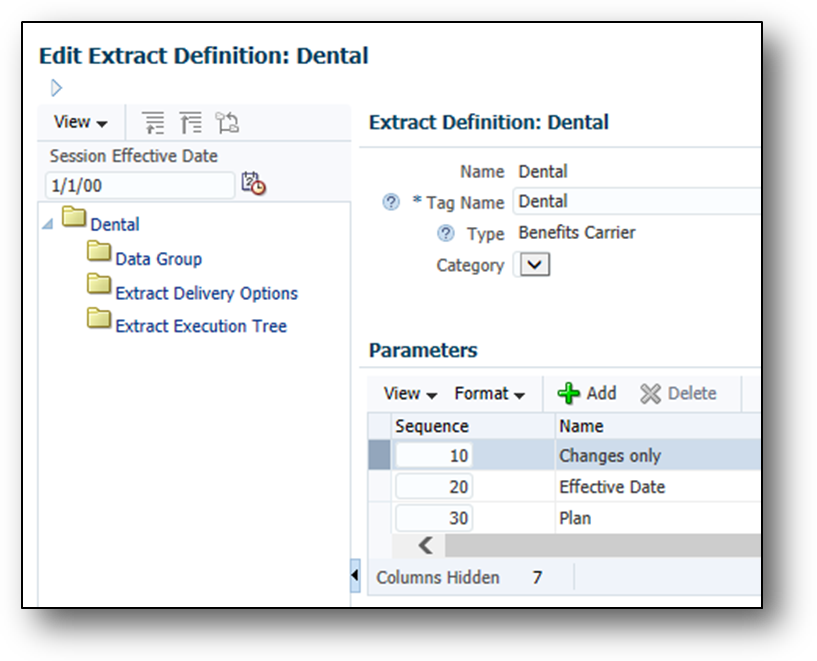
The Edit Extract Definition Page in the Data Exchange Work Area
Steps to Enable
There are no steps necessary to enable this feature.
Key Resources
For more information about extracting benefits data, go to Applications Help for the following topics:
- Extracting Benefits Data Using HCM Extracts: Points to Consider
- Defining an Extract: Worked Example
Check if your formula works as expected for a sample participant without any impact on existing data. Previously, a full-scale plan configuration was required before you could associate your formula with an appropriate object. Also, you had to necessarily use the participation evaluation process and enrollments to test the formula.
Now you can check to see if your formula works as expected even before you complete your plan configuration, thus reducing errors during implementation.
You test your formulas in the Formula tab of the Evaluation and Reporting work area.
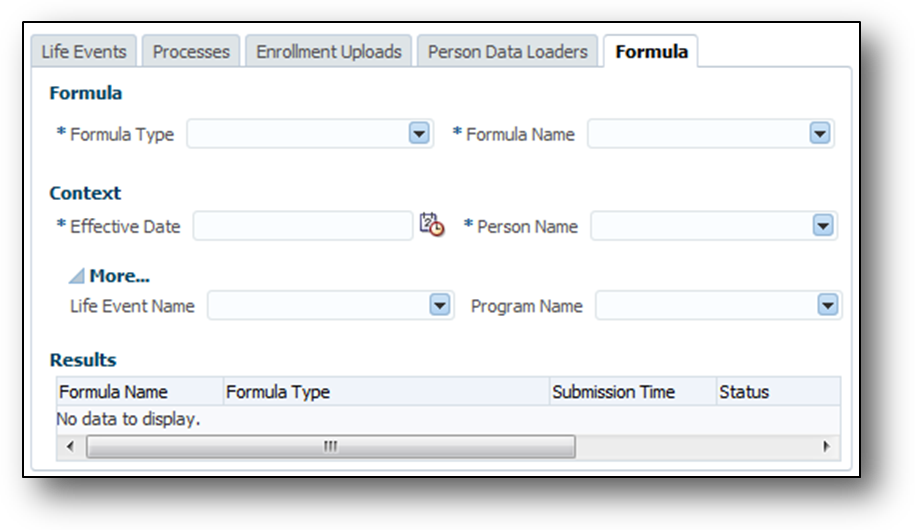
The Formula Tab in the Evaluation and Reporting Work Area
Steps to Enable
There are no steps necessary to enable this feature.
Key Resources
For more information about testing benefits formulas, go to Applications Help for the following topic:
- Benefits Formula Evaluation: Points to Consider
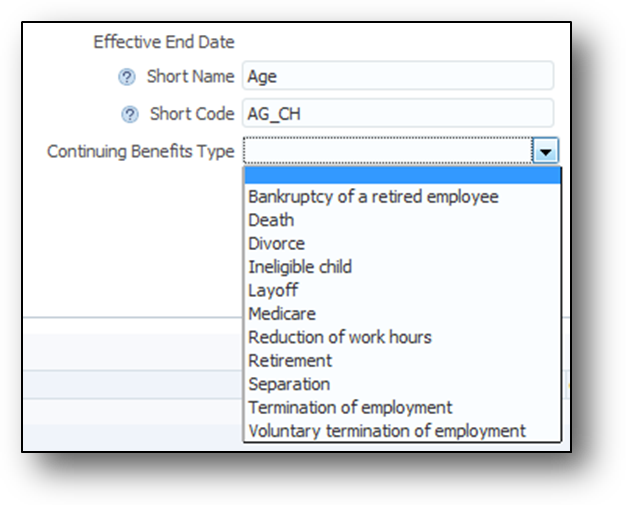
Report to benefits carriers when enrollments of a participant or dependent end. Some life events, such as termination, end the enrollment of compensation objects for participants or their dependents. When you define a life event, you can now specify to carriers about the existence of end-dated offerings and any associated dependents. You can comply with any reporting requirement associated with the continuation of benefits coverage to its next phase.
You specify the continuing benefits type in the Create or Edit Life Event page in the Plan Configuration work area.
Steps to Enable
There are no steps necessary to enable this feature.
Use the new rule to control which life events must close or remain in the Started status when you run the Close Enrollment process. You can now configure the process to either close life events irrespective of their enrollment period end date or close the events only if the enrollment period end date is met.
The Close Enrollment Rule list is available as part of the parameters page of the Close Enrollment process in the Evaluation and Reporting work area.
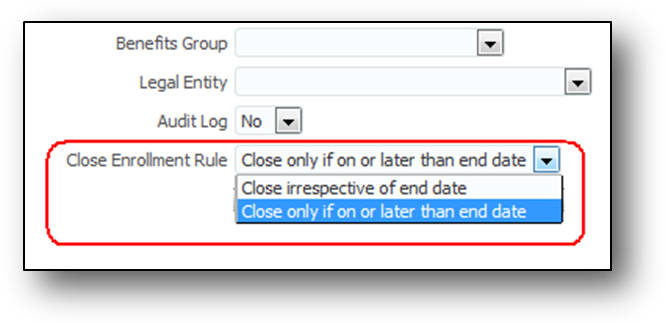
Close Enrollment Rule
Steps to Enable
There are no steps necessary to enable this feature.
Filter Data and Suppress Life Event Triggering
The following workbooks contain new attributes to enable you to filter data, if required:
- Upload Person Benefit Balances
- Upload Person Benefit Groups
The following table describes the new filters available in the workbooks:
| Workbook |
Newly Available Filters |
| Upload Person Benefit Balances |
Benefit Balance Legal Employer |
| Upload Person Benefit Groups |
Benefit Group |
Both workbooks now have an Event option that enables you to suppress triggering of life events during data upload, preventing timeout issues.
Select the following from the Event choice list:
- No to suppresses triggering of life events
- Yes to trigger life events on the participant's Person Life Events record
All the filters and the Event option are optional.
Access the workbooks from the Evaluation and Reporting work area, Person Data Loaders tab.
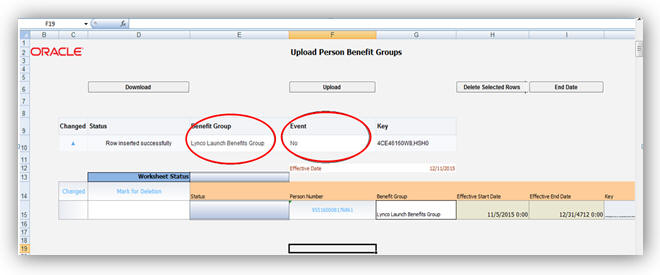
The Upload Person Benefits Group Workbook Showing Filters and Event Suppression

The Upload Person Benefits Balances Workbook Showing Filters and Event Suppression
Steps to Enable
There are no steps necessary to enable this feature.
End Date a Benefit Group for the Whole Batch
Use the new button on the Upload Person Benefit Groups workbook to end date a benefit group for the whole batch rather than end dating a benefit through the user interface, one employee at a time.
You access the workbook from the Evaluation and Reporting work area, Person Data Loaders tab, Upload Person Benefit Groups task.

The End Date button on Upload Person Benefit Groups Workbook
Steps to Enable
There are no steps necessary to enable this feature.
Compensation and Total Compensation Statement
Oracle Fusion Compensation enables your organization to plan, allocate, and communicate compensation using the most complete solution in the market. Make better business decisions using embedded analytics and a total compensation view of workers, regardless of geographic location or pay package components.
Workforce Compensation Supports Matrix Structures
A new task available in plan setup, called Configure Hierarchies, enables you to create up to three hierarchies for a single compensation plan to give multiple managers access to the same workers.
A hierarchy determines the workers that appear on each manager's worksheet. The source of these hierarchies can be the primary line manager hierarchy, another manager hierarchy, a formula, or a position or department tree.
The primary hierarchy, what we have today, determines the approval chain, the path that budgets roll down, and modeling usage.
The secondary and the review hierarchies enable other users to view compensation information for workers available to them, propose allocations, and save those allocations. The primary worksheet manager can either accept or overwrite those proposals.
For each hierarchy, you can configure how to handle a worker who does not have a manager and the default access level.
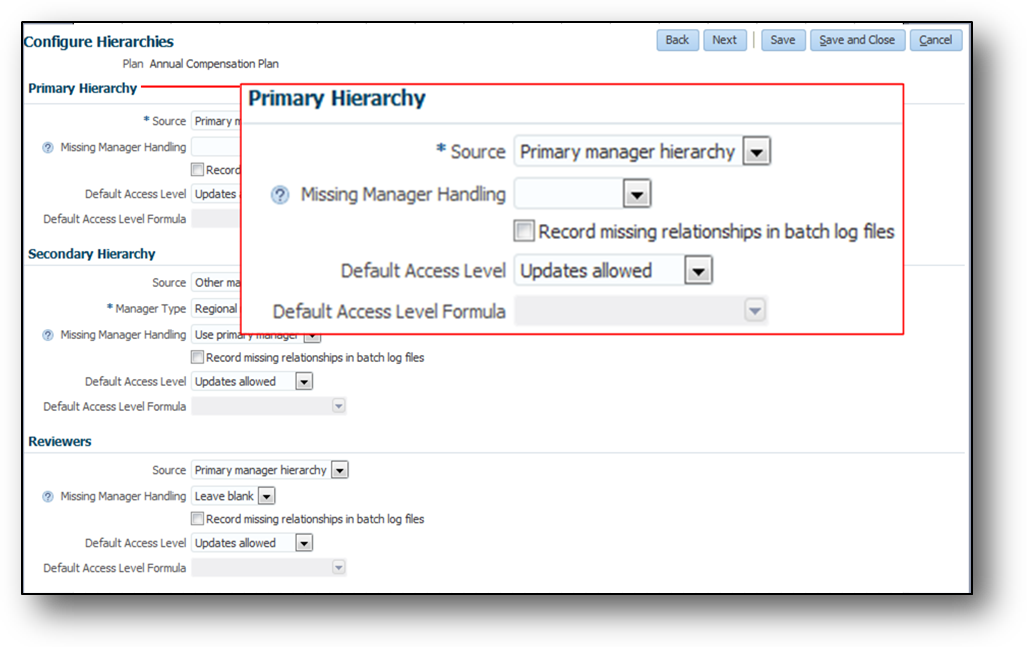
Configure Up to Three Hierarchies
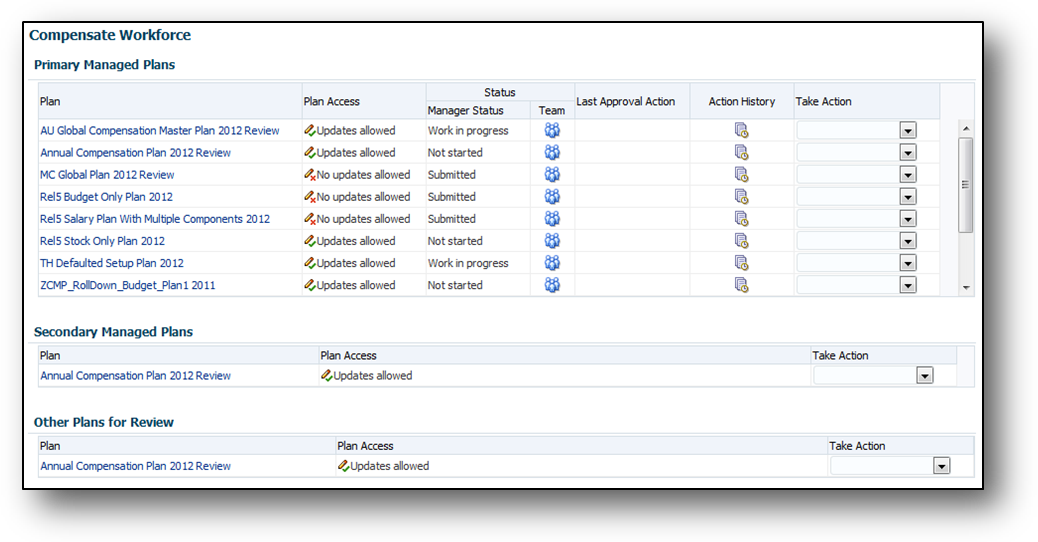
Managers See Plans for Which they have Access
If a manager doesn’t have a secondary managed plan or other plan to review, those regions don’t appear on the Compensation Plans page.
Global settings are also enhanced with new configuration options to control notifications when manually delegating workers.
Steps to Enable
Use the Configure Hierarchies task when you set up your workforce compensation plan.
Tips and Considerations
Examples are:
- Create a country-based primary hierarchy that enables country leaders to manage the budget, and a secondary hierarchy that allows line managers to manage the compensation for their organization.
- Give a dotted line manager access to a worker’s compensation if the worker completed a project for the manager.
Key Resources
For more information about matrix hierarchies, go to Applications Help for the following topics:
- Matrix Hierarchies: Explained
- Matrix Hierarchies: Points to Consider
- Notification Text: Explained
- Notifications: How They Work
Hide Ineligible Workers From Workforce Compensation Worksheet
You can now hide workers made ineligible manually or by the start or refresh processes when tracking ineligible workers.
Steps to Enable
Select the Hide ineligible workers on the worksheet check box when you configure plan eligibility.
Key Resources
For more information about hiding ineligible workers, go to Applications Help for the following topic:
- Ineligible Workers: Points to Consider
Prevent Worksheet Submission Using New Alert Type
You can enable managers to save their worksheets but not submit when they trigger a custom alert using a new alert type called Error preventing submit. Previously, managers could not save their worksheets if they triggered an error. Now, managers can save their work even though the worksheet contains this error.
Steps to Enable
Configure a custom alert using the new alert type, Error preventing submit, when you create or edit a workforce compensation plan.
Key Resources
For an example showing this feature, go to Applications Help for the following topic:
- Custom Alerts: Examples
Import Data Into External Data Tables
A new Manage External Data task in the Compensation work area enables you to import data from a third-party or legacy system using Oracle ADF Desktop Integration Add-in for Microsoft Excel. You can then use this data in a workforce compensation plan or display it in a total compensation statement.
To import data from an external source you:
Create different record types to identify the source or purpose of the data by configuring the lookup type CMP_EXTERNAL_DATA_RECORD_TYPE.
Configure the CMP_EXTERNAL_DATA_RECORD_TYPE
Use the Manage External Data page to open the spreadsheet template to populate your data and then import the data into the application.
Use the Manage External Data Page to Populate and Import your Data into the Application
To use the data in the total compensation statement or on the worksheet, you configure a compensation item to include in a total compensation statement, or the default values in the property settings for a worksheet column. You change the delivered column names by providing an Item Name or Display Name.
Select the Record Type and Column to Use as a Compensation Item in a Total Compensation Statement
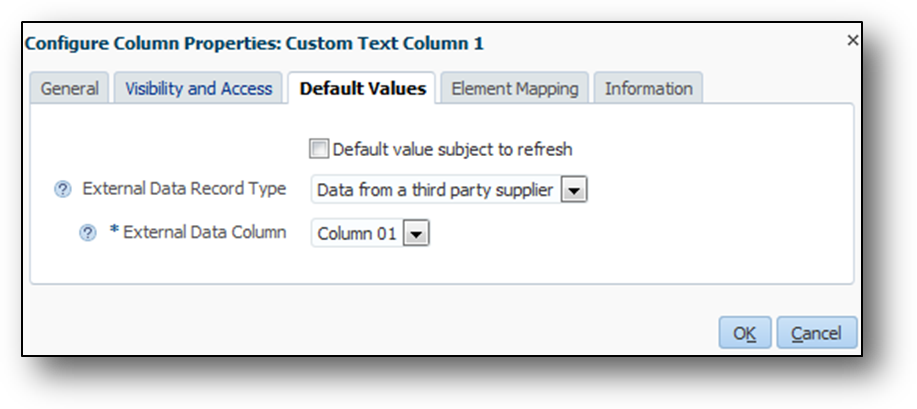
Select a Record Type and Column to Use as a Default Value in a Workforce Compensation Worksheet Column
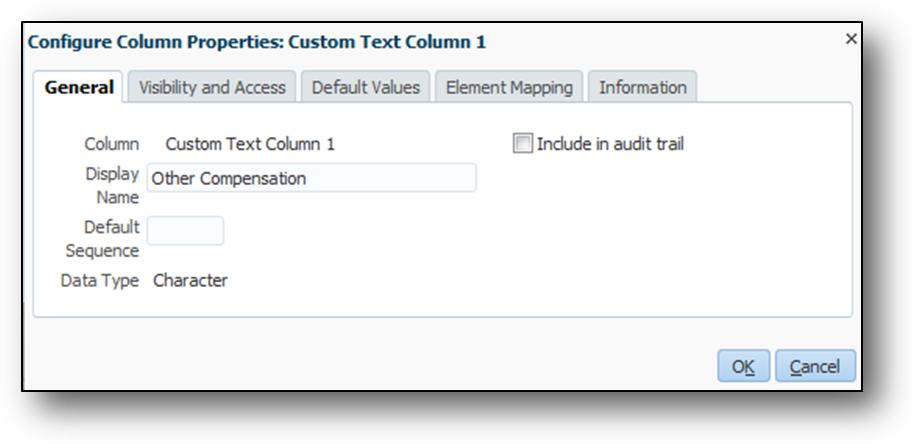
Change the Column Display Name
Steps to Enable
- Install Oracle ADF Desktop Integration for Excel on user’s desktops to import external data.
- To add External Data you can use one of the two options:
- Add External Data into Total Compensation Statement as an Item, and then finish the category and statement definition configuration.
- Add External Data into Workforce Compensation using a custom worksheet column, and then finish the plan configuration and start the compensation cycle.
- Use the external data to:
- Create a compensation item with External Data as the source and add the item to a category used in a total compensation statement.
- Configure External Data as the default value of a Workforce Compensation worksheet column.
Migrate Total Compensation Statement Using Functional Setup Manager
New services enable you to migrate total compensation statement definitions and all categories and items between environments.

Migrate Total Compensation Statements Using FSM
Steps to Enable
There are no steps necessary to enable this feature.
Enhanced Salary and Individual Compensation Approval Notifications
You can now add comments and attachments to salary and individual compensation approval notifications. Comments and attachments are available to all approvers. You can also configure salary and individual compensation approvals using the simplified HCM approvals page. The Manage Approval Transactions for Human Capital Management task is available from Functional Setup Manager.
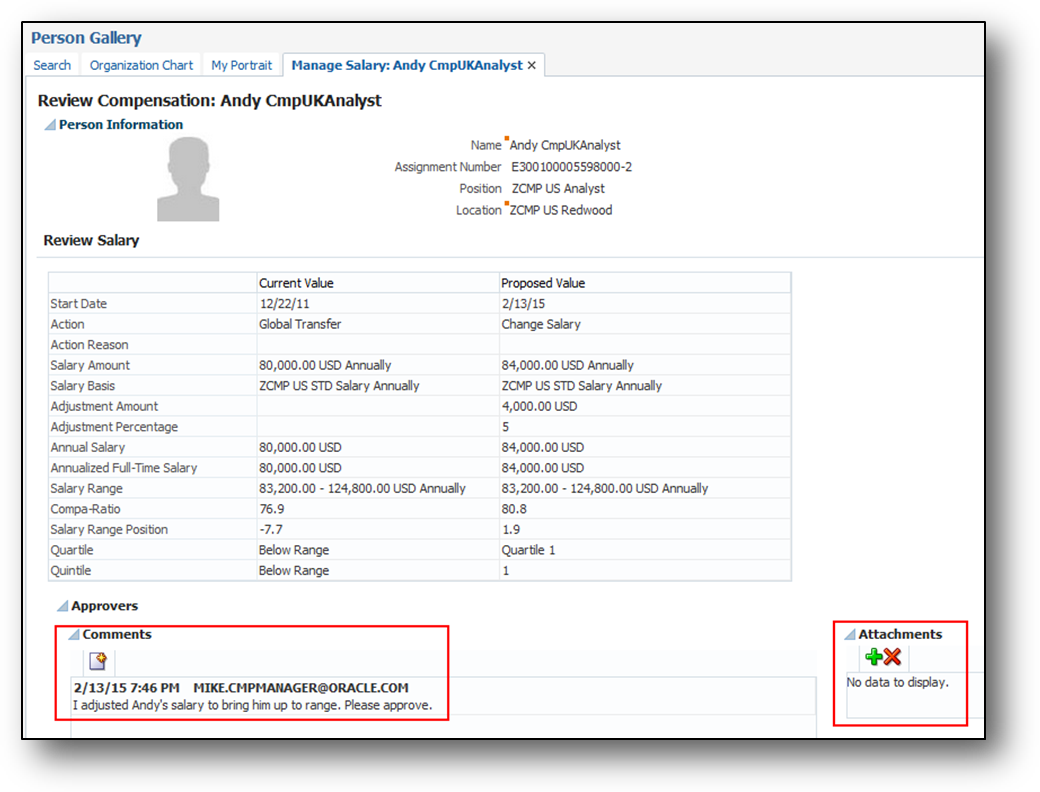
Add Comments and Attachments
You can still configure salary and individual compensation approvals from the BPM Worklist.
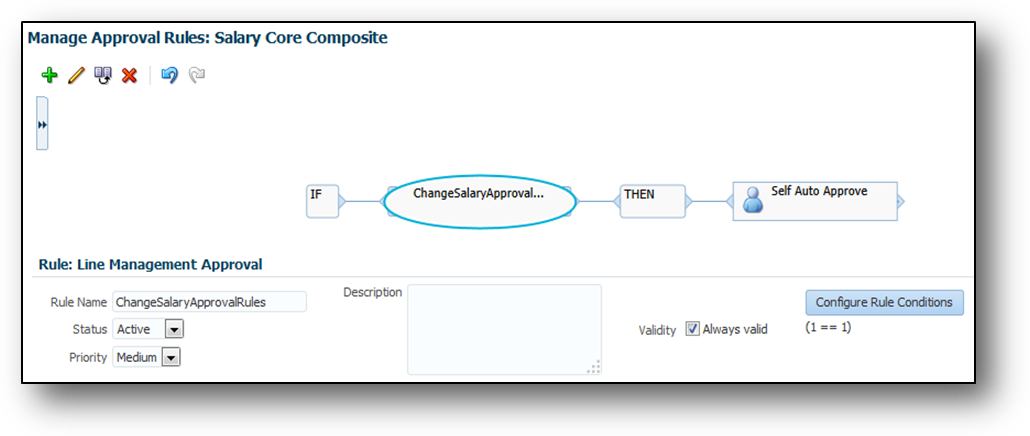
Configure and Edit Approval Rules for Salary
Configure and Edit Approval Rules for Individual Compensation
Steps to Enable
There are no steps necessary to enable this feature.
Convert Worker-Level Budget Amounts into Local Currency
Convert worker-level budget amounts easily into local currency using a dynamic calculation and new Currency Conversion Rate columns available for each component. Worker-level budgets are stored in corporate currency and sometimes must be converted to local currency for use in calculations.

Create Dynamic Calculation
Steps to Enable
There are no steps necessary to enable this feature. The Release Feature Summary action should be Automatically Available.
Competitions help managers engage their employees by providing an easy to use application to run competitions across their teams. Teams members competing with one another can easily see how they are doing real-time by viewing the competition leader board. Since competitions can be run on an individual or team basis, you get the added benefit of helping foster greater team building while focusing on business outcomes.
You can quickly see the latest status of any competition from the About Me by going to Competitions and My Competitions page in the simplified user interface.
My Competitions Page
Steps to Enable
There are no steps necessary to enable this feature.
The Competition Leader Board gives you a single place to see how you and other competitors are doing in the competition. The leader board also lets you drill into score details and add new scores.

Leader Board
Steps to Enable
There are no steps necessary to enable this feature.
Quick and Easy Competition Creation
Competition creation is now made quick and simple. Using the four-step wizard, you can easily create a competition by providing start and end dates, inviting participants, defining how you get points, and what the awards are.
Competitions Four Step Wizard
Steps to Enable
There are no steps necessary to enable this feature.
Both Competitors and Competition Owners can now easily access all competition details from a tab on the Leader board. Owners have the added ability to edit competition details as needed. Owners can even add new teams and users to the competition from this page, without going through the competition creation wizard.
Competition Details
Steps to Enable
There are no steps necessary to enable this feature.
Oracle Fusion Global Human Resources enables your organization to plan, manage and optimize all workforce segments using flexible and extensible best practices to realize extraordinary gains while ensuring compliance and increasing total workforce engagement.
Person Extra Information Effective Dating
The Extra Information tab in the Manage Person page is enhanced to provide date tracking capabilities. You can now update and correct, and store and retrieve date effective, extra information data for a person.
Steps to Enable
There are no steps necessary to enable this feature.
Worker Assignment Hours by Day of Week
You can now specify a worker’s daily assignment hours where the start time, end time, and hours vary by the day of the week. The availability calculation uses the work week schedule to calculate the worker’s availability by day.
The new Assignment Hours Details area is available as a pop-up window near the existing Working Hours field on the Hire, Manage Employment, and Create Work Relationship pages. Additionally, the Assignment Hours Details area is displayed in a separate region on the Change Working Hours transaction.
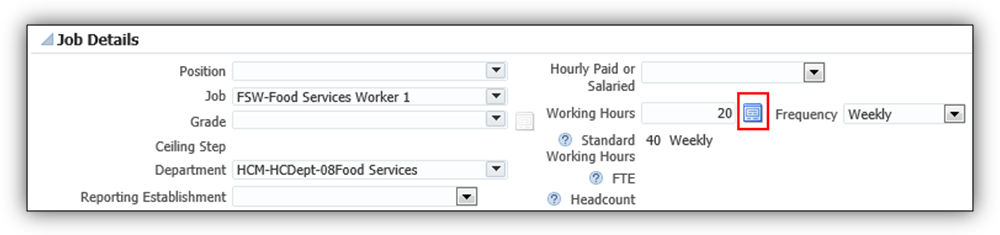
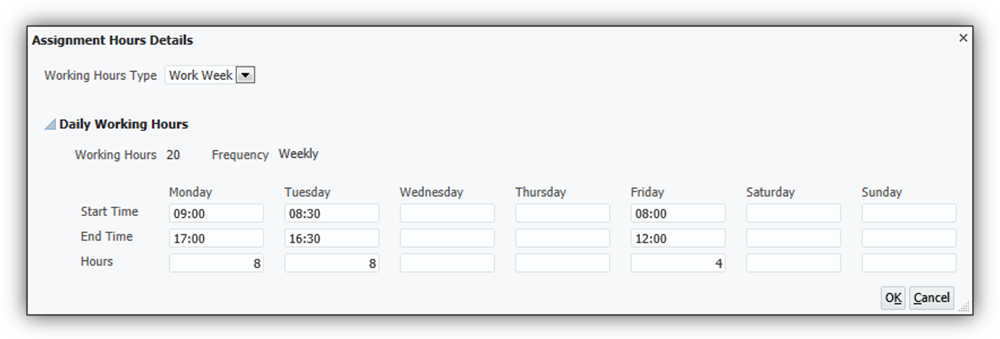
Steps to Enable
There are no steps necessary to enable this feature.
Position Management Enhancements - Defaulting of Additional Attributes From Position
Two new attributes are added to the Assignment page:
- Full Time or Part Time
- Regular or Temporary fields
The following assignment attributes are now derived from the position:
- Full Time or Part Time
- Regular or Temporary
- Line Manager
Steps to Enable
There are no steps necessary to enable this feature.
Position Management Enhancements - Position Sychronization
Position synchronization is inheritance of values in an assignment from the values specified in the associated position. Attributes that are configured to be synchronized will be displayed as read-only in the assignment and will inherit their values form the position.
Synchronized attributes which are blank at the position can be edited in the assignment.
If you allow override at the assignment, then an attribute “Synchronize from Position” is displayed in the Manage Employment page. If the Synchronize from Position attribute is set to Yes, then the assignment derives the values from the position.
If you update an existing position in the Manage Positions page and change any configured attribute, then all incumbents’ active assignments inherit that change.

Position Synchronization
Steps to Enable
As a Human Resources Administrator, you need to configure the attributes that you want to synchronize from position to the assignment, at the enterprise or legal employer levels.
You can also configure if the end-user can change the synchronized attributes in the assignment by selecting the Allow Override at Assignment check box in the Position Synchronization Configuration section.
Position Management Enhancements - Number of Incumbents
You can now control how many workers can be hired with the Number of Incumbents validation. This validation can prevent selecting a position in the assignment that does not have vacant Full Time Equivalents (FTEs) or headcount available. If overlap is not allowed at the position, then a warning is displayed if the open FTE or headcount is exceeded. If overlap is not allowed, you will not be able to continue unless you select a different position that has a vacant FTE or headcount.
Steps to Enable
The validation on the number of incumbents is available out of the box for new customers.
Upgrading customers must enable it to use the new validation. To enable the validation:
- Add the predefined organization information extensible flexfield “Position Incumbent Validation" to the Manage Enterprise page.
- Select the Apply Incumbent Validation attribute in the Position Incumbent Validation section in the Edit Enterprise page.
Ability to Add Transaction Initiator as a Checklist Task Performer
Tasks on a checklist can be assigned to performers either individually or through roles. The tasks can now be assigned to the person who initiated the transaction.
Task Creation
Steps to Enable
There are no steps necessary to enable this feature.
Access Person Information While Working on a Checklist Task
The performer or the owner can view the basic details of the person for whom the task is being performed, on a checklist task notification. Performers or owner can click the Person Contextual Action (PCA) icon to view additional details about the person including department and location.
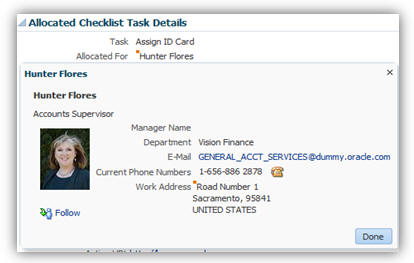
Person Basic Details
Steps to Enable
There are no steps necessary to enable this feature.
Manage Delay Duration of a Checklist Task
While defining tasks, you can set a delay duration that is used for calculating the planned start and end dates. The planned dates are calculated by adding the delay duration to the allocation date. Tasks get assigned on the allocation date, but tasks which have delay duration specified will have the planned dates reflecting the delay.
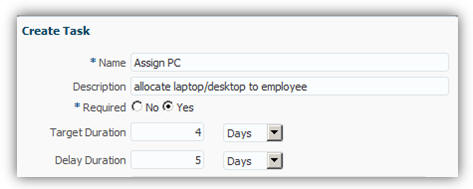
How to Create Delays When Creating Tasks
Steps to Enable
There are no steps necessary to enable this feature.
Restrict Checklist Template to a Localization
As a Human Resources Specialist or a Line Manager, you can choose a template that is applicable to all countries or a specific localization to assign to an employee. You can select the localization when you create a checklist template.
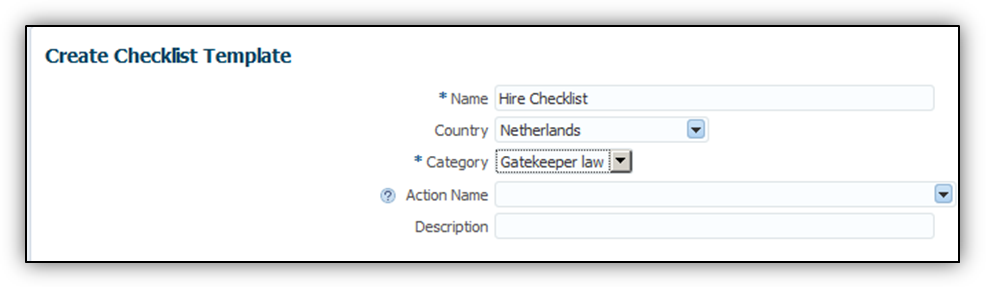
Checklist Template Creation
Steps to Enable
There are no steps necessary to enable this feature.
Ability to Update Actual Start and End Dates from the Notification
You can also modify the default actual start and end dates in a checklist task notification. The task actual dates get updated accordingly in the checklist.
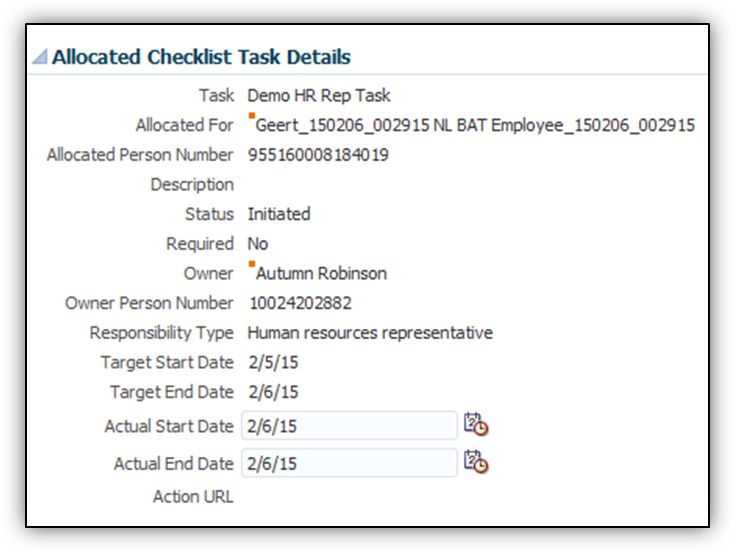
Start and End Dates Entry
Steps to Enable
There are no steps necessary to enable this feature.
Ability to Define Collective Agreements for Workers
You can now define collective agreements and link persons to collective agreements.
You can manage collective agreements by accessing the Manage Collective Agreements task from the Workforce Structures or Setup and Maintenance work area.
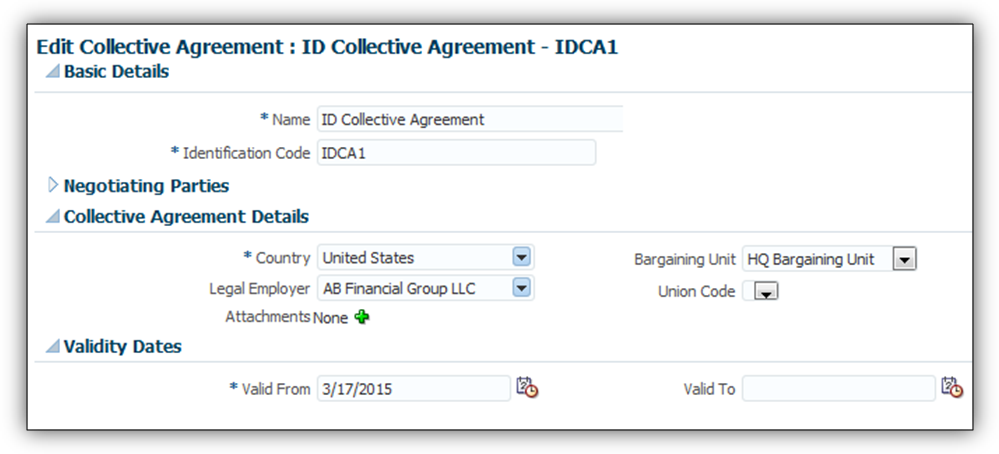
Manage Collective Agreements
You can link a person’s assignment or employment terms to a collective agreement by using the Add Person, Create Work Relationship, or Manage Employment user interfaces.
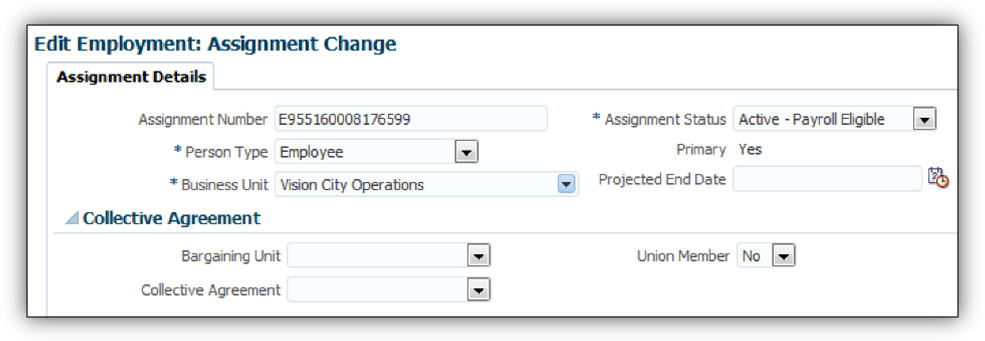
Link Collective Agreements
Steps to Enable
There are no steps necessary to enable this feature.
Ability to Define Seniority Dates
You can now define seniority dates and configure the rules for creating and defaulting seniority dates.
You can set up seniority dates at the person, work relationship, and assignment levels.
You can configure whether the user can override automatic defaulting of the seniority date by accessing the Configure Seniority Dates task from the Setup and Maintenance work area.
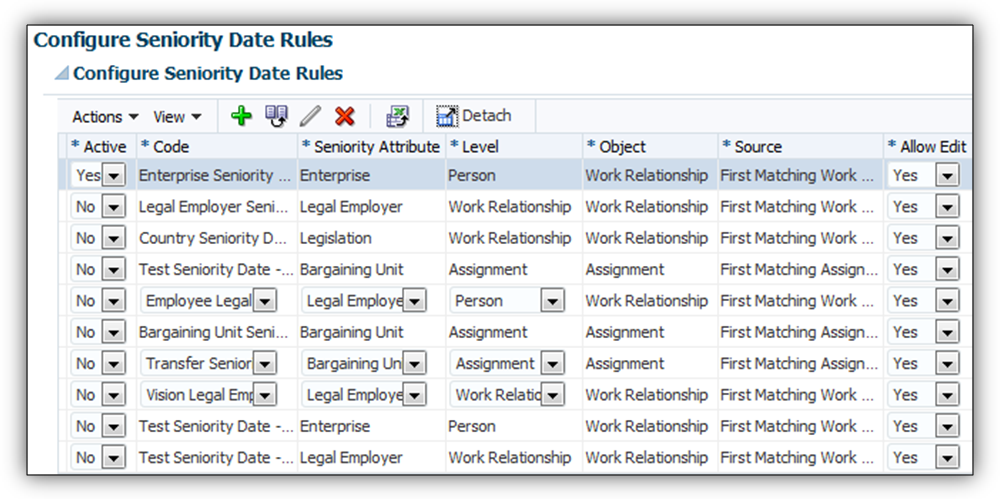
Configure Seniority Dates
You can view and edit the seniority dates of a person at different levels by using the Manage Seniority Dates user interface in the Person Management work area, provided the configuration allows you to.
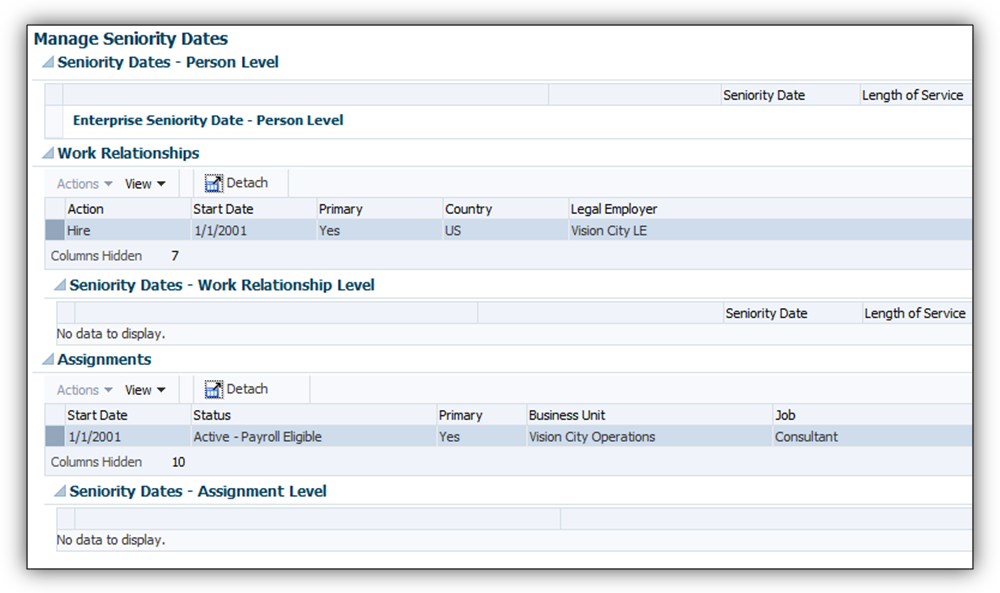
View and Edit Seniority Dates
Steps to Enable
To access the Manage Seniority Dates user interface, you must set up at least one seniority date rule in the Configure Seniority Dates task.
Enhancements for Global Transfer
In a global transfer and global temporary assignment, you can now copy assignment information from the previous primary assignment.
In a global temporary assignment, you can now decide to make the new work relationship primary.
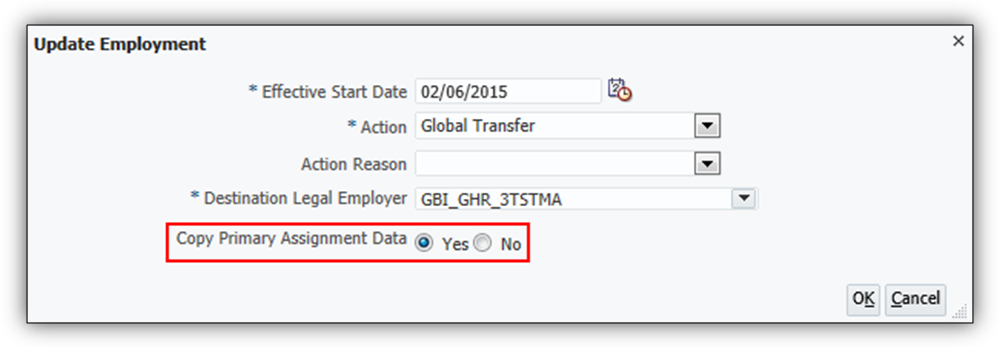
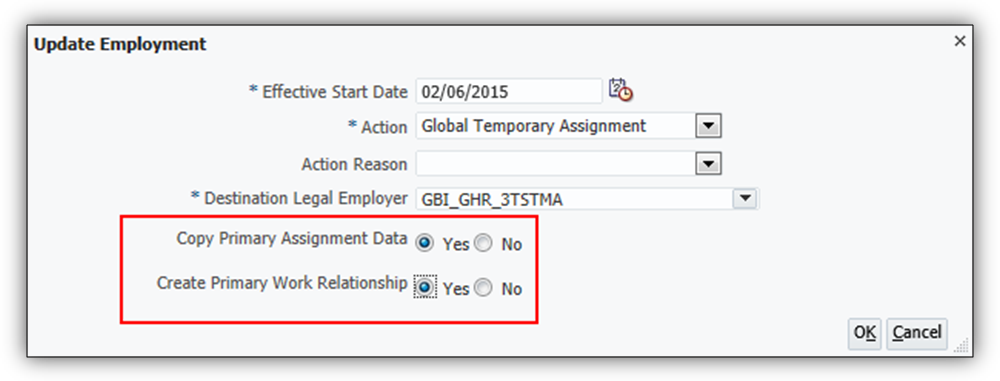
Steps to Enable
There are no steps necessary to enable this feature.
Approval Notification Personalization
As a Human Resources (HR) Administrator, you can now personalize HCM approval notifications.
Personalizing Approval Notifications
Using the Oracle Page Composer, you can selectively show and hide various components of the notification, including fields, labels and regions.
Display Options
You can edit labels, color, and the page layout.
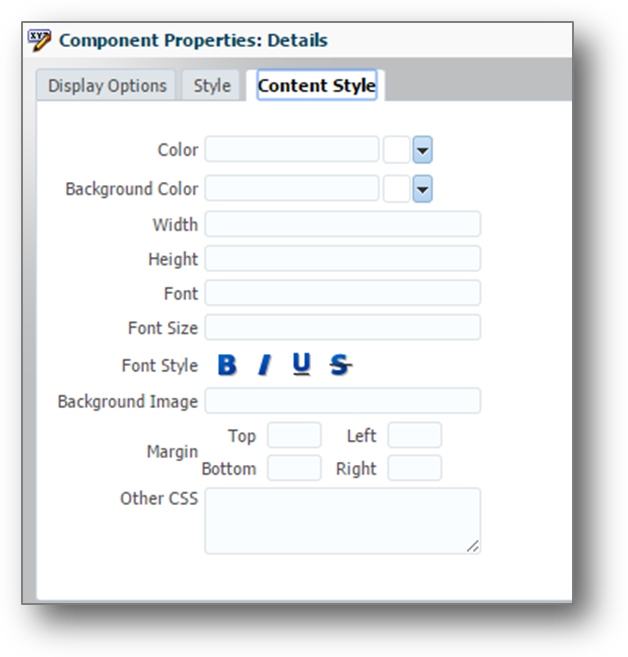
Content Style Options
You can also add custom text and external links to the page. This table shows Work Structures approval transactions that are available to personalize.
| Creates |
Updates |
Deletes |
|---|---|---|
| Create Grade |
Update Grade |
Delete Grade |
| Create Grade Ladders |
Update Grade Ladders |
Delete Grade Ladders |
| Create Grade Rate |
Update Grade Rate |
Delete Grade Rate |
| Create Job |
Update Job |
Delete Job |
| Create Job Family |
Update Job Family |
|
| Create Positions |
Update Positions |
Delete Positions |
| Create Organization |
Update Organization |
|
| Create Location |
Update Location |
Delete Location |
This table shows HR approval transactions that are available to personalize.
| HR Approval Transactions |
||
| Add Contingent Worker |
Add New Person |
Add Non Worker |
| Add Pending Worker |
Add Work Relationship |
Manage Employment |
| Promotions |
Transfer |
Create New Assignment |
| Create New Contract |
Manage Directs |
Change Location |
| Change Manager |
Change Work Schedule |
Termination |
| Manage Work Relationship |
||
Steps to Enable
There are no steps necessary to enable this feature.
Add Comments and Attachments When Submitting a Transaction for Approval
As the initiator of a transaction, you can now add comments and attachments when submitting the transaction for approval. You can provide relevant information, instructions, and related documents, along with the transaction to enable subsequent approvers to make informed decisions related to the approval.
Comment and Attachment Example
This table shows Work Structures approval transactions that are available to add attachments and comments.
| Creates |
Updates |
Deletes |
| Create Grade |
Update Grade |
Delete Grade |
| Create Grade Ladders |
Update Grade Ladders |
Delete Grade Ladders |
| Create Grade Rate |
Update Grade Rate |
Delete Grade Rate |
| Create Job |
Update Job |
Delete Job |
| Create Job Family |
Update Job Family |
|
| Create Positions |
Update Positions |
Delete Positions |
| Create Organization |
Update Organization |
|
| Create Location |
Update Location |
Delete Location |
This table shows HR approval transactions that are available to add attachments and comments.
| HR Approval Transactions |
||
|---|---|---|
| Add Contingent Worker |
Add New Person |
Add Non Worker |
| Add Pending Worker |
Add Work Relationship |
Manage Employment |
| Promotions |
Transfer |
Create New Assignment |
| Create New Contract |
Manage Directs |
Change Location |
| Change Manager |
Change Work Schedule |
Termination |
| Manage Work Relationship |
Cancel Work Relationship |
|
Steps to Enable
There are no steps necessary to enable this feature.
Audit of HCM Data Roles and Security Profiles
Oracle Fusion Applications supports the audit of changes to various business objects. You can now use this functionality to track and audit changes to HCM data roles and security profiles. Once audit is configured for these business objects, a user with the Internal Auditor job role can review any changes, identify who made them, and see when they were made in the Audit Reports work area.
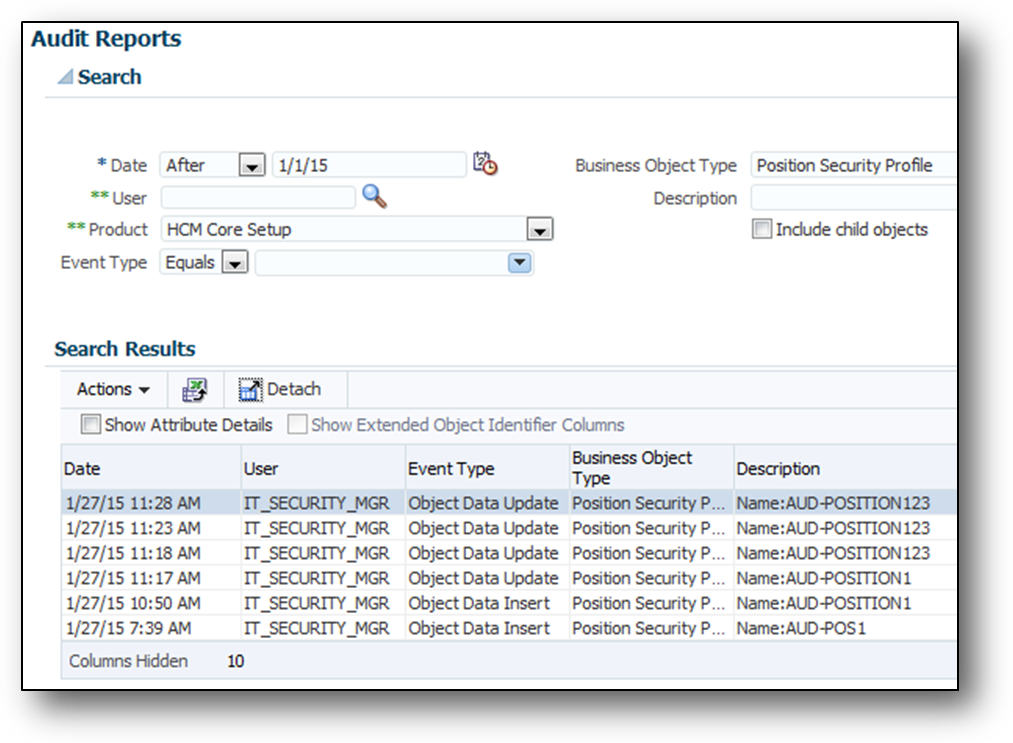
Reviewing Changes to HCM Security Profiles in the Audit Reports Work Area
Steps to Enable
By default, changes to HCM data roles and security profiles aren’t tracked. To enable tracking and subsequent audit:
- Sign in as the Application Implementation Consultant.
- Select Setup and Maintenance from the home page.
- Search for and select the Manage Audit Policies task.
- Click Configure Business Object Attributes in the Oracle Fusion Applications section on the Manage Audit Policies page.
- Set Application to HCM Core Setup on the Configure Business Object Attributes page.
- Select an object in the Audit column of the table of business objects that appears. For example, select Person Security Profile or Data Role. The Audited Attributes section of the page shows any attributes that will be audited for the selected object.
- Click Create to update the list of attributes when the Select and Add Audited Attributes dialog box opens.
- Select an attribute for audit and move it to the Selected Attributes section in the Available Attributes section.
- Click OK to close the dialog box.
- Click Save and Close.
- Set Audit Level to Auditing in the Oracle Fusion Applications section on the Manage Audit Policies page.
- Click Save and Close.
Tips and Considerations
To turn off all auditing for Oracle Fusion Applications, set Audit Level to None in the Oracle Fusion Applications section of the Manage Audit Policies page.
Future Dated Positions and Organizations
Organization security profiles include a new option, Include future organizations. Position security profiles include a new option, Include future positions. These options, which are deselected by default, control whether users can access future-dated objects that satisfy all other criteria in the security profile.
For example, if you create an organization security profile to include all enterprise departments, then users can’t access departments with future start dates unless you select Include future organizations.
Option to Include Future Organizations in an Organization Security Profile

Option to Include Future Positions in a Position Security Profile
Steps to Enable
There are no steps necessary to enable this feature.
Tips and Considerations
By default, future-dated organizations and positions aren’t included in existing organization and position security profiles. If appropriate, you can update existing organization and position security profiles to include future-dated organizations and positions.
Shared Person Information in Person Security Profiles
Until now, any person information that was shared with the signed-in user was included unconditionally in person security profile data instance sets. Having to include this information was causing performance problems, even though the Information Sharing feature isn’t widely used. Therefore, it’s been decided to make the inclusion of shared information optional. On the Create Person Security Profile and Edit Person Security Profile pages, you now see the Include shared people information option, which is deselected by default. If you want to include shared information in the security profile data instance set, then you must select this option.
Option to Include Shared Person Information on the Create Person Security Profile Page
Steps to Enable
There are no steps necessary to enable this feature.
Tips and Considerations
By default, shared person information is still included in existing person security profiles unless Access to Own Record is the only other criterion in the security profile. If appropriate, you can update existing security profiles to deselect Include shared people information.
Autoprovisioning for the Enterprise
The Apply Autoprovisioning button, which updates autoprovisioning for the enterprise, has been removed from the Create Role Mapping and Edit Role Mapping pages. Having this button available in role mappings was causing performance problems, as users were applying autoprovisioning repeatedly and generating large volumes of provisioning requests. Instead, you’re recommended to run the Autoprovision Roles for All Users process after creating or editing role mappings and after loading person records in bulk.
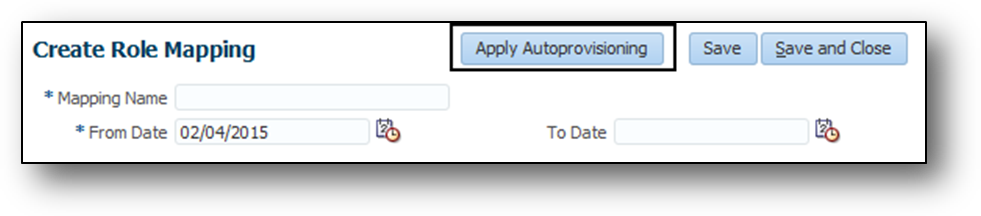
The Apply Autoprovisioning Button is removed from Create Role Mapping and Edit Role Mapping Pages
Steps to Enable
There are no steps necessary to enable this feature.
Tips and Considerations
Users who have the Application Implementation Consultant or IT Security Manager job role can run Autoprovision Roles for All Users.
New Approval Rule for Simplified User Interface Personal Information
You can now approve certain changed details in the Personal Information simplified user interface with a new approval rule, called Personal Information. The new rule enables approvals to be applied when personal information, such as name details, contacts, passports and so on are changed. The approval rule is modified using the Manage Approval Transactions for Human Capital Management task in the Setup and Maintenance work area.
Steps to Enable
There are no steps necessary to enable this feature.
Worker View of Employment Information in Simplified User Interface
Provide workers a complete view of their employment information. Workers can now view their work relationship, contract and assignment details, and flexfields on the new Employment Details tab in the Personal Information work area. Additionally, workers can view their employment history on a timeline for employment related events, such as promotion and manager change.
The employment information includes the following:
- Work Relationship: Legal Employer, Hire Date, and others
- Assignment: Job, Grade, Business Unit, and others
- Flexfields: Work Relationship (PER_PPS_DF), Contract (PER_CONTRACT_DF), Assignment (PER_ASG_DF), Legislative Assignment (PER_ASG_LEG_DDF), People Group Flexfield (PPG), Contract Legislative Information (PER_CONTRACT_LEG_DDF), and Work Relationship Legislative Information (PER_PPS_LEG_DDF)
- Employment History: A new region displays the employment history on a timeline for employment related events, such as promotion and manager change. This information can be viewed in graphical and tabular formats.
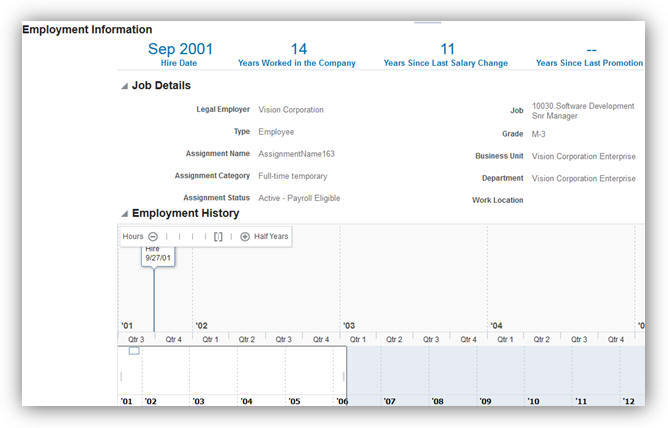
Employment Information for Workers
The Employment Details tab is hidden out of the box. To enable this feature, you must configure the visible property of the tab to 'Yes' using the Structures setup page in the Tools work area.
For a worker having multiple assignments or work relationships, only the primary assignment details from the primary work relationship is displayed on the Employment Details tab.
ROLE INFORMATION
If you are not using the predefined reference roles, then you need to ensure that the below security privileges are mapped to the relevant abstract or job roles. This table identifies the required security privileges and suggests target job and abstract roles. You can add the security privileges to different roles if you prefer.
See the Upgrade Guide for Oracle HCM Cloud Applications Security (My Oracle Support document ID 2023523.1) for instructions on implementing new features in existing roles.
| Aggregate Privilege Name and Code |
Abstract Role |
| View Employment Information Summary ORA_PER_VIEW_EMPLOYMENT_INFORMATION_SUMMARY |
Employee Contingent Worker |
Automated Reassigning of Pending Approvals and Correcting Invalid Supervisor Assignments
You can reassign pending approvals and correct invalid supervisory assignments of terminated or globally transferred managers by scheduling the Run Reassign Pending Approvals for Terminations and Correct Invalid Supervisor Assignments Process. This process reassigns all unassigned reports to the manager’s manager.
Steps to Enable
There are no steps needed to enable the feature. The human resource specialist can schedule this process to run periodically or on an ad-hoc basis.
Key Resources
For more information, go to Applications Help for the following topic:
- Pending Approvals and Invalid Supervisor Assignments: Explained
Directory Management – Incremental Refresh of Manager Hierarchy
In addition to performing full refreshes of the manager hierarchy, you can now perform incremental refreshes, refreshing the hierarchy based on supervisor changes occurring in the previous N days.
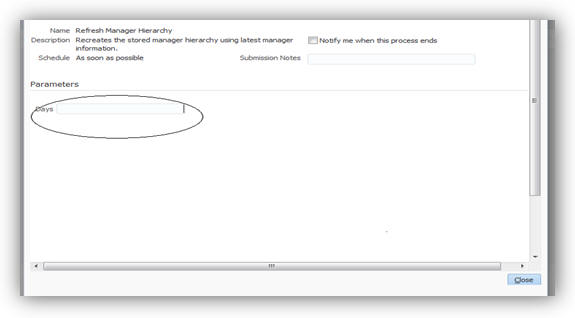
Days for Incremental Refreshes
Steps to Enable
There are no steps necessary to enable this feature.
Tips and Considerations
Schedule a full refresh every month or quarter and also schedule an incremental refresh every day or week.
New Profile Option to Cache Person Images
Enhance the performance of pages that display person images (for example, organization chart) by caching person images. To enable browsers to store person images, create the PER_IMAGE_ENABLE_CACHING profile option. You must create the profile option and set the value to Y at the site level.
Steps to Enable
To enable caching, you must create the profile option and set the value to Y at the site level.
To create the profile option:
- Search for and select the Manage Profile Options task in the Setup and Maintenance page.
- Click the New icon, in the Manage Profile Options page.
- Enter the following details.
- Enter the start date.
- Click Save and Close.
- Enter PER_IMAGE_ENABLE_CACHING as the Profile Option Code, In the Manage Profile Options page and then click Search.
- Select the Enabled and Updateable check boxes at the Site level In the PER_IMAGE_ENABLE_CACHING on the Profile Option Levels section.
- Click Save and Close.
| Field |
Value |
| Profile Option Code |
PER_IMAGE_ENABLE_CACHING |
| Profile Display Name |
Per Image Enable Caching |
| Application |
Global Human Resources |
| Module |
Global Human Resources |

Create the Profile Option

Enable the Profile Option at the Site Level
To set the value for the profile option:
- Search for and select the Manage Administrator Profile Values task in the Setup and Maintenance page.
- Enter PER_IMAGE_ENABLE_CACHING as the profile option code and click Search.
- In the PER_IMAGE_ENABLE_CACHING: Profile Option Values section, select Site from the Profile Level choice list.
- Enter Y as the profile value.
- Click Save and Close.
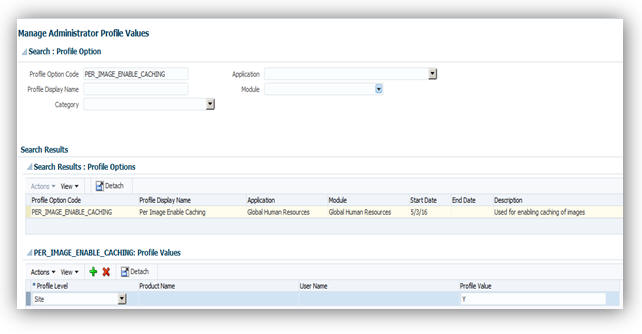
Set the Profile Value
Tips and Considerations
Don’t enable caching images if people at your site use kiosks to access the application.
Key Resources
For more information, go to Applications Help for the following topic:
- Caching Person Images: Explained
Buttons Relocated to Ribbon in Mass Assignment Change Spreadsheet
You can now find the Check In and Verify Changes buttons in the Ribbon of the Mass Assignment Change tab in the Mass Assignment Change spreadsheet. These buttons were displayed in the body of the spreadsheet earlier. You can access the spreadsheet by clicking the Manage in Spreadsheet button on the Create Mass Assignment Change: Verification page in the Mass Updates work area.
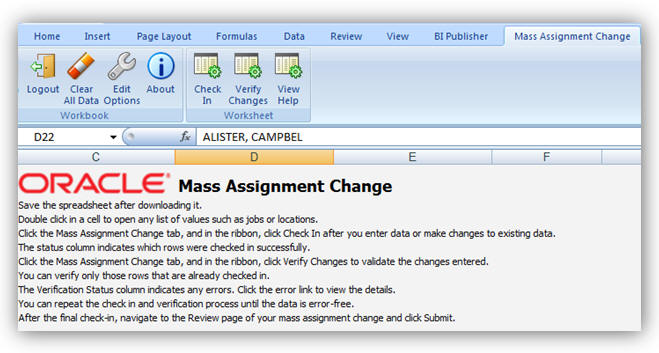
Buttons Located in the Ribbon of the Mass Assignment Change Tab
Steps to Enable
There are no steps necessary to enable this feature.
Key Resources
For more information, go to Applications Help for the following topic:
- Mass Updates: Explained
Half Day Calendar Events for Elasped Work Schedules
You can specify a calendar event as a half day event for elapsed work schedules using the Create Calendar Event task in the Setup and Maintenance work area. A worker’s availability for the half day will be reduced by half and is shown for the first half of the day in the calendar availability. Calendar events defined as half day for elapsed work schedules must be defined within the same date.
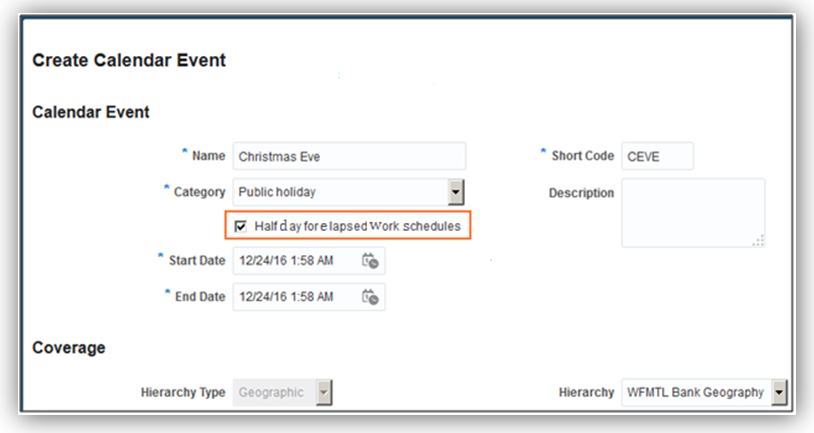
Half Day Calendar Event for Elapsed Work Schedule
Steps to Enable
There are no steps necessary to enable this feature.
Worklist Management – Checklist Real Time
Increase efficiency by reporting on the new checklist tasks for workers and other task performers. You can report on both automated and manually allocated tasks with this new subject area.
Steps to Enable
There are no steps necessary to enable this feature.
Role Information
If you have migrated to the Release 10 simplified reference role model, then no steps are necessary to enable this feature. If you have not migrated to the Release 10 simplified reference role model, then you must add a data security policy to the Workforce Reporting Data Duty role, which is inherited by the Human Resource Analyst job role. Follow these steps:
- On the All Tasks tab of the Overview page in the Setup and Maintenance work area, search for and select the Manage Duties task to open the Oracle Entitlements Server Authorization Policy Manager.
- In the Application Name section of the Authorization Policy Manager home page, select HCM.
- Click Search under the Application Roles heading.
- On the Role Catalog page, enter Workforce Transaction Analysis in the Display Name field and click Search.
- In the search results, select the entry for Workforce Transaction Analysis (ORA_FBI_WORKFORCE_TRANSACTION_ANALYSIS_DUTY_HCM) and click Find Policies - Default Policy Domain.
- On the Search Authorization Policies page, click the Data Security tab.
- On the Data Security tab, find the policy where the Action is Report Person Checklist and the Resource Name is Person Allocated Checklist. Select this data security policy and click Edit.
- On the Data Security Policy: Edit page, click the Roles tab.
- On the Roles tab, click Add to open the Select and Add: Roles dialog box.
- In the Select and Add: Roles dialog box, enter Workforce Reporting Data Duty in the Role Name field and set the Application to HCM.
- Click Search.
- In the search results, select Workforce Reporting Data Duty and click Apply.
- Click OK to close the dialog box.
- Click Save.
To verify that the data security policy has been created:
- On the home tab of Authorization Policy Manager, ensure that HCM is selected in the Application Name section.
- Click Search under the Application Roles header.
- Search for the Workforce Reporting Data Duty role.
- In the search results, select the role and select Find Policies - Default Policy Domain.
- On the Data Security tab, you should see the data security policy where the Action is Report Person Checklist and the Resource is Person Allocated Checklist.
You must also regenerate any data role that inherits Workforce Reporting Data Duty (PER_WORKFORCE_REPORTING_DATA_DUTY) to update its data security policies. For instructions on regenerating roles, see the Securing Oracle HCM Cloud guide for Release 10 on the Oracle Help Center (https://docs.oracle.com/en/).
Local Name Support on Edit My Details Page
A new page composer property, Is Enter Local Name Displayed, is added to the Edit My Details page. You can set this property to ‘Y’ so that the Enter local name check box displays for both the signed in user and their contacts. If you select the Enter local name check box, the local name region is displayed in the employee self-service page. Its behavior is similar to the Manage Person page.
Steps to Enable
- Sign in to the application as a user who has page composer access.
- In the Settings and Actions menu, click Manage Sandboxes.
- Create a sandbox and activate it.
- Click the Navigator icon.
- In the About Me work area, click Personal Information.
- Click Edit to display the Edit My Details page.
- Click the Contacts tab.
- In the Settings and Actions menu, click Customize Pages.
- Select the Site layer.
- Click OK to display the page composer.
- Change the view to Source mode from the View menu.
- Select the last name or any component in the page to display the name region in the Source mode.
- Select the name region, right click to display the context menu, and click Edit to edit the name region.
- Change the value of the Is Enter Local Name Displayed to Y to enable the local name in the Contacts tab on the Personal Information page.
- Click Close to save the customization and display the pages in normal mode.
- Verify if the Enter Local Name check box is selected.
- In the Settings and Actions menu, click Manage Sandboxes, review and publish the customization to publish in the environment.
Depending on the requirement you can select the Enter Local Name check box and enter the local name in your preferred language. When this attribute is selected, workers can specify their local name and local name of their contacts.

Select the Customization at Site Layer
Set the View to Source
NOTE: If you are not able to find the source view in the page, select the source position appropriately and use the panel splitter to adjust the region appropriately.
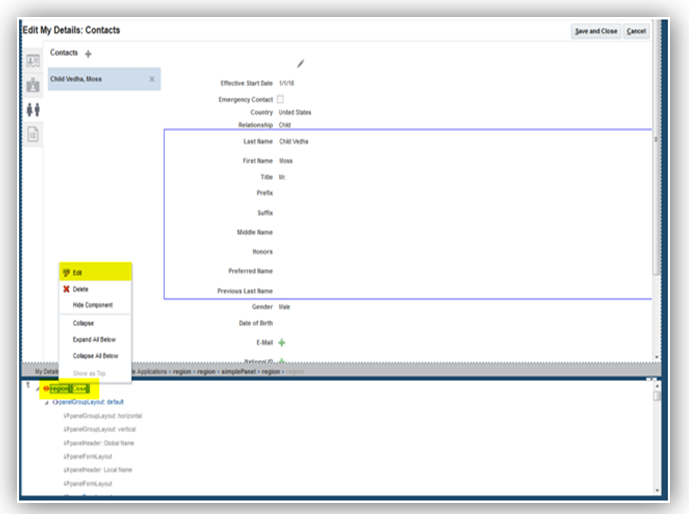
Edit the Name Region.
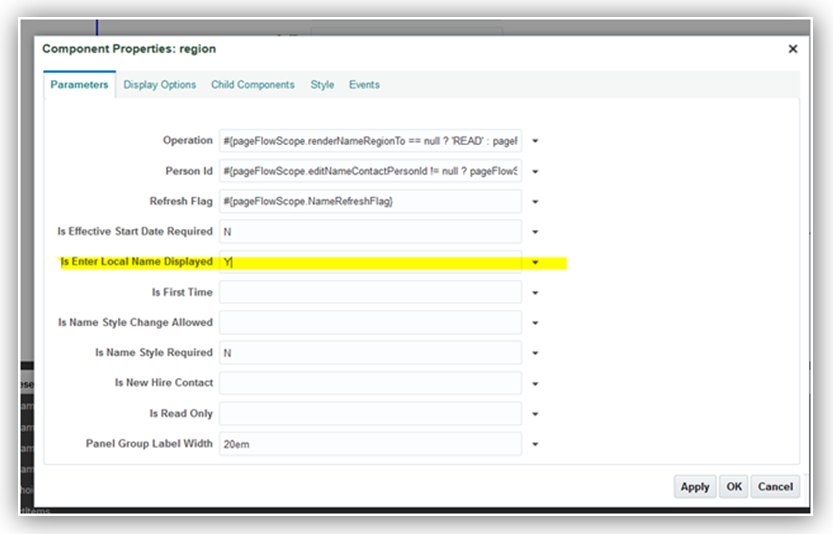
Set the Enter Local Name Displayed to Y
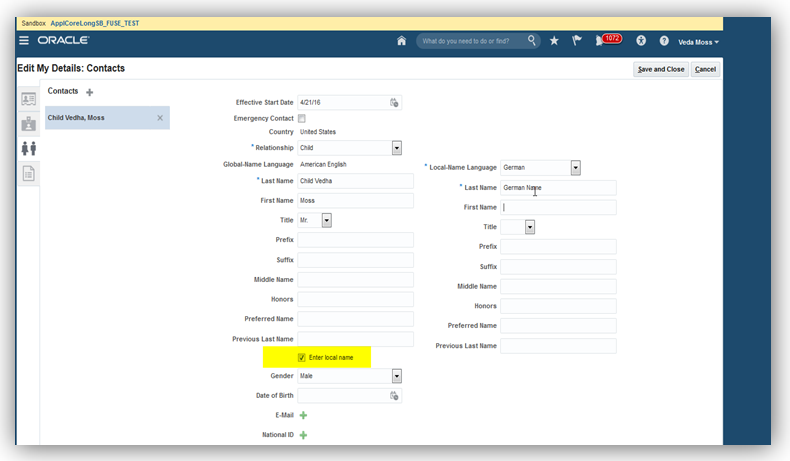
Verify if Enter Local Name Check Box is Selected
Tips and Considerations
You must consider if your workers must maintain a local name either for themselves or their contacts.
Key Resources
For more information, go to Applications Help for the following topics:
- Person Names: Explained
- How can I switch between local and global formats to display person names?
- What's the difference between global names and local names?
Additional Option for Rehire Recommendation
You now have an additional option for the rehire recommendation when you terminate a person’s work relationship. The Recommended for Rehire field is now a list and displays the additional value of “Not Specified” by default. You can terminate a work relationship using the Manage Work Relationship task in the Person Management work area or Terminate task in the My Team work area.
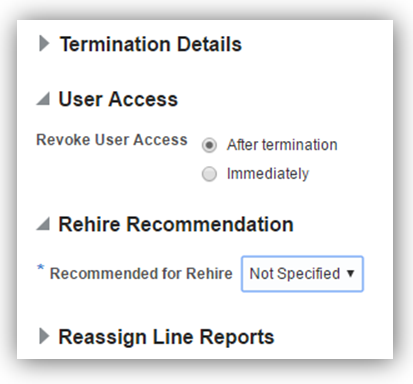
Additional option for Recommended for Rehire field
Steps to Enable
There are no steps necessary to enable this feature.
Key Resources
For more information, go to Applications Help for the following topic:
- What’s the impact of entering a rehire recommendation?
Position Synchronization When Using HCM Data Loader to Load Position Changes
Position synchronization is disabled when using HCM Data Loader (HDL) to load position changes, for performance reasons. This means that the load will not update the affected assignments even if position synchronization is enabled.
In order to synchronize, you can run the process, Position Synchronization Job to update the affected assignments using the Scheduled Processes work area. This process currently allows you to specify only one effective date. Therefore, the position changes will show date-effective assignment updates as of the same date even though the HDL load specifies position changes with different effective dates.
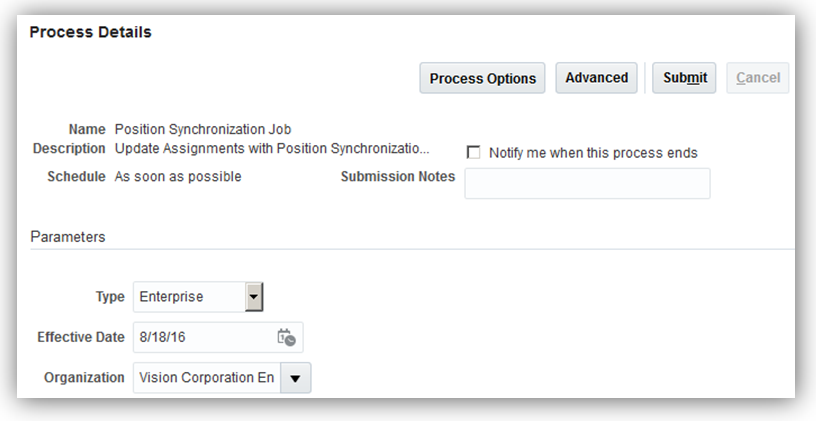
Run the Position Synchronization Job Process to Update Affected Assignments
The above behavior is applicable only to HDL. If you use the Manage Position UI to edit the position attributes, the changes will normally trigger updates to the affected assignments.
Steps to Enable
There are no steps necessary to enable this feature.
Changes to Privileges for Predefined Job Roles
The following three topics describe changes made to the privileges for predefined job roles.
- Import Worker Privilege from the IT Security Manager Job Role is removed
- Authorization to run the Send Personal Data for Multiple Users to LDAP Process
- Edit User Name Action from workers and line managers is removed
Import Worker Privilege From the IT Security Manager Job Role Change
Until now, the IT Security Manager job role has inherited the Import Worker privilege. This privilege is not appropriate for the IT Security Manager job role and is removed in this release. Only the Human Capital Management Application Administrator job role inherits the Import Worker privilege.
Authorization to Run the Send Personal Data for Multiple Users to LDAP Process
After loading person records in bulk, you’re recommended to run the Send Personal Data for Multiple Users to LDAP process to correct any differences in the person data held by HCM and Oracle Identity Management. Until now, HR Specialists could run this process. From this release, HR Specialists are no longer authorized to run the process. Only users who have the Human Capital Management Application Administrator job role can run Send Personal Data for Multiple Users to LDAP.
The following screen capture shows the process in the Search and Select dialog box in the Scheduled Processes work area. The signed-in user has the Human Capital Management Application Administrator job role.
The Process is Available to Human Capital Management Application Administrators Only
Edit User Name Action From Workers and Line Managers Change
Until now, users have been able to edit their own user names by selecting the Edit User Name action on the Manage User Account page. Line managers have been able to edit the user names of their reports in the same way. Being able to edit user names is inappropriate for these users. Therefore, in this release, the Edit User Name action is removed from the Manage User Account page for workers and line managers. Edit User Name remains available to HR specialists on the Manage User Account page.
Edit User Name Remains Available to HR Specialists
Steps to Enable
There are no steps necessary to enable this feature.
The Person Management entry in the Navigator is now secured by the Manage Person Work Area functional privilege. Until this release, the Person Management entry was secured by the Search Person functional privilege. Review custom roles that access the Person Management work area to ensure that they have the Manage Person Work Area functional privilege.
The Person Management Entry in the Navigator
Steps to Enable
There are no steps necessary to enable this feature.
Tips and Considerations
To review the role hierarchy of a custom role, you can use the Security Console. Edit the role and review functional privileges on the Functional Security Policies page. Ensure that you add the Manage Person Work Area functional privilege to any custom role that is currently accessing the Person Management work area by means of the Search Person functional privilege.
Typically, you schedule the Send Pending LDAP Requests process to run daily. This process sends future-dated and bulk requests for user accounts and roles to Oracle Identity Management. Send Pending LDAP requests has been updated to prevent it from terminating prematurely and reporting an inaccurate status. The process now pauses until all requests are processed before completing. In addition, logging details have been improved to facilitate error diagnosis.
Steps to Enable
There are no steps necessary to enable this feature.
User Details System Extract Report
The User Details System Extract Report is an Oracle BI Publisher report that provides details of selected user accounts. Until now, the report didn’t include pending workers. From this release, pending workers with user accounts can appear in the report.
Accessing the User Details System Extract Report in the Reports and Analytics Work Area
Steps to Enable
There are no steps necessary to enable this feature.
HCM Cloud Mobile will now support additional self-service transactions for both managers and employees.
Mobile - Employee Self Service Transactions
HCM Cloud Mobile now supports additional self-service transactions for both managers and employees.
For managers, three new transactions are available: Promote, Change Manager and Manage Salary. Each transaction is found in the Actions menu and can be configured to include Action and Action Reason fields.
For employees, two new transactions are available: Update Bio and Update Profile Photo.
The biographical data fields can be customized to best meet an organization’s needs.
Steps to Enable
There are no steps necessary to enable this feature.
Tips and Considerations
- Required fields are indicated in bold.
- Workflow approval may be required for these transactions and the changes will not be represented until the proper workflow approvals have been obtained.
Mobile - Manager Self Service Transactions
As a manager, you can perform the following self-service actions on a worker:
- Promote Worker: You can promote a worker from your mobile device.
- Change Salary: You can change the salary of a worker from your mobile device.
- Change Manager: You can change the manager for a worker to a new manager from your mobile device.
Steps to Enable
There are no steps necessary to enable this feature.
Key Resources
For more information, go to My Oracle Support (MOS) for the following document:
- Oracle Tap: Enabling Self-Service Transactions (Document ID 2006271.1).
Mobile - Worker Detail and Public Profile
Worker Detail and Public Profile gives the employees a way to search and view a list of workers across the organization and view the public profile of these workers. The public profile consists of generic information about the worker such as contact information, department, location, areas of interest, experience and number of directs. Employees can also export this contact information from Fusion HCM Cloud into their device contact list, if they choose.
Steps to Enable
There are no steps necessary to enable this feature.
Mobile - Organization Navigator
You can view and navigate the organization in an organization chart, then select a peer, manager or direct and view their profile in your mobile device.
Steps to Enable
There are no steps necessary to enable this feature.
Mobile - Update Biographical Information
You can update your biographical information directly on mobile device.
Steps to Enable
There are no steps necessary to enable this feature.
Key Resources
For more information, go to My Oracle Support (MOS) for the following document:
- Oracle Tap: Enabling Self-Service Transactions (Document ID 2006271.1)
Oracle Fusion Global Payroll is a high-performance, graphical, rules-based payroll management application. It’s designed to keep pace with the changing needs of your enterprise and workforce in order to reduce setup costs, administration, and processing time. Global Payroll operates consistently in every country supported by Oracle. It uses a highly scalable processing engine that takes advantage of the features of the Oracle database for parallel processing, resulting in optimal performance. In countries with payroll extensions delivered and supported by Oracle, the application delivers the calculations, tax reporting, and regulatory rules required to accurately process payroll and remain in compliance.
You can more easily submit a QuickPay process by selecting the Calculate QuickPay task from the task pane or from the Actions menu on the Manage Element Entries page in the Payroll Calculation work area. Use this task to process a correction or payment outside the usual payroll run, for example to process a new hire payment when the information was received too late for the last payroll period. The QuickPay process automatically enters information for the person based on the effective date you specified in the payroll search. For example, the process automatically specifies the person’s payroll, the period name, and a default naming convention for the payroll flow name.
Fields to Complete for the QuickPay Process
Steps to Enable
There are no steps necessary to enable this feature.
Tasks for Managing Balance Groups
Using the balance group feature you can easily control the balances you view in the application, reports, or archives. To control the balances included in a balance group you simply specify default inclusions or restrictions. Default inclusions are combinations of balance categories and dimensions. Any balance definitions you subsequently create, manually or through the element template, that meet those criteria are automatically included in the group.
Balance Group Default Inclusions Page Showing the Balance Categories and Balance Dimensions that can be Included in the Balance Group
Balance group usages indicate how a particular balance group is used. Some examples of balance group usages include: Statement of Earnings, Global Archive, and Global Payroll Run Result Report.
Balance Group Usages page showing usages for the Absence Balance Group
IMPORTANT: If you select Table as the format for a balance group, all the balances in the balance group are returned one line at a time in a table layout.
Steps to Enable
There are no steps necessary to enable this feature.
Tips and Considerations
- To control how a balance group usage will appear, select either the matrix format or the table format.
- For a matrix format, you select balance dimensions as columns in the matrix. Only the balance dimensions that you select as columns for the matrix are displayed.
- If you select the matrix format, you can select one of the sort methods listed below:
- Name - Sorts balance values by balance name.
- Value - Sorts balances by the actual balance value.
- Static Order – Sorts balance values in a sequence you specify.
Key Resources
For more information about balance groups, go to Applications Help for the following topics:
- Balance Group Usages: Examples
- Balance Groups and Usages: Explained
- Creating Balance Groups and Usages: Worked Example
- Rules for Editing Balance Groups and Their Usages: Explained
Roll Up Payments to Third-Party Organizations
Use the Run Third-Party Payment Rollup flow pattern when you submit a process from the Payroll Distribution work area to produce a single payment amount of combined employee deductions for each third-party payee, such as a court or union.
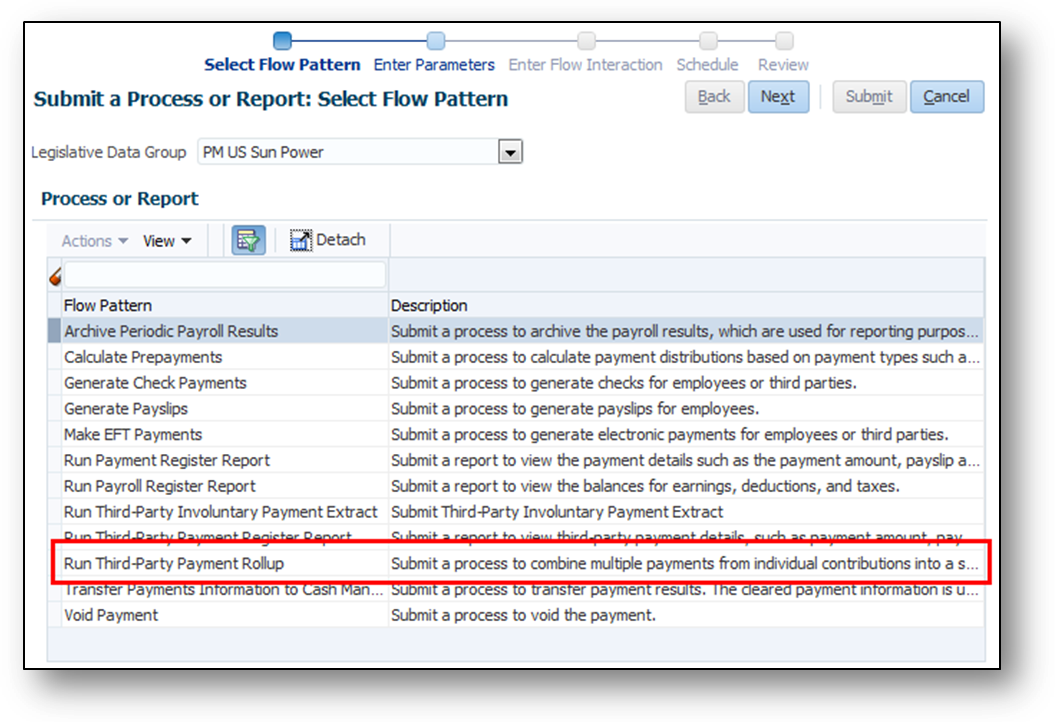
Run Third-Party Payment Rollup Flow Pattern
Steps to Enable
There are no steps necessary to enable this feature.
Typically you run the Payroll Costing Report before you transfer the results to general ledger. You view the output in a Microsoft Excel spreadsheet where you can verify the results of costing processes. Specify report parameters to control the output:
- Scope: Select the Detailed parameter to view the costing breakdown by person and entry. Select the Summary parameter to display results that you will transfer and post to Oracle Fusion General Ledger or a third-party financial provider.
- Process: Restrict the report to one type of costing, for example, to review corrections such as cost adjustments or retroactive costing, or leave the parameter blank to view the results of all costing processes.
- Start and end dates: Specify the time, such as a payroll period or accounting period.
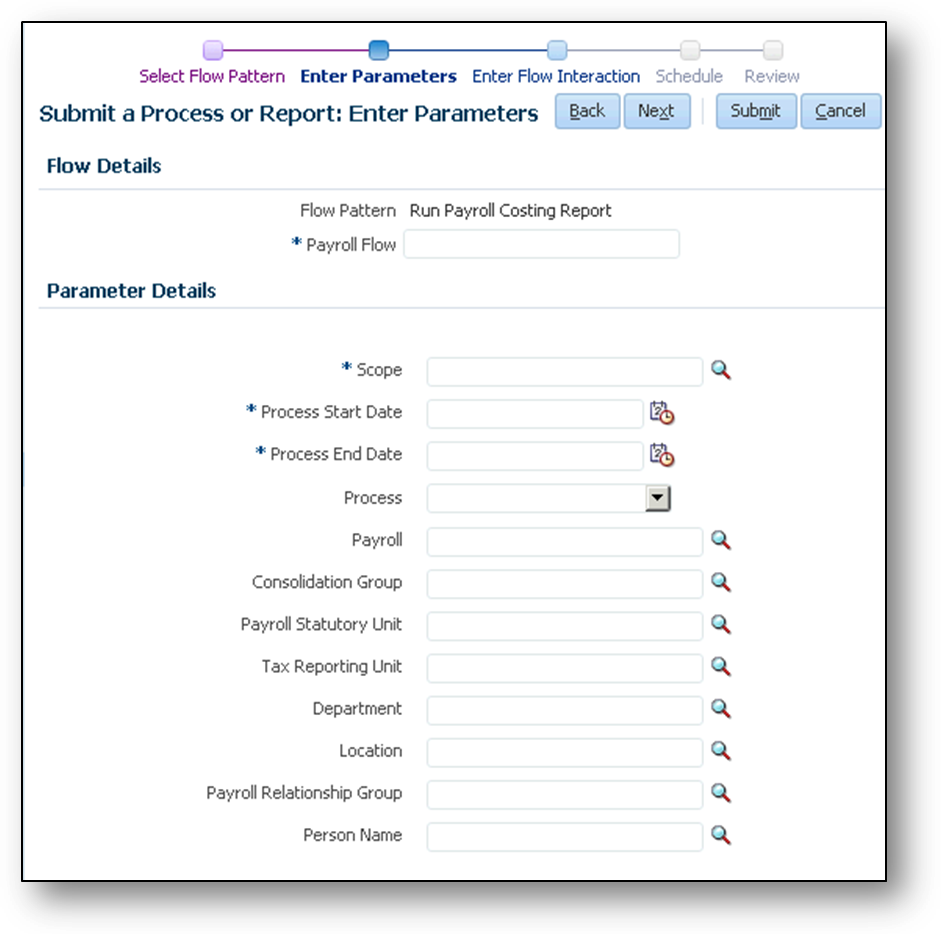
Parameters for the Payroll Costing Report
Steps to Enable
There are no steps necessary to enable this feature.
Tips and Considerations
Ensure that the start and end dates span the effective date of the costing process. Costing processes use the process end date as the effective date. The following processes use the process date: cost adjustments, costing of balance adjustments, partial period accruals, payroll calculations, retroactive pay calculations, QuickPay calculations, voids, and reversals.
Key Resources
For more information about this report, go to Applications Help for the following topic:
- Payroll Costing Report
Expansion of Payment Method Criteria
You can use criteria to set up rules that derive payment sources within a single tax reporting unit (TRU). The prepayments process identifies the source bank information using the employee's TRU and any additional payment criteria that you define.
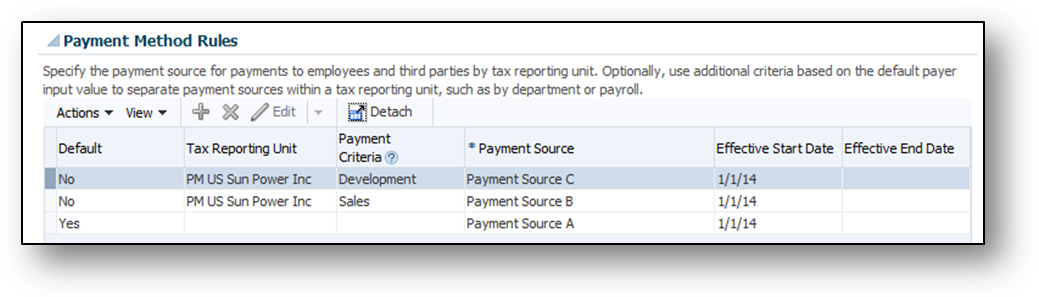
The Revised Payment Method Rules Section of the Manage Organization Payment Methods Page
Steps to Enable
There are no steps necessary to enable this feature.
Tips and Considerations
To use this feature you must create an Information element named Default Payer and two formulas to handle the payment rules. For example, if you want to pay a specified department from a special payment source, you must create one formula to get the department name and a second formula to get assignment IDs by the specified department. You can find the detailed steps in the help topic listed below.
Key Resources
For more information about creating formulas and the Default Payer element, go to Applications Help for the following topic:
- Deriving Payment Sources by Department: Worked Example
Payroll Cycle Flow Pattern Enhancements
You can process the key tasks in a payroll cycle by submitting the Global Simplified Payroll Cycle flow. This flow includes tasks you typically perform during the payroll cycle:
- Calculate current and retroactive payroll entries, and verify the results
- Calculate payments and verify the results
- Archive and distribute payments, and verify the results
- Transfer and post costing entries to Oracle Fusion General Ledger
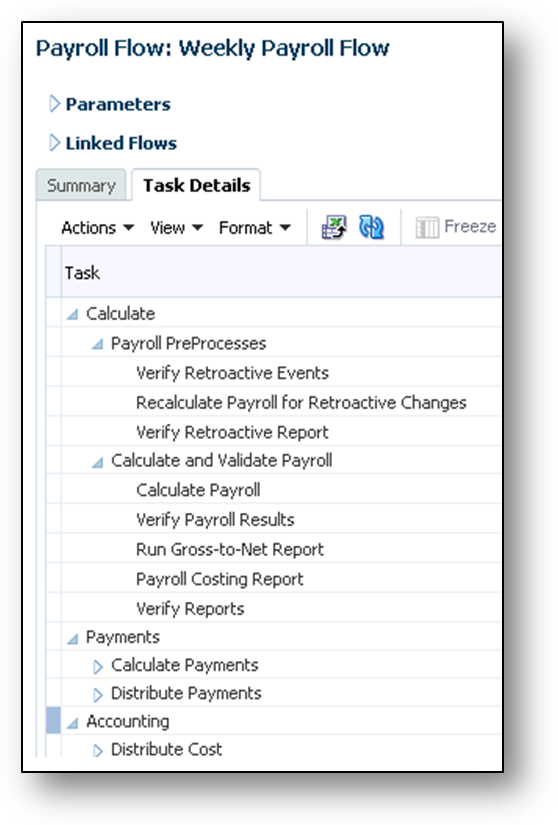
Tasks in the Global Simplified Payroll Cycle Flow
Steps to Enable
There are no steps necessary to enable this feature.
Tips and Considerations
Use the Manage Payroll Flow Pattern task in the Payroll Checklist work area to copy and customize the flow pattern for the Global Simplified Payroll Cycle flow. Add or delete tasks in the flow pattern. For example, you might add BI Publisher Report tasks to include your BI Publisher reports in the payroll cycle.
Update User-Defined Legislations
You can now correct payroll rules for countries or territories that aren’t initially provided by Oracle. Use the Configure Legislations for Human Resources task to correct rules for a legislation that you previously defined.
IMPORTANT: The corrections you can make are limited for legislations that are already implemented and in use.
The Configure Legislations page includes two new columns to indicate which legislations are:
- Predefined
- Implemented, meaning that objects such as element classifications and balances already exist for that country or territory

Installed Legislations Page Showing New Predefined and Implemented Columns
You can view payroll rules for predefined legislations, but you can’t update them.
You can configure these areas:
- Legislative rules
- Element classifications
- Payment types
- Component groups
- Balance dimensions
Under legislative rules, you can now map each person type to a payroll relationship type: Element Entries Only, or Standard. Select Element Entries Only if your use of payroll relationships is limited to element entries, for example to extract data for a third-party payroll provider.
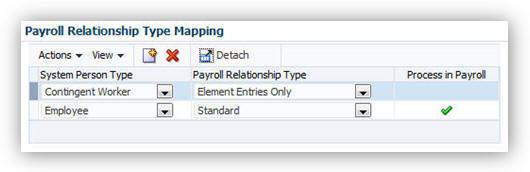
Payroll Relationship Type Mapping Section of the Manage Legislations Page
Steps to Enable
There are no steps necessary to enable this feature.
Your ability to edit the payroll rules for legislations may depend on the other objects you have created. For example:
- You can’t edit:
- Currency after saving a legislation because it would impact the generated balances
- Tax Year Start after running a payroll
- You can’t remove:
- An element classification if you have created an element in that classification
- A balance dimension if you have created balances with that dimension
- A payment type if you have created payment methods for that payment type
- A component group if you have created calculation cards for that component group
Key Resources
For more information about configuring legislations, go to Applications Help for the following topic:
- Payroll Legislative Data: Explained
New Country Field for Personal Payment Methods to Support International Payments
The new Country field makes it easier to pay people in your enterprise using international payments. You can create a personal payment method to pay a person in a different country, such as an employee who works temporarily in another country and receives EFT payments directly.
Complete these steps:
- In the Payroll Distribution work area, use the Manage Organization Payment Methods task to create a payment method.
- Select International Transfer from the Payment Type field and complete the remaining setup information.
- In the Payroll Calculation work area, use the Manage Payroll Definitions task to add the payment method to the appropriate payrolls.
- In the Payment Distribution work area, use the Manage Personal Payment Methods task to search for and select a person’s payment method record.
- Create a payment method and select the organization payment method with the International Transfer payment type.
- In the Country field, select the country of the bank account where a person is paid. Enter the appropriate bank details.
- Complete the remaining information and save the record.
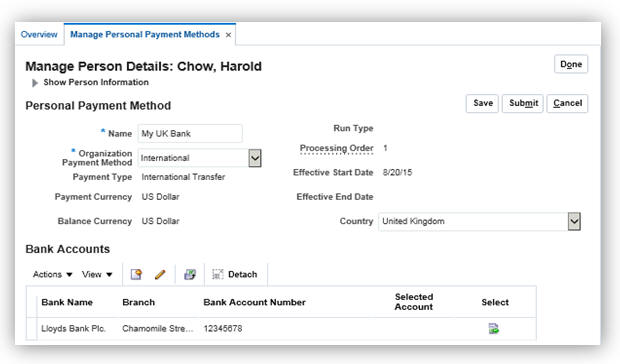
Create an International Payment Method.
Steps to Enable
Complete these steps to use the simplified bank account page and to enable the Country field.
- Enable the simplified bank account page using Payroll User Interface Configuration formula and the Show Simplified Bank Account preference in a user-defined table. For detailed steps, refer to the Payroll User Interface Configuration feature, described elsewhere in this document.
- Customize the Personal Payment Method section on the Manage Personal Payment Methods page using Oracle Page Composer. Enable the Country field component and its list of values.
Tips and Considerations
- You can edit the Country list only for organization payment methods with an International Transfer payment type.
- The default value in the Country list is based on the country code of the legislative data group.
Key Resources
For more information about payment methods, go to Applications Help for the following topics:
- Organization Payment Methods: Explained
- Entering Bank Information for Personal Payment Methods: Critical Choices
For more information about using Oracle Page Composer, refer to the following guide on the Oracle Help Center:
- Oracle Applications Cloud: Customizing the Applications for Functional Administrators
Enhanced Support for Rate Definitions
We have enhanced the Manage Rate Definitions page to provide new options for defining rates, in addition to the existing options based on payroll balances or element input values. Now you can also calculate and retrieve rates from other rate definitions, or using values defined by criteria, or by calling a formula, for example to retrieve a rate from a user-defined table.
Other enhancements support currency conversions and rate conversions that enable you to use the part-time or full-time status of employees.
With these enhancements, you can:
- Set up separate base rates of pay for different types of employees. For example, if each set of employees receives an allowance that's a percentage of the base rate, you only need to define one allowance rate that's calculated based on the two rates that have the Base Rate check box selected.
- Use elements to retrieve values from an element input value or to post values to an element input value. The element input value must have a special purpose of either Primary Input Value or Factor. For example, for an amount value such as a salary figure, create an element with the flat amount rule to automatically create an input value with the Primary Input Value special purpose. For a factor value, such as a bonus that you calculate as 10 per cent of average earnings, select the factor calculation rule to create an input value with the Factor special purpose.
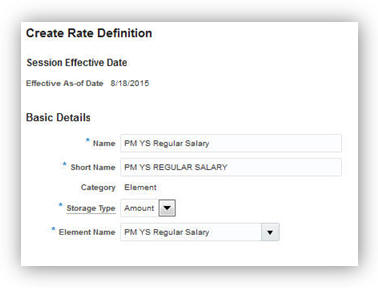
Create Rate Definition Page Showing the Element Category
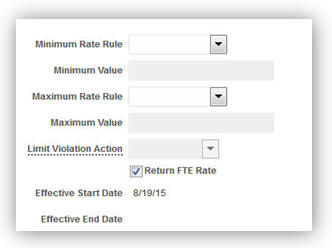
Create Rate Contribution Page Showing the Return FTE Rate Check Box
There are no steps necessary to enable this feature.
Tips and Considerations
The rates process converts periodicities using these values:
- 52 weeks per year
- 12 months per year
- 260 working days per year
To use different conversion rates, define your own formula using the Rate Convertor formula type and select it in the Periodicity Conversion Formula field on the Create Rate Definition page.
Key Resources
For more information about rate definitions, go to Applications Help for the following topics:
- Rate Definitions: Explained
- Creating Rate Definitions: Points to Consider
- Rate Contributors for Derived Rates: Points to Consider
Gross-to-Net Report Based on Process Date
When you submit the Gross-to-Net report from the Payroll Calculation work area, specify a date range. The date range must include the process date, such as the process date of the payroll run. The results of the report depend on the number of payroll calculations completed for the payroll within the date range.
Consider the following example:
- You calculate the payroll for semimonthly payrolls. The process date of the first payroll run is offset to the second payroll period. The following table displays the balances for each payroll run.
- You submit the Gross-to-Net report with a start date of January 16 and an end date of
January 31. - Both process dates fall in the second payroll period, so the report displays the combined results of both payrolls.
| Payroll Period |
Process Date |
Balance |
Total |
| January 1-15 |
January 17 |
Standard Earnings |
3,200.00 |
| Employee Tax Deductions |
1106.66 |
||
| Employer Liabilities |
468.80 |
||
| January 16-31 |
January 31 |
Standard Earnings |
3,200.00 |
| Employee Tax Deductions |
1391.73 |
||
| Employer Liabilities |
468.80 |
The following screen capture shows the results of the combined payrolls, because the process date of each payroll falls in the same payroll period.
Gross-to-Net Report Displays the Results of Both Payrolls.
Steps to Enable
There are no steps necessary to enable this feature.
Tips and Considerations
When submitting the report, specify a date range for the payroll period that includes the process date of the payroll calculations to view.
A new Report YTD Summary parameter was introduced in Release 9 for the Payroll Activity and Payroll Register reports. The Release 9 What’s New explained which values to set for the Report YTD Summary and Scope parameters to control the output.
In Release 10 the Statutory Deduction Report now includes this parameter. The Scope parameter works the same way as described in Release 9 for the other reports.
Steps to Enable
There are no steps necessary to enable this feature.
Report Payment and Nonpayment Balances
When you process a reversal or balance adjustment, you decide whether to include or exclude the balances from the payment. When you submit the Payroll Activity, Payroll Register, or Statutory Deduction Register reports, you specify which balances to display. If you leave the parameter blank, the report displays both payment and nonpayment balances.
Balances Reported Parameter
When you submit the report, you can optionally specify the Scope and Report YTD Summary parameters. These parameters determine how the balances are reported and whether you can select a value for the Balances Reported parameter.
| Report Parameter |
Parameter Value |
Report Results |
| Scope |
Summary |
The total is displayed for the payment and nonpayment balances |
| Scope |
Detail |
Payment and nonpayment balance details are listed in the Include in Payment report section |
| Report YTD Summary |
No or blank value |
Balances are based on the value selected for the Balances Reported parameter |
| Report YTD Summary |
Yes |
Payment and nonpayment balance information is listed Balances Reported parameter values are not available for selection |
Steps to Enable
There are no steps necessary to enable this feature.
Payroll User Interface Configuration
You can now customize payroll user interface preferences using the new user-defined table with fast formulas. Using the new Payroll User Interface Configuration formula type, you can create formulas for six different payment method preferences. After you create your formulas, you can attach the formula names to their corresponding preferences as values in the new user-defined table named PAYROLL_USER_INTERFACE_CONFIGURATION.
New Fast Formula Type: Payroll User Interface Configuration
New User-Defined Table: PAYROLL_USER_INTERFACE_CONFIGURATION
The following table lists the available payment method preferences that you can configure and examples of how you can customize them.
| Name of Preference |
Example |
Valid Return Values and Default Values |
|---|---|---|
| Default Organization Payment Method (for Simplified UI only) |
This formula snippet sets the default organization payment methods in LDG A (ID 300100001) based on payment type. IF (LEGISLATIVE_DATA_GROUP_ID = '300100001' AND PAYMENT_TYPE_NAME = 'EFT') THEN OUTPUT_VALUE = 'NACHA_OPM_A' ELSE IF (LEGISLATIVE_DATA_GROUP_ID = '300100001' AND PAYMENT_TYPE_NAME = 'Check') THEN OUTPUT_VALUE = 'CHECK_OPM_A' ELSE OUTPUT_VALUE = 'NO DATA' RETURN OUTPUT_VALUE |
Valid return values are organization payment method names. |
| Show Country Field for Personal Payment Method |
This formula snippet enables selection of a country for personal payment methods associated with organization payment methods of the International Transfer payment type. OUTPUT_VALUE = 'Y' RETURN OUTPUT_VALUE |
Valid return values are Y and N. If the formula for this preference doesn’t exist or is invalid, the default value is N. |
| Payment Types Available to Workers |
This formula snippet limits personal payment methods to be based only on organization payment methods of EFT (electronic funds transfer) or Check payment types. OUTPUT_VALUE[1] = 'EFT' |
Valid return values are the base payment type names as defined in the table PAY_PAYMENT_TYPES_VL. |
| Maximum Number of Personal Payment Methods |
This formula snippet limits the number of personal payment methods for employees in LDG A (ID 300100001) to 3, and employees in LDG B (ID 300100002) to 1. IF LEGISLATIVE_DATA_GROUP_ID = '300100001' THEN OUTPUT_VALUE = '3' IF LEGISLATIVE_DATA_GROUP_ID = '300100002' THEN OUTPUT_VALUE = '1' ELSE OUTPUT_VALUE = 'NO DATA' RETURN OUTPUT_VALUE |
Return values must be integers. If the formula for this preference doesn’t exist, the default value is no limit. |
| Show Percentage or Amount |
This formula snippet sets a restriction to display only the Percentage amount type and field on the Manage Personal Payment Methods page. OUTPUT_VALUE = 'PERCENTAGE' RETURN OUTPUT_VALUE |
Valid return values are AMOUNT or PERCENTAGE. If the formula for this preference doesn’t exist, the default value is both. |
| Show Simplified Bank Account Page |
This formula snippet sets the preference to show the simplified page for creating bank account information. This page works with the Use Existing Banks and Branches profile option to control whether employees and professional users can create bank and branch data. OUTPUT_VALUE = 'Y' RETURN OUTPUT_VALUE |
Valid return values are Y and N. If the formula for this preference doesn’t exist, the default value is N. |
All formulas for these preferences accept the following input values:
- LEGISLATIVE_DATA_GROUP_ID
- EFFECTIVE_DATE
- PAYROLL_RELATIONSHIP_ID
The formula for the Default Organization Payment Method preference also accepts the following input value:
- PAYMENT_TYPE_NAME
Steps to Enable
- Use the Manage Fast Formulas task to create the formula using the Payroll User Interface Configuration formula type.
- Use the Manage User-Defined Tables task to attach the formula in the user-defined table as follows:
- Select the legislative data group that you want to use to manage the user-defined table and then search for and select PAYROLL_USER_INTERFACE_CONFIGURATION.
Note: The formulas attached in the user-defined table are effective at the enterprise level. The legislative data group isn’t significant. However, to make any later edits to the table, you must select the same legislative data group. - Click Edit, and then click Next.
- On the User-Defined Table Values page, click Add.
- Select the exact row that corresponds with the formula, and then click OK.
- In the Value field, enter the name of your formula. You must enter the formula name exactly as it was created in the Manage Fast Formulas page.
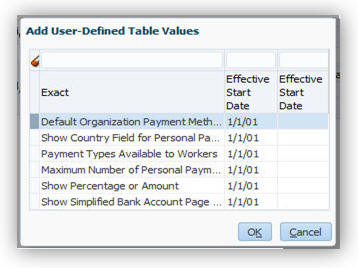
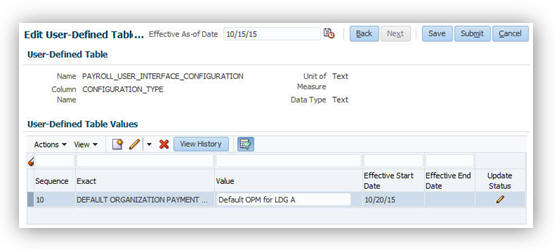
Tips and Considerations
- Each payment method preference that you customize must have its own formula. You can’t combine different payment method preferences into a single formula. For example, you can’t create a formula that sets the default organization payment method and also sets the maximum number of allowed personal payment methods.
- Make note of which legislative data group you select for the user-defined table. You must select that same legislative data group later if you want to make any modifications, such as add, update, or delete a formula value.
Display Additional Information on Payslips
You can now display additional information, such as congratulatory messages and detailed earnings information, on checks or payslips by configuring the Organization Information EFF extensible flexfield.
Using the Manage Enterprise HCM Information task, you add elements of the Information classification to the new Global Payroll Element Information to Archive section. The run results of these elements are archived in a new archive record, making them available to the .xml templates you use for checks and payslips.
Example A: Display earnings by earned weekly period
For example, you want to display earnings details on payslips, such as overtime pay per week within a semimonthly pay period. In this example, before modifying your payslip template, you create an element using the Information element classification. You create the following input values in your element and add them to the payroll information to archive:
- Description
- Start Date
- End Date
- Hours
- Rate
- Multiple
- Amount
Example B: Display a message on a check
You want to display a birthday congratulations message on checks. In this example, before modifying your check template, you could create an information element with the following input values:
- Message Title
- Message Description
Steps to Enable
Using this feature requires the following actions:
- Create the information element, its element eligibility, and the input values you want displayed.
- If you need a formula to calculate the run results, do the following:
- On the Manage Fast Formulas page, create a formula of type Oracle Payroll to return the values that you want to add.
- On the Manage Elements page, edit the information element to:
- Create a status processing rule associated with your new formula.
- Add formula result rules to return formula results to the element's input values.
- On the Manage Enterprise HCM Information page, in the Organization Information EFF section, add the information element and input values.
- Create employee element entries, unless you selected the Automatic Entry option for the element.
- After payroll processing, archive the results.
- Modify the check template or payslip template, as appropriate.
Tips and Considerations
- The Organization Information EFF configuration is at the enterprise level. For each LDG for which you want to archive payroll information, you must add a separate row for the information element.
- This feature has no conflicts or dependencies with any of the existing earnings and deductions whose results are archived. No existing archives or reports are affected by this feature.
Rolling 12-Month Balance Dimension
The new rolling 12-month balance dimensions enable you to retrieve balance information for a 12-month period from a specific start date. You can retrieve balance dimension information at both the assignment level and the relationship level.
The new rolling balance dimensions run backwards from a fixed date for an entire 12-month period. This type of balance dimension is useful if you, if for example, you want to know the base salary and sum of commission payments paid to a group of employees in the sales department for the last 12 months.
Here are the new rolling 12-month balance dimensions that are now available to you:
- REL_CORE_TU_R12MTH
- ASG_CORE_TU_R12MTH
Steps to Enable
There are no steps necessary to enable this feature.
Key Resources
For more information about balance dimensions, go to Applications Help for the following topics:
- Payroll Balance Definitions: Explained
- Balance Dimensions: Explained
- Balance Feeds: Explained
Display Year-to-Date Hours in Payroll Register Report
The Hours subsection of the Payroll Register report lists the current hours worked for standard earnings and absence payments in the Balance Categories Summary, Balances Summary, and Balances by PSU and TRU Summary sections. The Balance Details for a Person section displays the current and year-to-date totals for each person included in the report.

Balances Categories Summary

Balances Summary

Balances by PSU and TRU Summary

Balances Details for a Person
Steps to Enable
There are no steps necessary to enable this feature.
Corrective Actions Available on Completed Flows
The completed flow supplies the necessary context to quickly correct the flow from the following locations:
- Payroll Checklist work area: Mark the task as incomplete on the Tasks Details tab and select an action from the Select an Action window.
- Payroll work areas: Select the completed task from the Processes and Reports tab and select an action from the Actions menu.
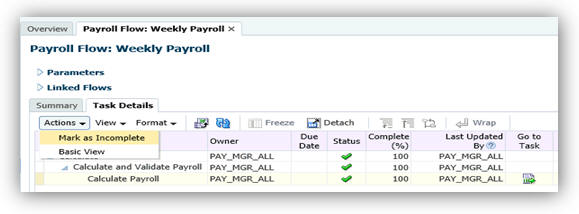
Changing the status of a completed flow by marking it as incomplete
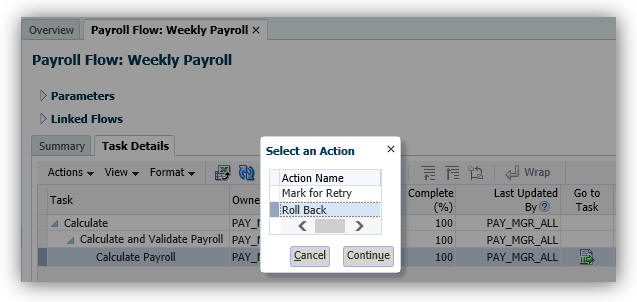
Marking the flow as incomplete automatically displays the Select an Action window

Action Menu Options for the Completed Flow on the Flow’s Processes and Reports Tab
Steps to Enable
There are no steps necessary to enable this feature.
A new flow task, Submit Another Flow, provides flexibility when customizing flow patterns. When you submit a flow, you can only specify flow interaction between existing flows. The Submit Another Flow task enables you to submit a flow and while it’s in progress, start a new flow. You configure the parameters for the task, so that when it starts, it submits a flow instance of the specified flow pattern with the necessary context.
Use the Submit Another Flow task to create shorter checklists, and to reduce the number of actions required to go back to a previous task in the checklist.

Shorter Checklist Results from Using the Submit Another Flow Task
After you submit the main flow, you have a choice when you reach the Submit Another Flow task. You can wait for the submitted flow to complete or continue processing the main flow. You might wait for the flow to complete to verify the results, if the following task in the main flow uses its results.
When the Submit Another Flow task completes, clicking the Go To Task button displays a Flow Interaction page where you can access the generated flow and view any errors produced when submitting the flow.

Completed Task Displays Flow Interaction Page
Clicking the name of the submitted flow displays the payroll flow where you can view the results of the tasks included in it.
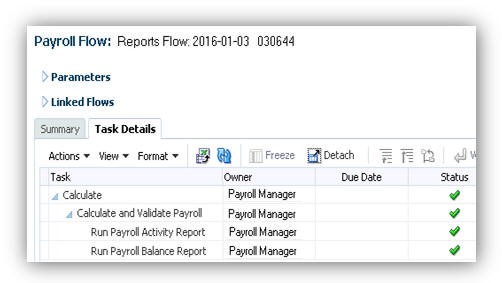
Clicking the Flow Name Displays Generated Flow Results
Steps to Enable
As a prerequisite, create two flow patterns, one that you will call from the main flow. In this example, your main flow includes a payroll calculation task. You add the Submit a Flow task to your main flow to call your Payroll Calculation Reports flow.
To add and configure the Submit Another Flow task:
- Use the Manage Payroll Flow Patterns task in the Payroll Checklist work area. Search for and display the main flow pattern.
- Click the Edit button.
- Click the Select and Add button on the Tasks tab.
- Click the Submit Another Flow task.
- Click the Edit button in the menu bar and rename the task to a more meaningful name, such as Payroll Calculation Reports.
- Click the Edit Task button to edit the Payroll Calculation Reports task.
- Configure the predefined task parameters, as shown in the following table.
- Review the flow parameters of the Payroll Calculation Reports flow pattern. Identify the ones required to successfully submit that flow. In this example, the three parameters are Payroll, Process Start Date, and Process End Date.
- Configure the Parameter Name and Parameter Value parameters so that you map the three flow parameters.
- Click the Next button, and optionally complete the Owner and Checklist information.
- Click the Next button, and optionally complete the Duration and Notification information.
- Click the Submit button to submit your changes.
- On the Tasks Sequence tab, confirm the order of the tasks.
For example, confirm that the reports task follows the calculation task. - Click the Submit button.
| Parameter |
Parameter Basis |
Basis Value |
| Flow Name |
Constant Bind |
Enter the name of the flow. Tip: For customized flows, you can confirm the name by using the following SQL query, replacing YOUR_FLOW with the name of your flow: (select * from pay_flows_vl where flow_name='YOUR_FLOW';) |
| From Flow Instance ID |
Context Binding |
Payroll Flow |
| From Flow Instance Task ID |
Context Binding |
Payroll task |
| Use to Calculate Results |
Constant Bind |
Y (for Yes) |
| Parameter |
Parameter Basis |
Basis Value |
| Parameter Name 1 |
Constant Bind |
Payroll |
| Parameter Name 2 |
Constant Bind |
Process Start Date |
| Parameter Name 3 |
Constant Bind |
Process End Date |
| Parameter Value 1 |
Bind to Flow |
Payroll |
| Parameter Value 2 |
Bind to Flow |
Process Start Date |
| Parameter Value 3 |
Bind to Flow |
Process End Date |
Tips and Considerations
Complete additional task parameters for Submit Another Flow to schedule the flow instance generated by the task:
- Schedule Formula Name: A formula you created using the Flow Schedule formula type that controls when to submit the flow and how often to submit future instances of the flow.
- Start Date and Time of the scheduled flow.
Key Resources
For more information about flow patterns, go to Applications Help for the following topic:
- Flow Pattern Parameters: Explained
Payment Method Batch Loader Tasks
Five task actions are added to the payroll batch loader workbooks as described in this table.
| Supported Object |
Task Action |
Purpose |
| Bank and Branch |
Inactivate Bank |
Inactivate a bank in a specified country, including its branches and internal and external accounts. |
| Inactivate Bank Branch |
Inactivate a bank branch, including any internal and external accounts. |
|
| External Bank Account |
Inactivate External Bank Account |
Inactive an external bank account used to receive EFT payments for workers. |
| Payment Method |
Delete Personal Payment Method |
Permanently delete payment method details for the associated worker, including external bank accounts. |
| End-Date Personal Payment Method |
End-date the payment method for the associated worker as of a specified date. |
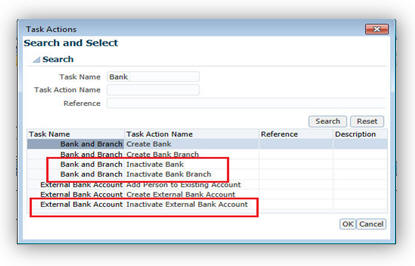
New Tasks for Bank and Branch and External Bank Account
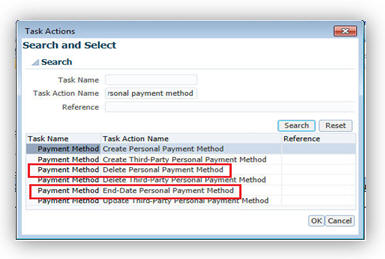
New Tasks for Payment Method
Steps to Enable
There are no steps necessary to enable this feature.
Key Resources
For more information about banks information related to personal payment methods, go to Applications Help for the following topics:
- Entering Bank Information For Personal Payment Methods: Critical Choices
- Payroll Batch Loader Workbooks for Bank Data
- Payroll Batch Loader Workbook for Payment Methods
Enhancements to Payment Method Rules
The criteria for payment method rules in organization payment methods is now expanded to include two new parameters that you can use to pay third parties: Third-Party Payment and Third-Party Name. For example, you can define rules to make payments to third-party pension providers from one payment source, and other third-party payments from another payment source.

New Parameters for Third-Party Payments in the Payment Method Rules Table
Steps to Enable
There are no steps necessary to enable this feature.
Key Resources
For more information about defining payment method rules to pay third parties, go to Applications Help for the following topics:
- Payment Method Rules: Examples
- Setting Up Payment Sources in Organization Payment Methods: Worked Example
Value Sets Usage in Flow Parameters
Use value sets for flow parameters to define and control which values display when submitting a flow. You might add a flow parameter that uses a value set to select a person, a flow instance, or a legislative data group. You can also create dependent value sets to filter the list of values. For example, the value set for payroll period might depend on the value selected for the payroll parameter.
The SQL query you specify when you create the value set determines the values that populate the flow parameter.
Steps to Enable
The following steps explain how to:
- Create a value set
- Update your flow pattern
Create a Value Set
To define a value set for a flow parameter:
- Use the Manage Value Sets task in the Setup and Maintenance work area.
- Click the Create icon to create a value set. Complete the following required fields:
- Value Set Code: Specify a name for your value set.
Tip: Use a prefix such as XX_ before the name, to more easily identify it from the predefined value set names. - Module: Select the module that uses the value set, such as Payroll Flow.
- Validation Type: Select Table.
- Value Data Type: Specify the data type of the displayed column.
If the value set is dependent on another parameter value, specify the parameter name as the bind value in the Where clause. As an example, to bind the payroll parameter, specify the following text for the Where clause: payroll_id = :{PARAMETER.PAYROLL} - Complete the Definition section of the Create Value Set page to create a SQL query for the value views. The Column Type and Column Length for each column is populated based on its definition in the database.
- FROM Clause: Specify the table names used for the query.
- Value Column Name: Specify the attribute.
This field holds the column value displayed for the flow submission parameter. - ID Column Name: Specify the attribute used to store the value in the database table.
This field holds the column value that processes and reports expect as a value, such as an ID. - WHERE Clause: Specify the SQL query you created to build the list of values.
- ORDER BY Clause: Specify the query used to order the list of values.
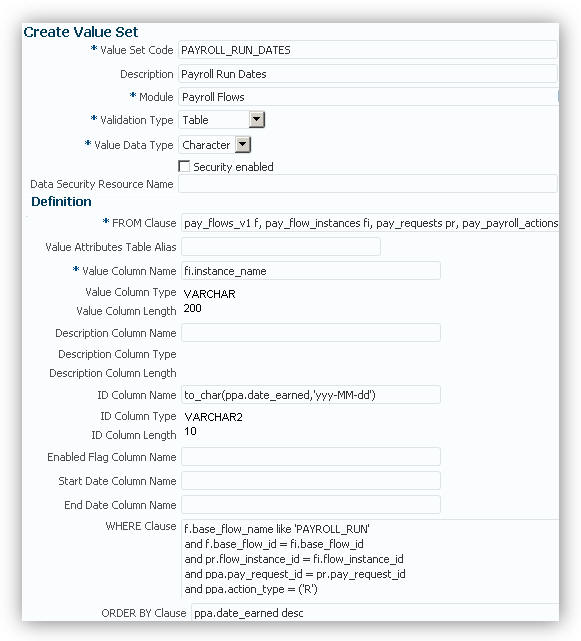
Example of Value Set Definition that Displays Flow Instances by Date Earned
Update Your Flow Pattern
To use the value set for a flow parameter:
Use the Manage Payroll Flow Patterns task in the Payroll Checklist work area.
- Search for and edit your customized payroll flow.
- Click the Parameters tab.
- Click the Add button to create a new flow parameter.
- Click the Edit button and enter the parameter details:
- Flow Parameter: Parameter name
- Description: Name to display
- Use for Searches: No
- Display Format column: Value Set
- Lookup column: Text entered in your value set definition for Value Set Code
- Click Submit.
When you submit the payroll flow the submission flow parameter displays the list of values based on the value set you created.
Tips and Considerations
If the query includes a date field, you must use the appropriate date format. For example, if the date field is date earned, you must use the following format: to_char (date_earned,'yyyy-MM-dd').
Key Resources
For more information about flow patterns, go to Applications Help for the following topic:
- Flow Pattern Parameters: Explained
Void Payment Action in Prepayments
The Actions menu in the Prepayments Results section now includes the Void action. You view prepayments results for the Calculate Prepayments task and from there can make or void payments. For example, if an employee requested a replacement for a damaged check you can use the Void action to void the check and then use the Make Payment action to reissue another check.
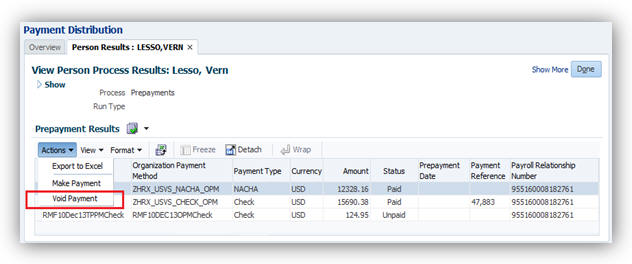
New Action Menu Item for Void Payment
Steps to Enable
There are no steps necessary to enable this feature.
Excel Output Support for Payroll Reports
You can now configure the delivery option to generate the output of payroll reports in Excel format.

Excel Output Support for Payroll Reports
The following reports can be configured to generate the Excel output:
- Payroll Balance Report
- Payroll Activity Report
- Payroll Register
- Statutory Deduction Register
- Deduction Report
- Payment Register
- Gross-to-Net Report
- Third-Party Payment Register
Steps to Enable
Repeat these steps for each payroll report listed above, as necessary.
NOTE: Enabling Excel output for the Payment Register requires an additional step as noted below.
- In the Data Exchange work area, click the Manage Extract Definitions task.
- Search for and select the extract definition name for the payroll report to edit, as listed in this table.
- Click the Deliver icon.
- Click Add to create a new row to point to your new template for Excel output.
- Select Excel 2007 in the Output Type field.
- Enter a start date and end date. For example, 1/1/01 and 12/31/4712.
- In the Report field and Template Name field, ensure that the .xdo file name and template name matches the name of your template.
- Optionally, in the Overriding Delivery Mode field, to override the default layout (PDF file), select the predefined delivery option for Excel output. This would result in only generating the Excel file. Otherwise, keep the default value to generate both the Excel and PDF files.
- Click Save.
- For edits to the Payment Register, follow these steps to add the report category details.
- In the Additional Details section, click Add.
- In the Deliver Output Name field, click Search.
- In the Search field, enter Extract Delivery Mode, and then click Search.
- Select Payment Register Results, and then click OK.
- Click Save.
- Click Submit.
| Report Name |
Extract Definition Name |
| Deduction Report |
Deduction Report |
| Gross-to-Net Report |
Gross to Net Summary Archive |
| Payment Register |
Global Payment Register |
| Payroll Activity Report |
Payroll Activity Report |
| Payroll Balance Report |
Payroll Run Result Report |
| Payroll Register |
Global Payroll Register |
| Statutory Deduction Register |
Statutory Deduction Register |
| Third-Party Payment Register |
Global Third Party Payment Register |
Dynamic Payroll Relationship Group Support for Payroll Activity Report
You can now specify a payroll relationship group as a submission parameter when running the Payroll Activity Report.
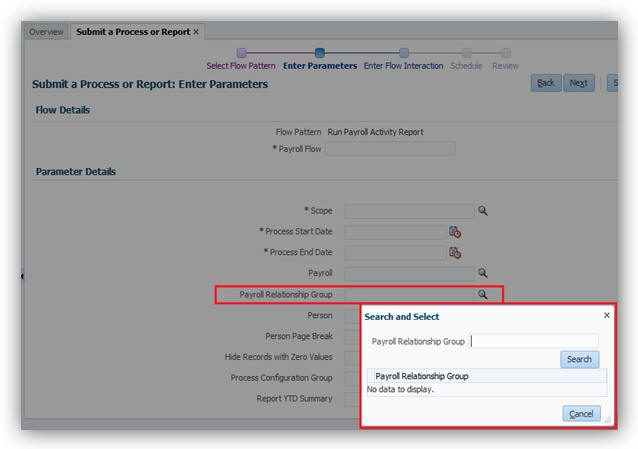
Payroll Relationship Group Flow Submission Parameter
A new formula type is available so you can create a formula with specific criteria to indicate whether to include a specific payroll relationship ID. Use the same formula for dynamically creating a payroll relationship group. You can then submit the report and the report will use the payroll relationship group derived by the formula. The formula type to use is named Payroll Relationship Group.

Payroll Relationship Group Formula Type
Steps to Enable
There are no steps necessary to enable this feature.
Tips and Considerations
The dynamic payroll relationship group parameter functionality works only for Payroll Activity Report with respect to payroll reporting. The relationship group is available for selection in several reports, but only the Payroll Activity Report displays results that use the dynamic payroll relationship group parameter functionality.
When you create a payroll definition or extend the number of years for it, the application automatically generates payroll periods. You can view these payroll periods on the Time Periods tab of the Manage Payroll Definitions page. The system-generated names are numbered in sequence based on the period type you selected when creating the payroll definition. You can now click the Edit button and revise the system-generated names as needed.
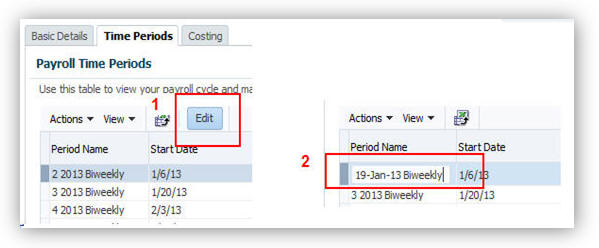
Edit System-Generated Payroll Period Names
Steps to Enable
There are no steps necessary to enable this feature.
Tips and Considerations
If you edit the payroll period names, ensure that they remain unique within the payroll definition.
Key Resources
For more information about payroll definitions, go to Applications Help for the following topic:
- Payroll Definitions: Explained
Deduction Category and Deduction Parameters for Run Deduction Report
You can now run the Deduction Report for all deduction categories and deductions including the deduction balances you define. Use the Deduction Category and Deduction parameters to run the report for specific deduction categories or deductions.

Deduction Category and Deduction Parameters
Steps to Enable
There are no steps necessary to enable this feature.
Key Resources
For more information, go to Applications Help for the following topic:
- Deduction Report
Person and Payroll Relationship Group Parameters for Run Deduction Report
You can now run the Deduction Report to verify deduction balances for a single person or a static payroll relationship group that you specify.
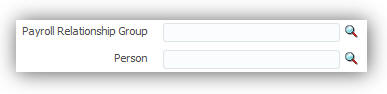
Steps to Enable
There are no steps necessary to enable this feature.
Key Resources
For more information about balance exception reports, go to Applications Help for the following topics:
- Deduction Report
Information Balances in the Payroll Balance Report
You can now configure the balance group usage item to display information balances in the Payroll Balance Report.

To configure the balance group usage item:
- Select the Manage Balance Group Usages task from the Payroll Calculation work area.
- Select Global Payroll Run Result Report (Payroll Balance Report) from the Report Type drop-down list.
- Select the desired legislative data group.
- Click Search. The search results display all the applicable balance group usages for the Payroll Balance Report.
- Select the Global Information Balances for Payroll Balance Report row and click the Edit icon.
- Select Matrix Items on the left panel, in the Balance Group Usage: Global Information Balances for Payroll Balance Report page.
- Click the Add icon to create a new matrix item.
- In the Matrix Item section, select the Balance Dimension matrix item type, select the name of the desired balance dimension, and enter a position value.
- Click Save.
- Click Submit.

Steps to Enable
There are no steps necessary to enable this feature.
Key Resources
For more information about the Payroll Balance Report, go to Applications Help for the following Topic:
- Payroll Calculation Report: Overview
Additional Flow Parameter for Create Batch for an Object
You can now select a process configuration group when running the Create Batch for an Object process to migrate elements and formulas from one environment to another. The name you specify in the Process Configuration Group list enables any processing parameters that are defined for that group, such as logging.
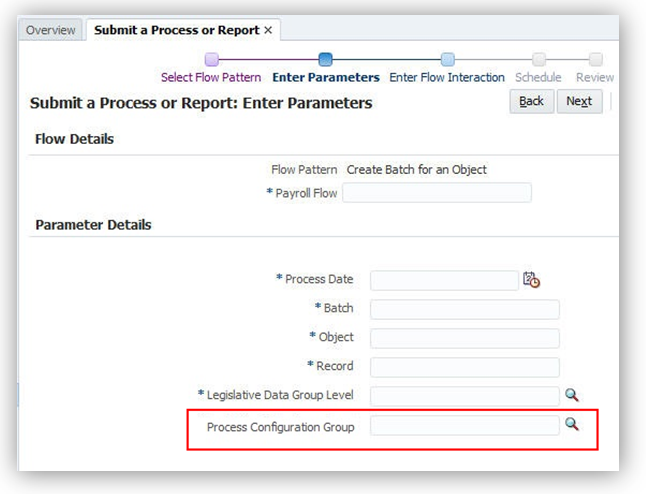
Steps to Enable
There are no steps necessary to enable this feature.
Key Resources
For more information about balance exception reports, go to Applications Help for the following topics:
- Migrating Objects Using the Payroll Batch Loader: Procedure
- Payroll Batch Loader Task Actions for Migrating Elements: Explained
You can view a list of payslips and open a PDF with more details on your device.
Steps to Enable
There are no steps necessary to enable this feature.
This section describes new features that are relevant if you extract details from HCM, such as earnings and deductions, to send to a third-party payroll provider.
Payroll Interface Report for NGA’s Payroll Exchange
A new extract definition enables Oracle Fusion Global Human Resources to integrate with Payroll Exchange from NGA Human Resources for third-party payroll processing. Use the predefined extract definition and flow pattern to extract data in an XML format compliant with NGA standards.
The payroll interface extract for NGA includes global fields and country-specific fields for Australia. The global fields include generic fields required by NGA for multiple locales. The country-specific fields are typically for legislative requirements.
Steps to Enable
There are no steps necessary to enable this feature.
Key Resources
For more information about the extract definition for NGA, go to Applications Help for the following topic:
- Payroll Interface Report for NGA Extract Definition
Calculate Gross Earnings Process Optional for Global Payroll Interface Extracts
You are no longer required to run the Calculate Gross Earnings process before using the Global Payroll Interface extract definition to extract data. By making this requirement optional, you can extract data from element entries and provide it to your third-party payroll provider more frequently than once each payroll period.
If you intend to extract data once per payroll period, it is recommended to first run the Calculate Gross Earnings process. However, if you plan to extract data more frequently, such as daily or in the middle of a payroll period, you can run the extract process at any time, but you should not run the Calculate Gross Earnings process.
Tips and Considerations
One of the following two approaches will be best suited for your third-party payroll provider when using the Global Payroll Interface extract:
- Approach 1:
- Extract and provide data once per payroll period
- Run Calculate Gross Earnings
- Include calculated earnings balance values
- Run subsequent reports, such as Element Result Register, Payroll Balance Report, and Balance Exception Report
- Approach 2:
- Extract and provide data multiple times per payroll period
- Include element entry values
IMPORTANT: It is best to pick only one approach. If you change approaches in the middle of a payroll period, the application will consider any records as changed, which could be misleading or incorrect.
Steps to Enable
There are no steps necessary to enable this feature.
Key Resources
For more information about the Global Payroll Interface extract definition, go to Applications Help for the following topic:
- Global Payroll Interface Extract Definition
Human Capital Management for Australia
Oracle Fusion Human Capital Management for Australia supports country specific features and functions for Australia. It enables users to follow Australia’s business practices and comply with its statutory requirements.
We have improved data quality by leveraging new address validations for Australia. The following validations are added to the Manage Features by Country or Territory task when selecting the Address Style for Australia:
- A warning message is displayed when changing the default Supplemental Taxation and Reporting Address style to the Postal Address style.
- If the Address Validation check box is checked, the Postal Code entered in the address must be four digits.
Steps to Enable
There are no steps necessary to enable this feature.
Supplemental Taxation and Reporting Address Style
The address style you select determines which address attributes are available and maintained in the application.
Depending on the country or territory and the country extension you select, you have one or both of the following address style options, each providing its own validation:
- Postal Address
- Supplemental Taxation and Reporting Address
Supplemental Taxation and Reporting Address:
Defined for country extensions, this address style can add validation or attribute changes in the application. For example, this style may add specific validation of postal codes, such as requiring a specific number of characters in a specific sequence.
For Australia, if your selected extension is Human Resources or None, you can keep the default Address Style of Postal Address or modify the value to Supplemental Taxation and Reporting Address.
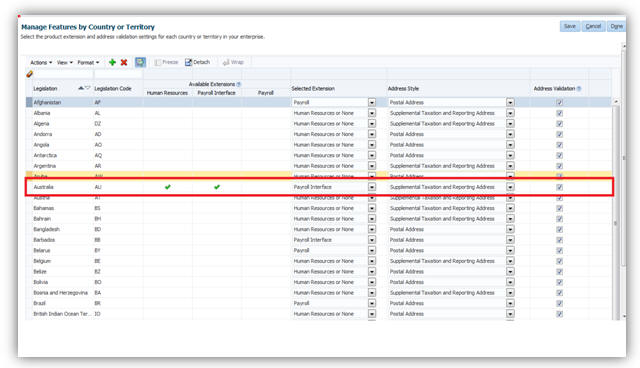
Selected Extension, Address Style by Country and Address Validation Settings
If your selected extension is Payroll Interface or Payroll, the value for the Address Style cannot be modified and must be set to Supplemental Taxation and Reporting Address. Validations are implemented to enforce that requirement.
Steps to Enable
There are no steps necessary to enable this feature.
You can now comply with the statutory recording and reporting of Trade Support Loans (TSL) for reporting to the Australian Taxation Office (ATO). TSL will be included with Higher Education Loan Payments (HELP) amounts and reported as one value to the ATO.
Steps to Enable
There are no steps necessary to enable this feature.
Workplace Gender Equality Profile Report
The Workplace Gender Equality Act 2012 requires non-public sector employers with 100 or more staff to submit a report to the Workplace Gender Equality Agency.
This new feature enables you to comply with the Australian Workplace Gender Equality Act by capturing the required data to report on a designated group of employees to complete the Workplace Gender Profile. The format of this generic spreadsheet may be modified by customers and can be used to assist in their yearly reporting obligations.
Steps to Enable
To enable the capture of workplace gender equality information, the Australian Workplace Gender Equality Information context has to be enabled in the PER_ASSIGNMENT_EIT_EFF. The steps to enable are listed below:
- Navigate to Setup and Maintenance and search for the task Manage Extensible Flexfields.
- Click on Go to task Manage Extensible Flexfields.
- Search for flexfield code PER_ASSIGNMENT_EIT_EFF.
- Select the PER_ASSIGNMENT_EIT_EFF record in the Search Results and click on the edit button.
- On the Edit Extensible Flexfield page, click on Manage Context button.
- On the Manage Context page, search for display name Australian Workplace Gender Equality Information.
- Select the Australian Workplace Gender Equality Information record in the search results. Click edit button.
- On the Edit Context page, Tick the Enabled checkbox. Click on Save and Close button.
- Deploy flexfield code PER_ASSIGNMENT_EIT_EFF.


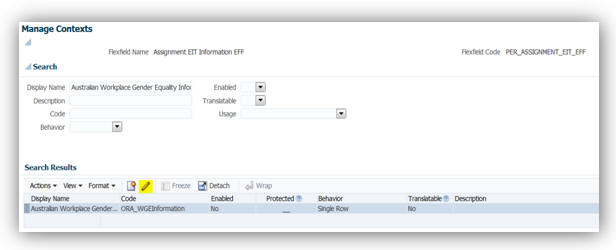
Implementation
To capture the workplace gender equality information during the hiring process, use the Assignment Page in the Add Person task. To capture the workplace gender equality information for current employees, use the Assignment Page in the Manage Employment task.
Reporting
To generate the workplace gender profile report, navigate to Submit a Process or Report and select Run Australian Workplace Gender Profile Report process.
Capture of Non-Specific Gender
This new feature enables you to capture the gender of employees who are neither male nor female. A new look up value Non-specific is now available to capture the gender of an employee who has provided a value that is neither male nor female.
To capture the gender during the hiring process, use the Add Person task. To capture the gender during the manage employee information process, use the Manage Employment task.
Steps to Enable
There are no steps necessary to enable this feature.
HCM Data Loader Support for Calculation Cards
You can now use HCM Data Loader to create or update calculation cards for the Australia localization.
All business objects related to the calculation card, such as calculation component, component details, and associations are available through HCM Data Loader. You can carry out actions such as Insert, Delete, or Update on these objects.
User keys are currently not supported to identify business objects; instead it uses the combination of SourceSystemOwner and SourceSystemID. Reports can be setup in Business Intelligence Publisher to retrieve the required ID.
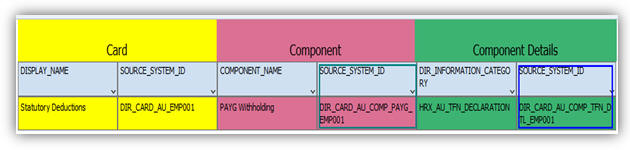
Using this information, you can prepare the data for loading. The file must be in data file format (.dat), with a METADATA line declaring what objects are being created or uploaded or deleted in the file, followed by one MERGE line for each record you wish to create or update.
For example, to update Tax information on employee’s PAYG component:
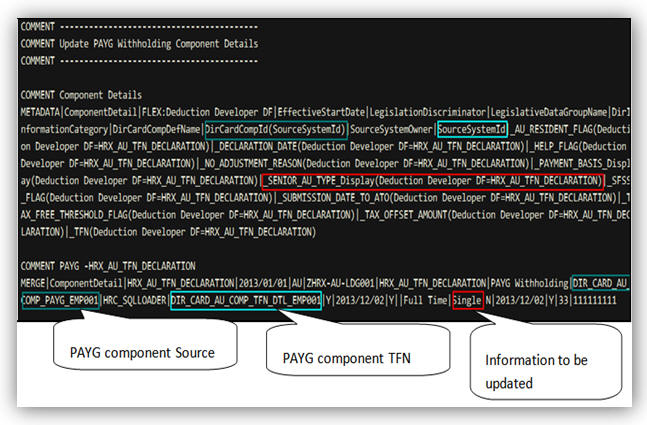
You can then upload the file in the Data Exchange Work Area under HCM Data Loader and Import and Load data.
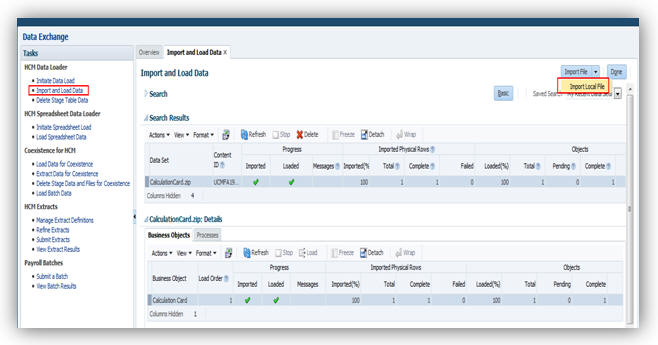
If the upload is unsuccessful, you can view the list of error messages using the Message icon.
To verify that the data has been updated, use the Manage Calculation Card task in the Payroll Calculation Work Area:
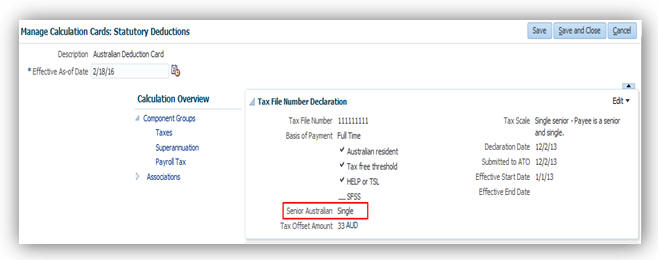
Steps to Enable
There are no steps necessary to enable this feature.
Tips and Considerations
User keys are not currently supported, either Source System id, GUID or Surrogate Id can be used to identify records.
It is possible to combine all business objects into a single file. The HCM Data Loader works out the order in which objects must be created. For example, if you are creating a new statutory deduction card, you can include all of the following business objects into a single .dat file:
- Calculation Card
- Superannuation Guarantee Contributions component
- Additional Employer Superannuation Contributions component
- Employee Superannuation Contributions component
- PAYG Withholding component
- Payroll Tax component
- TFN Declaration component details
- Medicare Levy Variation component details
- Withholding Variation component details
- Payroll Tax Information component details
- Superannuation Guarantee Contribution component details
- Additional Employer Superannuation Contribution component details
- Employee Superannuation Contribution component details
- Card association
Human Capital Management for Austria
Oracle Fusion Human Capital Management for Austria supports country specific features and functions for Austria. It enables users to follow Austria’s business practices and comply with its statutory requirements.
Maintaining Person Information
This feature supports the recording of person and other human resources data specific to Austria, such as:
- Austrian Name Style and Formats, including Academic Titles
- Austrian Address Structure with Validation
- Social Insurance Number
- Religion
- Marital Status
- Contacts
- Visa and Permit Types and Categories
- Localized Bank Information
The Ethnicity information is hidden to meet local statutory, business and cultural practices and requirements.
An HR specialist can maintain the person information using the tasks under Person Management or New Person work areas.
Steps to Enable
There are no steps necessary to enable this feature.
Human Capital Management for Bahrain
Oracle Fusion Human Capital Management for Bahrain supports country specific features and functions for Bahrain. It enables users to follow Bahrain’s business practices and comply with its statutory requirements.
Maintaining Person Information
This feature supports the recording of person and other human resources data specific to Bahrain, such as:
- Bahraini Name Style and Formats
- Bahraini Address Structure with Validation
- Validation of the following National Identifiers:
- Civil Identity Number - The Civil Identity Number is validated for the numeric format and maximum length of 10 digits.
- Social Insurance Number - The Social Insurance Registration number is used to identify a Bahraini and is mandatory for Social Insurance reporting. This number is validated for numeric format only.
- Mandatory entry of Date of Birth
- Ethnicity
- Religion
- Contacts
- Passports
- Visa and Permit Types
- Disabilities
- Highest Education Level
- Localized Bank Information
An HR specialist can maintain the person information using the tasks under Person Management or New Person work areas.
Steps to Enable
There are no steps necessary to enable this feature.
Human Capital Management for Belgium
Oracle Fusion Human Capital Management for Belgium supports country specific features and functions for Belgium. It enables users to follow Belgium’s business practices and comply with its statutory requirements.
Maintaining Person Information
This feature supports the recording of person and human resources data specific to Belgium, such as:
- Belgium Name Style and Formats, with the First Name and Last Name as mandatory fields.
- Belgium Address Structure with Validation
- The following National Identifiers with Format Validation
- RRN or BIS Number
- Mandatory entry of Date of Birth and Marital Status
- Contacts- If it is required, a contact can be shown to be a fiscal dependant and handicapped. This is important for payroll calculations.
- Passports
- Visa and Permit Types
- Highest Education Level
- Localized Bank Information
Religion and Ethnicity Information are hidden to meet local statutory, business and cultural practices and requirements.
Steps to Enable
There are no steps necessary to enable this feature.
Maintaining Employment Information
This feature supports employment information specific to Belgium, such as:
- Contract Type and details (End Contract Type, End Contract Reason, and Working Schedule Pattern)
- Worker Category
Social security deductions are based upon the type of contract an employee has with the company. Consequently there is a need to record the contract type.
Steps to Enable
There are no steps necessary to enable this feature.
Gender attribute of ‘Unknown’ was added as a value for Belgium.
Steps to Enable
There are no steps necessary to enable this feature.
Human Capital Management for Brazil
Oracle Fusion Human Capital Management for Brazil supports country specific features and functions for Brazil. It enables users to follow Brazil’s business practices and comply with its statutory requirements.
Maintaining Person Information
This feature supports the recording of person and human resources data specific to Brazil, such as:
- Brazilian Name Style and Formats
- Postal Code Format Validation
- National Identifiers:
- CPF with Validation – Person General Register. It is the Income Tax National Identifier.
- RG – General Register. Civil identification, also called ‘Identity Card’.
- Foreigner ID - ‘National Register of Foreigners’
- PIS with Validation– Identifier in Social Integration Program
- PASEP with Validation - Program of Public Servers Patrimony Formation
- NIT with Validation- Worker Identification Number
- Mandatory entry of Date of Birth and Gender
- Ethnicity
- Marital Status
- Contacts
- Passports
- Visa and Permit Types
- Disabilities
- Highest Education Level
- Localized Bank Information
Religion and Region of Birth information are hidden to meet local statutory, business and cultural practices and requirements.
An HR Specialist can maintain the person and employment information using the tasks under Person Management or New Person work areas.
Steps to Enable
There are no steps necessary to enable this feature.
Human Capital Management for Canada
Oracle Fusion Human Capital Management for Canada supports country specific features and functions for Canada. It enables users to follow Canada’s business practices and comply with its statutory requirements.
You can now use the Load Geographies for Canada task to update geography-related information on Canadian provinces, cities, and postal codes. Vertex publishes a geocodes file that reflects changes to the geography information. This data is required for address validations and payroll calculations.
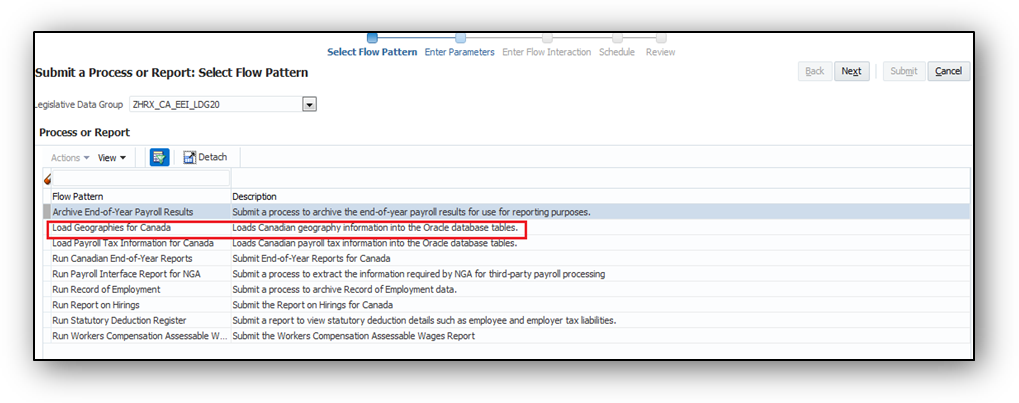
Running the Load Geographies Process
Once the file is installed, you must run this process to retrieve information from the file and load it into the Oracle database tables. The geographies are loaded into the Trading Community Architecture (TCA) database tables, which provide a centralized and consistent way to manage geographies. Once records are loaded in the TCA tables, you can use the Manage Geographies interface to easily view and update the data.
Some Canadian provinces and cities have both Canadian French and American English names. When the names are different, both Canadian French and American English records are automatically loaded. However if the name is the same, only one record is created.
The generated log files display details of the process run, as well as the records loaded.
Steps to Enable
You must run this process as part of your initial setup for the implementation project, as well as on a monthly basis.
Key Resources
For more information on Load Geographies for Canada, go to Applications Help for the following topics:
- Load Geography Information for Canada: Explained
- Viewing and Editing Geography Information for Canada: Procedure
Employers covered by the Employment Equity Act are required to submit the Employment Equity Report to the Minister of Labour on or before June 1st of every year.
You can now use the Run Employment Equity Interface task to create the following three Text Tab Delimited (txt) import files containing employee information pertaining to the preceding calendar year (January to December):
- employee.txt
- term.txt
- promo.txt
These files contain employment information pertaining to the designated groups of women, people with disabilities, aboriginal people, and visible minorities.
You can upload these files into the Workplace Equity Information Management System (WEIMS) database of the government.
You can run this report for the following two parameters:
- Year: Displays information for the reporting year.
- North American Industry Classification System (NAICS) Code: This is an optional parameter and if used, generates files for a specific code.
Steps to Enable
There are no steps necessary to enable this feature. An HR Analyst can access this report from the Navigator menu and the Reports and Analytics link.
Key Resources
For more information about Employment Equity, go to Applications Help for the following topic:
- Employment Equity Interface: Overview.
Features by Country or Territory
You can now use this feature to control the address style and the level of address validation for the countries or territories configured for Oracle Fusion Global Human Resources. The values you can set depend on the combination of the country or territory and the selected country extension. The default out-of-the-box value for Selected Extension is Human Resources or None and Address Selection is Postal Address.
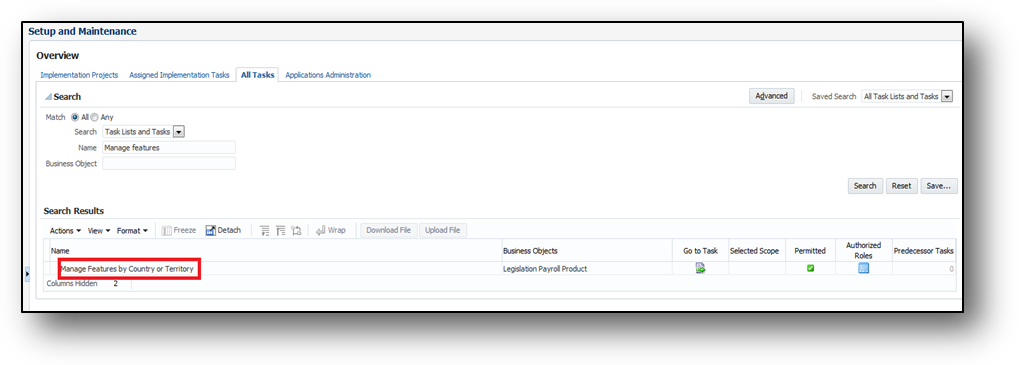
Manage Features by Country or Territory Task in Setup and Maintenance
For Canada, if your selected extension is Human Resources or None, you can keep the default Address Style of Postal Address or modify the value to Supplemental Taxation and Reporting Address.
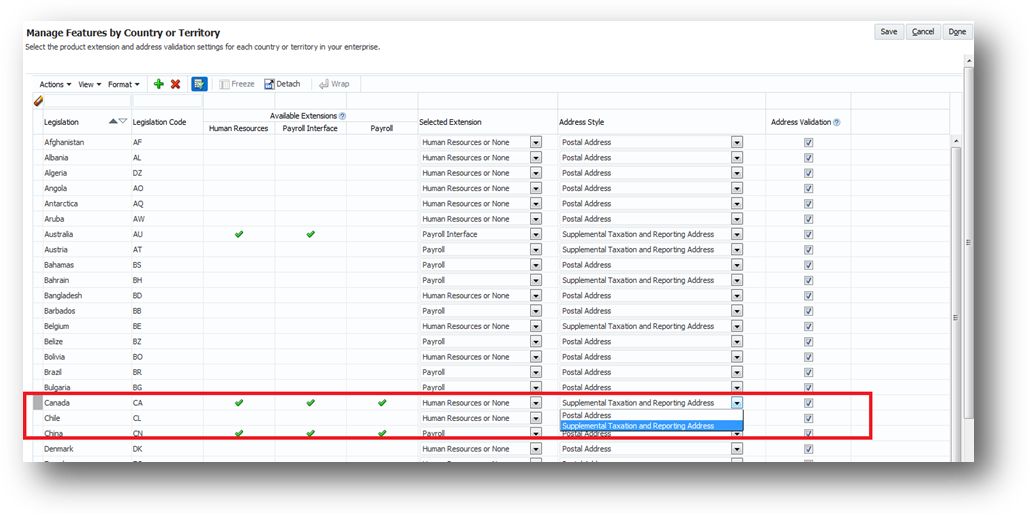
Setting up Selected Extension, Address Style and Address Validation
If your selected extension is Payroll Interface or Payroll, the value for the Address Style cannot be modified and must be set to Supplemental Taxation and Reporting Address. Validations are implemented to enforce that requirement.
Steps to Enable
There are no steps necessary to enable this feature.
Ability to Change Display for Province to Full Name
Oracle Fusion Human Capital Management for Canada offers the ability to change the primary display of provinces in user interfaces (UIs) where the province is displayed. You can now set the primary display for each province to the full name. Prior to this change, the province was displayed in the application as the two character province abbreviation.
In this update, the option to display the full name of the province is available for the following:
- Employee home address
- Employee location address
- Province of employment on the employee tax card
- Statement of earnings (SOE)
- Balance view
- Payroll run results
The default primary flag is set to display the province abbreviation. You can change the primary display flag to the full name of the province. To display the full name of the province, select the row with the province name and use the Action menu to set the primary flag for the selected row. The primary flag must be set for each province.
Navigation: FSM > Manage Geographies > Actions: Manage Geography Hierarchy > Actions: Edit Province > Primary and Alternative Names section
Steps to Enable
There are no steps necessary to enable this feature.
Time and Labor Calculation Component
Oracle Fusion Human Capital Management for Canada offers the ability to create the time entry calculation components for non-recurring earnings elements. This ability is available for those elements that have a calculation rule of hours * rate.
After you create the earnings element, use the Create Time Card Calculation Components process from the Checklist work area to create the time card components. You can then link the created Calculation Information Repository (CIR) shadow element. By linking the CIR shadow element, it transfers the employee’s time card entries (hours) from Oracle Fusion Time and Labor to Oracle Fusion Payroll, so that it is processed in the employee’s payroll. The time card entries appear as a “Time Cards” calculation component in Manage Calculation Cards, and also create an element entry.
Steps to Enable
There are no steps necessary to enable this feature.
Tips and Considerations
The Time Card Required flag for the employee is set in the Payment Details area under Payroll Details when the employee is created. Ensure you select the second Time Card Required flag as shown below.
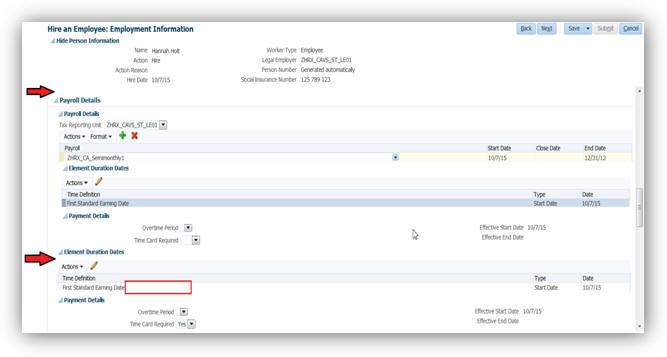
End-of-Year Reporting (T4 Only)
Oracle Fusion Human Capital Management for Canada offers a comprehensive process to generate the T4 year-end slip.
The T4 is the Federal Statement of Remuneration Paid for reporting an employee’s employment income, statutory deductions and other information required by Canada Revenue Agency (CRA). You must submit it to CRA at the end of every tax year. You must also submit it to your employees for tax filing purposes.
End-of-year processing for T4 includes the following activities:
- Setting up TRU transmitter information for federal reporting
- Setting up balance feeds to the T4 boxes and other information codes
- Using the Archive End-of-Year Payroll Results process from the Regulatory and Tax Reporting work area to process and view the results of the end-of-year archive for T4 information
- Using the End-of-Year Register Report process from the Regulatory and Tax Reporting work area to process the T4 register and view its output in Excel
- Using the Run End-of-Year Reports task from the Regulatory and Tax Reporting work area to generate the T4 PDF and view its output
- Using the Run End-of-Year Reports task from the Regulatory and Tax Reporting work area to generate the T4 interface and view its output
- Keeping a record of the information provided to employees and the governments for audit purposes
Payments reported on the T4 are elements with a secondary classification reporting type of T4/RL1.
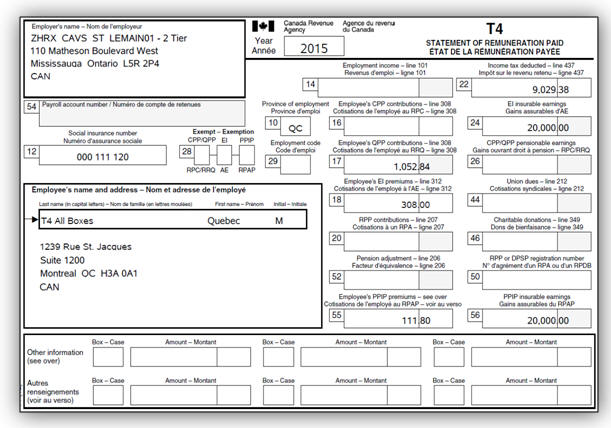
Sample T4
Use the Manage Legal Reporting Unit HCM Information task in the Setup and Maintenance work area to set up the transmitter information for federal reporting of T4 data.
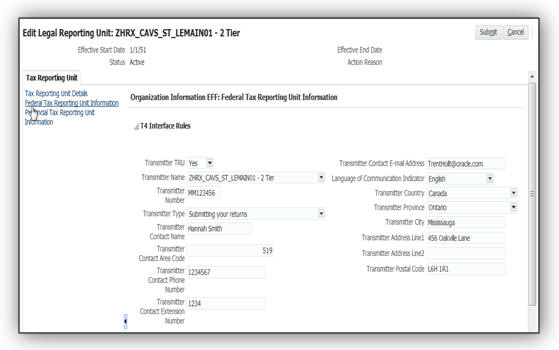
Manage Legal Reporting Unit Task
Additionally, you must review and configure balance feeds to the T4 boxes and other information codes before processing end-of-year reporting. Oracle pre-configures many balances for the T4 boxes for you, but you may need to manually configure some additional feeds.
Use the Manage Balance Definitions task from the Payroll Calculations work area.

Manage Balance Definitions Task
Use the Run End-of-Year Reports task from the Regulatory and Tax Reporting work area to generate the T4 slip.
Steps to Enable
There are no steps necessary to enable this feature.
End-of-Year Reporting (RL-1 Only)
Oracle Fusion Human Capital Management for Canada offers a comprehensive process to generate the RL-1 year-end slip.
The RL-1 slip is a provincial year-end form for reporting an employee’s employment income, statutory deductions and other information required by Revenu Quebec. At the end of every tax year you must submit RL-1 slip information to Revenu Quebec. You must also provide the slip to your employees for tax filing purposes.
End-of-year processing for the RL-1 includes the following activities:
- Setting up Quebec Provincial Tax registration information for each tax reporting unit (TRU) that has employees in Quebec.
- Setting up TRU transmitter information for Quebec reporting.
- Setting up balance feeds for the boxes and other information codes.
- Using the Archive End-of-Year Payroll Results process from the Regulatory and Tax Reporting work area to generate and view the results of the end-of-year archive for RL-1 information.
- Using the End-of-Year Register Report process from the Regulatory and Tax Reporting work area to generate the RL-1 register and view its output in Excel.
- Using the Run End-of-Year Reports task from the Regulatory and Tax Reporting work area to generate the RL-1 PDF and view its output.
- Using the Run End-of-Year Reports task from the Regulatory and Tax Reporting work area to generate the RL-1 electronic interface and view its output.
- Keeping a record of the information provided to employees and the governments for audit purposes.
Payments reported on the RL-1 are elements with a secondary classification reporting type of T4/RL1 or T4A/RL1.
Use the Manage Legal Reporting Unit Registrations task within the Define Legal Reporting Units for Human Capital Management task in the Setup and Maintenance work area to set up the Quebec Provincial Tax registration information.
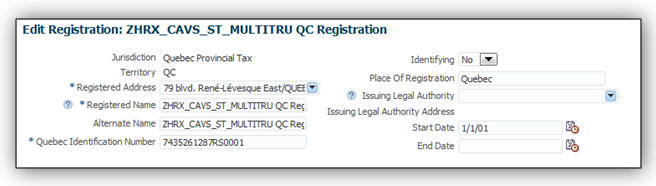
Set Up of the Quebec Provincial Tax Registration Information
Use the Manage Legal Reporting Unit HCM Information task in the Setup and Maintenance work area to set up the transmitter information for reporting RL-1 data.

Set Up the Transmitter Information for Reporting RL-1
Additionally, you must review and configure balance feeds to the RL-1 boxes and other information codes before processing end-of-year reporting. Oracle pre-configures many balances for the RL-1 boxes for you, but you may need to configure some additional feeds.
Use the Manage Balance Definitions task from the Payroll Calculations work area.
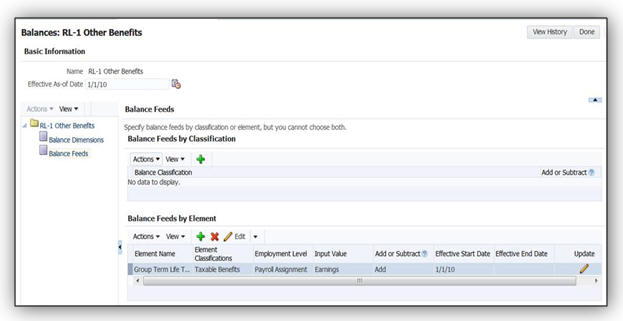
Manage Balance Definitions
Use the End-of-Year Register Report task to generate the register report and review employee information, as well as verify the box balances.
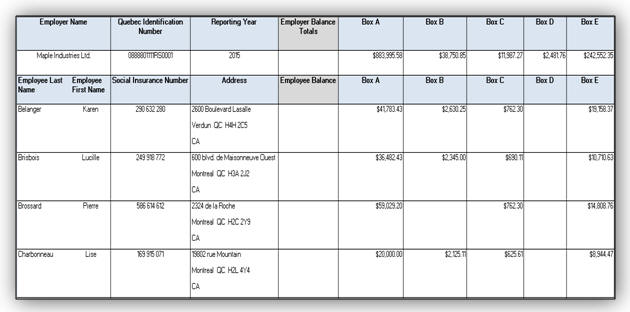
End-of-Year Register Report
Use the Run End-of-Year Reports task from the Regulatory and Tax Reporting work area to generate the RL-1 slip. The End-of-Year Reports process uses the archived payroll run results and generates employee details required for the RL-1.
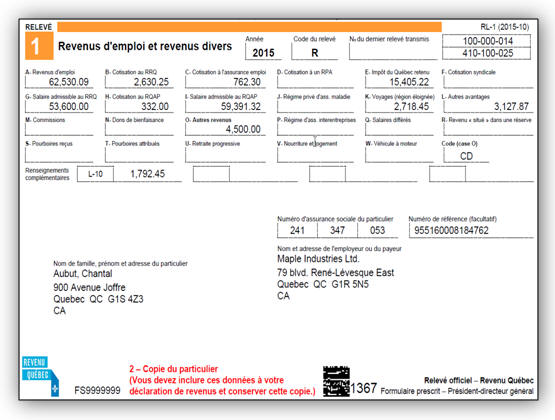
RL-1 slip
Steps to Enable
There are no steps necessary to enable this feature.
Tips and Considerations
Enter the Quebec Provincial Tax registration at payroll statutory unit (PSU) if the Quebec Identification Number applies to more than one TRU. Enter the registration at TRU if there is only one TRU within the PSU, or if you are overriding the default entry entered at PSU-level.
The registered name can be entered in either the Registered Name or the Alternate Name field. The user can choose to enter something unique in the Registered Name field. If the Alternate Name is populated, the Alternate Name entered will be displayed on the RL-1 slips and in the interface file. If it is not populated, the Registered Name will be displayed.
End-of-Year Reporting (T4A only)
Oracle Fusion Human Capital Management for Canada offers a comprehensive process to generate the T4A year-end slip.
The T4A slip is the Statement of Pension, Retirement, Annuity, and Other Income used to report these types of incomes to the Canada Revenue Agency (CRA). You must submit the T4A slip to the CRA at the end of every tax year. You must also provide the slips to your employees for tax filing purposes.
End-of-year processing for the T4A slip includes the following activities:
- Setting up TRU transmitter information for federal reporting
- Setting up balance feeds to the T4A boxes and other information codes
- Using the Archive End-of-Year Payroll Results process from the Regulatory and Tax Reporting work area to process and view the results of the end-of-year archive for T4A information
- Using the End-of-Year Register Report process from the Regulatory and Tax Reporting work area to process the T4A register and view its output in Excel
- Using the Run End-of-Year Reports task from the Regulatory and Tax Reporting work area to generate the T4A PDF and view its output
- Using the Run End-of-Year Reports task from the Regulatory and Tax Reporting work area to generate the T4A interface and view its output
- Keeping a record of the information provided to employees and the governments for audit purposes
Payments reported on the T4A are elements with a secondary classification reporting type of T4A/RL1 and T4A/RL2.
Use the Manage Legal Reporting Unit HCM Information task in the Setup and Maintenance work area to set up the transmitter information for reporting of T4A data.
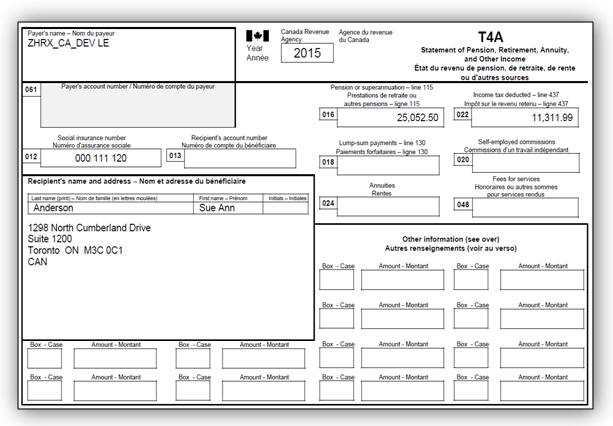
Additionally, you must configure balance feeds to the T4A boxes and other information codes before processing end-of-year reporting. Oracle pre-configures the income tax deducted box on the T4A, but you must manually configure any additional feeds.
Use the Manage Balance Definitions task from the Payroll Calculations work area to configure additional feeds.
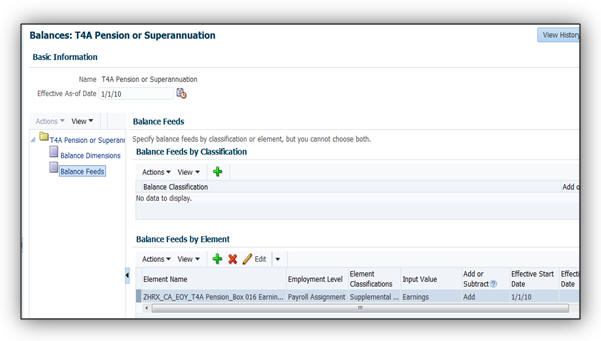
Use the End-of-Year Register Report task to generate the register report and review employee information, as well as verify the box balances.

Use the Run End-of-Year Reports task from the Regulatory and Tax Reporting work area to generate the T4A slip. The End-of-Year Reports process uses the archived payroll run results and generates employee details required for the T4A.
Steps to Enable
There are no steps necessary to enable this feature.
Involuntary deductions: Protected Pay Percentage
Oracle Fusion Human Capital Management for Canada provides a new Protected Pay Rule to specify how the employee’s protected pay is determined. A new rule is available to configure a percentage, in addition to an amount. This Protected Pay Percentage rule is defined as a new value definition.
You can define a Protected Pay Percentage for the deduction by selecting the value within the Edit Calculation Values tab on the involuntary deduction card for the employee. The rate is entered as a percent (for example, .50 for 50%). By defining this value, the formula creates a Percent of Protected Pay for the deduction, as follows:
- If the Disposable Income Calculation Rule is defined as Percentage of Gross Pay, the protected pay is a percentage of the employee’s gross wages.
- If the Disposable Income Calculation Rule is defined as Percentage of Net Pay, the protected pay is a percentage of the employee’s net pay.
- If the Disposable Income Calculation Rule is defined as Percentage of Net Pay Less Specific Deductions, the protected pay is a percentage of the employee’s net pay less specific deductions.
If multiple Involuntary Deduction components exist, each with a differing Protected Pay Percentage entered, the formula uses the highest percent defined.
You can select the rule from the list of values in the Edit Calculation Values within the Involuntary Deductions Calculation Card for the employee as displayed below.
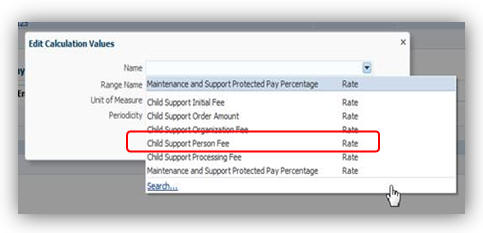
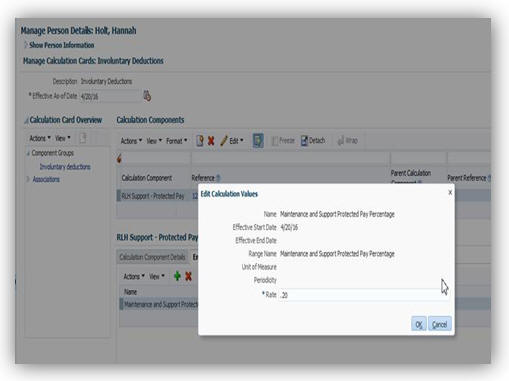
Steps to Enable
There are no steps necessary to enable this feature.
Human Capital Management for China
Oracle Fusion Human Capital Management for China supports country specific features and functions for China. It enables users to follow China’s business practices and comply with its statutory requirements.
The address style you select determines which address attributes are available and maintained in the application for a country or territory. For China Localization, one address style is defined, i.e. the Postal Address style.
You may define address validation via the Manage Geographies task by creating a list of values for specific address attributes. In this release we have enforced the 6-digit-only rule for postal code by enabling address validation through the Manage Features by Country or Territory task.

Setting up Selected Extension, Address Style and Address Validation
Once the validation is enforced, a code which is not 6-digit-only, will fail.
Steps to Enable
There are no steps necessary to enable this feature.
Include Enterprise Annuity Employer Contribution in the Monthly Income Tax Calculation
You can now comply with the tax updates issued by the State Administration of Taxation in December, 2009 and January, 2011. The tax calculation on enterprise annuity employer contribution is separated from the calculation on regular earnings, and the calculated tax amount is deducted from the employer contribution before it is deposited into an employee’s personal account.
Steps to Enable
You must set the Include in Monthly Tax Calculation field to ‘Yes’ for a territory that you would like to calculate tax on enterprise annuity employer contribution under the Taxes component group of your Payroll Statutory Unit Calculation Card, in order for the tax calculation to occur from an effective start date onwards.
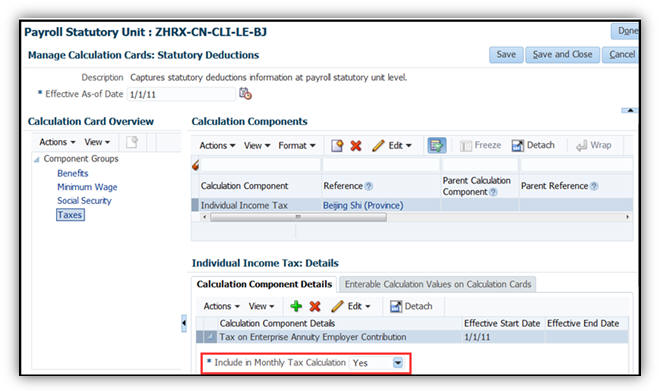
Setup for Include in Monthly Tax Calculation
Once the value is set to ‘Yes’, tax will be calculated on the employer contribution.
Enable the Global Element Result for China Localization
We have now increased efficiency in validating payroll run results by enabling the report for the China localization. It provides complete and meaningful information for users of Chinese legislative data groups.
You may submit the report from the Payroll Calculation work area or the Payroll Checklist work area.

Submitting Run Element Result Report
Steps to Enable
There are no steps necessary to enable this feature.
Tax Calculation on Severance Payments
We have enhanced this feature by adding a validation rule at the personal statutory calculation card level, where you set up the overriding years of service value used in the severance payments tax calculation. The rule is that the value must be a multiple of 0.5 within the range of 0.5 (inclusive) to 12 (inclusive).
Steps to Enable
There are no steps necessary to enable this feature.
Payroll Data Validation Report
We have enhanced the report by adding the Tax Reporting Unit (TRU) region. The region will show messages for a TRU if payroll needs to calculate individual Income Tax, Public Housing Fund, Social Insurance and/or Enterprise Annuity for the employees associated with the TRU, while registration information for any of the components is missing
Steps to Enable
There are no steps necessary to enable this feature.
Human Capital Management for Denmark
Oracle Fusion Human Capital Management for Denmark supports country specific features and functions for Denmark. It enables users to follow Denmark’s business practices and comply with its statutory requirements.
Maintaining Person Information
This feature supports the recording of person and other human resources data specific to Denmark, such as:
- Name Style and Formats
- Address Structure with Validation
- National Identifier: CPR Number
- Marital Status
- Contacts
- Highest Education Level
- Localized Bank Information
The Religion and Ethnicity information are hidden to meet local statutory, business and cultural practices and requirements.
An HR specialist can maintain the person information using the tasks under Person Management or New Person work areas.
Steps to Enable
There are no steps necessary to enable this feature.
Human Capital Management for Estonia
Oracle Fusion Human Capital Management for Estonia supports country specific features and functions for Estonia. It enables users to follow Estonia’s business practices and comply with its statutory requirements.
Maintaining Person Information
This feature supports the recording of person and other human resources data specific to Estonia, such as:
- Name Style and Formats, with the First Name and Last Name as mandatory fields.
- Address Structure
- The Estonian national identifier, Personal Code is validated for format
- Mandatory entry of Date of Birth and Gender
- Marital Status
- Passports
- Visa and Permit Types
- Highest Education Level
- Localized Bank Information
The Religion and Ethnicity information are hidden to meet local statutory, business and cultural practices and requirements.
Steps to Enable
There are no steps necessary to enable this feature.
Maintaining Employment Information
This feature supports employment information specific to Estonia, such as: Contract Type.
An HR specialist can maintain the person and employment information using the tasks under Person Management or New Person work areas.
Steps to Enable
There are no steps necessary to enable this feature.
Human Capital Management for Finland
Oracle Fusion Human Capital Management for Finland supports country specific features and functions for Finland. It enables users to follow Finland’s business practices and comply with its statutory requirements.
Maintaining Person Information
This feature supports the recording of person and human resources data specific to Finland, such as:
- Name Style and Formats with the First Name and Last Name as mandatory fields.
- Address Structure with Validation
- Marital Status
- Contacts
- Localized Bank Information
The Religion and Ethnicity information are hidden to meet local statutory, business and cultural practices and requirements.
Steps to Enable
There are no steps necessary to enable this feature.
Maintaining Employment Information
This feature supports employment information specific to Finland, such as: Contract Type.
Steps to Enable
There are no steps necessary to enable this feature.
Enabled Value for Marital Status
Marital Status attribute of ‘Other’ was re-enabled as a value for Finland.
Steps to Enable
There are no steps necessary to enable this feature.
Human Capital Management for France
Oracle Fusion Human Capital Management for France supports country specific features and functions for France. It enables users to follow France’s business practices and comply with its statutory requirements.
Statutory Reporting: Enhancement to Personnel Register
New information for home workers has been added to the Personnel register. If an employee is identified as a Home Worker, then this information is displayed in the report.
You can run this report from the Regulatory and Tax Reporting work area.
Steps to Enable
There are no steps necessary to enable this feature.
Tips and Considerations
You must specify the legal employer and the effective date to run the report.
Key Resources
For more information about this report, go to Applications Help for the following topic:
- Statutory Reports for France
Enhancement to Contract Type and Subtype
Permanent employees may be placed on a specific contract for a defined period. The following new contract subtypes are available for permanent employees.
- Contract generation period
- Period for job with a future
For fixed-term employees, a new contract type is now available:
- Job with a future
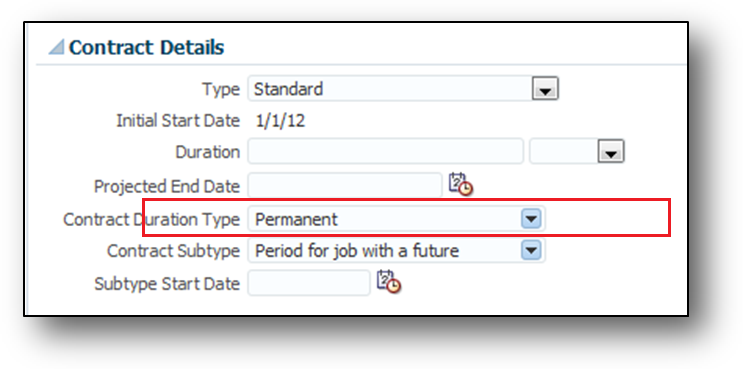
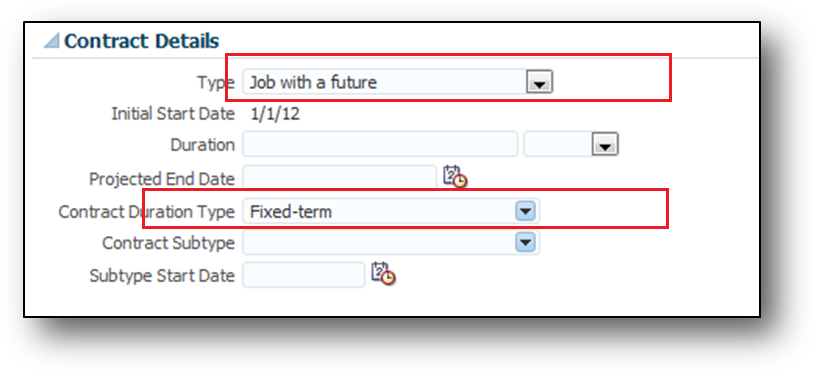
Contract Details
Steps to Enable
There are no steps necessary to enable this feature.
Key Resources
For more information about Contract Types for France, go to Applications Help for the following topic:
- Contract Types for France: Explained.
France legal authorities can issue temporary National Identifier. You can now enter a temporary National Identifier with no fixed format. The temporary National Identifier is not used in legal reports.
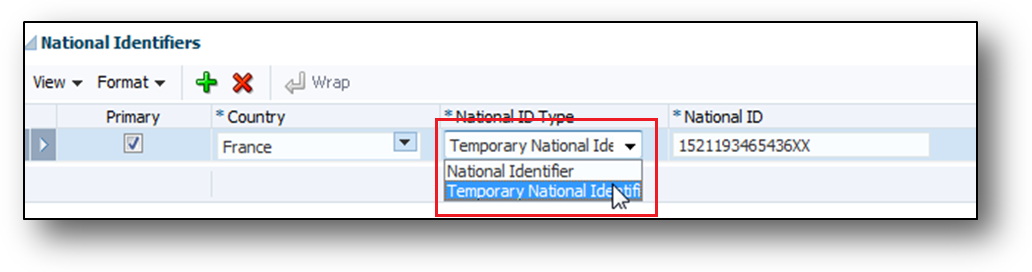
Temporary National Identifier
Steps to Enable
There are no steps necessary to enable this feature.
Automatic Calculation Card Creation
If your Oracle Product Usage is set to Oracle Fusion Payroll Interface, then a personal Statutory Deductions Calculation Card is automatically created for a person upon completion of the New Hire process. Use the Manage Personal Calculations task in the Payroll Calculations work area to view and update the card as needed. The automatically-created card contains the most commonly used values for the key fields.
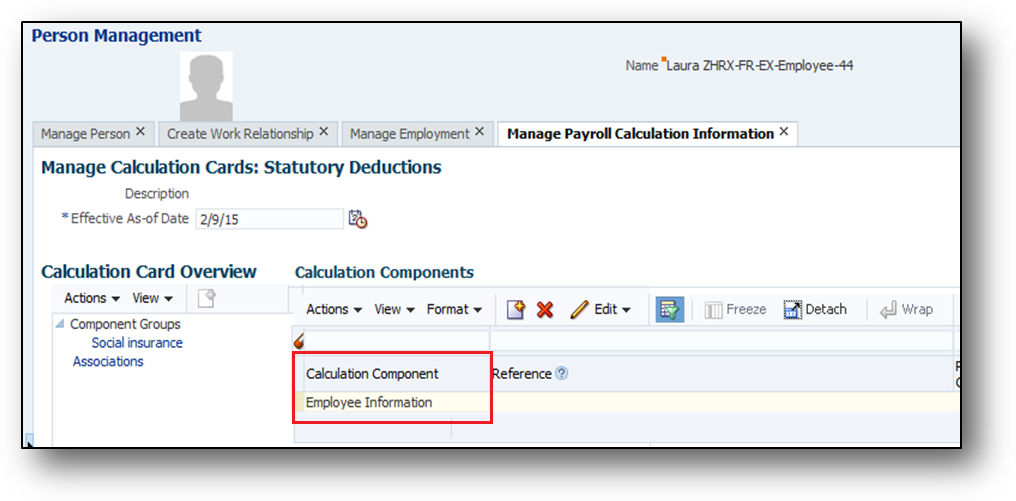
Calculation Card
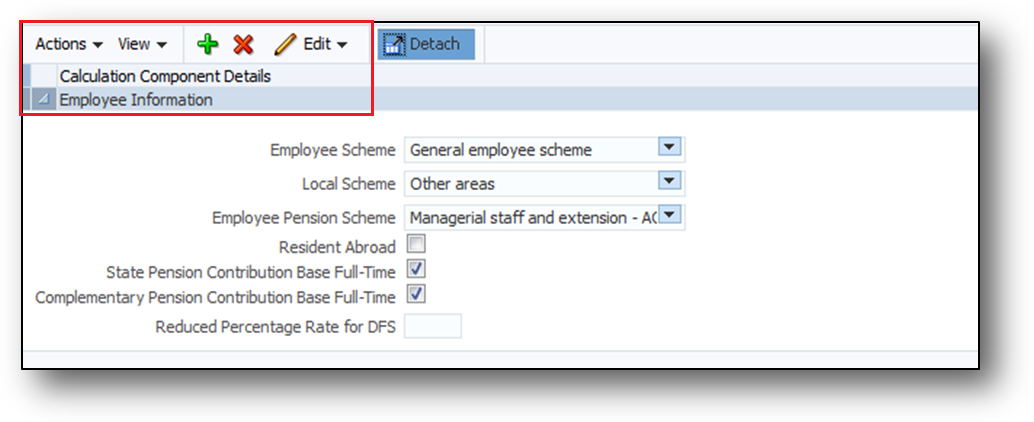
Calculation Component Details
Steps to Enable
There are no steps necessary to enable this feature.
Key Resources
For more information about Statutory Calculation Cards, go to Applications Help for the following topic:
- Automatic Statutory Deductions Calculation Card Creation for France: Explained
The following reports are enabled with France-specific requirements to check element entries at employee level, before running the Payroll Interface.
| Report Name |
Purpose |
| Payroll Balance |
Displays balance results of the payroll run. The report extracts the run balance results for a specific period. Run this report from the Payment Distribution work area. |
| Element Result |
View a listing of the elements and pay values processed for each payroll relationship. Run this report from the Payroll Calculations work area. |
Steps to Enable
There are no steps necessary to enable this feature.
Key Resources
For more information about these reports, go to Applications Help for the following topics:
- Payroll Balance Report: Explained
- Payroll Calculation Reports: Overview
- Element Results Report: Explained
Human Capital Management for Germany
Oracle Fusion Human Capital Management for Germany supports country specific features and functions for Germany. It enables users to follow Germany’s business practices and comply with its statutory requirements.
Legislative Changes for Name and Address Validations
To comply with the legislative changes that were published by the Social Insurance authority on January 1, 2014, the following changes are made for the German name and address validations:
- Removal of validations for the last name and birth name
- Modifications for the validation of the first name and last name
- Modification for the street address
Steps to Enable
There are no steps necessary to enable this feature.
Legislative Changes for the Disability Report
The following changes are made to comply with the legislative requirements to deliver the workforce and disabled employed person’s information on a yearly basis:
- Employer data: The lookups of the Legal Form field are enhanced to include:
- 36 – Other
- 33 – w.V.
- 34 –B.V.
- 35 – B.V. & Co. KG.
- Person’s disability data: The Authority Location field is no longer a mandatory field.
- The Work Time field is modified to include more detailed information on its usage.
Steps to Enable
There are no steps necessary to enable this feature.
Human Capital Management for Hungary
Oracle Fusion Human Capital Management for Hungary supports country specific features and functions for Hungary. It enables users to follow Hungary’s business practices and comply with its statutory requirements.
Maintaining Person Information
This feature supports the recording of person and human resources data specific to Hungary, such as:
- Name Style and Formats with the First Name and Last Name as mandatory fields.
- Address Structure with Validation
- Validation of the following National Identifiers:
- Tax identification number
- TAJ
- Pensioner Registration Number
- Contacts
- Passports
- Localized Bank Information
The Religion and Ethnicity information are hidden to meet local statutory, business and cultural practices and requirements.
Steps to Enable
There are no steps necessary to enable this feature.
Maintaining Employment Information
This feature supports employment information specific to Hungary, such as: Assignment Category.
An HR specialist can maintain the person and employment information using the tasks under Person Management or New Person work areas.
Steps to Enable
There are no steps necessary to enable this feature.
Human Capital Management for India
Oracle Fusion Human Capital Management for India supports country specific features and functions for India. It enables users to follow India’s business practices and comply with its statutory requirements.
We have improved the data quality by leveraging new address validations for India. The following validations are added to the Manage Features by Country or Territory task when selecting the Address Style for India:
- The Supplemental Taxation and Reporting Address style is defaulted for India. Users can not change this address style.
- If the Address Validation check box is checked, the Pin Code entered in the address is validated to be six digits.
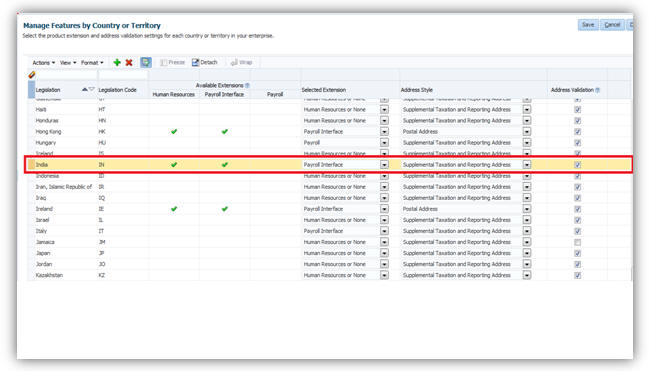
Selecting an Extension, Address Style and Address Validation
Steps to Enable
There are no steps necessary to enable this feature.
The list of values for Contact Person on India Nomination Extra Person Information page will show only the contacts associated with the employee after applying Update 8 patch.
Steps to Enable
There are no steps necessary to enable this feature.
Human Capital Management for Ireland
Oracle Fusion Human Capital Management for Ireland supports country specific features and functions for Ireland. It enables users to follow Ireland’s business practices and comply with its statutory requirements.
Automatic Creation of Deduction Card
If a Tax Reporting Unit is selected, a deduction card is automatically created during the new hire flow which contains only one component and is automatically displayed with the works number of the employee. This will enable information to be provided for the Payroll Interface.
If your Payroll Product Usage is set to Payroll Interface and a Tax Reporting Unit is selected, then a statutory calculation card is created. A calculation card captures values required for calculating and processing payroll deductions.
If a TRU is selected in the Payroll Details section on the Hire an Employee: Employment Information page, an association to that TRU is added to the calculation card.
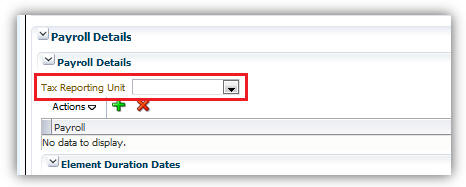
Selecting a TRU in the Payroll Details
The card contains only one component and is automatically displayed with the worker number of the employee. Once the card is created a Payroll Manager or a Payroll Administrator can view the deduction components and the values that are defaulted on the card.
Steps to Enable
There are no steps necessary to enable this feature. Calculation cards are only created for users with a Payroll Interface license.
Key Resources
For more information about Automatic Card Creation for Ireland, go to Application Help for the following topic:
- Automatic Calculation Card Creation for Ireland: Explained
The Element Results Report enables you to view a listing of all elements and pay values for an employee.
You can view the details of employees with Employee Full Name, Employee Number, Payroll Relationship, Payroll, Process Date, Element Name, and Element Result. This is a global report and you can use the report for validation of payroll items.
The report is run from the Payroll Calculation area.
Steps to Enable
There are no steps necessary to enable this feature. This report usually runs every pay period after the Payroll Activity Report.
The Payroll Balance Report enables you to view the payroll run results and validate the payroll runs and items. This is a global report and is run from the Payroll Calculation area.
Steps to Enable
There are no steps necessary to enable this feature.
Human Capital Management for Japan
Oracle Fusion Human Capital Management for Japan supports country specific features and functions for Japan. It enables users to follow Japan’s business practices and comply with its statutory requirements.
Maintaining Person Information
This feature supports the recording of person and human resources data specific to Japan, such as:
- Person Name validation
- Address Structure with Validation
- Contacts
- Disabilities
- Highest Education Level
- Localized Bank Information
The Religion and Ethnicity information are hidden to meet local statutory, business and cultural practices and requirements.
Steps to Enable
There are no steps necessary to enable this feature.
Maintaining Employment Information
This feature supports employment information specific to Japan, such as: Assignment Category.
An HR specialist can maintain the person and employment information using the tasks under Person Management or New Person work areas.
Steps to Enable
There are no steps necessary to enable this feature.
A new National Identifier lookup value with input validation has been delivered to support the introduction of its new national identifier “My Number”. An error message is displayed if the entered value doesn’t meet the correct format of a 12-digit number.
Steps to Enable
There are no steps necessary to enable this feature.
Key Resources
For more information on the My Number solution, especially for the security compliance, go to My Oracle Support for the following documents:
- Oracle Fusion Global Human Resources Cloud Services for Japan: Solution Overview of My Number Act 2016 Japan (Document ID 2087317.1)
- Oracle Fusion Global Human Resources クラウドサービス 日本仕様機能: マイナンバー法ソリューション概要 (Document ID 2092930.1)
For more information on national identifier validation, go to My Oracle Support for the following document:
- Validating National Identifier Numbers in Oracle Fusion Human Capital Management Release 10 (Document ID 2159758.1)
Human Capital Management for Kazakhstan
Oracle Fusion Human Capital Management for Kazakhstan supports country specific features and functions for Kazakhstan. It enables users to follow Kazakhstan’s business practices and comply with its statutory requirements.
Maintaining Person Information
This feature supports the recording of person and human resources data specific to Kazakhstan, such as:
- Name Style and Formats including Academic Title, with the Given Name and Surname as mandatory fields.
- Address Structure and Validation
- Validation of national Identifier, Individual Identification Number (IIN) for format.
- Contacts
- Passports
- Visa and Permit Types and Categories
- Highest Education Level
- Mandatory entry of Date of Birth, Marital Status, and Gender
- Localized Bank Information
The Religion and Ethnicity information are hidden to meet local statutory, business and cultural practices and requirements.
An HR specialist can maintain the person information using the tasks under Person Management or New Person work areas.
Steps to Enable
There are no steps necessary to enable this feature.
Human Capital Management for Kuwait
Oracle Fusion Human Capital Management for Kuwait supports country specific features and functions for Kuwait. It enables users to follow Kuwait’s business practices and comply with its statutory requirements.
Element Template for Additional Social Insurance
You can now create the payroll definitions required to deduct any additional social insurance contributions as requested by the Public Institution for Social Security. You can use the Manage Elements task to create the element and related definitions such as balances, formulas, and a calculation component that is tied to those definitions. You should add these definitions as a child component to the employee's social insurance details calculation component.
Steps to Enable
There are no steps necessary to enable this feature.
Key Resources
For more information about element templates, go to Applications Help for the following topic:
- Elements: Explained.
Statutory Reporting: Update to Report 103 - New Hires and Terminations
The monthly report that contains details of commencement or termination of an insured employee is updated to include any Additional Social Insurance contributions that have been deducted this period.
You can run this report from the Regulatory and Tax Reporting work area.
Steps to Enable
There are no steps necessary to enable this feature.
Key Resources
For more information about Statutory Reports for Kuwait, go to Applications Help for the following topic:
- Statutory Reports for Kuwait.
Statutory Reporting: Update to Report 166 - Monthly Contributions
The monthly report that contains details of the total social insurance payments for an employer is updated to include Unemployment Insurance contributions. You can run this report from the Regulatory and Tax Reporting work area.
Steps to Enable
There are no steps necessary to enable this feature.
Key Resources
For more information about Statutory Reports for Kuwait, go to Applications Help for the following topic:
- Statutory Reports for Kuwait
Statutory Reporting: IPE Consolidated Report - New Hire and Termination
You can now generate a monthly report that contains details of new hires and terminations in a calendar monthly period for citizens of the Gulf Cooperation Council (GCC). This report must be submitted to the Social Insurance office.
You can run this report from the Regulatory and Tax Reporting work area.
Steps to Enable
There are no steps necessary to enable this feature.
Key Resources
For more information about this report, go to Applications Help for the following topic:
- Kuwaiti IPE Consolidated Report
Gratuity Calculation 2013 Enhancement
Employers can opt to pay a reduced, or nil, gratuity amount based on the social insurance contributions paid by the employer for the specific employee, rather than the standard gratuity calculation. The payroll process will calculate gratuity based on the gratuity option selected on the Employer Gratuity Details.
Steps to Enable
There are no steps necessary to enable this feature.
Key Resources
For more information about gratuity calculations for Kuwait, go to Applications Help for the following topic:
- Employer Calculation cards for Kuwait: Explained.
Monthly Gratuity Accrual Process
The payroll process calculates a gratuity amount each month. This is for information only and is not paid. This is the amount that an employee would be entitled to, if they were terminated at the end of that month and if they were eligible for payment.
A record of the full accrued amount from the beginning of employment and the incremented accrued amount, the periodic difference, is available to be transferred to General Ledger.
Steps to Enable
There are no steps necessary to enable this feature.
Social Insurance Enhancement for Government Sector Terminations
The payroll process now calculates Social Insurance on earnings up to the last working date for Government Sector employees.
There are no steps necessary to enable this feature.
The following global reports have been enabled to meet Kuwait-specific requirements:
| Report Name |
Purpose |
|---|---|
| Deduction Report |
Validates the deduction amounts being processed. You can run this report from the Payroll Calculation work area. |
| Gross-to-Net |
View summary or detail listings for the total results calculated in the payroll run. Run this report from the Payroll Calculations work area. |
| Payment Register |
Displays results used to verify and audit payment distributions. Run this report from Payroll Checklist work area or the Payroll Calculations work area. |
| Payroll Register |
Displays details used to verify, validate, and audit payroll calculations. Compare this report to the Payroll Activity Report to ensure that payroll results have been archived correctly. Run this report from Payroll Checklist work area or the Payroll Calculations work area. |
| Balance Exception |
Identifies values that vary compared to other values for the same balance dimension. Run this report from Payment Distribution work area or Payroll Checklist work area. |
Steps to Enable
There are no steps necessary to enable this feature.
Key Resources
For more information about Reports, go to Applications Help for the following topics:
- Payroll Calculation Reports: Overview
- Deduction Report
- Payment Register: Explained
- Payroll Register: Explained
- Payroll Activity Report
- Balance Exception Report: Explained
Human Capital Management for Latvia
Oracle Fusion Human Capital Management for Latvia supports country specific features and functions for Latvia. It enables users to follow Latvia’s business practices and comply with its statutory requirements.
Maintaining Person Information
This feature supports the recording of person and human resources data specific to Latvia, such as:
- Name Style and Formats with the First Name and Last Name as mandatory fields.
- Address Structure
- Marital Status
- Passport
- Highest Education Level
- The Latvian national identifier, Personal Code is validated for correct format
- Localized Bank Information
- Mandatory entry of Date of Birth and Gender
The Religion and Ethnicity information are hidden to meet local statutory, business and cultural practices and requirements.
Steps to Enable
There are no steps necessary to enable this feature.
Maintaining Employment Information
This feature supports employment information specific to Latvia, such as: Contract Type.
An HR specialist can maintain the person and employment information using the tasks under Person Management or New Person work areas.
Steps to Enable
There are no steps necessary to enable this feature.
Human Capital Management for Liechtenstein
Oracle Fusion Human Capital Management for Liechtenstein supports country specific features and functions for Liechtenstein. It enables users to follow Liechtenstein’s business practices and comply with its statutory requirements.
Maintaining Person Information
This feature supports the recording of person and human resources data specific to Liechtenstein, such as:
- The Name Style with the First Name and Last Name as mandatory fields.
- Address Structure with Validation
- Religion
- Marital Status
- Contacts
- Visa and Permit Types and Categories
- National Identifier: Personal identification number
- Localized Bank Information
The Ethnicity information is hidden to meet local statutory, business and cultural practices and requirements.
Steps to Enable
There are no steps necessary to enable this feature.
Human Capital Management for Lithuania
Oracle Fusion Human Capital Management for Lithuania supports country specific features and functions for Lithuania. It enables users to follow Lithuania’s business practices and comply with its statutory requirements.
Maintaining Person Information
This feature supports the recording of person and human resources data specific to Lithuania, such as:
- Name Style and Formats with the First Name and Last Name as mandatory fields.
- Address Structure
- The Lithuanian national identifier, Personal Code is validated for correct format
- Marital Status
- Passport
- Highest Education Level
- Visa and Permit Types
- Localized Bank Information
- Mandatory entry of Date of Birth and Gender
The Religion and Ethnicity information are hidden to meet local statutory, business and cultural practices and requirements.
Steps to Enable
There are no steps necessary to enable this feature.
Maintaining Employment Information
This feature supports employment information specific to Lithuania, such as: Contract Type.
An HR specialist can maintain the person and employment information using the tasks under Person Management or New Person work areas.
Steps to Enable
There are no steps necessary to enable this feature.
Human Capital Management for Malaysia
Oracle Fusion Human Capital Management for Malaysia supports country specific features and functions for Malaysia. It enables users to follow Malaysia’s business practices and comply with its statutory requirements.
Maintaining Person Information
This feature supports the recording of person and human resources data specific to Malaysia, such as:
- Name Style and Formats with the First and Last Name as mandatory fields.
- Postal Code validation
- Religion
- Ethnicity
- Gender
- Highest Education Level
- Visa and Permit Types
- Validation of the following National Identifiers for the correct format:
- Old Identification Number
- Localized Bank Information
Steps to Enable
There are no steps necessary to enable this feature.
Human Capital Management for Mexico
Oracle Fusion Human Capital Management for Mexico supports country specific features and functions for Mexico. It enables users to follow Mexico’s’ business practices and comply with its statutory requirements.
National Identifier Validation
Oracle Fusion Human Capital Management for Mexico provides three levels of validation for CURP and RFC national identifiers. These levels depend on the country extensions settings, as given below:
| Country Extension |
Level of Validation |
| Human Resources or None |
Basic |
| Payroll Interface |
Intermediate |
| Payroll |
Full |
- The basic validation includes the following:
- Length
- Format (alphabetic, alphanumeric, and numeric characters)
- Intermediate validation includes the following:
- Basic Validation
- Structure rules (name letters and date of birth)
- Exception rules (names and words to ignore, inappropriate words, and so on)
- If an exception occurs the application sends a warning message, however, you can continue entering the information.
- Full validation includes the following:
- Basic Validation
- Structure rules (name letters and date of birth)
- Exception rules (names and words to ignore, inappropriate words, and so on)
- If an exception occurs the application errors out and you cannot continue until you fix the data.
Steps to Enable
Use the Manage Features by Country or Territory in the Setup and Maintenance task to select the country extension.
Scroll down to the Mexico legislation row and select an appropriate country extension.

Human Capital Management for the Netherlands
Oracle Fusion Human Capital Management for the Netherlands supports country specific features and functions for the Netherlands. It enables users to follow the Netherlands’ business practices and comply with its statutory requirements.
Gatekeeper Law (Law Poortwachter)
You can now comply with the Gatekeeper Law rules and procedures and manage your sickness absences using:
- Absences case management, including document attachments and Gatekeeper Law document types, such as the plan of approach.
- Predefined Gatekeeper Law HR checklist template (can be copied and customized).
- Allocation of checklist based on existence of valid Gatekeeper Law absence case.
- Allocation of Gatekeeper Law checklist tasks using an Enterprise Scheduler Service (ESS) process.
- Automatic calculation and recalculation of task start and end dates based on the absences associated with the case.
- Automatic suspension of checklist tasks when an employee returns to work and resumption of outstanding tasks if the employee goes on another (related) sickness absence during the 28-day period.
A new Absence Category for Gatekeeper Law is available for the Netherlands. Before creating an absence case for the Gatekeeper Law, set up your sickness absence types and associate them with the predefined Gatekeeper Law absence category.

Example Absence Case for the Gatekeeper Law
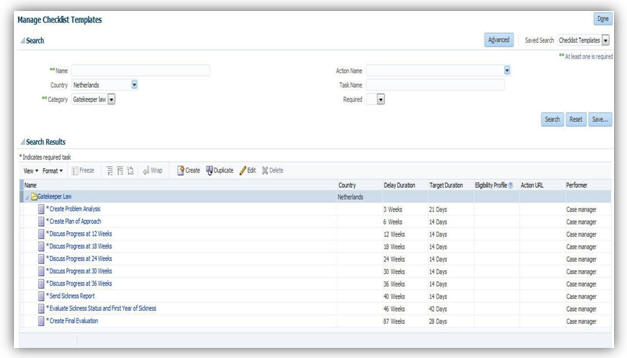
Example of a Gatekeeper Law Checklist
Steps to Enable
There are no steps necessary to enable this feature.
Key Resources
For more information about the Gatekeeper Law, go to Applications Help for the following topic:
- Gatekeeper Law Process: Explained and related topics.
The following global reports are enabled to meet Dutch-specific requirements:
| Report Name |
Purpose |
| Payroll Balance |
Displays balance results of the payroll run. The report extracts the run balance results for a specific period. Run this report from the Payment Distribution work area. |
| Balance Exception |
Identifies values that vary compared to other values for the same balance dimension. Run this report from Payment Distribution work area or Payroll Checklist work area. |
| Element Result |
View a listing of the elements and pay values processed for each payroll relationship. Run this report from the Payroll Calculations work area. |
Steps to Enable
There are no steps necessary to enable this feature.
Key Resources
For more information about these reports, go to Applications Help for the following topics:
- Payroll Balance Report: Explained
- Element Results Report: Explained
- Balance Exception Report: Explained
Human Capital Management for New Zealand
Oracle Fusion Human Capital Management for New Zealand supports country specific features and functions for New Zealand. It enables users to follow New Zealand’s business practices and comply with its statutory requirements.
Maintaining Person Information
This feature supports the recording of person and human resources data specific to New Zealand, such as:
- Name Style and Formats with the First Name and Last Name as mandatory fields.
- Validation of the national identifier, IRD number for the correct format, correct value range, and check digit.
- Gender
- Ethnicity
- Marital Status
- Contacts
- Highest Education Level
- Localized Bank Information
The Religion and Region of Birth information are hidden to meet local statutory, business and cultural practices and requirements.
Steps to Enable
There are no steps necessary to enable this feature.
Maintaining Employment Information
This feature supports employment information specific to New Zealand, such as: Assignment Category.
Steps to Enable
There are no steps necessary to enable this feature.
Enabled Value for Marital Status
Marital Status attribute of ‘Common Law’ was re-enabled as a value for New Zealand.
Steps to Enable
There are no steps necessary to enable this feature.
Human Capital Management for Norway
Oracle Fusion Human Capital Management for Norway supports country specific features and functions for Norway. It enables users to follow Norway’s business practices and comply with its statutory requirements.
Maintaining Person Information
This feature supports the recording of person and human resources data specific to Norway, such as:
- Name Style and Formats with the First Name 1 and Last Name 2 as mandatory fields.
- Address Formats and Types with Validation
- Marital Status
- Contacts
- Passports
- Visa and Permit Types
- The following National Identifiers
- Norwegian National Identifier
- Localized Bank Information
The Ethnicity, Religion, and Region of Birth information are hidden to meet local statutory, business and cultural practices and requirements.
Steps to Enable
There are no steps necessary to enable this feature.
Human Capital Management for Oman
Oracle Fusion Human Capital Management for Oman supports country specific features and functions for Oman. It enables users to follow Oman’s business practices and comply with its statutory requirements.
Maintaining Person Information
This feature supports the recording of person and human resources data specific to Oman, such as:
- Name Style and Formats with the First Name and Last Name as mandatory fields.
- Address Formats with Validation
- Ethnicity
- Religion
- Marital Status
- Contacts
- Disabilities
- Visa and Permit Types
- Highest Education Level
- Validation of the following National Identifiers
- Civil Identity Number
- Social Insurance Number, which is validated for correct format.
- Localized Bank Information
- Mandatory Date of Birth information
Steps to Enable
There are no steps necessary to enable this feature.
Human Capital Management for Poland
Oracle Fusion Human Capital Management for Poland supports country specific features and functions for Poland. It enables users to follow Poland’s business practices and comply with its statutory requirements.
Maintaining Person Information
This feature supports the recording of person and human resources data specific to Poland, such as:
- Name Style and Formats with the First Name and Last Name as mandatory fields.
- Address Formats and Address Types with Validation
- Marital Status
- Contacts
- Passports
- Highest Education Level
- Validation of the national identifier, PESEL number for correct format.
- Localized Bank Information
- Mandatory Date of Birth and Gender Information
The Religion and Ethnicity information are hidden to meet local statutory, business and cultural practices and requirements.
Steps to Enable
There are no steps necessary to enable this feature.
Human Capital Management for Qatar
Oracle Fusion Human Capital Management for Qatar supports country specific features and functions for Qatar. It enables users to follow Qatar’s business practices and comply with its statutory requirements.
Maintaining Person Information
This feature supports the recording of person and human resources data specific to Qatar, such as:
- Name Style and Formats with the First Name and Last Name as mandatory fields.
- Address Formats with Validation
- Ethnicity
- Religion
- Marital Status
- Contacts
- Disabilities
- Visa and Permit Types
- Highest Education Level
- Validation of the following National Identifiers for correct format:
- Civil Identity Number
- Social Insurance Number
- Localized Bank Information
- Mandatory Date of Birth Information
Steps to Enable
There are no steps necessary to enable this feature.
Human Capital Management for Republic of Korea
Oracle Fusion Human Capital Management for Republic of Korea supports country specific features and functions for Republic of Korea. It enables users to follow Republic of Korea’s business practices and comply with its statutory requirements.
Maintaining Person Information
This feature supports the recording of person and human resources data specific to the Republic of Korea, such as:
- Name Style and Formats
- Address Structure
- Format validation of the national identifier for Resident Registration Number. Marital Status
- Contacts
- Highest Education Level
- Disabilities
- Mandatory entry of Date of Birth and Gender
- Localized Bank Information
The Religion and Ethnicity information are hidden to meet local statutory, business and cultural practices and requirements.
An HR specialist can maintain the person information using the tasks under Person Management or New Person work areas.
Steps to Enable
There are no steps necessary to enable this feature.
Human Capital Management for Romania
Oracle Fusion Human Capital Management for Romania supports country specific features and functions for Romania. It enables users to follow Romania’s business practices and comply with its statutory requirements.
National Identifier Validation
The local specific value ‘CNP’ (Cod Numeric Personal) is delivered with validation. An error message is displayed if you do not enter the CNP with the correct format and check-digit.
Steps to Enable
There are no steps necessary to enable this feature.
Key Resources
For more information on national identifier validation, go to My Oracle Support for the following document:
- Validating National Identifier Numbers in Oracle Fusion Human Capital Management Release 10 (Document ID 2159758.1)
Human Capital Management for Saudi Arabia
Oracle Fusion Human Capital Management for Saudi Arabia supports country specific features and functions for Saudi Arabia. It enables users to follow Saudi Arabia’s business practices and comply with its statutory requirements.
Statutory Reporting: IPE Consolidated Report - New Hire and Termination
You can now generate a monthly report that contains details of new hires and terminations in a calendar monthly period for citizens of the GCC. This report must be submitted to the Social Insurance office.
Steps to Enable
There are no steps necessary to enable this feature. You can run this report from the Regulatory and Tax Reporting work area.
Key Resources
For more information about these reports, go to Applications Help for the following topic:
- Saudi IPE Consolidated Report.
Statutory Reporting: Saudi Arabia IPE Report - Annual Salary
You can now generate a report that contains details of the basic salary and housing allowance for citizens of the GCC. This report must be submitted to the Social Insurance office each January.
You can run this report from the Regulatory and Tax Reporting work area.
Steps to Enable
There are no steps necessary to enable this feature.
Monthly Gratuity Accrual Process
The payroll process calculates a gratuity amount each month. This is for information only and is not paid. This is the amount that an employee would be entitled to, if they were terminated at the end of that month and if they were eligible for payment.
A record of the full accrued amount from the beginning of employment and the incremented accrued amount, the periodic difference, is available to be transferred to General Ledger.
Steps to Enable
There are no steps necessary to enable this feature.
The following global reports are enabled to meet Saudi-specific requirements:
| Report Name |
Purpose |
| Deduction Report |
Validates the deduction amounts being processed. Run this report from the Payroll Calculation work area. |
| Payment Register |
Displays results used to verify and audit payment distributions. You can run this report from Payroll Checklist work area or the Payroll Calculations work area. |
| Balance Exception |
Identifies values that vary compared to other values for the same balance dimension. Run this report from Payment Distribution work area or Payroll Checklist work area. |
Steps to Enable
There are no steps necessary to enable this feature.
Key Resources
For more information about these reports, go to Applications Help for the following topics:
- Deduction Report
- Payment Register: Explained
- Balance Exception Report: Explained
Human Capital Management for Serbia
Oracle Fusion Human Capital Management for Serbia supports country specific features and functions for Serbia. It enables users to follow Serbia’s business practices and comply with its statutory requirements.
Value Enabled for Highest Education Level
The value ‘University degree’ was enabled as a value for the Highest Education Level attribute for Serbia.
Steps to Enable
There are no steps necessary to enable this feature.
Human Capital Management for Spain
Oracle Fusion Human Capital Management for Spain supports country specific features and functions for Spain. It enables users to follow Spain’s business practices and comply with its statutory requirements.
National Identifiers Validation
A specific list of values is delivered and validated for the Spanish National Identifier for NIF, Foreigner's Identification Number, and Social Security Number.
Steps to Enable
There are no steps necessary to enable this feature.
Key Resources
For more information on national identifier validation, go to My Oracle Support for the following document:
- Validating National Identifier Numbers in Oracle Fusion Human Capital Management Release 10 (Document ID 2159758.1)
Human Capital Management for Sweden
Oracle Fusion Human Capital Management for Sweden supports country specific features and functions for Sweden. It enables users to follow Sweden’s business practices and comply with its statutory requirements.
Maintaining Person Information
This feature supports the recording of person and human resources data specific to Sweden, such as:
- Name Style and Formats with the First Name and Last Name as mandatory fields.
- Address Formats and Address Types with Validation
- National Identifiers:
- Coordination number
- Personal identification number
- Marital Status
- Contacts
- Passports
- Visa and Permit Types
- Localized Bank Information
The Ethnicity, Religion and Place of Birth information are hidden to meet local statutory, business and cultural practices and requirements.
Steps to Enable
There are no steps necessary to enable this feature.
Maintaining Employment Information
This feature supports employment information specific to Sweden, such as: Worker Category.
An HR Specialist can maintain the person and employment information using the tasks under Person Management or New Person work areas.
Steps to Enable
There are no steps necessary to enable this feature.
Enhanced Post Number Validation
The Swedish Post Number validation is enhanced to accept a number in the format "NNN NN" (one space between 3rd and 4th digit), in addition to the already accepted format “NNNNN”.
Steps to Enable
There are no steps necessary to enable this feature.
Human Capital Management for Switzerland
Oracle Fusion Human Capital Management for Switzerland supports country specific features and functions for Switzerland. It enables users to follow Switzerland’s business practices and comply with its statutory requirements.
The Swiss Worker Data Validation Report helps you to validate the following:
- A reporting establishment is assigned for each person at the employment term level.
- If a contact type of guardian is included for persons less than 18 years of age.
You can start the Run Worker Data Validation Report process from either of these work areas:
- Data exchange
- Payroll checklist
The delivered output is in PDF format and lists persons without an assigned reporting establishment in the employment data or those who are below 18 years of age and without a contact guardian in the person’s data.

Worker Data Validation Report
Steps to Enable
There are no steps necessary to enable this feature.
Human Capital Management for Taiwan
Oracle Fusion Human Capital Management for Taiwan supports country specific features and functions for Taiwan. It enables users to follow Taiwan’s business practices and comply with its statutory requirements.
Maintaining Person Information
This feature supports the recording of person and human resources data specific to Taiwan, such as:
- Name Style and Formats with the First Name and Last Name as mandatory fields.
- Address Formats
- Validation of the Taiwanese National Identifier for correct format and checksum value.
- Marital Status
- Contacts
- Visa and Permit Types
- Disabilities
- Highest Education Level
The Religion and Ethnicity information are hidden to meet local statutory, business and cultural practices and requirements.
Steps to Enable
There are no steps necessary to enable this feature.
Human Capital Management for Ukraine
Oracle Fusion Human Capital Management for Ukraine supports country specific features and functions for Ukraine. It enables users to follow Ukraine’s business practices and comply with its statutory requirements.
Maintaining Person Information
This feature supports the recording of person and human resources data specific to Ukraine, such as:
- Name Style and Formats including Academic Title, with the Given Name and Surname as mandatory fields.
- Address Formats with Validation
- Validation of the national identifier, Individual Identification Number (IIN) for correct format.
- Contacts
- Passports
- Highest Education Level
- Localized Bank Information
- Mandatory Date of Birth, Gender and Marital Status Information
The Ethnicity and Religion information are hidden to meet local statutory, business and cultural practices and requirements.
Steps to Enable
There are no steps necessary to enable this feature.
Human Capital Management for The United Kingdom
Oracle Fusion Human Capital Management for the United Kingdom (UK) supports country specific features and functions for the United Kingdom. It enables users to follow the United Kingdom’s business practices and comply with its statutory requirements.
End of Year Process of P60 End of Year Statement
At the end of the tax year, a P60 statement must be provided to all current employees. This statement provides employee and employer data including year-to-date values of earnings, tax and National Insurance deductions, and any statutory payments for the tax year. P60 statements can now be produced for all employees within Oracle Fusion Global Payroll for UK in different formats. The formats supported are:
- P60 Plain Paper Substitute
- P60 Substitute Self Seal
- HMRC Single Sheet Portrait
- eP60 (electronic P60)
A new document type P60 is now available. Use the Manage Document Types task from the Setup and Maintenance work area to configure this new document type.
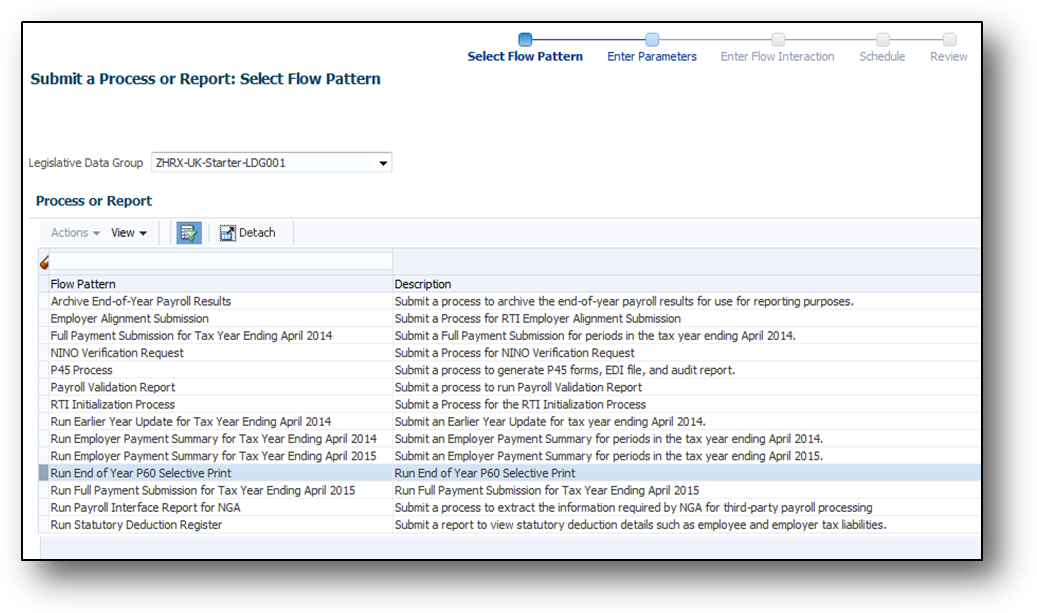
Submitting End of Year P60 Statements
You can select the P60 template from the task flow parameters. The eP60 does require a P60 template selection.
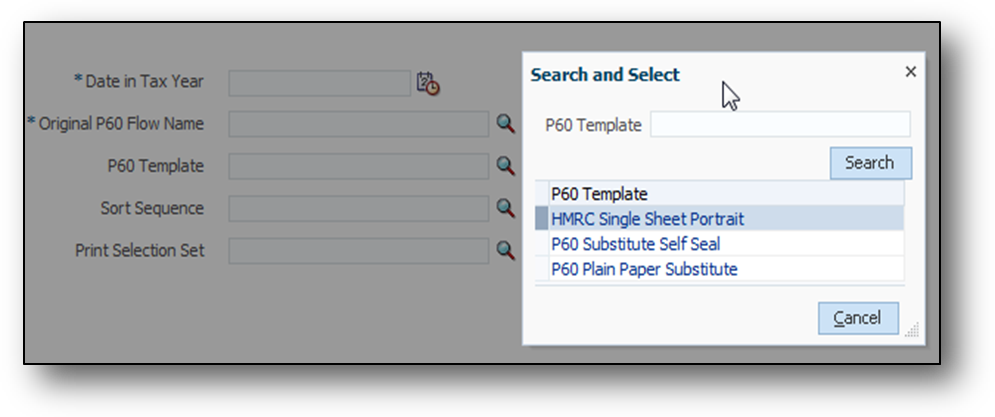
Steps to Enable
There are no steps necessary to enable this feature.
NI Category Update Process - Young Persons National Insurance Category Assessment
Use the NI Category Update Process to automatically assess and update the employees’ NI category from the Under 21 NI category to a corresponding 21 or Over NI Category, when they reach 21 years of age.
The following table displays the NI category mappings:
| Under 21 NI Category |
21 or Over NI Category |
| M |
A |
| Z |
J |
| I |
D |
| K |
L |

NI Category Update Process
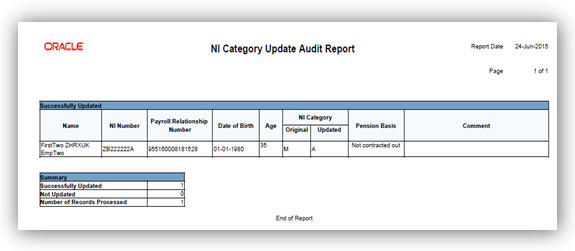
NI Category Update Audit Report
Steps to Enable
There are no steps necessary to enable this feature.
Pensions Automatic Enrolment and Re-enrolment Enhancement
The Pensions Automatic Enrolment is a comprehensive process to automatically assess and enroll or Re-enroll employees into a qualifying pension scheme. This process flow is now separate from the letter generation process. This implies that you run and retry this process as many times as required, but only if you have not run the Letter Generation process.
The automatic enrolment assesses and enrolls employees, or re-enrolls them when a re-enrolment date is present.
The recent changes announced for the Pensions Automatic Enrolment for the tax year 2015-16 by The Pensions Regulator (TPR) are included.
- Legislative Changes for Tax Year 2015-16 - Changes incorporated are the option to exclude or include employees for enrolment or re-enrolment with certain conditions such as:
- Former members of a qualifying pension scheme
- Within 12 month of enrolment or re-enrolment date
- More than 12 months since enrolment or re-enrolment date
- Under Notice given or when Notice is withdrawn
- Exempt due to Tax protection applied
- In receipt of Winding Up Lump Sum (WULS) payment
- Automatic Re-enrolment - Changes incorporated addresses the requirement for re-enrolment of employees. The application now supports:
- Cyclical Re-enrolment process that should be run every time the re-enrolment date is met.
- Additional data capture to ensure re-enrolment process can take place.
- Assessment for Automatic re-enrolment for eligible employees.
- Employee Notification letters to be generated for employees assessed for re-enrolment.
- Additional Data Capture at PSU or TRU Level - Additional information is required for the PAE component at organization-level for PAYE Reference or TRU. Where present, the TRU data takes precedence over the PSU data. For example, if the Automatic Re-enrolment Date is present at TRU, this takes precedence over the PSU Automatic Re-enrolment Date.
- Additional Data Capture for Employee - The additional data fields are added to the employee’s PAE calculation card.
| Component Data Field: |
Pensions Automatic Enrolment: Usage |
|
| Automatic Re-enrolment Date |
Enter the Automatic re-enrolment date for your organization. This date is validated to ensure it is within the allowed timeframe of the original staging date or previous re-enrolment date. The date entered must be within 6 month-period of the 3 months prior to anniversary date (where anniversary date for the first time is the staging date and subsequently the previous re-enrolment date). |
|
| Auto-enrolment for previous QS member within 12 months |
If the criteria for Eligible Job Holder are met, the application checks this field. If set to Exclude, then the person is not enrolled or re-enrolled. The default is NULL, which means the employee is enrolled or re-enrolled if found eligible. |
|
| Auto Enrolment if Notice given |
If the criteria for Eligible Job Holder are met, the application checks this field. If set to Exclude, then the person is not enrolled or re-enrolled. The default is NULL, which means the employee is enrolled or re-enrolled if found eligible. |
|
| Auto Enrolment if Winding Up Lump Sum taken |
If the criteria for Eligible Job Holder are met, the application checks this field. If set to Exclude, then the person is not enrolled or re-enrolled. The default is NULL, which means the employee is enrolled or re-enrolled if found eligible. |
|
| Exclude if tax protection applied |
If the criteria for Eligible Job Holder are met, the application checks this field. If set to Exclude, then the person is not enrolled or re-enrolled. The default is NULL, which means the employee is enrolled or re-enrolled if found eligible. |
|
| Component Data Field: |
Pensions Automatic Enrolment: Usage |
| Reason for exclusion |
This is populated by the re-enrolment or enrolment process if exclusion is to be applied. This applies when the conditions are met for Eligible Job Holder but the relevant exclude or include indicator is set to ‘exclude’. There is a new set of values created for this field which allows the process to use when exclusion has been detected for enrolling an eligible employee. You can also manually enter a value for this field. There is no default value. |
| Component Data Field: |
Pensions Automatic Enrolment: Usage |
|
| Overriding Automatic Re-Enrolment Date |
Enter a date here if it is different from the date entered at the organization-level. |
|
| Date Winding Up Lump Sum Taken |
Enter the date when WULS was taken. If this date is entered, the process checks for the exclude or include indicator and the criteria is set to ‘exclude’. In this case, the employee will not be enrolled or re-enrolled even if the employee is eligible. |
|
| Tax Protection Applied |
Select this field if there is Tax Protection applied to this employee. The process checks if the exclusion indicator is selected. If it is set to include then the employee is enrolled or re-enrolled if the eligibility criteria is met. |
|
| Date Notice Given |
This is a read-only field and is populated from the Termination component during the assessment process. |
|
| Date Notice Withdrawn |
Date used as the assessment date for the automatic enrolment process instead of the Payroll Reference Period Date or Staging or Re-enrolment date. |
|
- Changes to the Pensions Automatic Enrolment Process -The process flow has been amended to allow for multiple runs to be performed as required. You can re-try the process as many times as you wish before running the Generate Notifications process.
NOTE: Once the Pensions Notification Letters process has been run, it will not be possible to re-try or re-run the PAE process for the same effective period.
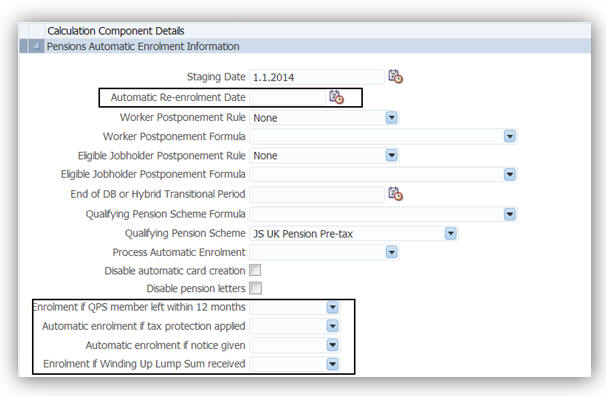
Pensions Automatic Enrolment Information Component Details
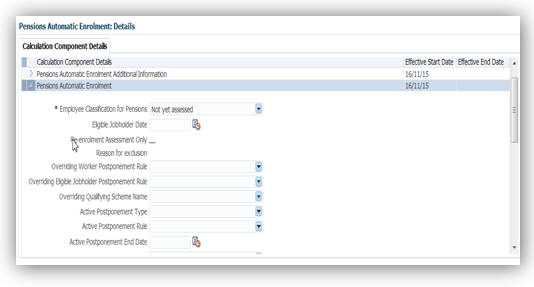
Pensions Automatic Enrolment Additional Information Component Details
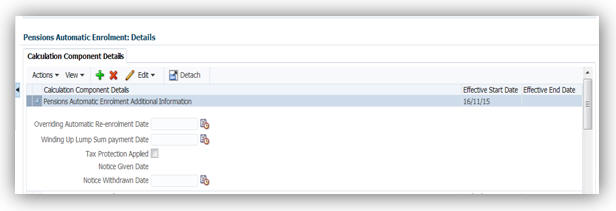
Pensions Automatic Enrolment Additional Information Component Details

Run Pensions Automatic Enrolment Report Task Details
Steps to Enable
There are no steps necessary to enable this feature.
Key Resources
For more information go to My Oracle Support for the following document:
- Oracle Fusion HCM (United Kingdom): Pensions Automatic Enrolment and Functional Considerations (Document ID 2006584.1)
Generate Pensions Automatic Enrolment Notification Letters Process
You can now generate notification letters using a separate flow pattern Generate Pensions Automatic Enrolment Reports. You can run the Pension Automatic Enrolment process multiple times. Use the new parameter Original Pensions Automatic Enrolment Flow Name to indicate the process to generate the notification letters.

Generate Pensions Automatic Enrolment Reports Flow Pattern

New Parameter Original Pensions Automatic Enrolment Flow Name
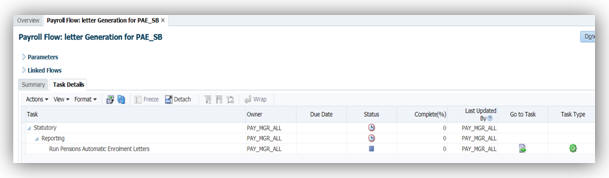
Task Detail for Run Pensions Automatic Enrolment Letters
Once the process is completed, the letters are generated using the new templates as mandated by the TPR:
| Letter Template provided for |
Template Reference |
When Generated |
Detail |
| Eligible jobholders automatically enrolled or re-enrolled |
Letter E + Letter EI |
Automatic Enrolment; and Automatic Re-enrolment |
Cover letter for employees who are being automatically enrolled or Re-enrolled (E); Plus Insert for employees who are being automatically enrolled or Re-enrolled (EI) |
| Postponement letter for all staff. |
Letter P |
Automatic Enrolment; |
Postponement Letter for all employees who have started an active postponement. (not applicable for re-enrolment) |
| Non eligible jobholders or entitled workers not automatically enrolled |
Letter N |
Automatic Enrolment; and Automatic Re-enrolment |
Letter for Non Eligible Jobholders and or/Entitled workers but are NOT automatically enrolled or Re-enrolled |
Steps to Enable
There are no steps necessary to enable this feature.
Tips and Considerations
You must download the new Pension Notification Letter templates delivered and update them with any details specific to your organization, such as your company logo, the extra information section including and URL references to your pension provider.
Key Resources
For more information go to My Oracle Support for the following document:
- Oracle Fusion HCM (United Kingdom): Pensions Automatic Enrolment and Functional Considerations (Document ID 2006584.1)
Year to Date Reconciliation Report
Use this report to reconcile year-to-date payments and deductions between Payroll, Earlier Year Update (EYU), FPS, and P60. Run this report for every period or at the end of each tax year.
To run this report, there must have been a payroll run in the tax year on or before the effective date parameter value.
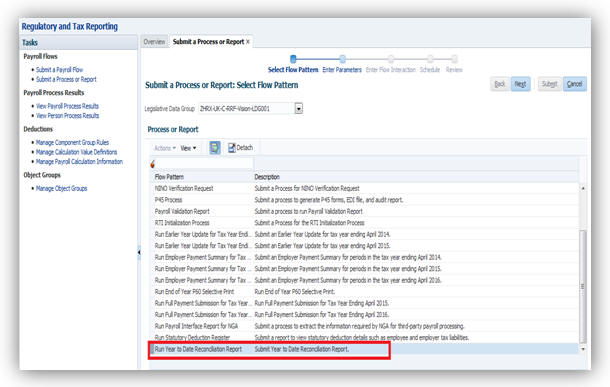
Submitting the Report
Steps to Enable
There are no steps necessary to enable this feature.
Three new non-recurring elements are provided that enable you to make a one-time adjustment to the National Insurance (NI) and Pay as You Earn (PAYE) deductions in a payroll run. These are:
- PAYE Adjustment
- NI Employee Adjustment
- NI Employer Adjustment
For these new elements you can:
- Enter either positive or negative values depending on the adjustment required to the already calculated and deducted amounts for PAYE or NI.
- Select the appropriate:
- NI Category
- Pension Basis
- CPE ID (where multiple employments exist)
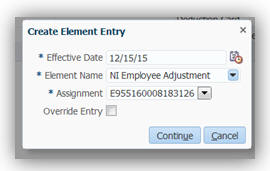
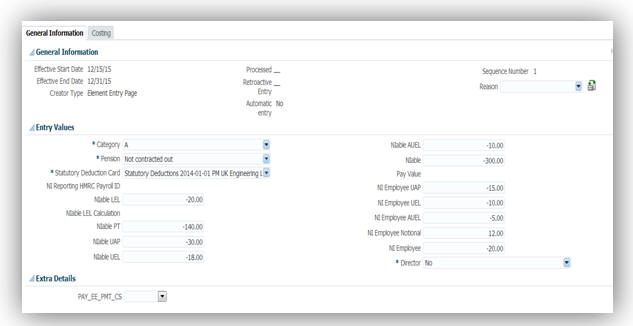

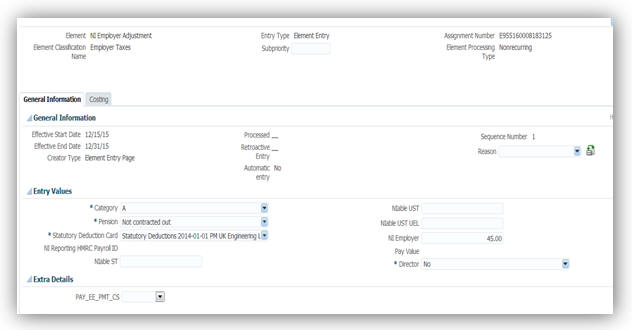
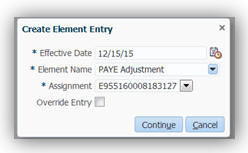

These new adjustment elements’ input values are identical to those on the existing PAYE & NI elements.
Steps to Enable
Before using the new elements, you must set their Element Eligibility after which they will be available in the Element Eligibility form.
Uptake of XML Format Output for Deductions from Earnings order (DEO)
You can generate report results in XML files in addition to PDF files for the Run DEO payment schedule process. The file includes data for all active DEOs that are operated by the employer across all the three types of DEO:
- DEO - Calculation Type Pre2003
- DEO – Calculation Type Post2003
- Child Maintenance Service (CMS) DEO
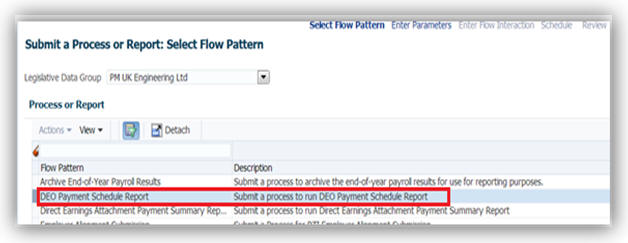
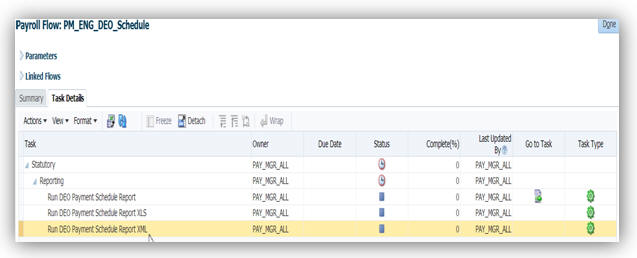
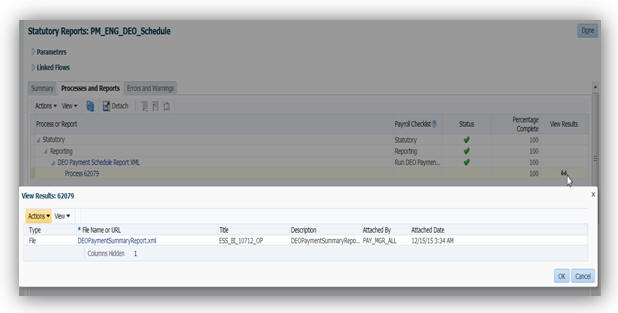
Steps to Enable
There are no steps necessary to enable this feature.
HCM Data Loader Support for Calculation Cards
You can now use HCM Data Loader to create or update calculation cards for the UK localization. The HCM Data Loader currently supports the following cards for upload:
- Statutory Deductions
- Pension Automatic Enrolment
- Benefits and Pensions
- Court Orders and Student Loans
All business objects related to the calculation card, such as calculation component, component details, and associations are available through HDL Data Loader. You can carry out actions such as Insert, Delete or Update on these objects.
User keys are currently not supported to identify business objects; instead it uses the combination of SourceSystemOwner and SourceSystemID. Reports can be setup in Business Intelligence (BI) Publisher to retrieve the required ID.

Sample BI Publisher Report Output
Using this information, you can prepare the data for loading. The file must be in data file format (.dat), with a METADATA line declaring what objects are being created or uploaded or deleted in the file, followed by one MERGE line for each record you wish to create or update.
For example, to update P45 information on employee’s PAYE component:
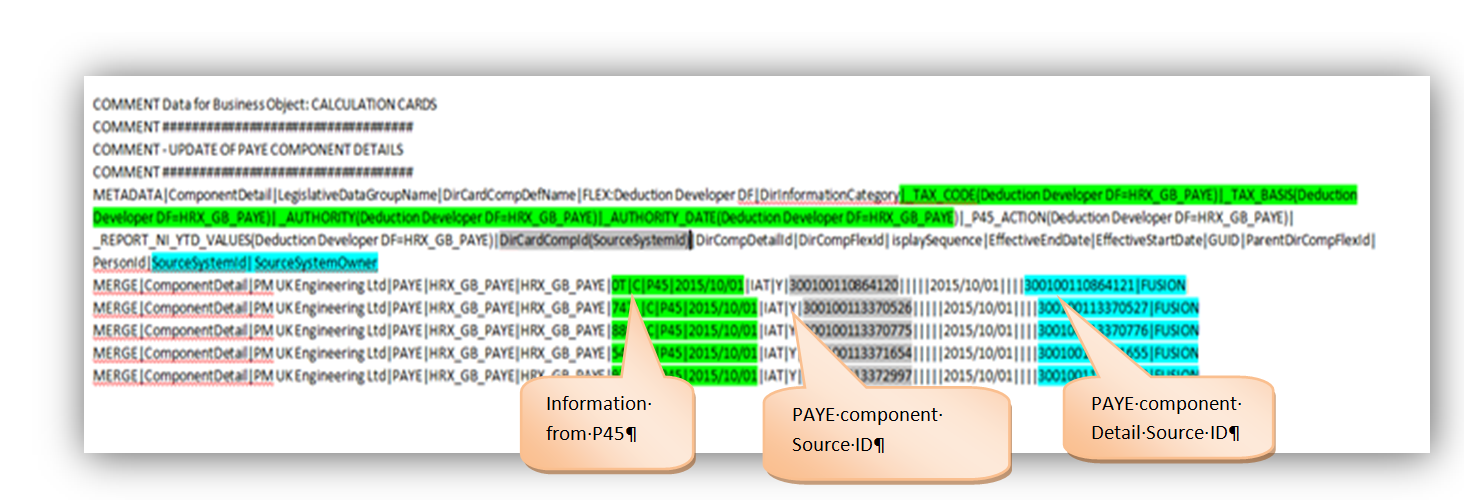
Example of a Subset of Information on the P45.
You can then upload the file in the Data Exchange Work Area, Import and Load data.
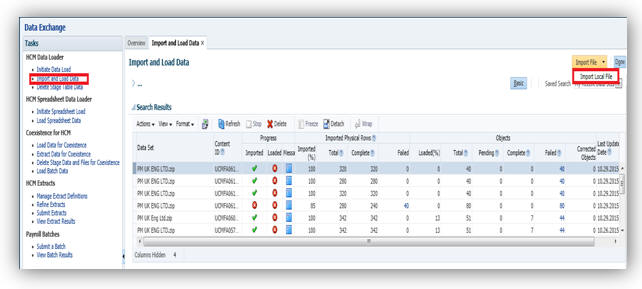
If the upload is unsuccessful, you can view the list of error messages using the Message icon.
To verify that the data has been updated, use the Manage Calculation Card task in the Payroll Calculation Work Area:
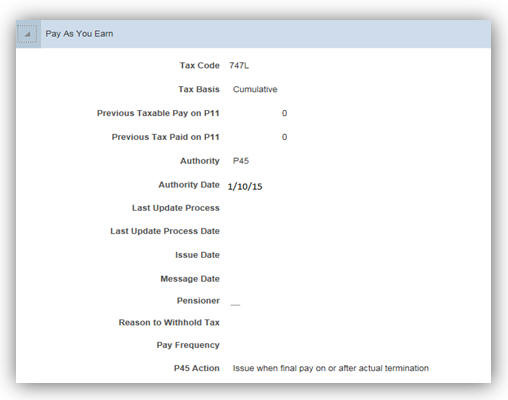
NOTE: The same validations happen while creating the data using HCM data loader than when created manually using the Manage Calculation Card task. However a few of the validations only happen during manual entry. It is recommended to run the Payroll Validation report or Diagnostic report to validate loaded data.
Steps to Enable
There are no steps necessary to enable this feature.
Tips and Considerations
User keys are not currently supported. Either Source System id, GUID or Surrogate Id can be used to identify records.
It is possible to combine all business objects into a single file. The HCM Data Loader works out the order in which objects must be created. For example, if you are creating a new statutory deductions card, you can include all of the following business objects into a single .dat file:
- Calculation card
- Aggregation component
- PAYE component
- NI component
- PAYE component details
- New Starter Declaration component details
- Card association
- PAYE component association
- NI component association
EXCEPTIONS
Following are the exceptions while using the HCM Data Loader:
- Only one PAYE component per card can be created within one .dat file. If you need to create multiple PAYE components, create them using multiple .dat file.
- When creating a Pension Automatic Enrolment calculation card, if you want to upload information about the Qualifying Pension Scheme (QPS), ensure that the Benefits and Pensions card already exists.
- When deleting cards, all business objects can be provided in a single file except for association details; if you need to delete a card as well as its association details, it must be a two-steps process.
EDI Incoming Message File Upload Method Change
The processes for P9/P6 and NVREQ both process incoming files from HMRC and in order to select the file received. To enable you to select the file you want to upload at the time of submitting the process flow, a new task has been added to the processes called ‘Upload File’.
When you submit the flow with your parameters, the task ‘Upload File’ remains in the status of ‘in progress’.
- In order to specify the file you want to process select ‘Go to Task’ icon on the Upload File task
- This then opens another window in which there is an option to add a file:
- Once you click on ’+’ (Manage Attachments), it will take you to the manage attachments window where you can browse and add your file.
- Select your file that has been sent to your server from HMRC
- Add a Title and Description for your reference
- You can also delete a file that may have been added by mistake by slicking on the ‘x’ against the relevant file.
- The details of the file attached are displayed when you point to the file
- Once you have completed adding the file, return to the task flow and mark the ‘Upload File’ task as complete which will then fire the remainder of the tasks in the flow.
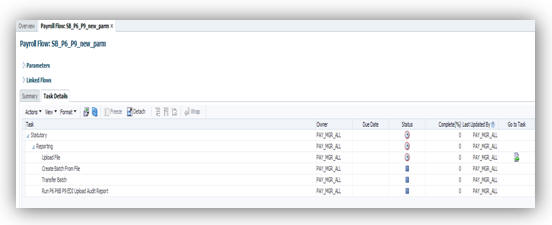
Go to Task Icon on Upload File

Click on Manage Attachments
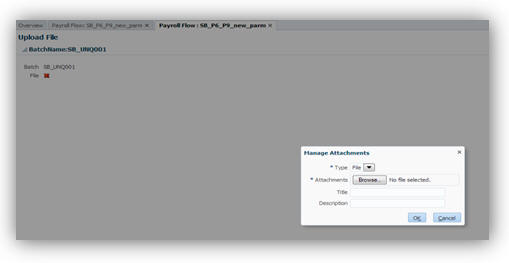
Browse for File

Title and Description
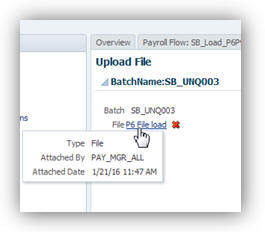
Details Displayed
Steps to Enable
There are no steps necessary to enable this feature.
National Insurance Calculation for Apprentices Under 25
You can now apply the new NI calculations for all your apprentices who are under 25 by allocating the relevant NI category delivered in the payroll application.
You can leverage the existing process that was delivered for updating the Under 21 NI Category to change employees’ who may be on an apprentice category H, but are no longer eligible (i.e. too old for that category). The process will change their category to A as of their 25th birthday.
Switching apprentices to category H is a manual process that you should undertake to ensure the NI calculations are correct.
Steps to Enable
There are no steps necessary to enable this feature.
The threshold used in the calculation of Student Loan deductions is increasing from 6th April 2016. In addition, a separate threshold is being introduced for a new second type of student loan. The actual calculation method remains unchanged.
| Type of Student Loan |
Value |
|---|---|
| SL Plan 1 Threshold |
17495.00 |
| SL Plan 2 Threshold |
21000.00 |
| SL Plan 1 Deduction |
9% |
| SL Plan 2 Deduction |
9% |
For New Student Loans from 6th April 2016, you will need to indicate the ‘Plan Type' on the CIR component for the Student Loans if it is to be deducted at the higher rate. Standard rate will be applied as a default.
You can do this by entering the ‘Plan Type’ on the Calculation Component Detail for the Student Loan element.

Student Loan Details
Steps to Enable
There are no steps necessary to enable this feature. Please contact My Oracle Support if you need existing data updated. There is a script that may be required to be ran that will update existing Student Loan to add Plan Type if it is to be deducted at the higher rate and not the standard rate.
This script is on a need only basis and is not supplied in the patch bundle.
Direct Earnings Attachments (DEA) Higher Rate Calculation
In order to comply with the change introduced for DEA, which can be deducted at the standard or the higher rate starting from 6th April 2016, new data capture has been introduced. This will allow you to choose which deduction table should be applied to the DEA for the employee.
Any existing DEA in place before 6th April 2016 will be deducted at the standard rate. If you wish to change the existing DEA to deduct at the higher rate, please contact your support POC as a script will be required to make this change. This script is on a need only basis and is not supplied in the patch bundle.
Once you have applied this patch, for any new DEA, you will need to indicate which rate it should be calculated at – higher or standard.
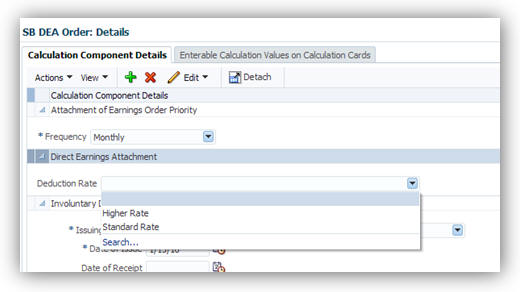
You can do this by entering the ‘Deduction Rate’ on the CIR component for the DEA element.
Deductions from Earnings Order (DEO) Parameter Change
The Tax Reporting Unit (TRU) parameter is mandatory when running the DEO Payment Schedule This parameter has been added to the task flow for DEO Payment Schedule Report.

DEO Payment Schedule Parameters
Steps to Enable
There are no steps necessary to enable this feature.
Scottish rate of income tax is applicable when you enter a Scottish Tax code for an employee. The validation on Tax codes has been therefore extended to allow Scottish Tax Code entry effective from 6th April 2016.
Scottish tax codes begin with a prefix of ‘S’ e.g. S807L, and you can enter them on the PAYE calculation card.
Valid Tax Code are:
- SBR, S0T, SNT, SD0, SD1, SKxxx, SxxxL
- There is no Scottish equivalent of the emergency tax code
The same rates and thresholds will be applied to Scottish tax codes as the other tax codes starting 6th April 2016.
| Low Value |
High Value |
Tax Rate |
|---|---|---|
| 0 |
31999.99 |
20% |
| 32000 |
149999.99 |
40% |
| 150000 |
99999999.99 |
45% |
| Tax Code |
Rate |
| SBR |
20% |
| SD0 |
40% |
| SD1 |
45% |
From 6th April 2016 the following tables will apply for Scottish earnings Arrestment:
- Deductions from Daily Earnings
- Deductions from Weekly Earnings
- Deductions from Monthly Earnings
| From |
To |
Deduction |
|---|---|---|
| 0 |
16.24 |
0 |
| 16.25 |
58.70 |
19% or 0.50, whichever is greater |
| 58.71 |
88.26 |
8.07 + 23% of earnings exceeding 58.70 |
| 88.27 |
99999999.99 |
14.87 + 50% of earnings exceeding 88.27 |
| From |
To |
Deduction |
|---|---|---|
| 0 |
113.68 |
0 |
| 113.69 |
410.90 |
19% or 4.0, whichever is greater |
| 410.91 |
617.82 |
56.47 + 23% of earnings exceeding 410.91 |
| 617.83 |
99999999.99 |
104.06+ 50% of earnings exceeding 617.83 |
| From |
To |
Deduction |
|---|---|---|
| 0 |
494.01 |
0 |
| 494.02 |
1785.61 |
19% or 15.00, whichever is greater |
| 1785.62 |
2684.51 |
245.40 + 23% of earnings exceeding 1785.61 |
| 2684.51 |
99999999.99 |
452.15 + 50% of earnings exceeding 2684.51 |
Steps to Enable
There are no steps necessary to enable this feature.
Legislative Changes for Tax Year End 2015-16
P60 templates have been delivered to reflect all the relevant changes for tax year ending 5th April 2016.
Oracle HCM supports the following P60 formats which you can choose from at the time of submitting the P60 process:
- HMRC Single Sheet Portrait
- Free stationery available from HMRC
- P60 (Substitute) Type LE(P)
- Available to order at a cost from Prolog Print Media
- P60 (Substitute) (Oracle UK) Plain Paper
- Can be printed on Plain A4 paper– no extra cost involved
- This will be the default format if there are no options for template at the Task Flow submission.
- Online eP60
- Available for Self Service by employees where SSHR is in place
- A copy of the eP60 will also be placed on Document of Record after the ‘publish’ action is complete.
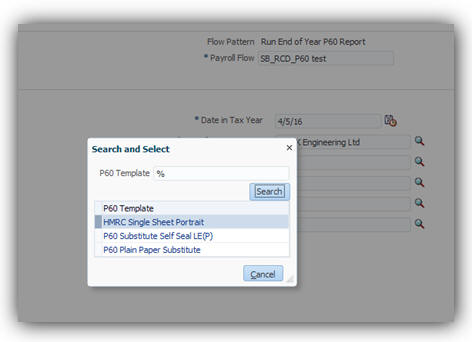
Steps to Enable
There are no steps necessary to enable this feature.
Legislative Changes for Tax Year 2016-17
Various legislative changes came into effect for the tax year 2016-17 for tax, national insurance and pensions.
PAYE and National Insurance Rates and Thresholds
Changes to the PAYE and NI rates and thresholds have been applied to take effect from 6th April 2016 as follows:
PAYE Changes
- PAYE thresholds effective from 6th April 2016:
- There is no change to the rates applied to tax codes D0, D1 and BR.
- There is a new emergency tax code of 1100L which will be applied where no tax code has been entered for any new starter.
| o Basic Rate 20% |
£0 - £32,000 |
| o Higher Rate 40% |
£32,001 - £150,000 |
| o Additional Higher Rate 45% |
over £150000 |
- A new category H for apprentice under 25 from 6th April 2016
- Contacted Out NI Categories have been made obsolete and the validation has been added to reject and the following letters on entry:
- D, E, I, K, L
- Valid NI categories from 6th April 2016 are:
- A, B, C, J, X
- H (Apprentice under 25)
- M (under 21)
- Z (Deferred rate for under 21)
- The UAP threshold has been removed
- A new threshold has been introduced for Apprentice Upper Secondary Threshold (AUST) and it applies to NI category H only
- The new rates for 2016-17 have been applied:
- Rates applied by NI Category for are:
- Employee Rates for 2016-17
- Employer Rates for 2016-17
- Roll up of Lower Earnings Limit and Contributions has been changed as follows to cater for the revised categories introduced:
- LEL Rollup:
- Contributions Rollup:
- Two new balances have been delivered and will be automatically be fed by the values calculated under the new category of H:
- AUST (Earnings above the ST up to and including the AUST)
- AUST_UEL (Earnings above the AUST up to and including UEL)
- A new NI Rate (category H) has been introduced for calculation related to employers NI calculations for apprentices under 25. This does not employee NI calculations. This rate is called:
- ORA_HRX_GB_NI_ERS_CI_RATE_APP_U25 – 0% for NI Cat H only
- From 6th April 2016, only 1 NI category can be processed at any one point in time of payment run.
- Rates applied to the employee and employer calculations will be as follows:
- Employee Calculation rates
- Employer Calculation rates
| Threshold/limit |
Weekly (£) |
2 Weekly (£) |
4 Weekly (£) |
Monthly (£) |
Annual (£) |
|---|---|---|---|---|---|
| Lower Earnings Limit (LEL) |
112 |
224 |
448 |
486 |
5824 |
| Primary Threshold (PT) |
155 |
310 |
620 |
672 |
8060 |
| Secondary Threshold (ST) |
156 |
312 |
624 |
676 |
8112 |
| Upper Secondary Threshold (UST) |
827 |
1654 |
3308 |
3583 |
43000 |
| Apprentice Upper Secondary Threshold (AUST) |
827 |
1654 |
3308 |
3583 |
43000 |
| Upper Earnings Limit (UEL) |
827 |
1654 |
3308 |
3583 |
43000 |
| Category letters |
A |
H |
M |
B |
J |
Z |
C |
|---|---|---|---|---|---|---|---|
| Earnings < LEL |
Nil |
Nil |
Nil |
Nil |
Nil |
Nil |
Nil |
| Earnings >= LEL <= PT |
0% |
0% |
0% |
0% |
0% |
0% |
Nil |
| Earnings > PT <= UEL |
12% |
12% |
12% |
5.85% |
2% |
2% |
0% |
| Earnings > UEL |
2% |
2% |
2% |
2% |
2% |
2% |
0% |
| Category letters |
A |
H |
M |
B |
J |
Z |
C |
|---|---|---|---|---|---|---|---|
| Earnings < LEL |
Nil |
Nil |
Nil |
Nil |
Nil |
Nil |
Nil |
| Earnings >= LEL <= ST |
0% |
0% |
0% |
0% |
0% |
0% |
0% |
| Earnings > ST <= UST\AUST |
13.8% |
0% |
0% |
13.8% |
13.8% |
0% |
13.8% |
| Earnings > UST\AUST <= UEL |
13.8% |
13.8% |
13.8% |
13.8% |
13.8% |
13.8% |
13.8% |
| Earnings > UEL |
13.8% |
13.8% |
13.8% |
13.8% |
13.8% |
13.8% |
13.8% |
| From |
To |
|---|---|
| M |
A |
| H |
A |
| A |
C |
| Z |
J |
| B |
A |
| B |
C |
| From |
To |
|---|---|
| A |
M |
| A |
H |
| J |
Z |
| A |
B |
| Not-contracted out: |
12% |
| Married Women Reduced Rate: |
5.85% |
| Earnings > UEL: |
2% |
| Not-contracted out: |
13.8% |
| Not-contracted out: Reduced Under Specified Age |
0.0% |
| Not-contracted out: Apprentice Under Age 25 |
0.0% |
ST -> UST and UST -> UEL are only for categories M and Z
ST -> AUST and AUST -> UEL are only for category H
Statutory Payment Rate Changes
Rates for Statutory payments SSP, SMP, SAP, OSPP, ShPP remain the same:
| Payment of: |
Value |
|---|---|
| SSP |
88.45 |
| SMP |
139.58 |
| SAP |
139.58 |
| OSPP |
139.58 |
| ShPP |
139.58 |
NOTE: ASPP has been removed as this is no longer effective as of 6th April 2016.
Pensions Automatic Enrolment Thresholds
The upper threshold for Pension Automatic enrolment has been changed and comes into effect from 6th April 2016. There is no change to the lower threshold.
| Frequency |
Upper Threshold |
|---|---|
| Weekly |
827 |
| Fortnightly |
1654 |
| Lunar Month |
3308 |
| Monthly |
3683 |
| Quarterly |
10750 |
| Bi-Annual |
21500 |
| Annual |
43000 |
Steps to Enable
There are no steps necessary to enable this feature.
Legislative Updates to Real Time Information Reporting
New Processes Real Time Information Reporting
New processes have been added to the existing ones for RTI, namely:
- Run Full Payment Submission for Tax Year ending April 2017
- Run Employer Payment Summary for Tax Year ending April 2017
- Run Earlier Year Updates for Tax Year ending April 2016

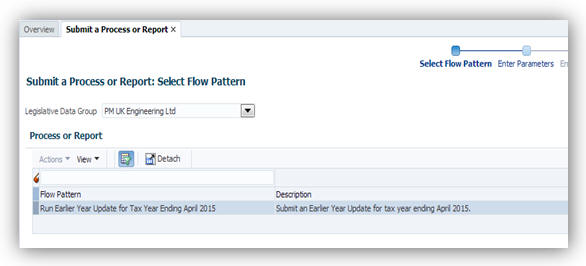
There have been changes in the validations and also some reporting items for RTI for tax year 2016-17 which have been incorporated. To see the full set of changed validation rules and items of data please refer to the HMRC documentation for RTI which can be found here:
Electronic Data Interchange: Message implementation guidelines
Here is the summary of the changes:
Full Payment Submission 2016-17
Flow Parameters
These parameters have been removed from the process as they are no longer needed for FPS 2016-17:
- Free of Tax Payments made to Employee
- Expense and Benefits from others
- Anyone employed out of the UK more than 30 days
- Employee Pay to Third Party
- P11/P11D(b) Due
File Output Format Enhancement
The FPS process now produces an Excel format file containing all the data extracted and is more granular in terms of showing the information that will be placed on the EDI file going to HMRC.
You can access this file via ‘View Results’ of Processes under Processes and Reports for the task Run Full Payment Submission for Run Full Payment Submission for Tax Year ending April 2017.


- The Excel output replaces the PDF version of the report previously provided.
New, Changed and Deleted Items
The following attributes on the PAYE CIR component have been renamed as they are only applicable up to FPS 2016:
- Flexibility Access Pension Rights
- Flexibility Accessing Pension Rights Check
Renamed to:
- Flexibly accessing pension rights until April 2016
- Retain flexibly accessing pension rights until April 2016
For FPS 2016-17, the process will automatically detect if Flexibly Accessing Pension Rights is applicable and the appropriate flag will be set on the EDI file for FPS.
There is an additional flag in the FPS 2016-17 EDI file that needs to be set if someone is in receipt of either taxable or non-taxable death benefit. This flag will also be set automatically by the FPS process if the new balances for Pension Death Benefit Payment delivered for this purpose.
- The new balances delivered to enable automatic setting of the flags for ‘Flexibly accessing pension rights’ and ‘Pension Death Benefit’ are
- Taxable Flexible Drawdown Payment
- Non-Taxable Flexible Drawdown Payment
- Taxable Pension Death Benefit Payment
- Non-Taxable Pension Death Benefit Payment
- These balances should be fed by your own elements that hold the payments for Flexible drawdown and Pension death benefit as follows:
- These balances should be fed by your own elements that hold the payments for Flexible drawdown and Pension death benefit as follows:
- The process can be summarized as follows:
- Add the balances for Taxable Flexible Drawdown Payment and Taxable Pension Death Benefit Payment and report them to the field ‘Flexible Drawdown Taxable Payment’ as a total
- Add the balances for Non-Taxable Flexible Drawdown Payment and Non-Taxable Pension Death Benefit Payment and report them to the field ‘Flexible Drawdown Non-Taxable Payment’ as a total
- Sets the field for Flexibly Accessing Pension Rights to ‘Y’ if
- Sets the field for Pension Death Benefit Indicator to ‘Y’ if
- The Primary Threshold (PT) up to and Including the Upper Earnings Limit (UEL) Year to Date has been changed so
- Balances have been removed for:
- Additional Statutory Paternity Pay (ASPP)
- Scheme Contracted Out Number (SCON) is no longer required for reporting in RTI, however it has not been removed from the TRU component as it could potentially be required for Earlier Year Updates relating to previous tax years
- Employee Contracted Out Number (ECON) is no longer required for reporting in RTI
| Your element |
Balance to feed |
|---|---|
| Acme_Flex Drawdown Taxable |
Taxable Flexible Drawdown Payment |
| Acme_Flex Drawdown non-Taxable |
Non-Taxable Flexible Drawdown Payment |
| Acme_Pension Death Benefit Taxable |
Taxable Pension Death Benefit Payment |
| Acme_Pension Death Benefit non-Taxable |
Non-Taxable Pension Death Benefit Payment |
You will need to set up elements for Flexible Drawdown and Pension and Death Benefit and feed them to new balances that have been delivered in this patch bundle as indicated in the above table.
The payroll process will populate the new balances as necessary.
The FPS process will interrogate these balances and:
Taxable Flexible Drawdown Payment
And/or
Non-Taxable Flexible Drawdown Payment balances are non-zero
Taxable Pension Death Benefit Payment balance
And/or
Non-Taxable Pension Death Benefit Payment balance are non-zero
POINT TO BE NOTED: There is only one field for taxable payment and one for non-taxable payment amounts on the FPS file. HMRC are not concerned if the amount is for Death Benefit or Flexible Drawdown payments made. As long as the correct indicators are set and it is possible to have both Death Benefit and Flexible Drawdown amounts – in which case both the flags could potentially be set.
It now houses only the “NI UEL” value
Replaces the previous two items in the FPS EDI file of
Earnings Above the PT, up to and Including the Upper Accrual Point (UAP) Year to Date
Earnings Above the upper accrual point (UAP) up to and including upper earnings limit (UEL) Year to Date
Earnings Above the PT, up to and Including the Upper Accrual Point (UAP) Year to Date
Earnings Above the upper accrual point (UAP) up to and including upper earnings limit (UEL) Year to Date
Shared Parental Pay (ShPP) is now reported on its own
Significant Validation Changes
There are some new validation checks introduced for FPS as follows:
- Partner information being present when Shared Parental Payment is received
- A message will be given if validation fails of:
- “You must enter the partner surname and partner forename for the employee <EmployeeName> to report the shared parental pay amount. “
- National Insurance Category checks are introduced to ensure
- NI letters valid for 2016-17 (A, B, C, H, J, M, X and Z)
- If Gender is Male then NI Category cannot be B
- Negative amounts not allowed for
- Total Employer Contributions (NI) Year To Date
- Total Employee Contributions (NI) Year To Date
- Questions and Declarations flags have been removed as they do not exist anymore when you provide either:
- Ceased Indicator
- Final Submission for Year
- Date Scheme Ceased validation changed whereby:
- Future date entry is allowed if it is a test submission
- If Date is present and Final Submission Indicator is NOT given, the process does not fail
- Date entered must be between 6th April 2016 and 5th April 2017 for live submissions only
- FPS17 will report Scottish Tax Code under a renamed field ‘Tax Regime’ on the EDI file and it will be set to ‘S’ for any person with a Scottish Tax Code. (The actual Scottish tax code will be reported without the suffix)
Employer Payment Summary 2016-17
For EPS 2016-17 there are minor changes implemented as per the legislative requirements. These are:
- ASPP is no longer payable and therefore removed from the reporting balance for ShPP
- The balance will only contain the value of ShPP
- The Archive Results UI (accessible via the View Employer Payment Summary Results task) has been changed so that ASPP payments will not be included in the value of ShPP balances for NIC compensation and Recovery.
When a tax year ends, you cannot submit Full Payment Summary for that year after 19th April of the following tax year. Any changes you wish to submit to HMRC for your employees that relate to a previous tax year, should be done via the Earlier Year Updates (EYU) process.
Therefore each year a new version of EYU is provided. The changes that were applicable to FPS for the previous tax year are all applied to the EYU for tax year ending 5th April 2016.
A new EYU process has been delivered to allow you to submit changes to HMRC for tax year ending 5th April 2016 and the changes implemented are summarized here:
- New Validations have been introduced:
- SCON - Mandatory field if NI Category letter is one of the following: D, E, I, K, L, N, O.
- ECON must be present for the following NI Categories: D, E, I, K, L, N and O
- Partner’s first name and last name must be present if there is a value in the ASPP/ShPP
- A New attribute on the EDI & Audit reports has been delivered:
- Flexibly Accessing Pension Rights which you must set manually for 2015-16 for the employee as the automatic process is not available for EPS yet.
Steps to Enable
There are no steps necessary to enable this feature.
Override PAYE and NI Calculations for the Period
New predefined elements that enable you to stop the regular PAYE and National Insurance calculations during the payroll run are now available. These elements can be used on their own, or in conjunction with the existing NI and PAYE adjustment elements.
The new predefined override elements are as follows:
- NI Override
- No input values
- PAYE Override
- No input values
- Have a valid tax card with TRU association
- Have New Jersey identified as their SDI state on the tax card

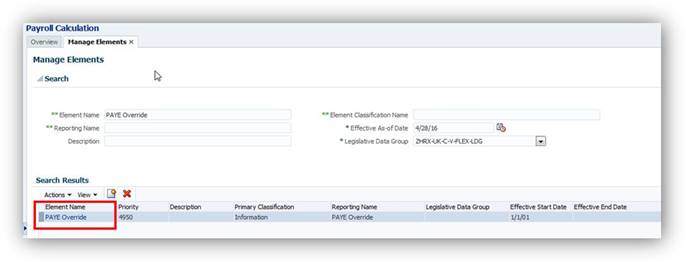
In order to use the PAYE and NI Override elements, you need to create an element entry for the specific assignment for the payroll period.
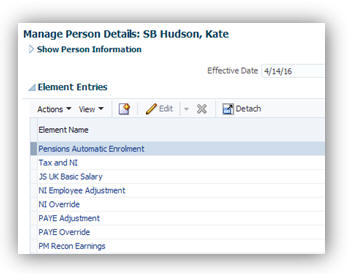
The PAYE Override element is similar to the NI Override element and the payroll process will stop the PAYE calculations, if it has been specified for an assignment. The values entered in the PAYE adjustment element are used as the deduction amounts for the assignment for that period.
When the NI Override and PAYE Override elements are attached to an assignment, only the regular calculations of NI and PAYE are stopped for the payroll relationship to which the assignment belongs. For other assignments with different NI categories, the regular calculations are processed even if they belong to the same payroll relationship.
Both the override elements are non-recurring. You must attach them each time you require the calculations to be overridden by the adjustment values entered for the assignment.
Steps to Enable
Once the patch is applied, in order to use these new predefined elements, you must create an eligibility record for each element:
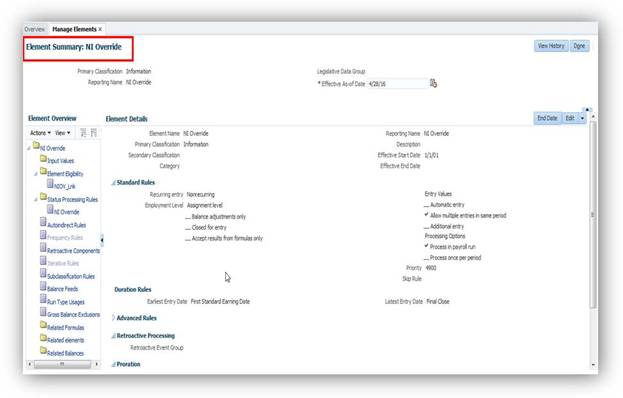
NI Override
Human Capital Management for The United States
Oracle Fusion Human Capital Management for the United States (US) supports country specific features and functions for the United States. It enables users to follow the United States’ business practices and comply with its statutory requirements.
Third-Party Involuntary Payments Extract
The Oracle Fusion Human Capital Management for the United States provides a third-party involuntary payments interface for capturing involuntary wage payments and sending that data to ADP’s Money Movement service.
To generate an extract file suitable for submission, run the Third-Party Involuntary Payments Extract task from the Payment Distribution work area:
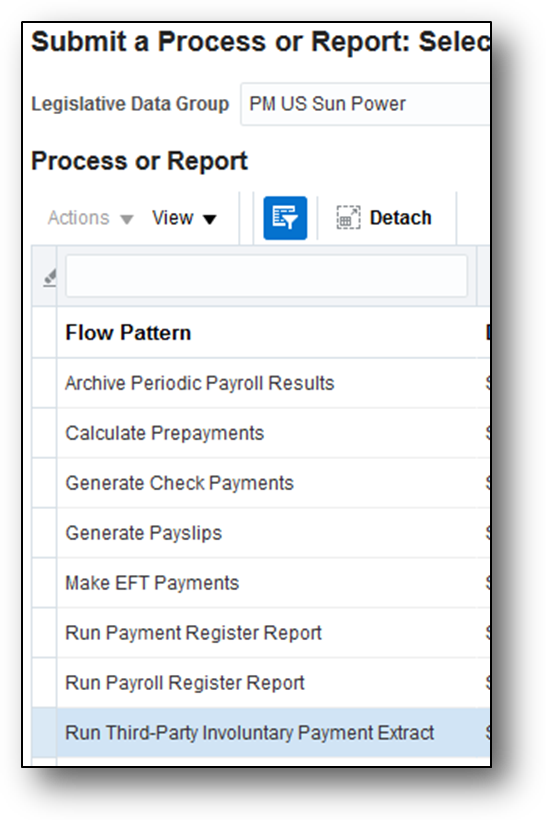
Run Third-Party Involuntary Payments Extract Process from the Submit a Process or Report Page
Steps to Enable
A prerequisite to running this payment extract is that you must have created and submitted the one-time Third-Party Deductions Initial Extract to ADP.
Tips and Considerations
On the Manage Legal Reporting Unit HCM Information Task, specify the value provided by ADP in the Branch Identifier and Client Identifier fields.
Use the Registry ID field on the Manage Third Parties task to specify the payee code on the payment extract.
The employee’s Involuntary Deductions card must specify each deduction’s Involuntary Deduction Number on the appropriate card component. This corresponds to ADP’s Lien Number.
New Jersey Family Leave Insurance
New Jersey law provides up to 6 weeks (42 days) of Family Leave Insurance (FLI) benefits for workers to bond with their newborn or newly adopted child or to provide care for a seriously ill family member. Benefits are payable to eligible employees through either the New Jersey State Plan or an approved employer-provided private plan.
Use the Manage Legal Reporting Unit HCM Information task to set your FLI plan information. From the New Jersey link of the Tax Reporting Unit tab, you can choose your family leave plan type:
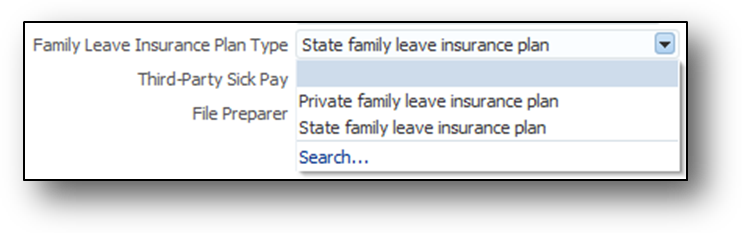
Family Leave Insurance Plan Type List of Values
If you elect to have a private family leave plan, identify the plan number:
Private Family Leave Insurance Plan Number Field
Steps to Enable
There are no steps necessary to enable this feature.
Tips and Considerations
To be eligible for New Jersey FLI taxation, an employee must:
For New Jersey employers, to select your FLI plan type:
- Start the Manage Legal Reporting Unit HCM Information task.
- Select the Tax Reporting Unit tab.
- Select New Jersey.
- Use the Family Leave Insurance Plan Type field to identify your plan type, in the New Jersey W-2 Reporting Rules Overrides section.
- Use the Private Family Leave Insurance Plan Number field to specify the plan number, if you select a private plan.
Key Resources
For additional information on New Jersey Family Leave, go to Applications Help for the following topic:
- New Jersey Family Leave Insurance: Explained
Quarter-end processing consists of the archival of data and the generation and submission of statutory reports. The Quarter-to-Date Archive is a payroll process that archives employee, employer, and tax data for a quarterly tax period.
The Multiple Worksite Electronic Report process uses the archived data for generating the reports.
Run this process from the Regulatory and Tax Reporting work area:
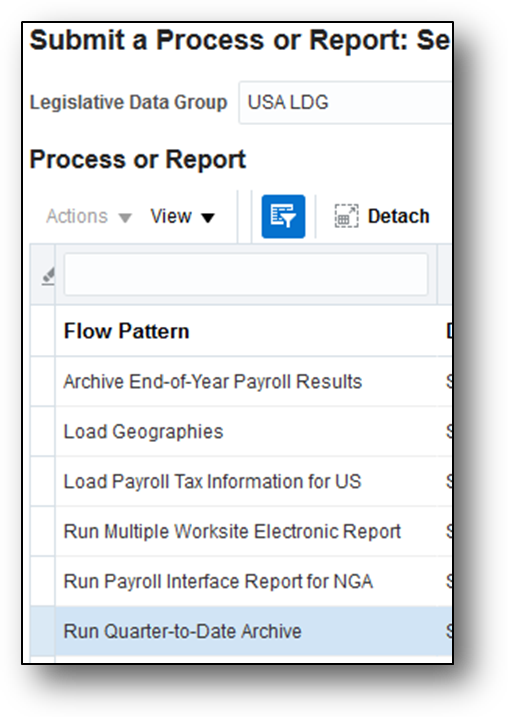
Run Quarter-to-Date Archive process from the Submit a Process or Report Page
Steps to Enable
There are no steps necessary to enable this feature.
Tips and Considerations
The Quarter-to-Date Archive does not support all mandatory quarter-end reports. Use the Oracle Fusion Third-Party Tax Interface in conjunction with this process to satisfy all requirements.
Key Resources
For more information on quarter end, go to Applications Help for the following topics:
- Quarter-End Processing for the US: Explained
- Quarter-to-Date Archive
Support for State-Specific Payslip/Checkwriter Enhancements
To comply with California state requirements, the US Payslip template has been updated to display the following details in the Earning Details section:
- Total hours worked for Earnings elements of Regular and Overtime secondary classifications
- Earnings start and end dates for retroactive pay eligible Earnings elements of Overtime secondary classification
Steps to Enable
There are no steps necessary to enable this feature.
Key Resources
For more information on payslips, go to Applications Help for the following topic:
- Viewing My Payslip and Bank Details tutorial.
Third-Party Monthly Tax Filing Extract
The Oracle Fusion Third-Party Tax Filing Interface for the US has added a new extract for monthly reporting intervals. This extract uses payroll data to file monthly state unemployment wages and taxes.
Run this process from the Regulatory and Tax Reporting work area:
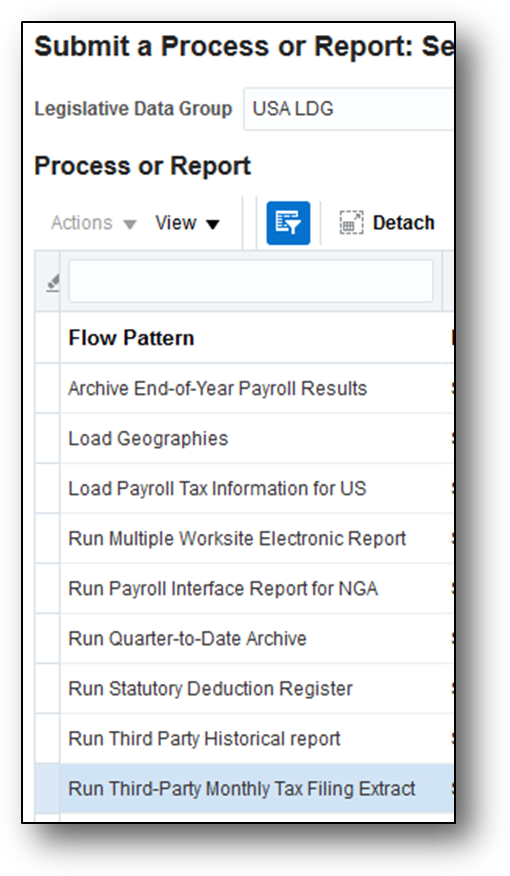
Run Third-Party Monthly Tax Filing Extract Process from the Submit a Process or Report Page
Steps to Enable
There are no steps necessary to enable this feature.
Tips and Considerations
Currently, Illinois is the only state requiring this type of reporting.
Key Resources
For more information Third-Party Tax Filing, go to Applications Help for the following topics:
- Third-Party Tax Filing: Explained
- Tax-Filing Setup for US ADP Transporter: Critical Choices
- Running the Third-Party Tax Interface: Worked Examples
- Tax-Filing Interface Error Recovery: Examples
Additionally, you can view on My Oracle Support (MOS) the following document:
- US Third-Party Tax Filing Interface white paper Document ID 1594079.1.
Manage Features by Country or Territory
You can now use this feature to control the address style and the level of address validation for the countries or territories configured for Oracle Fusion Global Human Resources. The values you can set depend on the combination of the country or territory and the selected country extension. The default out-of-the-box value for Selected Extension is Payroll and the Address Style is Supplemental Taxation and Reporting Address for US.
Manage Features by Country or Territory Task
If your selected extension is Human Resources or None, you can keep the default Address Style of Postal Address or modify the value to Supplemental Taxation and Reporting Address.
Selecting Extension, Address Style and Address Validation
If your selected extension is Payroll Interface or Payroll, the value for the Address Style cannot be modified and must be set to Supplemental Taxation and Reporting Address. Validations are implemented to enforce that requirement.
Steps to Enable
There are no steps necessary to enable this feature.
Employee Active Payroll Balance Report
Use the Employee Active Payroll Balance Report to assist you in reconciling your periodic payrolls and quarterly or year-end balances. Run this report from the Payroll Checklists work area to generate a pipe-delimited text file of selected live payroll balances for the employees, filtered by various levels (Federal, State, City, County, and School District) and time frames.
Steps to Enable
There are no steps necessary to enable this feature.
Tips and Considerations
Open the output file in Microsoft Excel to easily perform additional totaling and data manipulation.
Key Resources
For more information about this report, refer to the My Oracle Support (MOS) for the following document:
- Oracle Fusion Human Capital Management (US): End-of-Year Processing Guide, Document ID 1944400.1.
PA Act 32 Calculation Enhancements
Act 32 of the Pennsylvania Department of Community and Economic Development requires a PSD code and school district for both an employee’s residence and work locations in order to determine the proper local income taxation. To determine these codes, Oracle Fusion HCM (US) now checks the residency certificate of the employee’s withholding certificate first instead of the address. If there is no resident data entered the residency certificate, then it uses the employee’s address, including the tax district, to determine them. If the data is missing from both the employee’s residency certificate and address, then it raises an error during payroll calculation.
Steps to Enable
There are no steps necessary to enable this feature.
Tips and Considerations
The PSD code entered on the location is not used in the employee tax calculations. Any changes to the work PSD code must be done on the employee’s residency certificate. Use the Manage Calculation Cards task in the Payroll Calculation work area to update the employee’s residency certificate information. The residency certificate information is visible under the PA regional component.
Key Resources
For more information on PA Act 32, refer to the My Oracle Support (MOS) for the following document:
- Oracle Fusion HRMS (US): Implementation and Use, Document ID 1676530.1.
Assignment Enhancements for Affordable Care ACT Support
In support of ACA reporting and eligibility requirements, you can define the following at the employee assignment level:
- Limited non-assessment period
- Measurement period
- Administration period
- Stability period
- Safe harbor override
Steps to Enable
There are no steps necessary to enable this feature.
Tips and Considerations
You can use HCM Data Loader (Worker.dat file) to update this information for multiple employees.
Key Resources
For more information about ACA, refer to My Oracle Support (MOS) for the following documents:
- Oracle Fusion HRMS (US): Prerequisite Set Up Steps for ACA Reporting, Document ID 2067360.1
- Oracle Fusion HRMS (US): Benefits Legislative Updates, Document ID 2066466.1.
Legal Employer Enhancements for Affordable Care Act Support
In support of ACA reporting requirements, you can facilitate the configuration of your Form 1094-C by defining the following at the legal employer level:
- Designated government entity name (DGE)
- Aggregated ALE group name
- Annual announced percentage
- Annual poverty level value
- Transmission control code
Steps to Enable
There are no steps necessary to enable this feature.
Key Resources
For more information about ACA, refer to My Oracle Support (MOS) for the following documents:
- Oracle Fusion HRMS (US): Prerequisite Set Up Steps for ACA Reporting, Document ID 2067360.1
- Oracle Fusion HRMS (US): Benefits Legislative Updates, Document ID 2066466.1.
Tax Reporting Unit Enhancements for Affordable Care Act Support
In support of ACA reporting requirements, you can facilitate the configuration of your Form 1094-C by setting the following at the TRU level:
- ACA contact person name and phone number
- Certifications of eligibility, including qualifying offer method, qualifying offer method transition relief, Section 4980H transition relief, and 98% offer method
- Safe harbor type
- Yearly minimum coverage validation for ALE members
- Employee headcount benchmark date
- DGE participation and DGE contact person name and phone number
- Aggregated ALE group assignment
Steps to Enable
There are no steps necessary to enable this feature.
Key Resources
For more information about ACA, refer to My Oracle Support (MOS) for the following documents:
- Oracle Fusion HRMS (US): Prerequisite Set Up Steps for ACA Reporting, Document ID 2067360.1
- Oracle Fusion HRMS (US): Benefits Legislative Updates, Document ID 2066466.1.
Pennsylvania Residency Certificate Available from Portrait
Employees can now use the Portrait Gallery to view and update their own Pennsylvania Residency Certificates. The form defaults the employee and employer information, such as name, address, SSN, and Employer FEIN. Employees can update their Resident and Work location PSD codes directly on the state PDF form.
Steps to Enable
There are no steps necessary to enable this feature.
Key Resources
For more information, refer to My Oracle Support (MOS) for the following document:
- Oracle Fusion HRMS (US): Implementation and Use, Calculation and Withholding of Pennsylvania Local Earned Income Tax Document ID 1676530.1.
Batch Loader Support for New Jersey Family Leave Insurance Exemption
Facilitate the updating of multiple employees through the new batch loader task action, Upload State NJ Component Details. Available for the US Employee Withholding Regional Card task, this task action allows you to load multiple employee exemptions for the New Jersey Family Leave Insurance Tax.
Steps to Enable
There are no steps necessary to enable this feature.
Key Resources
For more information on loading tax records, refer to My Oracle Support (MOS) for the following document:
- Fusion Payroll: How to Load Employee Tax Cards via Payroll Batch Loader (PBL) for Release 9 and Higher, Document ID 2022994.1.
Calculate Federal Income Taxes Based on Period-to-Date Amount
You can now perform your Federal Income Tax calculations based on a period-to-date amount. On the calculation cards at either the payroll statutory unit or tax reporting unit levels, set this override through the new Federal Income Tax Organization Information segment.
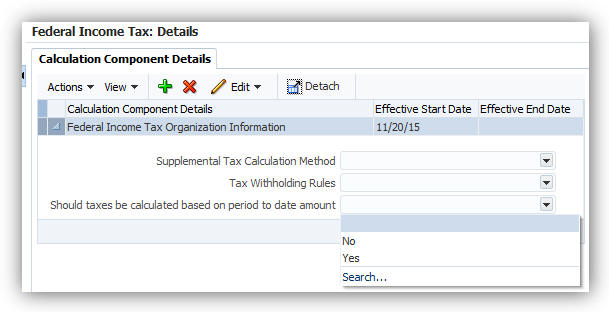
Steps to Enable
There are no steps necessary to enable this feature.
Archive End-of-Year ACA Information
You can now begin your Affordable Care Act (ACA) reporting with the Archive End-of-Year ACA Information process. This process captures all data needed to generate the employee 1095-C forms and the 1094-C electronic file. It includes a comma-delimited text format audit report for data verification.
To run the archive, start the Archive End-of-Year ACA Information process from the Submit Extracts task in the Data Exchange work area.

Steps to Enable
There are no steps necessary to enable this feature.
Role Information
See the Oracle Fusion HRMS (US): ACA Implementation and Use white paper Document ID 2067360.1 for information on the required duty roles.
Tips and Considerations
You must select Original as the ACA file type. Correction and Replacement types are not currently supported.
Do not specify any values for the Changes Only, Receipt ID, or Corrected fields.
To view the archive’s audit file:
- Launch the Reports and Analytics work area.
- In the Contents region, expand Shared Folders > Human Capital Management > Workforce Management > Person Management > US, and select 1095cAuditReport.
- Select History.
- Clear the value in the Owner field in the Filters section.
- Click Search.
- Select Report Job Name.
- Select Output Name in the Output & Delivery section.
Key Resources
For more information on ACA, refer My Oracle Support (MOS) for the following documents:
- Oracle Fusion HRMS (US): ACA Implementation and Use, (Document ID 2067360.1)
- Oracle Fusion HRMS (US): Benefits Legislative Updates, (Document ID 2066466.1)
- Information Center: Fusion Human Capital Management - United States Legislative Update, (Document ID 2063588.2)
You can now use Oracle Fusion HCM for the US to generate your employee 1095-C forms from archived data through the Run US 1095-C Employee Report process. This process generates the Employer-Provided Health Insurance Offer and Coverage forms from data captured by the Archive End-of-Year ACA Information process. The generated forms are then pushed to the Documents of Record and made available to employee viewing through their Portraits.
To run the report, start the Run US 1095-C Employee Report process from the Submit Extracts task in the Data Exchange work area.
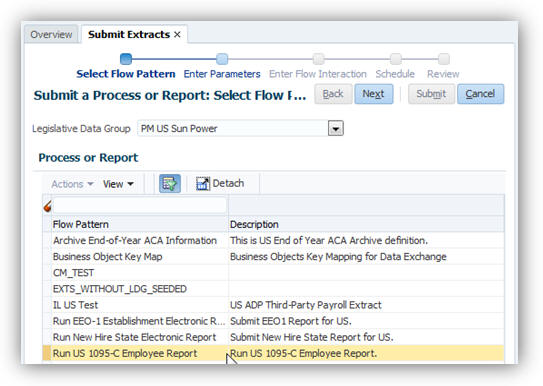
Steps to Enable
There are no steps necessary to enable this feature.
Role Information
See the Oracle Fusion HRMS (US): ACA Implementation and Use white paper Document ID 2067360.1 for information on the required duty roles.
Tips and Considerations
ACA archive runs executed prior to the Release 10 Patch Bundle 14 are not compatible with this report process. Before generating this report, you must perform a rollback and rerun of the archive.
You must select Original as the ACA file type. Correction and Replacement types are not currently supported.
Do not specify any values for the Receipt ID and Corrected fields.
To view the report’s audit file:
- Launch the Reports and Analytics work area.
- In the Contents region, expand Shared Folders > Human Capital Management > Workforce Management > Person Management > US, and select 1095c.
- Select History.
- Clear the value in the Owner field in the Filters section.
- Click Search.
- Select Report Job Name.
- Select Output Name in the Output & Delivery section.
Key Resources
For more information on ACA, refer My Oracle Support (MOS) for the following documents:
- Oracle Fusion HRMS (US): ACA Implementation and Use, Document ID 2067360.1.
- Oracle Fusion HRMS (US): Benefits Legislative Updates, Document ID 2066466.1
- Information Center: Fusion Human Capital Management - United States Legislative Update, Document ID 2063588.2.
You can now process any employee’s regional tax levy liabilities by defining a Regional Tax Levy involuntary deduction element and processing it through Oracle Fusion HCM for the US. This applies to any tax levy imposed by all 50 states and DC. Regional tax levy payments can now be processed on the Third-Party Involuntary Payments Extract.
Use the Manage Elements task in the Payroll Calculations work area to create your regional tax levy elements:

There are no steps necessary to enable this feature.
Key Resources
For more information on involuntary deductions, refer My Oracle Support (MOS) for the following documents:
- Oracle Fusion HRMS (US): Payroll Involuntary Deductions Document ID 1597039.1
- Oracle Fusion HRMS (US): Third-Party Involuntary Payments Interface, Document ID 2043941.1
PA Act 32 Support for Third-Party Periodic Tax Filing
You can now use the Third-Party Tax Filing Interface to accurately calculate tax withholdings for employees working in jurisdictions subject to PA Act 32. All tax money is remitted to the work location regardless of where the tax money was withheld. Previously, the extract reported the tax data based on the jurisdiction of where the money was actually withheld.
Steps to Enable
There are no steps necessary to enable this feature.
Key Resources
For more information on the Third-Party Tax filing process, refer to My Oracle Support (MOS) for the following document:
- Oracle Fusion HRMS (US): Payroll Third-Party Tax Filing Interface, Document ID 1594079.1
PA Act 32 Support for Third-Party Quarterly Tax Filing
You can now use the Third-Party Tax Filing Interface to accurately calculate tax withholdings for employees working in jurisdictions subject to PA Act 32. All tax money is remitted to the work location regardless of where the tax money was withheld. Previously, the extract reported the tax data based on the jurisdiction of where the money was actually withheld.
Steps to Enable
There are no steps necessary to enable this feature.
Tips and Considerations
The school district taxes are included with the local city jurisdiction taxes for PA Act 32 jurisdictions. The school district taxes for PA Act 32 are no longer reported separately on the quarterly file.
Key Resources
For more information on the Third-Party Tax filing process, refer My Oracle Support (MOS) for the following document:
- Oracle Fusion HRMS (US): Payroll Third-Party Tax Filing Interface, Document 1594079.1.
Third-Party Tax Filing Interface Support for User-Defined Taxes
You can now include any user-defined taxes on the ADP quarterly tax files you generate through the Third-Party Tax Filing Interface. To identify balances for inclusion in the tax-filing process:
- Define your elements and balances.
- Start the Manage Enterprise HCM Information task in the Workforce Structures area.
- Add the new balances to the US Balance Definition region, and select them for inclusion in the quarterly tax-filing process.
Steps to Enable
There are no steps necessary to enable this feature.
Key Resources
For more information, refer to My Oracle Support (MOS) for the following documents:
- Oracle Fusion HRMS (US): US Local Tax Configuration, Document ID 2056960.1.
- Oracle Fusion HRMS (US): Payroll Third-Party Tax Filing Interface, Document ID 1594079.1.
You can now customize how you process your payroll payments through the new Override Payment Date parameter. This parameter is part of the US Simplified Payroll Flow and overrides the default payment date, as defined on the payroll calendar.

Steps to Enable
There are no steps necessary to enable this feature.
Payroll Batch Loader Support for Regional Tax Levies
You can now perform mass loads of regional tax levies, using the Involuntary Deduction Card Payroll Batch Loader:
- Start the Batch Loader task from the Administration work area.
- Download the Batch Loader spreadsheet.
- Search for the US Employee Involuntary Deduction Card Details Upload task.
- Use the new Upload Regional Tax Levy Involuntary Deduction Data task action.

Steps to Enable
There are no steps necessary to enable this feature.
Key Resources
For more information, refer to My Oracle Support (MOS) for the following document:
- Oracle Fusion HRMS (US): Involuntary Deductions Payroll Batch Loader (Document ID 2022585.1)
You can now use Oracle Fusion HCM for the US to generate your employer 1094-C forms from archived data through the Run US 1094-C Employer Report process. This process generates the Employer-Provided Health Insurance Offer and Coverage Information Returns forms from data captured by the Archive End-of-Year ACA Information process. Upon successful completion, this process creates the Form 1094-C in XML format, suitable for submission to the IRS.
To run the report, start the Run US 1094-C Employer Report process from the Submit Extracts task in the Data Exchange or Payroll Checklists work areas.
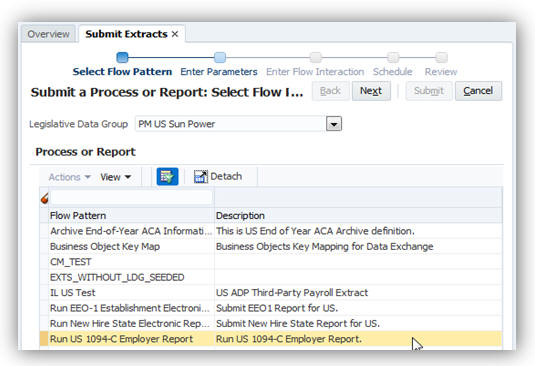
Steps to Enable
There are no steps necessary to enable this feature.
Role Information
See the Oracle Fusion HRMS (US): ACA Implementation and Use white paper on My Oracle Support (MOS) document id 2067360.1 for information on the required duty roles.
Tips and Considerations
You must select Original as the ACA file type. Correction and Replacement types are not currently supported.
Do not specify any values for the Receipt ID and Corrected fields.
Refer to the next entry for information on the Form 1094-C employer audit report.
Key Resources
For more information, refer to My Oracle Support (MOS) for the following documents:
- Oracle Fusion HRMS (US): ACA Implementation and Use (Document ID 2067360.1)
- Information Center: Fusion Human Capital Management - United States Legislative Update (Document ID 2063588.2)
ACA 1094-c Employer Audit Report
Use the new ACA 1094-C employer audit report to review all employer-provided health insurance coverage data captured by the Archive End-of-Year ACA Information process. Use this comma-delimited text formatted report to validate the data before generating the ACA forms for submission to the IRS.
To view the audit report:
- Launch the Reports and Analytics work area.
- In the Contents region, expand Shared Folders > Human Capital Management > Workforce Management > Person Management > US, and select 1094cAuditReport.
- Select History.
- Clear the value in the Owner field in the Filters section.
- Click Search.
- Select Report Job Name.
- Select Output Name in the Output & Delivery section.
Steps to Enable
There are no steps necessary to enable this feature.
Role Information
See the Oracle Fusion HRMS (US): ACA Implementation and Use white paper on My Oracle Support (MOS) document id 2067360.1 for information on the required duty roles.
Key Resources
For more information, refer to My Oracle Support (MOS) for the following documents:
- Oracle Fusion HRMS (US): ACA Implementation and Use (Document ID 2067360.1)
- Information Center: Fusion Human Capital Management - United States Legislative Update (Document ID 2063588.2)
Payroll Batch Loader Support for School District Codes
You can now include school district geocodes or names in your payroll batch loader upload, using the US Employee Withholding Regional Card task and the appropriate city or county component details task action. This enables more flexibility and options for loading regional tax card data.
Steps to Enable
There are no steps necessary to enable this feature.
Key Resources
For more information, refer to My Oracle Support (MOS) for the following documents:
- Oracle Fusion HRMS (US): Tax Card Payroll Batch Loader (Document ID 2022994.1)
Third-Party Involuntary Payment Extract Reports
You can now perform in-depth analysis and error recovery of your third-party involuntary payments through the new audit and exception reports. These reports are generated automatically as comma delimited output and are viewable through any spreadsheet application like Microsoft Excel. Use them to facilitate your payment balancing and reconciliation operations.
To download and view these reports:
- Upon successful payment extraction, select Checklists from the Navigator.
- Use the search criteria to determine the flow name, and copy it.
- Select Reports and Analytics from the Navigator.
- In the Contents pane, expand Shared Folders > Human Capital Management > Payroll > Payment Distribution > US.
- Select Third-Party Involuntary Payments Extract, and click View.
- In the flowInstanceName field, enter the flow name you queried on the Checklists page, and click Apply.
- Select Export from the Actions menu to save these reports as CSV files, suitable for viewing in a spreadsheet application.
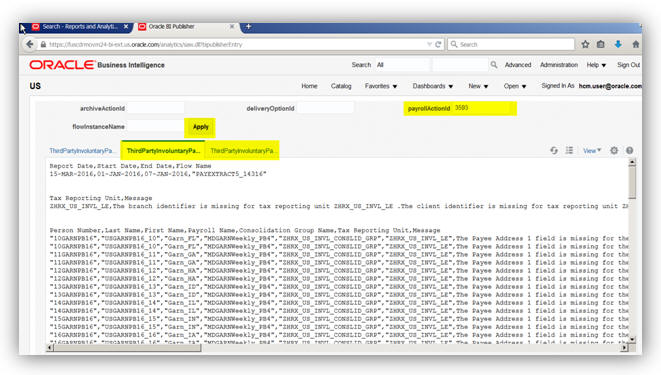
The XML output, exception report, and audit report appear as separate tabs.
Steps to Enable
There are no steps necessary to enable this feature.
Key Resources
For more information on this extract, refer to My Oracle Support (MOS) for the following documents:
- Oracle Fusion HRMS (US): Third-Party Involuntary Payments Interface (Document ID 2043941.1)
- Fusion Human Capital Management - United States Legislative Update (Document ID 2063588.2)
You can now withhold state, county, and city taxes for employees living in jurisdictions where such employer withholdings are not required. You can set up these courtesy taxes at the Payroll Statuatory Unit (PSU), Tax Reporting Unit (TRU), and employee levels.
Courtesy tax implementation involves:
- Defining the state withholding rules.
- Defining the county and city withholding rules.
- Defining any required overrides at the employee level.
Steps to Enable
There are no steps necessary to enable this feature.
Tips and Considerations
Settings you make at the TRU level override your PSU settings. Employee settings override both TRU and PSU settings.
Key Resources
For more information on Courtesy Tax, refer to My Oracle Support (MOS) for the following document:
- Oracle Fusion HRMS (US): Courtesy Tax Implementation (Document 2138998.1)
Support for Resident and Nonresident Balances in Third-Party Quarterly Tax Filing
You can now make your local tax filing more robust through the inclusion of resident and nonresident balance reporting for the Third-Party Quarterly Tax Filing Extract. This extract now includes resident and nonresident wage and tax data for cities and counties. This data is reported to resident and nonresident jurisdictions on the output file and audit report.
Steps to Enable
There are no steps necessary to enable this feature.
Tips and Considerations
- Existing city and county tax codes represent nonresident jurisdictions.
- New city and county tax codes are generated with an “R” appended to the end to represent resident jurisdictions.
- School taxes and head taxes are not impacted.
- Pennsylvania locals subject to PA Act 32 are not impacted and are not reported by resident and nonresident tax codes.
Key Resources
For more information, refer to My Oracle Support (MOS) for the following document:
- Oracle Fusion HRMS (US): Payroll Third-Party Tax Filing Interface (Document ID 1594079.1)
Enhanced Employer Matching for 401 (k) Deferred Compensation Plans
You can now define employer-match deferred compensation elements for cases where the employee opts not to provide contributions of their own. To do so, select the appropriate option during element configuration:
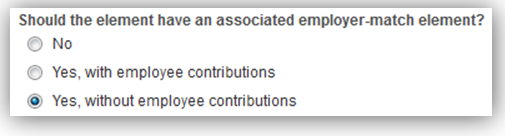
Steps to Enable
There are no steps necessary to enable this feature.
Synchronize Employee Withholding Certificates with HR Data
You can now easily update the Employee Withholding Certificate whenever you make location-specific changes on the employee’s definition using the new Synchronize Calculation Cards process. When you make a change to the employee’s work location, this process updates the following values on the tax card:
- State for unemployment calculation
- State for disability calculation
- Primary work location
It also creates new regional components on the card based on appropriate changes you make to the following fields (such as changing the employee’s work state):
- Home address or resident tax address
- Work-at-home status
This process is available from the Payroll Checklists work area.
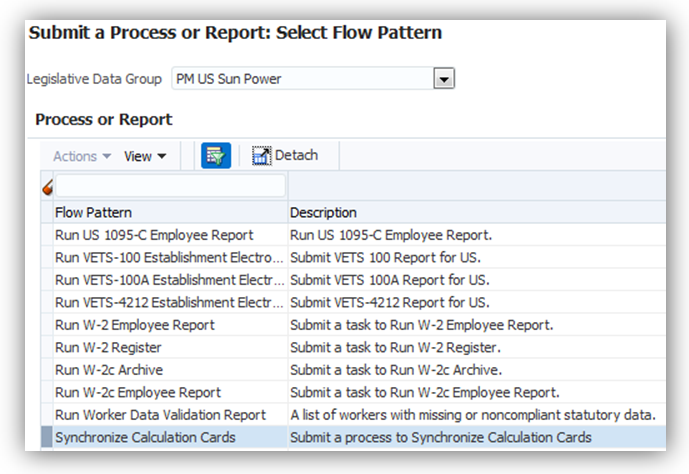
Payroll Checklists Work Area
Steps to Enable
There are no steps necessary to enable this feature.
Tips and Considerations
By default, this process runs against all employees. You can use the optional parameters to refine the list:
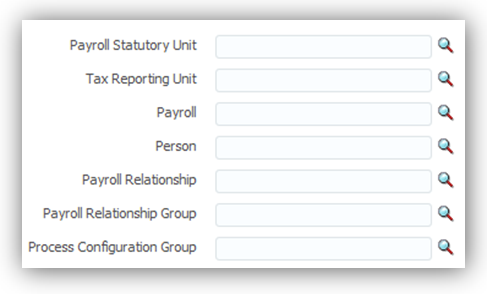
Parameters
Include Resident and Nonresident City and County Tax Balances on Quarterly Tax Filing
You can now include resident and nonresident balances for cities and counties in your third-party quarterly tax filing. These balances are used by local tax filings that require resident and nonresident wages and taxes to be reported separately. For a given jurisdiction, the quarterly interface file passes these balances on multiple rows. For example, a tax code of OH0952490CITY would represent the nonresident wages and taxes for Toledo, Ohio. A tax code of OH0952490CITYR would represent the resident wages and taxes for Toledo, Ohio.
Steps to Enable
There are no steps necessary to enable this feature.
Key Resources
For more information on third-party tax filing, refer to My Oracle Support (MOS) for the following document:
- Oracle Fusion HRMS (US): Payroll Third-Party Tax Filing Interface (Document ID: 1594079.1)
Refined Data Selection for Third-Party Tax Filing Extracts
You can now further refine the payroll data you submit for third-party reporting by payroll statutory unit or tax reporting unit.

These new parameters are available for third-party periodic, monthly and quarterly tax filing extracts.
Steps to Enable
There are no steps necessary to enable this feature.
Key Resources
For more information on third-party tax filing, refer to My Oracle Support (MOS) for the following document:
- Payroll Third-Party Tax Filing Interface (Document ID: 1594079.1)
Set Check Date on Third-Party Periodic Tax Filing Extract
You can now improve the accuracy of your third-party tax filings by setting a new the payment date for liability payments. By default, this date is derived based on the payroll data captured by the periodic archive. The Check Date parameter on the Run Third-Party Periodic Tax Filing Extract job overrides this default liability date for all data you send on the periodic tax file.
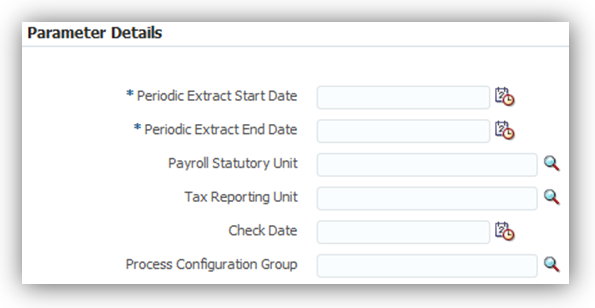
Steps to Enable
There are no steps necessary to enable this feature.
Tips and Considerations
The Check Date parameter overrides the liability date for all tax data you send on the output file. If you need to override the date for only selected payroll data within the same period, such as for a quick pay operation:
- Run your standard payrolls and prepayments.
- Run the periodic archive.
- Run the periodic tax-filing extract process, and submit the output file to your third-party tax filing provider.
- Run the payroll operations that require a different check date, such as quick pays.
- Run the periodic archive.
- Run the periodic tax-filing extract process, specifying the new date on the Check Date field.
- Submit the output file to your third-party tax filing provider.
These steps may not apply for all situations. You should adjust accordingly to suit your business needs.
Key Resources
For more information on third-party tax filing, refer to My Oracle Support (MOS) for the following document:
- Payroll Third-Party Tax Filing Interface (Document ID: 1594079.1)
Human Capital Management for United Arab Emirates
Oracle Fusion Human Capital Management for the United Arab Emirates supports country specific features and functions for the United Arab Emirates. It enables users to follow the United Arab Emirates’ business practices and comply with its statutory requirements.
Statutory Reporting: IPE Consolidated Report - New Hire and Termination
You can now generate a monthly report that contains details of new hires and terminations in a calendar monthly period for citizens of the Gulf Cooperation Council (GCC). This report must be submitted to the Social Insurance office.
Steps to Enable
There are no steps necessary to enable this feature. You can run this report from the Regulatory and Tax Reporting work area.
Key Resources
For more information about this report, go to Applications Help for the following topic:
- Emirati IPE Consolidated Report
Statutory Reporting: Wage Protection System (WPS) Salary Information File
You can now generate a monthly report that contains details of the monies paid to individual employees. This report must be submitted to the Wage Protection Agent at the end of each month.
Steps to Enable
There are no steps necessary to enable this feature. You can run this report from the Regulatory and Tax Reporting work area.
Key Resources
For more information WPS Salary Information, go to Applications Help for the following topic:
- Emirati Salary Information File
Monthly Gratuity Accrual Process
The payroll process calculates a gratuity amount each month. This is for information only and is not paid. This is the amount that an employee would be entitled to, if they were terminated at the end of that month and if they were eligible for payment.
A record of the full accrued amount from the beginning of employment and the incremented accrued amount, the periodic difference, is available to be transferred to General Ledger.
There are no steps necessary to enable this feature.
The following global reports have been enabled to meet UAE-specific requirements:
| Report Name |
Purpose |
| Deduction Report |
Validates the deduction amounts being processed. You can run this report from the Payroll Calculation work area. |
| Gross-to-Net |
View summary or detail listings for the total results calculated in the payroll run. Run this report from the Payroll Calculations work area. |
| Payment Register |
Displays results used to verify and audit payment distributions. Run this report from Payroll Checklist work area or the Payroll Calculations work area. |
| Payroll Register |
Displays details used to verify, validate, and audit payroll calculations. Compare this report to the Payroll Activity Report to ensure that payroll results have been archived correctly. Run this report from Payroll Checklist work area or the Payroll Calculations work area. |
| Balance Exception |
Identifies values that vary compared to other values for the same balance dimension. Run this report from Payment Distribution work area or Payroll Checklist work area. |
Steps to Enable
There are no steps necessary to enable this feature.
Key Resources
For more information about these reports, go to Applications Help for the following topics:
- Payroll Calculation Reports: Overview
- Deduction Report
- Payment Register: Explained
- Payroll Register: Explained
- Payroll Activity Report
- Balance Exception Report: Explained
Abu Dhabi Retirement Pensions and Benefits Fund
Comply with legislative requirements. Any UAE citizen who works for any type of employer based in the emirate of Abu Dhabi or who works in the government or semi government in any of the other emirates is eligible to be in the Abu Dhabi Retirement Pensions and Benefits Fund. Employers now have the ability to select which social insurance or pension fund they wish to utilize to ensure that the appropriate statutory deductions are being calculated for their employees. The payroll process will calculate social insurance or pension at the correct rates for employees and employers based on the combination of Employer Sector and Social Insurance Fund Type.
Steps to Enable
To enable the Abu Dhabi Retirement Pensions and Benefits Fund feature for your company navigate to Manage Calculation Cards: Employer Social Insurance Details. The payroll process will calculate social insurance or pension based on the Social Insurance Fund Type selected on the Payroll Statutory Unit Social Insurance Details calculation component details. The calculation is based on the legislative regulations for the General Pension and Social Security Authority or the Abu Dhabi Retirement Pensions and Benefits Fund.

If a specific value for Social Insurance Fund Type is not selected it will be assumed that the employer is registered with the General Pension and Social Security Authority when the payroll is processed.
Please note that once a payroll process has been run for a specific payroll statutory unit you can no longer update the Social Insurance Fund Type.
Tips and Considerations
Employee Social Insurance Details Calculation Card
A minor change has been made to one label on the Employee Social Insurance Details calculation card. Registered for Social Insurance is now shown as Registered for Social Insurance or Pension.
The functionality of this checkbox has not been altered, and is populated using the same criteria.

Employee End of Service Details Calculation Card
As workers registered in the Abu Dhabi Retirement Pensions and Benefits Fund are not eligible for end of service payments there will be no automatic card creation when an employee is terminated if the Social Insurance Fund Type is Abu Dhabi Retirement Pensions and Benefits Fund.
Statutory Reports
Reports have been delivered that are specific to the General Pension and Social Security Authority. A payroll statutory unit created with a Social Insurance Fund Type of Abu Dhabi Retirement Pensions and Benefits Fund will not be available to select as the payroll statutory unit report parameter for the following reports:
- Form 1
- Form 2
- Form 6
- Form 7
- Monthly Contributions – Private Sector
- Monthly Contributions – Government Sector
Key Resources
For more information, go to Applications Help for the following topics:
- Employer Calculation Cards for the UAE: Points to Consider
- Employee Social Insurance Calculation Component and Details (UAE): Points to Consider
- Employee End of Service Details Calculation Card Components for UAE: Points to Consider
- Automatic End of Service Details Calculation Card Creation for UAE: Explained
- Statutory Reports for UAE: Overview
Oracle Fusion Network at Work provides integration between Oracle Fusion HCM and Oracle Social Network (OSN) to allow workers to collaborate with others in the organization. Network at Work also provides the capability for workers to give each other informal kudos, which can be used in feedback and performance evaluations.
We replaced Kudos with the new Fusion HCM Kudos feature.
Though many features remain the same, you can now configure whether users can:
- Hide kudos they receive
- Delete kudos they give to others
You continue to create and manage Kudos in Portrait, though you may notice cosmetic differences.
You can also view Kudos in:
- Performance Management, performance documents
- Talent Review, on the Details dialog that you open from the Dashboard
- Succession Management, on the Details dialog you open on the Overview page
On the Details dialog, you can also create and delete kudos.
Create and Manage Kudos in the Person Gallery
Steps to Enable
- Click Configure Offerings to open the Configure Offerings page, in the Task section of the Setup and Maintenance work area.
- Expand Workforce Deployment.
- Configuration Offerings
- Select the View or Select Feature Choices icon to open the Select Feature Choices page, in the Network at Work row.
- Select Feature Choices Page
- Select Yes to enable Kudos in the Network at Work section.
- Select Allow users to hide kudos received, in the Kudos section.
- Select Allow users to delete kudos given.
- Click Save and Close.
Tips and Considerations
- Kudos appear in the performance document when you click the Kudos icon at the top of the document.
- Kudos appear on the General tab of the Details dialog you open from succession plans and the Talent Review meeting dashboard.
- To hide the kudos you receive, on your Portrait Kudos card, select Private.
- To delete kudos you create, open the portrait of the person to whom you gave kudos, and click the Delete icon.
- If you already use Kudos, then the previous entries are upgraded to be visible in the new component.
Key Resources
For more information about Network at Work, see Application Help for the following topics:
- Networking at Work: Explained
- Networking at Work: How can I enable the network at work features?
Enhance communication with new notifications for a worker and his manager when the worker receives kudos.
The recipient receives the notification and can view the kudos without navigating to the Portrait.

Enable Kudos Notifications to Alert the Recipient
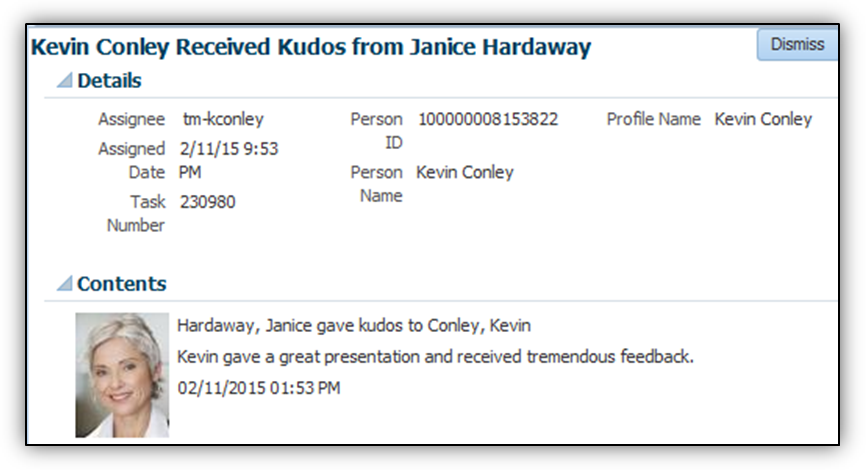
Expanded Kudos Notifications Display all Relevant Kudos Information
Steps to Enable
- Enter Manage Talent Notifications, in the Setup and Maintenance work area, on the All Tasks tab, in the Name field.
- Click Search.
- Click the Go to Task icon to open the Manage Talent Notifications page, in the Search Results section, for the Manage Talent Notifications row.
- Select the Profile Management tab.
- Select Kudos notification to manager.
- Select Kudos notification to worker.
- Click Save and Close.
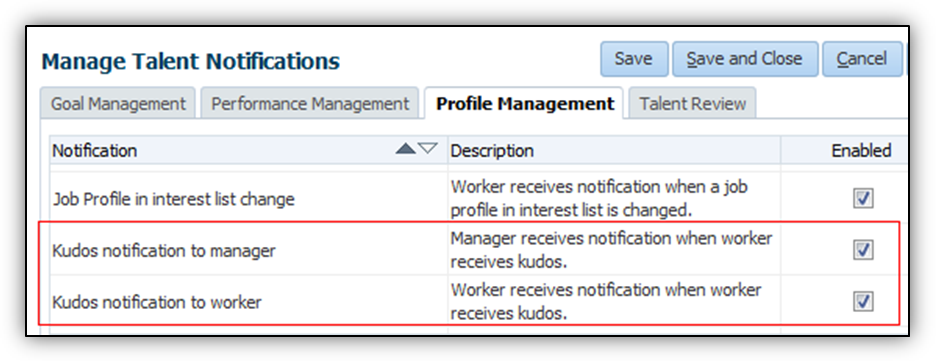
Tips and Considerations
- You can create kudos for anyone whose portrait you can access.
- Kudos, like all notifications, is not enabled by default; you must enable them.
Key Resources
For more information about Network at Work, go to Application Help for the following topics:
- Networking at Work: Explained
- Networking at Work: How can I enable the network at work features?
Collaboration Through Oracle Social Network
Increase collaboration through Oracle Social Network. You can use Oracle Social Network conversations for your collaboration needs instead of Spaces. Network at Work is no longer integrated with Spaces.
Use Oracle Social Network to Collaborate with Others to Replace Spaces
Steps to Enable
There are no steps necessary to enable this feature.
Tips and Considerations
Spaces you created in the Spaces region still exist in Release 10, but you can no longer navigate to them from your Portrait, nor will you be able to see a list of spaces when viewing other worker’s portraits.
Key Resources
For more information about Oracle Network at Work, go to Application Help for the following topics:
Oracle Fusion Time and Labor is a comprehensive, easy to use, rules-based time recording and management system. The calendar-based time entry interface and the fully configurable time card layout easily address simple and complex time recording requirements. The rule templates and real-time rules engine provide an extensible and robust method to validate time entries and automatically apply pay rules, such as overtime calculations. Complete integration with Global Human Resources, Absence Management, Global Payroll, and Oracle Fusion Project Costing ensures accurate and consistent data for payroll processing and costing as well as project management and billing.
Worker View of Personal Schedule and Team Schedule
Help workers manage their time with a complete view of their work schedule and their team members’ work schedules. This view enables workers to responsibly plan leaves and actively negotiate shift trades to accommodate personal appointments or desired time off.
Workers can use display options to filter the time that they see, such as personal and employment schedules and absences. The Time Card display option determines whether the View and Submit Time Card button appears on the Time page.
Worker's Schedule with Filters Set to Show my Personal and Employment Schedules as well as Absences and
Public Holidays.

Worker's Team Schedule
Steps to Enable
Time and Labor administrators must create the scheduler profiles. Details for these tasks are provided in the Manager View and Edit of Team Schedule section.
Manager View and Edit of Team Schedule
Enable managers to maintain weekly team schedules that ensure proper coverage and balanced workloads.
In the Time Management work area, managers can now:
- View weekly team schedule based on the members’ work schedules, which include approved absences and public holidays.
- Quickly analyze workload coverage using indicators of total hours scheduled, resources required, and resources scheduled.
- Easily edit labor demand and weekly team schedule using capabilities such as:
- Double-clicking an existing shift
- Clicking the Add button on the toolbar
- Editing Resources Required in the Planned Schedule Summary section
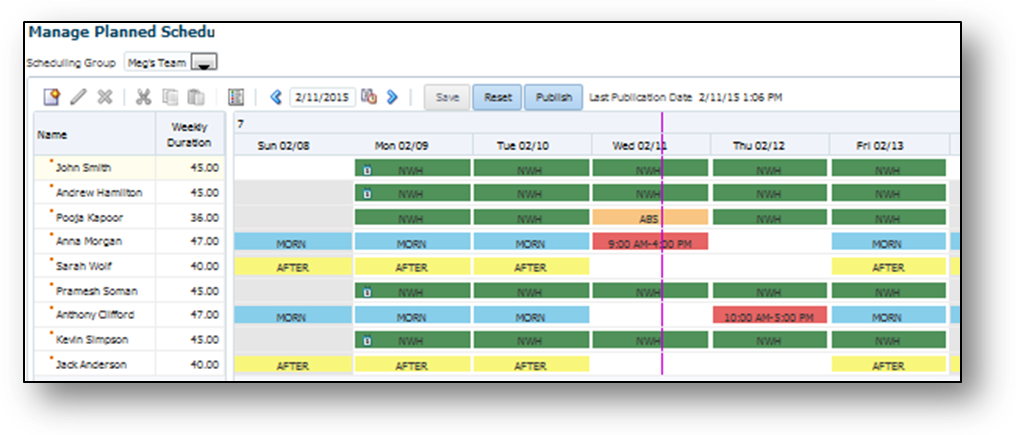
Manage Planned Schedule Page Showing the Shifts for the Selected Scheduling Group
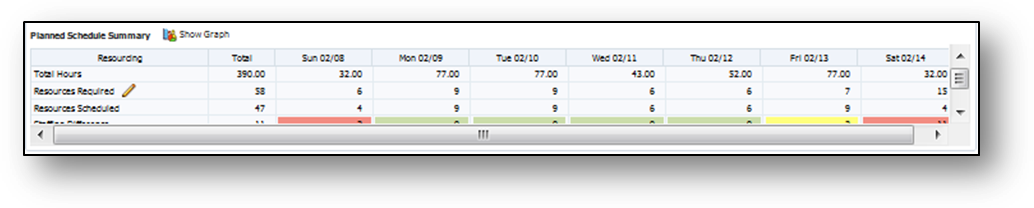
Planned Schedule Resourcing Summary for the Scheduling Group in the Table Format
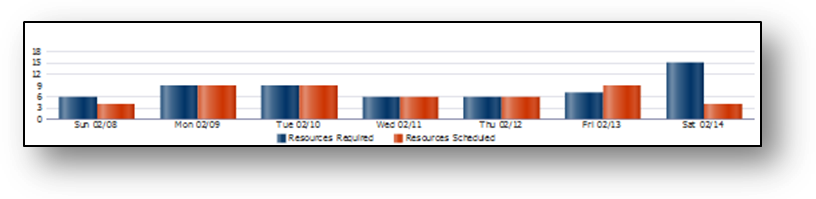
Planned Schedule Resourcing Summary for the Scheduling Group in Graph Format
Steps to Enable
Most shift properties are set when shifts are created using the Manage Work Shifts task in the Setup and Maintenance work area. Optionally, use the Manage Shift Properties task in the Time Management work area to edit the shift display properties short name and color.
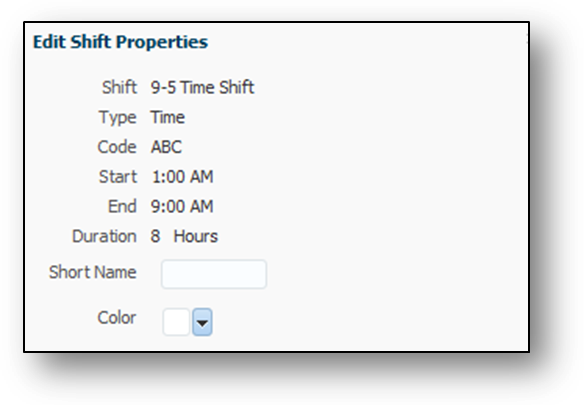
Edit Shift Properties Dialog Box Where You Configure the Shift Short Name and Color
To use any scheduling features, you must configure scheduler profile values and scheduler assignments. Profile values include scheduling group, default resources required, display labels and colors for custom shifts, and staffing differences for over, under, and normal staffing levels. Associate a color with each level to visually distinguish the levels on Planned Schedule Summary sections. Use the Manage Scheduler Profiles task in the Time Management work area to make profile value and assignment configurations.
Configure Values for the Scheduler Profile
Identify one or more schedulers to act on the manager’s behalf. All schedulers must have the Time and Labor Manager role to access the scheduling features. You can associate a scheduler with more than one scheduler profile to enable the scheduler to manage multiple scheduling groups.

Associate the Appropriate Schedulers with the Scheduler Profile
Tips and Considerations
To schedule a shift where the worker has an approved absence, you must first delete the absence using the Manage Absence Records task in the Person Management work area.
Key Resources
For more information about schedules, go to Applications Help for the following topic:
- Sources for Schedule Shift Default Values: Explained
User-Defined Time Attributes Available for Time Entry
In addition to the time attributes delivered by Global Payroll, Project Costing, and Absence Management, you can now create your own custom time attributes that are defined in the workforce management data dictionary and stored in the repository. You can optionally associate dependent attributes with your independent custom attributes.
You can associate these time attributes with time card fields and use them on worker time cards. You can also use these custom time attributes in time calculation rules, time categories, and time card approval rules.
Using custom time attributes, you can capture additional information on worker time cards to meet company-specific needs, such as integration with third-party project management tools or third-party payroll applications. You cannot use custom attributes to transfer time to Global Payroll, Project Costing, or Absence Management.
Steps to Enable
Create time attributes using the following tasks in the Define Time and Labor task list in the Setup and Maintenance work area.
Setup Tasks to Create and Use Custom Time Attributes
- Manage Time and Labor Value Sets: Create the value sets to be used by time reporters during time entry and by administrators for setup tasks such as creating time categories and rules.
- Manage Custom Time Attributes: Create the independent time attribute and add any associated dependent time attributes. Specify the data source value sets to be displayed at the top of the data source list when configuring the time card fields that use the attributes. Also specify the data type of the attribute, which must match the data type of the associated value set.
- Manage Time Card Fields: Associate the custom attribute and any dependent attributes with a time card field and its dependent fields. Configure the data sources and filters for time entry.
- Manage Time Layout Sets: Add the time card fields that contain custom attributes to layout sets that you associate with time entry profiles.
- Manage Time Categories: Add custom time attributes to time categories to enable time to be summarized by that category. You cannot add attributes with data type of number, date, or percentage to a category.
- Define Time Rules: Create time rules using values associated with custom time attributes to configure the rule’s inputs and outputs.
Create Custom Time Attribute Page Showing One Associated Dependent Time Attribute
Tips and Considerations
After you create and save the custom attribute and related dependent attributes, you can edit only the description text and the data sources. You can add dependent time attributes, but cannot delete existing dependent attributes.
Key Resources
For more information about custom time attributes, go to Applications Help for the following topic:
- Creating Custom Time Attributes: Procedure
- Managing Time Attributes and the Data Dictionary: Explained
Enable US Location Overrides as Payroll Time Entries
Capture location information during time entry, to override the US worker’s work location. You can now use Payroll Time Types with US Area fields for State, County, and City as time card entries on the configurable time card. The available entries have delivered, filtered choice lists and transfer for use by payroll upon final approval.
You can capture State location only, or State, County, and City. If you use all three locations, you set them up to filter the County value list to only counties valid in the selected state, and filter the Cities list to only cities valid in the selected state and county.
Steps to Enable
To enable location overrides during time entry, follow these steps:
- Ensure that elements are created for the US legislative data group with the necessary location input values in Oracle Fusion Global Payroll.
- Run the Generate Data Dictionary attributes process from the Define Time and Labor task list in the Setup and Maintenance work area.
- Add the relevant location attributes as dependent time card fields on the related independent time card field, using the Manage Time Card Fields task.
- Add the data sources and configure the data source filters to filter the county and city list values.
- Add the dependent location fields to the appropriate layouts in the layout sets.
- Add the layout sets to the appropriate time entry profiles.
Tips and Considerations
The following table illustrates how to set up the attribute dependencies to filter the data source for each of the location dependent fields.
| Dependent Field |
Filter Bind Variable |
Variable Input Attribute |
Available Values for Dependent Field |
|---|---|---|---|
| State |
None |
None |
All values in the State data source |
| County |
pCodeLevel1 |
State |
All counties in the selected State |
| City (step 1) |
pCodeLevel1 |
State |
|
| City (step 2) |
pCodeLevel2 |
County |
All cities in the selected County in the selected State |
- The context availability value that you select when creating the dependent field determines your options for placing the field on the matrix or details dialog boxes in time card layouts:
- Available globally, for all independent time attribute values: Dependent time card field is configurable in the Time Card Matrix and details dialog boxes even if the independent attribute is not displayed in the Time Card Matrix.
- Add the location dependent time card fields to the layouts in the proper sequence to ensure that time reporters enter the attribute filter values in proper succession: State, County, and then City.

Configuring Location Dependent Fields in the Row-Level Details on the Layout Set
Location Fields in the Additional Attributes Dialog Box on a Time Card
Key Resources
For more information about schedules, go to Applications Help for the following topic:
- Configuring Time Card Fields for US Location Overrides: Procedure
Transactional Business Intelligence
Oracle Transactional Business Intelligence (OTBI) is a real time, self-service reporting solution offered to all Oracle Fusion application users to create ad hoc reports and analyze them for daily decision-making. OTBI provides human resources managers and specialists, business executives, and line managers the critical workforce information to analyze workforce costs, staffing, compensation, performance management, talent management, succession planning, and worker benefits.
Line Manager Access to PII and Other Sensitive Information
Access to person personally identifiable information (PII) and other sensitive information is now restricted to the Human Resource Analyst role only. Line Managers no longer have access to information in the following folders in the Person subject area:
- Person Driver License
- Person Address
- Person Delivery Methods
- Person Contact Relationship
- Person Email Addresses
- Person National Identifiers
- Person Passport Details
- Person Phones
- Person Work Permit
Steps to Enable
There are no steps necessary to enable this feature.
Oracle Transactional Business Intelligence has been enhanced to report on the matrix manager hierarchy. Worker assignments in Oracle Fusion can have other managers, such as one or more project managers, in addition to their line manager. However, there can be only one line manager for a worker.
The newly added Matrix Manager dimension allows reporting on various manager hierarchies.
Steps to Enable
There are no steps necessary to enable this feature.
Unsecured Assignment Manager Hierarchy
A new dimension has been added to all subject areas except Talent Review Meeting Real Time that represents the line manager hierarchy. This dimension doesn't impose the logged in user security that is present in the existing Assignment Manager. In the existing Assignment Manager dimension, the first level of manager name is initialized to the logged-in user, however, in the unsecured dimension, all the managers within the security profile of the logged-in user are displayed. This enhancement allows the HR Analyst to create and test the report using the unsecured hierarchy and then replace it with the secured hierarchy before delivering the report to the line managers.
Steps to Enable
There are no steps necessary to enable this feature.
Workforce Management - Checklist Real Time
Increase efficiency by reporting on the new checklist tasks for workers and other task performers. You can report on both automated and manually allocated tasks with this new subject area.
Steps to Enable
There are no steps necessary to enable this feature.
Two new subject areas are available for Time and Labor. These subject areas enable you to report on timecards that are created, submitted, and approved. You can also report on historical data related to timecards. The new subject areas are:
- Workforce Management – Reported Time Cards Real Time
- Workforce Management – Processed Time Cards Real Time
Steps to Enable
There are no steps necessary to enable this feature.
Currency Conversion in Workforce Compensation
You can now report on compensation metrics using the currency preferred by the user. The compensation subject areas have been enhanced with a new folder containing the respective metrics in the user’s preferred currency. The folder name is Amounts in User Preferred Currency, and has been added to the following subject areas:
- Compensation – Salary Details Real Time
- Compensation – Salary History Details Real Time
- Compensation – Workforce Compensation Budgets Real Time
- Compensation – Workforce Compensation Real Time
Steps to Enable
There are no steps necessary to enable this feature.
Metrics in Workforce Compensation
The Compensation Budgets Real Time subject area now includes these metrics:
- Number of Direct Reportees: Count of direct reports.
- Overall Budget Percentage: The logic to compute this metric is (Overall Budget Amount / Total Eligible Salaries).
The Workforce Compensation Real Time subject area now includes these metrics:
- Workers with Compensation: Number of workers with a compensation amount.
- Average Allocation Percentage: Average of the compensation allocation. The logic to compute this metrics is (Compensation Amount / Eligible Salary) / Workers with Compensation.
Steps to Enable
There are no steps necessary to enable this feature.
Personal Payment Details Real Time Subject Area
A new subject area called Personal Payment Method Details - Real Time is available to create reports and analyze personal payment method details of employees. You can now view employee bank details using this subject area regardless of whether payroll is being processed.
Steps to Enable
There are no steps necessary to enable this feature.
Element Entries Subject Area Enhancements
The following dimensions now include additional attributes that are available in the Element Entries Real - Time subject area.
| Dimension |
Additional Attributes |
|---|---|
| Element |
Allow Multiple Entries Automatic Entry Employment Level Process in Payroll Run Processing Type |
| Input Value |
Display Input Value Input Value Effective Start Date Input Value Effective End Date |
| Worker Payroll |
Overtime Period Time Card Required |
Steps to Enable
There are no steps necessary to enable this feature.
The Accruals - Real Time subject area now includes a metric for Vacation Balance.
Steps to Enable
There are no steps necessary to enable this feature.
Vacancy Real Time Subject area
The Vacancy Real Time subject area has been enhanced to include the Position dimension.
Steps to Enable
There are no steps necessary to enable this feature.
Expected Return Date - Absence Subject Area
We have now enhanced the worker absence details by including the Expected Return Date attribute. This shows the date on which the worker would return after the absence period.
Steps to Enable
There are no steps necessary to enable this feature.
The Worker dimension has been enhanced to include additional attributes that can be used in reporting on worker data. The new attributes include:
- Bargaining Unit
- Enterprise Seniority Date
- Marital Status
- Person Display Name
- Primary National Identifier Number
- Union Flag
Steps to Enable
There are no steps necessary to enable this feature.
The Job dimension has been enhanced with two additional attributes:
- Valid Grades: Provides list of grade(s) associated to a job.
- Progression Job: Displays the list of job(s) that are a probable progression from the current job.
Steps to Enable
There are no steps necessary to enable this feature.
Attribute in Worker Absence Details - Real Time Subject Area
The Worker Absence Details – Real Time subject area now includes the Expected return date attribute. This attribute provides the date on which the worker will return after the absence period.
Steps to Enable
There are no steps necessary to enable this feature.
Action Type - Benefits Action Items Subject Area
The Benefits Action Items - Real Time subject area now includes the Action Type dimension. This dimension provides information on action types, their current status, due date, and the completion dates for the participants while enrolling in a benefit or designating coverage for a dependent or beneficiary.
Steps to Enable
There are no steps necessary to enable this feature.
Oracle Business Intelligence Mobile Application Designer (Oracle BI MAD) is a tool for designing purposeful applications for mobile phones and tablets. The applications that you create with BI Mobile Application Designer are platform independent. Applications run in HTML5 on any modern browser on your mobile device. No client install is required.
Steps to Enable
There are no steps necessary to enable this feature.
A reporting establishment is an organization that is used for statutory reporting other than tax and social insurance reporting. A reporting establishment has a parent-child relationship with a legal employer, with the legal employer being the parent organization. A legal employer can be the parent of multiple reporting establishments. In some countries, such as France, a reporting establishment can also be a tax reporting unit.
Customers want to report often on the Reporting Establishment using the OTBI subject areas. In order to enable this request, Reporting Establishment has been added to all the subject areas that have the Department or Organization dimension.
The Reporting Establishment dimension contains the following attributes:
- Reporting Establishment - Additional Attributes
- Reporting Establishment Created By
- Reporting Establishment Creation Date
- Reporting Establishment Last Updated By
- Reporting Establishment Last Updated Date
- Reporting Establishment Identifiers
- Location Identifier
- Reporting Establishment Identifier
- Reporting Establishment Name
- Effective Start Date
- Effective End Date
- Internal Address Line
- City
- Postal Code
- Location Name
- Location Code
- Status
- Status Code
- Internal External
- Internal External Code
Steps to Enable
There are no steps necessary to enable this feature.
Worker Legislation - ‘Enabled’, ‘Obsolete’ Flags
Customers want to report on countries based on their preferences. For example, they would not want to display a few countries that have been marked as Obsolete in the reports. In other words, they would want to display only those countries that have been marked as Enabled. Some customers would want to display either of the cases i.e. both enabled and obsolete countries.
To meet this requirement, two new flags have been added to the Worker Legislation folder:
- Enabled Flag
- Obsolete Flag
You can add filters on these flags to display or not display the respective countries. For example, a report prompt can have the logical query as below to fetch the list of values:
SELECT "Location"."Country" FROM "Workforce Management - Worker Assignment Real Time" WHERE ("Worker Legislation"."Obsolete Flag") = 'N'
Steps to Enable
There are no steps necessary to enable this feature.
You can view your KPI watchlist as well as drill into the reports that make up a specific KPI. You can tag reports as favorite reports and also view your most recent reports.
You can also browse your BI Catalog in the Fusion HCM Cloud directly from your mobile device.
Steps to Enable
To enable this feature, refer to the Oracle Tap for HCM Cloud: Configuring KPIs for Oracle Tap (Document ID 1586159.1).
You can leverage 18 new sample HCM reports in Oracle Transactional Business Intelligence. The new sample reports are related to Core HR, Compensation, Talent Management, Absence Management, and Performance Management.
The following table lists the new sample reports.
| Analysis Name |
Drill Down |
Drill Down Analysis |
|---|---|---|
| Headcount by Employee Category and Person Type |
Y |
Headcount by Employee Category and Person Type Details |
| Workforce Events |
Y |
Workforce Events by Quarters |
| Workforce Events |
Y |
Workforce Events by Months |
| Workforce Events |
Y |
Workforce Events Details |
| Team Diversity |
N |
|
| Absence Overview |
Y |
Absence Overview Details |
| Absence Trend |
Y |
Absence Trend by Quarters |
| Absence Trend |
Y |
Absence Trend by Months |
| Absence Trend |
Y |
Absence Trend Details |
| % of Workers Aligned with Organization Goals |
Y |
Organization Goals Alignment Worker Details |
| Performance Document Status |
Y |
Performance Document Status Details |
| Terminations Overview |
Y |
Termination Details |
| Performance Calibration |
Y |
Performance Calibration Worker Details |
| Talent Performance by Potential Matrix |
Y |
Talent Performance by Potential Matrix Details |
| Compensation Allocation by Managers |
Y |
Compensation Allocation Worker Details |
| Compensation Target to Actual |
Y |
Compensation Target to Actual Worker Details |
| Pay for Performance |
Y |
Pay for Performance Worker Details |
| Salary Outliers |
Y |
Salary Outliers Worker Details |
| Salary Quartile |
Y |
Salary Quartile Details |
| Workers Without Salary Adjustment |
Y |
Workers Without Salary Adjustment Details |
| Salary Change Percent Trend |
Y |
Salary Change Percent Trend Details |
| Workers Detailed Report |
N |
Steps to Enable
There are no steps necessary to enable this feature.
Oracle Fusion Workforce Modeling provides an integrated solution supporting Oracle Fusion Global Human Resources and provides an easy to use, drag and drop interface that allows you to create reorganization proposals and assess their impact before they are even sent for approval. The intuitive interface and integration with Oracle Fusion Global Human Resources ensure that changes are accurately reflected and validated in the transactional system.
View Empty Positions in the Hierarchy
View associated positions in the hierarchy in Workforce Modeling using the Group By position feature.

Group By Options
Allow vacant positions to display in the hierarchy by recording positions against vacancies.
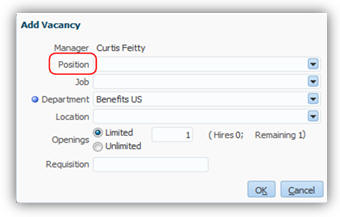
Recording Vacancies
Steps to Enable
There are no steps necessary to enable this feature.
Add Values Automatically Using Position Defaulting
Optionally you can use automatic defaulting to add additional attributes from the position, such as Job, Department and Location.
Steps to Enable
There are no steps necessary to enable this feature.
Streamline your mass termination process with Workforce Modeling. You can model worker terminations and view the impact immediately. When the termination model is finally approved, Fusion HCM applies the terminations using the model effective date.
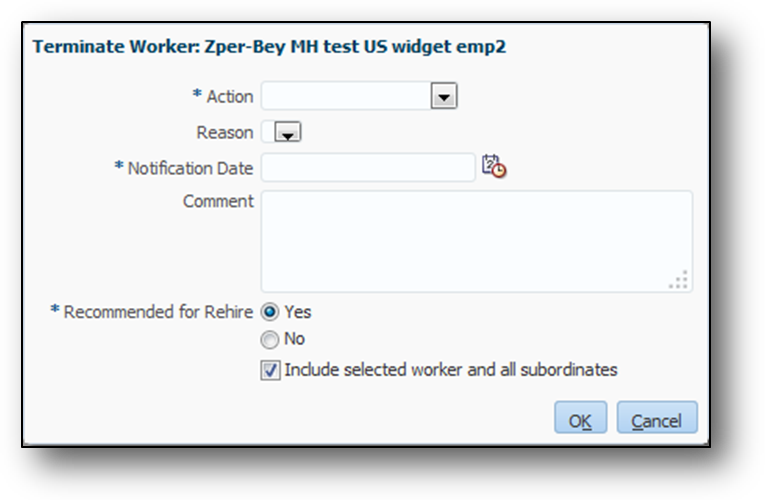
Terminating Workers in Workforce Modeling
Any workers you terminate will display in grey, giving you a quick visual indication of your planned terminations.
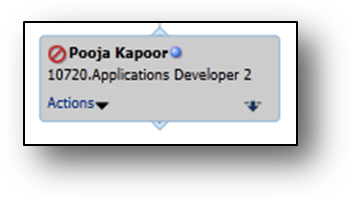
Capture Salary Details in Workforce Modeling
Steps to Enable
There are no steps necessary to enable this feature.
Enter salary details in existing salary records if the:
- Worker salary basis does not use payroll rates
- Worker assignment doesn’t have a grade ladder
- Action code is Promote or Transfer
- Salary basis doesn’t use components
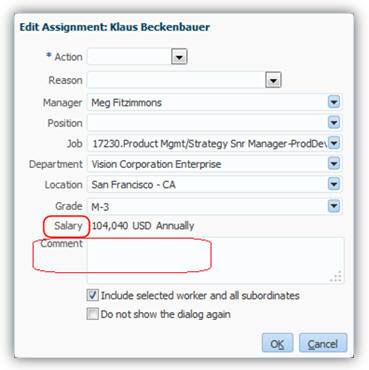
Capture Salary Change
Steps to Enable
There are no steps necessary to enable this feature.
Workforce Reputation Management
Oracle Fusion Workforce Reputation Management harnesses social networks to help organizations discover, mobilize and retain talent. This functionality provides insight into workers' social reputation and influence while also monitoring workers' social media usage compliance and mitigating social media risk.
A simplified user interface is now available supporting both line managers and employees. Line managers can now view details about team members.
Line Manger and Employee Reputation View
Line manager capabilities supported in the simplified user-interface include:
- Dashboard view of Team Social Reputation
- Team Reputation List, Analytic, and Outlier Report Views
- Team Compliance List, Analytic, and Outlier Report Views
- Employee Detail Reputation Score View
- Employee Detail Social Roles View
- Employee Detail Compliance View
- Reputation Profile Search
Also new in this release is the ability for employees to access their reputation scores, social roles, and other details about their social reputation. In addition employees have mentorship capability available to support their needs for increasing their social networking influence.
My Reputation View
Employee capabilities supported in the simplified user-interface include:
- Dashboard Views of Social Reputation Profile, Social Connections Graph, Mentorship, and News and Notifications
- Reputation Score Details
- Social Roles Details
Steps to Enable
There are no steps necessary to enable this feature.
Employee Access to Reputation Scores and Social Roles
Employees can now access their reputation scores which were only available to managers in previous releases. They also have access to a new view of their social roles which is also based on their online social behaviors. Social roles complement reputation scores allowing workers and managers multiple views of a person’s online social reputation. An employee can attain the following social roles: Ambassador, Communicator, Expert, Innovator, Leader, Knowledge Broker, and Team Player. Employees are presented with information about the role they socially represent and how it relates to their social networking behaviors.
My Social Roles View
Both views, reputation scores and social roles, support actionable feedback, to facilitate improvement in the areas.
Steps to Enable
There are no steps necessary to enable this feature.
Employees can now request mentors and identify themselves as mentors to complement their social networking behavior. As part of their social reputation profile employees can identify themselves as mentors, making themselves and their social reputation profile available to co-workers for mentorship. This feature also enables managers to suggest mentors for their team members.
Employee Mentorship and Actions
Steps to Enable
There are no steps necessary to enable this feature.
Line managers can now access more details about a person via the results of the reputation profile search. These details include a person’s talent profile (including skills, degrees, and certifications), reputation scores, and social connections. The search now also supports advanced search capability and provides greater flexibility in defining search criteria.

Reputation Profile Search
Steps to Enable
There are no steps necessary to enable this feature.
Corporate Social Media Usage Compliance
Line managers and social media compliance officers now have a greater ability to view, track, and mediate social media-usage compliance within their team. New manager views of their team and employee compliance details give managers greater access to compliance results. In addition, managers now receive notifications when employees violate usage policies.
Manager View of Compliance Results
Steps to Enable
There are no steps necessary to enable this feature.
Oracle Social Network (OSN) Integration
Oracle Social Network (OSN) is a rich source from which to derive a person’s social reputation. This data is now being used as part of developing individual’s reputation scores and social roles.
Steps to Enable
There are no steps necessary to enable this feature.
---

Copyright © 2016, Oracle and/or its affiliates. All rights reserved.
This document is provided for information purposes only, and the contents hereof are subject to change without notice.This document is not warranted to be error-free, nor subject to any other warranties or conditions, whether expressed orally or implied in law, including implied warranties and conditions of merchantability or fitness for a particular purpose. We specifically disclaim any liability with respect to this document, and no contractual obligations are formed either directly or indirectly by this document. This document may not be reproduced ortransmitted in any form or by any means, electronic or mechanical, for any purpose, without our prior written permission.
Oracle and Java are registered trademarks of Oracle and/or its affiliates. Other names may be trademarks of their respective owners.
Intel and Intel Xeon are trademarks or registered trademarks of Intel Corporation.All SPARC trademarks are used under license and are trademarks or registered trademarks of SPARC International, Inc. AMD, Opteron, the AMD logo, and the AMD Opteron logo are trademarks or registered trademarks of Advanced Micro Devices. UNIX is a registered trademark of The Open Group.
PB10.21