

This document will continue to evolve as existing sections change and new information is added. All updates appear in the following table:
| Date | Feature | Notes |
|---|---|---|
| 09 MAR 2018 | Increased User Agent Length | Updated document. Added new feature delivered in Release 18A. |
| 16 FEB 2018 | Created initial document. |
This guide outlines the information you need to know about new or improved functionality in this update.
DISCLAIMER
The information contained in this document may include statements about Oracle’s product development plans. Many factors can materially affect Oracle’s product development plans and the nature and timing of future product releases. Accordingly, this Information is provided to you solely for information only, is not a commitment to deliver any material, code, or functionality, and should not be relied upon in making purchasing decisions. The development, release, and timing of any features or functionality described remains at the sole discretion of Oracle.
This information may not be incorporated into any contractual agreement with Oracle or its subsidiaries or affiliates. Oracle specifically disclaims any liability with respect to this information. Refer to the Legal Notices and Terms of Use for further information.
| Action Required to Enable Feature |
||||
|---|---|---|---|---|
| Feature |
Automatically Available |
End User Action Required |
Administrator Action Required |
Oracle Service Request Required |
New REST Interface Showing API Throttling Limits for Key Interfaces |
 |
|||
|
||||
|
||||
|
||||
|
||||
|
||||
|
||||
|
||||
|
||||
|
||||
|
||||
|
||||
|
||||
|
||||
|
||||
|
||||
|
||||
|
||||
|
||||
|
||||
|
||||
|
||||
|
||||
|
||||
|
||||
|
||||
|
||||
Merge and Purge for Supplemental Tables Disabled by Default for New Accounts |
|
|||
|
||||
|
||||
|
||||
|
||||
|
||||
|
||||
|
||||
|
||||
|
||||
|
||||
|
||||
|
||||
|
||||
|
||||
|
||||
|
||||
|
||||
|
||||
|
||||
|
||||
|
||||
Content Paging is Enabled by Default for Custom Reports in Interactive Dashboards Plus |
|
|||
|
||||
|
||||
|
||||
|
||||
|
||||
|
||||
|
||||
|
||||
|
||||
|
||||
New REST Interface Showing API Throttling Limits for Key Interfaces
We added a new REST API to obtain the account-specific throttling limits for API functions that are throttled (e.g., function for merging records into a profile list).
For details, please see the latest Responsys REST API Developer's Guide available here.
Steps to Enable
No steps are required to enable this feature.
REST Login Calls Return Rest Endpoint of Login Domain
If an account is enabled for AFTM, the AFTM API endpoint is returned as the RESTENDPOINT if authentication is through the account-specific AFTM endpoint. Otherwise, the standard REST endpoint is returned.
Steps to Enable
No steps are required to enable this feature.
Improved Error Handling and Logging
We improved the error messages for REST API's Merge List Members.
For more information, please refer to the latest API documentation.
Steps to Enable
No steps are required to enable this feature.
Discontinued Support for Version 1 of the REST API
IMPORTANT: Oracle Responsys plans to stop supporting version 1 of the REST API on September 1, 2018 (the latest version is 1.3). This may require small changes in your software code. More details are available here.
Steps to Enable
No steps are required to enable this feature.
Support for Save As for Classic Filters
When Audience Designer is enabled for an account, you can now save Classic Filters via the Save As option for use in new Classic Filters.
Steps to Enable
No steps are required to enable this feature.
Export and Import Email Campaigns
Account Administrators can now import and export email campaigns.
Exporting a campaign exports the campaign metadata, data schema, and content.
Steps to Enable
To export a campaign:
- On the Manage campaigns page, click
 and select Export campaign.
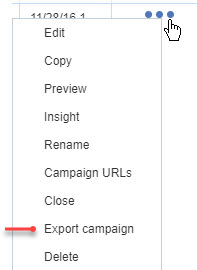
The campaign is exported as a ZIP file.
To import a campaign
- On the Manage campaigns page, click the arrow next to Create Campaign and select Import Campaign.
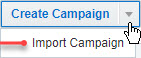
- Click Choose File, select the campaign to import, then click Upload.
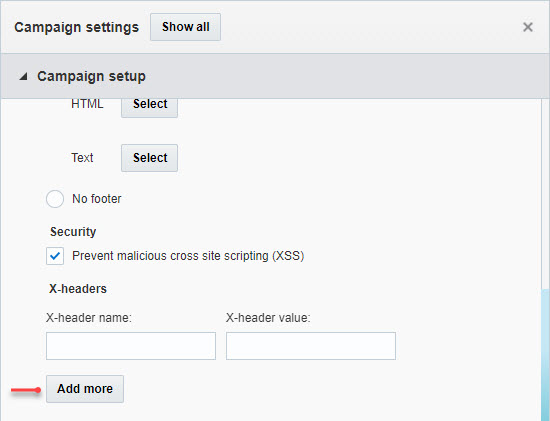
Support for Multiple X-Headers
You can now add multiple x-headers to your email campaigns.
Steps to Enable
- Open the Campaign settings section of the Email Campaign Workbook. For Classic email campaigns, click Options in the Campaign Wizard and scroll to the Custom X-Header section.
- In the Campaign setup section, click Add more to add additional x-headers.
Email Split Run Launch Workflow Improvements
You can now set up split run notifications when scheduling a split run launch.
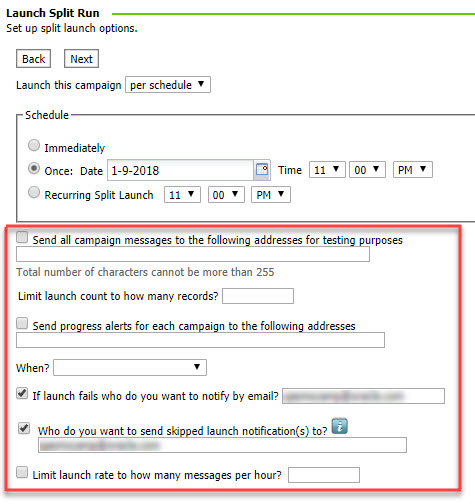
In addition, "Immediately" is no longer the default schedule selection. This enhancement helps prevent accidental immediate split run launches.
Steps to Enable
No steps are required to enable this feature.
Campaign Version ID of MVT Campaigns
You can now reference the Version ID of a MVT campaign from an email or link table using the new RPL method, {campaign.versionid}. This enables you to pass along the Version ID of a particular test to external systems using external tracking parameters in your links.
Steps to Enable
No steps are required to enable this feature.
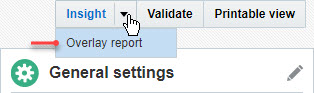
Access Overlay Report from Email Campaign Workbook
You can now access the Overlay report for a campaign from the Email Campaign Workbook.
Steps to Enable
- In the Campaign Workbook, click the arrow next to Insight and select Overlay report.
With this update, you can filter campaigns by campaign type on the Manage Campaigns page and the Campaign Monitor.
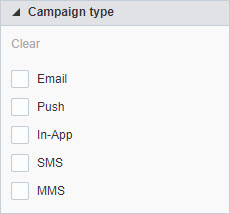
In addition, the Campaign Monitor now displays Campaign type rather than Channel.
Steps to Enable
- In the Campaign Workbook, click the arrow next to Insight and select Overlay report.

Launch Notification Improvements
In this update, we updated the verbiage of launch notifications for progress and skip alerts to include information such as messages sent so far, skipped messages, and targeting count.
In addition, the email notification sent upon launch start now includes the campaign name and campaign ID.
Steps to Enable
No steps are required to enable this feature.
Assign Link Categories Using the RILC Link Attribute
You can now automatically assign link categories in the link table using the RILC attribute in the anchor (<a>) tag in HTML.
Similarly to the RILT attribute, the link category will be automatically assigned when generating or updating a link table, provided the Account Administrator defined the link category for the account.
Note: this feature is not supported for Classic campaigns or the Create Link Table option in Content Library.
Steps to Enable
No steps are required to enable this feature.
Show Main Document Path in Email Message Designer
To help ensure that you are using the correct document, you can now view the full Content Library path to the document in the Email Message Designer.
Steps to Enable
- In Email Message Designer, hover over the document name.
The path is displayed in a tooltip.

Create New Document Button Renamed
To improve clarity, we renamed the Create new document button in the Dynamic Content Rule Editor to Add new content for both the HTML and Text versions.
Click this button to add content to the campaign.
Steps to Enable
- In the Rules Editor, click Select Content.

Limit the Number of Characters in SQL View Statements
With this update, the length of a SQL view is restricted to a maximum of 2,000 characters for new accounts. For existing accounts, the limit is 50,000 characters.
Existing SQL views will continue to run, but when you update an existing SQL view , the new restriction will apply.
Steps to Enable
No steps are required to enable this feature.
View Active Campaigns Option is No Longer Available
We removed the View Active Campaigns option from the Campaigns menu on the side navigation bar since the information available on that page is available on the Manage Campaigns page and the Campaign Workbook.
Steps to Enable
No steps are required to enable this feature.
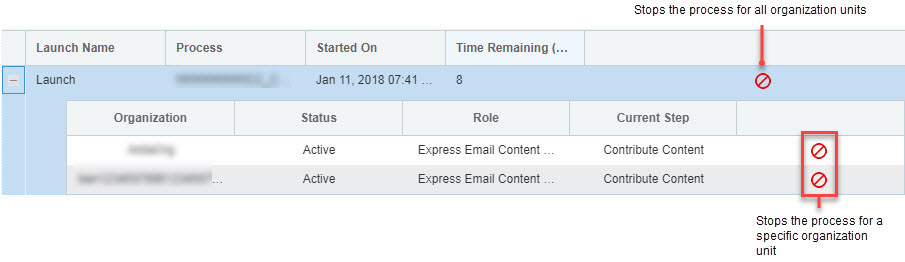
You can now stop a launched Collaboration Process for all or some organizational units using the Collaboration Monitor. This feature is especially useful for Distributed Content Collaboration, where the corporate marketer initiates the process.
After the process is stopped, tasks that are waiting for action will not be available, and subsequent steps in the process will not be executed.
Steps to Enable
- Click the Stop button in the Process Monitor dashboard.
After you import an Audience Scope file, you can now search, view, and update the RIID to Audience scope Code mapping using the new Manage Audience Scope Records page.
Steps to Enable
- Import an Audience Scope file.
- In the Collaboration section of the Account Management page, click Manage Audience Scope Records.
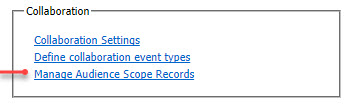
- Select the list and field to search, and the search criteria, then click Search.

Output Targeted Organization for Email Events
If you use Targeting By Organization, you can now capture and output the targeted organizational unit ID in CED output files for the following Email events:
- Sent
- Skipped
- Failed
- Opened
- Clicked
- Bounced
- Opted Out
- Complaint
The new column is called RECIPIENT_ORG_ID.
To enable this feature, please update your CED ingestion processes to accommodate the existence of the new RECIPIENT_ORG_ID column, then submit a My Oracle Support Service Request.
Steps to Enable
No steps are required to enable this feature.
Additional Enhancements to Collaboration Processes
We made the following improvements to Collaboration Processes:
- Content Contributors can now quickly see the default content configured for the email campaign using the new View Default button.

- To help you easily identify which account generated a task notification, task notification emails now include the account name.
Steps to Enable
No steps are required to enable this feature.
In this update, you can use the new simplified Connect interface for the following job types:
- Export Feed Data
- Export Data
- Import Supplemental Data
- Import Profile Data
NOTE: The new Connect interface does not support FTP connections. However, existing jobs using FTP connections will still execute.
Steps to Enable
- On the All Jobs tab of the Connect page, click Create Job and select the job type you want.
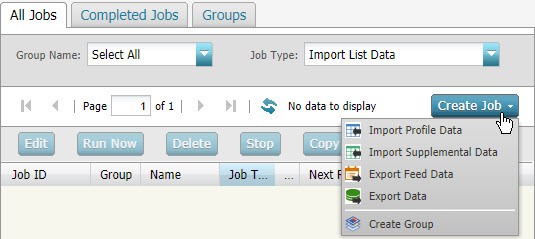
- Specify a unique Name for the job and, optionally, a Description, then click Create Job.
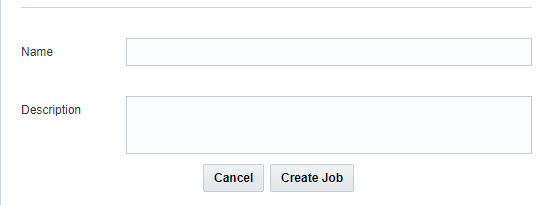
- Complete the steps in any order to create and schedule the job.
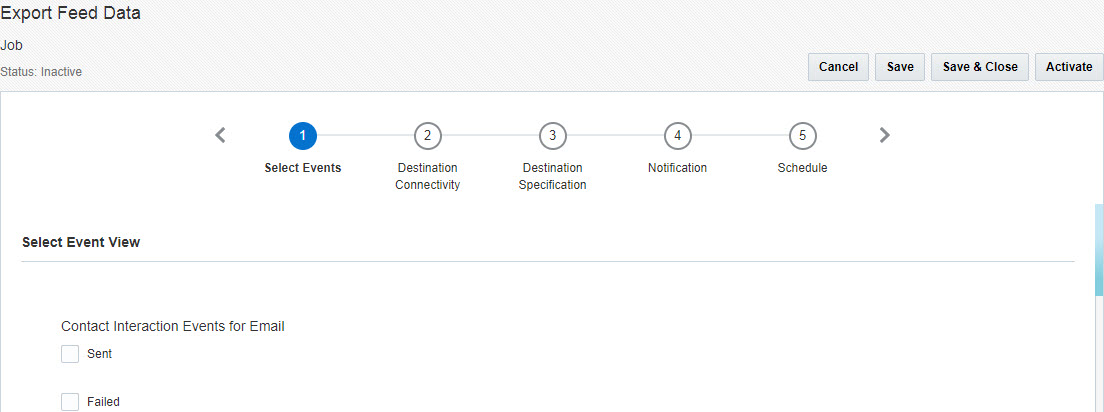
The illustration below shows the steps for an Export Feed Data job. The steps vary for each job type.
You can save your work and continue at a later time.
Re-Try Import Job if Files Do Not Exist
If a source file is not available for import from an external SFTP server, Connect will wait at least 15 minutes and re-try the import process up to three times.
Re-try attempts are stopped if the maximum re-try limit is reached or a source file is found.
To enable this feature, please submit a My Oracle Support Service Request.
Steps to Enable
No steps are required to enable this feature.
Set a Maximum Number of Output Records Per File
To improve performance, you must now specify the maximum number of records included in one Contact Event Data (CED) output file.
The preferred maximum number of records must be 1,000,000 or more. If the number or rows exceeds the specified number of records, Connect will generated additional files.
To specify your preferred maximum number of records, please submit a My Oracle Support Service Request.
Steps to Enable
No steps are required to enable this feature.
Capture SMS Message Body in Sent Events
You can now capture the SMS message with the Sent event.
The message body will be available for export in CED feeds.
Steps to Enable
No steps are required to enable this feature.
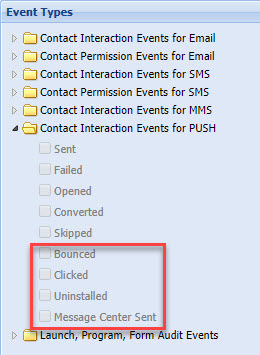
Support for More Mobile App Events for Export
You can now export the following Push events through a Connect Export job:
- Bounced
- Clicked
- Uninstalled
- Message Center Sent
Steps to Enable
- Create an Export Event Data Feed job.
- Select the events in Contact Interaction Events for PUSH.
We have observed that the length of some of the user agents we are receiving has increased more than 255 characters. Until now we were truncating the user agent string to 255 characters which results in a malformed user agent. Instead, we have decided to support length of user agent up to 512 characters. As a result, the contact event data (CED) feed will contain up to 512 characters long user agents.
Steps to Enable
No steps are required to enable this feature.
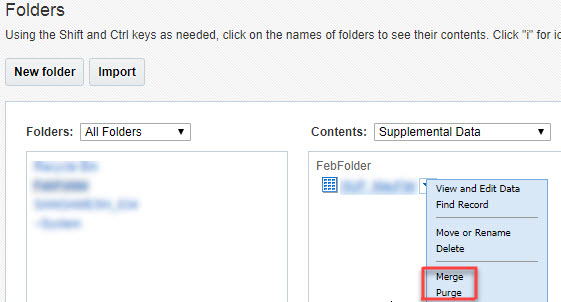
Merge and Purge for Supplemental Tables Disabled by Default for New Accounts
For new accounts, the merge and purge options for supplemental tables are available only if this feature is enabled for the account. These options appear in the Folder menu.
For existing accounts, these options are always available, you do not need to enable them.
Steps to Enable
No steps are required to enable this feature.
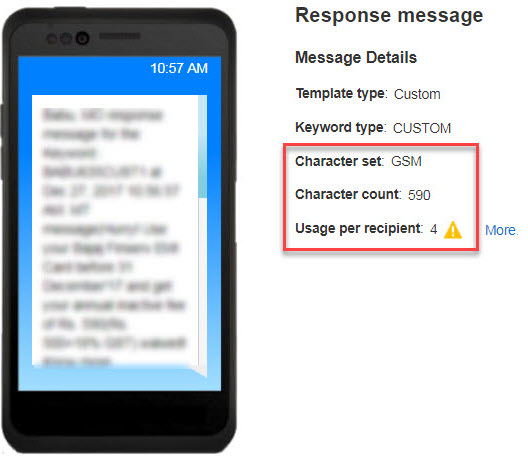
Automatic Character Set Detection
With this update, Oracle Responsys automatically determines the character set of the message. You can no longer specify the character set.
In addition, you no longer have the option to truncate or not send a message if it is split. If the character count exceeds the industry standard limit per message (160 characters for GSM and 70 characters for UCS), the message will always be split and sent.
As you design the message, the Message Designer shows the character set, count, and number of messages that will be sent.
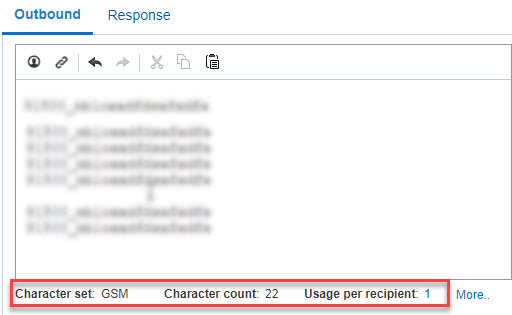
If the message contains personalization tokens, the Message Designer does not show the character set and count. In such cases, you can see that information when you preview the message.
Steps to Enable
No steps are required to enable this feature.
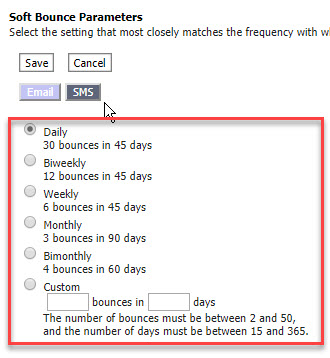
You can now configure the soft bounce rules for SMS.
When you define the rules, recipients who are classified as soft bounced will be excluded from SMS campaign bulk launches.
Recipients classified as soft bounced will be de-classified as such after the specified number of days. For example, recipients classified as soft bounced based on a rule 30 bounces in 45 days will start receiving messages again after 45 days.
To enable this feature, please submit a My Oracle Support Service Request.
We also provide support for national number format in soft bounce suppression. Please notify Oracle Responsys if you need support for national numbers.
Steps to Enable
- In the Campaign Management section of the Account Management page, click Define soft bounce processing rules.
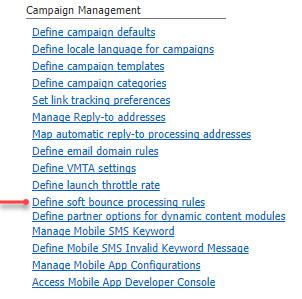
- Select the SMS tab and specify the rules as needed.
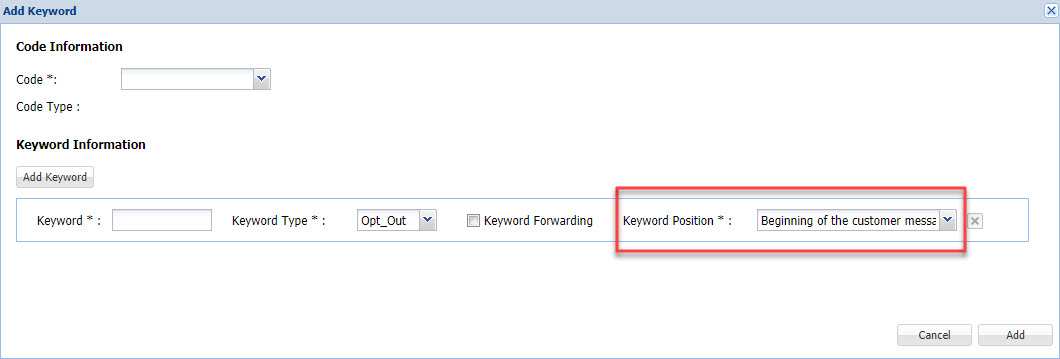
Opt-Out Keyword Within the SMS Message Body
You can now place the opt-out keyword either in the beginning or anywhere in the customer message.
If the keyword can be placed anywhere in the message, Oracle Responsys parses the message to check for the keyword and opts the customer out.
All existing opt-out keywords that are defined in your account are placed at the beginning of the customer message.
Account managers can change the keyword position, and campaign designers can view the position of the selected keyword.
Steps to Enable
To select the opt-out keyword position
-
In the Campaign Management section of the Account Management page, click Manage Mobile SMS Keyword.
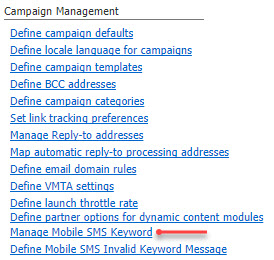
- Add an opt-out keyword or select an existing one.
- On the Add Keyword or Edit Keyword page, select the position from the Keyword Position list.

To view the opt-out keyword position
- In the SMS Message Designer, the keyword position is shown below the Keyword list after you select the keyword.
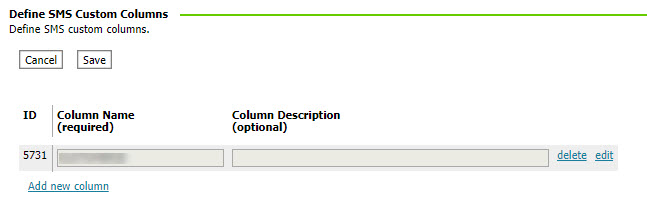
Support for Custom Columns in SMS Events
Account Administrators can now add custom columns for SMS Events for use in CED feeds.
Custom columns will be captured with the Sent, Skipped, and Failed events as key/value pairs and will be available in Connect Export Event Data Feed jobs.
Steps to Enable
- In the Global Settings section of the Account Management page, click Define SMS custom columns.
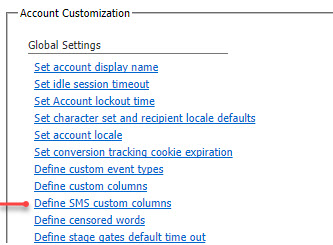
- Specify the Name and, optionally, a Description for each column.
Click Add new column to add new rows.
Interactive Push Notifications
You can now add greater interactivity to your push notifications using Interactive Push Notifications.
Interactive Push Notifications enable you to add actionable buttons to your push messages. Your app users can use these buttons to take specific actions such as buy now or add to wish list, and to express preferences, such as accept or decline.
Currently, Interactive Push Notifications can be added to push campaigns that have either Launch App or Open URL Notification Actions. Interactive Notifications cannot be added to Rich Push Campaigns.
We offer standard and custom Interactive Push Notification buttons. You can use the standard notification buttons without any setup or SDK integration. In addition to the standard buttons, you can co-ordinate with your app developers to implement your own custom Interactive Push Notification buttons.
Standard Interactive Push Notifications
The standard Interaction Push Notifications buttons are:
- Accept OR Decline
- Yes OR No
- Buy Now
- Add to Wishlist
- Buy Now OR Add to Wishlist
- Rate
Custom Interactive Notifications
Before you can use custom Interactive Push Notifications in push campaigns, app developers must:
- Integrate with the SDK version 6.35.0 to define the notification.
- Implement the custom Interactive Push Notification buttons and define them in the Mobile App Console.
Steps to Enable
To implement custom buttons
- Integrate with SDK version 6.35.0. For more information, please see the Oracle Responsys Mobile App Platform Cloud Service documentation available here.
- Log into the Mobile App Console, navigate to the Notification buttons section of the app and click Add notification buttons to create custom Interactive Notification buttons.

To use Interactive Notifications buttons in a push campaign
- In the Push Message Designer, click
 next to Add push notification buttons and select Yes.
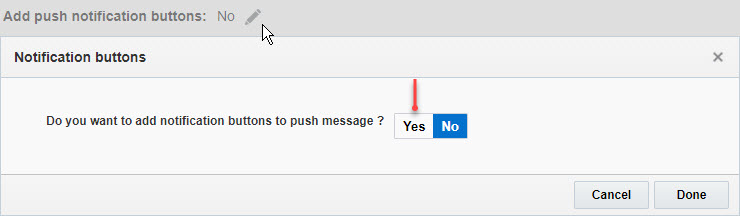
- Select the button you want to use.

More Mobile Device Attributes in Filter Designer
You can now use the following attributes in new and existing Classic and Simple App Channel filters:
- CHANNEL_PERMISSION_STATUS_ Indicates whether the user has opted in to receive push notification from this device
- DEVICE_MODEL_ The model of the device
- RIID_ The Oracle Responsys recipient ID for the device
- SDK_VERSION_ Oracle Push Cloud Service SDK version
Steps to Enable
No steps are required to enable this feature.
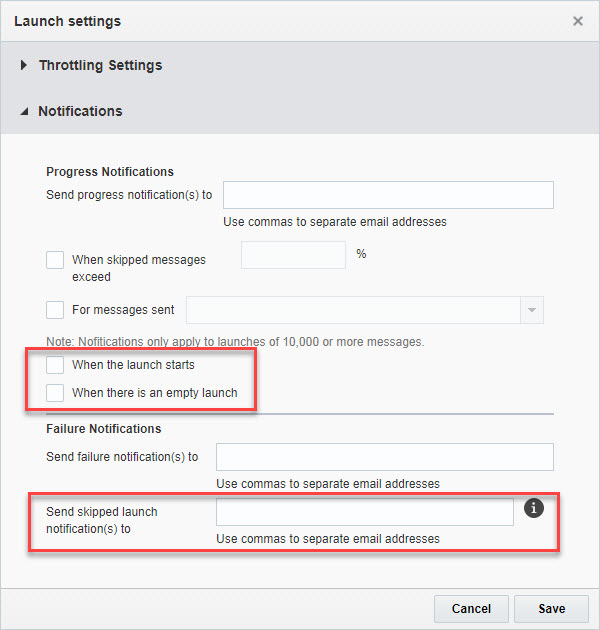
Support for Push Campaign Launch Notifications
We added three new launch notifications for Push campaigns:
- When the launch starts
- When there is an empty launch
- Skipped launch
Account Administrators can set default notifications for the account, and marketers can override those defaults for each campaign.
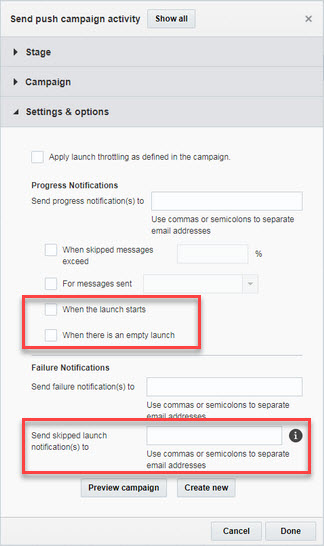
Program designers can also override the default notifications for the Send push campaign activity.
Steps to Enable
To set account defaults
-
In the Notification Settings section of the Account Management page, click Manage Campaign notifications.
-
Select the Mobile App tab and set the default notifications.

To set notifications for a campaign
- Open the Launch Settings section of the Campaign Workbook.
- Set the notifications in the Notifications section.
For the Send push campaign activity in a program
- Double-click the Send push campaign activity.
- Set notifications in the Settings & options section.
More Control of Links in In-App and Rich Push Messages
App developers can now control the way destination links in Rich Push and In-app messages are displayed.
The SDK can now determine the final destination URL for the link. For messages with link tracking, the SDK can determine the destination URL without leaving the app.
Note that the SDK does not invoke any links, the app remains responsible for redirecting the user to the destination URL.
To use this feature, you must integrate with SDK version 6.35.0. For more information, please see the Oracle Responsys Mobile App Platform Cloud Service documentation.
Steps to Enable
No steps are required to enable this feature.
Launch Throttling for Push Campaigns
You can now specify a launch throttling rate for Push campaigns. Launch throttling controls the number of push messages sent per hour.
Account Administrators can set the default throttling rate for the account, and marketers can override those defaults for each campaign when designing or launching a campaign.
Program designers can use the throttle rate specified for the campaign instead of the default account rate.
Steps to Enable
To set default throttle rate for the account
- In the Campaign Management section of the Account Management page, click Define launch throttle rate.
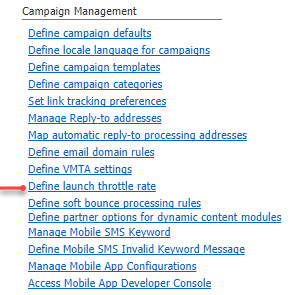
- Specify the throttle rate in the Push section.
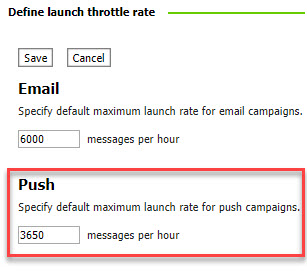
To set the throttle rate for a campaign
- In the Launch settings section of the Campaign Workbook, click
 .
. - Specify the throttle rate in the Throttling settings section.
If you do not want to use throttling for the campaign, leave this is field blank.
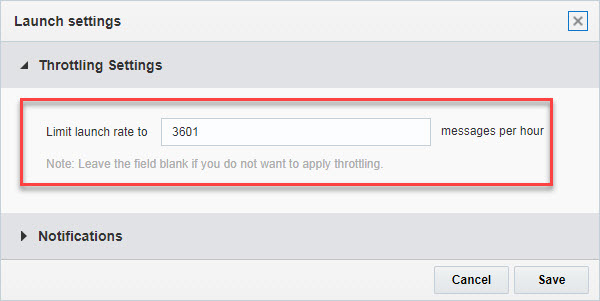
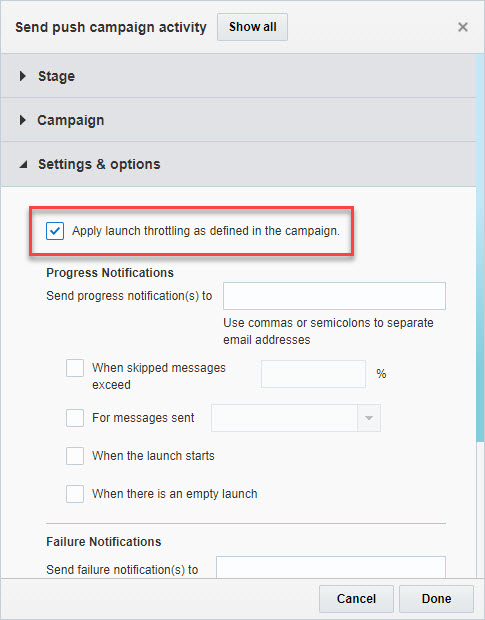
To use the campaign setting in a program
- Double-click the Send push campaign activity.
- Select Apply launch throttling as defined in the campaign checkbox in the Settings & options section.
Mobile Web Application Enhancements
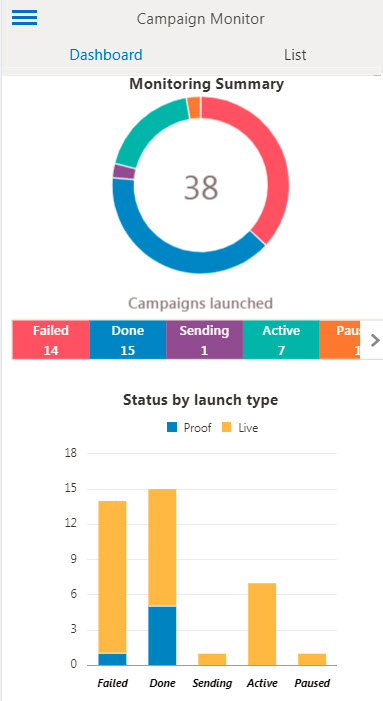
In the Oracle Responsys Mobile Web Application, the Campaign Monitor Dashboard refreshes aggregated data for the sent, skipped, open, and click rate charts every 15 minutes instead of every 1 hour. The Mobile Web Application now also shows the skip reason for triggered campaigns, and for SMS, Push, and In-App campaigns.
In addition, a visual dashboard is now available to give you easy access to campaign monitoring stats. This will enable you to learn which of your campaigns launched successfully, how many failed, how many are in paused state and how many resulted in skipped messages.
Steps to Enable
No steps are required to enable this feature.
Multi-Brand Management Available for Existing Customers
Existing customers can now upgrade their accounts to support multiple brands.
NOTE: This feature is currently not available for accounts where non-email channels are enabled.
Steps to Enable
No steps are required to enable this feature.
Separate From and Reply-To Addresses for Each Brand
With this update, each brand in an account can have its own From and Reply-to address to use as the default value in campaigns for that brand.
Steps to Enable
No steps are required to enable this feature.
"Save As" Copies Filters and Test Programs
With this update, when you copy a program using the Save As option, Program copies standard filters in data switches and test programs, as well as other objects such as campaigns, settings, and Entry Tracking Variables.
Steps to Enable
No steps are required to enable this feature.
Program Proof Testing Support for Audiences
Program Testing now supports programs that start with the Get Audience event.
Steps to Enable
No steps are required to enable this feature.
Schedule Dashboards with Interactive Dashboards
You can now schedule dashboards via agents.
If you customized the dashboard, the agent uses the default customization for scheduling. You can change the default customization using the  menu at the top right of the page.
Steps to Enable
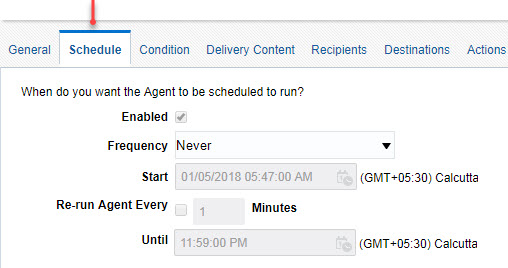
- Open the dashboard you want to schedule.
- Select Agent from the New menu.
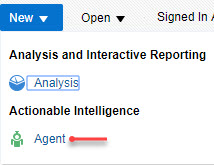
- Select the Schedule tab and set the schedule.
Interactive Dashboards Plus for SMS
You can now use Interactive Dashboards Plus to create custom reports for the SMS channel.
Please note that the following fields will be retired in a subsequent release. Therefore, please avoid including these columns in your custom reports for SMS:
- Undelivered
- Other Undelivered
- Carrier Error
- Split Undelivered
- Split Delivered
Steps to Enable
If Interactive Dashboards Plus is already enabled for your account, add the SMS Analytics Author role to the user who needs to create custom reports for SMS.
If Interactive Dashboards Plus is not enabled for your account, you need to attend free online self-serve training available on Topliners, then work with your account team to enable the feature.
Account Filter on SMS Dashboards for Parent Accounts
If your account includes sub accounts, the parent account now shows a new prompt on all SMS Dashboards that you can use to filter the SMS performance metrics by account.
Note that this prompt is not visible for sub-accounts.
Steps to Enable
No steps are required to enable this feature.
Re-Organized Dashboard Catalog
We reorganized the standard report catalog to make it easier to find, schedule, and customize reports.
We also added descriptions where applicable to help you better understand the report contents.

We moved some reports to new folders. This means that if you need to make any changes to a report, you will find it in the new location. However, if you previously scheduled any standard report, your schedule will continue to work.
Note that we did not make any changes to custom reports saved in My Folders or My Company Shared folders.
Steps to Enable
No steps are required to enable this feature.
Revisualized Device Performance Dashboard
The Device Performance dashboard now surfaces the most important device attributes.
Based on your analysis needs, you can switch between three views of the data: a monthly view, an overall view, and a tabular view. The tabular view provides a great way to identify the device types, browsers, and OS's with the highest engagement rates.
Note: If you have customizations on the device dashboard, you have clear customizations to be able to view the new device dashboard visuals.

Steps to Enable
- To switch between views, select the view you want then click Apply.

With this update, you can use the Sent Date Range as both a column and a filter.
Using the Sent Date Range as a column helps you visualize performance metrics by rolling date ranges such as Last 7 Days, Last 30 Days, etc. on a single report.
Steps to Enable
No steps are required to enable this feature.
Increased Column Width for Subject Lines
To allow for longer subject lines to render on the report, we increased the column width of the subject line from 40 to 400 characters.
This enhancement is useful when using dynamic subject lines, as they tend to be longer than static subject lines.
Steps to Enable
No steps are required to enable this feature.
Content Paging is Enabled by Default for Custom Reports in Interactive Dashboards Plus
This enhancement makes it easier to scroll through the contents of the analysis.
Steps to Enable
No steps are required to enable this feature.
Legacy Insight Functional Roles No Longer Available
Because legacy Insight was sunset at the end of December 2017, the legacy Insight Reporting Manager and Reporting Admin functional roles of are no longer available.
Steps to Enable
No steps are required to enable this feature.
RPL (Responsys Personalization Language)
RPL Tokens in From and Reply-To Addresses
You can now use RPL tokens in From and Reply-to addresses. This enables dynamic selection of From and Reply-to addresses used for campaigns.
Steps to Enable
No steps are required to enable this feature.
FacebookShare Method Deprecated
In this update, we are deprecating the FacebookShare method as it is no longer compatible with the Facebook API.
You can create the Share functionality by creating a link using the Facebook Developers Documentation and copy/pasting it into an email.
Steps to Enable
No steps are required to enable this feature.
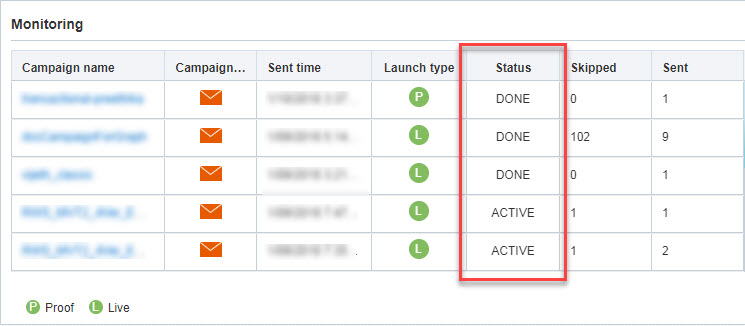
Home Page Monitoring Section Improvements
The Monitoring section of the Home page now displays the launch status of the campaign instead of the abbreviated version.
Steps to Enable
No steps are required to enable this feature.
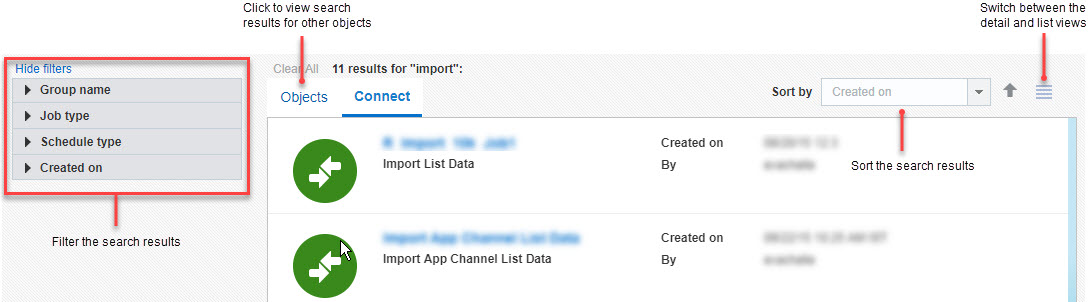
With this update, we added support for:
- Wildcard search, group search, and combination search You can replace a single character with the ? wildcard, or multiple characters with the * wildcard
- Search by Object ID To search by Object ID, use id:<id_number> as search criteria
- Search for Connect jobs Search results list jobs starting with the most recently created one
Steps to Enable
- Click
 at the top of any page, and type your search criteria in the Search field.
Manage Programs Page Improvements
The updated Manage programs page improves and enhances the user experience.
The user-centric design focuses on key usability aspects such as search, filter, sort, and loading additional campaigns with scrolling.
In addition, the page now supports two views: a detail view and a list view.
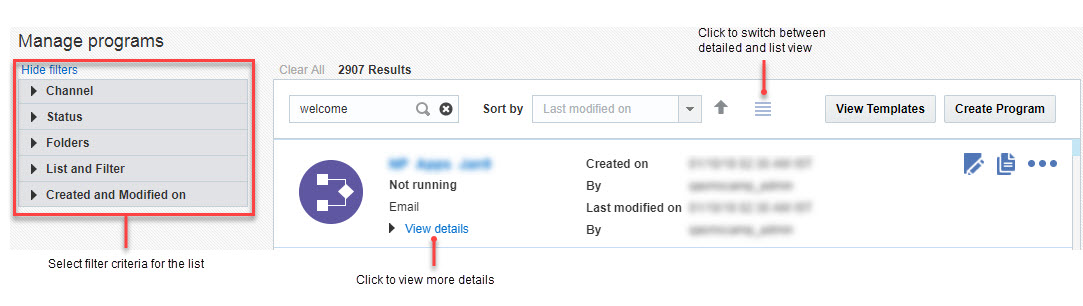
Steps to Enable
No steps are required to enable this feature.
View Program Templates Page Improvements
The updated View program templates page improves and enhances the user experience.
The user-centric design focuses on key usability aspects such as search, filter and sort.
In addition, the page now supports two views: a detail view and a list view.
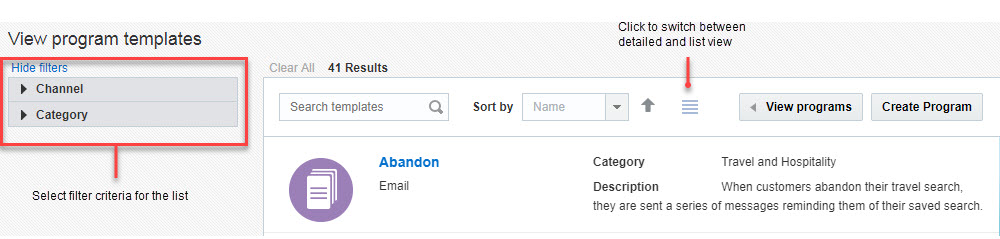
Steps to Enable
No steps are required to enable this feature.
Manage Audiences Page Improvements
We made enhancements to the Manage Audiences page to improve and enhance the user experience.
The updated design focuses on key usability aspects such as search, filter, sort, and showing additional campaigns upon scroll.
In addition, the page now supports two views: a detail view and a list view.

Steps to Enable
No steps are required to enable this feature.
Improved Locked Account Notification
The notification that is sent to the user whose account was locked now includes the account name and the option to reach out to Oracle Support for further assistance.
Steps to Enable
No steps are required to enable this feature.
We enhanced the design of the Oracle Responsys error pages and included links to the Oracle web site.
Steps to Enable
No steps are required to enable this feature.
---

Copyright © 2018, Oracle and/or its affiliates. All rights reserved.
This document is provided for information purposes only, and the contents hereof are subject to change without notice.This document is not warranted to be error-free, nor subject to any other warranties or conditions, whether expressed orally or implied in law, including implied warranties and conditions of merchantability or fitness for a particular purpose. We specifically disclaim any liability with respect to this document, and no contractual obligations are formed either directly or indirectly by this document. This document may not be reproduced or transmitted in any form or by any means, electronic or mechanical, for any purpose, without our prior written permission.
Oracle and Java are registered trademarks of Oracle and/or its affiliates. Other names may be trademarks of their respective owners.
Intel and Intel Xeon are trademarks or registered trademarks of Intel Corporation.All SPARC trademarks are used under license and are trademarks or registered trademarks of SPARC International, Inc. AMD, Opteron, the AMD logo, and the AMD Opteron logo are trademarks or registered trademarks of Advanced Micro Devices. UNIX is a registered trademark of The Open Group.
