
This document will continue to evolve as existing sections change and new information is added. All updates are logged below, with the most recent updates at the top.
| Date |
What's Changed |
Notes |
|---|---|---|
| 03 MAR 2017 |
Updated Proof Settings Section in the Email Campaign Workbook |
Added new feature |
| 24 FEB 2017 |
Initial Document Creation |
This guide outlines the information you need to know about new or improved functionality in Oracle Responsys’ 6.31 February 2017 Release and describes any tasks you might need to perform for the update. Each section includes a brief description of the feature, the steps you need to take to enable or begin using the feature, any tips or considerations that you should keep in mind, and the resources available to help you.
This section gives you information to help you plan and use the features included in this release. We frequently update this document so don’t forget to check back and get the latest information.
- 6.31 February 2017 Release Training Videos
- Oracle Responsys 6.31 February 2017 Release Fixes and Known Issues
- Responsys Insiders (Customer Community)
- 6.31 Release Feature Availability
Some of the new features are automatically available to users after the upgrade and some require action from the user, the company administrator, or Oracle.
The table below offers a quick view of the actions required to enable each of the features.
| Action Required to Enable Feature |
||||
|---|---|---|---|---|
| Feature |
Automatically Available |
End User Action Required |
Administrator Action Required |
Oracle Service Request Required |
| Mobile |
||||
|
|
||||
|
|
||||
| Flexibility in Acquiring Contacts through SMS Email Acquisition Template |
|
|||
|
|
||||
|
|
||||
| Interactive Dashboards |
||||
|
|
||||
|
|
||||
| Campaigns |
||||
|
|
||||
|
|
||||
|
|
||||
|
|
|
|||
|
|
||||
| Updated Proof Settings Section in the Email Campaign Workbook |
|
|||
|
|
|
|||
| API |
||||
| REST API: New Request Body Format for Merge Trigger Email and Merge Trigger SMS |
|
|
||
| Program |
||||
|
|
||||
| Connect |
||||
|
|
|
|||
| Account Administration |
||||
|
|
|
|||

The Mobile App Message Center feature allows marketers to send Push messages to an app’s Message Center (also known as Inbox or Notification Center). Messages can remain within an In-App Message Center until they are either explicitly deleted by the user or expire.
This feature is available only to customers who are enabled for Integrated Push. In addition, your apps must implement integration with the PushIO SDK to retrieve Message Center messages from Oracle Responsys.
We enhanced the Push Campaign Designer to allow the campaign designer to send Push notifications to the Message Center and to set preferences for those messages.
When the campaign is launched, the Push notification is sent to target devices and is made available to the app for retrieval through a PushIO SDK API call.
- In the Push Message Designer, click
 .
. - In the Message Center dialog, select Yes and specify options for the message center message.
![]()

You can use the new Message center settings section of the Campaign Workbook to change the Message Center settings.

New Column in the App Channel List
A new column, User_Identifier_, has been added to the App Channel List. App developers can use this column to represent whether or not a device has a known app user or a logged in app user. The value in this column matches the corresponding value in the match key of the Profile List.
Sending Messages to Known Users or Devices with Unknown Users
When a campaign is launched, Message Center messages are made available either to:
- Known user that corresponds to the User_Identifier_ value in the device’s App Channel List record
- If the User_Identifier is Null, to the Device for the App Channel List record
To send Message Center messages to known users or devices with unknown users:
- Ensure your app sets and clears the UserId appropriately in scenarios such as App Login / Logout
- Use appropriate filters
To fetch Message Center messages from Oracle Responsys, the apps must implement PushIO SDK versions 6.31.x.
PushIO SDK for Message Center supports the following platforms:
- iOS 8 and higher
- Android 4.0 and higher
- Windows 10 and higher
Steps to Enable
To implement the Message Center:
- App designers and marketers must design the Message Center.
- App developers must integrate with PushIO SDK to implement an In-App Message Center.
For details about integrating with the PushIO SDK, please refer to https://docs.oracle.com/cloud/latest/marketingcs_gs/OMCFB/message-center/
In this release, we updated the interface and workflow of the SMS Campaign Designer to match that of the Email and Push Campaign Designers. In addition, we upgraded the SMS Campaign Designer to the ALTA design style used across Oracle Cloud products.
These updates ensure a consistent user experience across all channels.
We made no functional changes to the Campaign Designer, and all existing functionality is retained. Existing SMS Campaigns will open in the new Campaign Designer.
Steps to Enable
- Create an SMS campaign and select a template.
- Use the new SMS Message Designer to create and preview messages.
- Use the new Campaign Workbook to review the campaign.
NOTE: The Voting/Survey and Text for Customer Care templates are no longer supported.

The SMS Message Designer now allows you to save campaigns without defining mandatory elements such as Codes and Outbound and Response messages.


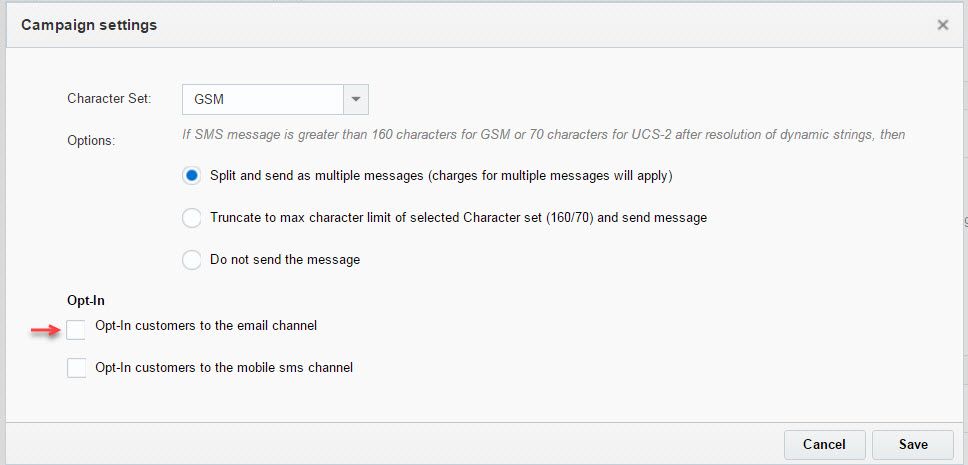
Flexibility in Acquiring Contacts Through SMS Email Acquisition Template
You can now acquire contacts using the Email Acquisition Template, with the added flexibility of not opting contacts into the email channel.
Previously, all MO senders’ email addresses were added to the Profile List and opted in to the email channel. With this release, email addresses continue to be added to the Profile List, but opt-in to the email channel is optional.
By default, email addresses are opted in to the email channel for new and existing campaigns.
Steps to Enable
- If you do not want MO senders to be opted in to the email channel, clear the new Opt-In customers to the email channel checkbox in the Campaign settings section of the Campaign Workbook.
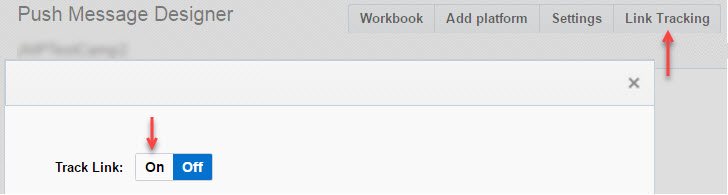
Click Tracking for In-App and Rich Push Campaigns
With this release, you can use link tracking to track http web links in In-App, Rich Push, and SMS campaigns.
In-App and Rich Push Message Designers now allow marketers to:
- Enable link tracking for a campaign
- Attach a link table to a campaign
- Choose to track an http web link in an In-App and Rich Push HTML message
This feature is also available for existing SMS campaigns.
Reporting
Interactive Dashboards now report clicks on all tracked links.
For Rich Push campaigns, you can analyze link clicks or clickthrough rates at an aggregate level by app or campaign.
Steps to Enable
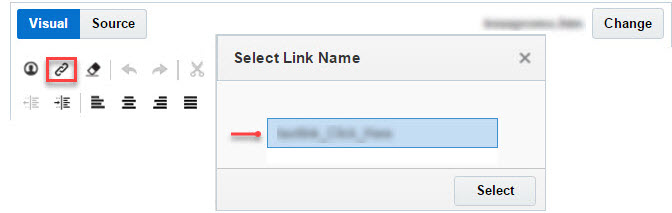
- In the Message Designer, click the new Link Tracking button, then click On.
- Select the link table you want to use and click Select.
- Click
 , and select the link to track.

Opens Tracking for In-App Campaigns
You can now track opens or displays of In-App messages on devices.
NOTE: In-App opens for iOS devices is supported only if your account is provisioned for https with all requisite Security Certificates.
Enabling open tracking inserts a 1x1 pubweb Open Tracking URL in your In-App message. This can add up to 350 bytes to your In-App message.
This feature is also available for existing SMS campaigns.
Steps to Enable
- In the Trigger and Schedule section of the Campaign Workbook, click
 .
. - In the Trigger section, select the Track In-App Opens checkbox.

Interactive Dashboards now report In-App opens and open rates at an aggregate level by app or campaign.
In this release, we made the following additional enhancements.
- Launch Notifications Options for new Push campaigns
By default, the launch notifications options are set to the notification settings specified for the account for new Push campaigns.
This dashboard visualizes changes in key performance metrics for email campaigns over specific time periods such as year over year or month over month.
Steps to Enable
- Click
 and select View Interactive Dashboards from the Insight menu.
 - On the Email tab, expand Performance and select Time Period Comparison.

Campaign Performance by Org Hierarchies
This new dashboard provides a roll-up view of email performance metrics by the Organizational Hierarchies defined in Oracle Responsys.
Steps to Enable
- Click and select View Interactive Dashboards from the Insight menu.
- On the Email tab, expand Performance and select Org Performance.
- Click the new View More Reports link and select Campaign Performance by Org Hierarchies.

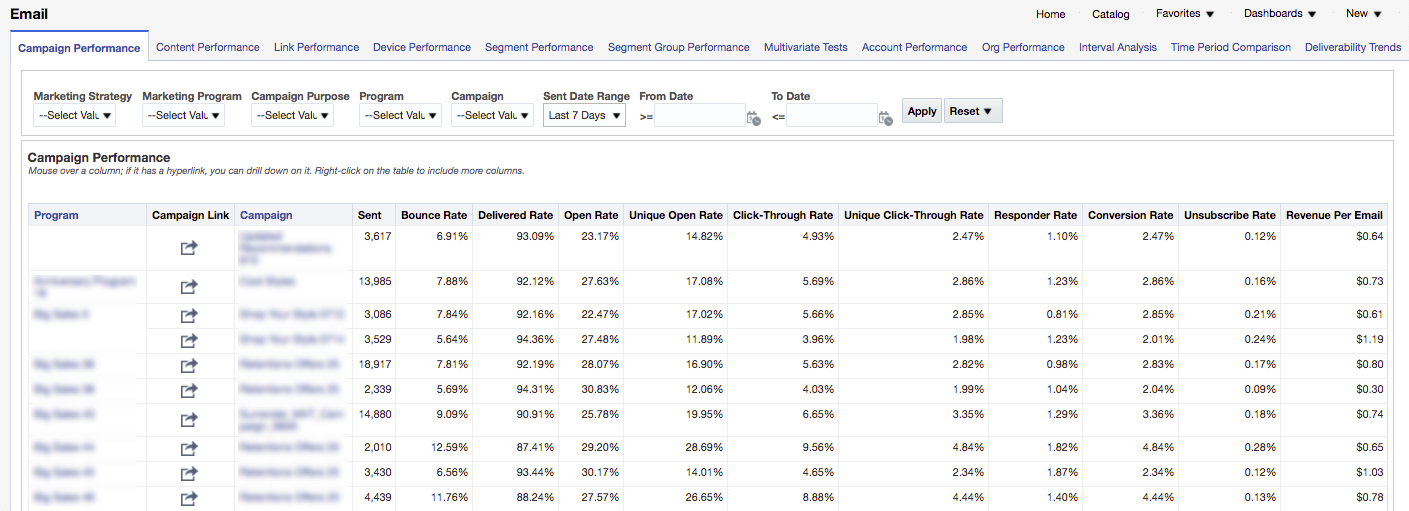
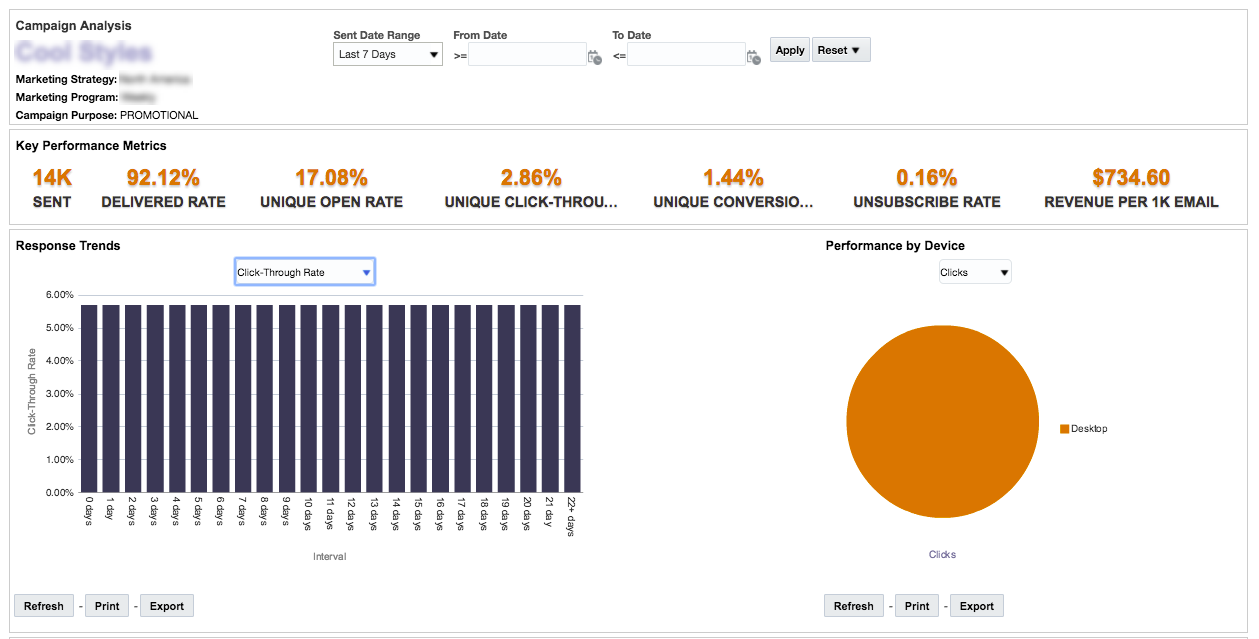
This report provides a basic view of the campaigns sent in the last 7 days and their related performance metrics. You can drill-down on a specific campaign to view key performance metrics and trends for the selected campaign.
Steps to Enable
- Click and select View Interactive Dashboards from the Insight menu.
- On the Email tab, expand Performance and select Campaign Performance.
Campaign Comparison Across Intervals
This dashboard helps you compare performance of specific campaigns against each other by the number of days (or intervals) after they were sent. For example, you can compare the performance of a specific Thanksgiving campaign you sent this year on day 2 vs. a similar campaign you sent last year.
By default, the dashboard shows all campaigns sent in the last 7 days, but you can select specific campaigns.
Steps to Enable
- Click and select View Interactive Dashboards from the Insight menu.
- On the Email tab, expand Performance and select Interval Analysis.
- Click the new View More Reports link, and select Campaign Comparison Across Intervals.

Single Campaign View of Email Campaigns
The Single Campaign view is a dedicated dashboard that allows you to analyze key performance metrics of a single campaign, as well as to trend responses to the campaign over the number of days after send. You can also see the most popular devices that recipients use to interact with the campaign.
Steps to Enable
- To access the Single Campaign View, drill down on the campaign from the Campaign Performance report or from the Campaign Exploration chart on the Email Summary dashboard.
Mobile Apps Dashboard Enhancements
The summary dashboard for Mobile Apps now includes performance metrics and charts for In-App campaigns.
Steps to Enable
- Click and select View Interactive Dashboards from the Insight menu.
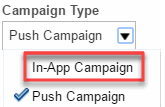
- Select the Mobile Apps tab, then select In-App Campaign from the Campaign Type dropdown list.
This new dashboard trends the number of App Uninstalls (as reported by the service providers to Oracle Responsys) over time.
Steps to Enable
- Click and select View Interactive Dashboards from the Insight menu.
- Select the Mobile tab, expand Deliverability and select App Uninstalls.

Single Campaign View of Push and In-App Campaigns
For both Push and In-App campaigns, you can now see performance metrics and visuals for a more focused analysis of a specific campaign. You can select a sent date range to view historical performance data of the campaign.
Steps to Enable
- Click the Campaign Link column in the Push or In-App Campaign Performance table.

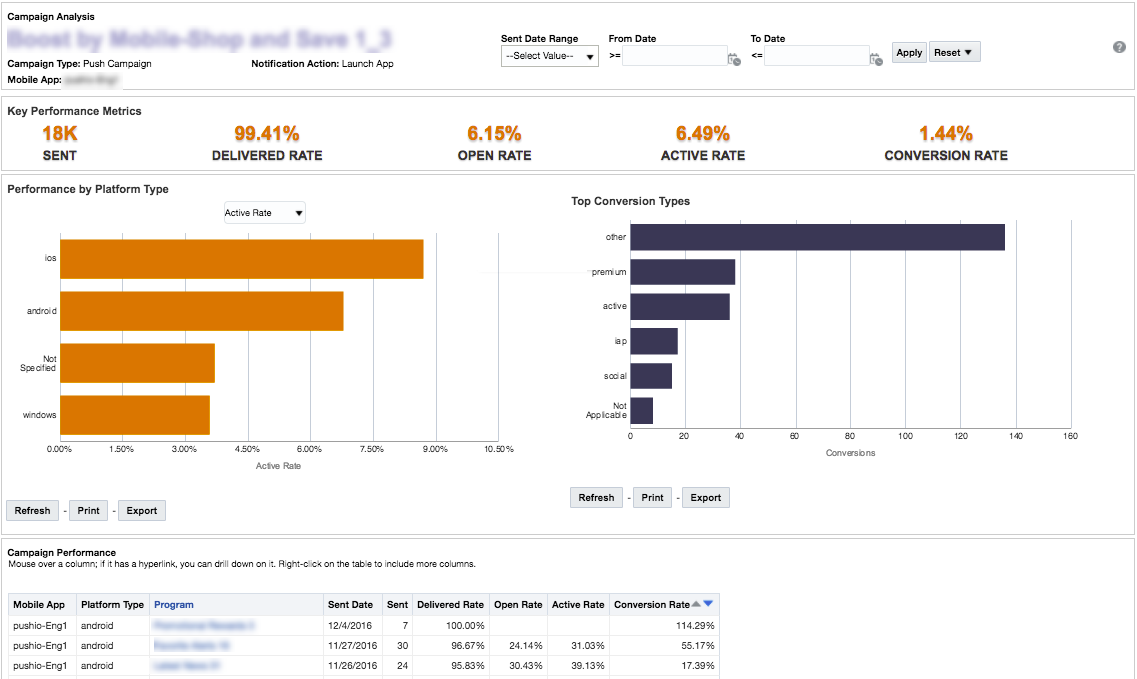
The Active Rate indicates the number of Push notification recipients that were already in the app when the notification was delivered to the device.
This metric helps you understand the true effectiveness of your Push campaigns as the count of recipients who were already in the app will not be included in the count of recipients who opened the app.
The Active Rate replaces the Response Rate.
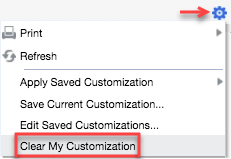
In this release, Interactive Dashboards get a new look and feel, making the dashboards even more user friendly and consistent with the rest of the Oracle Cloud.

IMPORTANT: If you customized any dashboards in previous releases, you will have to clear the customizations to view the new style.
To clear your customizations, click ![]() and select Clear My Customization.
and select Clear My Customization.
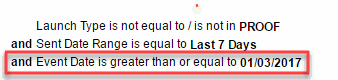
We added Event Date to dashboard filter views. Event date is the date on which any event, such as sent, open, or click, occurred. The Event Date is greater than or equal to the first day of the Sent Date Range. There are no changes to the data as a result of this change.
Using Event Date, you can see the date from which the Sent Date Range filter applies. For example, if you've applied "Last 7 Days' on 01/10/2017, the Event Date will show 01/03/2017.
Removed Ability to Export Entrie Dashboard to Excel
We removed the Export to Excel option for an entire Dashboard because this option caused performance issues and errors.
You can download the entire Dashboard as PDF or HTML using Print, and can continue to export individual reports to Excel.
Faster Reporting Data for Email and SMS
IMPORTANT: This feature will be available for all new accounts provisioned after March 2017. Faster reporting data for existing accounts will be under measured deployment, contingent on retiring legacy Insight for the account.
This feature allows you to start seeing data on Interactive Dashboards sooner than the current 24 hour latency expectation. As we continue to monitor our systems, we will have more accurate expectations on the data latency.
In addition to faster reporting data, this feature provides the following benefits:
- Updated response attribution for triggered campaigns
This means that for triggered campaigns, the response event such as an open or click will be attributed to the correct instance of the send. Prior to this change, the response events for triggered campaigns were attributed to the first sent in the last 90 days. - An updated set of Region, ISP, and Domain mappings that cover more regions and ISPs
NOTE: To achieve low latency for all performance metrics while providing a strong indicative number for unique metrics, the unique metrics might show up to less than 2% of their actual counts.
The updated Manage Campaigns page improves and enhances the user experience. The user-centric design focuses on key usability aspects such as search, filter, sort, and load additional campaigns upon scroll.
In addition, the page now supports two views: a detail view and a tabular list.
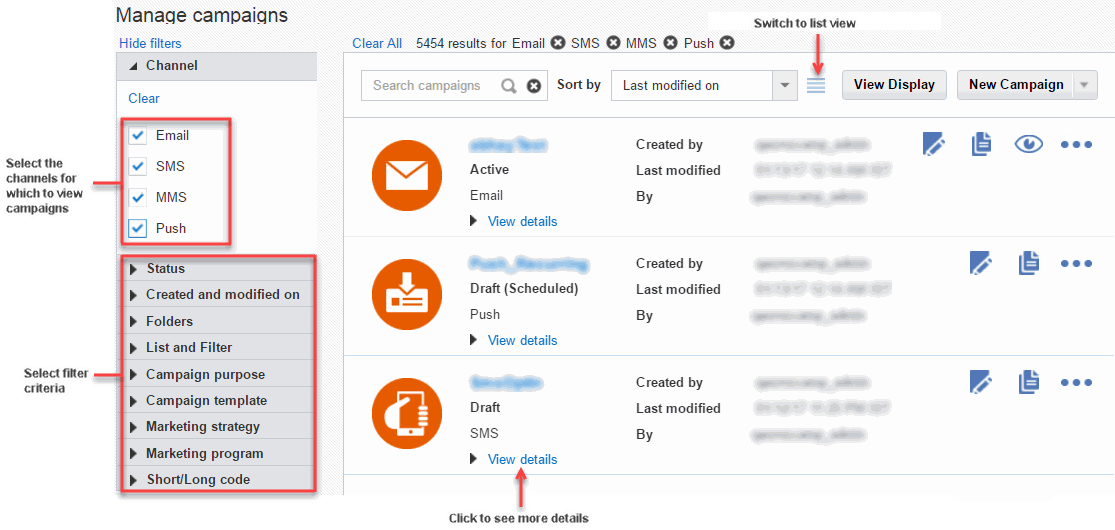
Detail View
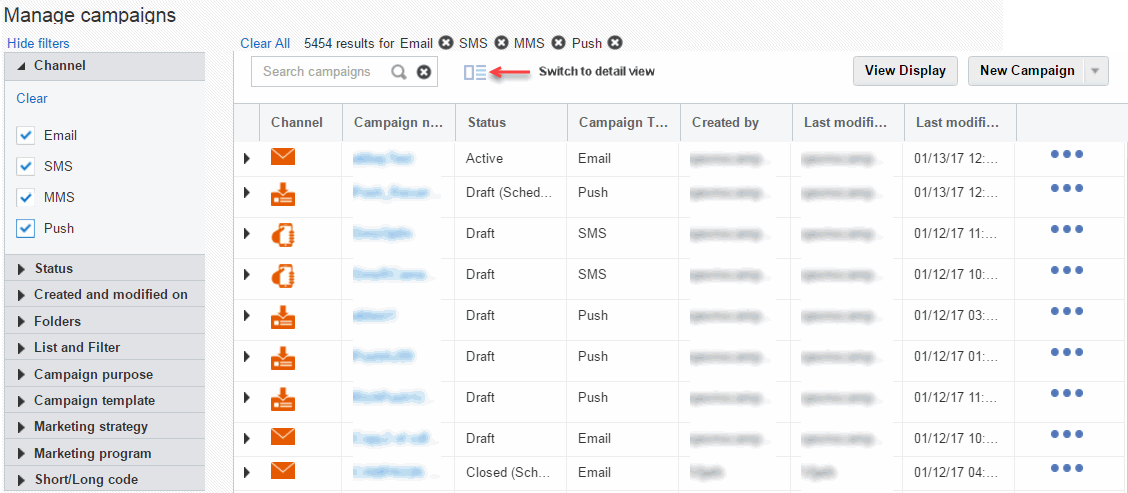
List View
We made the following enhancements to the Campaign Monitor:
Updated look and feel
This enhancement improves the user experience and provides the ability to filter the list of campaigns.
Shareable link
You can now generate a link to the Campaign Monitor report. You can share the report URL with other users, who will be able to view the metrics without logging into Oracle Responsys.
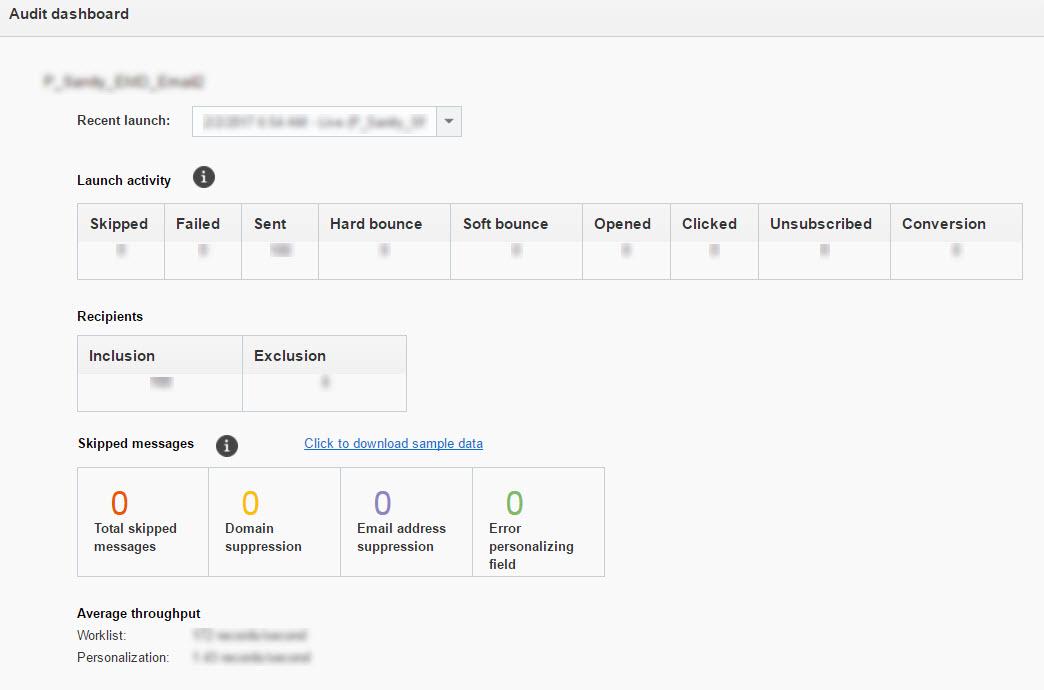
Audit Dashboard
The new Audit Dashboard shows the following details:
- Launch Activity for the selected launch of a campaign. By default, the most recent launch is selected, and you can select any launch that happened in past week.
- Recipient inclusions and exclusions, the breakdown of skipped activity, and the average throughput.
- For email campaigns, you can download a sample data report that provides five samples of data for each skip reason that can you can use for troubleshooting a campaign.
- Note that the triggered launch activity data is cumulative.
Steps to Enable
- Click
 and select Campaign Monitor from the Tools menu.
 - To open the Audit Dashboard, click
 of the campaign you want.

.
IMPORTANT: Do not enable this feature if Push and In-App Campaigns are enabled for your account. To use this feature, you need to turn off the Rich Text Editor, but the Push Message Designer and In-App Message Designer require the Rich Text Editor to edit campaign messages.
The Split View Editor introduces a new way to edit HTML documents in Email Message Designer and Content Library.
Split View provides two side-by-side editing panels:
- The source view editor for editing HTML
The main HTML document source opens in the source panel and is rendered in the Visual panel. - The visual panel for instant previews of the HTML
The visual panel also allows you to edit content blocks and define dynamic content regions in the Email Message Designer.
Steps to Enable
- In the Account Customization section of the Account Management page, select the new Set rich text editor preference link.
- Un-select the Enable rich text editor when editing HTML documents checkbox and click Save.

Express Campaign through Collaboration
This feature gives local marketers the ability to easily create email campaigns from a base campaign, and work on the copied campaign as and when required. The local marketer can copy the campaign, contribute content, select audience/ filters, and easily configure the campaign schedule with the pre-defined options provided to them.
To achieve this, the corporate marketer creates the base campaign. The process designer then includes the base campaign in a process and specifies the required process steps. The local marketer can launch the process, create a new express campaign, and schedule it for launch as and when required.
Change in the Collaboration Process
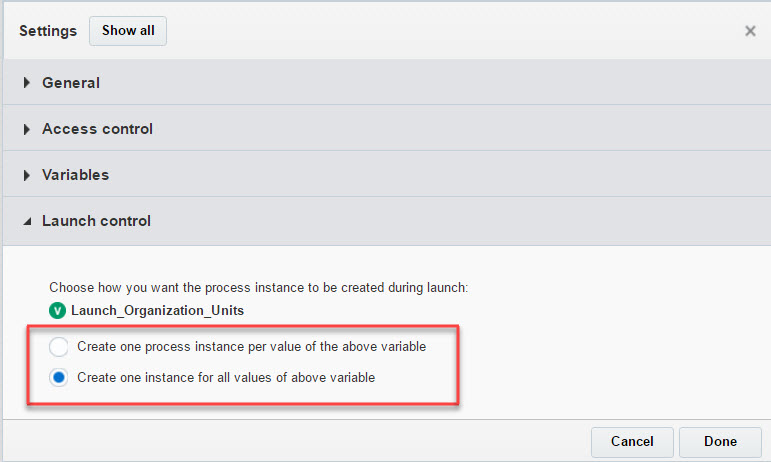
We added a new setting to the collaboration process, called Launch Control, based on Organization units.
This setting gives the process designer flexibility to decide at design time how the process should be launched:
- One process instance per value of the selected organizational unit
This option creates one process instance, and thus one task, per selected organizational unit. Use this method for Distributed Content Collaboration, where multiple team members of one organizational unit can work on a campaign. - One process instance for all values of the selected organizational unit
This option creates one process instance, and thus one task, for all selected organizational units. Use this method for Express Campaigns, where the express campaign manager can use the same copied campaign for multiple organizational units.
Steps to Enable
- In the Collaboration Process Designer, click Settings.
- In the new Launch control section of the Settings dialog, select the option you want.
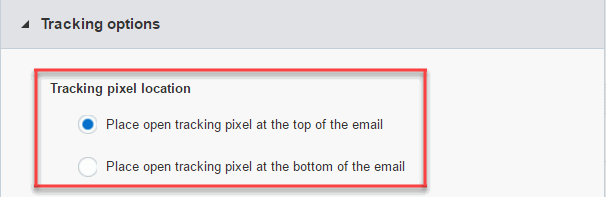
Email Tracking Pixel Management
With this release, you can choose whether the Track HTML Opens pixel, Responsys Display pixel, and BlueKai ID Swap pixel are placed at the top or the bottom of an email message.
The Account Administrator can choose the default pixel location for the account. The campaign designer can overwrite the location for each campaign.
The location you choose applies to all three pixels.
NOTE: Responsys Display and BlueKai are add-on features. The Responsys Display pixel and BlueKai ID Swap pixels will appear only if these features are enabled for your account.
Steps to Enable
To set the default pixel location:
- In the Campaign Management section of the Account Management page, click the Define Campaign defaults link.
- In the General Options section of the Set Campaign Defaults page, select the Top or Bottom tracking pixel location.
- Open the Campaign Settings section in the Campaign Workbook, expand the Tracking Options section, and select the Tracking pixel location.
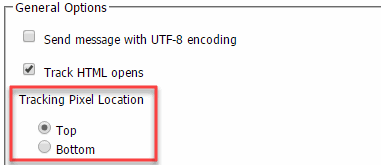
To set the pixel location for a campaign:
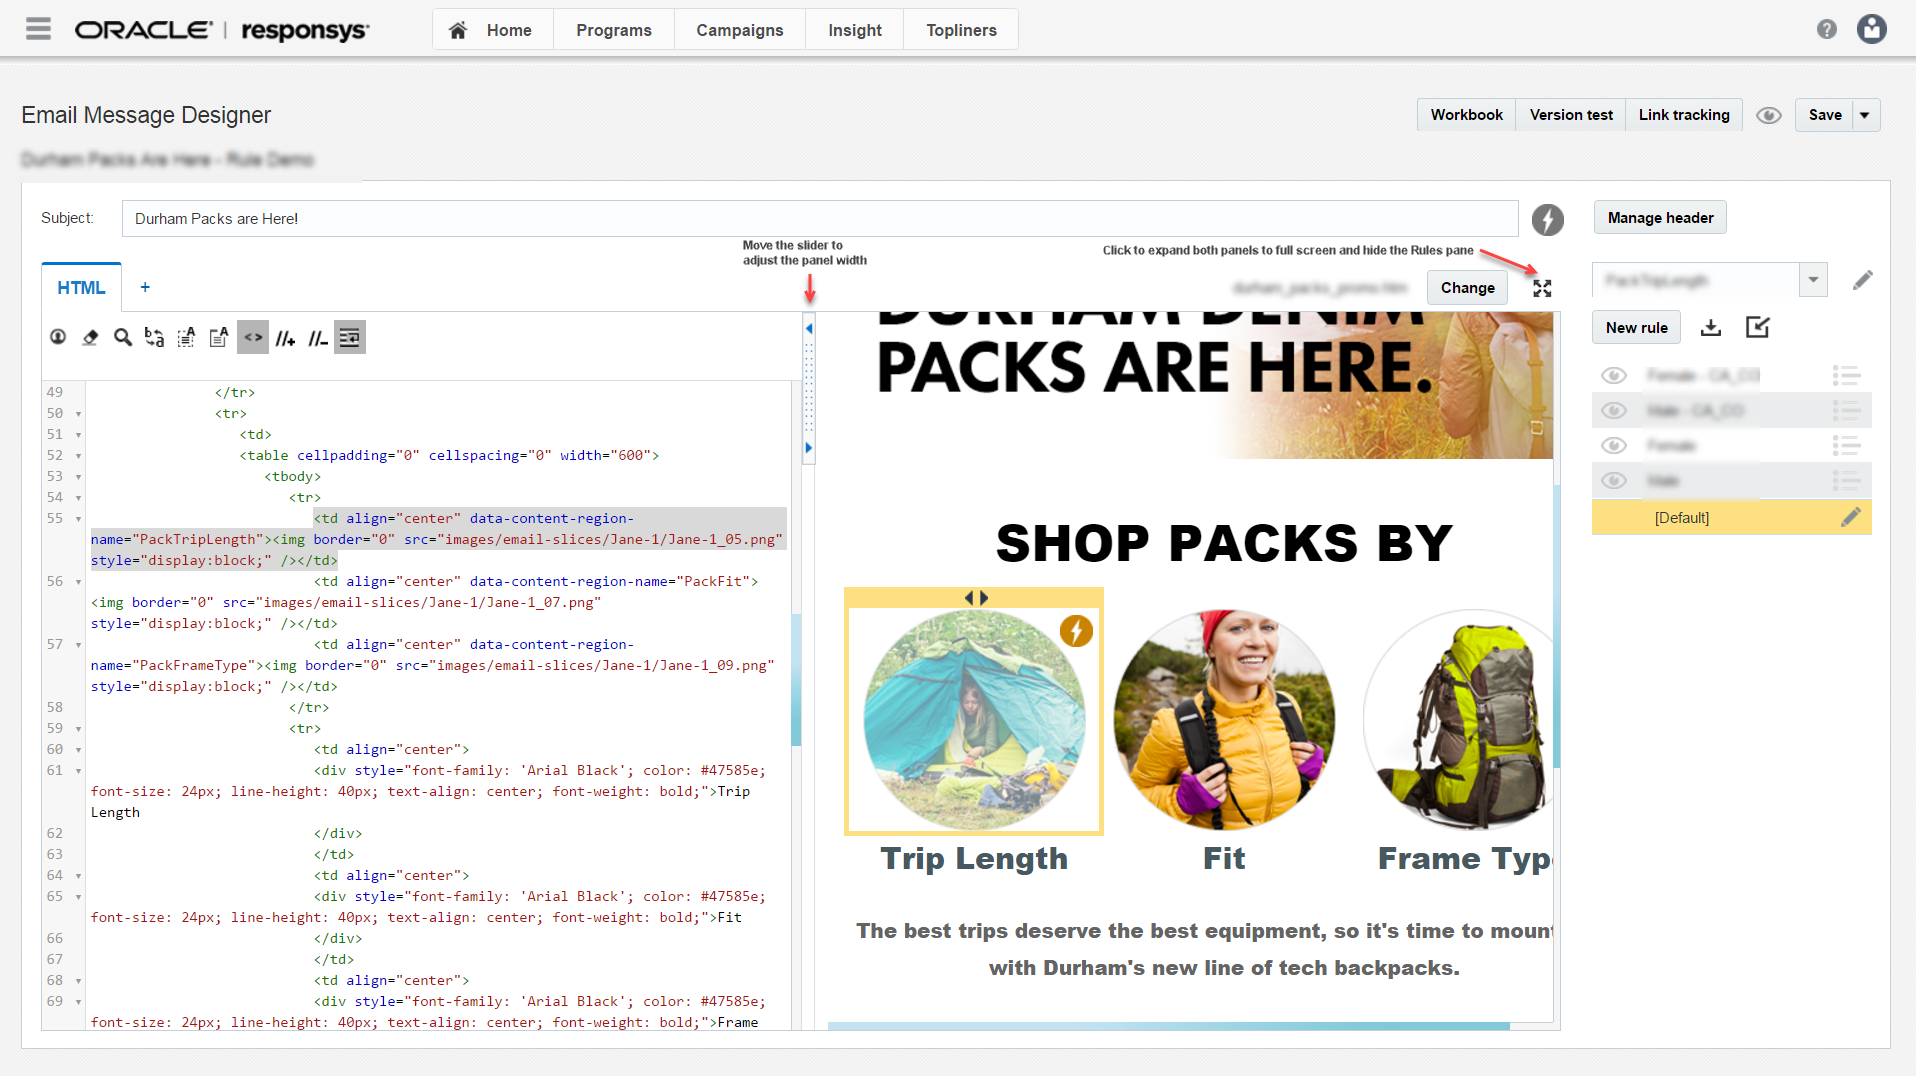
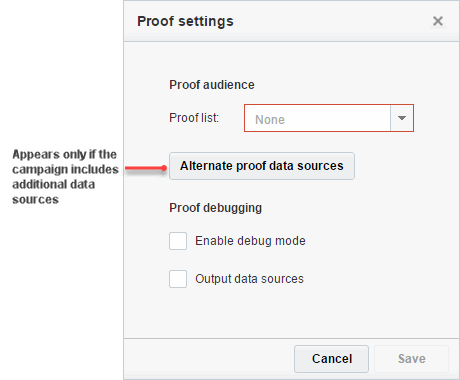
Updated Proof Settings Section in the Email Campaign Workbook
We moved the Proof audience selection and Proof debugging options from the Proof launch dialog to the new Proof settings dialog.
Proof send options and Notification settings remain in the Proof launch dialog.
Steps to Enable
- In the Proof settings section of the Campaign Workbook, click
 to open the new Proof settings dialog.
 - Select the Proof list and Proof debugging options.
In this release, you can send skipped launch notifications for email campaigns and split-run launches.
The email notifications will be sent if a scheduled launch does not go out. The notification includes a reason for the skipped launch, enabling you to take the necessary action such as reschedule the campaign.
Steps to Enable
For email campaigns:
- Open the Launch settings section of the Campaign Workbook and expand the Notifications section of the Launch Settings dialog.
- Specify the email addresses in the Send skipped launch notification(s) to field.
For split-run launches:
- On the Set up launch options page, select the Who do you want to send skipped launch notification(s) to? checkbox and type the email addresses, separated by commas.

For Classic email campaigns:
- In the Settings section of the Live Launch step, select the Who do you want to send skipped launch notification(s) to? checkbox and type the email addresses, separated by commas.
REST API: New Request Body Format for Merge Trigger Email and Merge Trigger SMS
We extended the existing Campaign Scheduling REST APIs for Email Message Designer campaigns to also support Push campaign schedules. You can now manage Push campaign schedules using these APIs.
You can use the REST API to:
- Schedule a Push campaign launch
- Get a Push campaign launch schedule by its ID
- Get a list of all Push campaign scheduled launches
- Update a Push campaign launch schedule
- Delete a Push campaign launch schedule
Keep in mind the following:
- For mobile, the APIs support only Push Campaigns. They do not support In-App Campaigns.
- Campaigns must be created in Oracle Responsys and have no validation errors.
- As with Email campaign scheduling, you cannot schedule a recurring Push campaign through the Web Services API.
- If you want to schedule a Push Campaign using these APIs, your Push Campaign must have the "From address" set in the Launch Options section of the Push Campaign Workbook. If the "From address" is not set, the campaign launch will be scheduled successfully, but the Campaign launch will fail.
Additional resources for more information:
- Campaign Scheduling topics in the Oracle Responsys REST API Developer's Guide (PDF) (Available after February 3rd).
- Campaign Scheduling topics in the Oracle Responsys REST API Developer's Guide (HTML). (Available after February 21st).
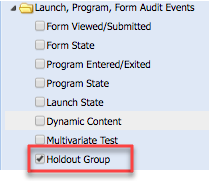
You can now use holdout groups to compare the performance of contacts who received a campaign to those who did not.
The Holdout Group is the percentage of the audience who do not receive the specified campaigns.
To create a holdout group, use the new Holdout group activity to specify the percentage of the audience that should not receive the campaign. You can select all campaigns in the flow, or a specific campaign.
Steps to Enable
- Use the Holdout group activity as one of the paths for an Allocation switch.
- In the Holdout group properties dialog, specify the campaign to which the holdout group applies.


The holdout group data is available in the new Holdout Group CED feed.
Steps to Enable
- In the Source step of an Export Event Data Feed job, select the new Holdout Group check box.
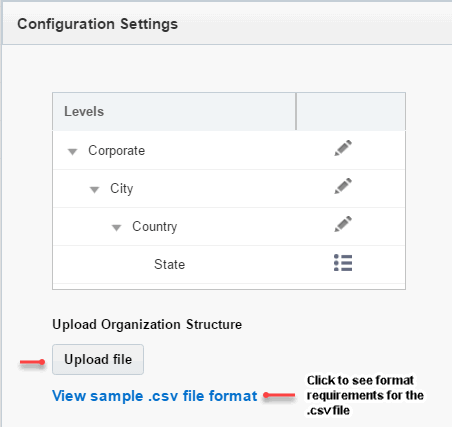
Bulk Upload of Organizational Hierarchy
The Account Administrator can now upload Organizational Hierarchy additions, edits, and deletions in bulk via a .csv file.
Steps to Enable
- Click the Organization Management link in the Authorization Management section of the Account Management page.
- On the Organization Management page, click Configuration Settings.
- In the Configuration Settings dialog, click the new Upload file button and upload the file.
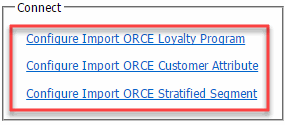
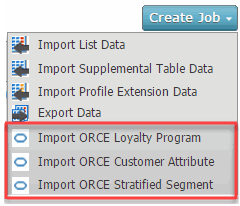
Oracle Retail Customer Engagement (ORCE) Integration
With this release, Oracle Responsys customers who are also Oracle Retail Customer Engagement (ORCE) customers can import data from ORCE into Oracle Responsys using Connect.
This feature introduces the following new Connect job types:
- Import ORCE Loyalty Program
- Import ORCE Customer Attributes
- Import ORCE Stratified Segments
The new job types use a simplified user interface and require fewer configuration steps. You can also create new integrations much faster. You can now:
- Save and close the job without completing the job configuration and continue at a later time
- Configure steps in any order
- Edit any step without completing a pervious step
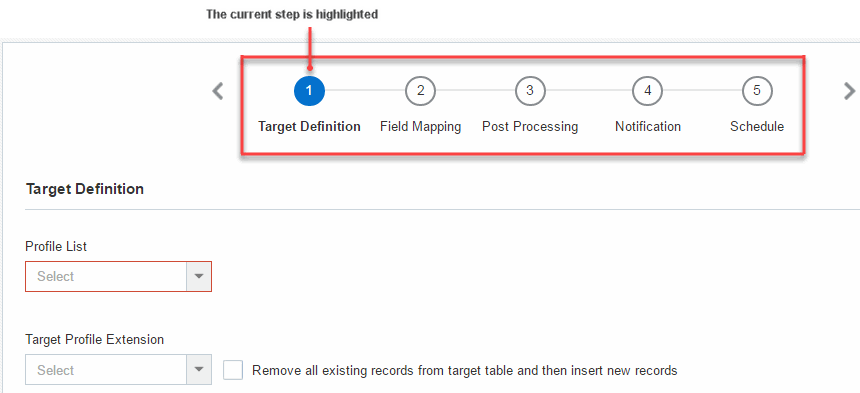
Steps to Enable
The Account Administrator must provide the path to the source file:
- In the new Connect section of the Account Management page, click the job you want to configure.
- Specify the path to the location where the data file is located.
- On the Connect page, click Create Job and select the ORCE job you want to create.
- Enter the Name for the job and click Create Job.
- Click each step in any order to configure and schedule the job.

The Data Director can then configure and schedule the job:

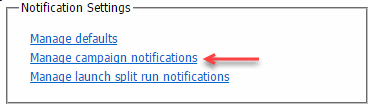
Centralized Notification Settings
The Account Administrator can now manage all progress and failure notifications for Email and Push campaign launches and split-run launches for the account.
These settings will serve as the default settings for Email and Push campaigns and split-run launches, and can be changed for each campaign launch.
Steps to Enable
- Click the new Manage campaign notifications or Manage launch split run notifications link in the Notification Settings section of the Account Management page.
- Specify the notification settings on the Manage campaign notifications or Manage launch split run notifications page.
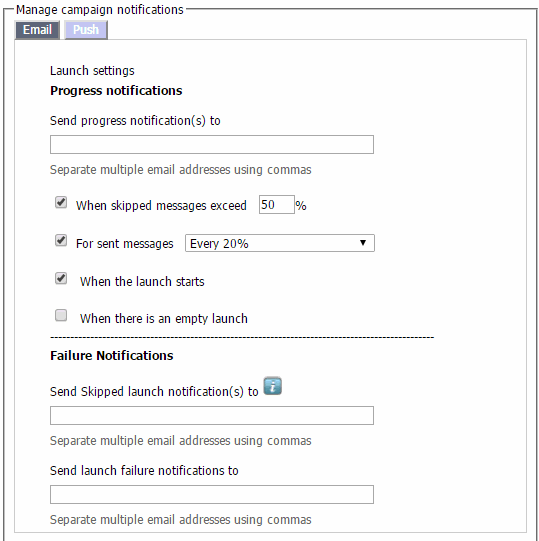
Manage campaign notifications page

Manage launch split run notifications page
---

Copyright © 2017, Oracle and/or its affiliates. All rights reserved.
This document is provided for information purposes only, and the contents hereof are subject to change without notice. This document is not warranted to be error-free, nor subject to any other warranties or conditions, whether expressed orally or implied in law, including implied warranties and conditions of merchantability or fitness for a particular purpose. We specifically disclaim any liability with respect to this document, and no contractual obligations are formed either directly or indirectly by this document. This document may not be reproduced or transmitted in any form or by any means, electronic or mechanical, for any purpose, without our prior written permission.
Oracle and Java are registered trademarks of Oracle and/or its affiliates. Other names may be trademarks of their respective owners.
Intel and Intel Xeon are trademarks or registered trademarks of Intel Corporation. All SPARC trademarks are used under license and are trademarks or registered trademarks of SPARC International, Inc. AMD, Opteron, the AMD logo, and the AMD Opteron logo are trademarks or registered trademarks of Advanced Micro Devices. UNIX is a registered trademark of The Open Group.
Rev01