Developing a PHP Web Application with Oracle Database 11g
Purpose
This tutorial shows you how to use PHP with Oracle Database 11g.
Time to Complete
Approximately 2 hours
Overview
PHP is a popular web scripting language, and is often used to create database-driven web sites. This tutorial helps you get started with PHP and Oracle Database by showing how to build a web application and by giving techniques for using PHP with Oracle. If you are new to PHP, review the Appendix: PHP Primer to gain an understanding of the PHP language.
This tutorial is divided in two sections that may be done in any order:
- Developing a Web Application using Zend Framework and Oracle Database 11g
- Using PHP OCI8 with Oracle Database 11g
Prerequisites
For this Hands On Session, the following has already been installed for you:
|
. |
Oracle Database 11g, with a user "phphol" and password (case sensitive) of "welcome". The example tables in this schema are from Oracle's Human Resources or "HR" schema, with some modifications to simplify the web application example. |
|---|---|
|
. |
Zend Server 5.0 which provides PHP 5.3 with the OCI8 1.4 extension, and Zend Framework 1.10. |
| . |
The Apache web server. |
|
. |
NetBeans 6.9 IDE (PHP edition) and XDebug for debugging |
|
. |
The files you use throughout the tutorial are located in the /home/phphol/public_html directory. |
Developing a Web Application using Zend Framework and Oracle Database 11g
This section of the tutorial creates an employee management web site using Zend Framework.
Zend Framework is a popular open source framework for PHP. It provides a Model-View-Controller structure for web sites to be built and easily maintained. The "model" handles database interaction, the "view" handles display logic, and the "controller" has the application and business logic. Zend Framework has many pre-existing framework components that can be integrated to build sophisisticated applications. It uses PHP in an object-orientated manner.
Creating the Application Framework
Creating a Zend Framework Application
Use the NetBeans IDE to create a Zend Framework-enabled project.
| . |
Start the NetBeans IDE from your desktop.
|
|---|---|
| . |
Start a new project by selecting File > New Project from the menu. Alternatively, you can click the new project icon in the toolbar, or use the keyboard shortcut Ctrl+Shift+N.
|
| . |
In the New Project wizard, click Next, leaving the category with the default of PHP, and the project with the default of PHP Application.
|
| . |
Change the Project Name to PHPLab. The sources folder will automatically change to /home/phphol/public_html/PHPLab. Click in the PHP Version field, and select PHP 5.3. Click Next.
|
| . |
Append public/ to the Project URL, making it http://localhost/~phphol/PHPLab/public/. NetBeans will warn you if the trailing slash is missing. Click Next.
|
| . |
Select the Zend PHP Web Framework option. Click Finish to complete the Wizard.
|
| . |
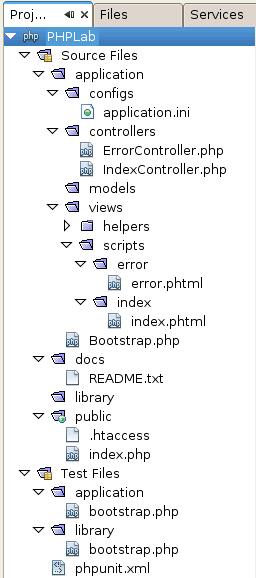
In the Projects pane, explore the files generated by Zend Framework and NetBeans. The created skeleton includes project configuration files, a folder for "models" to handle database interaction, some "views" for display page layout, and "controllers" to manage incoming page requests. This is the MVC application model.
|
| . |
In the Projects pane, navigate to Source Files > public > .htaccess. Open the file and insert a new RewriteBase line so it reads:
RewriteEngine On
RewriteBase /~phphol/PHPLab/public
RewriteCond %{REQUEST_FILENAME} -s [OR]
RewriteCond %{REQUEST_FILENAME} -l [OR]
RewriteCond %{REQUEST_FILENAME} -d
RewriteRule ^.*$ - [NC,L]
RewriteRule ^.*$ index.php [NC,L]
The .htaccess file causes all HTTP requests for the application to load the index.php file, which then invokes the appropriate code path. The RewriteBase rule allows Apache to correctly remap URLs in the $HOME/public_html directory which is where our application files are created and executed from.
|
| . |
In the Projects pane, open Source files > application > views > scripts > index > index.phtml and replace the entire contents with: <h2>Welcome</h2> <p>Welcome to the home page of My Company</p> This is the main body content of the application's home page. Click Save to save the Project files.
|
| . |
Run the project by clicking the green Run arrow, or by pressing the F6 function key. A Firefox browser window will open the application homepage http://localhost/~phphol/PHPLab/public/. By default the Zend Framework invokes its "index" controller and loads the matching index view that you just edited.
|


Enabling a Layout
A layout contains code common to each page of the application. The employee application will use one to show the same title and menu on each page.
| . |
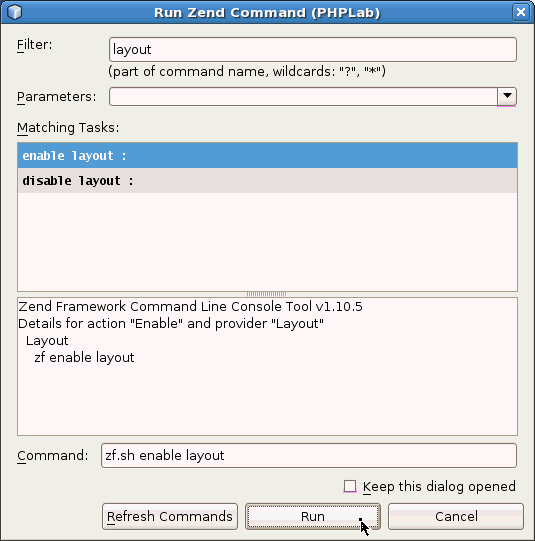
Press Alt+Z to open the Run Zend Command window. This is a GUI wrapper around Zend Framework's control and configuration script. In the Filter field enter layout. This returns two matching Zend Framework commands in the Matching Tasks list. Select the enable layout task. Notice the command at the bottom changes to zf.sh enable layout. Click Run.
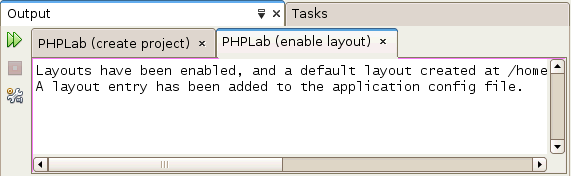
The Netbeans Output window reports that a new layout file was created.
|
|---|---|
| . |
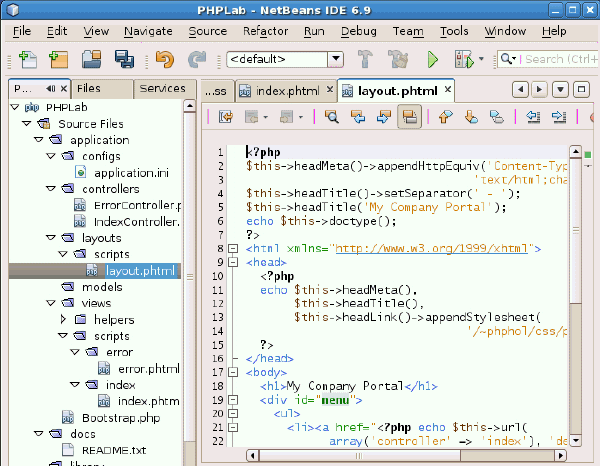
Open the newly created layout file in Source Files > application > layouts > scripts > layout.phtml. Change the file to:
<?php
$this->headMeta()->appendHttpEquiv('Content-Type',
                                 'text/html;charset=utf-8');
$this->headTitle()->setSeparator(' - ');
$this->headTitle('My Company Portal');
echo $this->doctype();
?>
<html xmlns="http://www.w3.org/1999/xhtml">
<head>
  <?php
  echo $this->headMeta(),
       $this->headTitle(),
       $this->headLink()->appendStylesheet(
                                '/~phphol/css/php_hol.css');
  ?>
</head>
<body>
  <h1>My Company Portal</h1>
  <div id="menu">
    <ul>
      <li><a href="<?php echo $this->url(
            array('controller' => 'index'), 'default', true) ?>"
            >Home</a></li>
      <li><a href="<?php echo $this->url(
            array('controller' => 'employee'), 'default', true) ?>"
            >Employee Administration</a></li>
    </ul>
  </div>
  <div id="content">
    <?php echo $this->layout()->content; ?>
  </div>
</body>
</html>
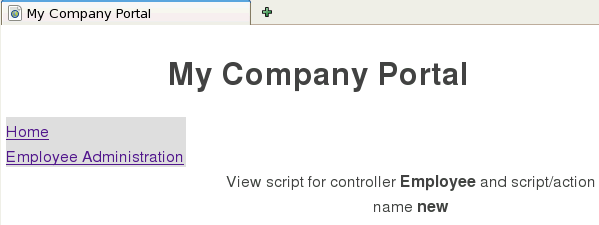
This page mixes PHP and HTML code. The PHP code is executed and any output is sent to the browser inline with the HTML code. The page prints an appropriate HTML prologue which includes a link to a cascading style sheet pre-created prior to the tutorial. More typically the CSS would be located within the application code tree. The body of the page displays a heading "My Company Portal" and two sections. The first section is a navigation menu containing two links. The links are generated by the framework to load the default actions of the "index" and the "employee" controllers. The second section of the body prints page specific content using: echo $this->layout()->content; For the application's home page this will be the content of views > scripts > index > index.phtml.
|
| . |
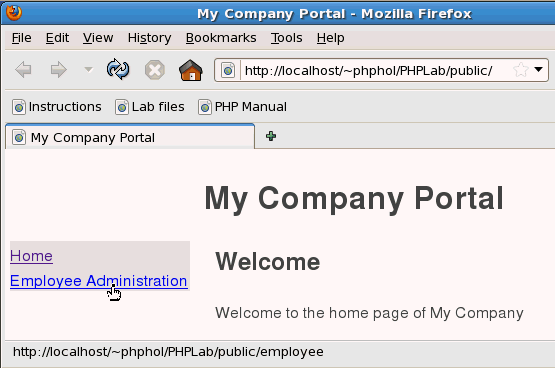
Save the Project files. Run the project by pressing F6 or simply reload the web page http://localhost/~phphol/PHPLab/public/ in the browser. PHP does not need to be compiled.
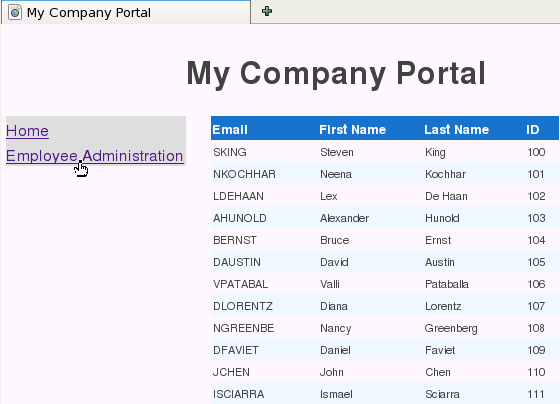
If you don't see this page, make sure you saved the project. Beneath the title, the CSS positions the menu to the left of the page and the content of the default index page to the right. Hover over the menu links. The home page link is for the current page. This allows every part of the application to return here. The Employee Administration link goes to http://localhost/~phphol/PHPLab/public/employee. This URL is for the employee controller which we will create next. It will give a Page not found error if clicked now. |
Creating the Employee Controller Object
| . |
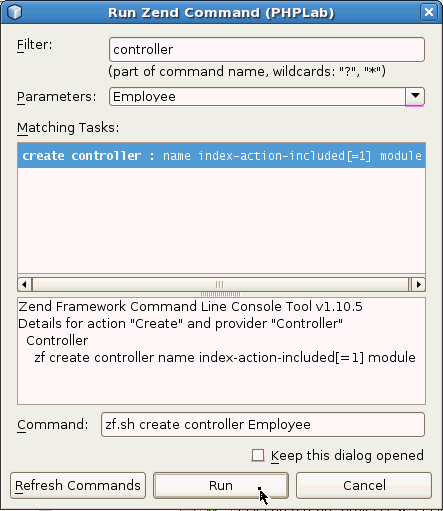
Press Alt+Z to open the Run Zend Command window. In the Filter field enter controller. Make sure create controller is selected in the Matching Tasks list. In the Parameters field above the tasks enter Employee (take care with the capitalization and do not add a plural 's'). The command shown will be zf.sh create controller Employee. You cannot enter the argument directly in the Command field. Click Run.
The Netbeans Output pane will show the controller was created. The files generated and added to the project are controllers > EmployeeController.php and views > scripts > employee > index.phtml.
|
|---|---|
| . |
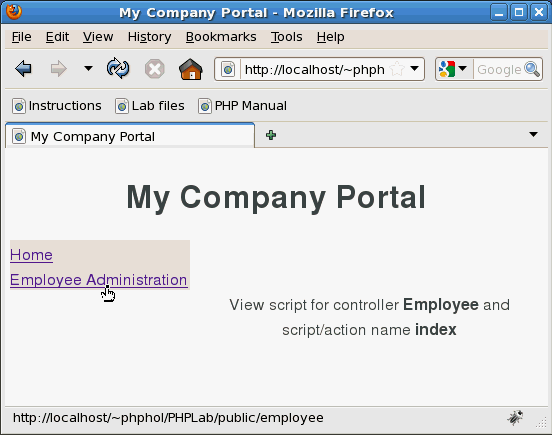
Run the application (or return to the application home page in the browser) and click the Employee Administration link.
At runtime, Zend Framework recognizes the URL http://localhost/~phphol/PHPLab/public/employee is handled by the Employee controller and invokes controllers > EmployeeController.php and its associated view in views > scripts > employee > index.phtml. The view content is "injected" into the common layout.phtml page. By default, index.phtml displays the controller and action names. Now we have the base to code a page listing employees. |

Listing Employees
There are various Zend Framework components that can be used to display data on the Employee Administration page. The framework doesn't manadate a particular model. This tutorial uses a class that inherits Zend_Db_Table's database interaction methods. The tutorial also uses a data mapper class to map this data to a model used in the application.
Configuring the Database Adapter
| . |
From the Projects pane, open Source Files > application > configs > application.ini. This file contains all the Zend Framwork configuration for the project. Separate sections allow the application to be configured differently during the development and deployment phases.
|
|---|---|
| . |
At the end of application.ini under the section with the heading [development : production] add the following database connection information: resources.db.adapter = "Oracle" resources.db.params.dbname = "localhost/orcl" resources.db.params.username = "phphol" resources.db.params.password = "welcome" This tells the application to use Zend Framework's Oracle database layer which calls PHP's OCI8 extension to connect to the Oracle Database. The database connected to is called orcl and runs on the local machine. The database schema is phphol.
|
Creating the Employee DB Table Object
| . |
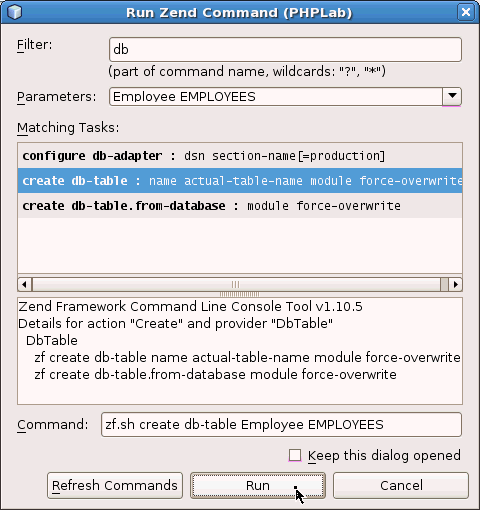
Press Alt+Z to open the Run Zend Command window. In the Filter field enter db. In the Matching Tasks list select the create db-table task. In the Parameters field enter Employee EMPLOYEES (take care with the capitalization and pluralization). The command shown will be zf.sh create db-table Employee EMPLOYEES. Click Run.
|
|---|
Creating the Employee Model Object
| . |
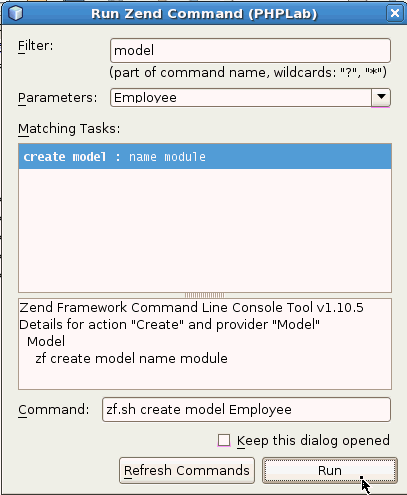
Press Alt+Z to open the Run Zend Command window. In the Filter field enter model. In the Matching Tasks list select the create model task. In the Parameters field enter Employee (take care with the capitalization and pluralization). The command shown will be zf.sh create model Employee. Click Run.
|
|---|
Creating the EmployeeMapper Object
| . |
Press Alt+Z to open the Run Zend Command window. In the Filter field enter model. In the Matching Tasks list select the create model task. In the Parameters field enter Employee (take care with the capitalization and pluralization). The command shown will be zf.sh create model Employee. Click Run.
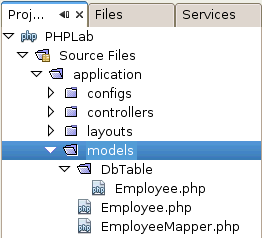
You should see in the Project pane the generated files for the 3 model objects you created (Db Table, Employee, EmployeeMapper):
|
|---|

Adding Business Logic
| . |
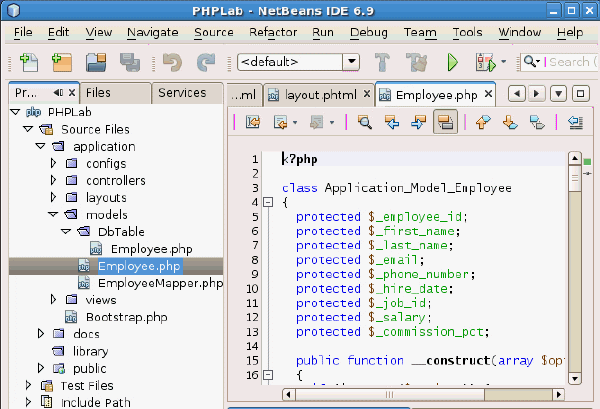
Change the Application_Model_Employee class in Source Files > application > models > Employee.php. It was created as an empty class. Open a terminal window and execute: cd $HOME/public_html/PHPLab/application/models cp $HOME/samples/models_Employee.php Employee.php Note: If you accidentally named the project something other than PHPLab then replace PHPLab with your project name in the cd command above. If you have this file open in NetBeans the screen will automatically reload after a short delay. Do not confuse this file with the file of the same name in DbTable just above it in the Project file list! The class now has an attribute for each column in the EMPLOYEES table, and has getters and setters for those attribute values. There is no logic in this class to retrieve or save that data. Instances of the class will simply hold data corresponding to a row of the EMPLOYEES table.
|
|---|---|
| . |
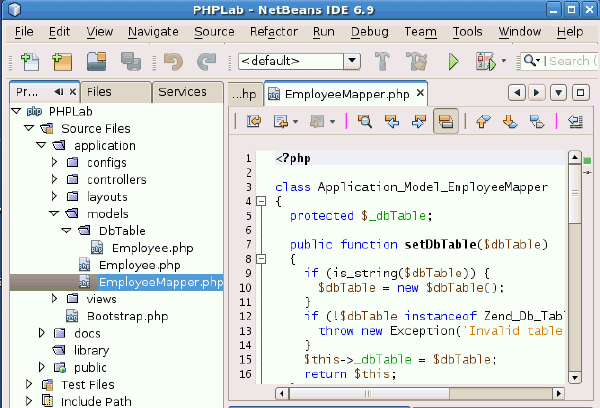
Change the Application_Model_EmployeeMapper class in Source Files > application > models > EmployeeMapper.php. Open a terminal window and execute: cd $HOME/public_html/PHPLab/application/models cp $HOME/samples/EmployeeMapper.php EmployeeMapper.php If you have this file open in NetBeans the screen will automatically reload after a short delay. This is where the basic interaction with the database and the business logic occurs. It maps our model Application_Model_Employee (in application > models > Employee.php) to the data source Application_Model_DbTable_Employee (in application > models > DbTable > Employee.php). The Application_Model_DbTable_Employee class appears empty but it inherits database interaction logic from Zend Framework's parent class. The mapper class contains methods for setting and getting the type of data to be used, and a fetchAll() method to retrieve all rows from the EMPLOYEES table.
|
Rendering the Employee List
| . |
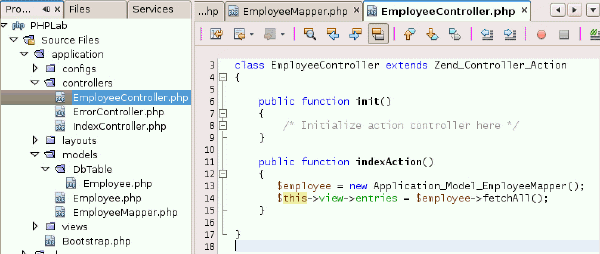
In Netbeans, edit Source Files > application > controllers > EmployeeController.php and add two lines to the indexAction() method. This queries the list of employees. The file should look like:
<?php

class EmployeeController extends Zend_Controller_Action
{

    public function init()
    {
        /* Initialize action controller here */
    }

    public function indexAction() {
        $employee = new Application_Model_EmployeeMapper();
        $this->view->entries = $employee->fetchAll();
    }

}
The indexAction() of the Employee controller is invoked when the URL http://localhost/~phphol/PHPLab/public/employee is loaded. It simply fetches all the rows from the EMPLOYEES table using the new fetchAll() method we created in EmployeeMapper.php. We'll change the corresponding view next to display those rows. Note there is no closing ?> PHP tag in the file. The tag is optional in PHP scripts and many coding standards suggest omitting it. This prevents whitespace that accidentally follows the tag from being sent to the browsers and interferring with the page layout.
|
|---|---|
| . |
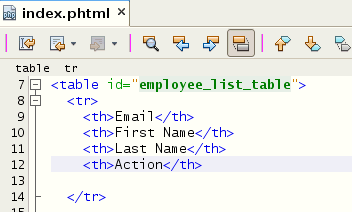
Edit Source Files > application > views > scripts > employee > index.phtml to render the code. Change the file to look like:
<table id="employee_list_table">
  <tr>
    <th>Email</th>
    <th>First Name</th>
    <th>Last Name</th>
    <th>ID</th>
  </tr>

<?php foreach ($this->entries as $entry): ?>
  <tr>
    <td><?php echo $this->escape($entry->email) ?></td>
    <td><?php echo $this->escape($entry->firstname) ?></td>
    <td><?php echo $this->escape($entry->lastname) ?></td>
    <td><?php echo $this->escape($entry->employeeid) ?></td>
  </tr>
<?php endforeach ?>

</table>
|
| . |
Save the Project files. Reload the web page or run the project by pressing F6 in NetBeans. In the browser click the Employee Administration link. The list of employees is shown. You can easily navigate back and forth between the home page and the employee list.
|

Creating, Editing, and Deleting Employees
Creating Actions on the Employee Controller
Zend Framework "actions" for creating, editing and deleting employees can be created.
| . |
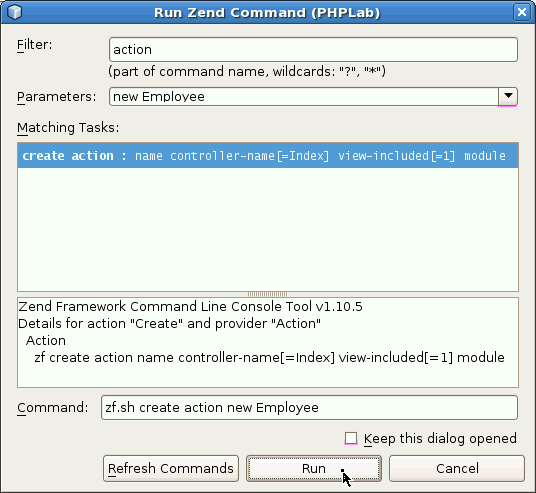
Run Alt+Z to open the Run Zend Command window. In the Filter field enter action. Make sure the create action task is selected in the Matching Tasks list. In the Parameters field enter new Employee. The command shown will be zf.sh create action new Employee. Click Run.
This creates a newAction() method in the existing EmployeController.php file and a corresponding view in Source Files > application > views > scripts > employee > new.phtml. These are used when the URL http://localhost/~phphol/PHPLab/public/employee/new is called.
|
|---|---|
| . |
Run Alt+Z to open the Run Zend Command window. Make sure the Matching Tasks list has the create action task selected. In the Parameters field change the text to be edit Employee. The command shown will be zf.sh create action edit Employee. Click Run.
This creates an editAction() method in the existing EmployeController.php file and a corresponding view in Source Files > application > views > scripts > employee > edit.phtml. These are used when the URL http://localhost/~phphol/PHPLab/public/employee/edit is called. Note: If you run into a duplicate action error it may be because you forgot to change the Zend Framework parameter. It might also occur if you have multiple NetBeans projects open. Be sure to click on the correct project before opening the Run Zend Command window. The error might be like: An Error Has Occurred
This controller (Employee) already has an action named (edit)
Zend Framework Command Line Console Tool v1.10.3
Details for action "Create" and provider "Action"
Action
zf create action name controller-name[=Index]
view-included[=1] module
|
| . |
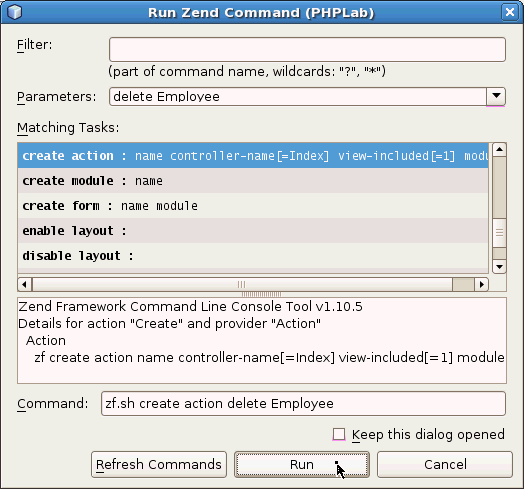
Run Alt+Z to open the Run Zend Command window. Make sure the Matching Tasks list has the create action task selected. In the Parameters field change the text to be delete Employee. The command shown will be zf.sh create action delete Employee. Click Run.
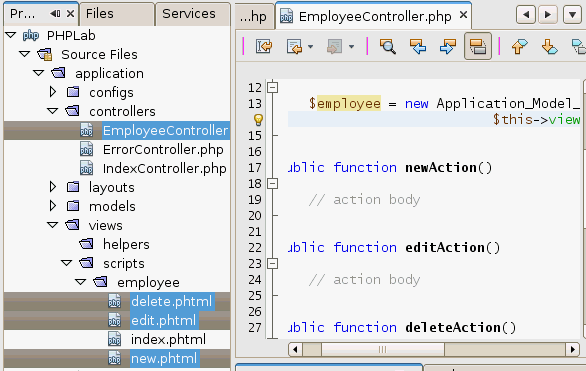
This creates an editAction() method in the existing EmployeController.php file and a corresponding view in Source Files > application > views > scripts > employee > edit.phtml. These are used when the URL http://localhost/~phphol/PHPLab/public/employee/edit is called. Creation of three actions added corresponding methods to EmployeeController.php and the three created views:
|
| . |
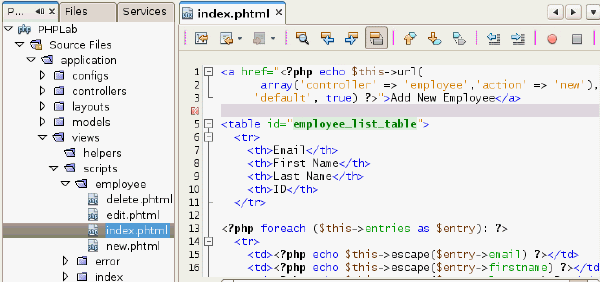
Edit Source Files > application > views > scripts > employee > index.phtml to modify the employee list and add the link for the new employee action. Add the following text at the top, above the <table id="employee_list_table"> line:
<a href="<?php echo $this->url(
      array('controller' => 'employee','action' => 'new'),
     'default', true) ?>">Add New Employee</a>
|
| . |
Save the Project files. In the browser, reload the Employee Administration page http://localhost/~phphol/PHPLab/public/employee. It shows the Add New Employee link above the table. If you hover over the link, its URL is http://localhost/~phphol/PHPLab/public/employee/new.
Clicking the link shows the contents of the file Source Files > application > views > scripts > employee > new.phtml
|


Creating the New Employee Form
In this section, you create a form for inserting new employees, and change the default new employee view to display an HTML form using the Zend_Form component of Zend Framework.
| . |
Run Alt+Z to open the Run Zend Command window. In the Filter field enter form. Make sure the create form task is selected in the Matching Tasks list. In the Parameters field change the text to be Employee (singular). The command shown will be zf.sh create form Employee. Click Run.
|
|---|---|
| . |
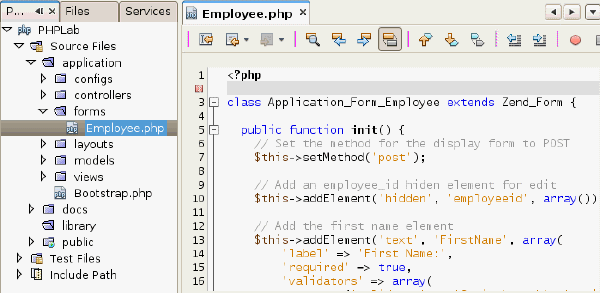
Update the new file Source Files > application > forms > Employee.php. Open a terminal window and execute: cd $HOME/public_html/PHPLab/application/forms cp $HOME/samples/forms_Employee.php Employee.php If you have this file open in NetBeans the screen will automatically reload after a short delay. The file:
|
| . |
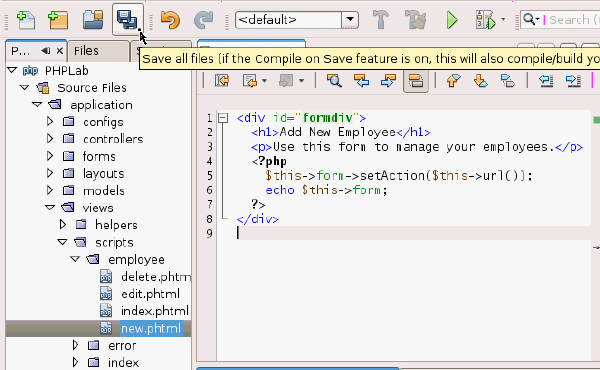
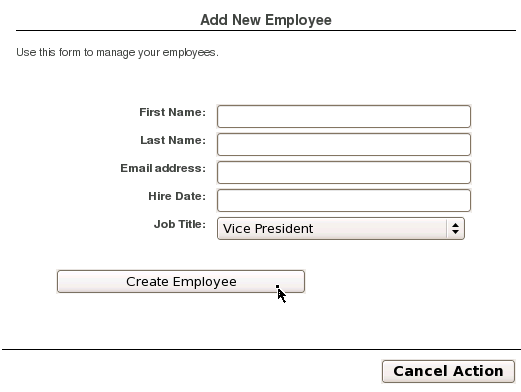
Edit the view script Source Files > application > views > scripts > employee > new.phtml. Replace the automatically generated file with:
<div id="formdiv">
  <h1>Add New Employee</h1>
  <p>Use this form to manage your employees.</p>
  <?php
    $this->form->setAction($this->url());
    echo $this->form;
  ?>
</div>
Save the file.
|
| . |
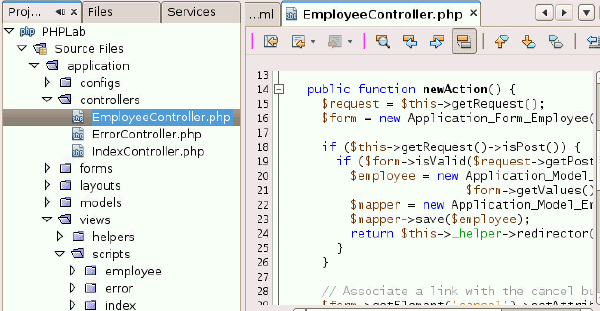
Edit the employee controller script Source Files > application > controllers > EmployeeController.phtml. Replace the empty newAction() method with the following code. Make sure to leave the other methods unchanged:
public function newAction()
{
  $request = $this->getRequest();
  $form    = new Application_Form_Employee();

  if ($this->getRequest()->isPost()) {
    if ($form->isValid($request->getPost())) {
      $employee = new Application_Model_Employee(
                                    $form->getValues());
      $mapper   = new Application_Model_EmployeeMapper();
      $mapper->save($employee);
      return $this->_helper->redirector('index');
    }
  }

  // Associate a link with the cancel button
  $form->getElement('cancel')->setAttrib('onclick',
	  "window.open('".
	  $this->view->url( array(
	  'controller' => 'employee',
	  'action'     => 'index'
	  ), 'default', true).
	  "','_self')");

  $this->view->form = $form;
}
This code is invoked when http://localhost/~phphol/PHPLab/public/employee/new is called. It instantiates a form, saves any data if it was invoked as a post request, and sets the appropriate URL for when the cancel button is clicked.
|
| . |
Save the project files and reload the application in the browser. Navigate to the Add New Employee page. Leave the form fields empty and click the Create Employee button.
Validation supplied by Zend Framework prevents invalid data being submitted.
Clicking the Cancel Action button will return back to the employee list page. If you try to insert a valid record right now you will get an error that Application_Model_EmployeeMapper::save() is missing. In a few more steps, this method will be created. Note: If you made the change to the new.phtml view without changing the newAction() controller action you may get an error similar to: Fatal error: Call to a member function setAction() on a non-object in PHPLab/application/views/scripts/employee/new.phtml |
| . |
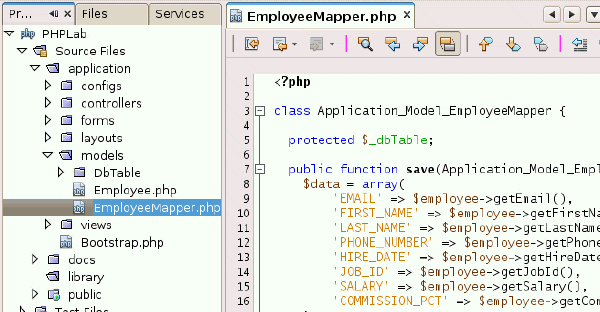
Edit Source Files > application > models > EmployeeMapper.php to add the logic to save a new employee's data. Add a new save() method at the top of the class, leaving the rest of the file unchanged. This method saves the employee on the EmployeeMapper class:
public function save(Application_Model_Employee $employee)
{
  $data = array(
      'EMAIL'          => $employee->getEmail(),
      'FIRST_NAME'     => $employee->getFirstName(),
      'LAST_NAME'      => $employee->getLastName(),
      'PHONE_NUMBER'   => $employee->getPhoneNumber(),
      'HIRE_DATE'      => $employee->getHireDate(),
      'JOB_ID'         => $employee->getJobId(),
      'SALARY'         => $employee->getSalary(),
      'COMMISSION_PCT' => $employee->getCommissionPct(),
  );

  if (null === ($id = $employee->getEmployeeId())) {
    unset($data['EMPLOYEE_ID']);
    $this->getDbTable()->insert($data);
  } else {
    $this->getDbTable()->update($data,
                         array('EMPLOYEE_ID = ?' => $id));
  }
}
|
| . |
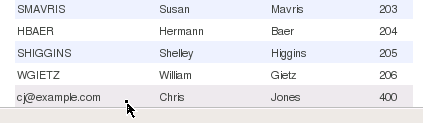
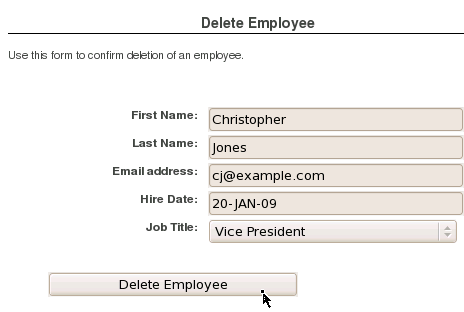
Save the Project files. Reload the web page (or run the application) and navigate to the Add New Employee page. Enter the following values: Chris Jones cj@example.com 20-JAN-09 Vice President Click the Create Employee button. The new record will be inserted into the database and will be displayed at the end of the employee list.
|


Creating the Edit Employee Form
In this section, you create the code for editing employee records, reusing the form created in the previous steps.
| . |
Edit the employee list page Source Files > application > views > scripts > employee > index.phtml. Change the $entry->email column to be a link for editing an employee:
<td><a href="<?php echo $this->url(
	  array('controller' => 'employee',
		'action'     => 'edit',
		'id'=> $this->escape($entry->employeeid)),
		'default',
		true) ?>">
	 <?php echo $this->escape($entry->email) ?></a></td>
|
|---|---|
| . |
Save the Project files. Reload the employee list page http://localhost/~phphol/PHPLab/public/employee in your browser. The new edit links are shown for the email addresses. Hover over the edit links and see how the URLs relate to the code we just modified. If you click any of the links you are shown the default template text in the related view for the edit "action".
|
| . |
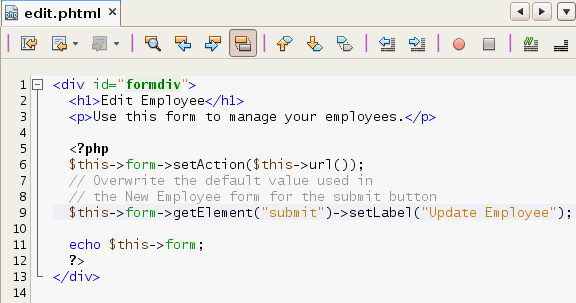
Edit the edit-action view script Source Files > application > views > scripts > employee > edit.phtml and replace its contents with:
<div id="formdiv">
  <h1>Edit Employee</h1>
  <p>Use this form to manage your employees.</p>

  <?php
  $this->form->setAction($this->url());
  // Overwrite the default value used in
  // the New Employee form for the submit button
  $this->form->getElement("submit")->setLabel("Update Employee");

  echo $this->form;
  ?>
</div>
This will reuse the form previously created for adding new employees, but uses different submit button text. Save the file.
|
| . |
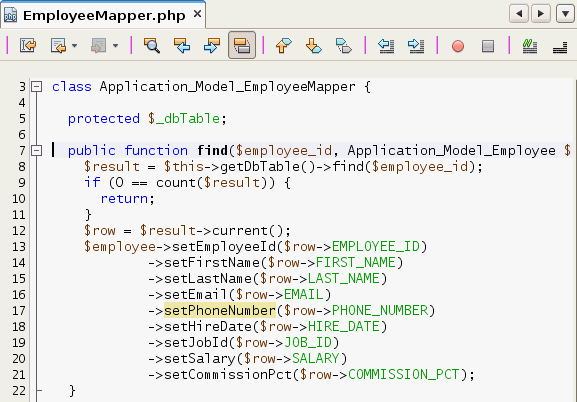
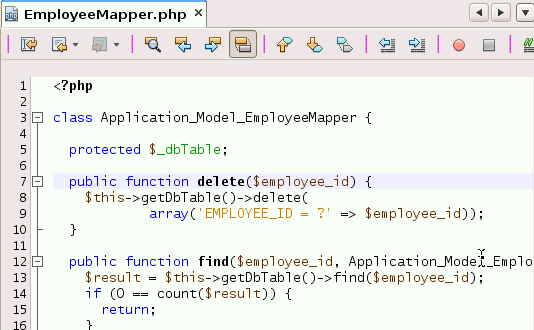
Edit Source Files > application > models > EmployeeMapper.php. Add a new find() method at the top of the Application_Model_EmployeeMapper class. This will be used to populate the form with data for an existing employee. Leave the other classes in the file unchanged. The new method is:
public function find($employee_id, Application_Model_Employee $employee) {
  $result = $this->getDbTable()->find($employee_id);
  if (0 == count($result)) {
    return;
  }
  $row = $result->current();
  $employee->setEmployeeId($row->EMPLOYEE_ID)
	  ->setFirstName($row->FIRST_NAME)
	  ->setLastName($row->LAST_NAME)
	  ->setEmail($row->EMAIL)
	  ->setPhoneNumber($row->PHONE_NUMBER)
	  ->setHireDate($row->HIRE_DATE)
	  ->setJobId($row->JOB_ID)
	  ->setSalary($row->SALARY)
	  ->setCommissionPct($row->COMMISSION_PCT);
}
|
| . |
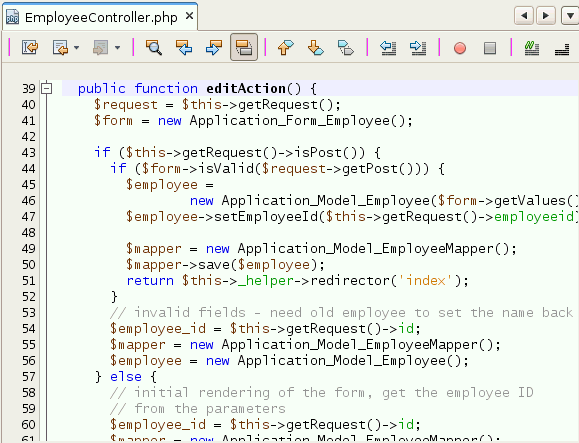
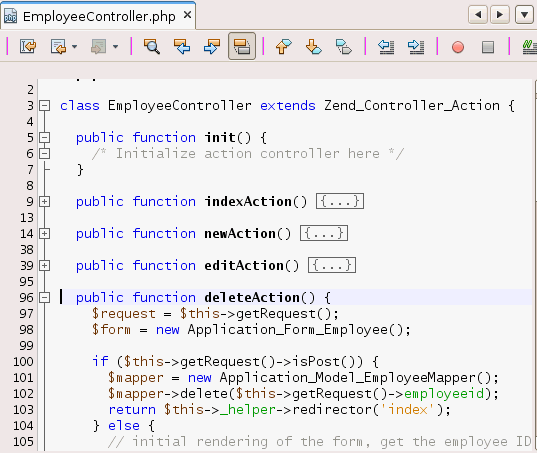
Update the editAction() method in Source Files > application > controllers > EmployeeController.php. Open a terminal window and execute: cd $HOME/public_html/PHPLab/application/controllers cp $HOME/samples/EmployeeController.php EmployeeController.php If you have this file open in NetBeans the screen will automatically reload after a short delay. This method registers the form in the controller editAction() method and add the business logic calling EmployeeMapper's find() and save() methods.
|
| . |
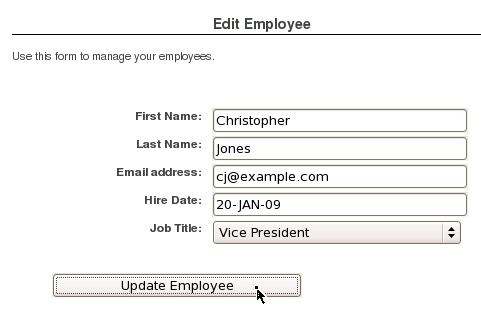
Save the Project files. In your browser, navigate to the Employee Administration page. Locate the recently added entry for Chris Jones at the bottom.
Click on the cj@example.com edit link. Change the First Name from Chris to Christopher and click the Update Employee button.
The new value will be stored in the database and shown in the employee list.
|


Creating the Delete Employee Form
In this section you create the code for deleting an employee, reusing the form created earlier.
| . |
Edit Source Files > application > views > scripts > employee > index.phtml. Change the column header from ID to Action: <th>Action</th>
Change the $entry->employeeid column output into a deletion action link:
<td><a href="<?php echo $this->url(
	   array('controller' => 'employee',
		 'action'     => 'delete',
		 'id'=> $this->escape($entry->employeeid)),
		 'default', true) ?>"
      >Delete</a></td>
|
|---|---|
| . |
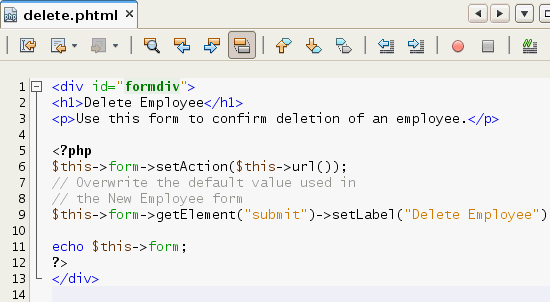
Edit the view script Source Files > application > views > scripts > employee > delete.phtml. Change the default contents of the file to: <div id="formdiv">
<h1>Delete Employee</h1>
<p>Use this form to confirm deletion of an employee.</p>
<?php
$this->form->setAction($this->url());
// Overwrite the default value used in
// the New Employee form
$this->form->getElement("submit")->setLabel("Delete Employee");
echo $this->form;
?>
</div>
This will reuse the form previously created form for adding and editing new employees, with appropriate text for the submit button.
|
| . |
Edit Source Files > application > models > EmployeeMapper.php. Add a delete() method to the Application_Model_EmployeeMapper class, leaving the other code unchanged.
public function delete($employee_id)
{
  $this->getDbTable()->delete(
             array('EMPLOYEE_ID = ?' => $employee_id));
}
|
| . |
Update the deleteAction() method in Source Files > application > controllers > EmployeeController.php. Open a terminal window and execute: cd $HOME/public_html/PHPLab/application/controllers cp $HOME/samples/EmployeeController_del.php EmployeeController.php If you have this file open in NetBeans the screen will automatically reload after a short delay.
The logic for deletion is very similar to the edit logic. The difference is that there is no need to validate the data, and the setAttrib() method is used in a loop to make all fields read-only. 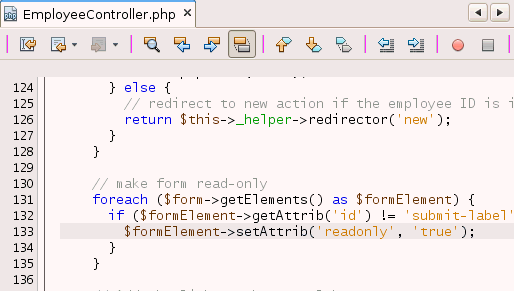
|
| . |
Save the Project files . Run the application, or reload the page in your browser. Navigate to the Employee Administration page and delete the employee Christopher Jones that you previously added.
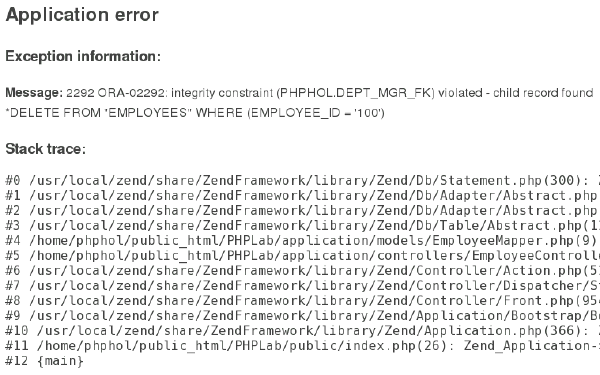
If you try to delete a manager such as SKING you will get the following SQL error: Message: 2292 ORA-02292: integrity constraint (PHPHOL.DEPT_MGR_FK) violated - child record found *DELETE FROM "EMPLOYEES" WHERE (EMPLOYEE_ID = '100')
In future, the application business logic could be extended to only enable the 'delete' action on non-managerial employees. |


This web application example has shown how to build a Zend Framework powered web site. Zend Framework provides a large number of flexible features and components from form validation to page caching that aid application development and maintenance.
Using PHP OCI8 with Oracle Database 11g
This section of the tutorial shows how to use the PHP OCI8 extension directly with Oracle Database. Using the OCI8 extension directly gives programmers maximum control over application performance.
Creating a Standard Connection
To create a connection to Oracle that can be used for the lifetime of the PHP script, perform the following steps.
|
. |
Review the code in $HOME/public_html/connect.php <?php
// Create connection to Oracle
$conn = oci_connect("phphol", "welcome", "//localhost/orcl");
if (!$conn) {
$m = oci_error();
echo $m['message'], "\n";
exit;
}
else {
print "Connected to Oracle!";
}
// Close the Oracle connection
oci_close($conn);
?>
The oci_connect() function contains the username, the password and the connection string. In this case, Oracle's Easy Connect connection string syntax is used. It consists of the hostname and the DB service name. The oci_close() function closes the connection. Any standard connections not explicitly closed will be automatically released when the script ends.
|
|---|---|
|
. |
Open a Web browser and enter the following URL to display the output: http://localhost/~phphol/connect.php
"Connected to Oracle!" is displayed if the connection succeeds.
|
|
. |
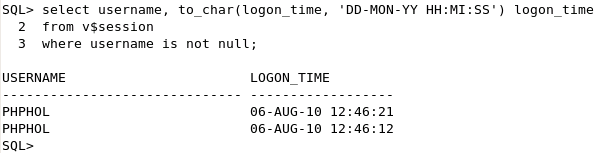
Review the SQL in $HOME/public_html/usersess.sql column username format a30 column logon_time format a18 set pagesize 1000 feedback off echo on select username, to_char(logon_time, 'DD-MON-YY HH:MI:SS') logon_time from v$session where username is not null; exit This is a SQL script file that you run in SQL*Plus (Oracle's command-line SQL scripting tool). This SQL*Plus script shows the current database sessions, and what time they logged into the database.
|
| . |
Open a terminal window and enter the following commands to run the SQL script. Note that you could also execute the script in SQL Developer. cd $HOME/public_html sqlplus -l phphol/welcome @usersess.sql
The SQL*Plus script lists the current database sessions. The only session shown is for SQL*Plus. The PHP connections from the oci_connect() function has been closed.
|
|
. |
Edit $HOME/public_html/connect.php and change oci_connect() to use a persistent connection oci_pconnect(). $conn = oci_pconnect("phphol", "welcome", "//localhost/orcl"); Reload the connect.php script in the browser. Now rerurn usersess.sql in SQL*Plus. cd $HOME/public_html sqlplus -l phphol/welcome @usersess.sql
There should be two connected users. You may see more than two if you reloaded the page several times and Apache allocated different processes to handle the PHP script. By default, persistent connections stay open until the Apache process terminates. Subsequent PHP scripts can reuse the already opened connection, making them run faster. |


Using Database Resident Connection Pooling
Database Resident Connection Pooling is a new feature of Oracle Database 11g. It is useful for short lived scripts such as typically used by web applications. It allows the number of connections to be scaled as web site usage grows. It allows multiple Apache processes on multiple machines to share a small pool of database server processes. Without DRCP, a non-persistent PHP connection must start and terminate a server process, and a persistent PHP connection keeps hold of database resources even when PHP is idle.
Below left is diagram of nonpooling. Every script has its own database server proces. Scripts not doing any database work still hold onto a connection until the connection is closed and the server is terminated. Below right is a diagram with DRCP. Scripts can use database servers from a pool of servers and return them when no longer needed.
 |
 |
Batch scripts doing long running jobs should generally use non-pooled connections.
This section of the tutorial shows how DRCP can be used by new or existing applications without writing or changing any application logic. Perform the following steps:
|
. |
Check that php has oci8.connection_class set. Open a terminal window and execute the following command: php -r 'echo ini_get("oci8.connection_class"), "\n";'
The connection class tells the database server pool that connections are related. Session information (such as the default date format) might be retained between connection calls, giving performance benefits. Session information will be discarded if a pooled server is later reused by a different application with its own connection class name.
|
|---|---|
|
. |
Review the code in $HOME/public_html/query_pooled.php <?php Compare this code to the code in $HOME/public_html/query_nonpooled.php <?php
The only difference is the ":pooled" in the Easy Connect connection string in query_pooled.php.
|
|
. |
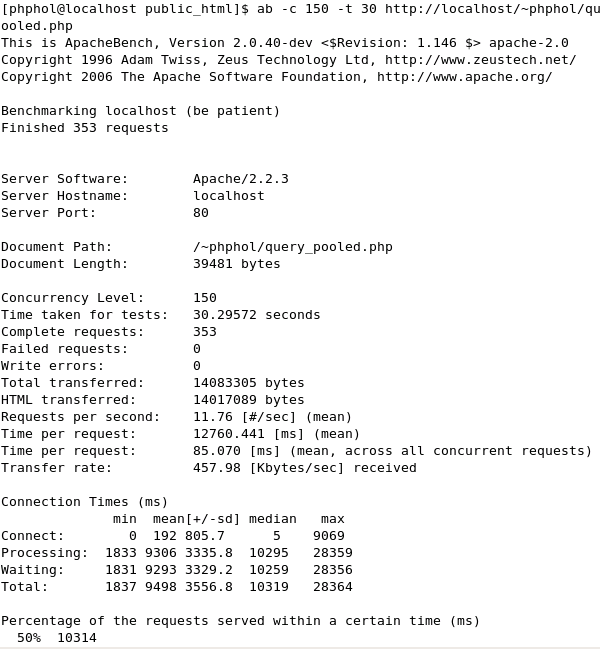
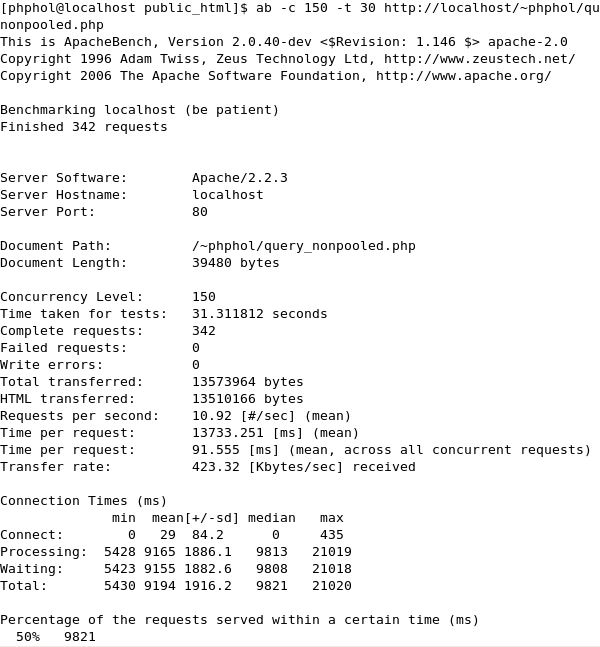
To run the scripts, the Apache Benchmark tool is used. This command repeatedly loads a web page, measuring its performance. From a terminal window, execute the following: ab -c 150 -t 30 http://localhost/~phphol/query_pooled.php
The above command sends Apache 150 concurrent requests for the script, repeatedly for 30 seconds.
|
|
. |
Now look at the number of database connections open. Open another terminal window, execute the following: sqlplus phphol/welcome select username, program from v$session where username = 'PHPHOL';
The default DRCP pool MAXSIZE is 40. You see up to 40 connections with PHPHOL username, depending on how many Apache processes handled the 'ab' requests. You may also need to execute the query while 'ab' is running to see the pooled servers working. Oracle manages the DRCP pool, shrinking it after a specified timeout.
|
|
. |
Now, you will run the same command except run the non-pooled script to compare the difference. From a terminal window, execute the following: ab -c 150 -t 30 http://localhost/~phphol/query_nonpooled.php
|
|
. |
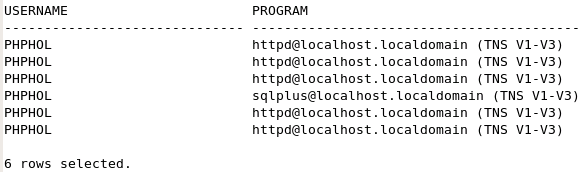
Now look at the number of database connections open. Open another terminal window, execute the following: sqlplus phphol/welcome select username, program from v$session where username = 'PHPHOL';
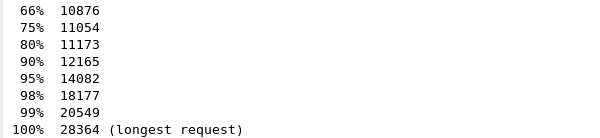
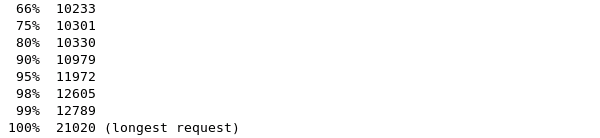
Many more rows than previously are returned. The rows with httpd@localhost.localdomain (TNS V1-V3) correspond to a running Apache process holding a database connection open. For PHP, Apache runs in a multi-process mode, spawning child processes each of which can handle one PHP script. Depending how Apache allocated these processes to handle the "ab" requests, you may see a varying number of rows in V$SESSION. Compare the number of requests completed in each run. You might want to run each script a few times to warm up the caches. Performance of the scripts is roughly similar. For the small works loads used in these two files, the tiny overhead of the handoff of pooled servers might make query_pooled.php a little slower than query_nonpooled.php. But the non-pooled script causes every single Apache process to open a separate connection to the database. For larger sites, or where memory is limited, the overall benefits of DRCP are significant. |


Fetching Data
A common task when developing Web applications is to query a database and display the results in a Web browser. There are a number of functions you can use to query an Oracle database, but the basics of querying are always the same:
| 1. | Parse the statement for execution. | |
| 2. | Bind data values (optional). | |
| 3. | Execute the statement. | |
| 4. | Fetch the results from the database. | |
To create a simple query, and display the results in an HTML table, perform the following steps.
|
. |
Review the code in $HOME/public_html/query.php <?php
// Create connection to Oracle
$conn = oci_connect("phphol", "welcome", "//localhost/orcl");
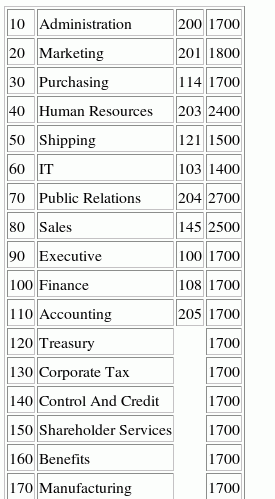
$query = 'select * from departments';
$stid = oci_parse($conn, $query);
$r = oci_execute($stid);
// Fetch the results in an associative array
print '<table border="1">';
while ($row = oci_fetch_array($stid, OCI_RETURN_NULLS+OCI_ASSOC)) {
print '<tr>';
foreach ($row as $item) {
print '<td>'.($item?htmlentities($item):' ').'</td>';
}
print '</tr>';
}
print '</table>';
// Close the Oracle connection
oci_close($conn);
?>
The oci_parse() function parses the statement. The oci_execute() function executes the parsed statement. The oci_fetch_array() function retrieves a row of results of the query as an associative array, and includes nulls. The htmlentities() function escapes any text resembling HTML tags so it displays correctly in the browser.
|
|---|---|
|
. |
From your Web browser, enter the following URL to display the output: http://localhost/~phphol/query.php
The results of the query are displayed in the Web browser. The OCI_ASSOC parameter fetches the row as an associative arrary of column names and column data. |
Using Bind Variables
Bind variables enable you to re-execute statements with new values, without the overhead of reparsing the statement. Bind variables improve code reusability, and can reduce the risk of SQL Injection attacks.
To use bind variables in this example, perform the following steps.
|
. |
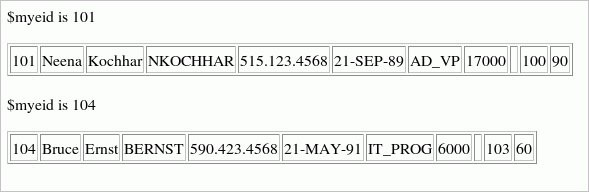
Review the code in $HOME/public_html/bind.php <?php
function do_fetch($myeid, $s)
{
// Fetch the results in an associative array
print '<p>$myeid is ' . $myeid . '</p>';
print '<table border="1">';
while ($row = oci_fetch_array($s, OCI_RETURN_NULLS+OCI_ASSOC)) {
print '<tr>';
foreach ($row as $item) {
print '<td>'.($item?htmlentities($item):' ').'</td>';
}
print '</tr>';
}
print '</table>';
}
// Create connection to Oracle
$c = oci_connect("phphol", "welcome", "//localhost/orcl");
// Use bind variable to improve resuability,
// and to remove SQL Injection attacks.
$query = 'select * from employees where employee_id = :eidbv';
$s = oci_parse($c, $query);
$myeid = 101;
oci_bind_by_name($s, ":EIDBV", $myeid);
oci_execute($s);
do_fetch($myeid, $s);
// Redo query without reparsing SQL statement
$myeid = 104;
oci_execute($s);
do_fetch($myeid, $s);
// Close the Oracle connection
oci_close($c);
?>
|
|---|---|
|
. |
From your Web browser, enter the following URL to display the output: http://localhost/~phphol/bind.php
The $myeid variable is bound to the :eidbv bind variable so when the query is re-executed the new value of $myeid is passed to the query. This allows you to execute the statement again, without reparsing it with the new value, and can improve performance of your code. If you don't see the returned rows, you may have deleted these employees in the web application part of the tutorial. Use SQL*Plus to query the EMPLOYEE_ID column of the EMPLOYEES table, and edit bind.php to use IDs that exist in the table. |
Creating Transactions
When you manipulate data in an Oracle Database (insert, update, or delete
data), the changed or new data is only available within your database session
until it is committed to the database. When the changed data is committed
to the database, it is then available to other users and sessions. This is
a database transaction.
By default, when PHP executes a SQL statement it automatically commits. This
can be over-ridden, and the oci_commit()
and oci_rollback()
functions used to control transactions. At the end of a PHP script, any uncommitted
data is rolled back.
Committing each change individually causes extra load on the server. In general
you want all or none of your data committed. Doing your own transaction
control has performance and data-integrity benefits.
To learn about transaction management in PHP with an Oracle database, perform
the following steps.
|
. |
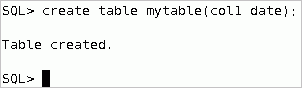
Start SQL*Plus and create a new table: sqlplus phphol/welcome create table mytable (col1 date);
|
|---|---|
|
. |
Review the code in $HOME/public_html/trans_rollback.php <?php
$conn = oci_connect("phphol", "welcome", "//localhost/orcl");
// PHP function to get a formatted date
$d = date('j:M:y H:i:s');
// Insert the date into mytable
$s = oci_parse($conn,
"insert into mytable values (to_date('" . $d . "',
'DD:MON:YY HH24:MI:SS'))");
// Use OCI_DEFAULT to insert without committing
$r = oci_execute($s, OCI_DEFAULT);
echo "Previous INSERT rolled back as no commit is done before script ends";
?>
The OCI_DEFAULT parameter overrides the basic behavior of oci_execute().
|
|
. |
From your Web browser, enter the following URL to display the output: http://localhost/~phphol/trans_rollback.php This script inserts a row into the table.
|
|
. |
Because there is no automatic or explicit commit, the data is rolled back by PHP when the script finishes. To see that the data has not been committed, query the table to see if there are any inserted rows. From your SQL*Plus session, enter the following commands to select any rows from the mytable table: select to_char(col1, 'DD-MON-YY HH:MI:SS') time from mytable;
|
|
. |
Review the code in $HOME/public_html/trans_autocommit.php <?php
$conn = oci_connect("phphol", "welcome", "//localhost/orcl");
// PHP function to get a formatted date
$d = date('j:M:y H:i:s');
// Insert the date into mytable
$s = oci_parse($conn,
"insert into mytable values (to_date('" . $d . "',
'DD:MON:YY HH24:MI:SS'))");
// Insert & commits
$r = oci_execute($s);
// The rollback does nothing: the data has already been committed
oci_rollback($conn);
echo "Data was committed\n";
?>
This script differs from trans1.php in that there is no OCI_DEFAULT when the data is inserted. This means the new data is committed by the oci_execute() call.
|
|
. |
From your Web browser, enter the following URL to display the output: http://localhost/~phphol/trans_autocommit.php
The data is now committed.
|
|
. |
From your SQL*Plus session, enter the following command to select any rows from the mytable table: select to_char(col1, 'DD-MON-YY HH:MI:SS') time from mytable;
If you reloaded the PHP script more than once, a row from each execution is inserted.
|
|
. |
You can compare the performance difference between committing each row individually versus at the end of the transaction. To test the difference, review the code in $HOME/public_html/trans_time_autocommit.php This code commits on each insert. <?php
function do_insert($conn)
{
$stmt = "insert into mytable values (to_date('01-JAN-08 10:20:35',
'DD:MON:YY HH24:MI:SS'))";
$s = oci_parse($conn, $stmt);
$r = oci_execute($s); // automatically commit
}
function do_row_check($conn)
{
$stid = oci_parse($conn, "select count(*) c from mytable");
oci_execute($stid);
oci_fetch_all($stid, $res);
echo "Number of rows: ", $res['C'][0], "<br>";
}
function do_delete($conn)
{
$stmt = "delete from mytable";
$s = oci_parse($conn, $stmt);
$r = oci_execute($s);
}
// Program starts here
$c = oci_connect("phphol", "welcome", "//localhost/orcl");
$starttime = microtime(TRUE);
for ($i = 0; $i < 10000; $i++) {
do_insert($c);
}
$endtime = microtime(TRUE) - $starttime;
echo "Time was ".round($endtime,3)." seconds<br>";
do_row_check($c); // Check insert done
do_delete($c); // cleanup committed rows
?>
Load the URL http://localhost/~phphol/trans_time_autocommit.php several times and see how long it takes to insert the 10,000 rows.
The bigger row count shown in the first query is from the previous insertion in trans_autocommit.php. Note: Your time values may differ depending on the hardware resources you are using.
|
|
. |
Now review the trans_time_explicit.php script. The only difference in this script is that in the do_insert() function OCI_DEFAULT has been added so it doesn't automatically commit, and an explicit commit has been added after the insertion loop: ...
function do_insert($conn) {
$stmt = "insert into mytable values (to_date('01-JAN-08 10:20:35',
'DD:MON:YY HH24:MI:SS'))";
$s = oci_parse($conn, $stmt);
$r = oci_execute($s, OCI_DEFAULT); // Don't commit
}
...
$starttime = microtime(TRUE);
for ($i = 0; $i < 10000; $i++) {
do_insert($c);
}
oci_commit($c);
$endtime = microtime(TRUE) - $starttime;
...
Load the URL http://localhost/~phphol/trans_time_explicit.php. The insertion time is less.
In general you want all or none of your data committed. Doing your own transaction control has performance and data-integrity benefits. Note: Your time values may differ depending on the hardware resources you are using. |
Using Stored Procedures
PL/SQL is Oracle's procedural language extension to SQL. PL/SQL procedures and functions are stored in the database. Using PL/SQL lets all database applications reuse logic, no matter how the application accesses the database. Many data-related operations can be performed in PL/SQL faster than extracting the data into a program (for example, PHP) and then processing it. Oracle also supports Java stored procedures.
In this tutorial, you will create a PL/SQL stored procedure and call it in a PHP script. Perform the following steps:
|
. |
Start SQL*Plus and create a new table, ptab with the following command: sqlplus phphol/welcome create table ptab (mydata varchar(20), myid number);
|
|---|---|
|
. |
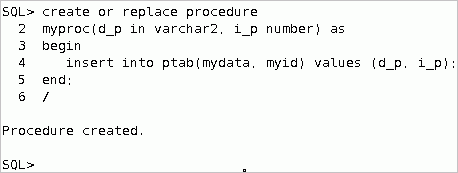
In SQL*Plus, create a stored procedure, myproc, to insert data into the ptab table, with the following commands: create or replace procedure myproc(d_p in varchar2, i_p in number) as begin insert into ptab (mydata, myid) values (d_p, i_p); end; /
|
|
. |
Review the code in $HOME/public_html/proc.php <?php
$c = oci_connect('phphol', 'welcome', '//localhost/orcl');
$s = oci_parse($c, "call myproc('mydata', 123)");
oci_execute($s);
echo "Completed";
?>
|
|
. |
From a Web browser, enter the following URL to display the output: http://localhost/~phphol/proc.php
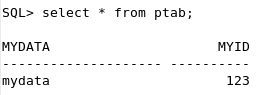
The PHP script has created a new row in the ptab table by calling the stored procedure myproc. The table ptab has a new row with the values "mydata" and 123. Switch to your SQL*Plus session and query the table to show the new row: select * from ptab;
|
|
. |
Extend proc.php to use a bind variable. Change proc.php to the following (changes are in bold): <?php
$c = oci_connect('phphol', 'welcome', '//localhost/orcl');
$s = oci_parse($c, "call myproc('mydata', :bv)");
$v = 456;
oci_bind_by_name($s, ":bv", $v);
oci_execute($s);
echo "Completed";
?>
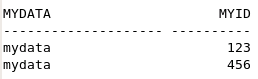
The oci_bind_by_name() function binds the PHP variable $v to ":bv" and experiment changing the value inserted by changing the value in $v. Rerun the following URL: http://localhost/~phphol/proc.php
Switch to your SQL*Plus session and query the table again to show the new row: select * from ptab;
|
|
. |
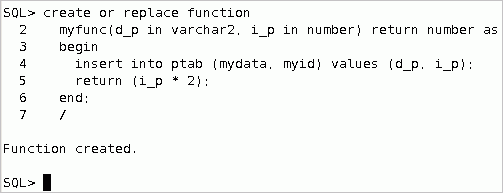
PL/SQL stored functions are also commonly used in Oracle. In SQL*Plus, create a PL/SQL stored function myfunc() to insert a row into the ptab table, and return double the inserted value: create or replace function myfunc(d_p in varchar2, i_p in number) return number as begin insert into ptab (mydata, myid) values (d_p, i_p); return (i_p * 2); end; /
|
|
. |
Review the code in $HOME/public_html/func.php <?php
$c = oci_connect('phphol', 'welcome', '//localhost/orcl');
$s = oci_parse($c, "begin :bv := myfunc('mydata', 123); end;");
oci_bind_by_name($s, ":bv", $v, 10);
oci_execute($s);
echo $v, "<br>\n";
echo "Completed";
?>
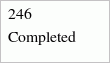
Because a value is being returned, the optional length parameter to oci_bind_by_name() is set to 10 so PHP can allocate the correct amount of memory to hold up to 10 digits Rerun the following URL: http://localhost/~phphol/func.php
|


Improve Query Performance
This section demonstrates some ways to improve query performance. Perform the following steps:
| . |
Review the SQL in $HOME/public_html/fetch_prefetch.sql set echo on This script creates a table with a large number of rows. From your sqlplus session, run the following: connect phphol/welcome @fetch_prefetch
|
|---|---|
| . |
Review the code in $HOME/public_html/fetch_prefetch.php <?php This performs the same query with different prefetch sizes. Prefetching is a form of internal row buffering. The number of rows in the buffer is the prefetch value. The larger the prefetch value, the fewer the number of physical database access are needed to return all data to PHP, because each underlying physical request to the database returns more than one row. This can help improve performance. PHP code does not need to change to handle different prefetch sizes. The buffering is handled by Oracle code. The included script helper.php contains the simple currTime() and elapsedTime() timing functions, as well as some additional setup functions used later.
|
| . |
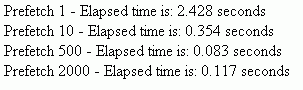
Load the following URL to display the output: http://localhost/~phphol/fetch_prefetch.php
Reload a few times to see the average times. Your time values may differ depending on your hardware resources, and so on. The default prefetch size can be set in PHP's initialization file, php.ini. Prior to PHP 5.3, the default prefetch size was 10 rows. In 5.3, it is 100 rows. You should choose a suitable default value for your application, and use oci_set_prefetch() for specific queries that need a different value. When using Oracle Database 11g Release 2 client libraries, row prefetching also benefits fetching from REF CURSORS.
|
| . |
This section shows the oci_bind_array_by_name() function that allows a PHP array to be retrieved from, or passed to, a PL/SQL procedure. Review the SQL in $HOME/public_html/fetch_bulk.sql set echo on This script creates a PL/SQL package that fetches from BIGTAB using a PL/SQL BULK COLLECT statement, and returns the results in a PL/SQL array. From your sqlplus session, run the following: sqlplus phphol/welcome @fetch_bulk
|
| . |
Review the code in $HOME/public_html/fetch_bulk.php <?php This code calls the PL/SQL package and binds a PHP variable to hold the returned data array. No OCI8 fetch call is needed.
|
| . |
Load the following URL to display the output: http://localhost/~phphol/fetch_bulk.php
Reload a few times to see the average times. Array binding is a useful technique to reduce database overhead when inserting or retrieving data. This example doesn't print the returned results. If you want to see them, add "var_dump($res);" before the function return statement. The output shows the random 20-character data strings created by fetch_prefetch.sql, which you ran earlier. |


Using LOBs: Uploading and Querying Images
Oracle Character Large Object (CLOB) and Binary Large Object (BLOB) columns (and PL/SQL variables) can contain very large amounts of data. There are various ways of creating them to optimize Oracle storage. There is also a pre-supplied package DBMS_LOB that makes manipulating them in PL/SQL easy.
To create a small application to load and display images to the database, perform the following steps.
|
. |
Before doing this section create a table to store a BLOB. In SQL*Plus logged in as phphol, execute the following commands: sqlplus phphol/welcome create table btab (blobid number, blobdata blob);
|
|---|---|
|
. |
Review the code in $HOME/public_html/blobins.php <?php This shows HTML code embedded in multiple PHP blocks.
In particular, a PHP 'if' statement encloses the HTML code.The first
time the script is loaded, the HTML upload form is shown. PHP has populated
the form action name to call the same script again.
|
|
. |
From your Web browser, enter the following URL to display the output: http://localhost/~phphol/blobins.php
It shows a Web form with Browse and Upload buttons. Click Browse.
|
|
. |
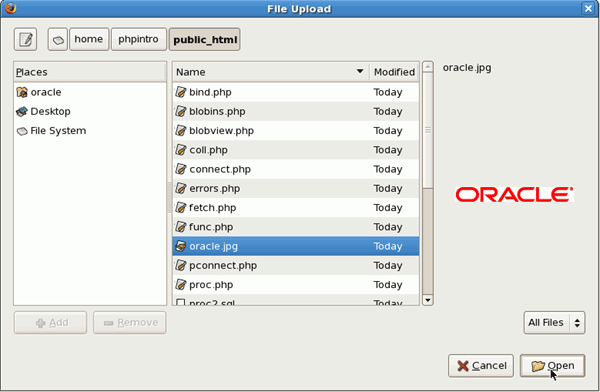
Select oracle.jpg from the /home/phphol/public_html directory and click Open.
|
|
. |
Click Upload.
The form action calls the script a second time, but now the special variable $_FILES['lob_upload'] is set and picture is uploaded. The successful echo message is displayed. The image has been uploaded to the Web server.
|
|
. |
To show the image, review the code in $HOME/public_html/blobview.php <?php
$conn = oci_connect("phphol", "welcome", "//localhost/orcl");
$query = 'SELECT BLOBDATA FROM BTAB WHERE BLOBID = :MYBLOBID';
$stmt = oci_parse ($conn, $query);
$myblobid = 1;
oci_bind_by_name($stmt, ':MYBLOBID', $myblobid);
oci_execute($stmt);
$arr = oci_fetch_array($stmt, OCI_ASSOC);
$result = $arr['BLOBDATA']->load();
header("Content-type: image/JPEG");
echo $result;
oci_close($conn);
?>
|
|
. |
From your Web browser, enter the following URL to display the output: http://localhost/~phphol/blobview.php
Make sure there is no whitespace before <?php and no echo statements in the script, because otherwise the wrong HTTP header will be sent and the browser won't display the image properly. If you have problems, comment out the header() function call and see what is displayed. |


Setting Trace Information
OCI8 has several functions that send meta data to the database when statements are executed. These are shown in many Oracle tools and are useful for application monitoring and tracing.
| . |
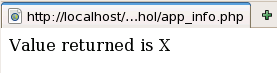
To show two of the functions, review the code in $HOME/public_html/app_info.php
<?php

$c = oci_pconnect('phphol', 'welcome', 'localhost/orcl');
oci_set_module_name($c, 'Home Page');
oci_set_action($c, 'Friend Lookup');

$s = oci_parse($c, "select * from dual");
oci_execute($s);

$r = oci_fetch_array($s);
echo "Value returned is ", $r[0];

?>
|
|---|---|
| . |
From your Web browser, enter the following URL to display the basic output: http://localhost/~phphol/app_info.php
|
| . |
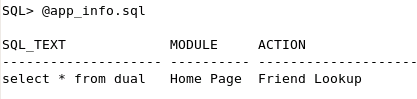
Review the SQL in $HOME/public_html/app_info.sql col sql_text format a20 col module format a10 col action format a20 select sql_text, module, action from v$sqlarea where module = 'Home Page'; exit This script shows SQL statements previously executed in the database by the Home Page module.
|
| . |
Open a terminal window and enter the following commands to run the SQL script. sqlplus phphol/welcome @app_info.sql
The SQL*Plus script shows the meta data is saved with the statement. The meta data can be used for tracing or identifying the location in a PHP application of a misbehaving SQL statement. Note only the application information from the first execution of a statement is stored in V$SQLAREA. |
Incorporating AJAX into Your Page
This section shows the basic technique of updating a section of a page without reloading the whole content. Perform the following tasks:
You can use a XmlHttpRequest to update a section of a page without reloading the whole page content. Perform the following steps:
|
. |
Review the code in $HOME/public_html/ajax_id.php This file simply echoes the parameter passed in. <?php
|
|---|---|
|
. |
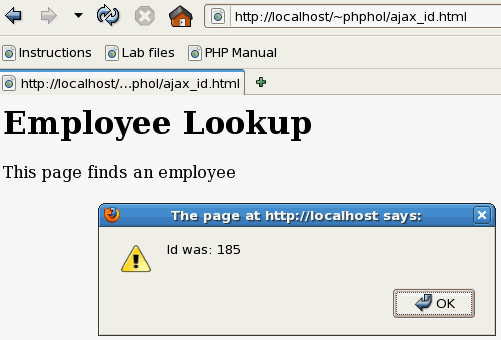
From your browser, enter the following URL to display the output: http://localhost/~phphol/ajax_id.php?id=185
|
|
. |
Review the code in $HOME/public_html/ajax_id.html This file contains a JavaScript function, makeRequest(). <html>
|
|
. |
From your browser, enter the following URL to display the output: http://localhost/~phphol/ajax_id.html
Click OK to dismiss the alert window. Note: if you use Internet Explorer, you will need to edit ajax_id.html and change the XMLHttpRequest() call to ActiveXObject("Msxml2.XMLHTTP") or ActiveXObject("Microsoft.XMLHTTP"). When the HTML page is loaded, the makeRequest() javascript function is called. It prepares an XMLHttpRequest request to call ajax_id.php. A callback function onreadystatechange is set. Finally the request is sent to the webserver asynchronously. When the callback function is notified that the web
server request has returned, the output from ajax_id.php
is displayed by the alert()
function. In web application, the Java script could be invoked by various
|
|
. |
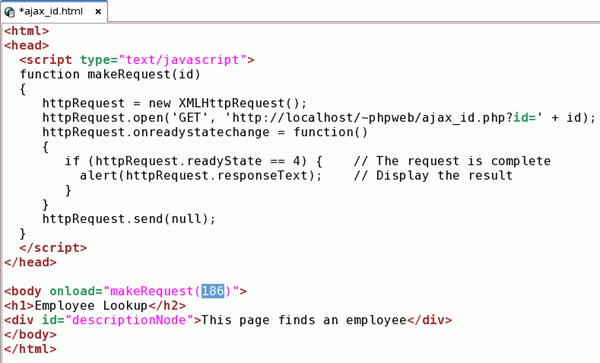
Edit ajax_id.html and change 185 to 186.
|
|
. |
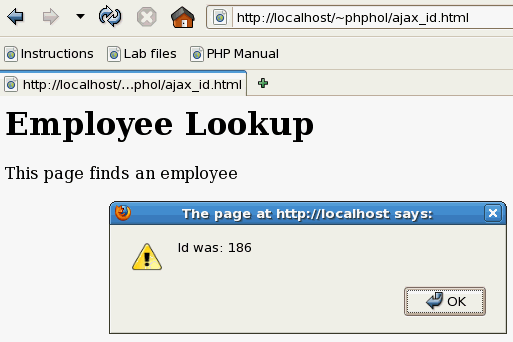
Reload it in the browser. The new value is displayed. Click OK to dismiss the alert window.
Note: You may also need to flush the browser cache to see the changed value. |

Summary
In this tutorial, you have learned how to:
- Create a Zend Framework application
- Create a connection
- Use Database Resident Connection Pooling
- Fetch data
- Use bind variables
- Use transactions
- Call PL/SQL
- Improve query performance
- Use LOBs to upload and query images
- Incorporate AJAX into your page
- Use a PHP framework database component
Appendix: PHP Primer
PHP is a dynamically typed scripting language. It is most often seen in Web applications but can be used to run command-line scripts. Basic PHP syntax is simple to learn. It has familiar loops, tests, and assignment constructs. Lines are terminated with a semi-colon.
Strings can be enclosed in single or double quotes:
'A string constant'
"another constant"
Variable names are prefixed with a dollar sign. Things that look like variables inside a double-quoted string will be expanded:
"A value appears here: $v1"
Strings and variables can also be concatenated using a period.
'Employee ' . $ename . ' is in department ' . $dept
Variables do not need types declared:
$count = 1;
$ename = 'Arnie';
Arrays can have numeric or associative indexes:
$a1[1] = 3.1415;
$a2['PI'] = 3.1415;
Strings and variables can be displayed with an echo or print statement. Formatted output with printf() is also possible.
echo 'Hello, World!';
echo $v, $x;
print 'Hello, World!';
printf("There is %d %s", $v1, $v2);
The var_dump() function is useful for debugging.
var_dump($a2);
Given the value of $a2 assigned above, this would output:
array(1) {
  ["PI"]=>
  float(3.1415)
}
Code flow can be controlled with tests and loops. PHP also has a switch statement. The if/elseif/else statements look like:
if ($sal > 900000) {
  echo 'Salary is way too big';
}
elseif ($sal > 500000) {
  echo 'Salary is huge';
}
  else {
  echo 'Salary might be OK';
}
This also shows how blocks of code are enclosed in braces.
A traditional loop is:
for ($i = 0; $i < 10; $i++) {
  echo $i;
}
This prints the numbers 0 to 9. The value of $i is incremented in each iteration. The loop stops when the test condition evaluates to false. You can also loop with while or do while constructs.
The foreach command is useful to iterate over arrays:
$a3 = array('Aa', 'Bb', 'Cc');
foreach ($a3 as $v) {
  echo $v;
}
This sets $v to each element of the array in turn.
A function may be defined:
function myfunc($p1, $p2) {
  echo $p1, $p2;
  return $p1 + $p2;
}
Functions may have variable numbers of arguments, and may or may not return values. This function could be called using:
$v3 = myfunc(1, 3);
Function calls may appear earlier than the function definition.
Sub-files can be included in PHP scripts with an include() or require() statement.
include("foo.php");
require("bar.php");
A require() will generate a fatal error if the script is not found.
Comments are either single line:
// a short comment
or multi-line:
/*
  A longer comment
*/
PHP scripts are enclosed in <?php and ?> tags.
<?php
  echo 'Hello, World!';
?>
When a Web server is configured to run PHP files through the PHP interpreter, loading the script in a browser will cause the PHP code to be executed and all output to be streamed to the browser.
Blocks of PHP code and HTML code may be interleaved. The PHP code can also explicitly print HTML tags.
<?php
  require('foo.php');
  echo '<h3>';
  echo 'Full Results';
  echo '</h3>';
  $output = bar(123);
?>
<table border="1">
  <tr>
    <td>
     <?php echo $output ?>
    </td>
  </tr>
</table>
Many aspects of PHP are controlled by settings in the
php.ini configuration file. The location of the file is system specific.
Its
location, the list of extensions loaded, and the value of all the initialization
settings can be found using the phpinfo() function:
<?php
  phpinfo();
?>
Values can be changed by editing phpl.ini and restarting the Web server. Some values can also be changed within scripts by using the ini_set() function.
A list of the various oci functions include the following:
| oci_bind_array_by_name |
Binds PHP array to Oracle PL/SQL array by name |
| oci_bind_by_name |
Binds the PHP variable to the Oracle placeholder |
| oci_cancel |
Cancels reading from cursor |
| oci_close |
Closes Oracle connection |
| oci_commit |
Commits outstanding statements |
| oci_connect |
Establishes a connection to the Oracle server |
| oci_define_by_name |
Uses a PHP variable for the define-step during a SELECT |
| oci_error |
Returns the last error found |
| oci_execute |
Executes a statement |
| oci_fetch_all |
Fetches all rows of result data into an array |
| oci_fetch_array |
Returns the next row from the result data as an associative or numeric array, or both |
| oci_fetch_assoc |
Returns the next row from the result data as an associative array |
| oci_fetch_object |
Returns the next row from the result data as an object |
| oci_fetch_row |
Returns the next row from the result data as a numeric array |
| oci_fetch |
Fetches the next row into result-buffer |
| oci_field_is_null |
Checks if the field is NULL |
| oci_field_name |
Returns the name of a field from the statement |
| oci_field_precision |
Tell the precision of a field |
| oci_field_scale |
Tell the scale of the field |
| oci_field_size |
Returns the size of the field |
| oci_field_type_raw |
Tell the raw Oracle data type of the field |
| oci_field_type |
Returns data type of the field |
| oci_free_statement |
Frees all resources associated with statement or cursor |
| oci_internal_debug |
Enables or disables internal debug output |
| oci_new_collection |
Allocates new collection object |
| oci_new_connect |
Establishes a new connection to the Oracle server |
| oci_new_cursor |
Allocates and returns a new cursor (statement handle) |
| oci_new_descriptor |
Initializes a new empty LOB or FILE descriptor |
| oci_num_fields |
Returns the number of result columns in a statement |
| oci_num_rows |
Returns number of rows affected during statement execution |
| oci_parse |
Prepares Oracle statement for execution |
| oci_password_change |
Changes password of Oracle's user |
| oci_pconnect |
Connect to an Oracle database using a persistent connection |
| oci_result |
Returns a field's value from a fetched row |
| oci_rollback |
Rolls back outstanding transaction |
| oci_server_version |
Returns server version |
| oci_set_prefetch |
Sets number of rows to be prefetched |
| oci_statement_type |
Returns the type of an OCI statement |
![]()

|
About
Oracle |Oracle and Sun | |