Oracle WebCenter Sites 11g: Customizing the Dashboard
Overview
Purpose
This tutorial shows you how to customize the dashboard area of the Oracle WebCenter Sites 11g Contributor interface.
Time to Complete
Approximately 60 minutes
Introduction
 Oracle WebCenter
is an integrated platform that enables social businesses to
improve customer loyalty with targeted websites. The websites
offer their customers seamless access to the right information
in context.
Oracle WebCenter
is an integrated platform that enables social businesses to
improve customer loyalty with targeted websites. The websites
offer their customers seamless access to the right information
in context.
One of the major pillars of Oracle WebCenter is Oracle WebCenter Sites. The Oracle WebCenter Sites 11g Web Experience Management (WEM) platform enables marketers and business users to easily create and manage contextually relevant social and interactive online experiences across multiple channels on a global scale to drive sales and loyalty.
- Add a Daily Tips widget to the Contributor interface dashboard
- Add a Recently Modified Assets widget to the Contributor interface dashboard
- Oracle WebCenter Sites 11g JumpStart Kit or full installation with sample sites installed and running
- WebCenter Sites Developer Tools plug-in installed, configured, and running or WebCenter Sites Explorer (included with WebCenter Sites)
- The Developer's Guide for Customizing the Contributor Interface downloaded from the Oracle Technology Network (OTN)
- Sample elements provided with the developer's guide
- Mozilla Firefox or Internet Explorer web browser
- Attended the Oracle WebCenter Sites 11g for Developer training course offered by Oracle University
- Working knowledge of the Oracle WebCenter Sites 11g Contributor interface
- Experience with Java, JavaScript, and HTML
- Solid familiarity with the WebCenter Sites Developer Tools plug-in
- Thoroughly reviewed the Developer's Guide for Customizing the Contributor Interface (specifically chapters 1 and 2)
This tutorial shows you how to customize the dashboard area of the Contributor interface.
Scenario
In this tutorial, you perform the following:
Hardware and Software Requirements
Prerequisites
To successfully complete this tutorial, you must have:
User Interface Framework
- Configuration phase
- Action phase
- Presentation phase
- Asset type-specific paths for a single site:
CustomElements/<SiteName>/<AssetType>/<controllerElementName>Config - Asset type-specific paths for all sites:
CustomElements/<AssetType>/<controllerElementName>Config - Site-specific paths:
CustomElements/<SiteName>/<controllerElementName>Config - Global paths:
CustomElements/<controllerElementName>Config
In this section, you learn about the user interface (UI) framework and process flow of the UI Controller.
The Contributor interface framework sits on top of the Service layer and handles client requests. The UI Framework consists of the Presentation layer and the UI Controller.

The Presentation Layer consists of elements that render views and elements that generate a response. After it receives requests from the Contributor interface, the UI Controller processes the requests in three phases:
The UI Controller checks for custom elements at each phase.
Each phase is conditional. If the UI Controller finds that a
custom element does not exist for that phase, it moves on to the
next phase. It looks for custom elements by traversing all paths
under CustomElements in the ElementCatalog
table in the following order. (The list shows sample
paths for a custom configuration phase element.)
- Configuration phase elements:
<controllerElementName>Config - Action phase elements:
<controllerElementName>Action - Presentation phase elements:
<controllerElementName>Html
You create custom elements under CustomElements
in the ElementCatalog. Here are the element
naming conventions:
The following diagram shows the UI Controller process flow:

It is best practice to store custom elements and system default
elements separately. If you directly override system defaults,
the customizations are overridden when you upgrade your system
to a newer version of WebCenter Sites. Here is an example data
structure view for CustomElements from WebCenter
Sites Explorer:

Customizing the Dashboard
- Change the number of columns
- Adjust the column width
- Change the widget's display name, height, and position on the dashboard
- Add widgets
- To customize the dashboard for all content management sites,
place your custom element under
CustomElementsUI>Layout>CenterPane.
- To customize the dashboard for a specific site, place your
element under
CustomElements> <site_name> >UI>Layout>CenterPane.
This section covers the types of customizations that you can perform on the Contributor interface dashboard.
When you first log on to the Contributor interface, the dashboard displays four default widgets in two columns: Bookmarks, SmartLists, Assignments, and Checkouts. You can customize the following portions of the dashboard and its widgets:

You customize the dashboard in the ElementCatalog.
The following is a sample
DashBoardContentsConfigelement:

Customizable properties of a widget are listed in the following table:
| Property Name | Description | Value |
name |
Displays the name of the widget |
Arbitrary string value |
height |
Adjusts the height of the widget |
Pixels, for example, 350px |
dragRestriction |
Restricts dragging and
repositioning of the widget |
true | false |
column |
Determines the column in which the widget is displayed |
1 to n,
where n is the
value specified in <numberofcolumns> |
closeable |
Determines whether the widget can be closed |
true | false |
open |
Designates that the widget is open by default |
true | false |
Adding a Daily Tips Widget to the Dashboard
- Creating a custom Daily Tips widget element
- Editing the custom
DashboardContentsConfigelement - Registering your Daily Tips widget
- Host name or address:
localhost - Username:
fwadmin - Password:
xceladmin - Port:
8080 - Select application server URL path:
CS
                              servlet (/cs/CatalogManager)
In this section, you create a new Daily Tips widget and add it to the dashboard. The Daily Tips widget is a simple, presentation-only, customization. The following tasks are demonstrated:
Creating a Custom Daily Tips Widget Element
Launch WebCenter Sites Explorer and complete the following steps to log in:
a. Select File > Open Oracle WebCenter Sites.
b. In the Oracle WebCenter Sites Login dialog box, enter or select the following login credentials and click OK:

Navigate to ElementCatalog > CustomElements > avisports > UI > Layout > CenterPane and right-click CenterPane.

Select New > Folder.

Enter DashBoard for the name of the
folder.

In the right panel, right-click under elementname
and select New.
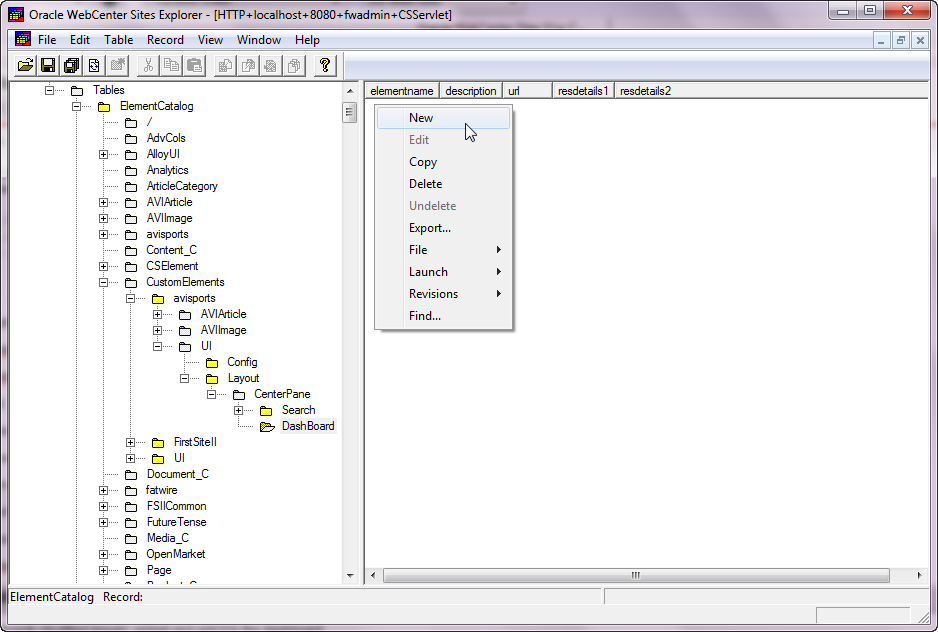
Enter DailyTipsHtml for the name of the
element.

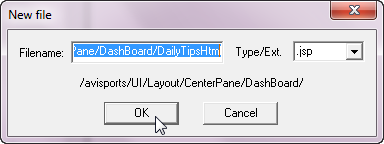
With DailyTipsHtml selected, click
under the url column and then click the
button that appears.

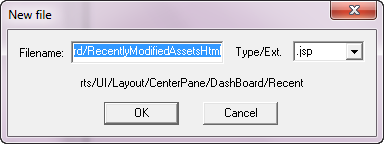
In the "New file" dialog box, ensure that the Type/Ext. field is set to .jsp then click OK.
In the element window, enter the following code after
"<!-- user code here -->".
<div
                            data-dojo-type="dijit.layout.BorderContainer"
                            data-dojo-props="'class':'fwPortletContainer'">
    <span
                            data-dojo-type="dijit.layout.ContentPane"
                            data-dojo-props="region:'top','class':'portletTitleButtons'">
</span>
    <div>Be sure to
                            add assets you frequent to your Bookmarks list. This
                            will help you work more efficiently in the
                            system.</div>
</div>

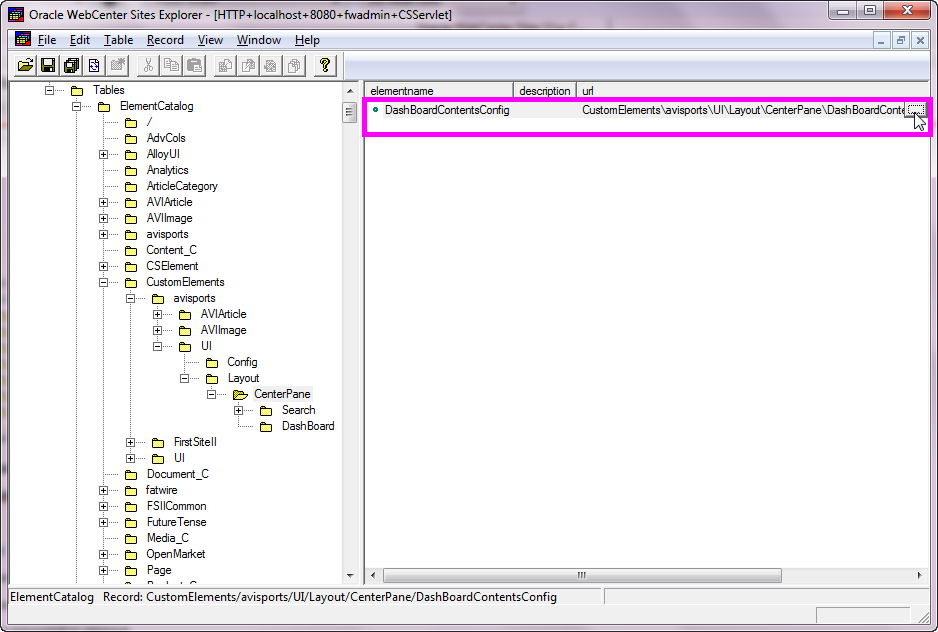
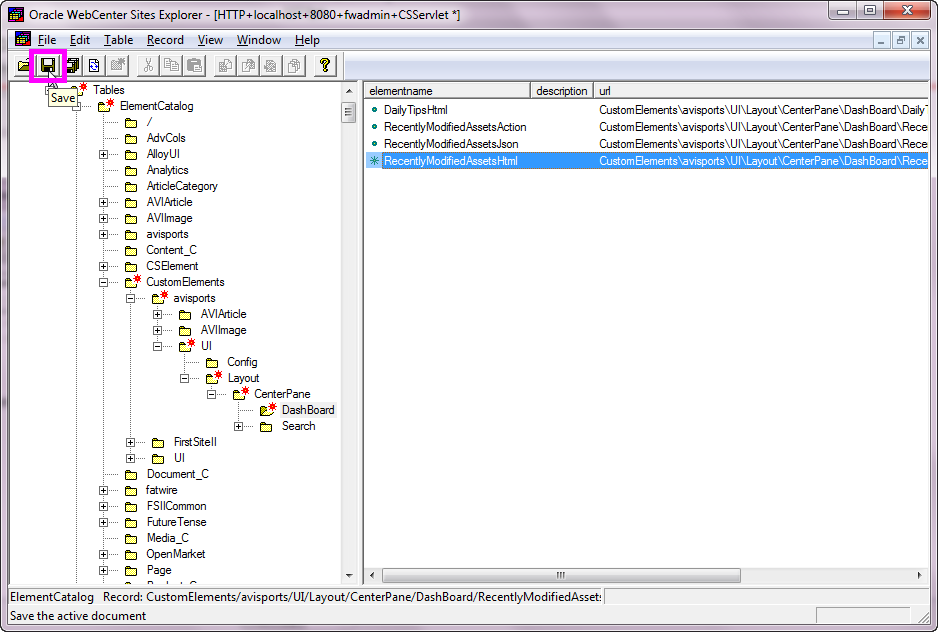
Click Save.

Close the element.

Click Save to commit the changes to the database.

Editing the Custom
DashboardContentsConfig Element
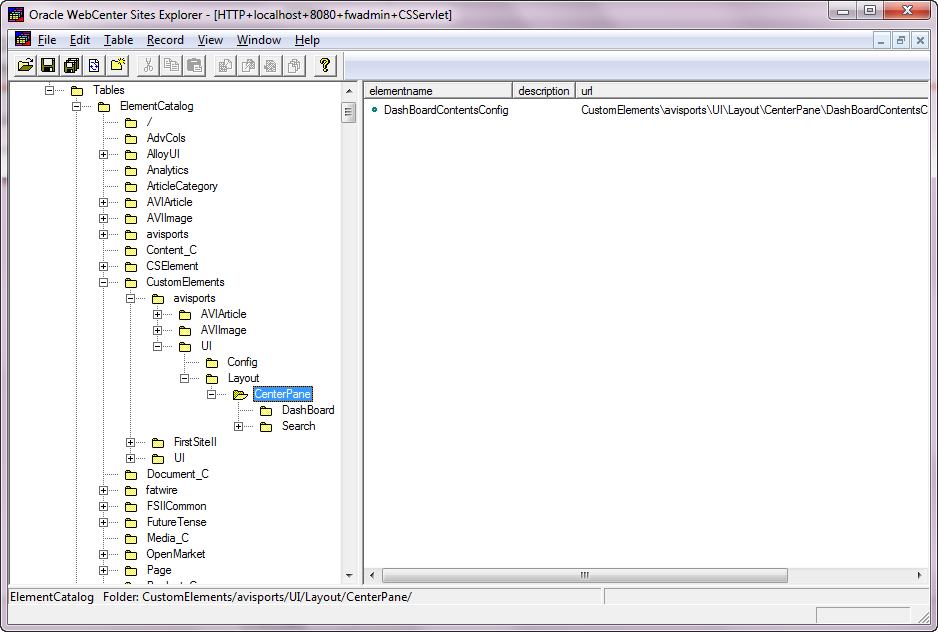
In the left panel, click CenterPane to display its contents in the right panel.

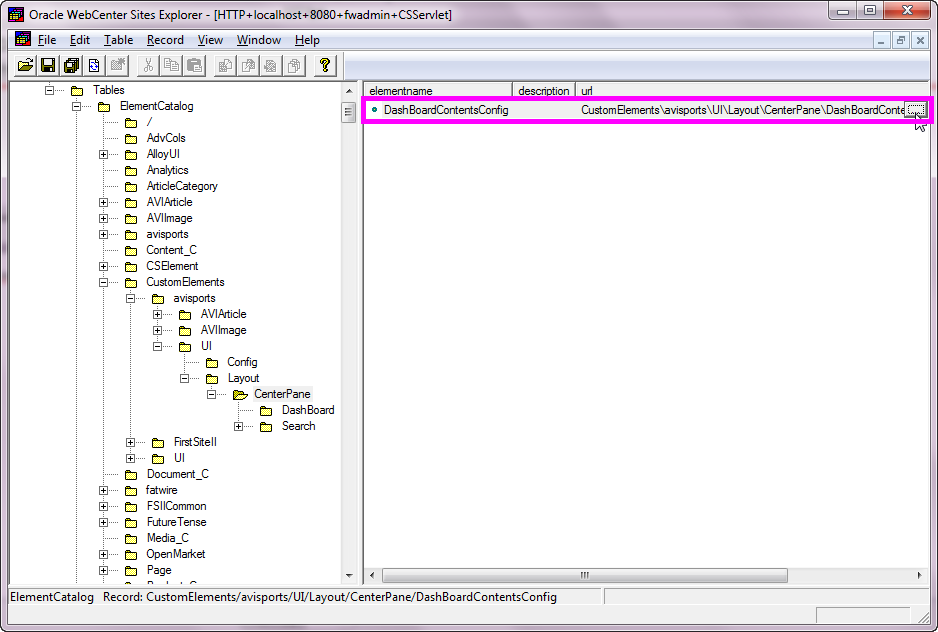
For DashBoardContentsConfig, click
under the url column and then
click the button that appears.
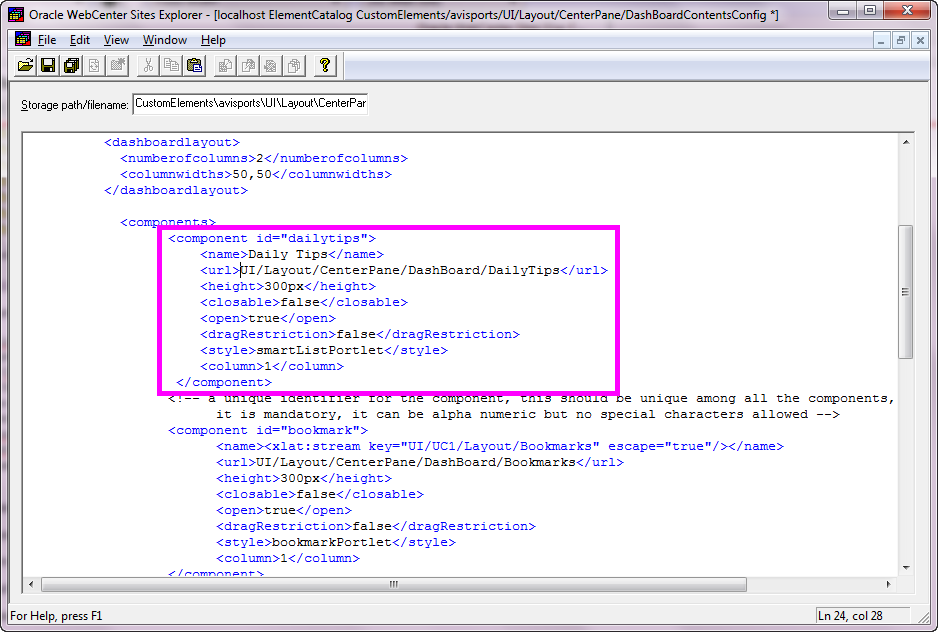
In the element window, add the following code under <components>
to register your Daily Tips widget:
<component id="dailytips">
<name>Daily
                            Tips</name>
<url>UI/Layout/CenterPane/DashBoard/DailyTips</url>
<height>300px</height>
<closable>false</closable>
<open>true</open>
<dragRestriction>false</dragRestriction>
<style>smartListPortlet</style>
<column>1</column>
</component>
Click Save.
Close the element.

Click Save to commit the changes to the database.

Registering Your Daily Tips Widget
Perform the following steps to modify your Daily Tips widget:
a. Navigate to the <applicationServer_install_directory>/webapps/<cs_context>/WEB-INF/classes/ReqAuthConfig.xml
file.
b. Open the file in a text editor.
c. Add the following path under excludedControllerElements:
<value>UI/Layout/CenterPane/DashBoard/DailyTips</value>
d. Save your changes.

In your web browser, log in to the Contributor
interface as fwadmin with password xceladmin.

For Site, select avisports and then click the Contributor button.

Confirm that the Daily Tips widget is displayed in the dashboard view of the Contributor interface.

Adding a Recently Modified Assets Widget to the Dashboard
- Creating the custom
Actionelement - Creating the custom
Jsonelement - Creating the custom
Htmlelement - Editing the custom
DashBoardContentsConfigelement - Registering your custom widget
In this section, you create a Recently Modified Assets widget that shows assets which were modified in the past week. The custom Recently Modified Assets widget contains both action and presentation elements. The following tasks are demonstrated:
Creating the Custom Action
Element
In WebCenter Sites Explorer, navigate to ElementCatalog > CustomElements > avisports > UI > Layout > CenterPane > DashBoard and click DashBoard.

Right-click under elementname and
select New.

Enter RecentlyModifiedAssetsAction for
elementname.
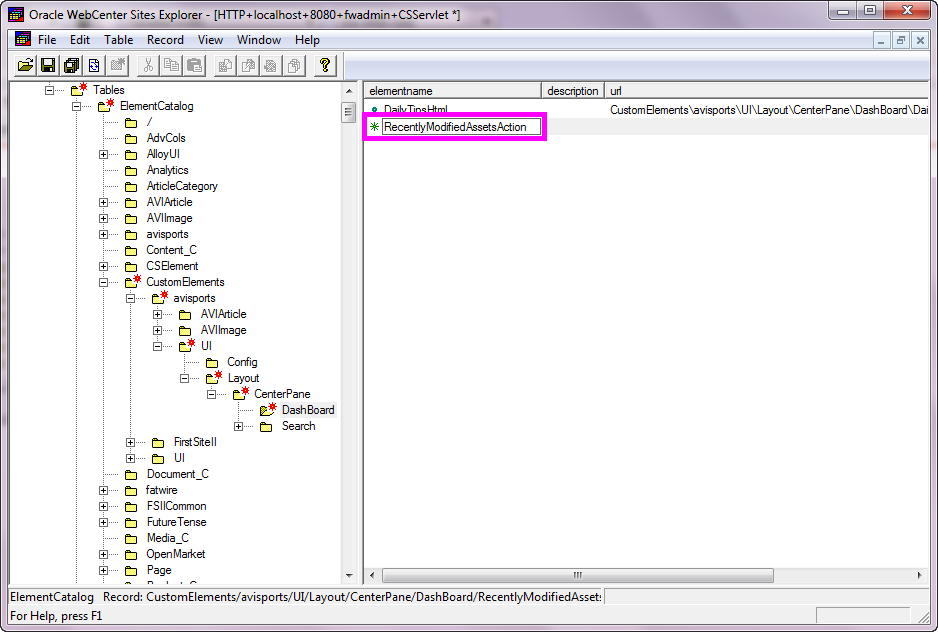
For RecentlyModifiedAssetsAction, click
under the url column and then click the
button that appears.

In the "New file" dialog box, ensure that the Type/Ext. field is set to .jsp, then click OK.
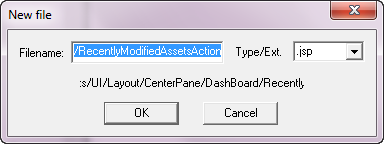
Replace all of the existing code with the following:
<%@page
                            import="com.fatwire.ui.util.GenericUtil"
%><%@page
                            import="org.codehaus.jackson.map.ObjectMapper"
%><%@page
                            import="com.fatwire.cs.ui.framework.UIException"
%><%@page import="java.util.*"
%><%@taglib prefix="cs"
                            uri="futuretense_cs/ftcs1_0.tld"
%><%@page
                            import="com.fatwire.services.beans.search.SearchCriteria"
%><%@page
                            import="com.fatwire.services.SearchService"
%><%@page
                            import="com.fatwire.services.ServicesManager"
%><%@page
                            import="com.fatwire.system.SessionFactory"
%><%@page
                            import="com.fatwire.system.Session"
%><%@page
                            import="com.fatwire.cs.core.search.data.ResultRow"
%><%@page
                            import="com.fatwire.cs.core.search.data.IndexData"
%><%@page
                            import="com.fatwire.assetapi.data.AssetId"
%><%@page
                            import="com.openmarket.xcelerate.asset.AssetIdImpl"
%><cs:ftcs>
<%
try {
    // This element uses
                            the search service to look for the assets modified
                            in past week for the logged in site.
    // build search
                            criteria
    SearchCriteria
                            searchCriteria = new
                            SearchCriteria();
searchCriteria.setSiteId(GenericUtil.getLoggedInSite(ics));
searchCriteria.setModifiedDateOption(SearchCriteria.DateOption.PASTWEEK);
    //call search service
                            to get assets modified by logged in user since last
                            week
    Session ses =
                            SessionFactory.getSession();
    ServicesManager
                            servicesManager
                            =(ServicesManager)ses.getManager(ServicesManager.class.getName());
    SearchService
                            searchService =
                            servicesManager.getSearchService();
    List<ResultRow>
                            searchResults = searchService.search(searchCriteria,
                            -1, null);
    // build the asset
                            list, its a list of map
    List<Map>
                            assets = new
                            ArrayList<Map>();
    for (ResultRow r :
                            searchResults)
{
        Map
                            asset = new HashMap();
                            //this map will have, id, name, type and asset
                            fields.
String id = r.getIndexData("id").getData();
String type = r.getIndexData("AssetType").getData();
                            AssetId assetId = new AssetIdImpl(type,
                            Long.parseLong(id));
asset.put("id", assetId.toString());
asset.put("asset", assetId);
                            asset.put("name",
                            r.getIndexData("name").getData());
                            asset.put("type",
                            r.getIndexData("AssetType").getData());
assets.add(asset);
}
request.setAttribute("assets", assets);
} catch(Exception e) {
e.printStackTrace();
    UIException uie = new
                            UIException(e);
                            request.setAttribute(UIException._UI_EXCEPTION_,
                            uie);
throw uie;
}%>
</cs:ftcs>
Click Save.

Close the element.

Click Save to commit the changes to the database.

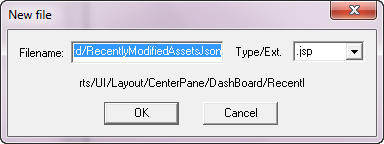
Creating the Custom Json
Element
Right-click under elementname and
select New.

Enter RecentlyModifiedAssetsJson
for elementname.

For RecentlyModifiedAssetsJson, click
under the url column and then click the
button that appears.

In the "New file" dialog box, ensure that the Type/Ext. field is set to .jsp, then click OK.
Replace all of the existing code with the following:
<%@page
                            import="com.fatwire.ui.util.GenericUtil"
%><%@page
                            import="org.codehaus.jackson.map.ObjectMapper"
%><%@page
                            import="com.fatwire.cs.ui.framework.UIException"
%><%@page
                            import="com.fatwire.services.ui.beans.UIAssetBean"
%><%@page import="java.util.*"
%><%@ taglib prefix="cs"
                            uri="futuretense_cs/ftcs1_0.tld"
%>
<cs:ftcs>
<%
try {
    // The list of assets
                            gets converted into json string using Jackson API.
    List<Map> result
                            = (List<Map>)request.getAttribute("assets");
    // the json string in
                            this case is similar to
                            //[{"id":"AVIArticle:1328196047443","asset":{"id":1328196047443,"type":"AVIArticle"},"name":"U.S.
                            Olympic Skiers Prep for
                            Games","type":"AVIArticle"},...]
    String json = new
                            ObjectMapper().writeValueAsString(result);
%>
    {"identifier":
                            "id","items":<%=json%>}
<%
} catch(Exception e) {
    UIException uie = new
                            UIException(e);
                            request.setAttribute(UIException._UI_EXCEPTION_,
                            uie);
throw uie;
}%>
</cs:ftcs>
Click Save.

Close the element.

Click Save to commit the changes to the database.

Creating the Custom Html
Element
Right-click under elementname and
select New.

Enter RecentlyModifiedAssetsHtml for elementname.
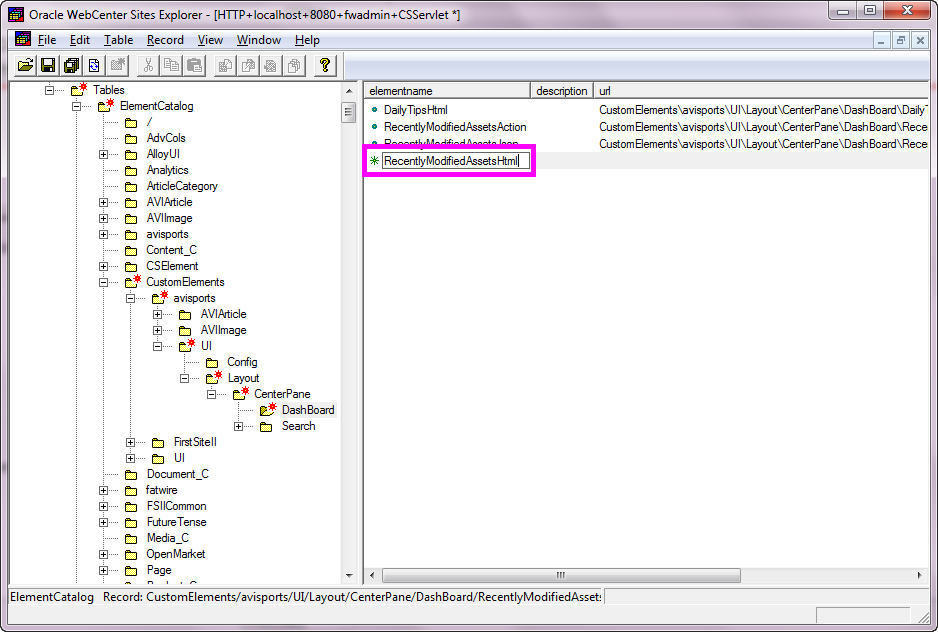
For RecentlyModifiedAssetHtml, click
under the url column and then click the
button that appears.

In the "New file" dialog box, ensure that the Type/Ext. field is set to .jsp, then click OK.
Replace all of the existing code with the following:
<%@page
                            import="com.fatwire.cs.ui.framework.UIException"
%><%@page
                            import="com.fatwire.ui.util.GenericUtil"
%><%@ taglib prefix="cs"
                            uri="futuretense_cs/ftcs1_0.tld"
%><%@ taglib prefix="controller"
                            uri="futuretense_cs/controller.tld"
%><%@ taglib prefix="xlat"
                            uri="futuretense_cs/xlat.tld"
%><%@ page
                            import="org.apache.commons.lang.StringEscapeUtils"
%><cs:ftcs><%
try {
    // change the url
                            passed to buildControllerURL() as per the location
                            of RecentlyModifiedAssetsAction
    String storeUrl =
                            GenericUtil.buildControllerURL("UI/Layout/CenterPane/DashBoard/RecentlyModifiedAssets",
                            GenericUtil.JSON);
%>
<script>
dojo.unsubscribe(myContextMenuSubscription);
    // listening to
                            bookmarkcontext menu right click event
    var
                            myContextMenuSubscription =
                            dojo.subscribe("fw/ui/dashboard/mycontextmenu",
                            "myContextMenu");
    function
                            myContextMenu(args){
//Summary
                            //        this
                            function publishes dojo topic '/fw/ui/app/oncontext'
                            with specified function id and asset data.
        //
                            args
                            //        {label:
                            'label', functionid: 'functionId'}
        var
                            assetData = getSelectedAsset();
        //
                            publish the generic 'oncontext' event
                            dojo.publish('/fw/ui/app/oncontext', [{functionid:
                            args.functionid, asset:assetData}]);
}
    function
                            getSelectedAsset(){
//Summary
                            //        This method
                            returns the selected asset from the grid
//returns
                            //
                            asset{type:assetType, id:assetId, name:assetName}
        var
                            grid = dijit.byId("myGridId");
        var
                            asset, store, item;
if(grid){
                                // get the selected items, we are
                            interested in first item
                                items =
                            grid.selection.getSelected();
                                if(items && items.length
                            == 1){
                                    store =
                            grid.store;
                                    item =
                            items[0];
                                    if(item
                            && store) {
// get the selected asset
asset = {
                                    "type":
                            store.getValue(item, 'type'),
                                    "id":
                            store.getValue(item, 'id'),
                                    "name":
                            store.getValue(item, 'name')
};
}
}
else{
                            fw.ui.app.displayMessage("No assets selected.",
                            "warn");
return;
}
}
return asset;
}
    function
                            refreshRecentAssets(){
//summary
                            //        This method
                            fetches the assets and builds grid's store and
                            refreshes the grid.
        var
                            grid = dijit.byId("myGridId");
if(grid){
                                store = new
                            dojo.data.ItemFileReadStore({
                                    url:
                            '<%=storeUrl%>'
});
                                // reset the store for the grid
                            and refresh
if (grid.store) {
grid.store.close();
}
grid.setStore(store);
                                //startup grid after the store
                            set.
grid.startup();
grid._refresh();
grid.selection.deselectAll();
}
}
</script>
<%-- build the context menu --%>
<controller:callelement
                            elementname="UI/Layout/CenterPane/Search/View/ContextMenu">
                            <controller:argument name="menuId"
                            value="myMenuId" />
                            <controller:argument name="configName"
                            value="UI/Layout/CenterPane/DashBoard/ContextMenuConfig"/>
                            <controller:argument name="topic"
                            value="fw/ui/dashboard/mycontextmenu" />
</controller:callelement>
<div
                            data-dojo-type="dijit.layout.BorderContainer"
                            data-dojo-props="'class':'fwPortletContainer'">
    <span
                            data-dojo-type="dijit.layout.ContentPane"
                            data-dojo-props="region:'top','class':'portletTitleButtons'">
<span
data-dojo-type="dijit.form.Button"
data-dojo-props="
                                    onClick:
                            function() {
refreshRecentAssets();
}
">
                                <img
                            src="wemresources/http://www.oracle.com/webfolder/technetwork/tutorials/obe/fmw/web_center/webCenter_sites_11g/customizedashboard/images/ui/ui/dashboard/refreshIcon.png"
                            height="26" width="26" alt="" title=""/>
</span>
</span>
    <div
                            data-dojo-type="dijit.layout.ContentPane"
                            data-dojo-props="region:'center','class':'fwGridContainer'">
                                <!-- Build Grid
                            -->
                            <controller:callelement
                            elementname="UI/Layout/Utils/Grid">
                                <controller:argument
                            name="configName"
                            value="UI/Layout/Utils/GridConfig"/>
                                <controller:argument
                            name="storeURL" value="<%=storeUrl%>" />
                                <controller:argument
                            name="storeId" value="myStoreId"/>
                                <controller:argument
                            name="storeType" value="dojo.data.ItemFileReadStore"
                            />
                                <controller:argument
                            name="gridId" value="myGridId" />
                                <controller:argument
                            name="contextMenuId" value="myMenuId"/>
                                <!-- possible values of
                            selection mode are 'none', 'single', 'multiple' and
                            'extended' -->
                                <controller:argument
                            name="selectionMode" value="single"/>
</controller:callelement>
<div class="buttonContainer">
<div
data-dojo-type="fw.ui.dijit.Button"
data-dojo-props="
label:'Refresh',
onClick: function() {
refreshRecentAssets();
}
">
</div>
</div>
</div>
</div>
<%
} catch(Exception e) {
    UIException uie = new
                            UIException(e);
                            request.setAttribute(UIException._UI_EXCEPTION_,
                            uie);
throw uie;
}%>
</cs:ftcs>
Click Save.

Close the element.

Click Save to commit the changes to the database.
Editing the Custom DashBoardContentsConfig
Element
In the left panel, navigate to ElementCatalog > CustomElements > avisports > UI > Layout > CenterPane and click CenterPane.
For DashBoardContentsConfig, click
under the url column and then click the
button that appears.
Add the following snippet under <components>:
<component id="recentassets">
    <name>Recently
                            Modified Assets</name>
<url>UI/Layout/CenterPane/DashBoard/RecentlyModifiedAssets</url>
<height>300px</height>
<closable>false</closable>
<open>true</open>
<dragRestriction>false</dragRestriction>
<style>checkoutPortlet</style>
<column>2</column>
</component>
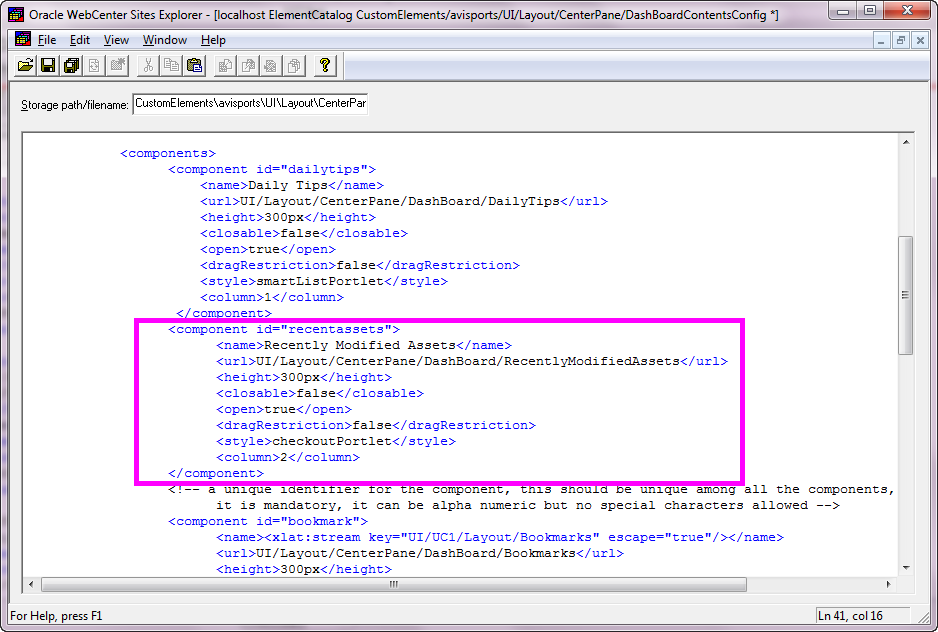
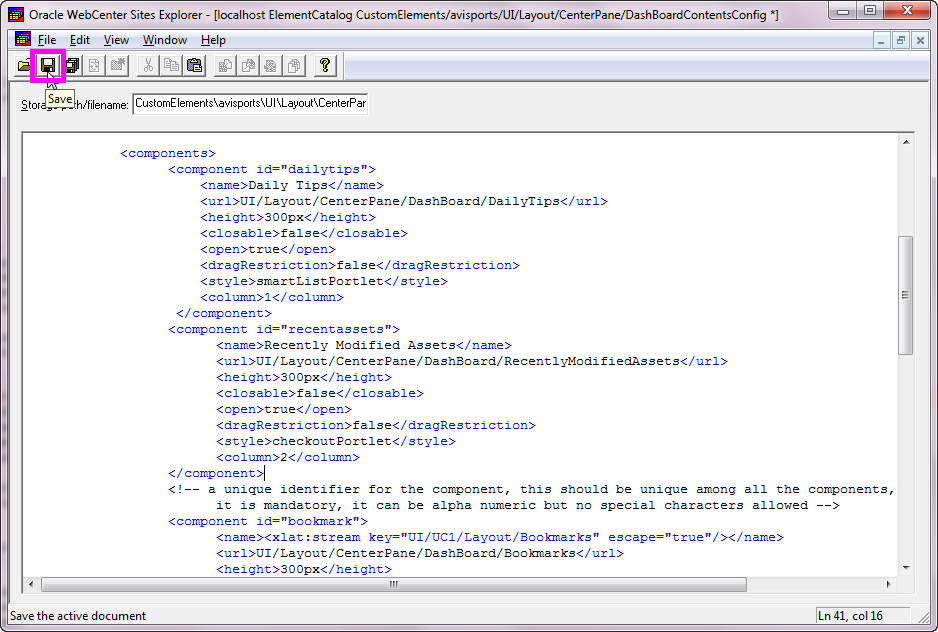
Click Save.
Close the element.

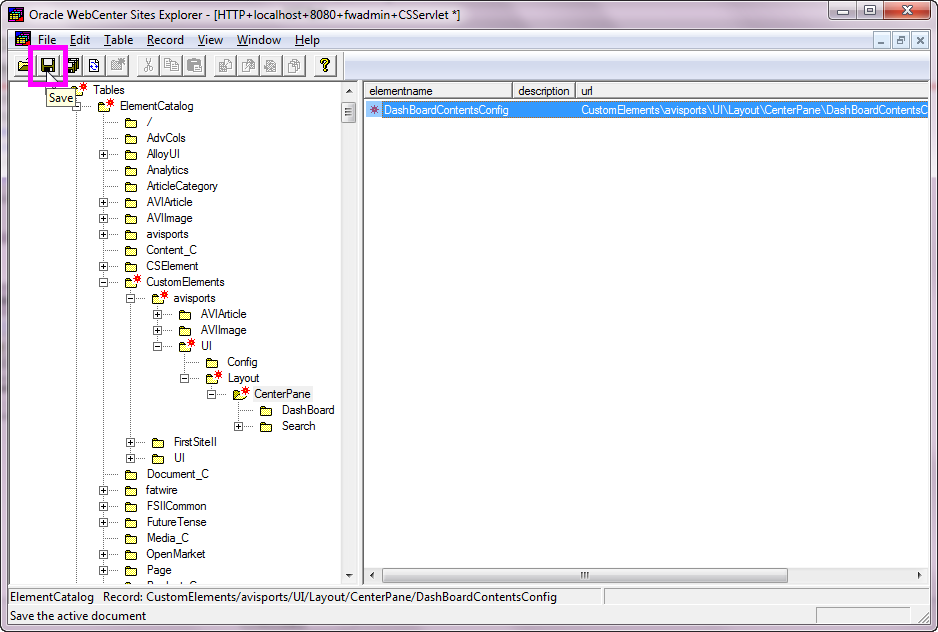
Click Save to commit the changes to the database.
Registering Your Custom Widget
Perform the following steps to modify your custom widget:
a. Navigate to the <applicationserver_install_directory>/webapps/<cs_context>/WEB-INF/classes/ReqAuthConfig.xml
file.
b. Open the file in a text editor.
c. Add the following path to your custom element
under excludedControllerElements:
<value>UI/Layout/CenterPane/DashBoard/RecentlyModifiedAssets</value>
d. Save your changes.
e. Close the ReqAuthConfig.xml file.

Log in to the Contributor interface as
fwadmin with password xceladmin.
In the dashboard area, verify that the Recently Modified Assets widget appears. If your widget does not produce any recently modified assets, edit and save an asset from the Content tree, and then refresh your dashboard view.

Summary
- Customize the Contributor interface dashboard
- Create custom elements in WebCenter Sites Explorer
- Add a new Daily Tips widget to dashboard
- Add a Recently Modified Assets widget to the dashboard
In this tutorial, you learned how to:
Resources
To navigate this Oracle by Example tutorial, note the following:
- Hide Header Buttons:
- Click the title to hide the buttons in the header. To show the buttons again, click the title again.
- Topic List:
- Click a topic to navigate to that section.
- Expand All Topics:
- Click the button to show or hide the details for the sections. By default, all topics are collapsed.
- Hide All Images:
- Click the button to show or hide the screenshots. By default, all images are displayed.
- Print:
- Click the button to print the content. The content that is currently displayed or hidden is printed.
To navigate to a particular section in this tutorial, select the topic from the list.