Before You Begin
Purpose
This tutorial shows how to deploy JD Edwards EnterpriseOne Release 9.2 using One-Click Provisioning where all JD Edwards components are deployed exclusively on premises on Linux. It describes the following sequence of required and optional tasks:- Access the JD Edwards Provisioning Console
- Configure the Server Manager Account
- Orchestrate Using Quick Start Mode
- Orchestrate Using Advanced Mode
- Orchestrate Using Advanced Mode to Add Web Servers and Enterprise Servers Post Deployment
- Deploy an Orchestration
- Export and Import a Deployment Plan
- Complete Post-Installation for the Deployment Server
- Complete Post-Installation for the Development Client
- Obtain and Install CA Certificates in Oracle WebLogic Servers and the Deployment Server
- Access the JD Edwards EnterpriseOne Servers Using Their Public IP Address
- Complete Post-Provisioning Tasks
- Troubleshoot
Important: Before you begin the procedures described in this document, it is imperative that all of the prerequisites tasks be completed as described in the companion document entitled: Preparing for a Deployment of JD Edwards EnterpriseOne Release 9.2 Using One-Click Provisioning.
Time to Complete
2-3 hours
Note that this estimate completion time is not the elapsed time. That is, it does not account for on premises machine runtime functions.
Background
You can use the JD Edwards One-Click Provisioning Server to deploy JD Edwards EnterpriseOne on premises.
Scenario
JD Edwards EnterpriseOne Release features a One-Click Provisioning Server. This server features a web-based JD Edwards Provisioning Console interface that enables the provisioning of a fully functional suite of interconnected Linux-based servers and a Microsoft Windows-based machine. For Linux-based servers, the required core servers are the Database Server, the Enterprise Server, the HTML Web Server, and the Application Interface Service (AIS) Server. The One-Click Provisioning Server includes the JD Edwards Server Manager Console (SMC). One-Click Provisioning will also deploy the required Deployment Server in a Microsoft Window environment.
For the Linux-based servers you should use the highest release level of the Linux operating system available. For the initial release of One-Click the following Linux-based servers are deployed by One-Click Provisioning:
- A single Database Server
- One or more Enterprise Servers
- One or more HTML Servers (as standalone
instances within WebLogic, not clustered)
- One or more AIS Servers (as standalone instances
within WebLogic, not clustered)
For the Microsoft Windows-based environment, this machine is deployed by One-Click Provisioning on a Microsoft Windows Server 2012 R2:
- A single Deployment Server
Note: In order to maintain optimal performance the Microsoft Windows environment must reside in the same domain (zone) as the companion Linux-based servers (which also must reside in the same domain). You must have a Deployment Server in order to apply ESUs (updates), perform Package Builds and commit to future upgrades.
What Do You Need?
Access to Oracle e-delivery in order to download the archive files for the One-Click Provisioning Server.
Context
Warning: For One-Click Provisioning, it is mandatory to use the same SSH key for all the instances in a particular provisioning cycle.What Do You Need?
To perform the steps in this tutorial, you must have:
- An account on the Oracle Software Delivery Cloud so you can download the JD Edwards EnterpriseOne VM Configuration Tool.
- The PuTTY tool (http://www.putty.org) for generating SSH key pairs on the client machine that you will use to connect to the on premises machine.
- Completed all prerequisite tasks in the companion document to this guide entitled: Preparing for a Deployment of JD Edwards EnterpriseOne Release 9.2 Using One-Click Provisioning.
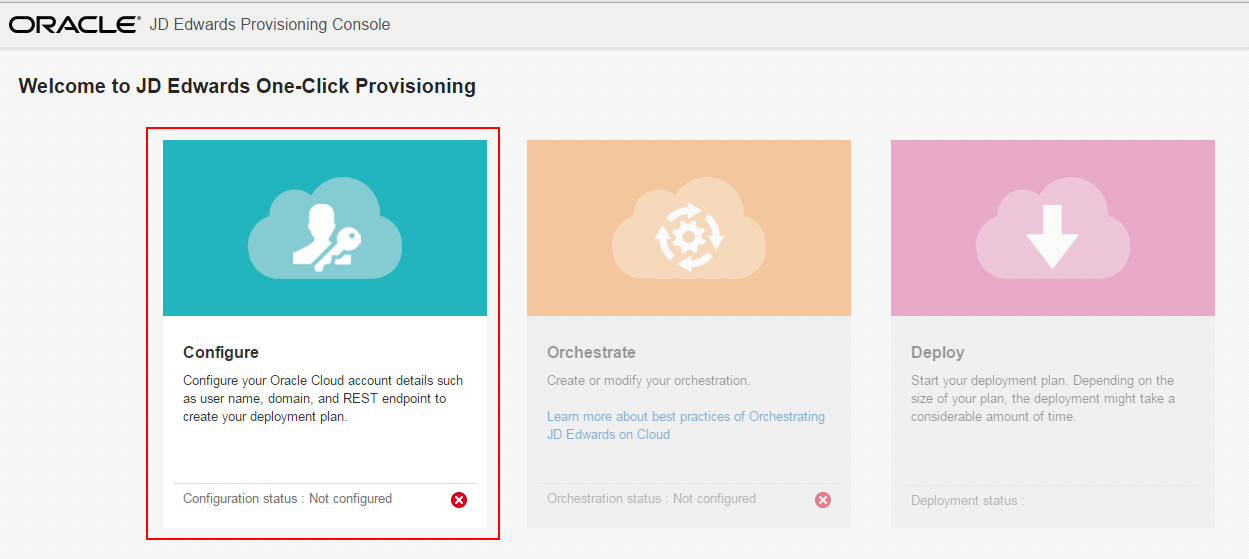
Access the JD Edwards Provisioning Console
The recommended browsers for accessing the One-Click Provisioning Console are:
- Google Chrome
- Mozilla Firefox
https://XXX.XXX.XXX.XXX:3000
Where:
- https is the only supported browser protocol.
- XXX.XXX.XXX.XXX is the public IP address for the One-Click Provisioning Server Instance created by the section entitled: Reserve a Public IP Address for the One-Click Provisioning Server Image in the document entitled: Preparing for a Deployment of JD Edwards EnterpriseOne Release 9.2 Using One-Click Provisioning.
- 3000 is the port on which the One-Click Provisioning Server is running, and which you must include as part of the address.
Important: Should you exit the Provisioning Console or experience a timeout, the next time you enter the Provisioning Console it displays the point where you left off. When you click the Configure icon, you will be prompted for the same credentials that you entered during your first access to the One-Click Provisioning Console.
Configure the Server Manager Account
Use this procedure to provide the account information.
-
On Welcome to the JD Edwards Provisioning Console, click the Configure icon.
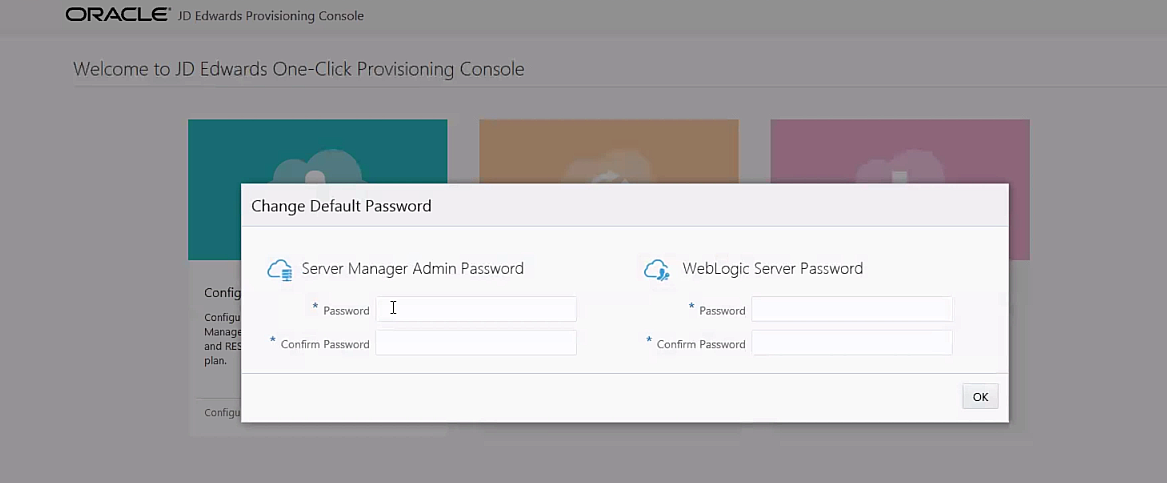
-
If you are a new user, as prompted by the JD Edwards Provisioning Console, you are also required to change the administrator passwords for WebLogic Server and Server Manager Console.
On Change Password, enter the passwords for the Server Manager Administrator. The password must only have numbers, alphabets, and special characters (@,!,$,_,#), and is between 8 and 30 characters long.
Also, enter the password for the WebLogic Server. The password must start with a letter, is between 8 and 30 characters long, contains atleast one number, and optionally, any number of special characters (#,_). For example, Ach1z0#d
Tip: Valid values for the passwords are displayed in the tooltip when you click the field.
Click OK.
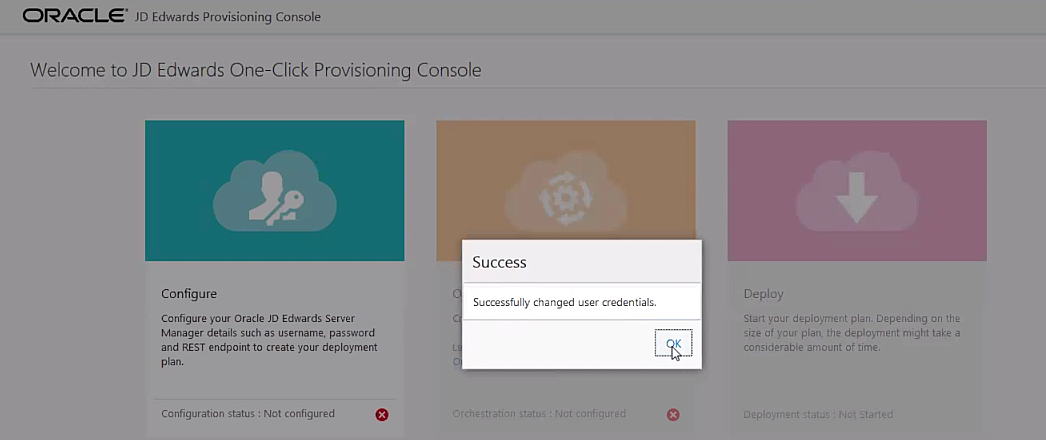
-
On the Success window, click the OK button.
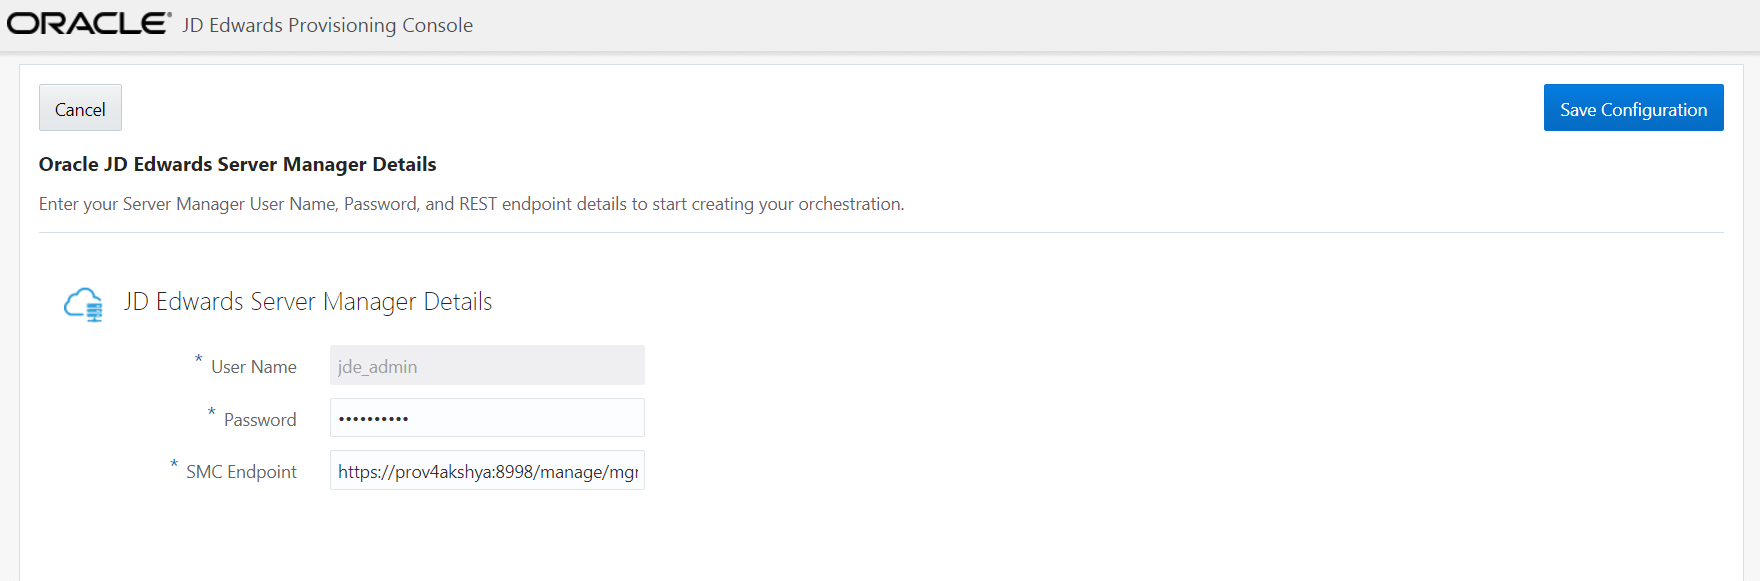
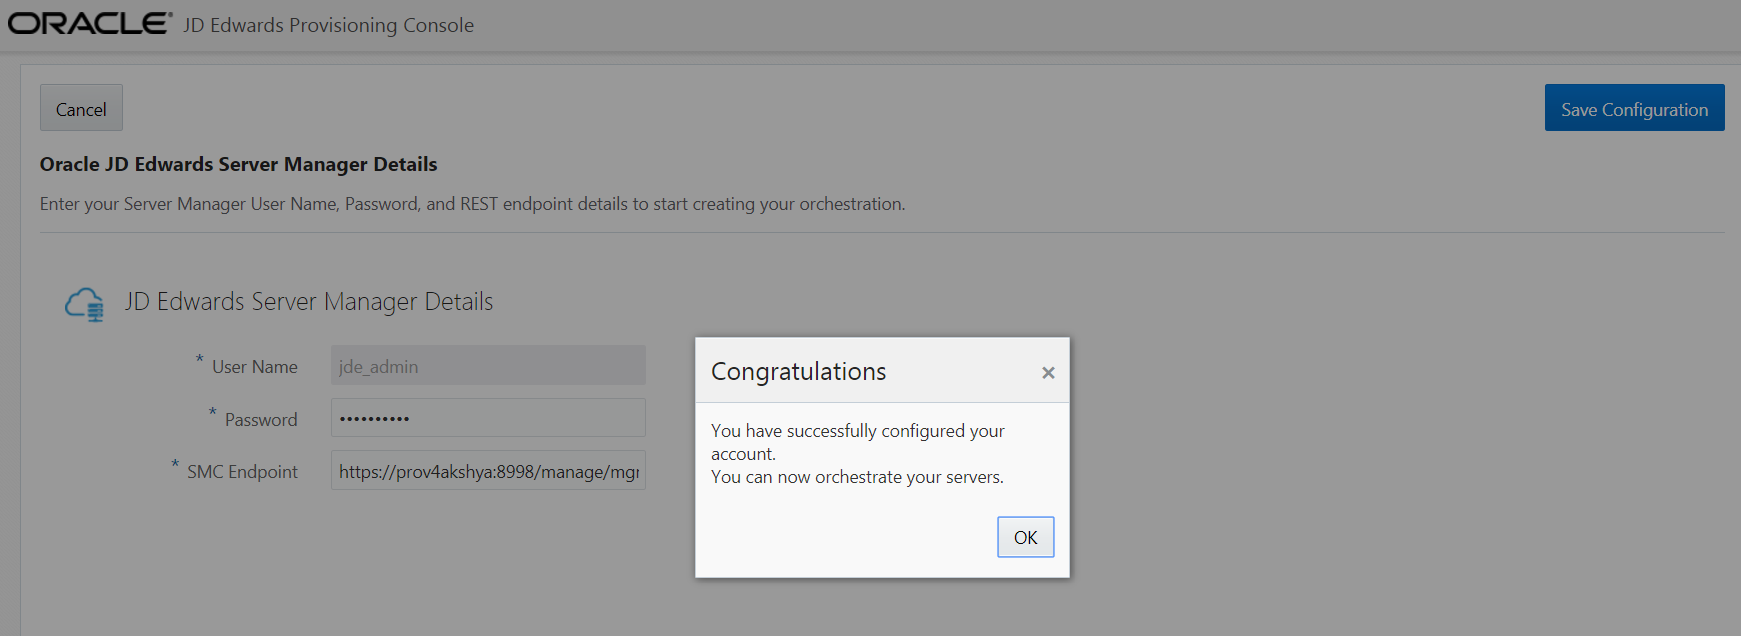
- On Oracle JD Edwards Server Manager Details, reenter the Admin password for the Server Manager Console. The SMC Endpoint is pre-populated automatically.
- Click the Save Configuration
button.
The system will take some time to authenticate the Server Manager Endpoint and Credentials. When the authentication is verified, click the OK button on the Congratulations dialog box.
Important: It is recommended that you record this value on the Pre-Install Worksheet, which you created as described in the companion document to this tutorial entitled: Preparing for a Deployment of JD Edwards EnterpriseOne Release 9.2 Using One-Click Provisioning in the section of that guide entitled: Create the Pre-Install Worksheet.
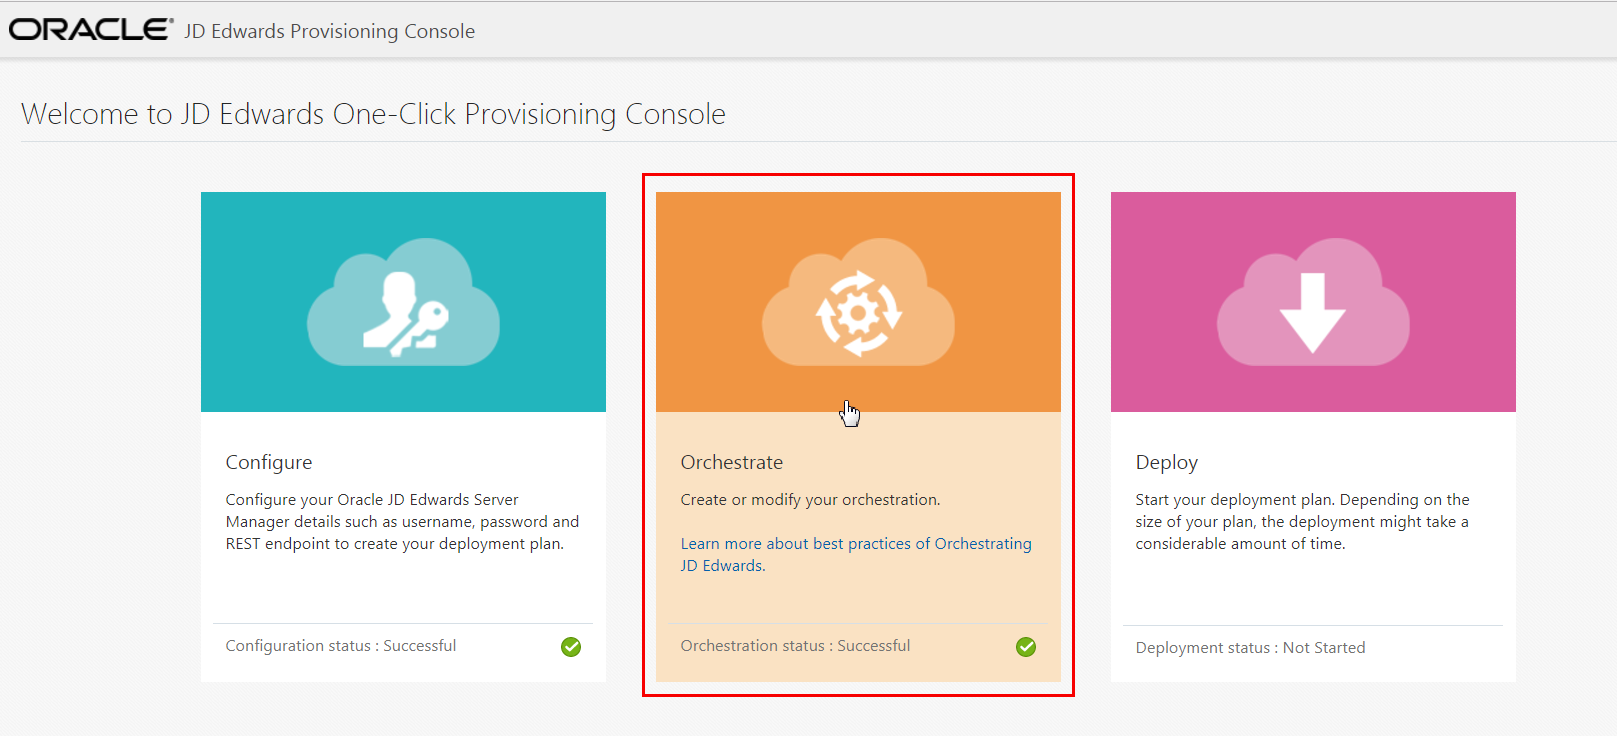
Orchestrate Using Quick Start Mode
You can use the Quick Start mode to create a Deployment Plan that includes all the core components of JD Edwards EnterpriseOne, which will be deployed exclusively on premises.
- On Welcome to the JD Edwards Provisioning
Console, click the Orchestrate
icon.

Orchestrate tile -
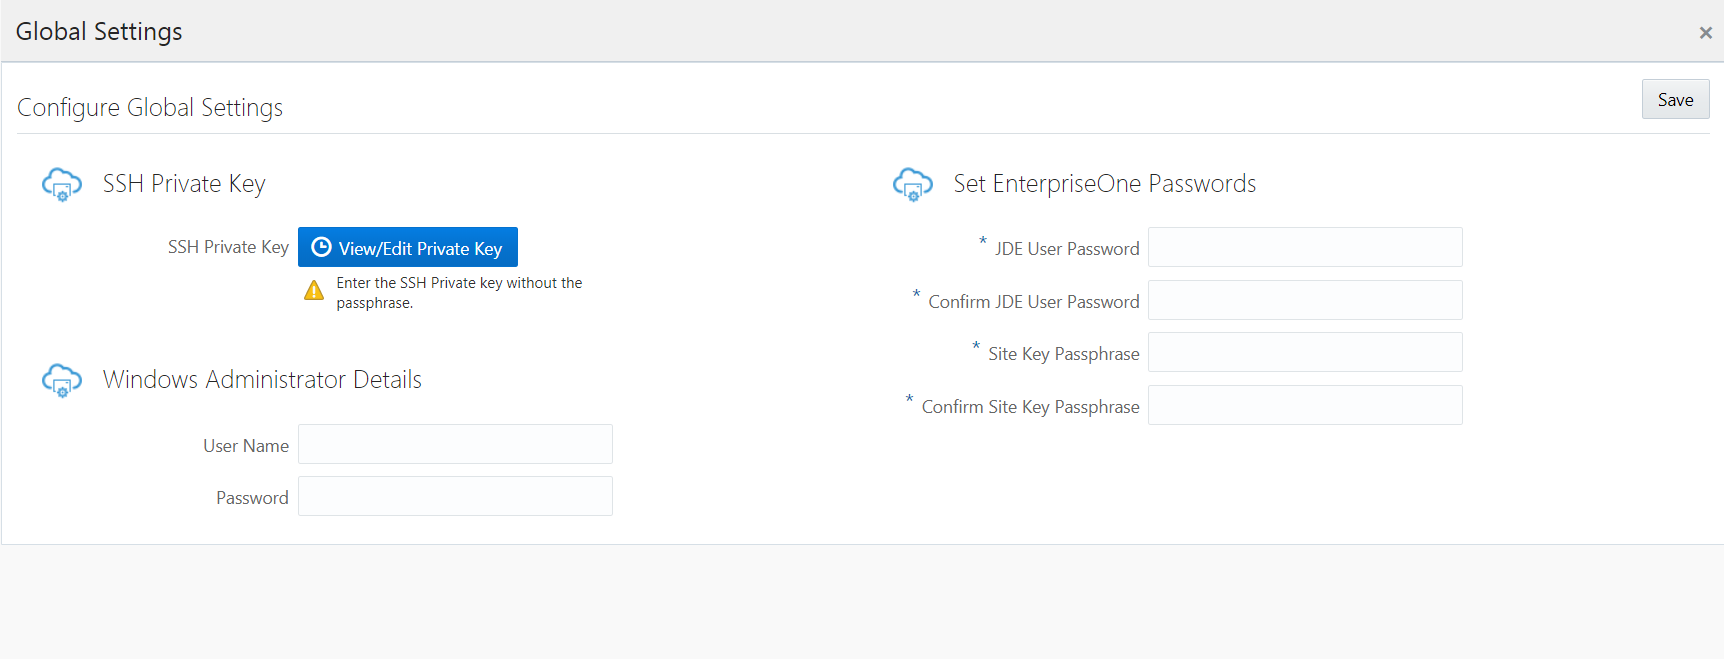
If this is the first pass through a JD Edwards One-Click Provisioning orchestration, the following Global Settings screen will appear first. In the SSH Private Key section, click the View/Edit Private Key button.
-
On the popup box for Private Key input for VM access, you must specify the values for either the private key text, or the file that contains the private key contents for accessing all the instances that are provisioned using this tool.
Select the radio button labelled SSH Private Key File and then click the Choose File button. For more information regarding SSH Keys, refer to the section entitled: Generate Secure SHell (SSH) Key Pairs on Your Local System in the companion document to this guide entitled: Preparing for a Deployment of JD Edwards EnterpriseOne Release 9.2 Using One-Click Provisioning.
Important: Ensure that the SSH Private Key field is not empty. The One-Click Provisioning Console validates the private keys and it is not possible to save the Global Settings if this field is empty.
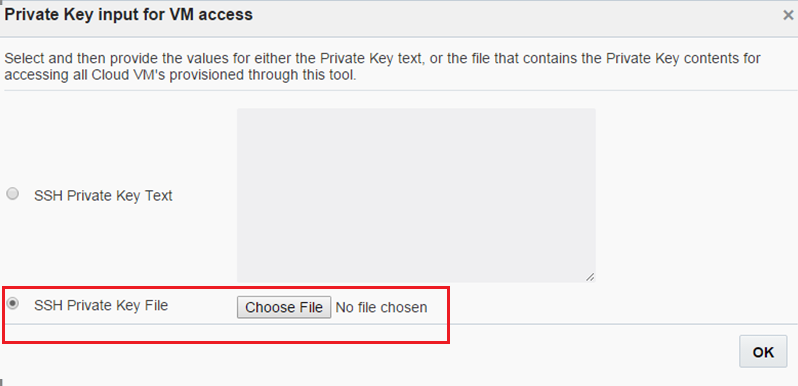
Public Key input for VM access -
Browse and select the appropriate file, and then click OK.
Note: If you click the View/Edit Private Key button again, you can see the Public Key for VM access window with the SSH Public Key value in the SSH Public Key text field. To change the private key, click the Change button and provide the new value.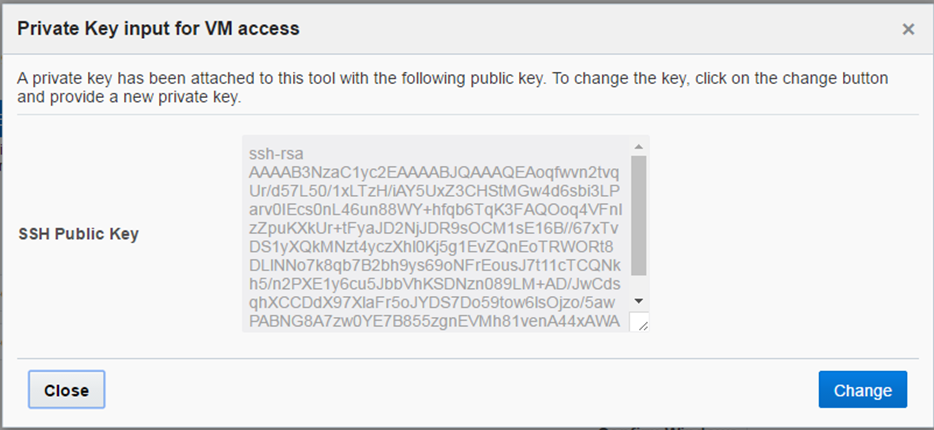
Private Key input for VM access -
Click the Close button.
- In the Windows Administrator Details section, enter the Windows User Name and Password. Ensure that the user name is entered as opc and that this user has the Administrative privileges.
-
In the Set Enterpriseone Passwords section, enter and then confirm these passwords:
- JDE User Password
Create the password for JD Edwards EnterpriseOne. The password must be between 8 and 10 characters. It can contain only alphanumeric characters, and the underscore character.
- Site Key Passphrase
Enter the Passphrase for generating the Site Key. The Passphrase must start with a letter, end with an alphanumeric character, must be between 8 and 40 characters, and contain at least 2 uppercase letters, 2 lowercase letters, 2 numbers, and 2 underscore characters.
Tip: The conditions to set the passwords appear in the tooltip window when you click the fields.
Important: It is highly recommended that you keep a record of these critical passwords. If you have not already done so, you should ensure these values are recorded on the Pre-Install Worksheet, which is described in the document entitled: Preparing for a Deployment of JD Edwards EnterpriseOne Release 9.2 Using One-Click Provisioning.
- JDE User Password
-
Click the Save button to exit the Global Settings screen.
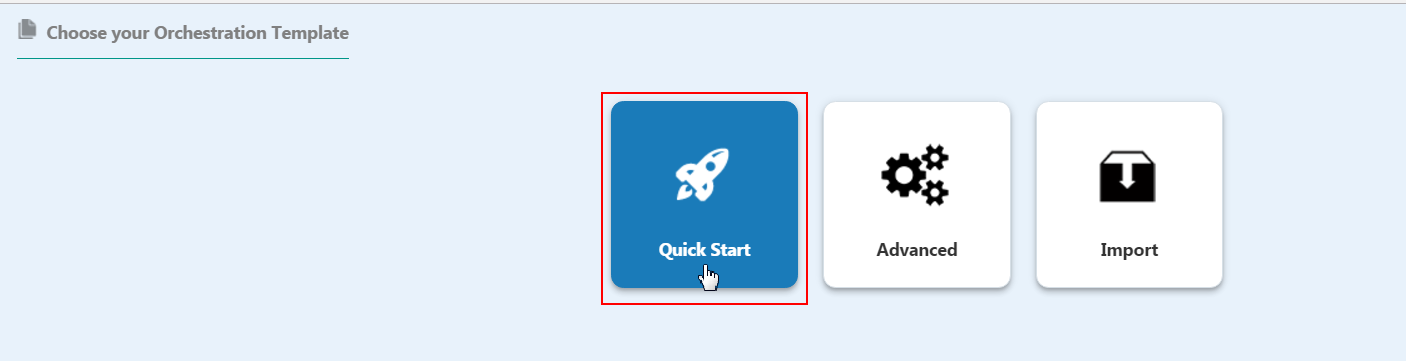
-
On Choose your Orchestration Template, click the Quick Start icon to create your Quick Start JD Edwards Deployment Plan.
Note: Refer to applicable sections of this guide for instructions on using the Advanced, Export, and Import orchestration functions. -
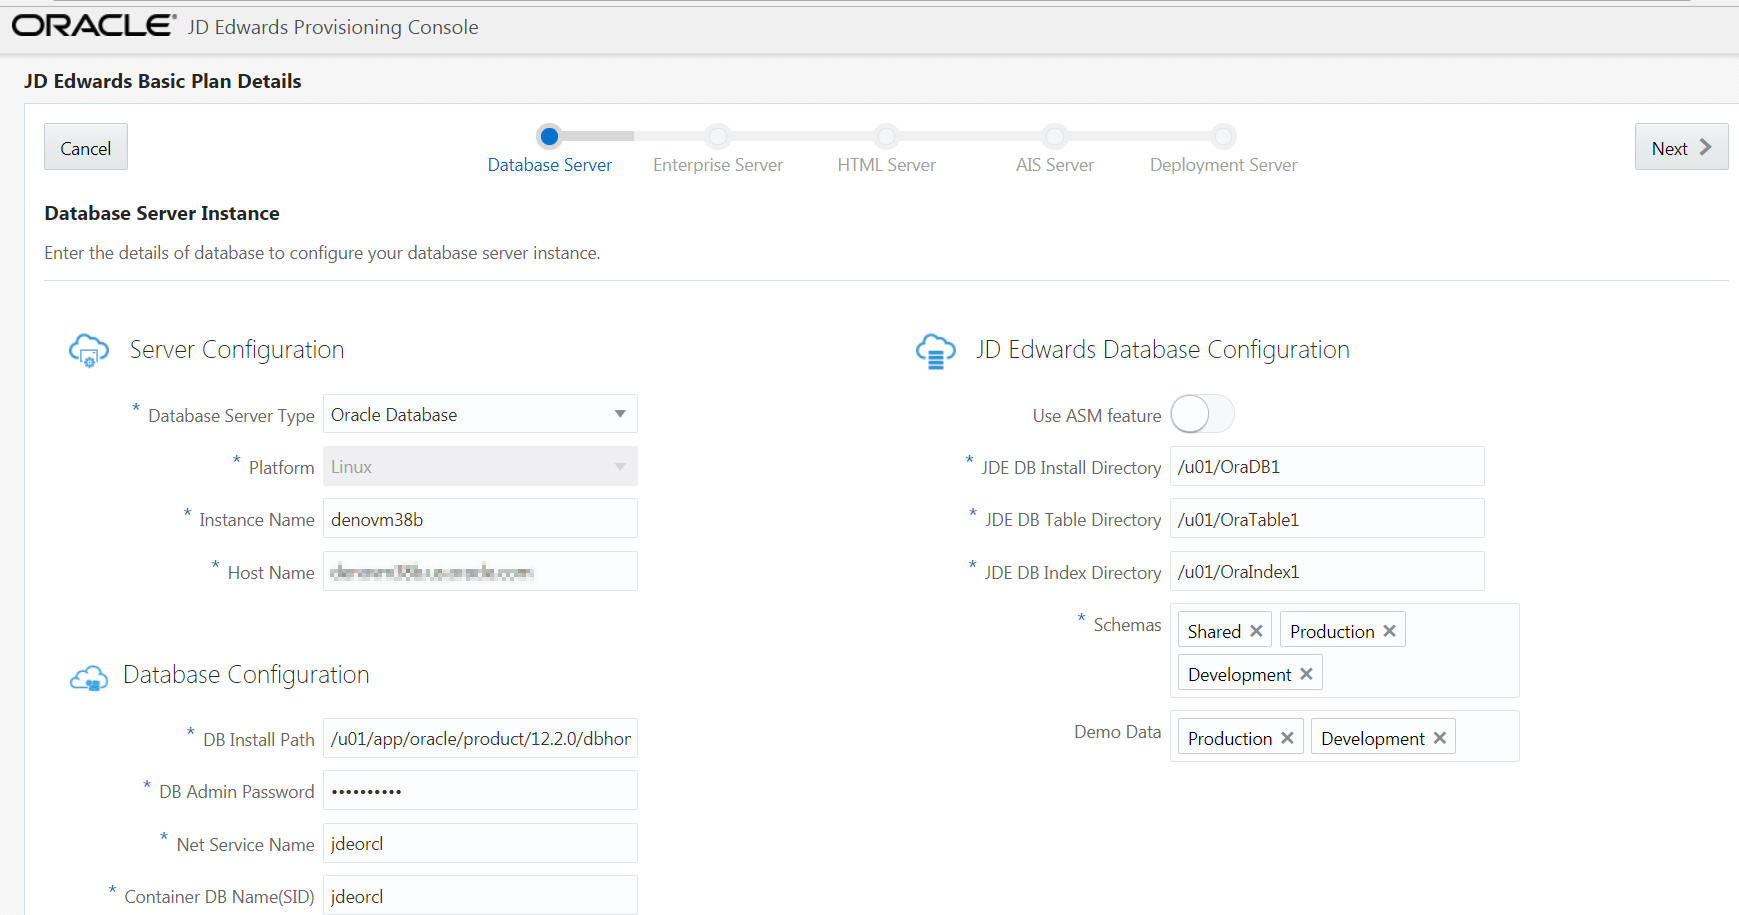
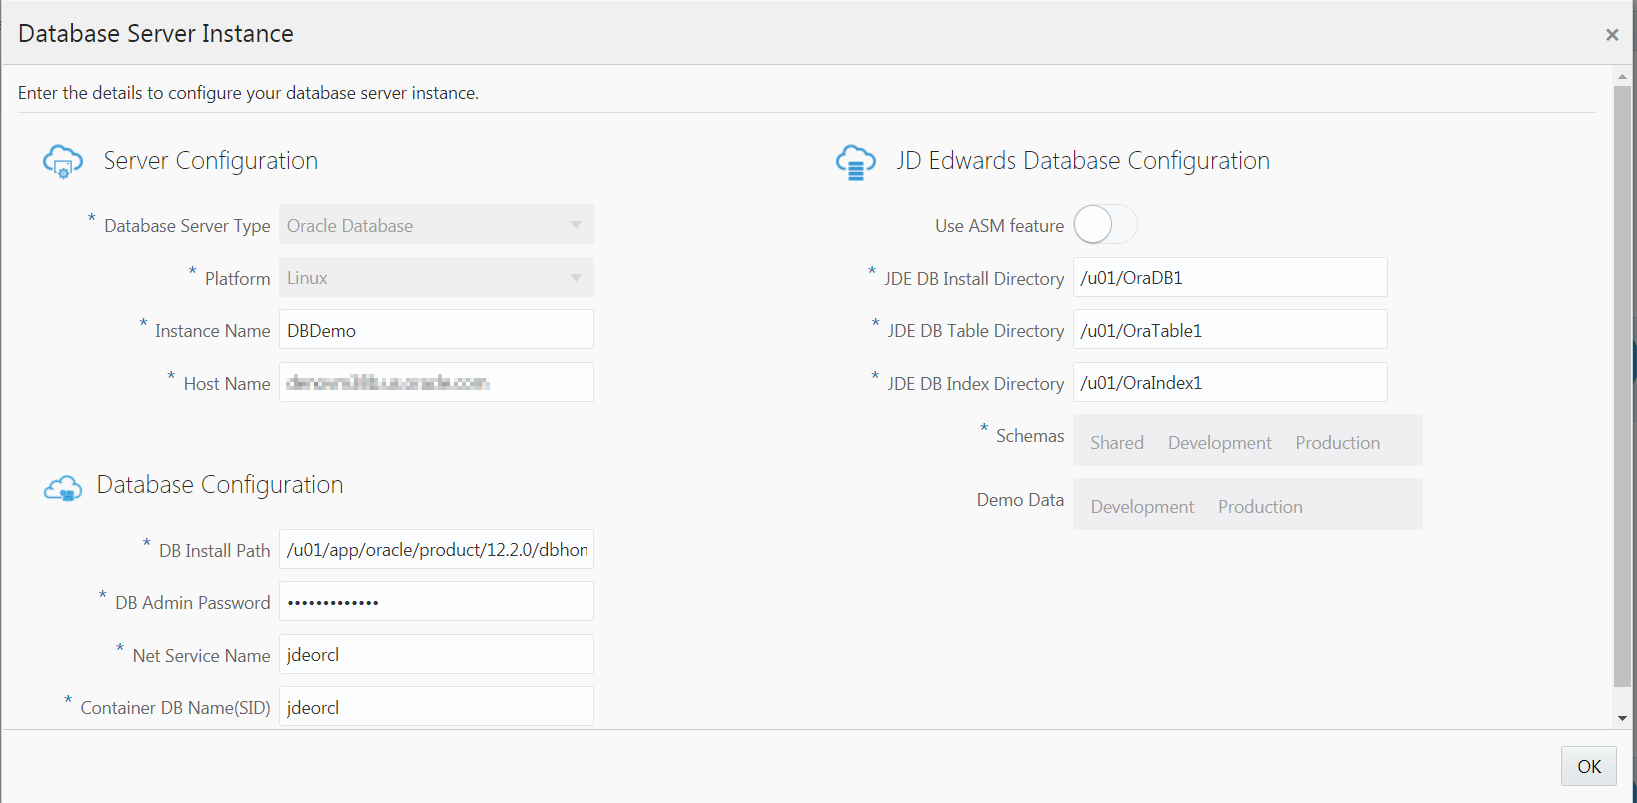
On JD Edwards Database Server, complete these fields to create and configure the Database Server instance.
Server Configuration
-
Database Server Type
The Database Server Type is displayed as Oracle Database.
-
Platform
This field is disabled and it is automatically populated as Linux.
-
Instance Name
Create an instance name for your database instance.
-
Host Name
Enter the host name. To determine a currently set host name, refer to the section of this guide entitled: Tip: Retrieve a host name.
Database Configuration
-
DB Admin Password
Enter the password of the database administrator.
-
Net Service Name
Enter the Net Service Name.
JD Edwards Database Configuration
-
JDE DB Install Directory
Enter the installation path.
-
JDE DB Table Directory
Enter the path to install the table data.
-
JDE DB Index Directory
Enter the path to install the indexes.
- Schemas
Click the Schemas field and select the schemas you want from the auto-suggest text. The schemas available are: Shared, Development, Prototype, Production, and Pristine with Demo data.
Note: It is mandatory to add the Shared schema.
Important: At this point, you should ensure that you specify all the schemas you might plan to use. The schemas you choose to install on the Database Server can only be deployed once, which is specified at this point in the Provisioning Console. You can use the Provisioning Console to programmatically add additional schemas after deploying the orchestration.
-
Demo Data
Click the Demo Data field and select the demo data available from the auto-suggest text. Demo data will be available depending on the schema selected. For example, if you select the schema as Development, the Development demo data will be available.
-
-
Click the Next button. Because you will be connecting to an existing on premises database instance, the system validates all the inputs that are provided. If the validation is successful, the JD Edwards Enterprise Server page is displayed.
-
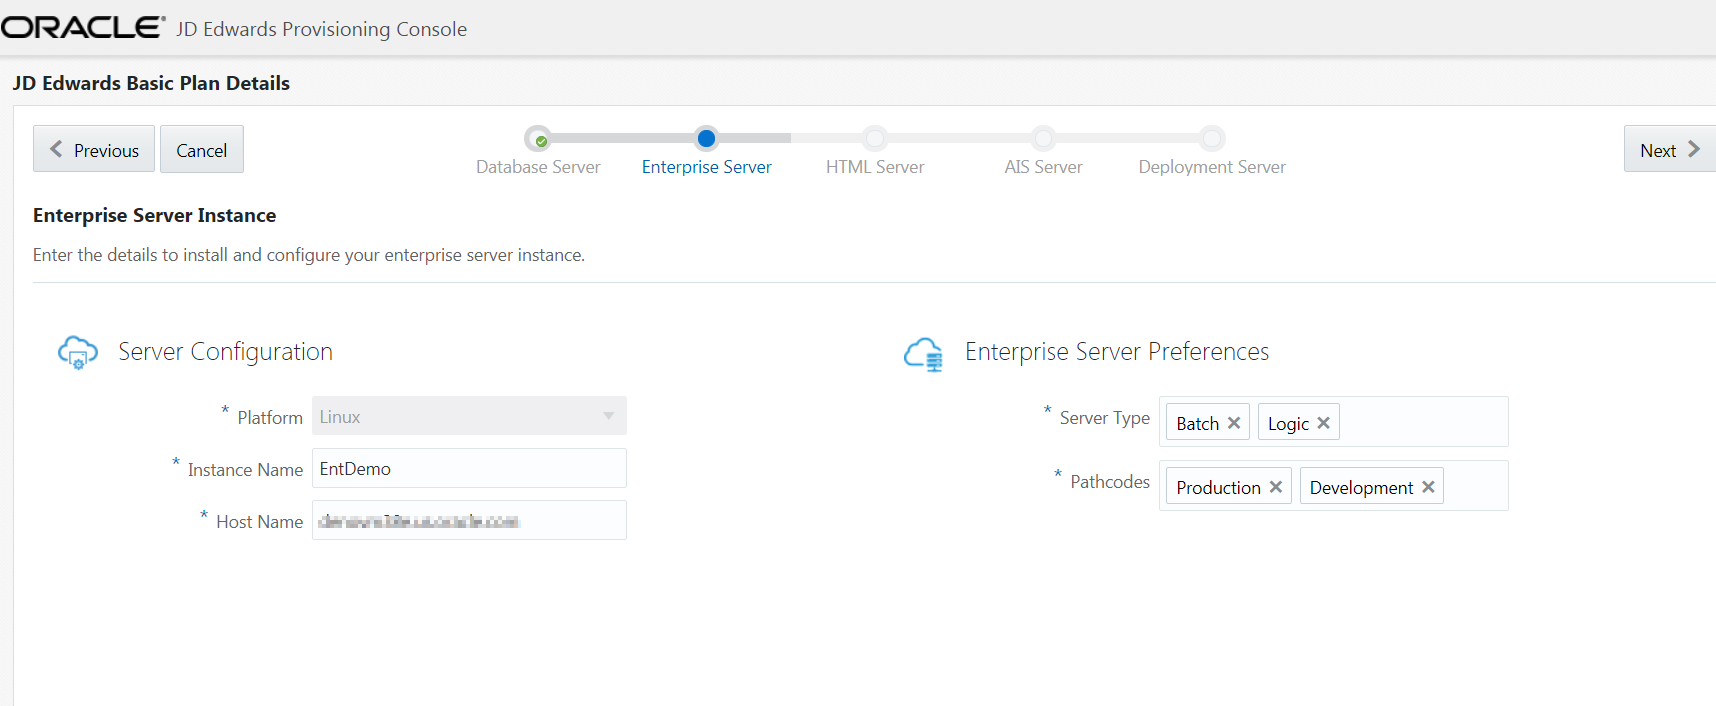
On JD Edwards Enterprise Server, complete these fields to create and configure the Enterprise Server instance.
Service Configuration
-
Platform
This field is disabled and it is automatically populated as Linux.
-
Instance Name
Create an instance name for the Enterprise Server. The conditions to set the instance name is displayed in the tooltip when you click the field.
-
Host Name
Enter the host name. To determine a currently set host name, refer to the section of this guide entitled: Tip: Retrieve a host name.
Enterprise Server Preferences
-
Server Type
Select one or both of the available Server Types for this Enterprise Server.
Single Enterprise Server. If you are deploying only a single Enterprise Server, select both Logic and Batch.
Multiple Enterprise Servers. If you are deploying multiple Enterprise Servers, at least one must be specified as a Logic server per path code. The others can be specified as batch servers.
Pathcode Details
-
Available Pathcodes
Click the Available Pathcodes field and select the pathcodes required from the auto-suggest. The four available pathcodes are: Development, Prototype, Pristine, and Production.
-
- Click the Next button. Because you will be connecting to an existing on premises EnterpriseOne instance, the system validates all the inputs that are provided. If the validation is successful, the JD Edwards HTML Server page is displayed.
-
On JD Edwards HTML Server, complete these fields to create and configure the HTML Server instance.
Service Configuration
-
Platform
This field is disabled and it is automatically populated as Linux.
-
Instance Name
Create the instance name of the HTML Server instance.
-
Host Name
Enter the host name. To determine a currently set host name, refer to the section of this guide entitled: Tip: Retrieve a host name.
-
Port
Enter a unique port number.
Web Server Preferences
-
PathCode
Select the required pathcode from the drop-down menu.
WebLogic Details
-
User Name
Enter the user name.
-
Password
Enter the WebLogic password.
-
Admin Port
Enter the admin port number.
-
Install Path
Enter the installation path of the WebLogic instance.
-
JDK Install Path
Enter the JDK installation path.
Important: Each HTML Server can only support one pathcode. If you want additional HTML instances to support additional pathcodes, you should use the Advanced mode of the Provisioning Console. Refer to the section of this tutorial entitled: Orchestrate Using Advanced Mode.

Web Server Instance Details - HTML Server -
-
Click the Next button. The system validates the inputs. If the validation is successful, the JD Edwards AIS Server page is displayed.
-
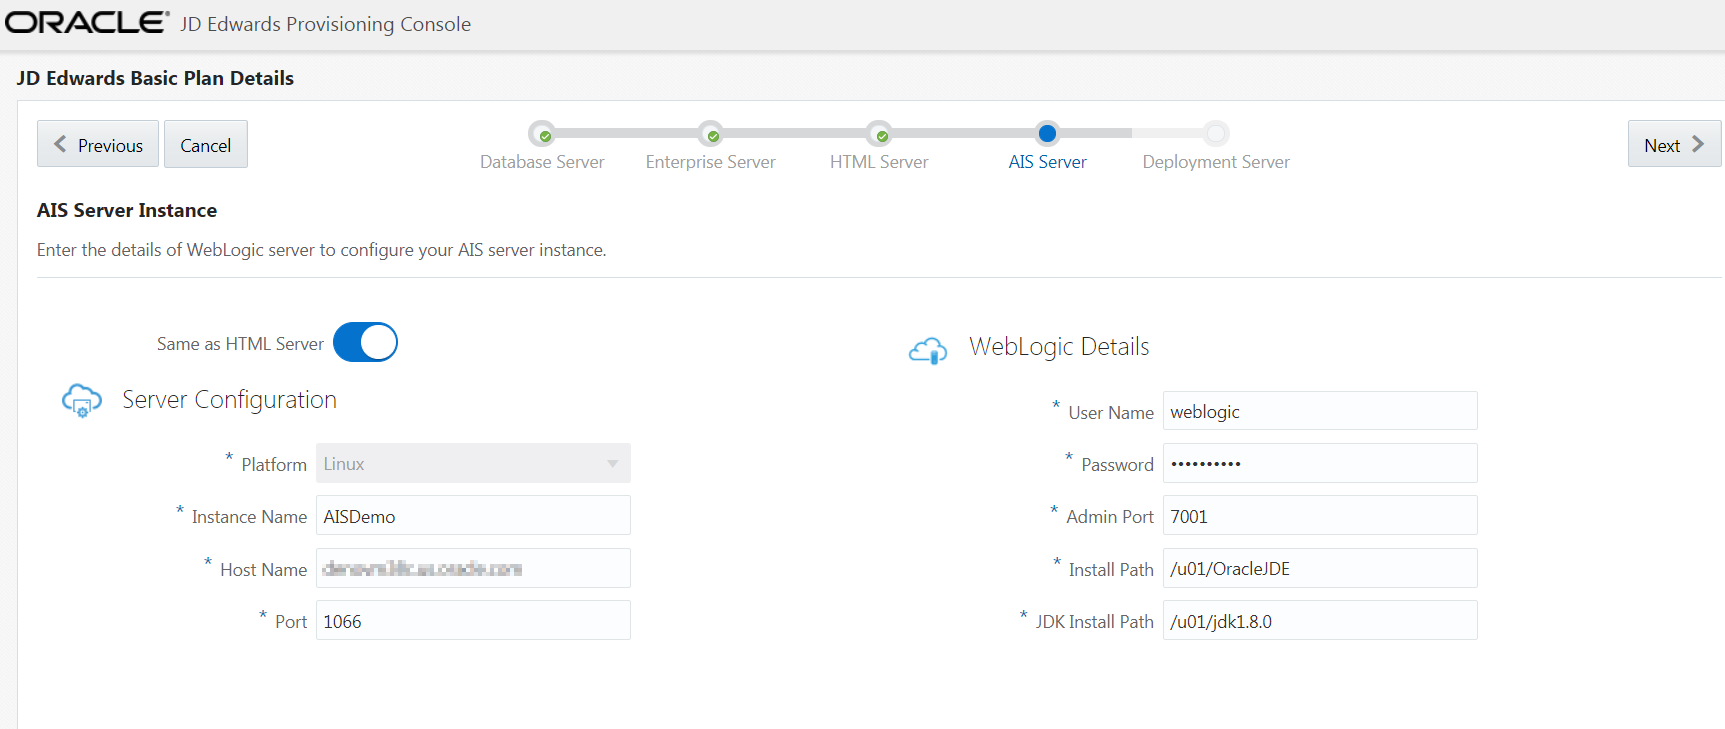
On JD Edwards AIS Server, complete these fields to configure your AIS Server instance. Select the Same as HTML Server option if you want to set the configuration of the AIS Server similar to the HTML Server.
Server Configuration
-
Platform
This field is disabled and it is automatically populated as Linux.
-
Instance Name
Create an instance name for the WebLogic Server.
-
Host Name
Enter the Host Name. To determine a currently set host name, refer to the section of this guide entitled: Tip: Retrieve a host name.
-
Port
Enter a unique port number.
WebLogic Details
-
User Name
Enter the user name.
-
Password
Enter the WebLogic password.
-
Admin Port
Enter the admin port number.
-
Install Path
Enter the installation path of the WebLogic instance.
-
JDK Install Path
Enter the JDK installation path.
-
-
Click the Next button. The system validates the inputs. If the validation is successful, the JD Edwards Deployment Server page is displayed.
-
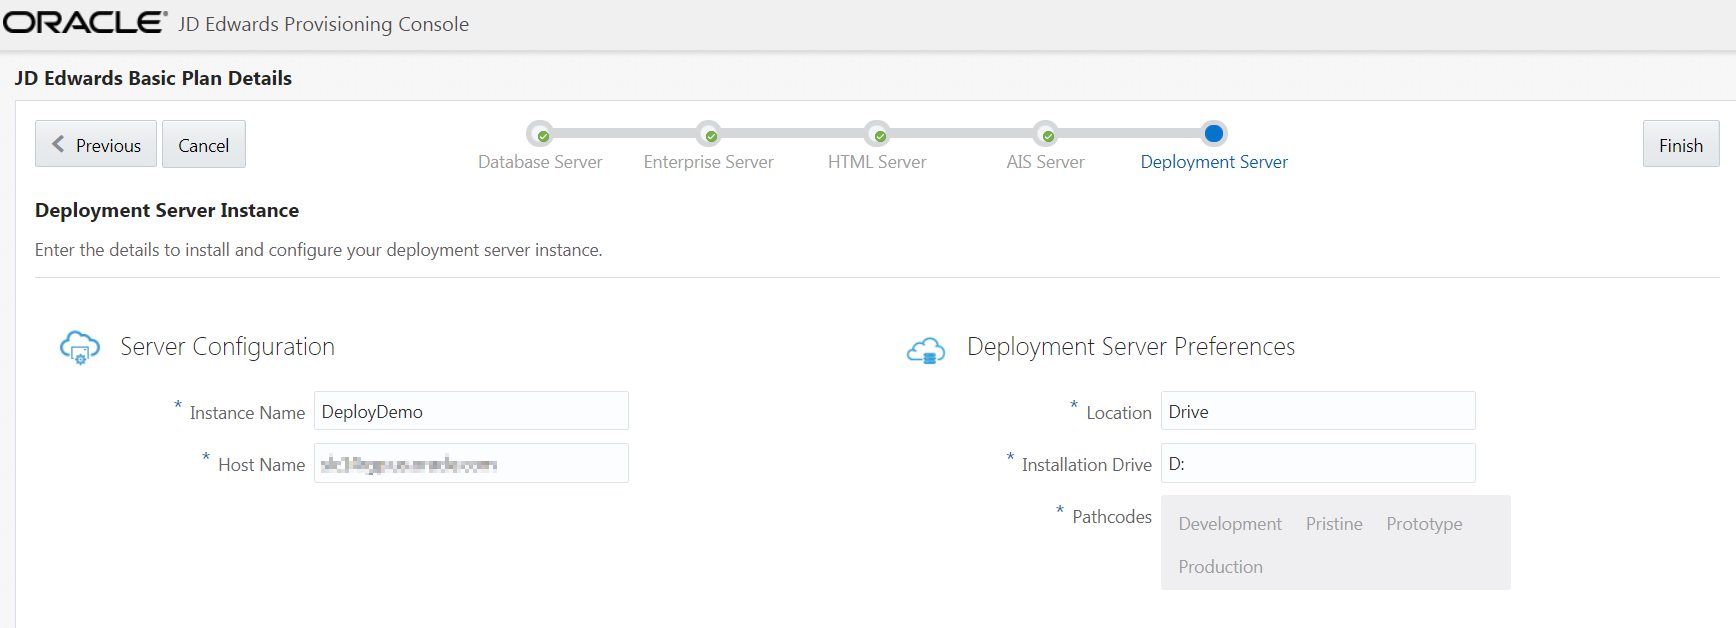
On JD Edwards Deployment Server, complete these fields to create and configure your Deployment Server instance.
Server Configuration
-
Instance Name
Create an instance name for the Deployment Server instance. The conditions to set the instance name is displayed in the tooltip when you click the field.
-
Host Name
Enter the host name. To determine a currently set host name, refer to the section of this guide entitled: Tip: Retrieve a host name.
Deployment Server Preferences
-
Location
Enter the location.
-
Installation Drive
Enter the drive for the installation.
-
Pathcodes
This field is automatically populated.
Important: The pathcodes that are available here correlate to the pathcodes that you previously selected for the Database Server. The pathcodes you choose to install on the Deployment Server can only be deployed once, which is specified at this point in the Provisioning Console. You can use the Provisioning Console to programmatically add additional schemas after the deploying the orchestration.
-
-
Click the Finish button.
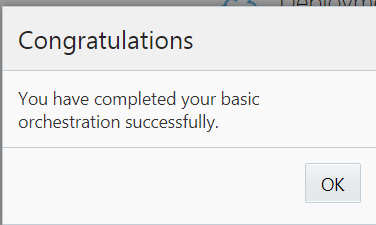
Orchestration Successful box -
Click the OK in the success message window.
-
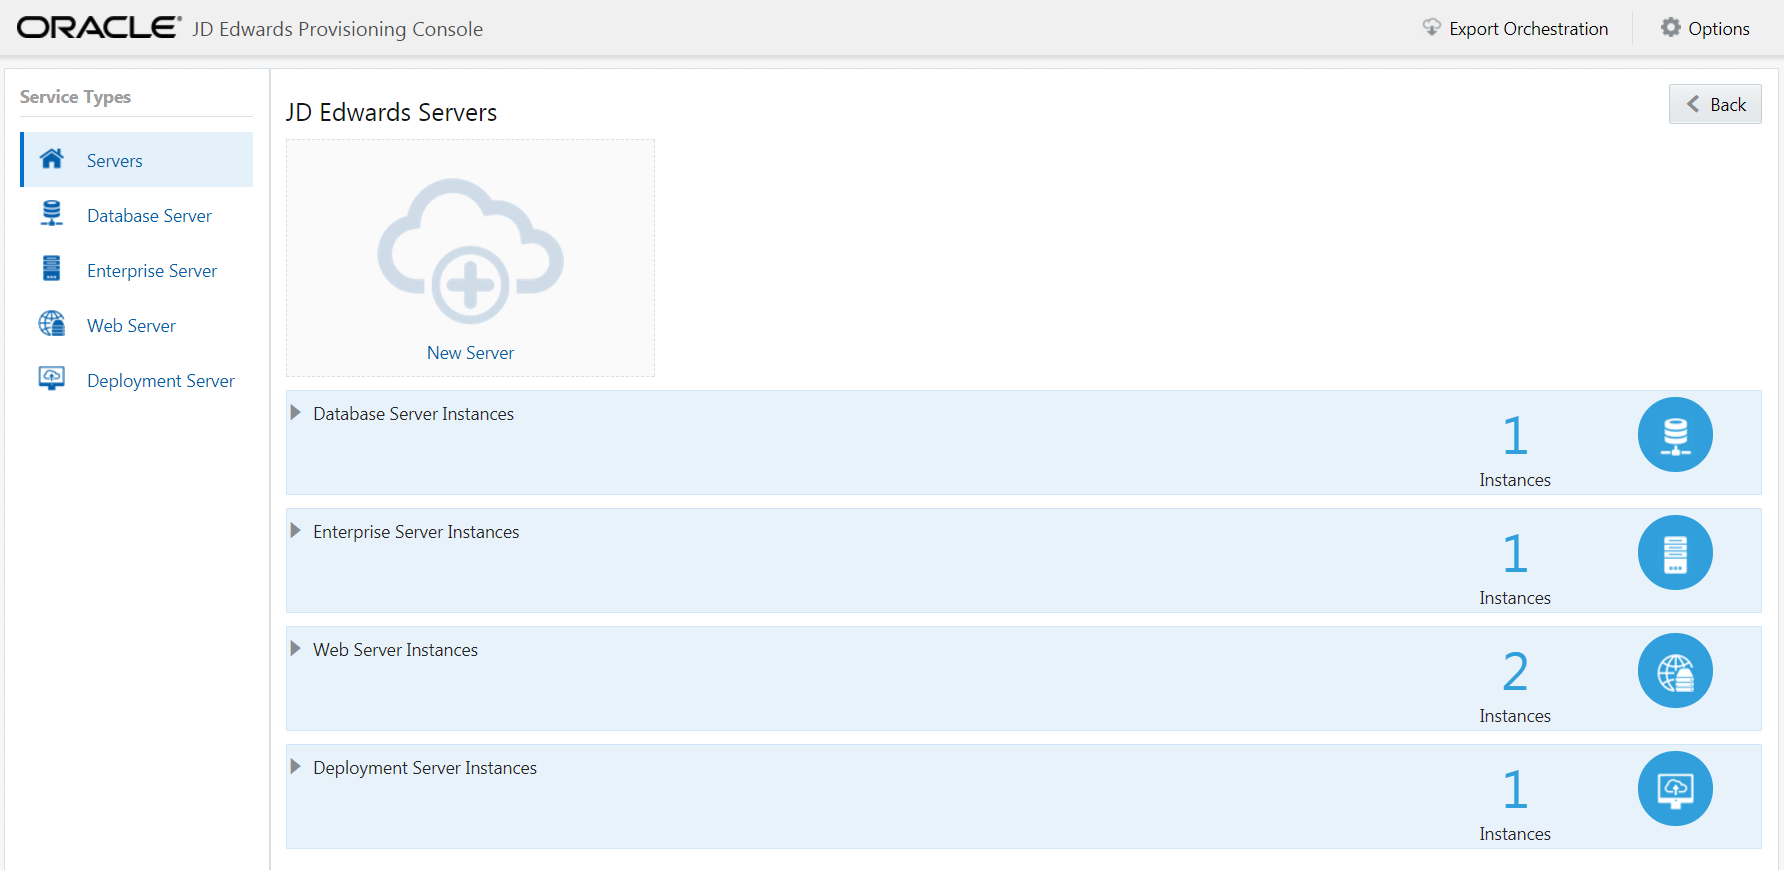
The summary window is displayed. In the summary window, you can see that one instance is created for each of the servers. Click the Back button to proceed to deploy your services as described in the Deploy an Orchestration section of this tutorial.
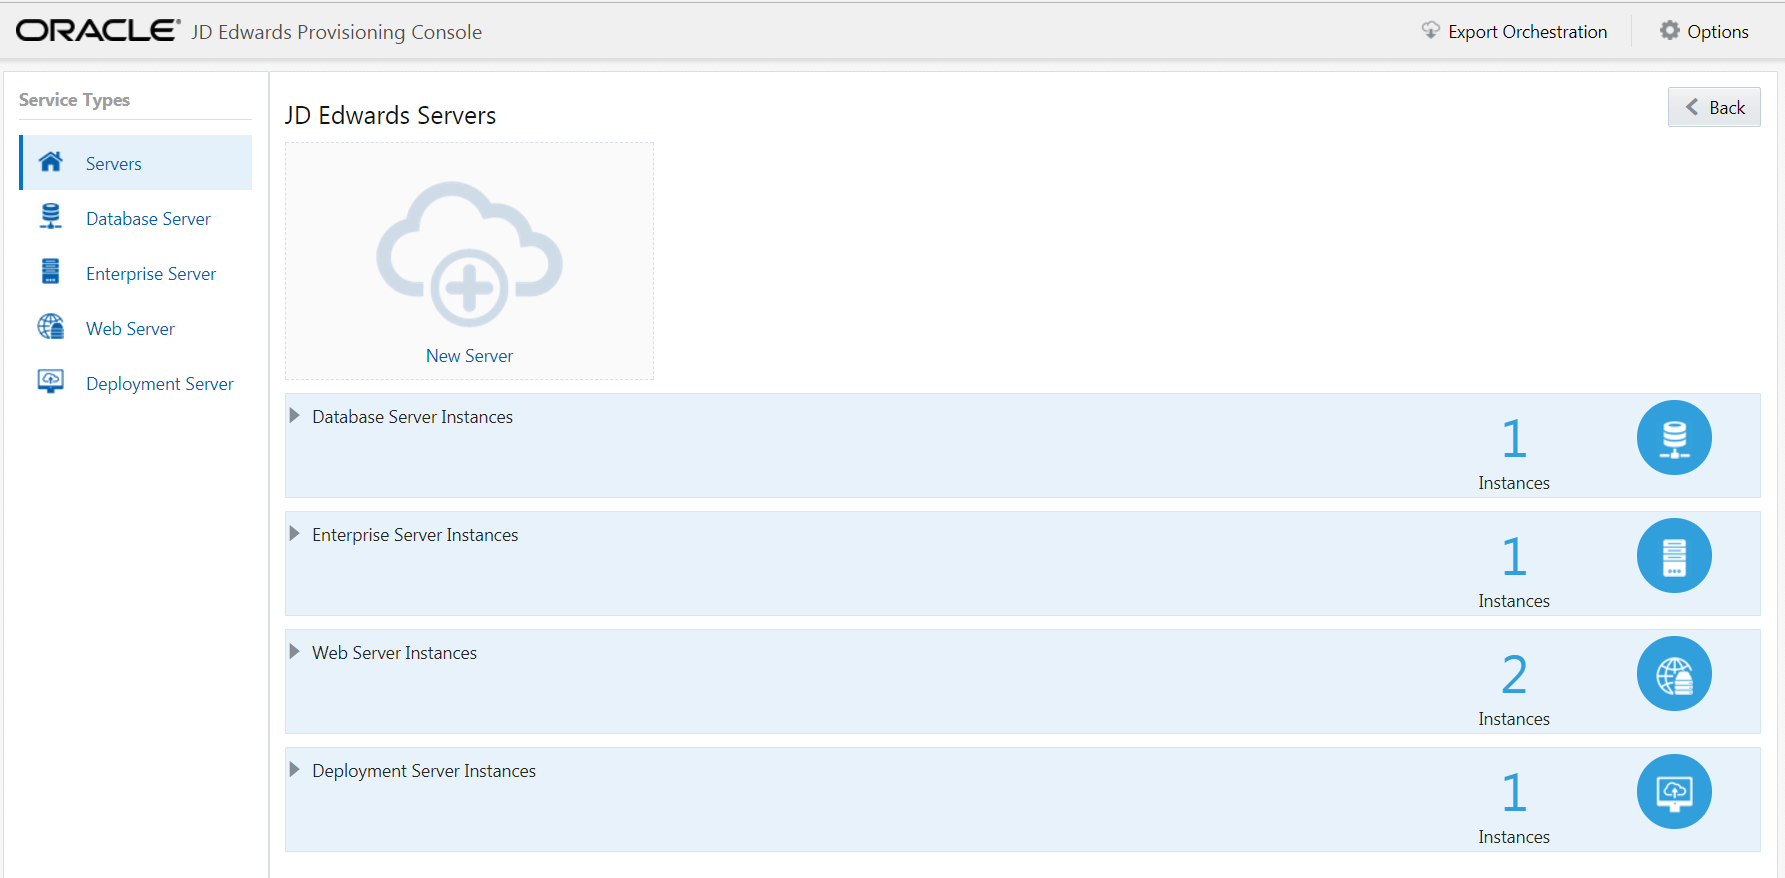
Quick Start Deployment Plan Summary
Note: For this Quick Start Deployment Plan, you can click the Options function from the menu bar to change your Global Settings or to Reset your settings (that is, to delete your configuration details, global settings, and orchestration data). Also optionally, you can further customize a completed Quick Start Deployment Plan using the Advanced deployment function of the JD Edwards Provisioning Console. Refer to the section of this guide entitled: Orchestrate Using Advanced Mode.
- Run the hostname command where the output is the host name.
If DNS is enabled:
- Run the hostname command and note the output.
- Run the nslookup
command with the first argument as output of
Step 1.
The host name is specified in the Name field of the output from the nslookup command.
For example:
root@my_machine share]# hostname
mymachine
[root@my_machine share]# nslookup mymachine
Server: 11.111.11.111
Address: 11.111.11.111#11
Non-authoritative answer:
Name: mymachine.us.oracle.com
Address: 11.111.111.111
Orchestrate Using Advanced Mode
You can orchestrate a Deployment Plan using Advanced mode, which allows you to:
- Modify and add servers to an existing
Orchestration that was created using the Quick
Start wizard.
- Create a new Orchestration with no guidance from a wizard. Unlike using the Quick Start wizard, the Advanced mode will not guide you through the required sequence of machines to satisfy dependencies of the configuration. For example, the allowable pathcodes for an Enterprise Server are dependent on the schemas previously selected for the Database Server.
The required sequence of adding instances to an orchestration and the rules related to the machines and pathcodes is as follows:
- Database Server
You can create only one Database Server per deployment. However, you can make modifications to the Database Server created using the Quick Start mode. You can also delete the Database Server created using the Quick Start mode and create a new one in the Advanced mode.
- Enterprise Server
One to many Enterprise Servers can be created. At least one Enterprise Server must be created with selected pathcodes available from the available schemas that were selected for the Database Server. An Enterprise Server must be configured before you can add HTML Servers. If multiple Enterprise Servers are deployed, at least one must be configured as a Logic Server per pathcode. Additional Enterprise Servers can be added to an Orchestration and they can be deployed after your initial plan is deployed.
- HTML Servers
One to many HTML Server instances can be created and each will be associated with one specific pathcode that is available on the Enterprise Server. Additional HTML Servers can be added to an Orchestration and they can be deployed after your initial plan is deployed.
- AIS Servers
Zero to many AIS Server instances can be created and each will be associated with a specific HTML Server instance. Additional AIS Server instances can be added on to your plan and deployed after your initial plan is deployed.
Important: If you do not specify at least one AIS Server, the full functionality of certain JD Edwards EnterpriseOne applications will not be available.Important: You cannot specify an HTML Server instance to also support an AIS Server. You must create a separate instance for each AIS Server.
- Deployment Server
A single Deployment Server can be created and all pathcodes can be selected regardless of pathcodes selected for your runtime servers.
Before orchestrating an Advanced Deployment Plan, the recommended practice is to first orchestrate a Deployment Plan using Quick Start. The Quick Start procedure is documented in the section of this document entitled: Orchestrate Using Quick Start Mode. After this Quick Start orchestration is created, you can use the Advanced mode to modify, delete, or add on additional server instances. Alternately, experienced users can use Advanced Mode to create an orchestration from start , which assumes they are aware of the required sequence of creation and the interdependencies.
Note: For any orchestration created or modified using the Advanced Mode Deployment Plan, you can click the Options function from the menu bar to change your Global Settings or to Reset your settings (that is, to delete your configuration details, global settings, and orchestration data).
To use the JD Edwards Provisioning Console to orchestrate and deploy an Advanced Deployment Plan:
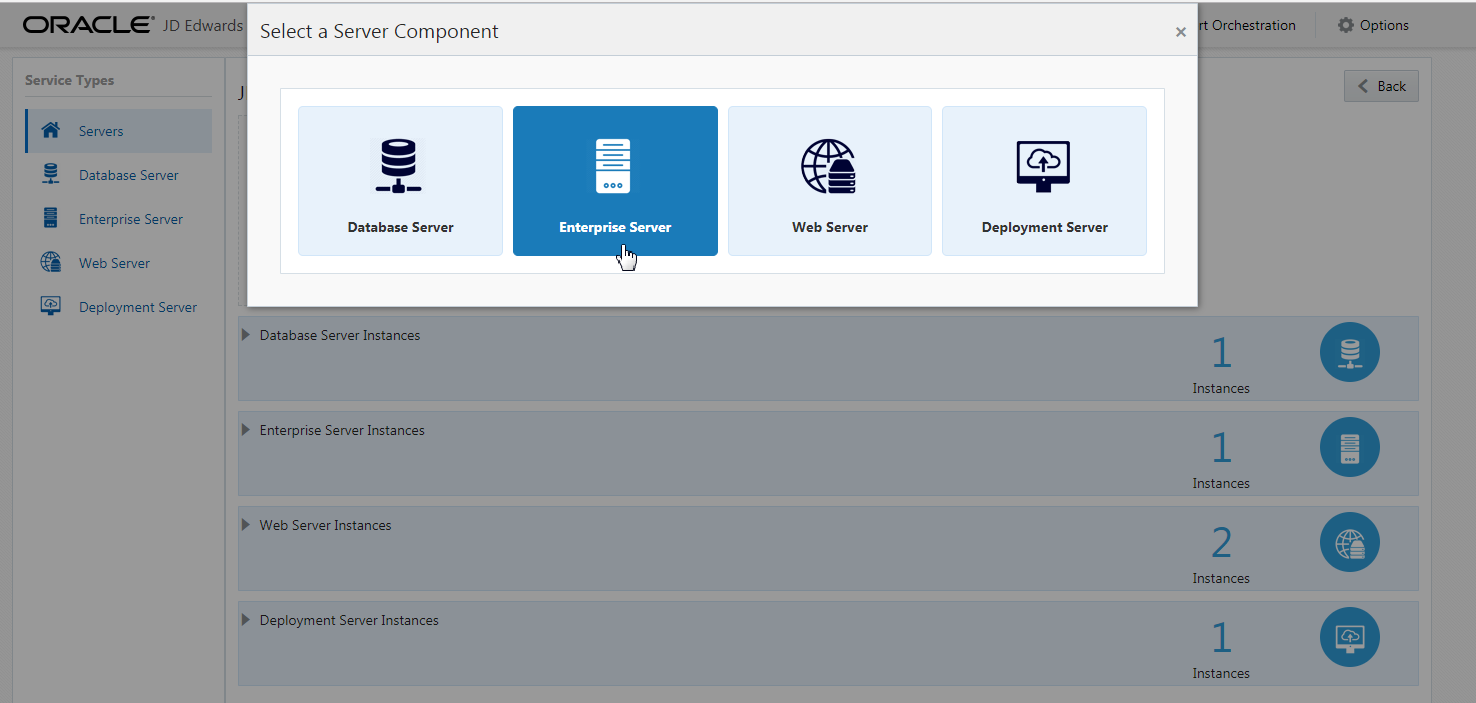
- On the JD Edwards Provisioning Console, click the Orchestrate icon.
-
On JD Edwards Servers, click on the instance of an existing server, or click the New Server icon to add a new JD Edwards service. Alternately you can select the desired server from Service Types on the left tab, and then click New Server to add a new service.
Note: The remainder of this procedure includes steps to either add (where allowed) or modify (existing) these instances:
- Database Server*
- Enterprise Server
- Web Server (for example, HTML Server and AIS Server)
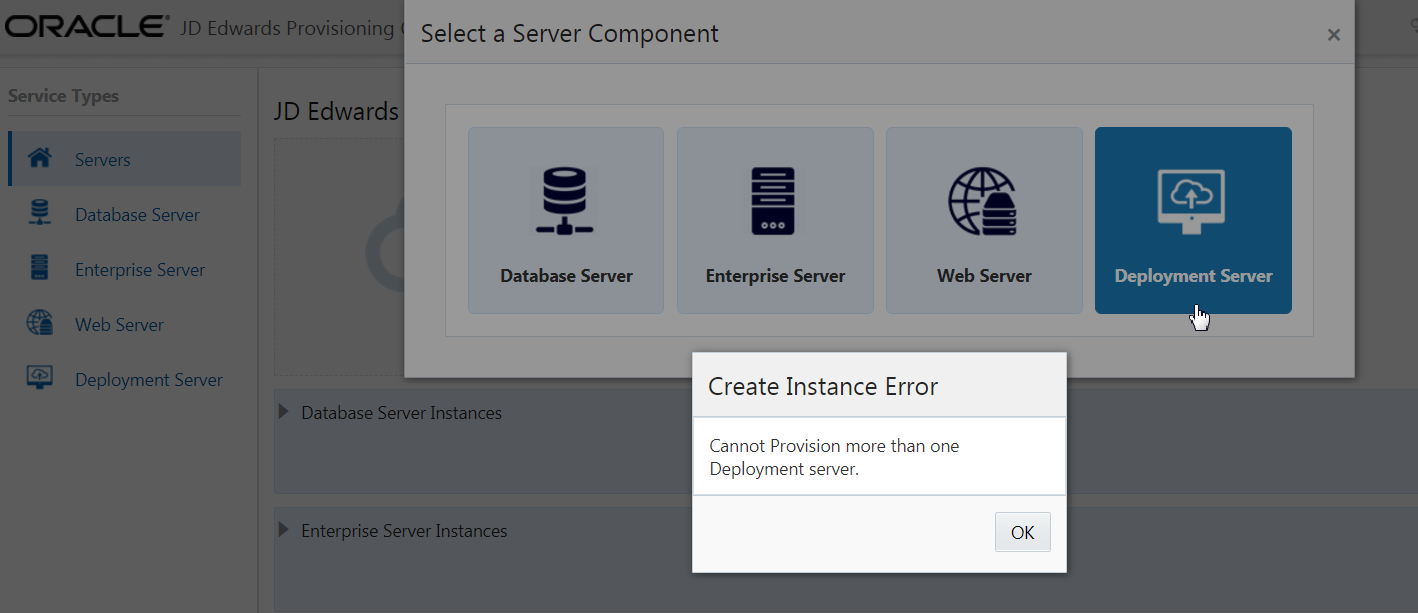
- Deployment Server* * The Provisioning Console will not allow you to add more than one of these server types because only one server of this type is supported per deployment.
- Development
- Shared (required)
- Prototype
- Production
- Pristine
-
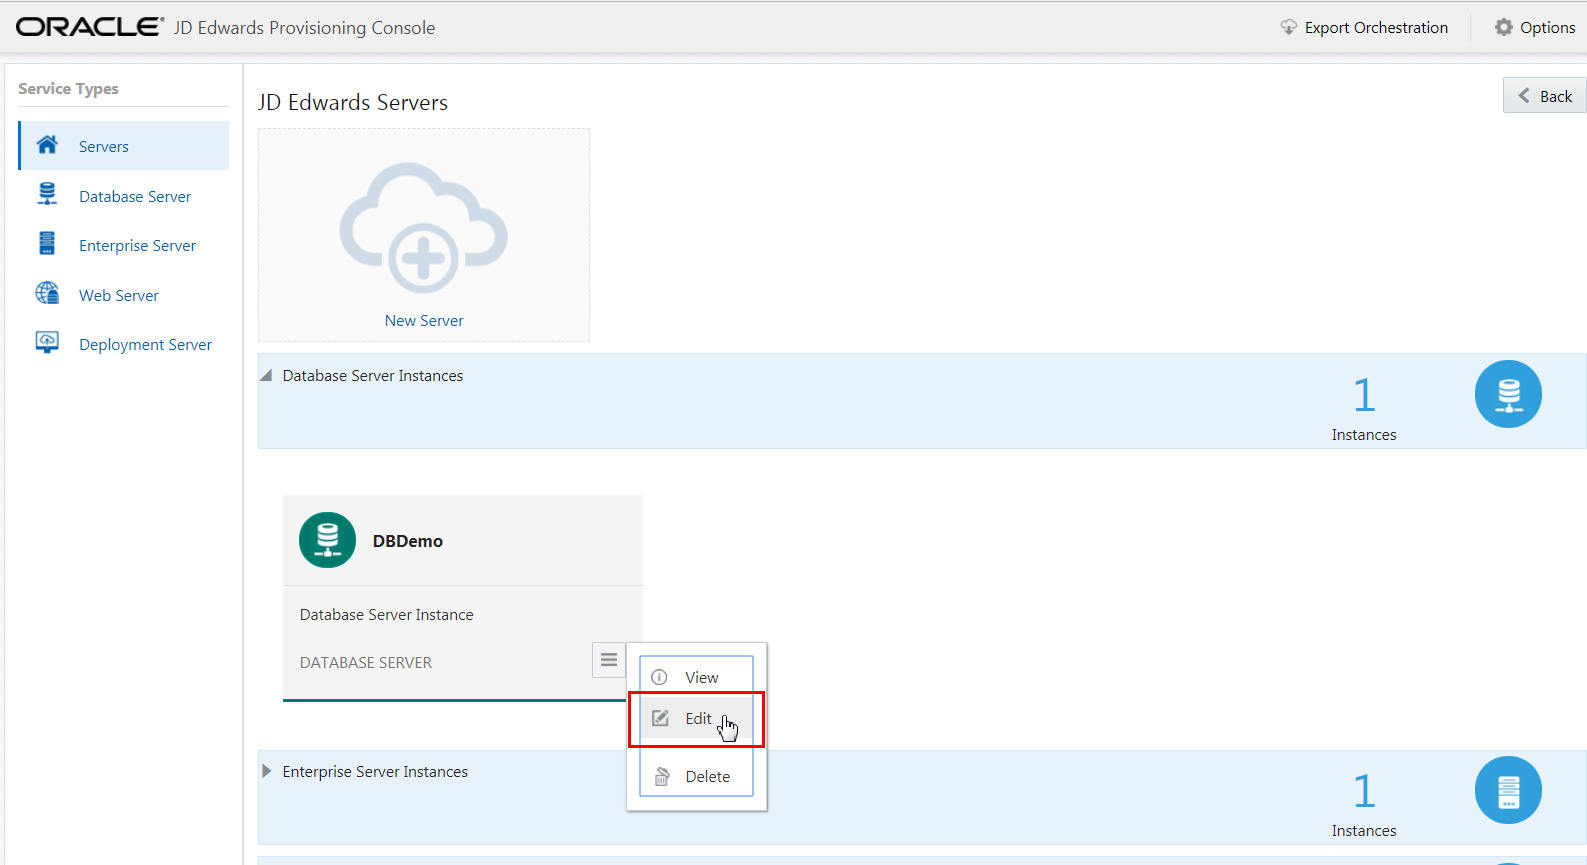
On JD Edwards Servers, click the existing Database Server Instance, click the Applications Options icon, and then click Edit.
-
On Existing Database Instance details, enter the appropriate values for your installation as illustrated in the following example, and then click the OK button.
-
If a Database Server exists, click View from the action tab to view the existing configuration for the Database Server.
-
You can choose the Delete option in the action tab to delete the Database Server instance. After you delete the existing Database Server instance, you can click the New Server icon, and then select Database Server from the Select a Component page to add a new Database Server instance.
-
Click the New Server icon and select Enterprise Server from the Select a Component window.
-
On Enterprise Server Instance Details, enter the appropriate values for your installation as illustrated in the following example, and then click OK.
-
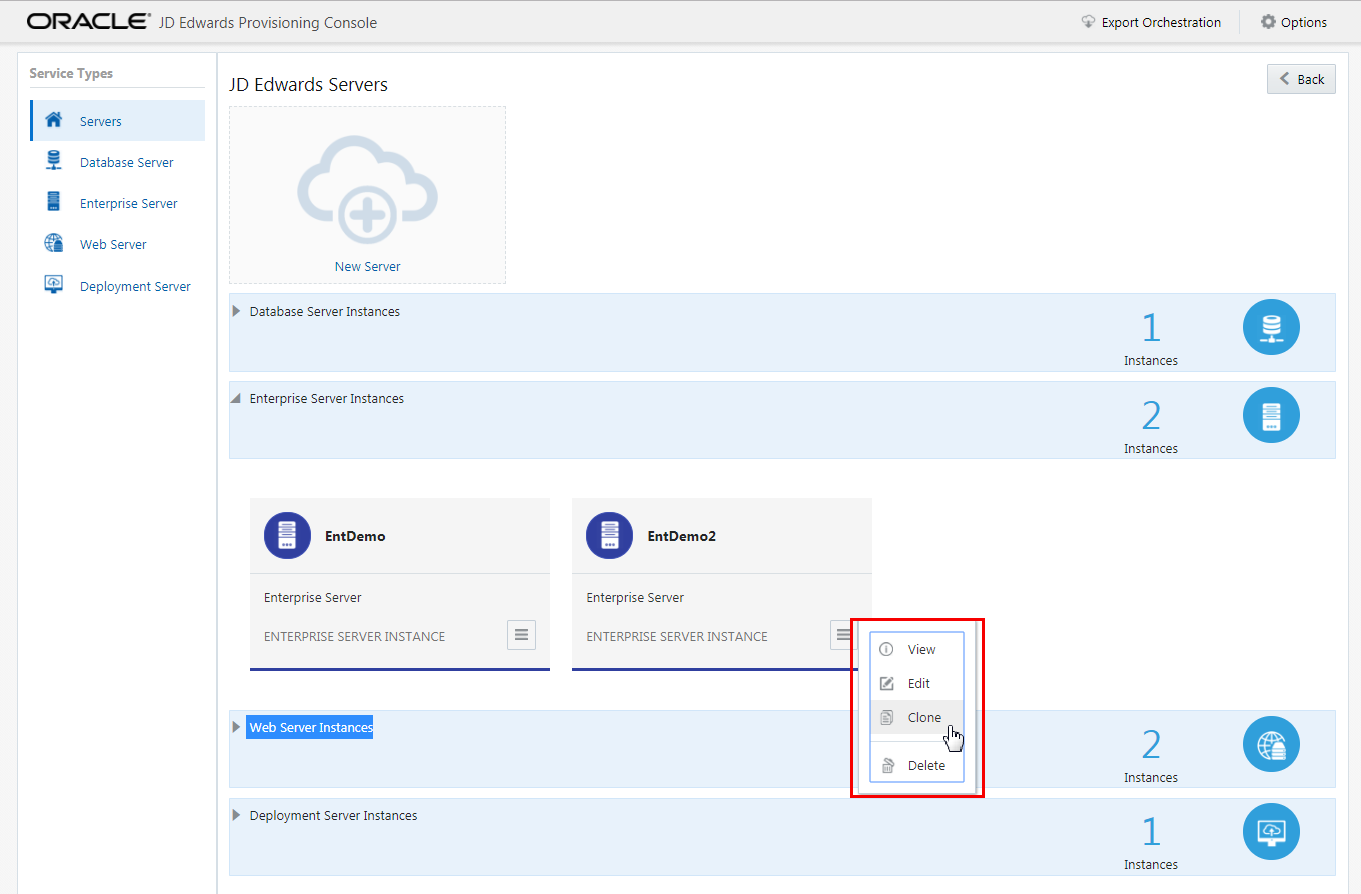
You should now be able to view multiple instances of the Enterprise Server.
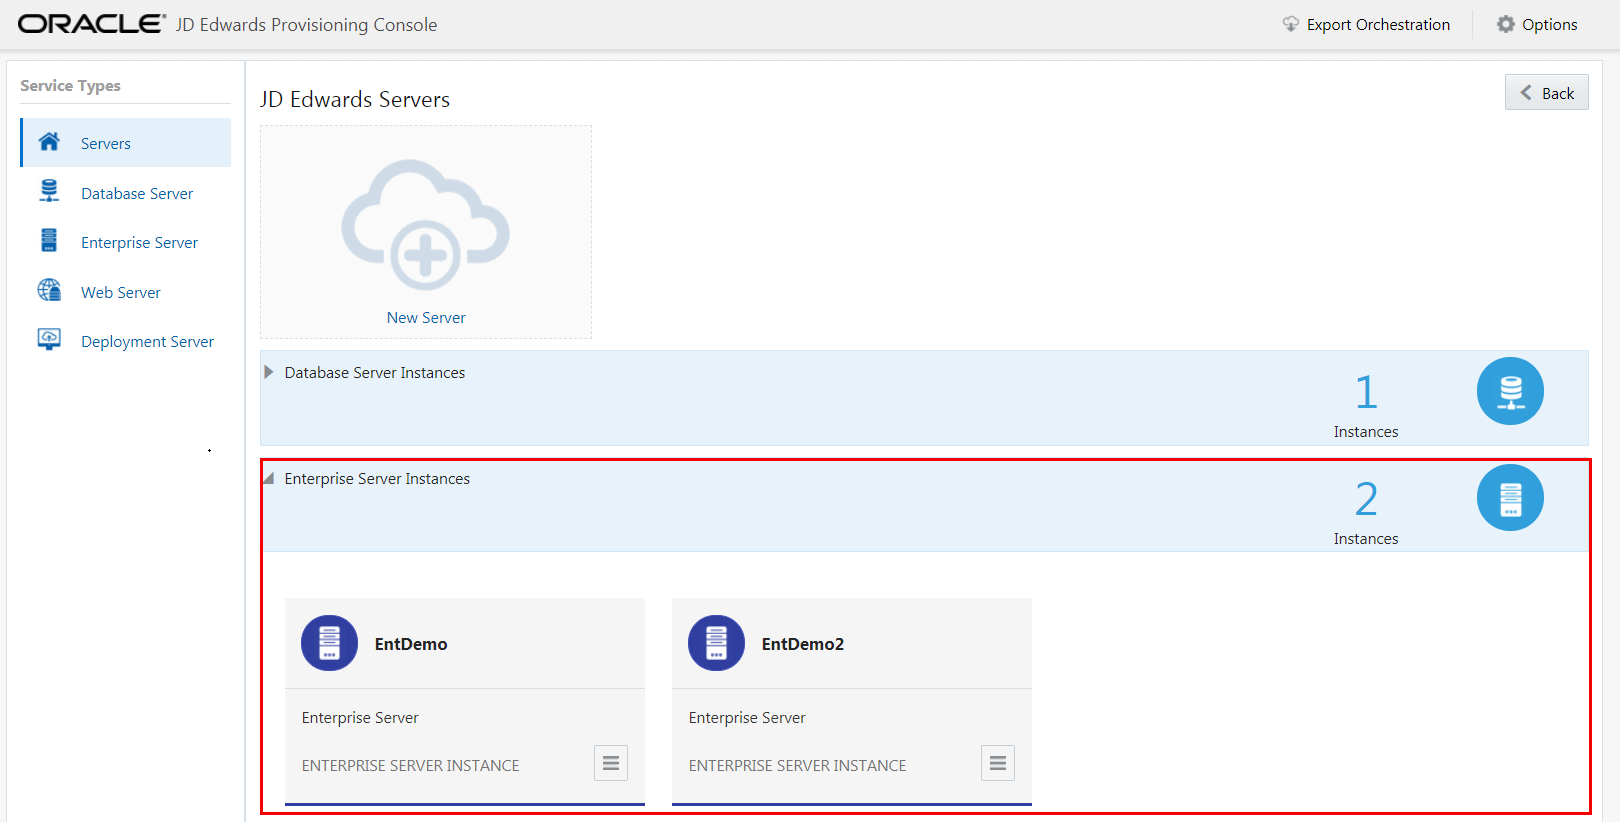
Enterprise Service Instances - If an Enterprise Server exists, click View from the Application Options tab to view the existing configuration for the Enterprise Server. To modify the instance configuration use the action tab and choose the Edit option. Use the Clone option to clone the Enterprise Server instance.
- To delete the instance, use the Application Action tab to select Delete.
Database Server
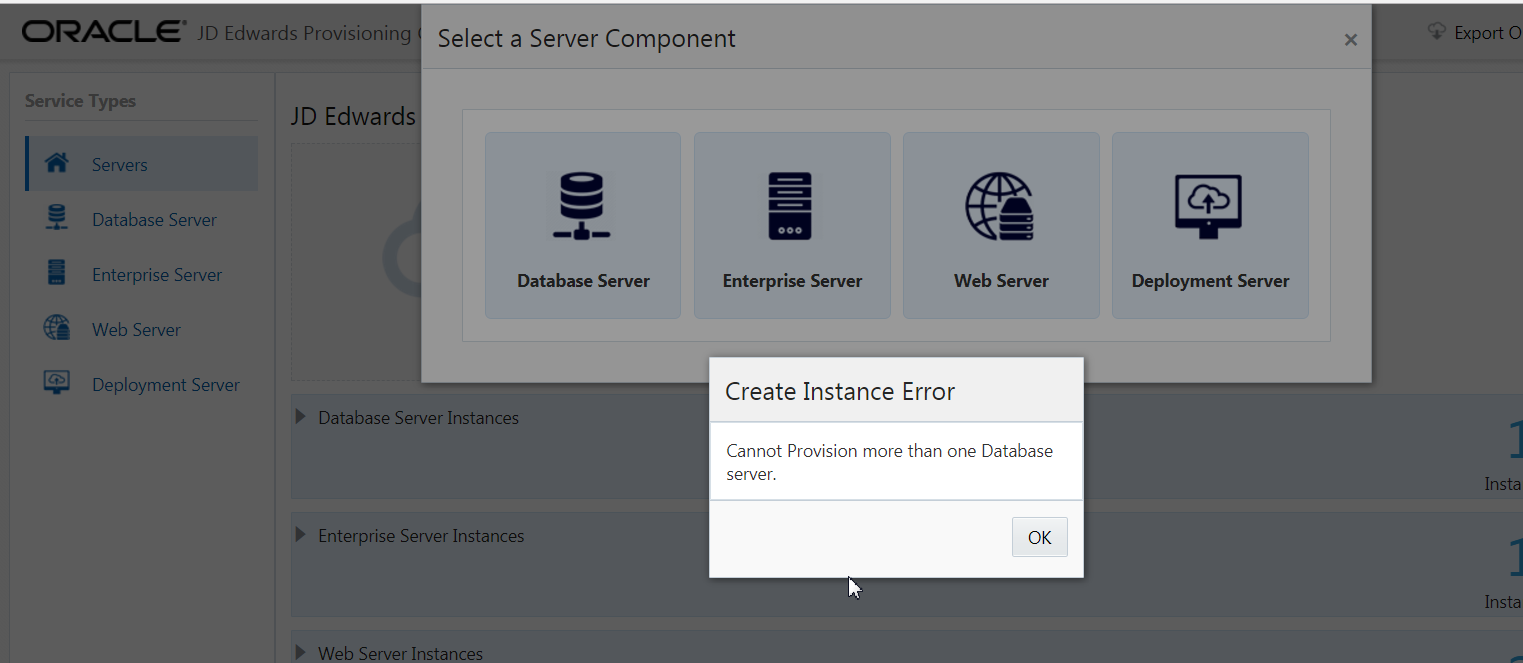
You can use only one Database Server per deployment. If you attempt to add more than one Database Server, the Provisioning Console displays an error.
You can provision the existing Database Server instance with the available schemas as required. The following schemas are available for the database instance:
To modify the Database Server instance:
Important: The Provisioning Console for One-Click Provisioning allows you to edit the schemas and demo data settings for an existing Database Server post deployment.
Enterprise Server
You can define any number of Enterprise Server instances. If you only want one Enterprise Server, you should define it to run both Logic and Batch. If you want to define multiple Enterprise Servers, at least one must be a Logic Server per pathcode.
To add an Enterprise Server:
Web Server
The Instance Type for Web Servers can be any of the available servers types selectable from the drop-down list; however, you must have at least one configured HTML Server saved prior to creating an associated AIS instance.
You can define any number of Web Server instances.
To add or modify a Web Server instance:
- Select the Service Type for Web Server.
- To create a new Web Server, click the New Server icon and then the Web Server icon and complete the required fields.
- To modify an existing Web Server, click View from the Application Actions tab to view the existing configuration for the Web Server. To modify the instance configuration use the action tab and choose the Edit option.
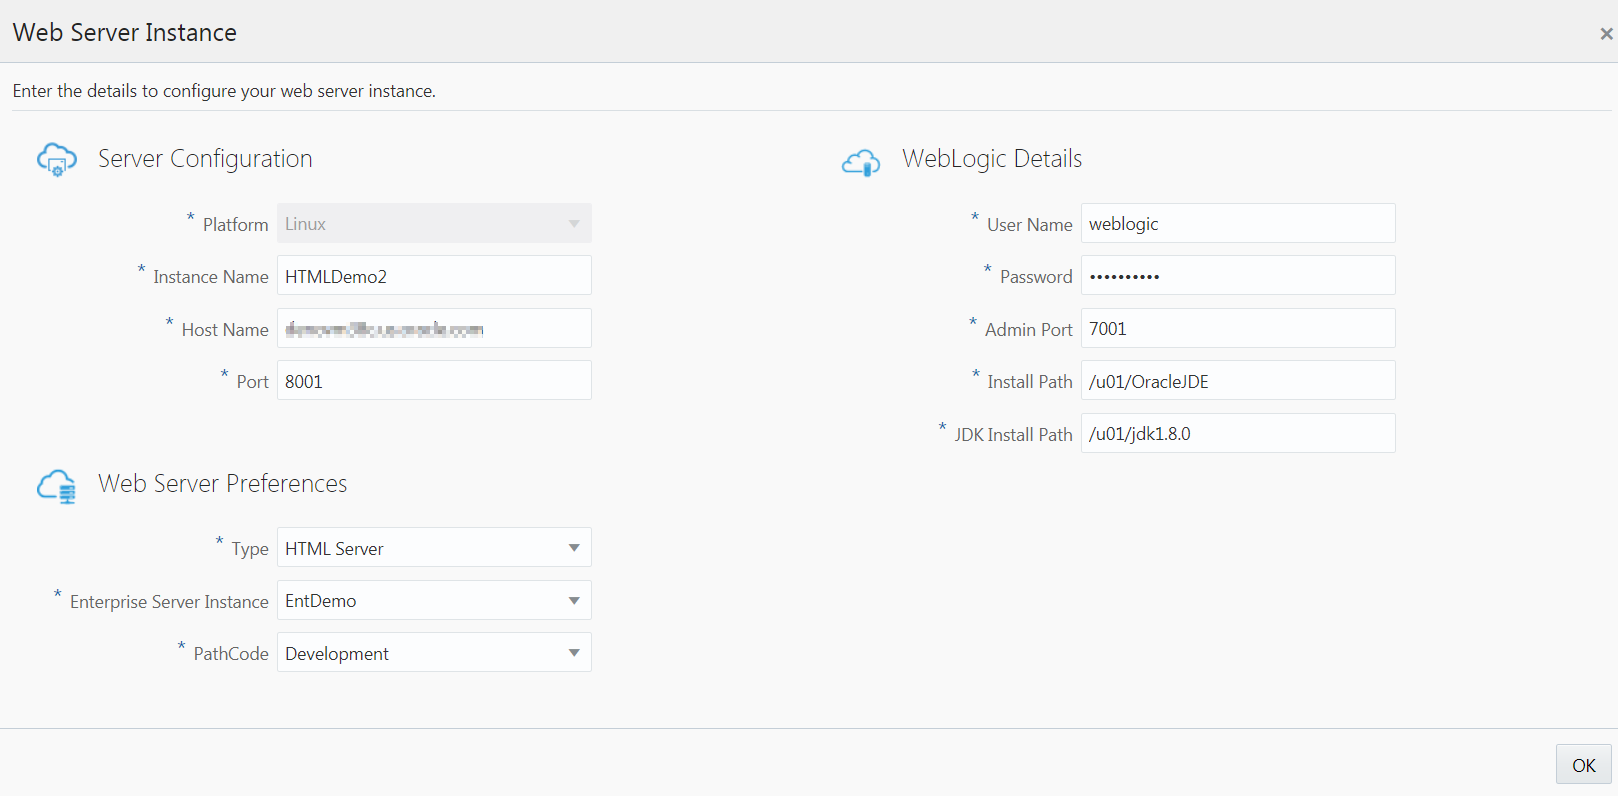
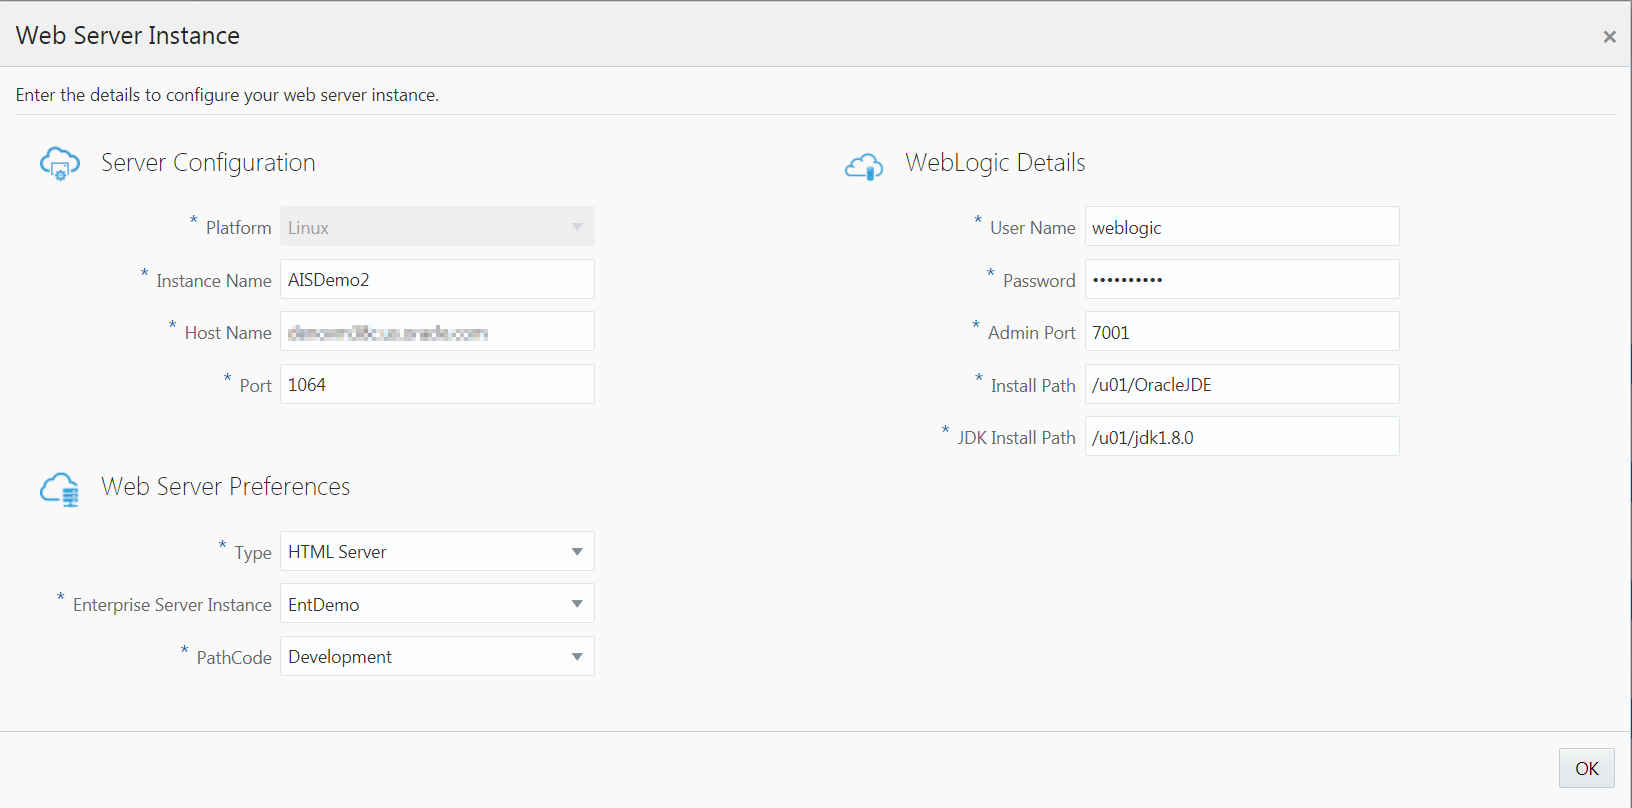
- On Web Server Instance Details, enter
appropriate values for your installation as
illustrated in the following examples for each of
these Web Server types:
- HTML Server
- Application Interface Services (AIS) Server
-
Click the OK button.
-
Verify the Web Server instances you modified or added is displayed in the JD Edwards Servers window.
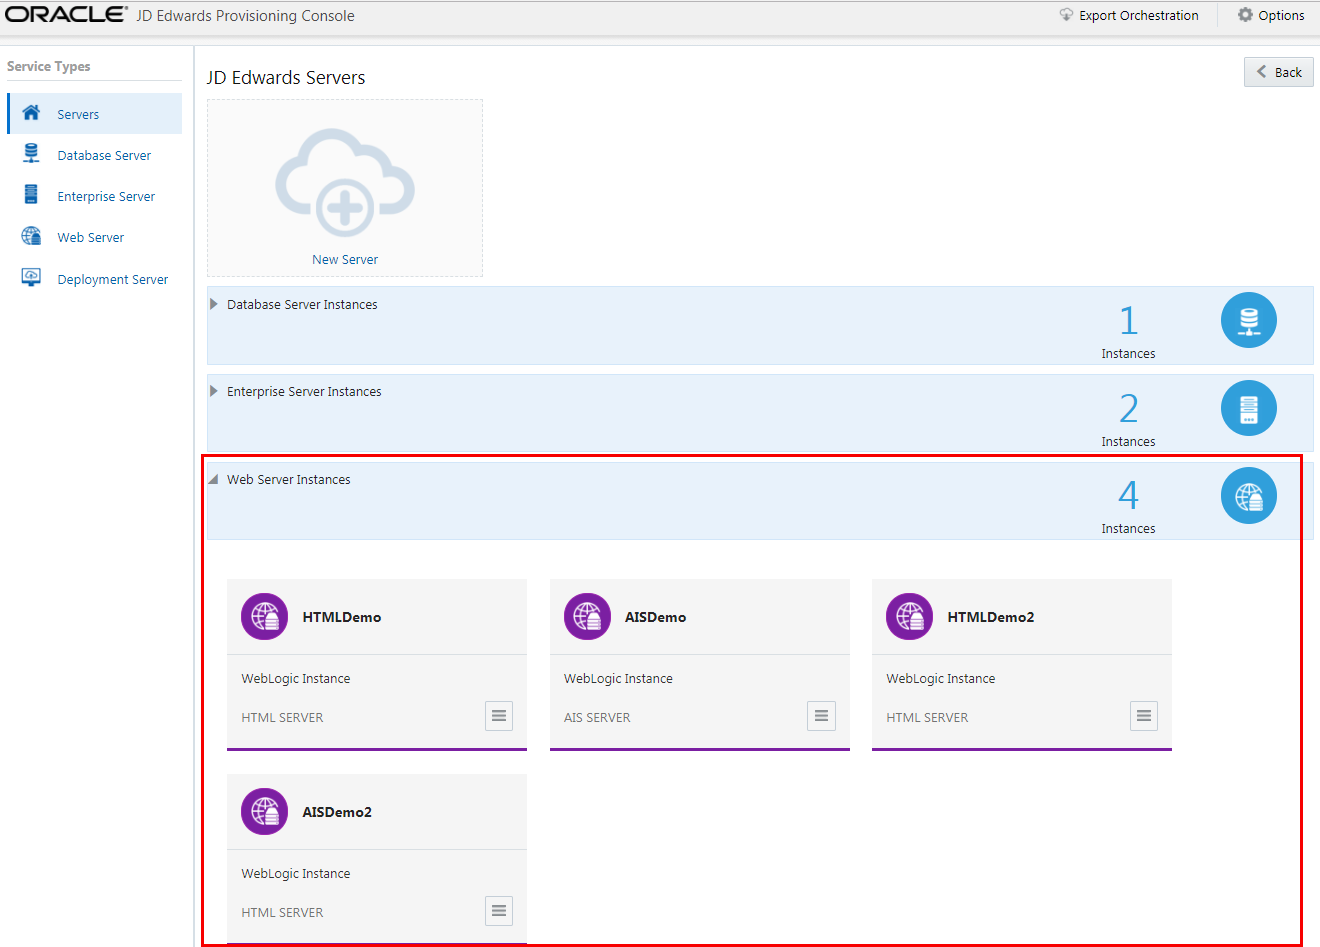
JD Edwards Servers - Web Servers -
To delete any web instance, use the Application Actions tab to select Delete.
Important: Because multiple Web Servers instances can run on the same WebLogic Server running on premises, you MUST specify different ports for each instance.
Deployment Server
You can use only one Deployment Server per deployment. If you attempt to add more than one Deployment Server, the Provisioning Console displays an error.
To modify the Deployment Server instance:
- On JD Edwards Servers, click the existing Deployment Server instance, click the Applications Options icon, and then click Edit.
-
On JD Edwards Deployment Server, complete these fields as illustrated in the following example, and then click OK.
- Verify that the Deployment Server instance you modified is displayed in the JD Edwards Servers window.
-
You can choose the Delete option in the action tab to delete the Deployment Server instance. After you delete the existing Deployment Server instance, you can click the New Server icon, and then select Deployment Server from the Select a Component page to add a new Deployment Server instance.


Note: To deploy an orchestration, refer to the section of this guide entitled: Deploy an Orchestration.
Orchestrate an Advanced Deployment Plan by Adding Web Servers and Enterprise Servers Post Deployment
You can add additional Web Servers and Enterprise Servers after you complete your Deployment. You cannot add any other server type after the deployment.
To add additional servers post deployment:
-
On JD Edwards One-Click Provisioning Console, click the Orchestrate icon.
-
On JD Edwards Servers, click the New Server icon, and in the Select a Component window, select Web Server.
-
On Web Server Instance Details, enter appropriate values for your installation.
-
Click the OK button. Similarly, you can add new Enterprise Servers.
-
On JD Edwards Servers, click the Back button.
-
On JD Edwards One-Click Provisioning Console, click the Deploy icon.
-
On JD Edwards Deployment window, review the deployment summary. You can verify the newly added servers in the Deployment Details tab.
Note: To deploy an orchestration, refer to the section of this guide entitled: Deploy an Orchestration.
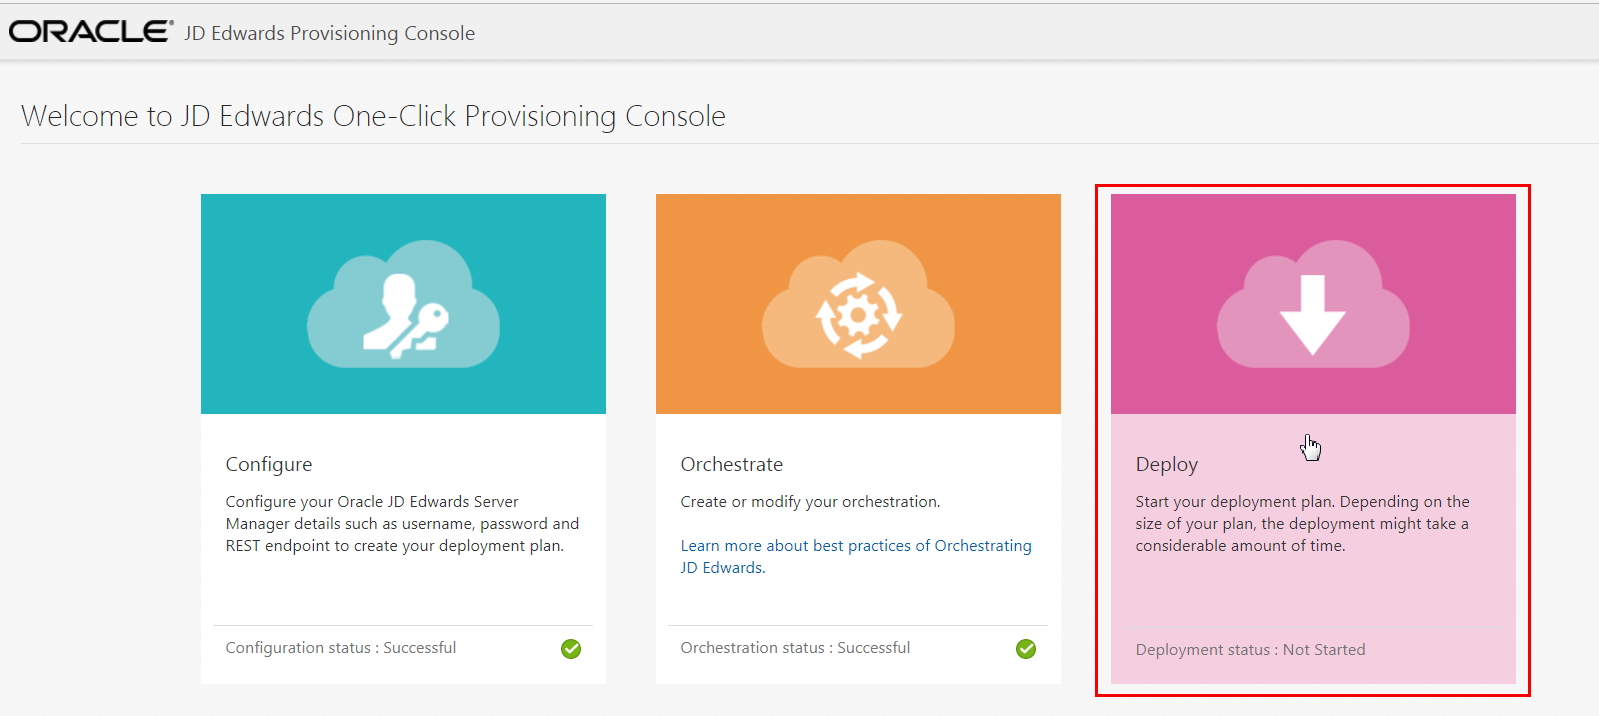
Deploy an Orchestration
This procedure describes how to deploy an orchestration, whether it is a Quick Start or an Advanced mode Deployment Plan.
-
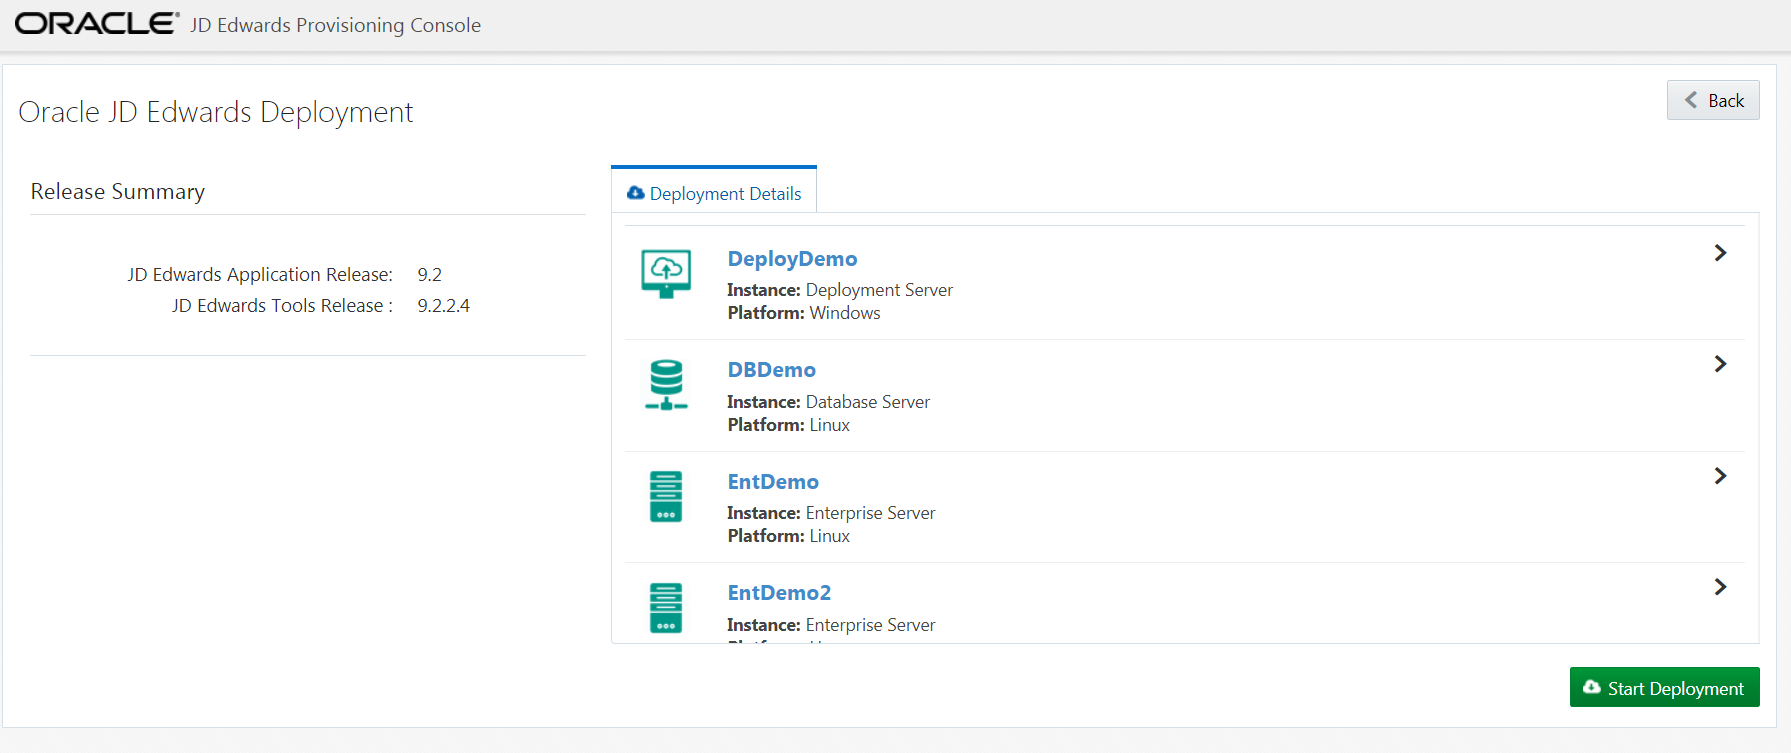
After you create a Deployment Plan, from the JD Edwards Provisioning Console, click the Deploy icon.
-
To view the Account details and Global Settings Summary, in the Deployment Details tab click the ">" icon for each server in the Deployment Details to see the details of the servers you provisioned.
-
Click the Back button if required to make additional changes to the server instances.
-
To start the deployment, click the Start Deployment button.
-
On Deployment Status, you can see all the instances and task details and their progress. You can also view the log or summary of each of the tasks.
The time taken to deploy the servers depends on your customization.
-
Click the Back button if you want to go back to the Deployment Summary window.

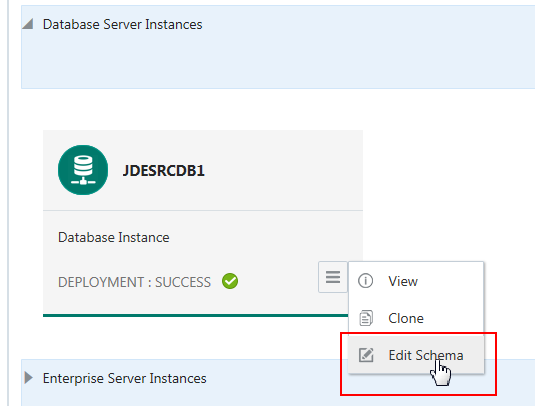
Adding Additional Pathcodes Post Deployment
You can add additional pathcodes to the Database Server instance after the deployment is successful.
To add additional pathcodes:
-
On Welcome to the JD Edwards Provisioning Console, click the Orchestrate icon.
-
On JD Edwards Servers, click on Database Server Instances.
-
Select the Database Server instance, and then use the action tab to choose Edit Schema option.
-
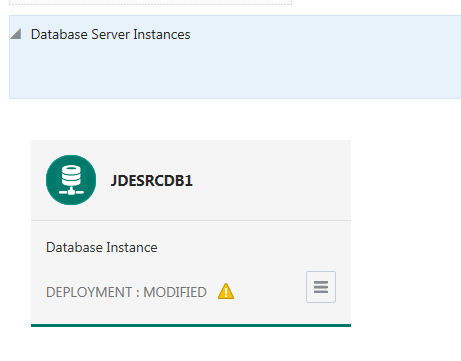
On Existing Database Instance Details, select the available pathcodes.
An error message window appears if you attempt to delete the previously installed schema or the demo data.
-
Click the OK button.
-
Now you can see the Deployment status as MODIFIED.
-
Click the Back button, and then Click Deploy icon to start your modified deployment.
Export and Import a Deployment Plan
Export a Configuration
To export a configuration:
- On the JD Edwards Provisioning Console, click the Orchestrate icon.
- To export an existing orchestration, on an existing Orchestration, from the title bar select Export Orchestration.
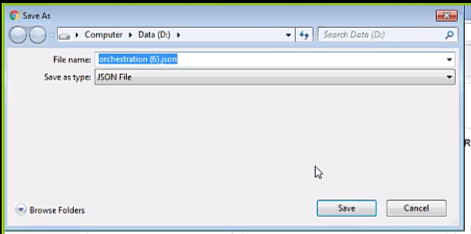
-
On the Save As dialog box, choose a path and file name for the exported orchestration.
- Click the Save button.

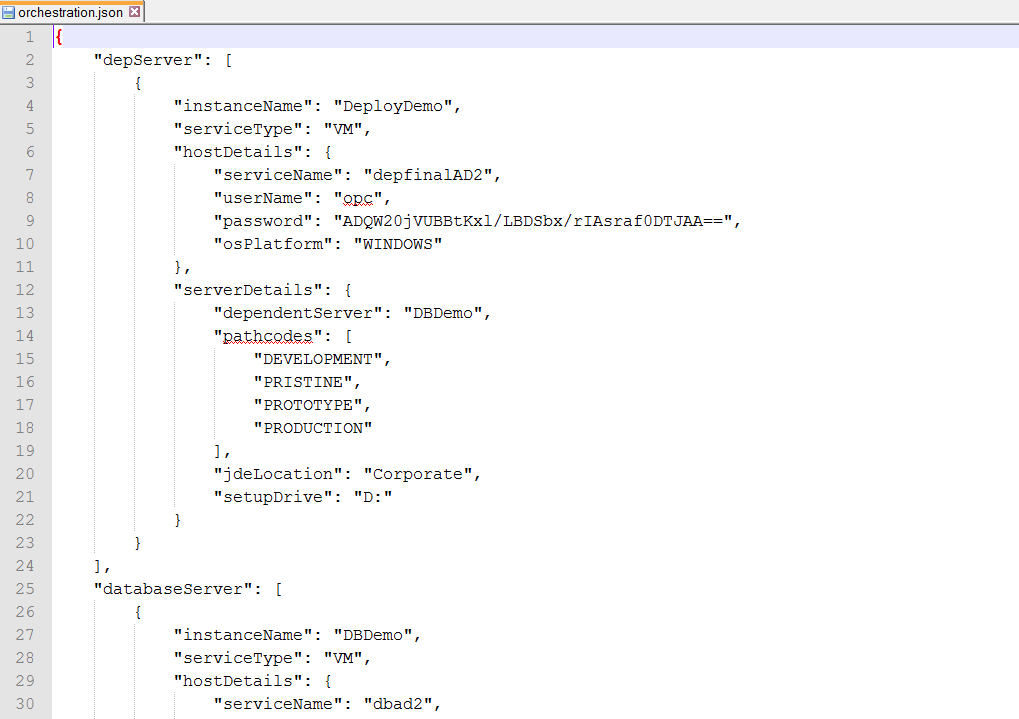
Note: If you want to view the raw contents of the .json file, you can open the file in an ASCII editor as shown in the following example.
Import an Orchestration
To import an existing exported orchestration:
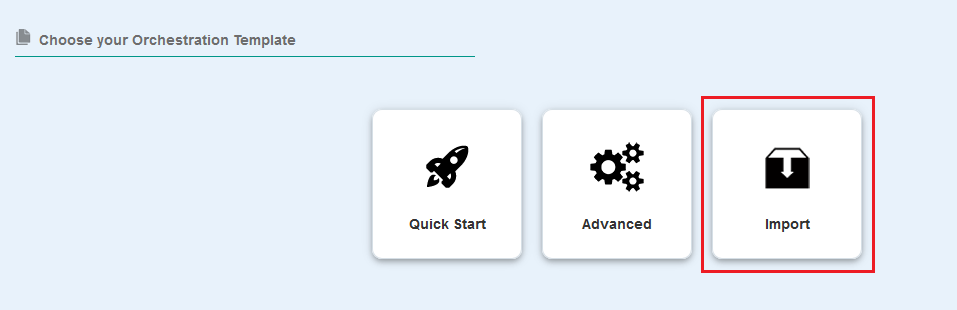
- On the JD Edwards Provisioning Console, select the Orchestrate tile.
-
Select the Import tile and follow the prompts to choose the Orchestration Template .json file that was previously exported.
Post Installation for the Deployment Server
Accessing the Deployment Server
You can access your Deployment Server using Microsoft Windows Remote Desktop Protocol (RDP). You will need the Public IP address of the Deployment Server and the password.
For information regarding the Public IP address, refer to the section of this document entitled: Access the JD Edwards EnterpriseOne Servers Using Their Public IP Address.
The password for the Deployment Server was assigned when you input values in the Deployment Server Instance screen in the preceding sections of this document that are titled: Orchestrate a Quick Start Deployment Plan. If you followed the recommendation, this password should be recorded on the Pre-Install Worksheet which is described in the document entitled: Preparing for a Deployment of JD Edwards EnterpriseOne Release 9.2 Using One-Click Provisioning.
Change the Administrator Password
Oracle recommends that you change the Administrator password for the Microsoft Windows image before applying any updates to the image.
Enable Change Assistant Access to the Update Center
In order to establish a connection to the update center to download ESUs, you must add a setting to the hosts file.
- Locate the hosts
file in the Microsoft Windows domain in which the
Deployment Server is running:
c:\windows\system32\drivers\etc\hosts
- Add this setting to the hosts
file:
209.17.4.8 login.oracle.com
- Save the hosts file.
To launch the web start Change Assistant:
- Disable the pop-up and ad blockers for the Update Center.
- Click here to access the Change Assistant application for multiple downloads and advanced search.
- Click here to install and launch the latest version of Change Assistant. This action, either downloads the jnlp file and/or launches javaws Java Web Start.
For more information, see Electronic Software Updates in the Update Center.
Package Build Considerations
In order to build packages on your Deployment Server, you will need to:
- Install Microsoft Windows Visual Studio and Windows SDK
- Disable 32-Bit Import and Export Functions of the Oracle Database Client
- Refresh CNC Data in JDEPLAN
- Build a New Client Package
- Build a New Server Package
Install Microsoft Windows Visual Studio and Windows SDK
The One-Click Provisioning Server delivers a Deployment Server to on premises Windows 2012 R2 with most of the software already installed with the exception of Microsoft Windows Visual Studio and Microsoft Windows Software Development Kit (SDK). Refer to the JD Edwards Deployment Server Certification page for current updates on supported software versions and software prerequisites. The Certification page can be accessed through the Oracle Support Portal:
https://www.oracle.com/support/index.html
The complete Visual Studio product (which includes the runtime and the compiler and associated tools) must be purchased and licensed from Microsoft.
- JD Edwards EnterpriseOne Tools Release 9.2 requires runtime libraries for Visual Studio 2010.
- JD Edwards EnterpriseOne Applications Release 9.2 requires runtime libraries and the full product for Visual Studio 2013.
As of the general availability of JD Edwards EnterpriseOne One-Click Provisioning for Tools Release 9.2 on the Oracle Compute Cloud Service, the following versions and associated links and navigation are valid.
Visual Studio 2013 Full Product
Note: You need Visual Studio 2013, which is a licensed product from Microsoft, if you plan on building packages on the Deployment Server.
Microsoft.com > Downloads > Search > Windows Software Development Kit for Windows 8.1
https://msdn.microsoft.com/en-us/library/dd831853(v=vs.120).aspxMicrosoft Software Development Kit (SDK) for Windows 8.1
Note: Although the SDK download is labelled as Microsoft Windows 8.1, the same download is applicable to both Windows Client 8.1 and Windows Server 2012. This SDK is specifically required for any Microsoft Windows-based machine that is building JD Edwards EnterpriseOne packages.
Microsoft.com > Downloads > Search > Windows Software Development Kit for Windows 8.1https://msdn.microsoft.com/en-us/windows/desktop/bg162891.aspx
Disable 32-Bit Import and Export Functions of the Oracle Database Client
There is an issue with the Oracle 12c 32-bit database client programs that import (impdp.exe) and export (expdp.exe) JD Edwards EnterpriseOne data and spec databases during installation of the Deployment Server. To work around the problem, you can force the system to use the impdp.exe and expdp.exe in the Oracle 12c 64-bit database \bin folder for importing and exporting data. This resolves the issue because the 64-bit versions of these import and export programs do not exhibit the issue that is observed with the 32-bit version.
For example, you could change the extension on these files (so they are not executable) using these commands:
cd
<32-bit_db_client_install_dir>\bin
rename
impdp.exe impdp.exe.bak
rename
expdp.exe expdp.exe.bak
Refresh CNC Data in JDEPLAN
The ESU process has changed to include automatic generation of OCM mappings and tables for tables that are not in Business Data. In order for this process to work correctly, you must update the CNC information in JDEPLAN before applying any Tools-related ESUs. Also if you have multiple Enterprise Servers, Database Servers, or both, you must perform this procedure in order to synchronize data between the System and Planner pathcodes before you do proceed further.
- Sign into JDEPLAN.
- Run R9840C and do the following copy, choosing
the option for Copy All Plan Components:
from: System – 920
to: Planner – 920
Note: R9840C will copy any missing CNC from System to Planner. - Run R98403A choosing version XJDE0004.
- Change the Data Selection to F98611.
- Change the Processing Options as follows:
- Source Data Source = System – 920
- Target Data Source = Planner – 920
- Proof Mode = 1
- Replace Duplicates = N
- Clear Table = N
Using these processing options, running the R98403A will add any missing data source definitions in JDEPLAN with the correct definitions from System – 920.
Build a New Client Package
You must build a new Client package. Due to space considerations on the D:\ drive, you will need to move the D:\Software directory and all of its contents to the C:\ drive or another computer. For example:
- Add a new directory under the C:\
drive labeled:
C:\SoftwareBKUP - Copy the D:\Software directory (and all its contents) to the C:\SoftwareBKUP directory.
- Delete the D:\Software directory.
Complete the following steps to build a full package by following the standard procedure to build a full package with the following important distinctions.
Note: The creation of update packages against the delivered FA packages (PS920FA, PY920FA, PD920FA, and DV920FA) is not supported. In order to build update packages in the future, you must build and deploy a new full package.
- On the last screen of the Build Definition, on Package Assembly – [Package Build Revisions], select the Compression Options tab.
- Ensure the Compress Foundation
check box is selected. This is required to
recompress the system folder on the Deployment
Server to create a new systemcomp directory that
includes a JRE. This JRE is required for use by
the Development Client.
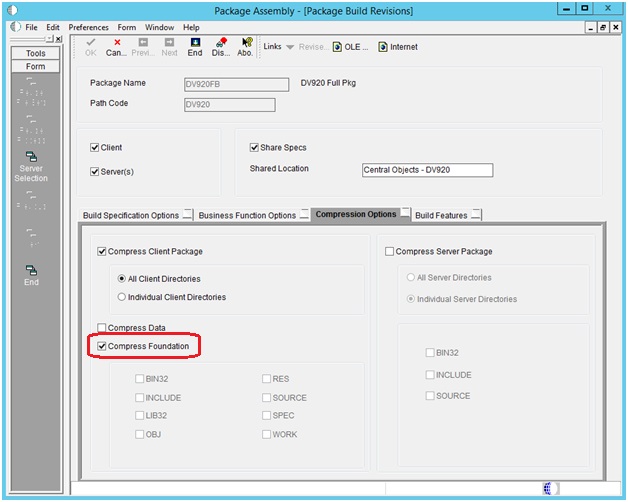
Package Assembly - (Package Build Revisions) - Client Package
Note: If you encounter NER failures during your full package build (server side only), to resolve these failures refer to the My Oracle Support Doc Id 1950295.1 at this link:
https://support.oracle.com/epmos/faces/DocumentDisplay?id=1950295.1
Build a New Server Package
As a best practice it is strongly recommended that you build a new server package. For multiple Enterprise Server environments, the procedures in this section are mandatory.
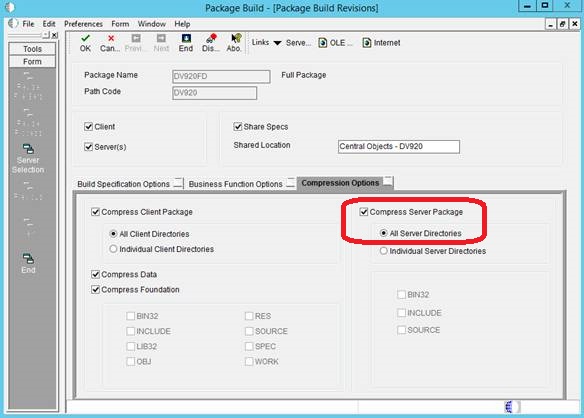
On Package Build, Package Build Revisions, in addition to the normal compression options, you must select these additional options during the package build process for any full package:
- Compress Server Package
- All Directories
Development Client Considerations
Consider the following requirements before you create the Development Clients:
- Windows machines are on the private network, and that they can communicate with the Database and the Enterprise Servers.
- A full package build is completed on the Deployment server. This package build creates the Development Client package installation. The delivered FA package will technically install a Development Client, but it is does not work for most developer activities.
Obtain and Install CA Certificates in Oracle WebLogic Servers and the Deployment Server
The deployment of JD Edwards EnterpriseOne One-Click Provisioning includes temporary Certificate Authority (CA) certificates. Because these certificates are set to expire at preset and non-extendable times, you must obtain and install your own CA certificates. These must be certificates that are verified by a verified CA authority such as Entrust and Symantec Corporation. The following outlines the general procedure to create a Keystore and to generate a Certificate Signing Request (CSR).
- In your local environment, obtain and install a Java Keystore. This is a repository for security certificates – either authorization certificates or public key certificates – plus corresponding private keys. These keys are used for SSL encryption by the Oracle WebLogic Server. A file with extension jks serves as keystore.
- From the Keystore, generate a Certificate Signing Request (CSR).
- Export the Certificate Signing Request (CSR).
- Validate the CSR. For example, you could use the validation tools provided by Symantec (https://ssltools.websecurity.symantec.com/checker).
- Submit the CSR to the Certificate Authority such as Entrust or Symantec Corporation.
- Upon return receipt, import the validated certificates to the Keystore for each server. That is, each server that must communicate with another must have its own certificate plus that of the target server. In this case, the HTML Server must have its own certificate plus that of the AIS Server, and vice versa.
- Logged in as the WebLogic Adminstrator, you must manually modify each of these instance of Oracle WebLogic Server within your One-Click deployment to use the new Keystore:
- Server Manager Console
- Each instance of a JD Edwards EnterpriseOne HTML Server (JAS)
- Each instance of a JD Edwards EnterpriseOne AIS Server
- You should also modify the parameters using Server Manager to use the https connection for communication between the HTML Server and the AIS Server.
- In the HTML
instance, modify the following Web
Runtime parameters to use https, a fully
qualified domain name, and https port:

Server Manager - Section in the HTML Server to Modify for Communication from the HTML Server to the AIS Server - In the AIS
instance, modify the following HTML
Server parameters to use https, a fully
qualified domain name, and https port:

Server Manager - Section in the AIS Server to Modify for Communication from the AIS Server to the HTML Server
Tip: After you have SSL configured and tested, it is recommended that you disable all the non-SSL ports.
For additional details on working with CA certificates on your Oracle WebLogic Server, refer to this guide: Fusion Middleware Administering Security for Oracle WebLogic Server 12.1.3.
Post Provisioning Tasks
Enabling a Firewall
You must turn the Firewall off for each Linux-based server in order to use JD Edwards EnterpriseOne One-Click Provisioning. After provisioning is complete, you can turn the Firewall back on using the following procedure.
-
On each JD Edwards EnterpriseOne Linux-based server, turn the Firewall back on using these commands:
 sudo systemctl enable
                                  firewalld.service
sudo service firewalld start -
Also on each JD Edwards EnterpriseOne server, repeat this command as necessary to specify open ports:
sudo firewall-cmd --zone=public
                                  --add-port=nnnn/tcp –-permanent
where
nnnnis the port number that must be open, which are listed in the following table in the column labelled OCI Firewall Port List. -
After all the ports are opened in the Firewall for each server, use this command to reload the Firewall:
sudo firewall-cmd --reload
Component
Machine
Ports
Comment
Server Manager Console
Provisioning Server Machine
8998
https (SSL)
Provisioning Server Machine
8999
http (non-SSL)
SSH
All Machines
22
One-Click Provisioning Console
Provisioning Server Machine
3000
Server Manager Console JMX
Provisioning Server Machine
14501
Server Manager Agent JMX
In each machine where these servers are installed:
· Database Server
· Enterprise Server
· WebLogic Server
· Deployment
14502-N
N depends on number of instances created under a particular Server Manager Agent.
For example, for two instances under single agent, ports 14502-14503 should be opened.
Database Server Listen Port
Database Server Machine
1521
Enterprise Server Listen Port
Enterprise Server Machine
6017
Enterprise Server Predefined Ports
Enterprise Server Machine
6018- 60NN
NN depends on the number of predefined ports, where the default is 6 ports. Therefore, for Release 9.2, if the default values are used, the port range would be 6018-6023. See Enterprise Server Predefined Ports below for further details.
WebLogic Admin Console
WebLogic Server Machine
*
User specified at the time of installation.
*
User specified at the time of installation.
HTML Server
WebLogic Server Machine
*
User specified using Provisioning Console.
AIS Server
WebLogic server Machine
*
User specified using Provisioning Console.
Deployment Server
Provisioning Server Machine
5985
Used for the winrm port for communication between Provisioning Server and Deployment Server.
Remote Desktop Protocol (RDP)
Deployment server machine
3389
Samba ports
Provisioning Server Machine
139 and 145
Enterprise Server Predefined Ports
You must enable Predefined Ports in the jde.ini file on the Enterprise Server. Use Server Manager to ensure this setting exists:
enablePredefinedPorts=1
For Release 9.,2, the serviceNameListen value is 6017. The next port for use by net services on the Enterprise Server is defined by the value serviceNameListen+1 until the value set by maxNetProcesses= is reached, where the default is value is 6 net processes. Therefore the default value of 6 net process means you must open ports in the firewall on the Enterprise Server 6018-6023 for use by net processes. These ports cannot be in use by any other process running on the Enterprise Server. If they are already in use, then whatever program is using them must be reconfigured to use different ports.
Re-enabling SELINUX
Use this command to check the status of Security Enhanced Linux (SELINUX):
sudo getenforce
If the returned status is Disabled, you can re-enable the extra security restriction provided by SELINUX by modifying this file:/etc/selinux/config
Edit the /etc/selinux/config file to change the SELINUX=setting to either of these values:
SELINUX=Enforcing
or
SELINUX=Permissive
You must reboot the machine in order for the change
to take affect any time you change the /etc/hostname
file or when you change security settings.
After the reboot is complete, run sudo
getenforce to confirm that the status of
SELINUX is Enforcing or Permissive,
whichever you set.
Access the JD Edwards EnterpriseOne Servers Using the Host Name
After the Provisioning Console has successfully completed deploying all servers defined in the Orchestration function of plan creation, you can access these deployed JD Edwards EnterpriseOne servers and Development Client using their public IP address:
Server Manager Console
After the Server Manager Console is started, you can access it using its host name using this syntax:
http://<Host Name>:8999/manage
For example:
http://abc.pqr.xyz:8999/manage
Important: You should always use HTTP to access the Server Manager Console for normal operations. Although the Server Manager Console is also enabled for HTTPS/SSL protocol, such access is restricted for internal use as part of the REST/API functionality, and should not be used for normal operations.
HTML Server
After your HTML Server is deployed, you can access it using its host name using this syntax:
https://<Host Name>:<port as defined in orchestration>/jde/E1Menu.maf
Important: The file name E1Menu.maf is case-sensitive and must be specified exactly as shown here.
For example:
https://abc.pqr.xyz:8001/jde/E1Menu.maf
AIS Server
After your AIS Server is deployed, you can access it using its host name using this syntax:
https://<Host Name >:<port as defined in orchestration>/jderest/defaultconfig
For example:
https://abc.pqr.xyz:8002/jderest/defaultconfig
Deployment Server
You can access your Deployment Server using Microsoft Windows Remote Desktop Protocol (RDP). To do so, provide the host name which you have given during the provisioning. On that tab, locate the instance name that you gave for your Deployment Server.
Troubleshooting
- One-Click Provisioning Console Troubleshooting Tips
- Enterprise Server Provisioning Fails - Communication Failure
- Enterprise Server Provisioning Fails - Health Check Fails
- HTML Server Intermittently Unavailable
- Server Manager Console Fails to View Log File and Download Log for Enterprise Server and HTML Server
- JAVA BSFN Fails in Web Server
- PDB on Compute Not Open
- Not Able to View and Download Server Manager Home Logs When Server Manager is SSL-Enabled
- Resolving host name Issues During Provisioning
- Health Checks Fail as Final Step in OCI Provisioning
- Invalid Identifier for Table F980051
One-Click Provisioning Console Troubleshooting Tips
This section contains the following troubleshooting tips for the EnterpriseOne One-Click Provisioning Console:
- Accessing a Previously Saved Provisioning Console Configuration
- Console Administration
- Console Service Status
- Start the Console
- Stop the Console
- View the
Console Logs
Accessing a Previously Saved Provisioning Console Configuration
Console Administration
The One-Click Provisioning Console process is configured as a systemd service in the One-Click Provisioning Server image. The configuration file (E1CloudConsole.service) is located in this directory:
/etc/systemd/system/E1CloudConsole.service
Console Service Status
Run the following command in the shell to display the One-Click Provisioning Console service status:
$ sudo systemctl status E1CloudConsole
Start the Console
Run the following command in the shell to start the One-Click Provisioning Console service.
$ sudo systemctl start E1CloudConsole
Run the following command to verify the service status within same machine:
$ curl -kI https://localhost:3000
The response from the Curl command should be similar to this:
[opc@multitest
~]$ curl -kI
https://localhost:3000//</span>\\\\ HTTP/1.1
200 OK
X-DNS-Prefetch-Control: off
X-Content-Type-Options: nosniff
X-Frame-Options: SAMEORIGIN
Strict-Transport-Security: max-age=86400
X-Download-Options: noopen
X-XSS-Protection: 1; mode=block
Accept-Ranges: bytes
Cache-Control: public, max-age=0
Last-Modified:
ETag: W/"5862-156cad16600"
Content-Type: text/html; charset=UTF-8
Content-Length: 22626
Date:
Connection: keep-alive
Outside the machine, you can access the One-Click Provisioning Console application using the below URL:
https://<#PUBLIC_IP#>:3000/
Stop the Console
Run following command in the shell to stop the One-Click Provisioning Console service.
$ sudo systemctl stop E1CloudConsole
View the Console Logs
Run following command in the shell to view the logs for the One-Click Provisioning Console.
$ sudo journalctl -u E1CloudConsole
Press Page-Down to scroll through the logs.
Enter Shift + G to scroll to end of the log.
Note: The One-Click Provisioning Console logs are completely regenerated each time the Console is run.
Enterprise Server Provisioning Fails - Communication Failure
Enterprise Server Provisioning Fails - Health Check Fails
HTML Server Intermittently Unavailable
Server Manager Console Fails to View Log File and Download Log for Enterprise Server and HTML Server
JAVA BSFN Fails in Web Server
If the host name command in the JAS Server returns the FQDN then set the short host name by using the following command.
sudo hostnamectl set-hostname<short host
                            name>
PDB on Compute Not Open
The Console checks to ensure the Pluggable Database (PDB) on the on premises is open (set to READ WRITE) as you begin to provision it. If the PDB is not open, the Console scripts will issue commands to open it. However, if the PDB is still closed (not set to READ WRITE) when the deployment commences, the deployment will fail. Use the following procedure to determine if the PDB is open, and if not how to set it to open.
- Connect to the database using this command:
sqlplus '/as sysdba';
- Verify the pluggable database JDEORCL
is open using this command:
select OPEN_MODE from v$pdbs where NAME = 'JDEORCL';
- If the OPEN_MODE is set to READ WRITE, then the PDB is ready to be provisioned by the JD Edwards EnterpriseOne One-Click Provisioning Server.
- If the OPEN_MODE is not READ
WRITE, then the PDB is not open. Open
the PDB using this command:
alter pluggable database JDEORCL open;
Not Able to View and Download Server Manager Home Logs When Server Manager is SSL-Enabled
When Server Manager is SSL-enabled, the users may not be able to view and download the Server Manager Home logs. The root cause may be because the proper security certificates are not available. For instructions on how create and import security certificates, refer to these documents:
Resolving Host Name Issues During Provisioning
If you encounter host name issues during orchestration because the provisioning was run against machines with the long host names, FQDNs, or both, then use the following procedure to resolve the issue:
- On the operating system level, change the host names of all servers in the on premises architecture to use a short host name without the FQDN.
- On the database level, change all the host names in JDE tables to use short host names without using the FQDN.
- Ping all the machines with short host names and verify that the ping test is successful.
See Understanding Machine Names for more information.
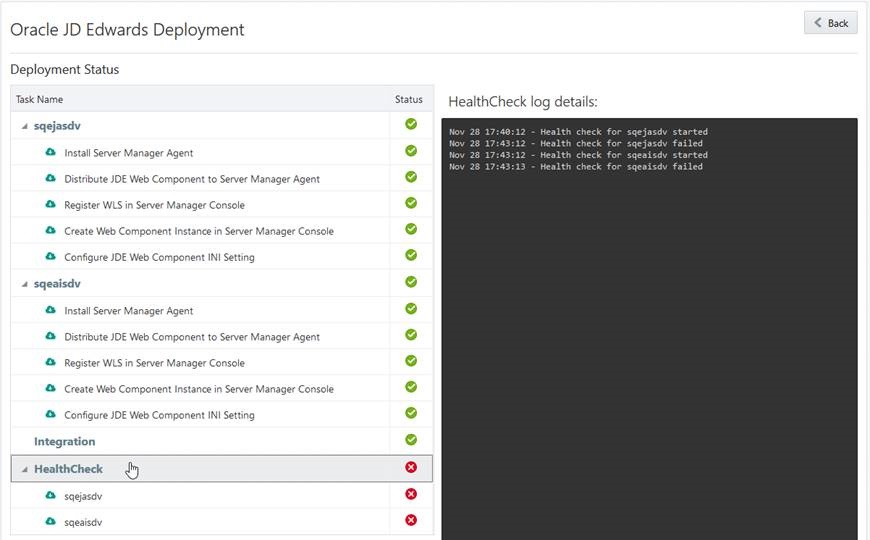
Health Checks Fail as Final Step in OCI Provisioning
If the health checks fail during the final step in OCI Provisioning (as shown in the example below), it is likely because the predefined ports for the Enterprise Server are either not enabled or not properly defined in the VCN. For details, refer to the section of the companion document entitled: Preparing for a Deployment of JD Edwards EnterpriseOne Release 9.2 Using One-Click Provisioning, in the section Create a Virtual Network, in the subsection Enterprise Server Predefined Ports.
Error ORA-00904: "NRUSER1": Invalid Identifier for Table F980051
The JAS log files displays the following error after you install EnterpriseOne using the JD Edwards One-Click Provisioning Console with Tools 9.2.2.4:
[SEVERE] - [JDBJ] SQLException occured in the
                            SQLPhysicalConnection.select():Auto: | Table or View
                            Name = F980051 - Data Source[0] = System - 920
                            java.sql.SQLSyntaxErrorException: ORA-00904:
                            "NRUSER1": invalid identifier
                            [SEVERE] - [BASE]
                            com.jdedwards.database.base.JDBException:
                            [SQL_EXCEPTION_OCCURRED] An SQL exception occurred:
                            ORA-00904: "NRUSER1": invalid identifier .
                            com.jdedwards.database.base.JDBException:
                            [SQL_EXCEPTION_OCCURRED] An SQL exception occurred:
                            ORA-00904: "NRUSER1": invalid identifier
Cause:
The delivered image for One-Click Provisioning has incorrect OCM mappings for the F980051 table. The OCM for this table is pointing to the System - 920 database data source where the structure of the table is not consistent with the table specs.
Solution:- Check both the System and the Server Map data
source OCM mappings and change the OCM mappings as
shown in the following list:
Use the following correct OCM mappings for F98005* tables: - F980051 (Bell Status) mapped to Control Tables - <Environment>
- F980052 (Notification Execution History) mapped to Control Tables - <Environment>
- F980053 (Subscription Metadata) mapped to Control Tables - <Environment>
- F980054 (Notification Queue) mapped to System - 920
- F980055 (Notifications Constants) mapped to System - 920
- F980056 (Notifications Offline Repository) mapped to System - 920
- F980057 (Notifications Offline Repository Archive) mapped to System – 920
- Restart the Enterprise service.
Want to Learn More?
Refer to the companion Oracle by Example (OBE) document entitled: Preparing for a Deployment of JD Edwards EnterpriseOne Release 9.2 Using One-Click Provisioning. This document describes these tasks:
- Set Preferences to Allow the Installation of Linux Servers
- Create a Pre-Install Worksheet
- Obtain the Images for JD Edwards from the Oracle Marketplace
- Create a Storage Volume for the One-Click Provisioning Server
- Generate Secure SHell (SSH) Key Pairs on Your Local System
- Upload the SSH Private Key to the On Premise
- Reserve a Public IP Address for the One-Click Provisioning Server Image
- Download the JD Edwards EnterpriseOne VM Configuration Tool from the Oracle Software Delivery Cloud
- Use the VM Configuration Tool to Generate the Security Orchestration for the One-Click Provisioning Server
- Upload and Run the Security Orchestration for Cloud
- Create an Instance for the One-Click Provisioning Server
Refer to the companion tutorial entitled: Deploying JD Edwards EnterpriseOne On Premises on Linux.
In this tutorial, you will learn how to:
- Configure Your Server Manager Account
- Create and Deploy a Quick Start Deployment Plan
- Create and Deploy an Advanced Deployment Plan
Refer to the companion Oracle by Example (OBE) document entitled: Administering Your Deployment of JD Edwards One-Click Deployment. This document provides information on these topics:
- List of Open Ports and Protocols in Security List for Provisioning JD Edwards EnterpriseOne Servers in the Oracle Public Cloud Service
- Start or Stop Services Configure Public IP Address/Internal host name on Client Machine
- About JD Edwards EnterpriseOne Security
- Access the Oracle Traffic Director (OTD)
- Using the Linux Logical Volume Manager (LVM) to Manage Free Disk Space on an Oracle On Premise
Server Manager for JD Edwards EnterpriseOne is a web based application used to manage the complete life cycle of the JD Edwards EnterpriseOne server products. Refer to the JD Edwards EnterpriseOne Tools Server Manager Guide.
The JD Edwards EnterpriseOne Tools Security Administration Guide contains comprehensive instructions and recommendations for setting up a secure EnterpriseOne environment. It contains pre- and post-installation security considerations, as well as instructions on how to use EnterpriseOne security applications to ensure only authorized individuals have access to EnterpriseOne applications, features, and data. This guide also contains instructions on using security certificates.
Refer to the JD Edwards EnterpriseOne Applications Release 9.2 Installation Guide for Oracle on UNIX for more information on these topics:
- Working with Installation Planner for an Install
- Working With Installation Workbench
- Copying an Environment to Another Environment
- Adding a Server to an Existing Configuration
- Understanding JD Edwards Environments and their Relationship with the Database
Users have the option to load their own data onto the Deployment Server for subsequent use by the environment created by the JD Edwards EnterpriseOne One-Click Provisioning Server. The tutorial describing this functionality is entitled: Migrating to a JD Edwards EnterpriseOne Multi Tier Deployment on Oracle Compute Cloud Service Instance.
Refer to these resources:
-
Working with the JD Edwards One-Click Provisioning Console Video Tutorial
For additional information on how REST APIs are
used with JD Edwards EnterpriseOne One-Click
Provisioning, refer to the JD
Edwards EnterpriseOne Tools REST API for Server
Manager. Further information on using REST
APIs is available for customers with an Oracle
customer ID in this document on My Oracle Support:
E1: SVM: How To Test Server Manager REST API With
Tools Release 9.2.1.0 and newer (Doc ID 2222019.1).