Before You Begin
Purpose
This Oracle By Example (OBE) shows how to prepare for a deployment of JD Edwards EnterpriseOne Release 9.2 On Premises with Linux and Oracle Database using One-Click Provisioning. It is important to note that this document is primarily concerned with the basic requirements for an installation of JD Edwards EnterpriseOne. It is not intended as a blueprint for operations in typical environments such as Development, Test, or Production.These topics are covered:
- Port Restrictions
- Create a Pre-Install Worksheet
- Generate Secure SHell (SSH) Key Pairs on Your Local System
- Set Up the Linux Servers
- All Linux Servers Common Setup
- Provisioning Server Setup
- Database Server Setup
- Enterprise Server Setup
- WebLogic Server Setup
- Run Commands to Change Microsoft Windows Settings
- Provisioning Next Steps
Time to Complete
2-4 hours
Note that this estimated completion time is not the elapsed time. That is, it does not account for machine runtime functions.
Background
You can deploy JD Edwards EnterpriseOne in an Oracle Linux On Premises environment using the JD Edwards One-Click Provisioning Server.
Scenario
JD Edwards EnterpriseOne Release features a One-Click Provisioning Server. This server features a web-based JD Edwards Provisioning Console interface that enables the provisioning of a fully functional suite of interconnected Linux-based servers and a Microsoft Windows-based machine. For Linux-based servers, the required core servers are the Database Server, the Enterprise Server, the HTML Web Server, and the Application Interface Service (AIS) Server. The One-Click Provisioning Server includes the JD Edwards Server Manager Console (SMC). One-Click Provisioning will also deploy the required Deployment Server into a Microsoft Window environment.
For the Linux-based servers you should use the highest certified version available that is specified in the Oracle Certifications for JD Edwards EnterpriseOne for One-Click Provisioning. For the initial release of One-Click the following Linux-based servers are deployed by One-Click Provisioning:
- A single Database Server
- One or more Enterprise Servers
- One or more HTML Servers (as standalone
instances within WebLogic, not clustered)
- One or more AIS Servers (as standalone instances
within WebLogic, not clustered)
For the Microsoft Windows-based environment, this machine is deployed by One-Click Provisioning into a Microsoft Windows Server 2012 R2:
- A single Deployment Server
Oracle Software Delivery Cloud
Visit the Oracle Software Delivery Cloud (also called E-Delivery) to download the components required for deploying JD Edwards EnterpriseOne. Select All Categories and search on JD Edwards One-Click Provisioning.
If you have questions regarding the download process, please review the Frequently Asked Questions document available from the Oracle Software Delivery Cloud welcome page: Oracle Software Delivery Cloud
Supported Software Versions
The following table lists the supported software versions for Oracle components:
|
Supported Versions |
|
|
Operating System |
|
|
- Provisioning Server |
Oracle Enterprise Linux 7.3 and 7.4 |
|
- Oracle Database
Server |
Oracle Enterprise Linux 7.3 and 7.4 |
|
- Enterprise Server |
Oracle Enterprise Linux 7.3 and 7.4 |
|
- Oracle WebLogic Server |
Oracle Enterprise Linux 7.3 and 7.4 |
|
- Deployment Server |
Microsoft Windows Server 2012 R2 |
|
Oracle Database |
Oracle 12.1.0.2 |
|
Oracle WebLogic Server |
12.1.3 and 12.2.1.2 |
What Do You Need?
One of the following tools for generating SSH key pairs on the client machine that you will use to connect to any Linux server:
- UNIX Local Systems. The ssh-keygen
utility is required for generating SSH key pairs
that you will use to connect to Linux Server. Many
Linux installations already include ssh-keygen.
Run the ssh-keygen command to verify that your
installation has this utility; otherwise, you may
obtain OpenSSH from this link:
http://www.openssh.com/portable.html
- Microsoft Windows Local Systems.
The PuTTY key generator is required for generating
SSH Key pairs. The utility is available at this
link:
http://www.putty.org
You will need access to Oracle e-delivery in order to download the archive files for the One-Click Provisioning Server.
|
JD Edwards EnterpriseOne Server Type |
Minimum Recommended |
Notes |
||
|
OCPU |
Memory (GB) |
Storage Volume (GB) |
||
|
Required JD Edwards Components |
||||
|
One-Click Provisioning Server |
2 |
30 |
100 |
Includes Server Manager |
|
Deployment Server |
2 |
30 |
210 GB for all four (4) pathcodes |
Using One-Click, customers must install all four (4) path codes. There is no automated way to add additional path codes post deployment. |
|
Database Server |
2 |
30 |
50 GB for a single pathcode and shared data |
20 GB is required for each additional pathcode These numbers are for demo data only and should be adjusted for expected required business data space. |
|
Enterprise Server |
2 |
30 |
75 |
|
|
WebLogic Server |
- |
- |
30 |
For the OS and WebLogic Server |
|
· HTML Server for Web Client |
2 |
30 |
20 |
Per Web Instance |
|
· HTML Server for AIS Server |
2 |
30 |
20 |
Per Web Instance |
|
· AIS Server |
2 |
30 |
20 |
Per Web Instance |
|
Optional JD Edwards Components1 |
|
|||
|
Business Services Server (BSSV) |
2 |
30 |
50 |
Per Web Instance |
|
Transaction Server for Real Time Events (RTE) |
2 |
30 |
50 |
Per Web Instance |
|
Application Development Framework Server (ADF) |
2 |
30 |
50 |
Per Web Instance |
|
One View Reporting (OVR) Server / BI Publisher Server (BIP) |
2 |
30 |
50 GB is required for a single pathcode |
10 GB is required for each additional pathcode |
|
Development Client |
2 |
30 |
100 |
Per each Development Client installation |
Note: Optional components are not deployed by One-Click. However the Web Components can be manually added through Server Manager and the Development Client can be added in a new Microsoft Windows instance using the traditional on-premise methodology.
Port Restrictions
You should be aware of restricted ports that cannot be defined or used while creating any web component and/or server. These specific port restrictions for any One-Click Provisioning deployment of JD Edwards EnterpriseOne are grouped as follows:
- One-Click Provisioning Console for JD Edwards
- All Internet Browsers
- Google Chrome and Mozilla Firefox Browsers
One-Click Provisioning Console for JD Edwards
Any port below 1024 is restricted.
All Internet Browsers
The following are restricted ports enforced by the rules of any Internet Browser:
- 2049
- 4045
- 6000
Google Chrome and Mozilla Firefox Browsers
In addition to the above mentioned restricted ports for any Internet browser, the Google Chrome and Mozilla Firefox browsers block specific ports which they deem as unsafe to use on HTTP/HTTPS protocol. Below are these restricted ports:
- 3659, // apple-sasl / PasswordServer
- 6665, // Alternate IRC [Apple addition]
- 6666, // Alternate IRC [Apple addition]
- 6667, // Standard IRC [Apple addition]
- 6668, // Alternate IRC [Apple addition]
- 6669, // Alternate IRC [Apple addition]
Note: It may be possible to configure Chrome and/or Firefox to change these restrictions.
Create the Pre-Install Worksheet
A Pre-Install Worksheet is provided in this guide to gather information about your planned installation prior to beginning the deployment of the One-Click Provisioning Server. Using this worksheet decreases the chances for data entry errors and makes for a documented and repeatable process.
The Pre-Install Worksheet that you create as part
of the tutorial is a record of the server names
assigned during the installation; you must use those
exact server names throughout the process.
Important Special Naming Restrictions: Some environments will allow multiple servers to start using the same hostname, but network traffic is unpredictable. You can avoid this potential issue by choosing your own unique hostnames for each server instance.
Ensure that the Host Name of a
Linux server contains only alphanumeric values. For all
servers, you cannot use special characters in
the name, such as an underscore “_”.
For the Database, Enterprise,
and Deployment Servers, machine names are
limited to a maximum of 15 lower-case
alphanumeric characters as limited by the JD
Edwards EnterpriseOne database table and
application design.
Do not use a fully qualified domain name for host
names; you should only specify the first node of
the domain name.
If the existing hostname does not conform to these
requirements, runtime of JD Edwards EnterpriseOne
will fail. If a hostname does not conform to these
restriction, you should permanently change the
hostname for your system.
Tip: Retrieve a hostname
- Run the hostname command where the output is the hostname.
If DNS is enabled:
- Run the hostname command and note the output.
- Run the nslookup
command with first argument as output of Step
1.
The hostname is specified in the Name field of the output from the nslookup command.
For example:
root@my_machine share]# hostname
mymachine
[root@my_machine share]# nslookup mymachine
Server: 11.111.11.111
Address: 11.111.11.111#11
Non-authoritative answer:
Name: mymachine.us.oracle.com
Address: 11.111.111.111
Pre-Install Worksheet
|
Machine |
IP Address |
|
Provisioning Server and Server Manager (same machine) |
https://___.___.___.___:3000
where https is the only supported browser protocol, and where 3000 is always the port, which you must include as part of the address |
|
Machine |
Hostname |
|
Database Server |
|
|
Enterprise Server |
|
|
HTML Server |
|
|
AIS Server |
|
|
Deployment Server |
Hostname: _______________________________________ Location Name: |
|
Warning:
Do not use a fully qualified
domain name for host names; you should
only specify the first node of the domain
name. |
|
|
User Account |
Password |
|
root |
|
|
oracle |
|
|
jde920 |
|
|
em_manager_user |
|
|
sys, system |
|
|
weblogic |
|
|
JDE |
|
|
jde_admin |
|
|
Initial Windows Machine Administrator (temporary) |
|
|
Site Key Passphrase |
|
|
Server Manager Console |
|
Generate Secure SHell (SSH) Key Pairs on Your Local System
- Public Key in OpenSSH Format
Required for each Linux server in the JD Edwards EnterpriseOne environment.
See Step 4 in the following procedure.
- Private Key in OpenSSH Linux/UNIX Format
Required as an input value to the One-Click Provisioning Console which uses the SSH keys to access the JD Edwards EnterpriseOne servers.
See Step 5 in the following procedure.
- Private Key in .ppk Microsoft Windows
Format
Required to connect from a Microsoft Windows machine to a Linux server including the Provisioning Server itself and also to connect to any provisioned server such as the Database Server, Enterprise Server, and WebLogic servers (which hosts the HTML and AIS servers).
See Step 6 in the following procedure.
- Locate and run puttygen.exe from the location where you installed it on your local system, which can be either Linux or Microsoft Windows.
- On PuTTY Key Generator, accept the default key type, SSH-2 RSA, and set the Number of bits in a generated key to 2048, if it is not already set.
- Click the Generate button.
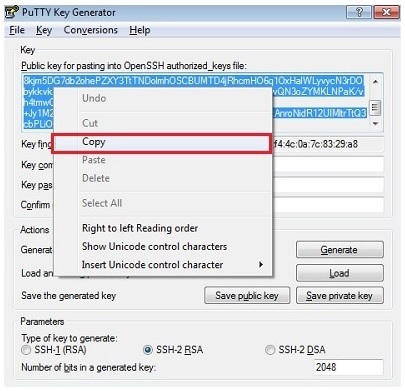
- Use this step to create a Public Key in OpenSSH Format.
- In the
PuTTY Key Generator dialog, select all the
characters in the Public key for
pasting into OpenSSH authorized_keys file
field.
Note: Be sure you select all the characters, not just the ones you can see in the narrow window. If a scroll bar appears next to the characters, scroll through the entire window to select all the characters.
- On the
selected text, right-click to show the context
menu and select Copy.
PuTTY Key Generator - Public Key - Open a plain text editor (such as vi on UNIX or Notepad on Microsoft Windows) and paste in the characters you just copied. Ensure that you paste the text at the first character in the text editor, and do not insert any line breaks.
- Save the
plain text file as a file name with a .pub
extension and keep a record of the file name.
Tip: You may give the file for the key any extension, but .pub is a useful convention to indicate that this is a public key.
Note: The key saved in this step will save the first key of a key pair as recommended in the preceding Tip just prior to the first step of this procedure.
- Click
the Save public key button to
save the key to a file and add a .pub extension.
Tip: You may give the file for the key any extension, but .pub is a useful convention to indicate that this is a public key.
Note: The key saved in this step will save a second key of a key pair as recommended in the preceding Tip just prior to the first step of this procedure.
- Keep a record of the file name and location which you will need when you upload this key.
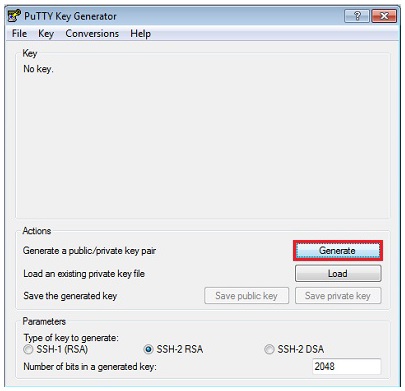
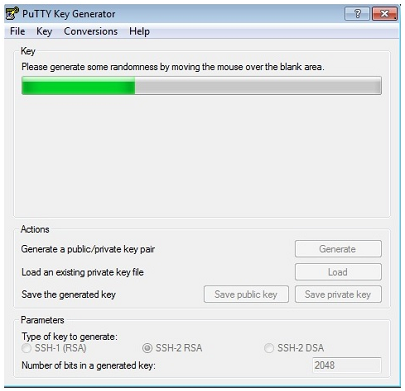
After you have clicked the Generate button, move your mouse around the blank area to generate randomness for the SSH key pair you generate.
- Use this step to create a Private Key in OpenSSH Linux/UNIX Format.
- In the
PuTTY Key Generator dialog, from the menu bar,
select Conversions > Export OpenSSH key.
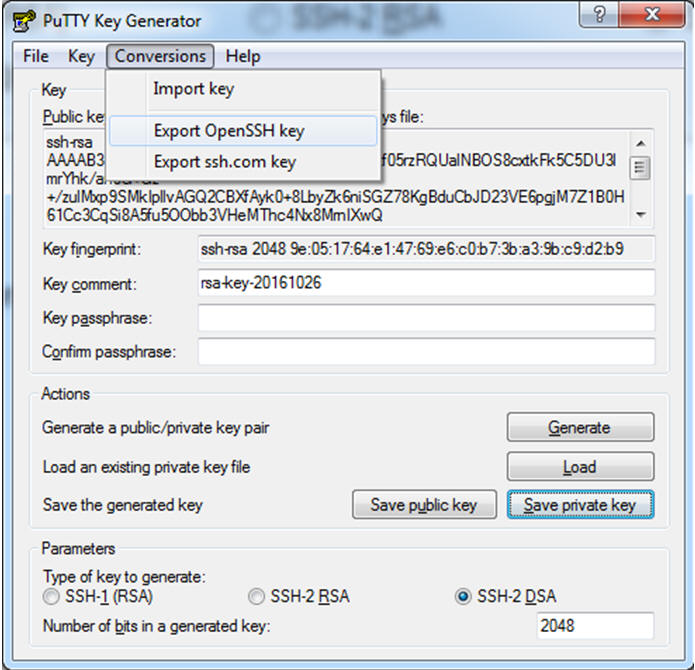
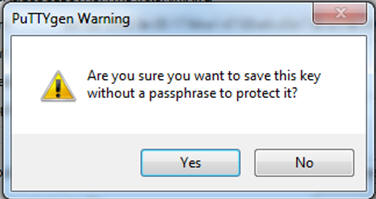
PuTTY Key Generator - Conversions > Export OpenSSH Key in Linux/UNIX Format - On PuTTYgen Warning, click the Yes button to confirm you want to create the Private Key without a passphrase.
- Keep a
record of the file name and location which you
will need when you upload this key as prompted
by the One-Click Provisioning Console.
Important: The file name you specify for this key should not have an extension.
- Use this step to create a Private Key in .ppk Microsoft Windows Format.
- In the PuTTY Key Generator dialog, click the Save private key button to save your private key to the system.
- The Key comment is the name of the key. You may keep the generated key comment or create your own.
- Do not enter a Key passphrase.
- To save
the private key in the PuTTY Private Key (PPK)
format, click the Save private key
button.
Note: The PuTTY Private Key (PPK) format works only with the PuTTY toolset.
- On
PuTTYgen Warning, click the Yes
button to confirm you want to create the Private
Key without a passphrase.
PuTTY Warning - Click No - Keep a
record of the file name and location which you
will need when you upload this key from a
Microsoft Windows machine that is accessing the
JD Edwards EnterpriseOne One-Click Provisioning
Server and any JD Edwards EnterpriseOne server
that it has created.
Important: The file name you specify for this key should have a .ppk extension.

Set Up the Linux Servers
This chapter contains these sections:
- All Linux Servers Common Setup
- Provisioning Server Setup
- Database Server Setup
- Enterprise Server Setup
- WebLogic Server Setup
All Linux Servers Common Setup
This sections describes these setup tasks which must be performed on each Linux-based server:
- General
- Disable Firewall Services
- Set Up Users and Groups
- Install Requisite YUM Packages
General
The following general prerequisites are required for each Linux server:
- Ensure that the Host Name of a Linux server contains only alphanumeric values. For all servers, you cannot use special characters in the name, such as an underscore “_”.
- If the /u01
mount point does not exist, create it using this
command:
cd / sudo mkdir u01
- Use this command to ensure that the /u01
mount point has proper permissions to allow the
One-Click Provisioning process to subsequently
create requisite folders:
sudo chmod 770 /u01
- Verify the
/etc/ssh/sshd_configfile contains this
setting:
ClientAliveInterval 3600
Ensure that the setting exists, is set properly to 3600, and is not commented out.
- Verify the
/etc/ssh/sshd_configfile has the SSH
connection over IPV6 disabled
by using this setting:
AddressFamily inet
Ensure the setting exists, is set properly to inet (not any), and is not commented out.
- Verify the /etc/sudoers
file does not contain
this setting or if it does, that it is disabled:
Defaults requiretty
- You must disable IPV6 using the following
commands:
sudo vi /etc/sysctl.conf
Ensure that these settings within the /etc/sysctl.conf file are set in order to disable IPV6 protocol:
net.ipv6.conf.default.disable_ipv6=1
net.ipv6.conf.all.disable_ipv6=1 - Because DNS is not configured you must ensure
that the Fully Qualified Domain Name in the /etc/hostname
file does not include the localdomain
suffix. For example, if a setting such as this
exists in your /etc/hostname
file:
sqeweb111.localdomain
You should edit the file to remove the ".localdomain" suffix.
- Use this command to check the status of
Security Enhanced Linux (SELINUX):
sudo getenforce
If the returned status is either Enforced or Permissive, you must temporarily disable the extra security restriction provided by SELINUX by modifying this file:
/etc/selinux/config
Edit the /etc/selinux/config file to change the SELINUX=setting to this value:SELINUX=disabled
-
You must reboot the machine in order for the change to take affect any time you change the /etc/hostname file or when you change security settings.
Important: This only needs to be disabled at the time of provisioning. As a recommended best practice, you should re-enable SELINUX after you have successfully completed JD Edwards EnterpriseOne One-Click Provisioning by changing the setting to be either of the following:
After the reboot is complete, run sudo getenforce to confirm that the status of SELINUX is Disabled.
SELINUX=Enforced
SELINUX=Permissive
Disable Firewall Services
You must disable firewall services in order to enable the functionality of the Provisioning Server. Use this command to stop the firewall services:
sudo service firewalld stop
Note: Any time you make a
change to the firewall, you must reload firewall
rules using this command:
sudo
firewall-cmd --reload
Set Up Users and Groups
Perform these tasks to set up additional users and groups on each Linux server:
- Create the dba and oracle
groups using these commands:
sudo groupadd -g nnnn dba
sudo groupadd -g nnnn oraclewhere nnnn is the id value with which the group will be created. You must use a free value which ideally should be above 1000. You can determine used group ids with the id command.
- Create the oracle and opc
users and add them to the oracle group using
these commands:
sudo useradd -d /home/oracle -m -s /bin/bash -g oracle oracle
sudo useradd -d /home/opc -m -s /bin/bash -g oracle opc
- Add the oracle user to the
dba group using this command:
sudo usermod -a -G dba oracle
- Set /u01
as owned by the oracle group
using this command:
sudo chgrp oracle /u01
- Set the opc user to have
passwordless sudo access by adding this entry in
/etc/sudoers:
opc ALL=(ALL) NOPASSWD: ALL
Install Requisite YUM Packages
You must install a specific set of packages from the YUM repository onto the One-Click Provisioning Server and each additional Linux-based Server in the JD Edwards EnterpriseOne environment which include:
The following tables lists the required packages alphabetically (second column) while column 1 contains the YUM install command. This enables you to cut and paste the content of this table into an ASCII editor to create a script to install the packages one at a time, or all at once. In either case, but sure to confirm that when executed each command returns either of these:
Complete
or
Nothing to do
Important: It is recommended that you run YUM install commands as the root user (sudo su).
|
Provisioning Server |
|
YUM Command and Package |
|
yum install –y bind-utils |
|
yum install –y gcc.x86_64 |
|
yum install –y gcc-c++.x86_64 |
|
yum install –y ksh.x86_64 |
|
yum install –y nmap |
|
yum install –y ruby.x86_64 |
|
yum install –y ruby-devel.x86_64 |
|
yum install –y samba.x86_64 |
|
yum install –y samba-yum install –y client.x86_64 |
|
yum install –y unzip.x86_64 |
|
yum install –y zip.x86_64 |
|
yum install –y zlib-devel.x86_64 |
|
Database Server |
|
YUM Command and Package |
|
yum install –y bind-utils |
|
yum install –y compat-libcap1.x86_64 |
|
yum install –y compat-libstdc++-33.x86_64 |
|
yum install –y gcc.x86_64 |
|
yum install –y gcc-c++.x86_64 |
|
yum install –y glibc.i686 |
|
yum install –y glibc.x86_64 |
|
yum install –y glibc-devel.x86_64 |
|
yum install –y ksh.x86_64 |
|
yum install –y libaio.x86_64 |
|
yum install –y libaio-devel.x86_64 |
|
yum install –y libgcc.x86_64 |
|
yum install –y libstdc++.x86_64 |
|
yum install –y libstdc++-devel.x86_64 |
|
yum install –y libX11.x86_64 |
|
yum install –y libXau.x86_64 |
|
yum install –y libxcb.x86_64 |
|
yum install –y libXext.x86_64 |
|
yum install –y libXi.x86_64 |
|
yum install –y libXtst.x86_64 |
|
yum install –y make.x86_64 |
|
yum install –y nmap |
|
yum install –y sysstat.x86_64 |
|
yum install –y unzip.x86_64 |
|
yum install –y zip.x86_64 |
|
Enterprise Server |
|
YUM Command and Package |
|
yum install –y bind-utils |
|
yum install –y compat-libcap1.x86_64 |
|
yum install –y compat-libstdc++-33.i686 |
|
yum install –y compat-libstdc++-33.x86_64 |
|
yum install –y elfutils-libelf-devel.x86_64 |
|
yum install –y file |
|
yum install –y gcc.x86_64 |
|
yum install –y gcc-c++.x86_64 |
|
yum install –y glibc.i686 |
|
yum install –y glibc.x86_64 |
|
yum install –y glibc-devel.i686 |
|
yum install –y glibc-devel.x86_64 |
|
yum install –y ksh.x86_64 |
|
yum install –y libaio.i686 |
|
yum install –y libaio.x86_64 |
|
yum install –y libaio-devel.i686 |
|
yum install –y libaio-devel.x86_64 |
|
yum install –y libgcc.i686 |
|
yum install –y libgcc.x86_64 |
|
yum install –y libstdc++.i686 |
|
yum install –y libstdc++.x86_64 |
|
yum install –y libstdc++-devel.x86_64 |
|
yum install –y libX11.i686 |
|
yum install –y libX11.x86_64 |
|
yum install –y libXau.i686 |
|
yum install –y libXau.x86_64 |
|
yum install –y libxcb.i686 |
|
yum install –y libxcb.x86_64 |
|
yum install –y libXext.i686 |
|
yum install –y libXext.x86_64 |
|
yum install –y libXi.x86_64 |
|
yum install –y libXtst.x86_64 |
|
yum install –y make.x86_64 |
|
yum install –y ncompress |
|
yum install –y nmap |
|
yum install –y sysstat.x86_64 |
|
yum install –y unixODBC.x86_64 |
|
yum install –y unixODBC-devel.x86_64 |
|
yum install –y vunzip.x86_64 |
|
yum install –y zip.x86_64 |
|
yum install –y zlib-devel.i686 |
|
yum install –y zlib-devel.x86_64 |
|
WebLogic Server |
|
YUM Command and Package |
|
yum install –y bind-utils |
|
yum install –y glibc.i686 |
|
yum install –y glibc.x86_64 |
|
yum install –y glibc-devel.x86_64 |
|
yum install –y ksh.x86_64 |
|
yum install –y net-tools |
|
yum install –y nmap |
|
yum install –y unzip.x86_64 |
|
yum install –y zip.x86_64 |
|
yum install –y zlib-devel.x86_64 |
Provisioning Server Setup
This section describes the setup tasks that must be performed on the Provisioning Server.
Important: These tasks are in addition to those tasks described in All Linux Servers Common Setup.
- General
- Install Requisite GEM Package
- Obtain, Unzip, Assemble, and Extract the Provisioning Server Archive Files
- Run the setupPr.sh Script as the Root User
- Verify Provisioning Console Necessary Services are Running
General
Ensure that there is sufficient storage available
on the Provisioning Server for the YUM packages,
and the Provisioning Server archive (compressed
and extracted).
Install Requisite GEM Package
You must install the winrm program as a GEM package on the Provisioning Server to enable access to the Deployment Server using this command:
gem install -v 1.8.1 -r winrm
Obtain, Unzip, Assemble, and Extract the Provisioning Server Archive Files
Due to file size limitations for files available from the Oracle Software Delivery Cloud (also called E-Delivery), the requisite archive as a single entity cannot be posted. Instead you must download a series of files that have been split into allowable sizes and then assemble them into a single archive, and then extract the contents of that archive using the following procedure.
- Download the files for JD Edwards EnterpriseOne One-Click Provisioning from the Oracle Software Delivery Cloud using All Categories and JD Edwards One-Click Provisioning as the search criteria. From the displayed list, choose the combination of JD Edwards EnterpriseOne applications and tools releases and proceed to add the items to your cart.
- Download the items in your cart.
- From your download location, upload the files to any directory on the Provisioning Server.
- Unzip the downloaded files, which will consist
of several "zip" files and one (1) integrity
check-sum file.
For example, for JD Edwards EnterpriseOne Applications Release 9.2.2 and Tools Release 9.2.2.2, the unzipped files have these filenames:- JDE_OCProv_9222_APOL73_18031_73GB.tar.gz.DiskPart00
- JDE_OCProv_9222_APOL73_18031_73GB.tar.gz.DiskPart01
- JDE_OCProv_9222_APOL73_18031_73GB.tar.gz.DiskPart02
- JDE_OCProv_9222_APOL73_18031_73GB.tar.gz.DiskPart03
- JDE_OCProv_9222_APOL73_18031_73GB.tar.gz.DiskPart04
- JDE_OCProv_9222_APOL73_18031_73GB.tar.gz_MD5SUMS
- Assemble the unzipped DiskPartnn
images into a single archive. Using the above
filenames as an example, use this command:
cat JDE_OCProv_9222_APOL73_18031_73GB.tar.gz.DiskPart* > JDE_OCProv_9222_APOL73_18031_73GB.tar.gz
- Verify the integrity of the assembled archive
by using the md5sums utility with this command:
md5sum –c JDE_OCProv_9222_APOL73_18031_73GB.tar.gz_MD5SUMS
If the utility returns OK as shown in the example below, the assembled image is valid and can be deployed:
JDE_OCProv_9222_APOL73_18031_73GB.tar.gz: OK
Note: To ensure that you do not run out of disk space on your Provisioning Server in later steps, at this point it is recommended that you delete the archive once you are sure all of the contents were successfully extracted. Alternately, if you have allocated greater than the recommended disk space for your Provisioning Server, you can wait to delete it until you are certain that all components are fully functional.
- The archive must be extracted by the opc
user and it must be extracted to the /u01
directory by preserving the existing permissions
using this command:
tar -P -C /u01 -x -f JDE_OCProv_9222_APOL73_18031_73GB.tar.gz
Note: Be sure and use the -P switch to preserve permissions, and the -C switch to untar to the specified directory. The extraction process can take quite some time, perhaps as long as 10 to 20 minutes.
- Once extracted, the /u01
should contain the following components:

Provisioning Server - Extracted Components - Sets up permission and ownership of the extracted content
- Adds system files such as jdedwards, chkPort, and chkDNS
- Configures the Samba service
- Adds the Server Manager Console service
- Adds Provisioning Console service
- Creates and configures CA certificates
Run the setupPr.sh Script as the Root User
As the root user, you must run the setupPr.sh script that was delivered when you extracted the Provisioning Server archive as described in the preceding section. This script automates the remaining required configuration of the Provisioning Server and performs these requisite tasks:
From the script location on /u01, as the root user, run this command:
./setupPr.sh
Once the command runs successfully, the Provisioning Console should be up and running. You can access the Provisioning Console using a URL with the following syntax:
https://<Public Ip Address>:3000
Database Server Setup
This section describes the setup tasks that must be performed on the Oracle Database Server.
Important: These tasks are in addition to those tasks described in All Linux Servers Common Setup.
- General
- Prerequisite Configuration for the Oracle Database Server
General
The following general prerequisites are required for the Oracle Database Server:
- The database must be installed under the /u01
directory.
Important: Installing the database on any mount point other than /u01 is not supported; provisioning cannot occur.
- You must configure the semaphore parameter in
the /etc/sysctl.conf
file using this command:
sudo vi /etc/sysctl.conf
Ensure that this setting exists with the co
kernel.sem = 1024 32000 100 1024
- Ensure that sufficient available storage is
available on /u01
for the Database Server.
Use this command to view your available storage space on /u01:
df -h
where the minimum required space is specified in the section of this document entitled: What Do You Need?
Prerequisite Configuration for the Oracle Database Server
The JD Edwards EnterpriseOne One-Click deployment of the Oracle database supports both Oracle Enterprise Edition and Standard Edition 2 for the current supported release of Oracle Database. Refer to the Oracle Certifications for JD Edwards EnterpriseOne One-Click Provisioning for current updates on supported software versions and software prerequisites. The Certification page can be accessed through the Oracle Support Portal:
https://www.oracle.com/support/index.html
Important: You should have an Oracle DBA monitor the database relative to subsequent JD Edwards functions, such as Package Build. Database aspects such as Archive Logging can adversely affect disk space usage and could potentially cause database failures.
The following prerequisite configuration settings are applicable to a customer-installed Oracle database. These prerequisites must be met before the One-Click Provisioning Server can install a JD Edwards EnterpriseOne Database Server:
- Customer must have an Oracle Database Server instance installed
- Customer must make TNS entry of the pluggable database in the tnsnames.ora file on the Database Server instance (do not use a variable for ORACLE_HOME; it must be an absolute value). The hostname field should be updated with the hostname of the Database Server machine should be udpated with JDEORCL.
- Customer must create and configure a Pluggable Database (PDB) named JDEORCL
- You must install the Oracle database as the oracle user -- not as any other user such as opc.
-
Customer must set the database character set to AL32UTF8
- Customer must set the database national
character set for the Unicode page setting to AL16UTF16
Important: The character set parameters are critical and must be set when the database is installed; they cannot be changed after installation.
- Minimum storage requirement for JD Edwards Shared Database is 10 GB
- Minimum storage requirement per pathcode is 20GB (Including demo data)
- Above mentioned storage should be made available for:
- OraDB install directory
- OraDB index directory
- OraDB table directory
Important:
Best practice is to use different
mount points for creating these directories.
Otherwise you may encounter database
deployment issues.
- Customer must set the minimum required DB processes to provision the JD Edwards EnterpriseOne Database Server to a minimum value of 1500
- Customer must ensure the Files System IO option is SETALL
- Database must be running with PDB (JDEORCL) set to OPEN_MODE
- Set environment variables for the Oracle Database because by default environment variables for the oracle user are not set
- Use this command to ensure that the /u01
mount point has proper permissions to allow the
One-Click Provisioning process to subsequently
create requisite folders:
sudo chmod 770 /u01
- Sudo to the oracle user from
the opc user using this
command:
sudo su - oracle
- Make a TNS entry of the pluggable database in
the listener.ora
and tnsnames.ora
files of the Database Server machine,
where hostname is the
hostname of the Database Server machine is jdeorcl.
Ensure the same port is also
specified in each file. For example:
----------------
listener.ora
----------------
LISTENER_ORCL =
(ADDRESS = (PROTOCOL = TCP)(HOST = hostname)(PORT = 1521))
ORCL =
(DESCRIPTION =
(ADDRESS = (PROTOCOL = TCP)(HOST = hostname)(PORT = 1521))
(CONNECT_DATA =
(SERVER = DEDICATED)
(SERVICE_NAME = jdeorcl)
)
)
-------------------
tnsnames.ora
-------------------
JDEORCL =
(DESCRIPTION =
(ADDRESS = (PROTOCOL = TCP)(HOST = hostname)(PORT = 1521))
(CONNECT_DATA =
(SERVER = DEDICATED)
(SERVICE_NAME = jdeorcl)
)
) - Connect to the database using this command:
sqlplus '/as sysdba';
- Verify the code page setting of the Oracle
database using this command:
SELECT VALUE FROM NLS_DATABASE_PARAMETERS WHERE PARAMETER = 'NLS_CHARACTERSET';
- If the character set is not AL32UTF8, you will have to reinstall the database using the correct parameter to set it.
- Verify the Unicode code page setting of the
Oracle database by executing this command:
SELECT VALUE FROM NLS_DATABASE_PARAMETERS WHERE PARAMETER = 'NLS_NCHAR_CHARACTERSET';
- If the setting is not AL16UTF16, you will have to reinstall the database using the correct parameter to set it.
- Determine the number of DB processes available
using this command:
select limit_value from v$resource_limit where resource_name='processes';
- If the value is less than 1500 (which is the
minimum recommended for use with JD Edwards
EnterpriseOne, run this command to set to the
minimum recommended value:
alter system set processes=1500 scope=spfile;
- Check the value of the filesystemio_option
parameter using this command:
show parameter filesystemio_options;
- If the value of the filesystemio_option
parameter is not SETALL (which
is required), use this command to set it:
alter system set filesystemio_options=setall scope=spfile;
- Shutdown the database using this command:
shutdown immediate;
- Start the database using this command:
startup;
- Verify the databaset is open using this
command:
select OPEN_MODE from v$pdbs where NAME = 'JDEORCL';
If the pluggable database you want to use is not named JDEORCL, you can issue this command to find the name of available PDBs (ignore PDF$SEED) and substitute that name for JDEORCL in the command above):
NAME, OPEN_MODE from v$pdbs;
- If the OPEN_MODE is set to READ WRITE then the PDB is ready to be provisioned by the JD Edwards EnterpriseOne One-Click Provisioning Server.
- If the OPEN_MODE is not READ
WRITE then the PDB is not open. Open
the PDB using this command:
alter pluggable database JDEORCL open;
The PDB is ready to be provisioned by the JD Edwards EnterpriseOne One-Click Provisioning Server. - Use this procedure to set the environment variables for the Oracle Database because by default environment variables for the oracle user are not set.
- Switch
to the oracle user using
this command:
sudo su – oracle
-
Edit the bash_profile using this command:
vi .bash_profile -
Add the following lines in the .bash_profile:
export ORACLE_HOME=path
export ORACLE_SID=orcl
PATH=path
export PATH
Note: You cannot use an environment variable when defining ORACLE_HOME, such as $ORACLE_HOME. You must use the absolute value.
For example, a properly completed .bash_profile might look like this:
export ORACLE_HOME=/u01/app/oracle/product/12.1.0/dbhome_1
export ORACLE_SID=orcl
PATH=$ORACLE_HOME/bin:$PATH:$HOME/.local/bin:$HOME/bin
export PATH -
Save and close the .bash_profile file.
-
Execute the .bash_profile file for the variables to take effect.
Enterprise Server Setup
This section describes the setup tasks that must be performed on the Enterprise Server.
Important: These tasks are in addition to those tasks described in All Linux Servers Common Setup.
The following general prerequisites are required for the One-Click Enterprise Server:
- Create the oneworld group
using this command:
sudo groupadd -g nnnn oneworld
where nnnn is the id value with which the group will be created. You must use a free value which ideally should be above 1000. You can determine used group ids with the id command.
Note: You must reboot the machine any time you add groups in order for the changes to take affect. - Create the jde920 user and
make the shell the default shell (using the -s
switch with /bin/ksh),
and add it to the oneworld
group using this command:
sudo useradd -d /home/jde920 -m -s /bin/ksh -g oneworld jde920
Note: This specific user, with access to ksh, is required in order to start and stop the Enterprise Server. - Add the jde920 user to the oracle
group using this command:
sudo usermod -a -G oracle jde920
- Ensure there is at least 35 GB free space on /u01.
WebLogic Server Setup
This section describes the setup tasks that must be performed on the WebLogic Server.
Important: These tasks are in addition to those tasks described in All Linux Servers Common Setup.
- General
- Install a JDK and Oracle WebLogic Server
- Post Installation of WebLogic Server
General
The following general prerequisites are required for the Oracle WebLogic Server:
- Ensure the user with which Oracle WebLogic
Server was installed is part of the oracle
group. Use this command to verify:
groups username
Install a JDK and Oracle WebLogic Server
You must manually pre-install Oracle WebLogic Server (WLS). Customers can then use JD Edwards One-Click Provisioning to deploy the JD Edwards EnterpriseOne web components into that WLS domain. The supported version of WLS is 12.2 Standard Edition or Enterprise Edition.
The complete list of prerequisites are below:
- A supported version of WLS must be pre-installed.
- A supported version of a JDK must be installed.
- WLS must be defined with at least one domain.
- WLS must be in a running state and able to connect to the Admin Console.
- WLS must have a running Node Manager process for the existing domain.
- WLS must be installed as a user that is part of the oracle group.
Post Installation of WebLogic Server
After you have installed WebLogic Server, prior to using the Provisioning Console for JD Edwards EnterpriseOne, you must manually configure WebLogic Node Manager to disable SSL. Otherwise the provisioning will fail.
- Locate the nodemanager.property
file which is typically found in this location:
<ORACLE_HOME>/user_projects/domains/<DOMAINNAME>/nodemanager/nodemanager.properties
- Edit the nodemanager.property
file so set this property to disable SSL:
SecureListener=false
- Save the nodemanager.property file.
- The node manager machine must be created in
the WebLogic Admin server and it must be in
reachable state. You must set the listen address
must be set exactly same as value of ListenAddress
property of nodemanager.properties
file. You must set the listen port 5556, which
is non-secure (instead of 5557, which is secure
) in both Node Manager properties file and in
node manager using the WebLogic Server user
interface. For instructions refer to this
procedure:
Changing the Oracle HTTP Server Listen Ports
- Restart the WebLogic Node Manager for the setting to take effect.
Run Commands to Change Microsoft Windows Settings
This section provides the commands that you must run to change these Microsoft Windows settings to enable One-Click Provisioning:
- Ensure the opc User Exists and has Administrator Rights
- Enable Remote Command Execution Through Powershell
- Disable the Firewall in the Private Network
Ensure the opc User Exists and has Administrator Rights
You must ensure that the opc user exists in the Windows Server and that this user is assigned Administrator rights.
Important: This step is critical or else ssh connections to the Windows Server instance will fail.
Enable Remote Command Execution Through Powershell
From Powershell, use this command to enable remote command execution:
Enable-PSRemoting -Force
Disable the Firewall in the Private Network
You must disable the firewall in the private network in order to enable Server Manager Agent functionality by using this command:
Set-NetFirewallProfile -Profile Private -Enabled False
Note: You can enable the firewall after One-Click Provisioning completes the deployment. For instructions on how to do so. and for which ports to explicitly open manually, refer to the companion document entitled: Deploying JD Edwards EnterpriseOne Release 9.2 Using One-Click Provisioning On Premises with Linux and Oracle Database.Provisioning Next Steps
Refer to the companion Oracle by Example (OBE) documents for Deploying On Premises:
This document describes these tasks:
- Access the JD Edwards Provisioning Console
- Orchestrate Using Quick Start Mode
- Orchestrate Using Advanced Mode
- Orchestrate Using Advanced Mode to Add Web Servers Post Deployment
- Deploy an Orchestration
- Export and Import a Deployment Plan
- Post Installation for the Deployment Server
- Post Installation for the Development Client
- Obtain and Install CA Certificates in Oracle WebLogic Servers and the Deployment Server
- Access the JD Edwards EnterpriseOne Servers Using Their Public IP Address
- Troubleshooting
Want to Learn More?
Refer to the companion tutorial entitled: Orchestrating and Deploying JD Edwards EnterpriseOne On Premises Using One-Click Provisioning Console. In this tutorial you will learn how to:
- Configure your Server Manager Account
- Orchestrate and Deploy a Quick Start Deployment Plan
- Orchestrate and Deploy an Advanced Deployment Plan
- List of Open Ports and Protocols in Security List for Provisioning JD Edwards EnterpriseOne Servers
- Start or Stop Services
- Configure Public IP Address/Internal Hostname on Client Machine
- About JD Edwards EnterpriseOne Security
- AIS Server Post Provisioning Configuration
- Use the Linux Logical Volume Manager (LVM) to Manage Free Disk Space
The JD Edwards EnterpriseOne Tools Security Administration Guide contains comprehensive instructions and recommendations for setting up a secure EnterpriseOne environment. It contains pre- and post-installation security considerations, as well as instructions on how to use EnterpriseOne security applications to ensure only authorized individuals have access to EnterpriseOne applications, features, and data. This guide also contains instructions on using security certificates.
Refer to the JD Edwards EnterpriseOne Applications Release 9.2 Installation Guide for Oracle on UNIX for more information on these topics:
- Working with Installation Planner for an Install
- Working With Installation Workbench
- Copying an Environment to Another Environment
- Adding a Server to an Existing Configuration
- Understanding JD Edwards Environments and their Relationship with the Database