Before You Begin
Purpose
This Oracle By Example (OBE) shows you how to
create and subscribe to a notification based on an
orchestration that checks for a credit hold message.
When a customer is placed on credit hold, the
account representative would like to be notified.
This notification calls an orchestration that checks
to see if a customer is on credit hold. If they are,
a notification is sent to the account representative
who has subscribed to the notification. If they are
not, no message is sent. You will define an input
for the notification so that the subscriber can
specify which customer they want to know about. You
will also define a schedule to run the notification
and check for holds once per week.
Time to Complete
60 minutes
Background
This OBE employs the following scenario to show you how to create a notification based on an orchestration: You need to create a notification that takes customer number as an input, uses the customer number to call an orchestration that returns the customer’s credit message and if the credit message is “On Credit Hold,” sends a notification. To do this, you will perform the following tasks:
- Create a data request that returns the credit message
- Add the data request to a new “Customer Credit Check” orchestration
- Test the Customer Credit Check orchestration in the Orchestrator client
- Create a notification based on the Customer Credit Check orchestration
- Create a weekly schedule and add it to your notification
- Test the notification with manual input
- Subscribe to the notification in Subscription Manager in EnterpriseOne
- Test the dispatch of notification messages
What Do You Need?
- Orchestrator Studio 6.0.1 or higher deployed in
a JD Edwards EnterpriseOne environment with a
minimum of EnterpriseOne Tools 9.2.2.
-OR- - The latest JD Edwards EnterpriseOne Trial Edition.
Creating a Data Request to Check for a Customer Credit Hold
-
Sign in to the Orchestrator Studio.
-
On the Orchestrator Studio Home page, click the Service Requests icon.
-
On the Service Requests page, click Create Service Request and then Data Request from the drop-down list.
-
On the Data Request page, complete the following fields:
Service Request =Check for Customer Credit Hold
Enter Short Description =Retrieve customer’s credit message -
Click the Product Code drop-down list and select 55 for a customer product code.
-
In the Table/View Name field, enter V03012F and click Load.
V03012F is the business view over the F0101 and F03012 tables used by the Customer Master program. -
Set up a condition to fetch a customer’s credit message:
- In the
Fields grid, click the Filter
 icon next
to Address Number [F0101]. The field appears
in the Conditions box in the Filter Criteria
area on the right.
icon next
to Address Number [F0101]. The field appears
in the Conditions box in the Filter Criteria
area on the right. - In the Filter Criteria area on the right, make sure Match All is selected for the Match Type.
- Make sure the equals (=) operand is selected and leave the variable that appears in the field by default. The orchestration uses this variable to pass the address book number of the customer to EnterpriseOne.
- In the
Fields grid, click the Filter
-
To define the field values that you want the data request to return:
- In the
Fields grid on the left, click the
Return
 icon next to the following fields:
- TC [F03012]
- Alpha Name [F0101] (Scroll down in the Fields grid to see Alpha Name.) This places these fields in the Return Fields and Variable Names section on the right.
- In
Return Fields and Variable Names section,
enter the following variables for the return
fields. Later, you will use these variables as
orchestration outputs to pass to the
notification:
TC [F03012] =Credit Message
Alpha Name [F0101] =Name
- In the
Fields grid on the left, click the
Return
-
Click Save

Adding the Data Request to a New “Customer Credit Check” Orchestration
- In the upper left corner of the Orchestrator
Studio, click the
 icon twice and then click
the Orchestrations icon in the
side panel.
icon twice and then click
the Orchestrations icon in the
side panel. - On the Orchestrations page, click New Orchestration.
- Complete the following fields:
Orchestration = - Click the Product Code drop-down list and select 55 for a customer product code.
- In the first row of the Input / Value Type grid, enter Customer Number in the Input column and then in the Value Type drop-down list, select Numeric.
- Add the “Check for Customer Credit Hold” data
request as the first step in the orchestration:
- Next
to Orchestration Steps, click Add
Step
 .
. - In the
Enter Type of Step pop-up, select Service
Request from the drop-down list,
and then click OK.
The Service Request step appears in the grid.

Service Request Step - At the end of the Service Request row, click the down arrow and select Check for Customer Credit Hold from the drop-down list.
- Next
to Orchestration Steps, click Add
Step
- Click Save
Notice that the Orchestrator Studio adds additional inputs to the grid. The inputs are return values defined with variables in the orchestration step.
- Map orchestration input to the input
defined in the orchestration step:
- Select the Check for Customer Credit Hold step in the Orchestration Steps grid.
- In the Transformations grid on the right, next to the ${Address Number 1} input, click the Orchestration Input drop-down list and select Customer Number.
- Click Save
- Define the orchestration outputs to be used for
the notification:
- Click the Orchestration Output button.
- On the Outputs page, click Add.
- Deselect
Return All Grid Rows.
- Select
the following fields:
TC [F03012]
Alpha Name [F0101] - Change the names in the Output column from "TC [F03012]" to "Credit Message" and from "Alpha Name [F0101]" to "Alpha Name."
- Click OK.
- Click
Close
 to return to the orchestration.
- Click Save to save the
orchestration.
Your orchestration should look like this:
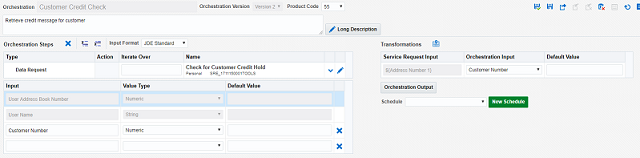
Customer
                              Credit Check
Customer
Credit Check Enter Short Description =
Retrieve credit message for customer
Testing the Customer Credit Check Orchestration in the Orchestrator Client
Before you test the orchestration, you must set the
customer’s temporary credit message to 7 (On Hold).
To set the customer’s temporary credit
message:
-
In the upper right corner of the Notifications page, click Tools.
-
On the Tools page, click the Oracle JD Edwards EnterpriseOne icon.
-
Sign into EnterpriseOne using the same user ID and enter P01012 in the Fast Path to access Work With Addresses.
-
Search and select your customer number (i.e. 4242), and then select A/R from the Row menu.
-
Click the Credit tab and in the Temporary Credit Message field, enter 7.
-
Click OK.
To test the Customer Credit Check orchestration:
-
Access the Orchestrator Client. You might have it open in another tab, or click the Tools link in the upper right corner of the Orchestrator Studio and click the Orchestrator Client icon to access it. You will most likely need to sign in again.
-
Click XML Cache Refresh.
-
In the Orchestrator Client, click the Orchestration Name drop-down list and select the Customer Credit Check orchestration.
-
In the Inputs area, enter a customer number for the Customer Number input.
 Make sure you are
using a customer number in the demo data
provided with the EnterpriseOne data pack.
Make sure you are
using a customer number in the demo data
provided with the EnterpriseOne data pack. -
Click Run. Look for the green check mark or a yellow caution symbol to see if the JD Edwards Orchestrator successfully processed the orchestration. You should also see TC [F03012] returned with a value of 7, and the Alpha Name [F0101] returned as output.
Creating a Notification Based on the Customer Credit Check Orchestration
-
Go back to or sign in to the Orchestrator Studio.
-
On the Orchestrator Studio Home page, click the Notifications icon.
-
On the Notifications page, click New Notification.
-
On the Notification page, complete the following fields:
- Notification
=
Customer Credit Hold
- Enter
Short Description =
                                    Notification that customer has been placed
                                    on credit hold
- Notification
=
-
Click the Product Code drop-down list and select 55 for a customer product code.
-
Click the Type drop-down list and select Orchestration as the notification type.
-
Turn on the options to Run As Subscriber and Allow User Overrides. This will enable subscribers to specify the customers for which they want to receive notifications.
-
Open the Notification Input section and add a notification input:
- Enter Customer Number in the Name column.
- Select the option to make it Required.
-
Open the Orchestration section and add the Customer Credit Check orchestration:
- Click the Orchestration drop-down list and select the Customer Credit Check orchestration.
- For
the Orchestration Input, Customer Number,
click the Mapped From
drop-down list and select the Notification
Input, Customer Number. At this point, your
notification should look like this:
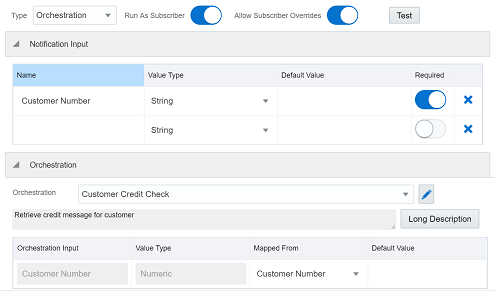
Credit Hold Notification
-
Click Save.
-
Open the Rule section and add a rule so that the notification is only sent if the customer is on credit hold:
- Click
the pencil
 icon to
add a new rule.
icon to
add a new rule. - Complete
these fields on the Rules design page:
Rule =Check for Credit Message Equal to 7
Enter Short Description =This rule compares the Temporary Credit Message field to the literal value ‘7,’ which means that the customer is on credit hold. - Click the Product Code drop-down list and select 55 for a customer product code.
- In the
grid, enter the following values in the first
row:
Rule Type= StringValue 1
=
                                    Credit Message
Operator
= =Literal
= Select this check box.
Value 2= 7Literal Value Type
= String - Click Save.
- Click Notification in the top left corner to return to your notification.
- In the Rule section, click the Rule drop-down list and select Check for Credit Message Equal to 7 for the rule.
- For
the Rule Input, Credit Message, click the Mapped
From drop-down list and select
TC [F03012].
- Click
the pencil
-
Click Save.
-
Open the Message section and complete the following fields:
Subject =Customer ${Customer Number} is on Credit Hold
Message Body (space below Subject) =Customer #${Customer Number}, ${Alpha Name [F0101]}, has been put on credit hold by Accounting.
Note that the ${xxxx} represents a variable that will be pulled into the message. -
Open the JD Edwards EnterpriseOne Shortcut section and complete the following fields:
Application = P4210
Form = W4210E
Version = ZJDE0001 -
Click Load. Starting with Orchestrator Studio 6.1.0, this button was removed as it is no longer necessary to "load" the shortcut.
-
Click Save
.
Creating a Weekly Schedule and Adding It to Your Notification
-
While still in your newly created notification, open the Schedule section.
-
Click New Schedule.
-
On the Schedules page, complete the following fields:
- Schedules
=
Weekly - Enter
Short Description =
Runs
                                    once a week or every 7 days
- Schedules
=
-
Click the Product Code drop-down list and select 55 for a customer product code.
-
Under Schedule to run every, select 7 and Days.
-
Click Save
.
Attaching this schedule to your notification establishes that it will run every week. However, your notification will not actually run on this schedule until your scheduler administrator starts this job for processing. See the link in the “Want to Learn More?” section below for more information. -
Click Close
to return to the Notification page and your
Customer Credit Hold notification. -
Open the Schedule section, and select Weekly from the drop-down list.
-
Click Save to save your notification with the new schedule.
Testing the Notification with Manual Input
-
In Orchestrator Studio, select the Notifications icon. Then select your Customer Credit Hold notification from the list of notifications on the left.
-
Click Edit Notification.
-
Click Test.
-
Leave the option to Dispatch Notifications set to off.
-
Enter your customer number (i.e. 4242) as the value for input, Customer Number.
-
Click Execute.
You should see values returned in the window, similar to these:
{
"T C [F03012]": "7",


                                  "Alpha Name [F0101]": "Capital System"
}
Subscribing to the Notification in Subscription Manager on the EnterpriseOne Client
-
Go back to your EnterpriseOne session, or if it is no longer open:
- In the upper right corner of the Notifications page, click Tools.
- On the Tools page, click the Oracle JD Edwards EnterpriseOne icon.
- Sign in to JD Edwards EnterpriseOne using the same user ID.
-
Click your User ID in the upper right corner to access the Personalization menu and select My Subscriptions.
-
In the upper left corner of Subscription Manager, click
Add
Subscription. -
From the list of available notifications, select Customer Credit Hold.
-
In the Configuration Settings section, complete these fields:
- Subscription
Name = Customer Credit Hold for
Customer #xxxx
(where xxxx
is your specific customer number)
Note: You might want to set up multiple subscriptions for multiple customers for whom you are responsible. - For Delivery Methods, select Notification List and Email.
- Enter your email address or SMS for text message (i.e. 1231231234@tmomail.net) where you would like to receive the notification. You can enter multiple email addresses separated by semicolons.
- Subscription
Name = Customer Credit Hold for
Customer #xxxx
(where xxxx
is your specific customer number)
- In the Inputs section, enter 4242 as the Override
Value for Customer Number.
-
In the Policy section, leave the value for the Notify me field as Always.
Note: This means that you will be notified each time the notification runs (once a week) if the customer is still on credit hold. If you select Only Once, you will only be notified the first time the customer is put on credit hold and then the subscription will be deleted by the system. -
Click Save.
Testing the Dispatch of Notification Messages
To test the Customer Credit Hold notification:
-
In Orchestrator Studio, select the Notifications icon. Then select your Customer Credit Hold notification from the list of notifications on the left.
-
Click Edit Notification.
-
Click Test.
-
Turn on the option to Dispatch Notifications.
The input value comes from the subscription when you do this. -
Click Execute.
You should see a “success” message.
To verify that the notification was delivered:
-
Access your email and look for the notification message with the subject, “Customer xxxx is on Credit Hold.”
-
In EnterpriseOne, click the Notifications List icon
 on the
EnterpriseOne menu toolbar to see if you have
received the notification message.
on the
EnterpriseOne menu toolbar to see if you have
received the notification message. -
Click the message name, “Customer xxxx is on Credit Hold,” in the list to see the detailed message and then click the shortcut displayed in the message. This shortcut takes you to the Customer Service Inquiry (P4210) application where you can view the customer’s sales orders.
-
If you have pop-ups enabled for your browser, you also receive a pop-up notification message. The first time you send a notification, you need to allow the pop-ups. Although this may vary by browser, here is an example:
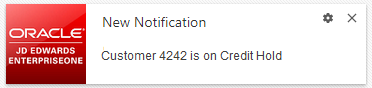
New Notification
NOTE: In this OBE, we left the various user-defined objects (UDO) as personal. This works for testing as long as the user ID that creates the objects is the same as the user ID that subscribes to the notification. Remember that UDOs need to be shared (Request to Publish) in order to give other users access to them.