Before You Begin
Purpose
This tutorial describes how to identify custom modifications using Customization Workbench and how to retrofit custom modifications for Interactive Applications, Reports, Table Conversions, Tables, Named Event Rules, and C Business Functions.
Time to Complete
Approximately 10 minutes
Background
For JD Edwards EnterpriseOne customers who retrofit customizations into standard JD Edwards objects as part of the EnterpriseOne applications upgrade or ESU update, the Customization Workbench is an upgrade simplification solution that groups detected customized objects together to be project managed together through a simplified user interface.
Identifying custom modifications using Customization Workbench
The Customization Workbench (F96UCUST) application provides you with a way to identify and manage the merge of EnterpriseOne customized objects changed in the most recent delivery.
-
Fastpath to OMW.
-
Create an OMW project. You need to be a developer and make sure this project is at a development status of 21.
-
Use Fastpath to launch P96UCUST.
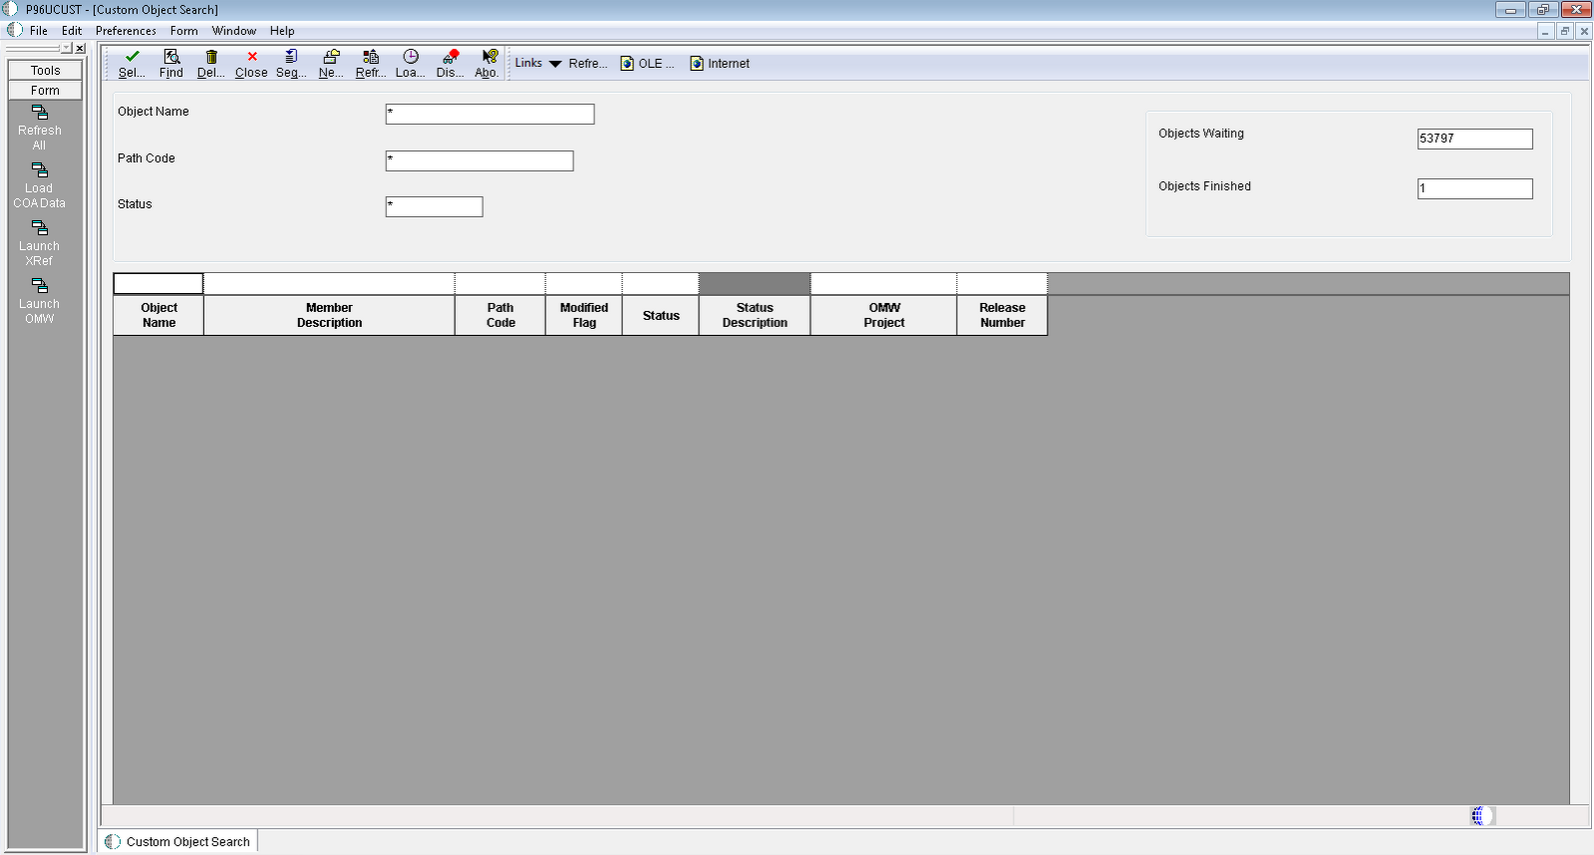
P96UCUST - Custom Object Search -
Refresh All
Calls BSFN to refresh the F96UCUST data based on the merge modification flag in the F9861 table.
-
Load COA Data
Launches batch versions for the Report R9840DL - Object Customizations Data Load Report.
-
Launch XRef
Launches the entry point form of the cross reference application.
-
Launch OMW
Launches OMW (P98220) where more actions can be taken on the object and project as needed.
-
After you load the F96UCUST table with customization objects information, click Find. Otherwise, click the form exit Load COA Data. This step might take several minutes to complete.
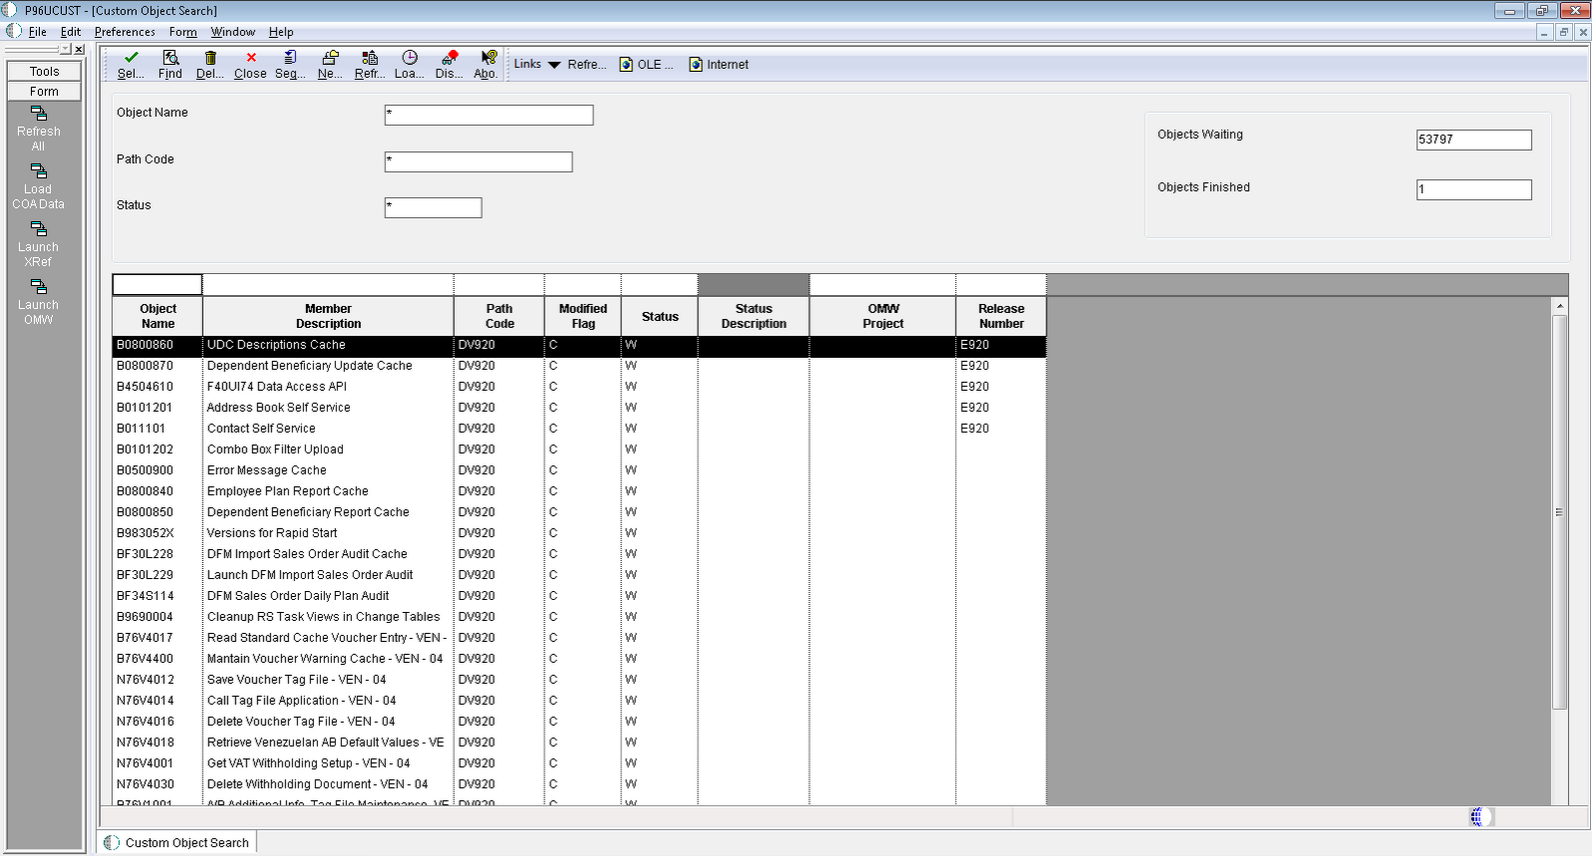
P96UCUST - Custom Object Search -
The grid displays the data. Notice that the counters in the form header indicate how many objects are completed and how many still need to be reviewed. Select an object from this list.
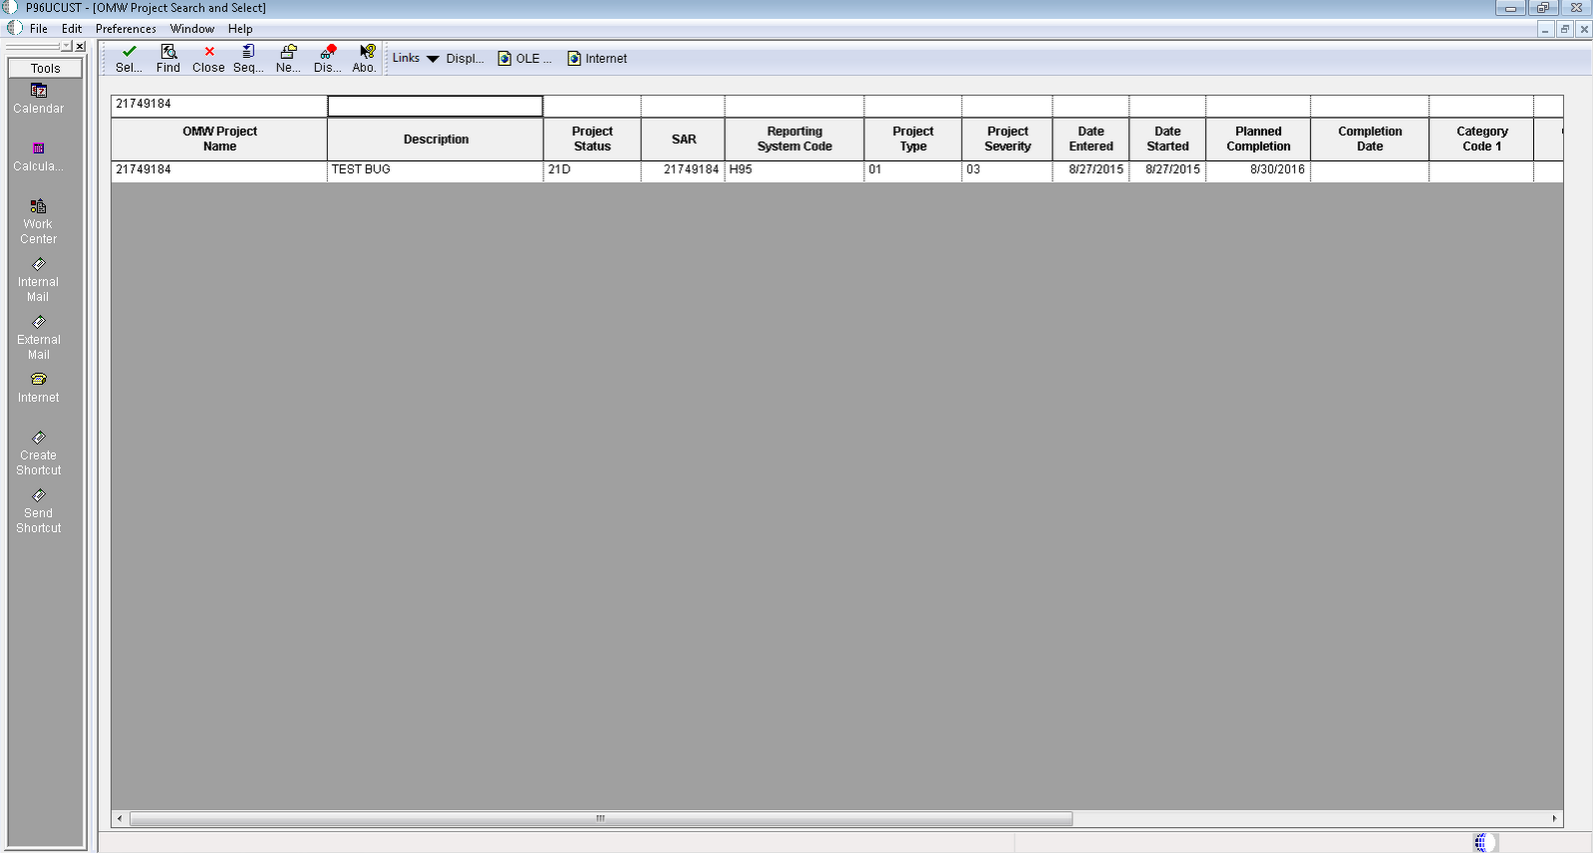
P96UCUST - OMW Project Search and Select -
The system displays the OMW Project Search and Select form, which you use to add the objects to the project you selected. A confirmation popup window displays.
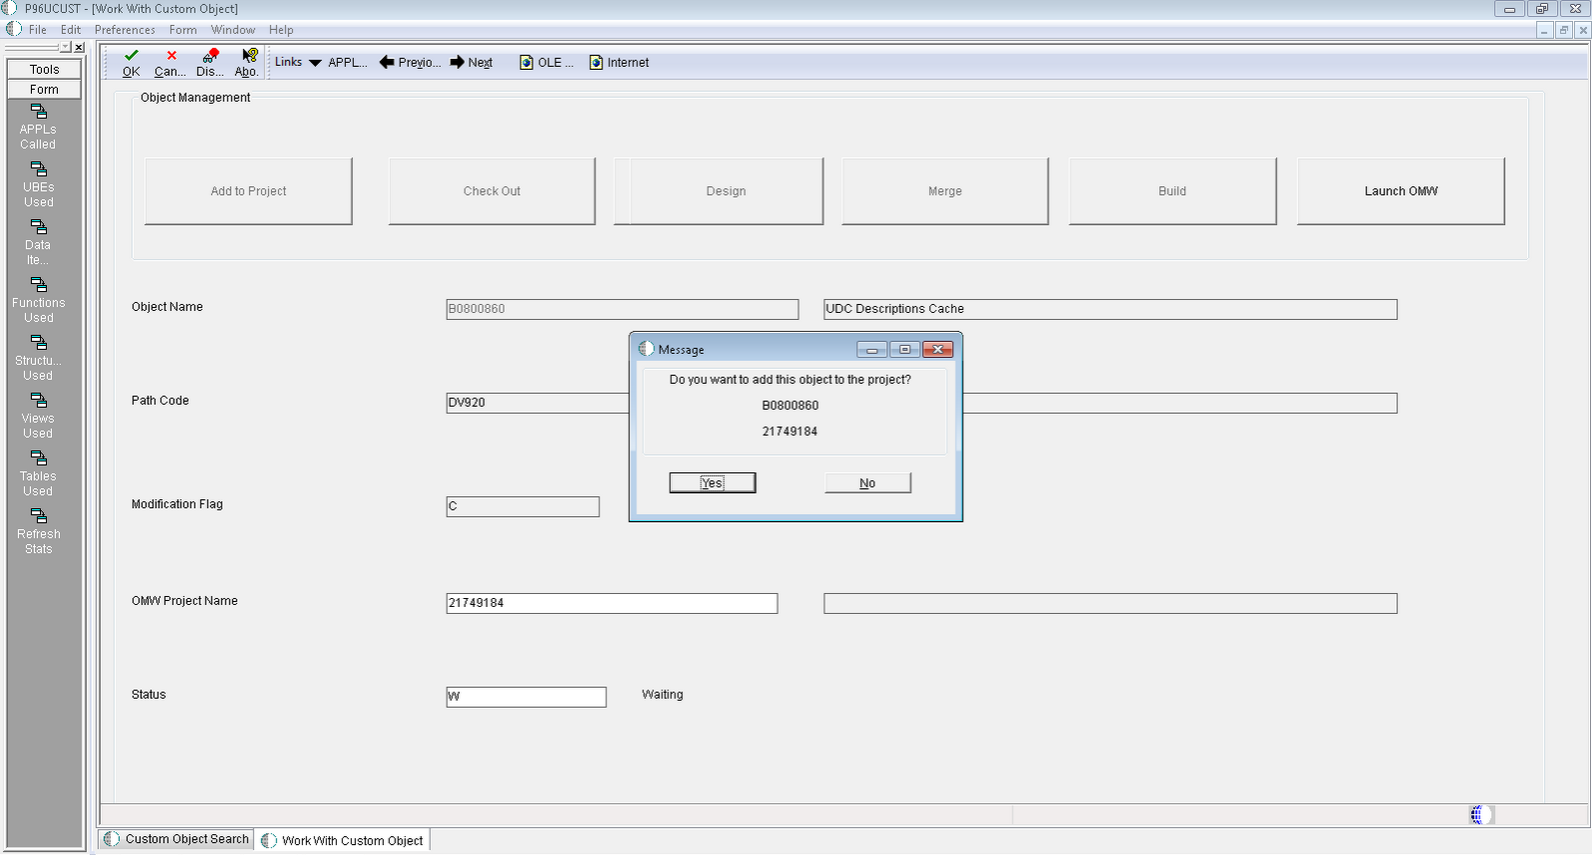
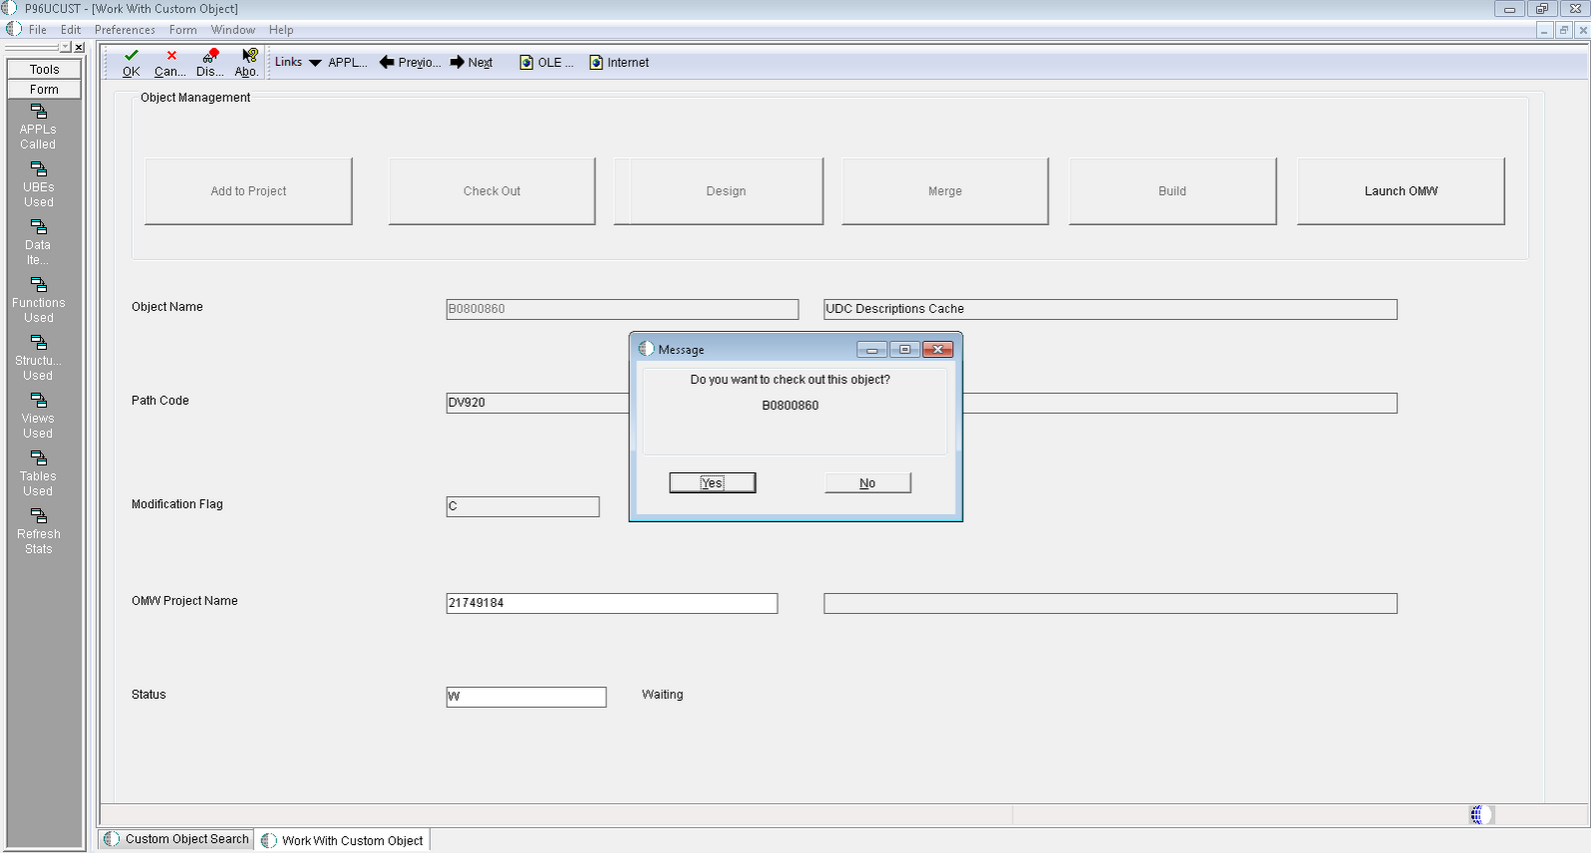
P96UCUST - Work With Custom Object -
Confirm that you want to check out the object to the project. If you select No, you can check out the object later.
P96UCUST - Work With Custom Object -
From the Object Management Workbench - Work With Custom Object form, you have several options that will change based upon the specific object. You need to determine:
- Is the object on the project?
- Is the object checked out?
- What is the object type?

Object Management Workbench - Work With Custom Object -
Perform the necessary tasks to add the appropriate customized objects. Options that change based upon the specific object:
- Rmv frm Project
- Removes the object from the current project.
- Add To Project
- Launches the OMW Project Search and Select form to all for the end user to choose the project to which to add the object.
- Check In
- Checks the object in on the current project.
- Check Out
- Checks the object out to the current project.
- Design
- Launches the appropriate design application for the object type (i.e. FDA for APPL type objects, RDA for UBE type objects, and so on).
- ER Compare
- Launches the ER Compare tool for APPL, UBE and BSFN (NER) type objects. The default comparison will be between the local specs and the specs of the login pathcode (both can be modified in the tool once it is launched).
- Build
- Available for BSFN type objects.
- Launch OMW
- Launches OMW (P98220) where more actions can be taken on the object and project as needed.
- OK
- After you enter the information, if you use the value D and click OK, the object will be checked (confirmation pending).
- Next/Previous
- Scrolls through the records on the previous screen for quick completion.
-
If the object is finished, it can be marked as D - Done. When the object is checked in, the system updates the number of completed objects.
-
Cross Reference
For reference purposes, launches the appropriate cross reference form based on the object selected.
Available Form Exits
Available Form Exits
Retrofitting Custom Modifications
Most users modify their software to make the functionality more applicable to their business situations. When you update to a new release, you need to transfer your modifications to the new release.
Because recreating custom modifications each time you update the software would be a laborious process, this section explains how to integrate custom modifications that you made in your current software into the updated software. This integration, called retrofitting, enables you to refit the customizations that can be merged into each new version of the software.
Prerequisites
To retrofit modifications, you need a workstation with the upgraded software and the development tools. The development tools enable you to compare the customizations that your current software merged into the new software with any path code in the system. This enables you to easily compare the upgraded modifications with a version of your modifications before the upgrade or with the pristine environment of the new release.
- Personnel
- A developer, preferably the same one who did the custom modifications, should perform this task.
- Logon Status
- You must be able to log on to the workstation on which you will retrofit object modifications, typically in the development or prototype environment.
- Package
- The environment must be updated and a package must be built and deployed to the workstation being used.
- Modified Objects
- The modified objects must be checked out.
Retrofitting Custom Modifications for an Interactive Application
-
From Object Management Workbench (OMW), use Form Design Aid (FDA) to copy custom objects into the target application.
You can use Compare Mode, under the File menu, to help with this process. Everything custom must be copied in FDA, except for Event Rule (ER) variables and ER statements that do not reference any custom objects.
-
Save your changes.
-
Within FDA, select Edit and Event Rules.
This option enables you to use EditER to reenter all ER statements that reference any custom objects other than custom ER variables.
-
Save your work.
-
Use the JD Edwards ER Compare tool (ER Compare button in OMW or ER Compare command in FDA) to compare the updated local specifications (target) with the original, customized (source) specifications.
-
Copy ER variables and then ER statements from source to target.
Do not copy any statements that reference objects that existed only in the source (customized) environment. Those should have been created in step 3.
-
Validate the resulting ER. Save and exit JD Edwards ER Compare.
-
When you finish retrofitting and testing the modifications, check them back in and rebuild the package.
-
Test and fix the modifications, and then rebuild and redeploy the corrected package. Repeat this step until all the modifications are functioning properly.
Retrofitting Custom Modifications for a Report
-
From OMW, use Report Design Aid (RDA) to recreate all custom report objects in the target UBE (universal batch engine).
-
Within RDA, select Edit and Event Rules.
This option enables you to use EditER to reenter all ER statements that reference custom objects other than custom ER variables.
-
Save your work.
-
Use the JD Edwards ER Compare tool (ER Compare button in OMW) to compare the updated local specifications (target) with the original, customized (source) specifications.
-
Copy ER variables and then ER statements from source to target.
Do not copy any statements that reference objects that existed only in the source (customized) environment. Those should have been created in step 2.
-
Validate the resulting ER. Save and exit JD Edwards ER Compare.
-
When you finish retrofitting and testing the modifications, check them back in and rebuild the package.
-
Test and fix the modifications, and then rebuild and redeploy the corrected package. Repeat this step until all the modifications are functioning properly.
Retrofitting Custom Modifications for a Table Conversion
-
Within OMW, use Table Conversion Design Aid to re-create all custom parts of the target UBE.
-
Within Table Conversion Design Aid, click the Advanced ER button within the Mapping dialog.
This option enables you to use EditER to reenter all ER statements that reference custom objects other than custom ER variables.
-
Use the JD Edwards ER Compare tool (ER Compare button in OMW) to compare the updated local specifications (target) with the original, customized (source) specifications.
-
Copy ER variables and then ER statements from source to target.
Do not copy any statements that reference objects that existed only in the source (customized) environment. Those should have been created in step 2.
-
Validate the resulting ER. Save and exit JD Edwards ER Compare.
-
When you finish retrofitting and testing the modifications, check them back in and rebuild the package.
-
Test and fix the modifications, and then rebuild and redeploy the corrected package. Repeat this step until all the modifications are functioning properly.
Retrofitting Custom Modifications for a Table
-
Within OMW, on the Design Tools tab, click the Table Trigger Design Aid button and use EditER to reenter all ER statements that reference custom objects other than custom ER variables.
-
Use the JD Edwards ER Compare tool (ER Compare button in OMW) to compare the updated local specifications (target) with the original, customized (source) specifications.
-
Copy the ER variables and then the ER statements from the source to the target.
Do not copy any statements that reference objects that existed only in the source (customized) environment. Those should have been created in step 1.
-
Validate the resulting ER. Save and exit JD Edwards ER Compare.
- Use the Table Design Aid tool within OMW to update each table that needs further work.
-
When you finish retrofitting and testing the modifications, check them back in and rebuild the package.
-
Test and fix the modifications, and then rebuild and redeploy the corrected package. Repeat this step until all the modifications are functioning properly.
Retrofitting Custom Modifications for a Named Event Rule
-
Within OMW, use the JD Edwards ER Compare tool to compare the updated local specifications (target) with the original, customized (source) specifications.
-
Copy the ER variables and then the ER statements from the source to the target.
Do not copy any statements that reference objects that exist only in the source (customized) environment.
-
Save and exit JD Edwards ER Compare.
-
Use the Business Function Design Aid tool from OMW to select and update each business function that needs further work.
-
Within the Business Function Design Aid tool, select Form and Edit.
The edit option enables you to use EditER to reenter ER statements that reference custom objects. Save your work.
-
Validate the resulting ER.
-
When you finish retrofitting and testing the modifications, check them back in and rebuild the package.
-
Test and fix the modifications, and then rebuild and redeploy the corrected package. Repeat this step until all the modifications are functioning properly.
Retrofitting Custom Modifications for a C Business Function
-
Within OMW, use the JD Edwards ER Compare tool to compare the updated local business function source code (target) with the original, customized (source) code.
-
Select Edit, Auto Merge Application to merge the code. Save and exit JD Edwards ER Compare.
-
Start the Business Function Design Aid tool from OMW.
-
Select Form and Edit to use Microsoft Visual Studio to finish editing the code.
-
Select the Build Business Function button in OMW to build the business function.
-
When you finish retrofitting and testing the modifications, check them back in and rebuild the package.
-
Test and fix the modifications, and then rebuild and redeploy the corrected package. Repeat this step until all the modifications are functioning properly.