Before You Begin
Purpose
This Oracle By Example (OBE) shows you how to create a custom mobile application from a copy of a JD Edwards EnterpriseOne mobile application archive (MAA) and configure the mobile application to fetch and display additional data from a JD Edwards EnterpriseOne application.
Time to Complete
90 minutes
Background
JD Edwards EnterpriseOne mobile enterprise applications (hereafter referred to simply as mobile apps) are built in JDeveloper using Oracle Mobile Application Framework (MAF). A mobile application archive (MAA) is a specially built JDeveloper project that enables developers to take an existing EnterpriseOne mobile app and generate their own application binary (apk or ipa) files. Developers can choose to customize the application and then sign it and deploy it with their own distribution profile. You can use an archive to generate a mobile app that you can deploy and manage locally in your environment without having to download mobile apps from an online web app store.
You can partially customize an MAA to suit your particular business needs. To do so, you copy the archive, customize it, and then publish it as your own application. For iOS, you must publish it with a different application ID in order to install it with your own iOS development profile.
What Do You Need?
Perform the prerequisites required to set up a mobile application development environment as described in the "Prerequisites" section in the JD Edwards EnterpriseOne Tools Developing and Customizing Mobile Enterprise Applications Guide. To use mobile application archives, you must perform additional tasks as described in the “Before You Begin” section in the Extending Mobile Application Archives appendix in this same guide, which is located at:
Create a Custom Mobile Application from a Copy of a Mobile Application Archive
-
In JDeveloper, select the File menu, New.
-
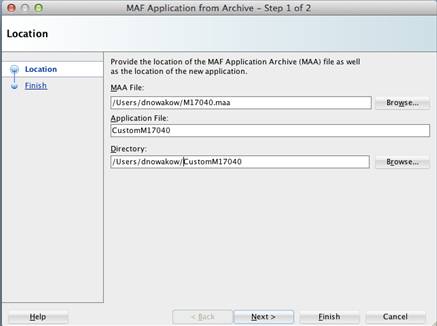
In the New Gallery window, select MAF Application from Archive File, and then click OK.
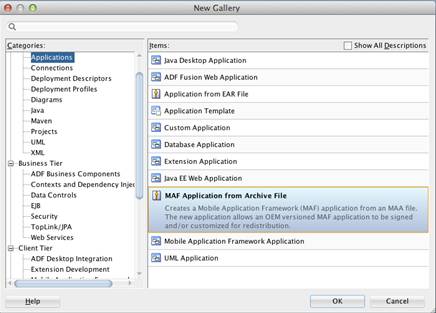
New Gallery -
Browse to your MAA file for the mobile application that you wish to customize.
- Click Finish to create your project.
-
Replace the JDEMobileFramework.jar in the MAA with the JDEMobileFramework.jar from External Libs:
-
In the Applications area on the left, right-click ApplicationController and select Project Properties.
-
Select Libraries and Classpath.
-
In the right pane, select JDEMobileFramework.jar and then click the Remove button to remove it.
-
Click Add Jar/Directory, navigate to ExternalLibs, and select JDEMobileFramework.jar.
-
Click Open.
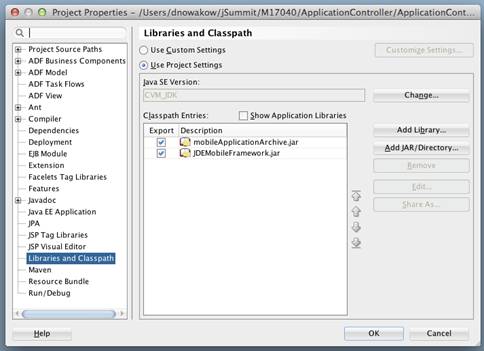
-
Replace the Login.jar and MediaObjetsTablet.jar in the MAA with the same files from External Libs:
-
Click the drop-down menu next to the application name and select Application Properties.
-
In the left pane, select Libraries and Classpath.
-
In the right pane, select Login.jar and MediaObjectsTablet.jar, and click Remove.
-
Click Add Jar/Directory, navigate to ExternalLibs, and select Login.jar and MediaObjectsTablet.jar.
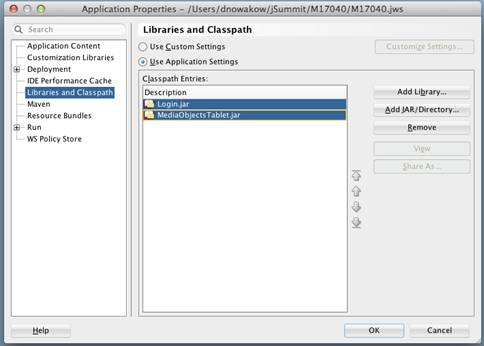
-
Click OK.
-
Open the Application Resources section in the left pane and then open maf-application.xml.
-
On the maf-application.xml tab, change the Name and ID of the application. If you are customizing an app for iOS, use the ID associated with your Apple Distribution Profile. Changing the name ensures that the application will not overwrite or interfere with the original application when deployed.
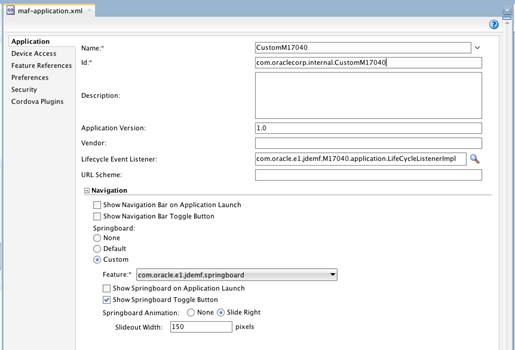
Custom Mobile App Name -
Click the drop-down menu next to the application name and select Application Properties.
-
Select Deployment in the left pane and then click the New Profile button in the right pane.
-
For Profile Type, select MAF for iOS or MAF for Android and enter a unique profile name.
-
Click OK to view the profile details, and then click OK to save the profile.
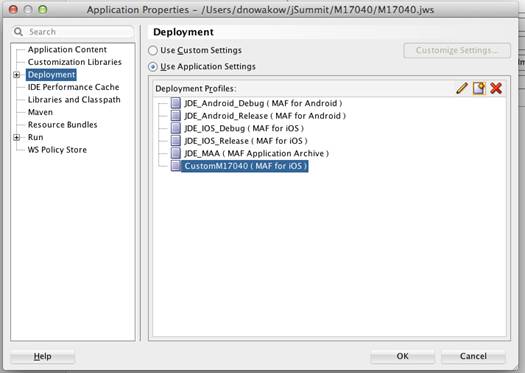
Deployment -
Click the drop-down menu next to the application name and select Deploy, and then select the custom deployment profile that you just created.
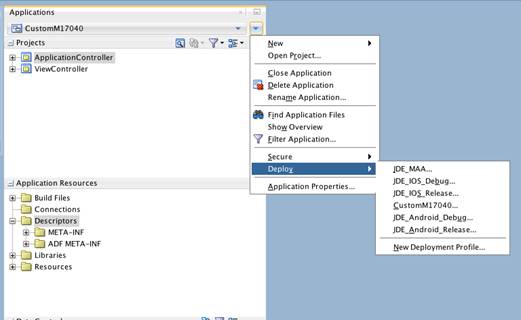
-
Use the simulator to test your application. If your application runs successfully in the simulator, continue to the next section.
Extend Your Custom Mobile App to Fetch Additional Data from EnterpriseOne
Next, complete the following tasks in this section to customize your mobile application to display category codes from the W48201F form in the P48201 application:
Generate Classes for Your Custom Mobile App
Use the AIS Client Class Generator to generate the classes that your mobile app will need to call and fetch the category codes.
Important: If you have not installed the AIS Client Class Generator, see the “What Do You Need?” section in this OBE for a link to the required prerequisites.
-
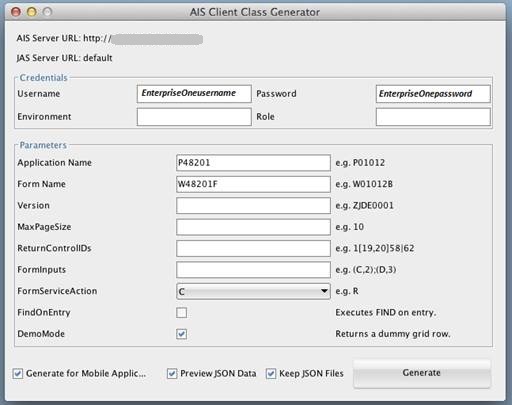
In JDeveloper, select the Tools menu, AIS Client Class Generator.
-
Enter your EnterpriseOne credentials in the Username and Password fields.
-
Enter P48201 for the Application Name.
-
Enter W48201F the Form Name.
-
Click Generate.
The AIS Client Class Generator creates the class files that you need and places them in the proper location. You may need to close and reopen the application to see the classes.
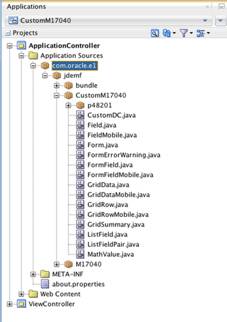
Custom Mobile App Classes
Create a New Custom Class
-
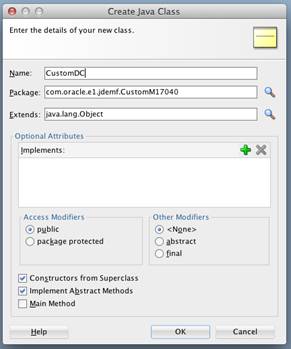
In JDeveloper, right-click the CustomM17040 package and select New, Java Class.
-
On Create Java Class, enter a name for the class in the Name field and then click OK.
This OBE uses CustomDC for the class name. You can use this name or enter your own.
-
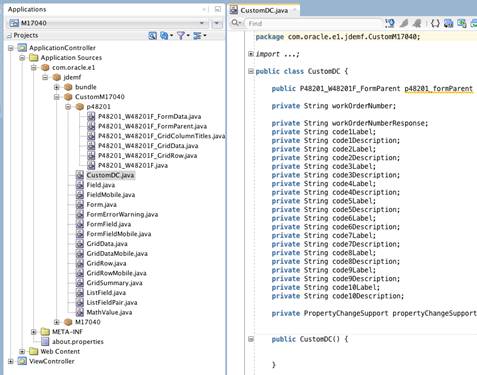
Open the new class—CustomDC.java.
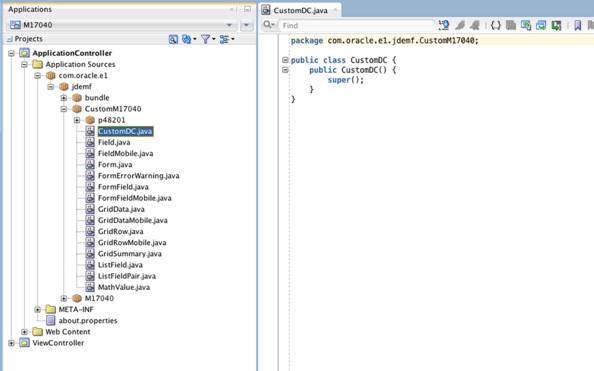
CustomDC.java -
Replace all of the code in the CustomDC.java with the following code, which contains the following logic from top to bottom:
-
Declaration of the class P48201_W48201F_FormParent. This class will serve as a repository for the responses from the Application Interface Services (AIS) Server.
-
Declaration of attributes to store the values that will be displayed in your custom mobile application. This is not necessary, as all of the category codes will be stored in the formparent class. These are added for the sake of clarity to demonstrate where in the hierarchy these values will reside.
-
The method fetchCatCodes will be the logic that, when invoked, will call the AIS Server with the selected work order number and return the category code values requested to your mobile application.
-
After adding the code, save everything.
-
In the left pane, right-click CustomDC.java and select Create Data Control.
CustomDC.java -
Click Next and then in the dialog box that appears, click Finish.
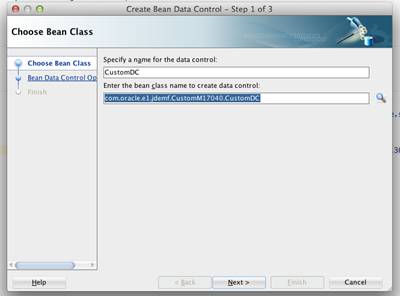
Create Bean Data Control
//BEGIN CODE HERE

 package com.oracle.e1.jdemf.CustomM17040;

import com.oracle.e1.formservicetypes.p48100.P48100_W48100A_GridRow;
import com.oracle.e1.jdemf.CustomM17040.p48201.P48201_W48201F;
import com.oracle.e1.jdemf.CustomM17040.p48201.P48201_W48201F_FormParent;
import com.oracle.e1.jdemf.CustomM17040.p48201.P48201_W48201F_GridData;
import com.oracle.e1.jdemf.CustomM17040.p48201.P48201_W48201F_GridRow;
import com.oracle.e1.jdemf.FSREvent;
import com.oracle.e1.jdemf.FormRequest;
import com.oracle.e1.jdemf.JDERestServiceException;
import com.oracle.e1.jdemf.JDERestServiceProvider;

import oracle.adfmf.bindings.dbf.AmxAccessorIteratorBinding;
import oracle.adfmf.bindings.iterator.BasicIterator;
import oracle.adfmf.dc.bean.ConcreteJavaBeanObject;
import oracle.adfmf.framework.api.AdfmfJavaUtilities;
import oracle.adfmf.framework.api.JSONBeanSerializationHelper;
import oracle.adfmf.framework.exception.AdfException;
import oracle.adfmf.java.beans.PropertyChangeListener;
import oracle.adfmf.java.beans.PropertyChangeSupport;
import oracle.adfmf.json.JSONObject;

public class CustomDC {

    public P48201_W48201F_FormParent p48201_formParent = new P48201_W48201F_FormParent();

    private String workOrderNumber;

    private String workOrderNumberResponse;
    private String code1Label;
    private String code1Description;
    private String code2Label;
    private String code2Description;
    private String code3Label;
    private String code3Description;
    private String code4Label;
    private String code4Description;
    private String code5Label;
    private String code5Description;
    private String code6Label;
    private String code6Description;
    private String code7Label;
    private String code7Description;
    private String code8Label;
    private String code8Description;
    private String code9Label;
    private String code9Description;
    private String code10Label;
    private String code10Description;

    private PropertyChangeSupport propertyChangeSupport = new PropertyChangeSupport(this);


    public CustomDC() {


    }

    public void fetchCatCodes() {

        workOrderNumber = ((String)AdfmfJavaUtilities.evaluateELExpression("#{applicationScope.selectedWO}"));

        FormRequest formRequest = new FormRequest();

        formRequest.setReturnControlIDs("1[7,29,607,30,608,31,609,32,610,33,611,34,612,35,613,36,614,37,615,38,616]");
        formRequest.setFormName("P48201_W48201F");
        formRequest.setFormServiceAction("R");

        //create event holder
        FSREvent myFSREvent = new FSREvent();

        //Set the Filter values

        myFSREvent.setQBEValue("1[7]", workOrderNumber);

        //Press the Find Button
        myFSREvent.doControlAction("6");

        //add event holder to the form request
        formRequest.addFSREvent(myFSREvent);

        // Execute SEND and RECEIVE operation
        try {
            // For POST request, set data payload is header delimited with | and service input class

            JSONObject jsonObject = (JSONObject)JSONBeanSerializationHelper.toJSON(formRequest);
            String postData = jsonObject.toString();

            //Call to JDERestServiceProvider with parameters json string, method (POST, //GET), URI (formservice, tokenrequest, defaultconfig)
            String response = JDERestServiceProvider.jdeRestServiceCall(postData, "POST", "formservice");


            P48201_W48201F_FormParent newFormParent =
                (P48201_W48201F_FormParent)JSONBeanSerializationHelper.fromJSON(P48201_W48201F_FormParent.class,
                                                                                response);

            P48201_W48201F_GridRow gridResponse =
                newFormParent.getFs_P48201_W48201F().getData().getGridData().getRowset()[0];


            this.setWorkOrderNumberResponse(gridResponse.getMnOrderNumber_7().getValue().trim());

            this.setCode1Label(gridResponse.getSPhaseDescription_607().getTitle());
            this.setCode1Description(gridResponse.getSPhaseDescription_607().getValue().trim());

            this.setCode2Label(gridResponse.getSCat02Description_608().getTitle());
            this.setCode2Description(gridResponse.getSCat02Description_608().getValue().trim());

            this.setCode3Label(gridResponse.getSCat03Description_609().getTitle());
            this.setCode3Description(gridResponse.getSCat03Description_609().getValue().trim());

            this.setCode4Label(gridResponse.getSCat04Description_610().getTitle());
            this.setCode4Description(gridResponse.getSCat04Description_610().getValue().trim());

            this.setCode5Label(gridResponse.getSCat05Description_611().getTitle());
            this.setCode5Description(gridResponse.getSCat05Description_611().getValue().trim());

            this.setCode6Label(gridResponse.getSStaDescription_612().getTitle());
            this.setCode6Description(gridResponse.getSStaDescription_612().getValue().trim());

            this.setCode7Label(gridResponse.getSSrvTypDescription_613().getTitle());
            this.setCode7Description(gridResponse.getSSrvTypDescription_613().getValue().trim());

            this.setCode8Label(gridResponse.getSSklTypDescription_614().getTitle());
            this.setCode8Description(gridResponse.getSSklTypDescription_614().getValue().trim());

            this.setCode9Label(gridResponse.getSExpLvlDescription_615().getTitle());
            this.setCode9Description(gridResponse.getSExpLvlDescription_615().getValue().trim());

            this.setCode10Label(gridResponse.getSWOCatDescription_616().getTitle());
            this.setCode10Description(gridResponse.getSWOCatDescription_616().getValue().trim());

        } catch (JDERestServiceException e) {
            JDERestServiceProvider.handleServiceException(e);
        } catch (Exception e) {
            AdfException adfe = new AdfException(e.getMessage(), AdfException.ERROR);
            throw adfe;
        }


    }

    public void setWorkOrderNumberResponse(String workOrderNumberResponse) {
        String oldWorkOrderNumberResponse = this.workOrderNumberResponse;
        this.workOrderNumberResponse = workOrderNumberResponse;
        propertyChangeSupport.firePropertyChange("workOrderNumberResponse", oldWorkOrderNumberResponse,
                                                 workOrderNumberResponse);
    }

    public String getWorkOrderNumberResponse() {
        return workOrderNumberResponse;
    }

    public void setP48201_formParent(P48201_W48201F_FormParent p48201_formParent) {
        P48201_W48201F_FormParent oldP48201_formParent = this.p48201_formParent;
        this.p48201_formParent = p48201_formParent;
        propertyChangeSupport.firePropertyChange("p48201_formParent", oldP48201_formParent, p48201_formParent);
    }

    public P48201_W48201F_FormParent getP48201_formParent() {
        return p48201_formParent;
    }

    public void setWorkOrderNumber(String workOrderNumber) {
        String oldWorkOrderNumber = this.workOrderNumber;
        this.workOrderNumber = workOrderNumber;
        propertyChangeSupport.firePropertyChange("workOrderNumber", oldWorkOrderNumber, workOrderNumber);
    }

    public String getWorkOrderNumber() {
        return workOrderNumber;
    }

    public void addPropertyChangeListener(PropertyChangeListener l) {
        propertyChangeSupport.addPropertyChangeListener(l);
    }

    public void setCode1Description(String code1Description) {
        String oldCode1Description = this.code1Description;
        this.code1Description = code1Description;
        propertyChangeSupport.firePropertyChange("code1Description", oldCode1Description, code1Description);
    }

    public String getCode1Description() {
        return code1Description;
    }

    public void setCode2Description(String code2Description) {
        String oldCode2Description = this.code2Description;
        this.code2Description = code2Description;
        propertyChangeSupport.firePropertyChange("code2Description", oldCode2Description, code2Description);
    }

    public String getCode2Description() {
        return code2Description;
    }

    public void setCode3Description(String code3Description) {
        String oldCode3Description = this.code3Description;
        this.code3Description = code3Description;
        propertyChangeSupport.firePropertyChange("code3Description", oldCode3Description, code3Description);
    }

    public String getCode3Description() {
        return code3Description;
    }

    public void setCode4Description(String code4Description) {
        String oldCode4Description = this.code4Description;
        this.code4Description = code4Description;
        propertyChangeSupport.firePropertyChange("code4Description", oldCode4Description, code4Description);
    }

    public String getCode4Description() {
        return code4Description;
    }

    public void setCode5Description(String code5Description) {
        String oldCode5Description = this.code5Description;
        this.code5Description = code5Description;
        propertyChangeSupport.firePropertyChange("code5Description", oldCode5Description, code5Description);
    }

    public String getCode5Description() {
        return code5Description;
    }

    public void setCode6Description(String code6Description) {
        String oldCode6Description = this.code6Description;
        this.code6Description = code6Description;
        propertyChangeSupport.firePropertyChange("code6Description", oldCode6Description, code6Description);
    }

    public String getCode6Description() {
        return code6Description;
    }

    public void setCode7Description(String code7Description) {
        String oldCode7Description = this.code7Description;
        this.code7Description = code7Description;
        propertyChangeSupport.firePropertyChange("code7Description", oldCode7Description, code7Description);
    }

    public String getCode7Description() {
        return code7Description;
    }

    public void setCode8Description(String code8Description) {
        String oldCode8Description = this.code8Description;
        this.code8Description = code8Description;
        propertyChangeSupport.firePropertyChange("code8Description", oldCode8Description, code8Description);
    }

    public String getCode8Description() {
        return code8Description;
    }

    public void setCode9Description(String code9Description) {
        String oldCode9Description = this.code9Description;
        this.code9Description = code9Description;
        propertyChangeSupport.firePropertyChange("code9Description", oldCode9Description, code9Description);
    }

    public String getCode9Description() {
        return code9Description;
    }

    public void setCode10Description(String code10Description) {
        String oldCode10Description = this.code10Description;
        this.code10Description = code10Description;
        propertyChangeSupport.firePropertyChange("code10Description", oldCode10Description, code10Description);
    }

    public String getCode10Description() {
        return code10Description;
    }


    public void removePropertyChangeListener(PropertyChangeListener l) {
        propertyChangeSupport.removePropertyChangeListener(l);
    }

    public void setCode1Label(String code1Label) {
        String oldCode1Label = this.code1Label;
        this.code1Label = code1Label;
        propertyChangeSupport.firePropertyChange("code1Label", oldCode1Label, code1Label);
    }

    public String getCode1Label() {
        return code1Label;
    }

    public void setCode2Label(String code2Label) {
        String oldCode2Label = this.code2Label;
        this.code2Label = code2Label;
        propertyChangeSupport.firePropertyChange("code2Label", oldCode2Label, code2Label);
    }

    public String getCode2Label() {
        return code2Label;
    }

    public void setCode3Label(String code3Label) {
        String oldCode3Label = this.code3Label;
        this.code3Label = code3Label;
        propertyChangeSupport.firePropertyChange("code3Label", oldCode3Label, code3Label);
    }

    public String getCode3Label() {
        return code3Label;
    }

    public void setCode4Label(String code4Label) {
        String oldCode4Label = this.code4Label;
        this.code4Label = code4Label;
        propertyChangeSupport.firePropertyChange("code4Label", oldCode4Label, code4Label);
    }

    public String getCode4Label() {
        return code4Label;
    }

    public void setCode5Label(String code5Label) {
        String oldCode5Label = this.code5Label;
        this.code5Label = code5Label;
        propertyChangeSupport.firePropertyChange("code5Label", oldCode5Label, code5Label);
    }

    public String getCode5Label() {
        return code5Label;
    }

    public void setCode6Label(String code6Label) {
        String oldCode6Label = this.code6Label;
        this.code6Label = code6Label;
        propertyChangeSupport.firePropertyChange("code6Label", oldCode6Label, code6Label);
    }

    public String getCode6Label() {
        return code6Label;
    }

    public void setCode7Label(String code7Label) {
        String oldCode7Label = this.code7Label;
        this.code7Label = code7Label;
        propertyChangeSupport.firePropertyChange("code7Label", oldCode7Label, code7Label);
    }

    public String getCode7Label() {
        return code7Label;
    }

    public void setCode8Label(String code8Label) {
        String oldCode8Label = this.code8Label;
        this.code8Label = code8Label;
        propertyChangeSupport.firePropertyChange("code8Label", oldCode8Label, code8Label);
    }

    public String getCode8Label() {
        return code8Label;
    }

    public void setCode9Label(String code9Label) {
        String oldCode9Label = this.code9Label;
        this.code9Label = code9Label;
        propertyChangeSupport.firePropertyChange("code9Label", oldCode9Label, code9Label);
    }

    public String getCode9Label() {
        return code9Label;
    }

    public void setCode10Label(String code10Label) {
        String oldCode10Label = this.code10Label;
        this.code10Label = code10Label;
        propertyChangeSupport.firePropertyChange("code10Label", oldCode10Label, code10Label);
    }

    public String getCode10Label() {
        return code10Label;
    }
}

//END CODE HERE
Add Code to Invoke the Method
After creating the logic to fetch the category codes that you want to display in the mobile application, you need to invoke the method. To do so:
-
Open ManageTeamWO.amx.
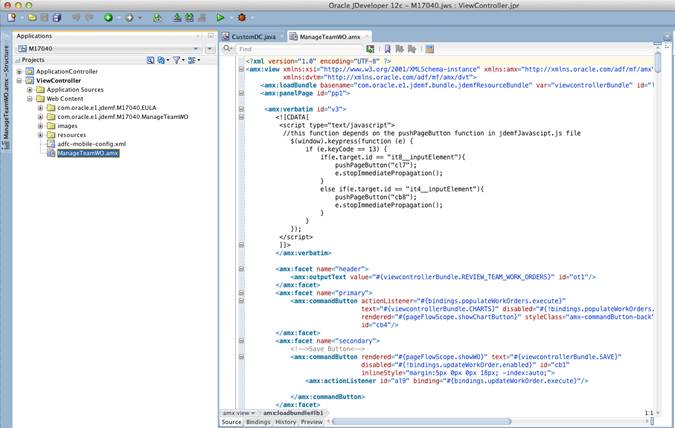
ManageTeamWO.amx -
Locate the following code on or around line 128:
</amx:tableLayout>
                        <amx:setPropertyListener id="spl4" from="#{row.rowKey}" to="#{pageFlowScope.selectedRowKey}"/>
                        <amx:actionListener id="al2" binding="#{bindings.processSelectedWorkOrder.execute}"/>
              </amx:listItem>
This code is an attribute of the left side listview of work orders shown in your mobile application.The propertyListener, on a click of an entry in the listview, stores the row key of the selected row in a variable to be consumed later.
In the next step, you will add a new line here that stores the work order number of the selected entry in a variable that will be used by the fetchCatCodes method to get the category codes for the correct method.
-
After the propertyListener, insert the following line:
<amx:setPropertyListener id="spl22" from="#{row.mnOrderNumber_17.bindings.value.inputValue}"
   to="#{applicationScope.selectedWO}"/>
The resulting code should look like this:
</amx:tableLayout>
                      <amx:setPropertyListener id="spl4" from="#{row.rowKey}" to="#{pageFlowScope.selectedRowKey}"/>
			<amx:setPropertyListener id="spl22" from="#{row.mnOrderNumber_17.bindings.value.inputValue}" to="#{applicationScope.selectedWO}"/>
                        <amx:actionListener id="al2" binding="#{bindings.processSelectedWorkOrder.execute}"/>
                    </amx:listItem>
The new propertyListener will store the Work Order Number from the selected row in the listview in an applicationScope variable named selectedWO.
If you return to the fetchCatCodes method in CustomDC.java, you will see the following line:
workOrderNumber = ((String)AdfmfJavaUtilities.evaluateELExpression("#{applicationScope.selectedWO}"));This line of code places the current value of selectedWO into a local variable workOrderNumber. Thus, when a work order row is selected in the application’s left listview, the work order number will be available to the fetchCatCodes method.
Modify an Existing Event to Fetch Category Code Values
This exercise describes how to modify the amx code to fetch category code values in the custom mobile app. To do so, you need to:
- Hook into the event.
- Call the fetchCatCodes.
- Place proper method calls in your new customBean.
The amx code contains a “select a work order row” event that fetches details about a particular work order and displays the details in a tab format in the right pane of the application. In this exercise, you will modify this event to also call the fetchCatCodes method in order to retrieve category code values for displaying in the mobile app as well.
The actionListener executes a Java method called processSelectedWorkOrder. This is the logic that, in the shipped application, fetches the details for each work order. Because the listview itself can have only a single actionListener, you need to create a custom bean that will be invoked by this actionListener instead of just executing a single method. The good news is that once you do that, you can call the processSelectedWorkOrder method as before, and then add the new method to be called as well.
-
In the amx code, locate the code block that you were working with in the preceding section:
</amx:tableLayout> <amx:setPropertyListener id="spl4" from="#{row.rowKey}" to="#{pageFlowScope.selectedRowKey}"/> <amx:setPropertyListener id="spl22" from="#{row.mnOrderNumber_17.bindings.value.inputValue}" to="#{applicationScope.selectedWO}"/> <amx:actionListener id="al2" binding="#{bindings.processSelectedWorkOrder.execute}"/> </amx:listItem> -
Remove the following line from the code:
amx:actionListener id="al2" binding="#{bindings.processSelectedWorkOrder.execute}"/> - Place your cursor within the listItem tag, looking at the List Item properties. If you do not see this window, select the Window menu, Properties to display it.
- Scroll to the bottom and locate the Action Listener field.
- Click the property menu icon to the right of the binding field.
- Select Edit and then select New.
- Complete the following fields and then click OK:
- Bean Name: Enter customBean.
- Class Name: Enter CustomBean.
- For the Method, click New.
- In the Method Name field, enter extendedAction and then click OK.
- In the new customBean, locate the following code and insert the proper method calls as described below.
The addition of the actionListener attribute will be added in the amx page to the top pair of the listItem tag, which is about 25 lines above the current area in the code. It should look similar to this:
<amx:listItem id="li1" actionListener="#{pageFlowScope.customBean.extendedAction}">Locate the following code, which should already have been created for you in CustomBean.java:
public class CustomBean {
    public CustomBean() {
    }
    public void extendedAction(ActionEvent actionEvent) {
        // Add event code here...
    }
}
Modify the code to look like this:
public class CustomBean {
    public CustomBean() {
    }

    public void extendedAction(ActionEvent actionEvent) {
        // Add event code here...

        List pnames = new ArrayList();
        List params = new ArrayList();
        List ptypes = new ArrayList();

        try{

            AdfmfJavaUtilities.invokeDataControlMethod("ManageTeamWODC", null, "processSelectedWorkOrder", pnames, params, ptypes);

            AdfmfJavaUtilities.invokeDataControlMethod("CustomDC", null, "fetchCatCodes", pnames, params, ptypes);


        }catch(AdfInvocationException e){

        }
    }
}
This completes this part of the exercise, in which you modified your custom mobile app to call the method processSelectedWorkOrder, and then created a new call to the fetchCatCodes method that you created previously. You preserved the original logic path of the original mobile app, but added additional processing on an action to fetch additional data.
It is important to note that by using the invokeDataControlMethod API, you can call any method exposed through a data control, whether the method was shipped with the mobile app or is a new method created by a customization.
Add UI Elements for Displaying Category Code Values
Add UI elements to display the new category code values fetched from the fetchCatCodes method.
-
Return to the ManageTeamWO.amx.
-
On or around line 165, locate the following code block:
 <!-->Work Order, Notes, Parts and Labor button bar<-->
                    <amx:rowLayout id="rl12">
                        <amx:cellFormat id="cf16" halign="center" columnSpan="8">
                            <amx:selectOneButton id="sob1" value="#{pageFlowScope.detailSelected}" simple="true">
                                <amx:selectItem id="si5" label="#{viewcontrollerBundle.WORK_ORDER_1}" value="0"/>
                                <amx:selectItem label="#{viewcontrollerBundle.PARTS}" id="si7" value="1"/>
                                <amx:selectItem label="#{viewcontrollerBundle.LABOR}" id="si8" value="2"/>
                                <amx:selectItem label="#{viewcontrollerBundle.NOTES}" id="si6" value="3"/>
                            </amx:selectOneButton>
                        </amx:cellFormat>
                    </amx:rowLayout>
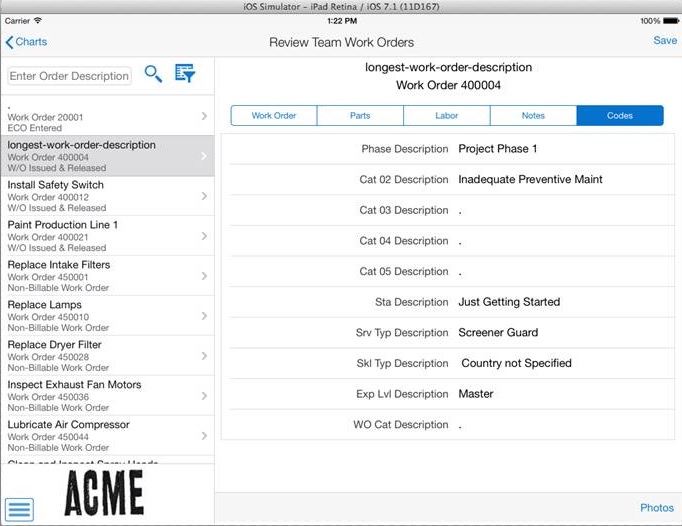
This amx code creates the four tabs shown in the right pane of the tablet application, as shown in the screenshot at the beginning of this tutorial.
-
Add the following line after the notes line:
-
Scroll down in the amx page to around line #455 and locate the following code block:
-
In the next line directly after the close of the tableLayout tag, insert the following code:
-
In the left pane, open the Data Controls panel and expand the CustomDC data control.
- Place your cursor in the code you just inserted above the panelFormLayout close tag.
- From the expanded CustomDC area, drag the attribute code1Description onto your page and place it inside the panelFormLayout tags.
- Select Text, then MAF Output Text w/ Label.
- Drag the attribute code1Label onto the page just below the panelLabelandMessage that you just created.
- To combine the two values placed on the page into one UI element, copy the value from the output text in the second panelLabelandMessage and place it as the label on the first panelLabelandMessage.
- Delete the second panelLabelandMessage element. The result should look like this:
- Perform the same steps for each of the category code pairs (1-10) that you created.
<amx:selectItem label="Codes" id="si9" value="4"/>This will create a fifth tab labeled Codes.
<!-->Notes Panel<-->
                 <amx:tableLayout id="tl15" inlineStyle="margin:-3px 3px 0px 0px;" width="100%"
                                  rendered="#{pageFlowScope.detailSelected eq '3' and pageFlowScope.showWO}">
                   <amx:rowLayout id="rl22">
                    <amx:cellFormat id="cf40" columnSpan="8" valign="top">
                     <amx:panelFormLayout id="pfl6" labelPosition="topStart" fieldHalign="start">
                      <!--New Media Text-->
                      <amx:inputText value="#{bindings.newNotes.inputValue}" id="it10" rows="2"
label="#{viewcontrollerBundle.NEW_NOTES}"                                                  inlineStyle="width:98%;"/>
                       </amx:panelFormLayout>
                       <!-->Current Media Text<-->
                       <amx:panelFormLayout id="pfl8" styleClass="jdemfMediaTextHistory" fieldWidth="100%"
                                             labelPosition="topStart" fieldHalign="start">
                       <amx:inputText value="#{bindings.notesHistory.inputValue}" rows="16" disabled="true"
                                  label="#{viewcontrollerBundle.NOTES_HISTORY}" inlineStyle="width:98%;" id="it7"/>
                     </amx:panelFormLayout>
                   </amx:cellFormat>
                  </amx:rowLayout>
                 </amx:tableLayout>
  <!-->Codes Panel<-->
                    <amx:tableLayout id="tl115" inlineStyle="margin:-3px 3px 0px 0px;" width="100%"
                              rendered="#{pageFlowScope.detailSelected eq '4'}">
                            <amx:rowLayout id="rl6">
                                <amx:cellFormat id="cf12" columnSpan="8" valign="top">
                                    <amx:panelFormLayout id="pfl14" labelPosition="end" fieldHalign="start">


                                </amx:panelFormLayout>
                                </amx:cellFormat>
                            </amx:rowLayout>
                        </amx:tableLayout>
                </amx:panelGroupLayout>
Your code should look similar to this:
<amx:panelLabelAndMessage label="#{bindings.code1Description.hints.label}" id="plam10">

<amx:outputText value="#{bindings.code1Description.inputValue}" id="ot17"/>

</amx:panelLabelAndMessage>

<amx:panelLabelAndMessage label="#{bindings.code1Label.hints.label}" id="plam12">

<amx:outputText value="#{bindings.code1Label.inputValue}" id="ot19"/>

</amx:panelLabelAndMessage>
<amx:panelLabelAndMessage label="#{bindings.code1Label.inputValue}" id="plam10">

<amx:outputText value="#{bindings.code1Description.inputValue}" id="ot17"/>

</amx:panelLabelAndMessage>
Note: You need to drag both elements onto the page; you cannot simply paste in the amx code from here, as the act of placing an attribute on the page creates a binding that makes that attribute available to the page. The resulting element shown in the preceding code example will include a label value pair with the category code label from EnterpriseOne on the left and the category code value from EnterpriseOne on the right.

In the end, your "Codes" section should look like this:
<!-->Codes Panel<-->
                    <amx:tableLayout id="tl115" inlineStyle="margin:-3px 3px 0px 0px;" width="100%"
                              rendered="#{pageFlowScope.detailSelected eq '4'}">
                            <amx:rowLayout id="rl6">
                                <amx:cellFormat id="cf12" columnSpan="8" valign="top">
                                    <amx:panelFormLayout id="pfl14" labelPosition="end" fieldHalign="start">

                                    <amx:panelLabelAndMessage label="#{bindings.code1Label.inputValue}"
                                                              id="plam5">
                                        <amx:outputText value="#{bindings.code1Description.inputValue}" id="ot7"/>
                                    </amx:panelLabelAndMessage>

                                    <amx:panelLabelAndMessage label="#{bindings.code2Label.inputValue}"
                                                              id="plam10">
                                        <amx:outputText value="#{bindings.code2Description.inputValue}" id="ot17"/>
                                    </amx:panelLabelAndMessage>

                                    <amx:panelLabelAndMessage label="#{bindings.code3Label.inputValue}"
                                                              id="plam12">
                                        <amx:outputText value="#{bindings.code3Description.inputValue}" id="ot19"/>
                                    </amx:panelLabelAndMessage>
                                    <amx:panelLabelAndMessage label="#{bindings.code4Label.inputValue}"
                                                              id="plam22">
                                        <amx:outputText value="#{bindings.code4Description.inputValue}" id="ot36"/>
                                    </amx:panelLabelAndMessage>
                                    <amx:panelLabelAndMessage label="#{bindings.code5Label.inputValue}"
                                                              id="plam23">
                                        <amx:outputText value="#{bindings.code5Description.inputValue}" id="ot40"/>
                                    </amx:panelLabelAndMessage>
                                    <amx:panelLabelAndMessage label="#{bindings.code6Label.inputValue}"
                                                              id="plam24">
                                        <amx:outputText value="#{bindings.code6Description.inputValue}" id="ot41"/>
                                    </amx:panelLabelAndMessage>
                                    <amx:panelLabelAndMessage label="#{bindings.code7Label.inputValue}"
                                                              id="plam25">
                                        <amx:outputText value="#{bindings.code7Description.inputValue}" id="ot42"/>
                                    </amx:panelLabelAndMessage>
                                    <amx:panelLabelAndMessage label="#{bindings.code8Label.inputValue}"
                                                              id="plam26">
                                        <amx:outputText value="#{bindings.code8Description.inputValue}" id="ot43"/>
                                    </amx:panelLabelAndMessage>
                                    <amx:panelLabelAndMessage label="#{bindings.code9Label.inputValue}"
                                                              id="plam27">
                                        <amx:outputText value="#{bindings.code9Description.inputValue}" id="ot44"/>
                                    </amx:panelLabelAndMessage>
                                    <amx:panelLabelAndMessage label="#{bindings.code10Label.inputValue}"
                                                              id="plam28">
                                        <amx:outputText value="#{bindings.code10Description.inputValue}" id="ot48"/>
                                    </amx:panelLabelAndMessage>

                                </amx:panelFormLayout>
                                </amx:cellFormat>
                            </amx:rowLayout>
                        </amx:tableLayout>
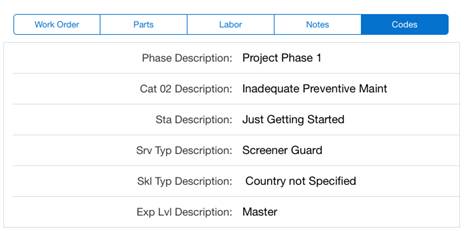
In the custom mobile app, the UI should like this:
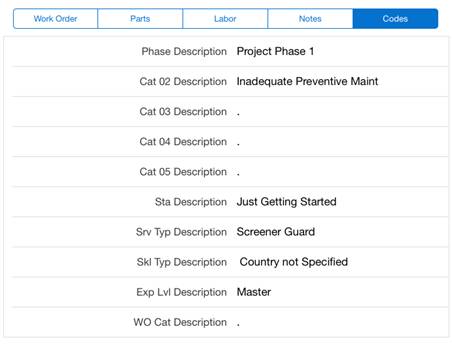
Note: In the preceding image, the label value on the left is the same value displayed in EnterpriseOne. This means that any Data Dictionary or Jargon overrides that change Cat 01 Description to Phase Description in EnterpriseOne will be displayed in your mobile app as well.
In the preceding exercise, you added 10 label value pairs to the code to show Category Codes 1 – 10. Each pair will display even if the value (description) field is blank or contains the all too common “.” value. If you want to refine your UI to only show the pair when the value field is not equal to blank or “.”, insert the following amx code:
<amx:panelLabelAndMessage label="#{bindings.code1Label.inputValue}:" id="plam31"

rendered="#{bindings.code1Description.inputValue ne '' and
bindings.code1Description.inputValue ne '.' ? 'true':'false'}">

       <amx:outputText value="#{bindings.code1Description.inputValue}" id="ot53"/>
 </amx:panelLabelAndMessage>
This code contains a rendered tag that will evaluate at runtime. If the description value is ne to 'blank' or ne to '.', the expression evaluates as true and the control will render. Otherwise, it will evaluate as false and not render. This returns white space to the page and gracefully cleans up the appearance of the UI.
The following image shows the mobile app UI when the amx code is modified with the above rendered tag for the same work order:
Customize the Brand Images in Your Custom Mobile Application
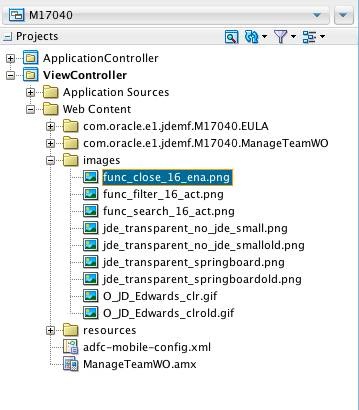
Lastly, you should replace the brand images that are shipped in the JD Edwards EnterpriseOne MAAs, which are:
- jde_transparent_no_jde_small.png
- jde_transparent_springboard.png
- O_JD_Edwards_clr.gif
These images are located in the "images" folder as shown in the screenshot below. You should replace them with your own company images or logo.
The easiest way to alter them is to simply replace each of the images with either a png or gif (depends on which one you are replacing) that has your image sized to 242 X 87 pixel, keeping the exact same name. When you redeploy the application, performing a "clean all" first should refresh the images with your own.
Review the Finished Product
After completing all of the exercises in this OBE, your custom mobile app should contain new Category Code values and altered brand images. If your custom mobile app looks similar to the mobile app in the image below, then congratulations. You have successfully created a custom mobile app!