 Creating
a Simple Orchestration in the JD Edwards Orchestrator Studio
Creating
a Simple Orchestration in the JD Edwards Orchestrator Studio  Before You Begin
This Oracle By Example (OBE) shows you how to create a simple orchestration that performs a transaction in EnterpriseOne and sends a message about the transaction to a recipient.
Background
This OBE employs the following scenario to show you how to create a simple orchestration:
When a customer exceeds their credit limit, you want an orchestration that will 1) place a hold on the customer’s credit and 2) send a message about the customer’s credit hold to the account representative. In this OBE, you will perform the following tasks:
- Review the steps to set a credit hold in EnterpriseOne
- Configure a form request (service request) to set a credit hold
- Configure a message service request to send a credit message
- Add the Set Credit Hold and Send Credit Message service requests to an orchestration
- Test the orchestration in the Orchestrator Client
What Do You Need?
- Orchestrator Studio 5.1.0 or higher deployed in a JD Edwards EnterpriseOne test environment with a minimum of EnterpriseOne Tools 9.2.1.4.. -OR-
- The latest JD Edwards EnterpriseOne Trial Edition.
 Reviewing
the Steps to Set a Credit Hold in EnterpriseOne
Reviewing
the Steps to Set a Credit Hold in EnterpriseOne
To configure a form request to set a credit hold, in the Orchestrator Studio, you identify the controls and order of actions needed to perform the credit hold in EnterpriseOne. Therefore, you should access EnterpriseOne and run through the steps to perform a credit hold to familiarize yourself with the “order of execution” required to complete the task.
- Sign in to the Orchestrator Studio. (You can access EnterpriseOne from the Tools page in the Studio.)
- Click the Tools link in the upper right corner.
- On the Tools page, click the JD Edwards EnterpriseOne icon.
- Sign in to EnterpriseOne.
- Click Navigator
 and enter P01012 in the Fast Path to access Work With
Addresses.
and enter P01012 in the Fast Path to access Work With
Addresses. - In the Address Number QBE field, enter the customer number that you will place on a credit hold and click Find.
- In the grid, select the customer row, then click the Row menu and select A/R.
- Click the Credit tab and enter 7 in the Credit Message field and press Tab. Notice that the “7 – On Credit Hold per Accounting” label appears next to the field.
- Cancel the form without saving. In the next task, you will use the Form Request design page in the Orchestrator Studio to identify each of the preceding steps for setting a credit hold.
 Configuring
a Form Request to Set a Credit Hold
Configuring
a Form Request to Set a Credit Hold
- Return to the Orchestrator Studio Home page. You might have to sign in again if your previous session timed out.
- On the Orchestrator Studio Home page, click the Service Requests icon.
- On the Service Requests page, click Create Service Request and then Form Request from the drop-down list.
- On the Form Request page, complete the following fields:
Service Request = Set Credit Hold
Enter Short Description = Set credit hold when customer exceeds credit limit - Click the Product Code drop-down list and select 55 for a customer product code.
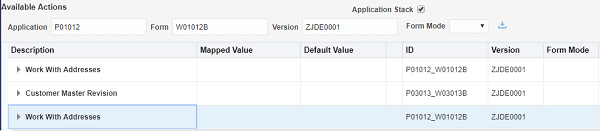
- In the Available Actions area, click the Application Stack check box.
- Complete the following fields and then click Load
Form
 to
load the controls from the Work with Addresses form in
EnterpriseOne:
to
load the controls from the Work with Addresses form in
EnterpriseOne:
Application = P01012
Form = W01012B
Version = ZJDE0001
The Orchestrator Studio loads the controls and fields in the grid, displaying the form name in the first row.
Note: For this form request, you do not need to select a Form Mode, which is used only if the form is set to run in particular mode in the EnterpriseOne Form Design Aid. - To specify the controls needed in Work with Addresses to
carry out a credit hold, configure these controls/actions in
the following table:
If you scroll to the top of the page, notice the actions you specified added to the Order of Execution area.Control/Action (in the Description column) Do this: Address Number (under “Work With Addresses – QBE” node) 1. For Address Number, enter Customer in the Mapped Value column.
When you create the orchestration, you will define Customer as one of the inputs, and then map the input to this service request.
2. Click Add Action at the end of
the row to add this control/action to the Order of
Execution area.
at the end of
the row to add this control/action to the Order of
Execution area.Find (under Buttons and Exits node) Click Add Action
at the end of the Find row to add this control to the
Order of Execution area.Select First Row (under “Work With Addresses-Grid” node) Click Add Action
to add the control to the Order of
Execution area.A/R (under Buttons and Exits node) Click Add Action
to add the control to the Order of
Execution area.
This action invokes the Customer Master Revision form, which contains the information about the customer. - Specify the controls needed in Customer Master
Revision to carry out a credit hold:
-
a. Return to the top of the Available
Actions area and complete the following fields to load the
controls from Customer Master Revision:
Application = P03013
Form = W03013B
Version = ZJDE0001b. - Click Load
Form .
The Orchestrator Studio adds a node for Customer Master Revision below the Work With Addresses node in the grid. - Configure these controls/actions under the Customer Master Revision node:
Control/Action Do this: Credit Message 1. Enter 7 in the Default Value column. This is the UDC for “On Credit Hold per Accounting.”
2. Click Add Action to add the
control to the Order of Execution.
OK (under Buttons and Exits) Click Add Action
to add the control to the Order of Execution.
This action saves the form and returns to the Work with Addresses form.
-
a. Return to the top of the Available
Actions area and complete the following fields to load the
controls from Customer Master Revision:
- After the credit hold, you want the form request to return the customer name so you can use it as an input to the message request (which you will create in the next task):
- Return to the top
of the Available Actions area and complete the following
fields to load the controls from Work With Addresses:
Application = P01012
Form = W01012B
Version = ZJDE0001 - Click Load
Form .
The Orchestrator Studio adds another node for Work With Addresses to the bottom of the Available Actions grid. - Expand Work With Addresses, and then expand Work with Addresses – Grid.
- In the Alpha Name row, click the check box in the Return column and in the adjacent field in the Variable Name column, enter Customer Name.
- Click Save
 .
. - To ensure that the order of actions are in the proper order to perform a credit hold:
- Select the first Work With Addresses node, and then scroll up to the “Order of Execution” area and verify that the actions are in the following order:
- Select the
Customer Master Revision node, and then verify
that the actions are in the following order in the “Order of
Execution” area:

Order of Execution
The final “action” you configured in the last Work With Addresses node is not displayed in the Order of Execution area because it is returning a value from the form in the orchestration response; it is not performing another action in EnterpriseOne. - Click Save .
- Click the Service Requests link in the top left corner to return to the Service Requests page.
- Select the Set Credit Hold form request that you just created. Notice that the graphical representation of the form request shows each of the forms in the order of execution, which should look like this:


 Configuring
a Message Service Request to Send a Credit Message
Configuring
a Message Service Request to Send a Credit Message
Create a message service request to enable the orchestration to send a message about the customer exceeding their credit limit. You will include variables in the message service request to pass the customer name and customer address book number from the orchestration to the message service request.
- On the Service Requests page, click Create Service Request and then select Message from the drop-down list.
- On the Message page, complete the following fields:
Service Request = Send Credit Message
Enter Short Description = Send credit hold message when customer exceeds credit limit - Click the Product Code drop-down list and select 55 for a customer product code.
- In the To field, select Address Book from
the drop-down list and then enter the address book number
associated with your user ID.
Using your own address book number will enable you to verify that a message was sent to the EnterpriseOne Work Center, which you will do later in this OBE.
As an alternative, if your EnterpriseOne environment has an SMTP server configured with EnterpriseOne to send messages to external email systems, you can select Email from the To field and enter a valid email address. - In the Subject field, to enter a subject that includes a
variable for the customer name:
- Right-click in the Subject field and click Insert Variable.
- Within the
brackets, rename the variable to Customer Name, and then
after the close bracket, type
“Over Credit Limit,” so it looks like this:
${Customer Name} Over Credit Limit
- In the body area, enter the following message,
right-clicking to include two variables to hold the address
book number and name of the customer:
Customer ${ABNum}: ${Customer Name} is over their credit limit.
When you add this message request to the orchestration in the next task, you will map the orchestration inputs Customer and Customer Name to the message request variables ABNum and Customer Name accordingly. - Expand the JD Edwards EnterpriseOne Shortcut
area and perform the following steps to include a shortcut to
the Customer Master Revision form in the message:
- Complete the
following fields and then click Load.
Application = P03013
Form = W03013B
Version = ZJDE0001
The Studio loads all the controls from the application form in the grid. - In the grid, enter the following form interconnect values for the controls in the form:
- Complete the
following fields and then click Load.
- Click Save .
 Adding
the Set Credit Hold and Send Credit Message Service Requests to
an Orchestration
Adding
the Set Credit Hold and Send Credit Message Service Requests to
an Orchestration
-
In this task, you will:
- Create a new “Credit Hold” orchestration that includes Customer as an input.
- Add the form request and message request components as “steps” in the orchestration.
- Map the orchestration inputs to the orchestration steps.
- In the upper left corner of the Orchestrator Studio,
click the
 icon
twice and then click the Orchestrations icon in the side
panel.
icon
twice and then click the Orchestrations icon in the side
panel. - On the Orchestrations page, click New Orchestration.
- Complete the following fields:
Orchestration = Credit Hold
Enter Short Description = Set credit hold and send credit hold message - Click the Product Code drop-down list and select 55 for a customer product code.
- In the first row in the Input grid, enter Customer for
the Input and then in the Value Type drop-down list, select Numeric.
You will use this input to pass in a customer number to the orchestration. - Click Save
.
- Add the Set Credit Hold form request as the first step in
the orchestration:
- Next to
Orchestration Steps, click Add Step
 .
. - In the Enter Type
of Step pop-up, click the drop-down list and select Service
Request, and then click OK.
The Service Request step appears in the grid. - At the end of the Service Request row, click the down arrow and select Set Credit Hold from the drop-down list. To select using Chrome, carefully hover over the down arrow until the cursor appears.

Service Request - Next to
Orchestration Steps, click Add Step
- Add the Send Credit Message service request as the next step
in the orchestration:

Orchestration Steps
- With the first
Service Request row selected, click Insert Step
After
 .
. - In the Enter Type of Step pop-up, click the drop-down list and select Service Request, and then click OK.
- At the end of the new Service Request row, click the down arrow and select Send Credit Message from the drop-down list.
- Click Save
again.
At this point, the orchestration steps and inputs should look like this:
If you highlight the Message row in the Orchestration Steps grid, notice that Customer Name, the variable name that you entered in the form request to return the Alpha Name, appears as an orchestration input. This makes the returned value available for mapping to the Message service request.
- With the first
Service Request row selected, click Insert Step
After
- Use the Transformations area to map the orchestration inputs
to the inputs defined in each orchestration step:
- Select the Set
Credit Hold step in the grid.
The Transformations grid displays the “Customer” variable that you defined as an input in this form request. - In the
Transformations area, click Auto Map
 .
.
The Studio automatically maps the “Customer” input defined in Set Credit Hold to the “Customer” input in the orchestration because the input names match. - Select the Send
Credit Message step in the grid.
Notice in the Transformations grid, the Service Request Input displays the variables entered for the inputs in the Send Credit Message service request. - In the ${Customer Name} row, click the Orchestration Input drop-down list and select Customer Name.
- In the ${ABNum} row, click the Orchestration Input drop-down list and select Customer.

Transformation Area - Select the Set
Credit Hold step in the grid.
- Click Save .
- In the upper left corner, click the Orchestrations link
and then from the list of orchestrations, select Credit
Hold.
The Orchestrator Studio displays a graphical representation of the orchestration with all its components, which should look like this:

Orchestration
 Testing
the Orchestration in the Orchestrator Client
Testing
the Orchestration in the Orchestrator Client
- Click the Tools link in the upper right corner of the Orchestrator Studio.
- On the Tools page, click the Orchestrator Client icon.
- Sign in using your user ID for both the User and Password.
- Click XML Cache Refresh. If a dialog box
appears, click Ok.
Before you test an orchestration, you should click XML Cache Refresh to ensure that you are not using cached data for the test. - Click the Orchestration Name drop-down list and select the Credit Hold orchestration.
- In the Inputs area, enter the following input:
Customer = Enter the customer number.
 Make sure that you are using a
customer number that is available in the data pack demo data.
Make sure that you are using a
customer number that is available in the data pack demo data. - Click Run.
If a green check mark or a yellow caution symbol appears next to the Input and Output areas that display the request and response in JSON code, then congratulations! You successfully configured the Credit Hold orchestration.
- Return to the Orchestrator Studio. If it timed out, you might have to sign in again.
- Select the Tools menu in the upper right corner, and then click the Oracle JD Edwards EnterpriseOne icon.
- Sign in to EnterpriseOne.
- Click the Navigator
 and enter P01012 in the Fast Path.
 - In the Address Number QBE field, enter the customer number that you placed on a credit hold and click Find.
- In the grid, select the customer row, then click the Row menu and select A/R.
- Click the Credit tab to verify the Credit
Message is at status “7 – On Credit Hold per Accounting.”
Congrats! It worked!
- On the EnterpriseOne home page, click the Navigator menu and in the Fast Path, enter P012503 to access the Employee Work Center.
- In the Work Center, click Find.
- Expand the Personal In Basket queue, where you should see the “Over Credit Limit” message for your customer.
- Select the message to view it.
- Click the Message Text drop-down list,
select Customer Master Revision.jde, and then click the
shortcut displayed in the message.
This shortcut should take you to the customer’s record in Customer Master Revisions, where you can click the Credit tab and see the “7 – On Credit Hold per Accounting” status.
 Next
OBE
Next
OBE
Proceed to “Creating a Complex Orchestration in the Orchestration Studio” OBE, which shows you how to create an orchestration that performs a sum of customer order amounts, compares it to the customer’s credit limit, and if the order amount exceeds the customer’s credit limit, invokes the Credit Hold orchestration that you just created here.