Creating
an Orchestration with a REST Connector and Custom Groovy Service Request
Before You Begin
In this Oracle By Example (OBE), you will learn how to create
an orchestration that includes a connector service request to
make a call to a REST service. You will also learn how to
create a custom service request with Groovy scripting and
simplify the output returned from a REST service call.
Background
This OBE employs the following scenario to show you how to
create a simple orchestration.
Your organization needs an orchestration that can provide the
weather forecast for a given city. You need to convert the
temperature returned in the response from Fahrenheit to
Celsius. And you want to simplify the output so that it
displays the information in an easy to read format. To do so,
you will perform the following tasks:
Create a REST connection to Yahoo! Weather
Create a REST connector service request to retrieve the
forecast from Yahoo! Weather
Create a custom service request using Groovy to convert
Fahrenheit to Celsius
Add these service requests to an orchestration and
simplify the output of the orchestration response
Test the orchestration in the Orchestrator Client
What Do You Need?
Orchestrator Studio 5.1.0 or higher deployed in a JD
Edwards EnterpriseOne test environment with a minimum of
EnterpriseOne Tools 9.2.1.4.
Depending on your network configuration, you may need to
configure a proxy server for the REST connection to the
Yahoo! Weather as described next in “Creating a REST
Connection to Yahoo! Weather.”
Creating a REST Connection to Yahoo! Weather
In Orchestrator Studio, click the Tools link.
On the Tools page, click the Connections icon.
Click New Connection and then complete
the following fields in the Connection Information area:
Name = YAHOO-XML
Description = Yahoo weather forecast
service
Type = Select External
REST from the drop-down list.
User/Role = *PUBLIC
Environment = JPS920
On the Service Information tab, enter the following URL in
the Endpoint field:
https://query.yahooapis.com/v1/public/yql
Click Save.
This saves the connection as a soft coding record in JD
Edwards EnterpriseOne. If desired, you can access
EnterpriseOne Soft Coding Records application (P954000) to
confirm that the soft coding record has been created in
EnterpriseOne.
In the next section, you create a connector that uses this
connection and then test it to see if it returns data from
Yahoo! Weather. If it does not return any data, then you
need to perform the following steps to specify a proxy
server to use for the connection.
On the Connections page in the Orchestrator Studio,
access the YAHOO-XML connection.
Click the Proxy tab.
In the Proxy Host field, enter the URL of the proxy
server.
In the Proxy Port field, enter the port number of the
proxy server.
Slide the Use Proxy toggle to the
right to enable the proxy.
Click Save.
Creating a REST Connector Service Request to
Yahoo! Weather
In the Orchestrator Studio, click the icon twice in the
upper left corner to access the slideout menu.
On the slideout, click the Service Requests
icon.
On the Service Requests page, click Create
Service Request and then Connector
from the drop-down list.
On the Connector page, complete the following fields:
Service Request = Weather Forecast
Description field = Check the
weather forecast for a given city
Click the Product Code drop-down list and
select 55 for a customer product code.
Click inside the Connection field, and
select the YAHOO-XML connection that you
created, which should be listed under the REST
node.
Note: If the connection does not appear in
the list, then log off and sign back in to the Orchestrator
Studio.
After selecting the connection, the Orchestrator Studio
displays the URL to the REST service available through the
connection.
Complete the remaining fields as described in the
following table:
Field
Input
HTTP Method
GET (This is the default)
Fire and Forget switch
(Leave this in the default, off position)
Pathing
No input required
Parameters (Click the triangle to expand)
Enter the following rows that the Yahoo!
Weather REST service requires as input (all values
are case sensitive):
Key
Value
q
select * from weather.forecast where
                                      woeid in (select woeid from geo.places(1)
                                      where text="${location}")
format
json
env
store://datatables.org/alltableswithkeys
Headers
No input required
Output
No input required
Click Save.
To test the connection to the Yahoo! Weather service:
Click Test.
A pop-up appears prompting you to enter an input for
“location.” The input variable ${location}
comes from the “q” parameter you entered above.
In the Value field, enter the name of a city, and then
click Execute.
A pop-up displays the full, live JSON data returned from
the Yahoo! Weather service. Scroll down and notice the
current and extended forecast data returned from the
service such as the current wind, atmosphere,
temperature, and the extended forecast.
Note: If it does not retrieve any data,
then you need to modify the connection to use a proxy
server. See step 5-a in the previous section.
Click anywhere outside the pop-up box to close it.
To simplify the output from the Yahoo! Weather service
response:
Click the triangle
in the Output section to expand it, and then click the
triangle next to Manipulate Output.
An editing box appears with a Groovy template, which you
can modify to manipulate the output returned from the
Yahoo! Weather service.
Insert a line
after line 8 and type the following command:
jsonIn["groovy"] = "Thanks for using Weather
                        Forecast";
Important: Do not edit or delete any of
the existing Groovy commands. Be careful to edit the
script exactly as shown here. Manipulate
Output
Next, use the Output table to refine the output to include
only the forecasted conditions, high temperature, and the
message that you inserted in the preceding groovy code.
In the Output
table, specify the return values that you want displayed
in the final output, which must be entered in a
period-delimited format (the format required by Yahoo!
Weather service):
Output
Variable Name
query.results.channel.item.forecast[0].text
Forecast-Rain
query.results.channel.item.forecast[0].high
Forecast-HighTempF
groovy
These parameters provide instructions to filter the
response so that the orchestration output shows only the
specified values, including the message that you added
using the Groovy script.
Click Save.
Click Test again, and enter a city to
test the modified output.
Again, the pop-up shows the full response.
Click Show Output at the bottom of the
pop-up window.
The Orchestrator Studio shows the modified output.
Creating a Service Request with a Groovy Script
to Convert Fahrenheit to Celsius
Use Groovy to create a custom service request that converts
the temperature value in the response from Fahrenheit to
Celsius.
In the upper left corner of the Orchestrator Studio, click
the icon.
On the Service Requests page, click Create
Service Request and from the drop-down list,
select Custom.
On the Custom page, complete the following fields:
Service Request = Fahrenheit to
Celsius Conversion
Enter Short Description = Groovy
script for converting returned temperature value from
Fahrenheit to Celsius
Click the Product Code drop-down list
and select 55, and leave Groovy
option selected.
In the area with the Groovy template, replace the template
with the following Groovy script:
The Studio populates the Degrees Celsius output in the grid
at the bottom of the page because this is the output that
was defined in the Groovy script: returnMap.put("Degrees
Celsius", degC.toString());
In the Degrees Celsius row, enter Forecast-HighTempC
in the adjacent Variable Name field.
To test the Fahrenheit to Celsius conversion:
In the first row in the Input / Test Value grid, enter
Degrees Fahrenheit in the Input field.
In the adjacent Test Value field, enter a value for
Degrees Fahrenheit.
Click Test.
If you entered the Groovy script correctly, the converted
Celsius value appears in the Test Output field.
Click Save
.
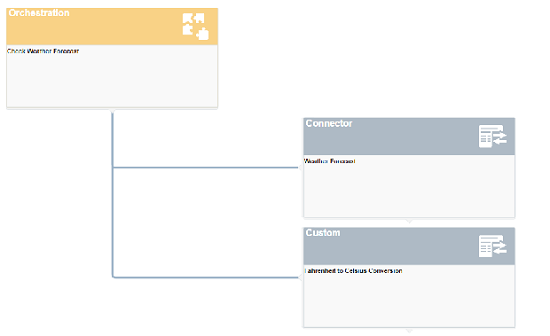
Adding the Service Requests to a “Check Weather
Forecast” Orchestration
Create a “Check Weather Forecast” orchestration, adding the
Weather Forecast connector and custom Groovy service request
as steps in the orchestration.
In the upper left corner of the Orchestrator Studio, click
the icon twice and then
click the Orchestrations icon on the
slideout menu.
On the Orchestrations page, click New
Orchestration.
Complete the following fields:
Orchestration = Check Weather
Forecast
Enter Short Description = Retrieve
forecast of weather conditions (sunny, cloudy,
thunderstorms, etc.) and temperature for a given location.
Click the Product Code drop-down list and
select 55 for a customer product code.
In the first row of the Input / Value Type grid, enter
Location in the Input column and then in the Value
Type drop-down list, select String.
Add the “Weather Forecast” connector as the first step in
the orchestration:
Next to
Orchestration Steps, click Add Step .
In the Enter
Type of Step pop-up, select Service
Request from the drop-down list, and then click OK.
Modify the orchestration to simply the output of the
orchestration response
Test the orchestration to review the simplified output
Test the orchestration in the Orchestrator Client:
Access the Orchestrator Client. You might have it open in
another tab, or click the Tools link in
the upper right corner of the Orchestrator Studio and click
the Orchestrator Client icon to access it.
You will most likely need to sign in again.
Click XML Cache Refresh.
In the Orchestrator Client, click the Orchestration
Name drop-down list and select the Check
Weather Forecast orchestration.
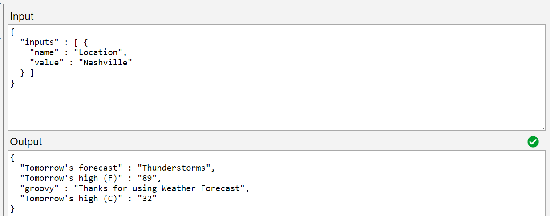
In the Inputs area, enter a city for the Location
input.
Click Run.
Look for the green check mark or a yellow caution symbol to
see if the JD Edwards Orchestrator successfully processed
the orchestration.
Notice that the orchestration response contains the full
response in JSON. In the next task, you can modify the
orchestration to simplify the output that appears in the
JSON response.
To simplify the output of the
orchestration:
Return to the Orchestrations page in the Orchestrator
Studio, select the Check Weather Forecast orchestration,
and then click Edit Orchestration.
On the Orchestration page, click the Orchestration
Output button located near the center of the
page.
On the Outputs page, click Add All.
In the first row with the Weather Forecast connector,
where the Field value is query.results.channel.item.forecast[0].text,
replace the value in the adjacent Output field with Tomorrow’s
forecast
In the second row with the Weather Forecast connector,
where the Field value is query.results.channel.item.forecast[0].high,
replace the value in the adjacent Output field with Tomorrow’s
high (F)
Do not change the third row with the Weather Forecast
connector, which should display groovy in both the Field and
Output columns.
In the fourth row with the Fahrenheit to Celsius
Conversion custom service request, where the Field value is
Degrees Celsius, enter Tomorrow’s high
(C) in the adjacent Output field.
Click Close
to return to the Orchestration page, where you need to click
Save to
save your changes.
To test the orchestration to view the simplified output:
Return to the Orchestrator Client.
You might need to sign in again.
Click XML Cache Refresh.
In the Orchestrator Client, click the Orchestration
Name drop-down list and select the Check
Weather Forecast.
In the Inputs area, enter a city for the Location
input.
Click Run.
A green check mark or a yellow caution symbol indicates the
Orchestrator successfully ran the orchestration.
If the Output area contains the labels that you entered to
simplify the orchestration output, as shown in the following
example, then congratulations! You successfully completed
this OBE!
 Creating
an Orchestration with a REST Connector and Custom Groovy Service Request
Creating
an Orchestration with a REST Connector and Custom Groovy Service Request
 Before You Begin
 Creating a REST Connection to Yahoo! Weather
 Creating a REST Connector Service Request to
Yahoo! Weather
Creating a REST Connector Service Request to
Yahoo! Weather .
.
 Creating a Service Request with a Groovy Script
to Convert Fahrenheit to Celsius
Creating a Service Request with a Groovy Script
to Convert Fahrenheit to Celsius icon.
icon. Adding the Service Requests to a “Check Weather
Forecast” Orchestration
Adding the Service Requests to a “Check Weather
Forecast” Orchestration .
.
 .
. 
 Testing the Check Weather Forecast Orchestration
 to return to the Orchestration page, where you need to click
Save
to return to the Orchestration page, where you need to click
Save