Implementing
a UX One Role
Implementing
a UX One Role Before You Begin
This 45-minute tutorial shows you how to set up and implement a UX One role.
Background
JD Edwards EnterpriseOne UX One provides an intuitive interface that enables users in specific roles to perform their day-to-day tasks efficiently.
UX One is delivered with several pre-configured user roles. A UX One role uses several user-defined objects (UDOs), such as Composed EnterpriseOne Pages, Springboards, Watchlists, and Queries. Therefore, to set up and implement a UX One role, it is important that you identify the components required for that role.
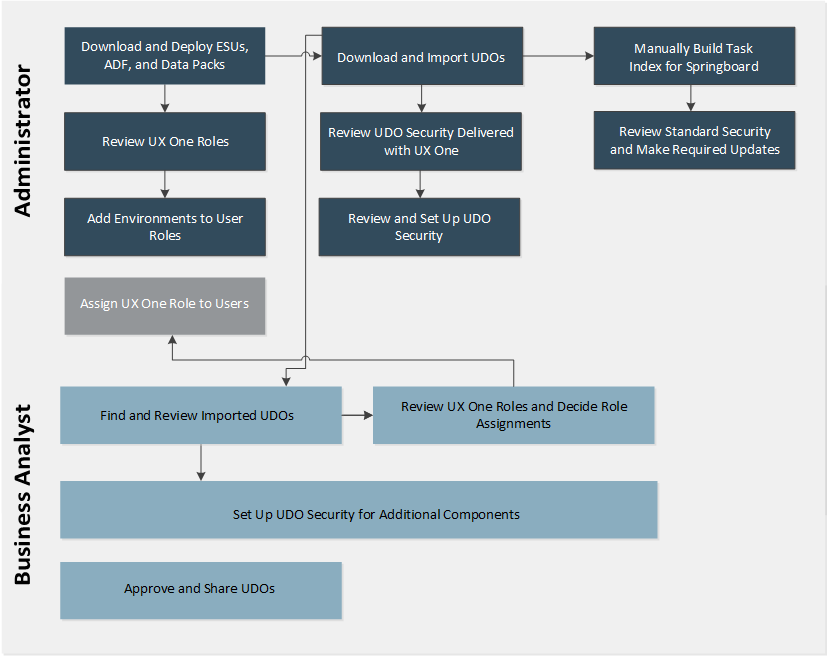
The following image describes the process flow for implementing a UX One role. It describes the tasks performed by a business analyst and an administrator.
In this OBE, you will implement the Requisition Manager UX One role.
What Do You Need?
- JD Edwards EnterpriseOne Applications Release 9.2
- JD Edwards EnterpriseOne Tools Release 9.2 Update 1 or later
- Application Interface Services (AIS) Server
- All ESUs and ADF components from the "UX One" query in Change Assistant
- Data packs:
- Security and Roles
- Demo Data (optional)
 Review
the UX One Cross-Reference Document
Review
the UX One Cross-Reference Document
To implement the Requisition Manager UX One role, you must identify the components for this role.
- Download the UX One Cross-Reference document from Oracle Support Document 2227250.1.
- Locate the Requisition Manager role from the UX One
XREF tab and review the number of EnterpriseOne
pages and components for the role.
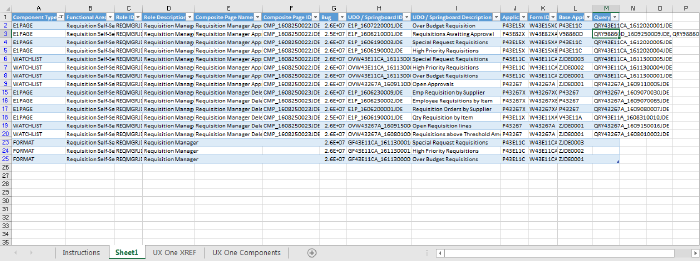
Note: Review the Instructions tab to understand how to use the document. - Double-click the Grand Total column value for the Requisition Manager role to see a list of all the components available for this role. The list of components is populated in a tab titled Sheet1.
- Review the object type and description for the components, and then note the UDO/Springboard ID for the objects along with the related Query and Composite Page ID.
- Note that for the Requisition Manager role (Role ID REQMGRJDE), the following UDO object types are available:
- E1 Page
- Watchlist
- Format
The Sheet1 tab should look like this:
 Import
UDOs
Import
UDOs
You can import the UX One UDOs using the following options:
- Batch import using Change Assistant 4.0.0.4 and Tools Release 9.2.2
- Manual import
Import UDOs Using Change Assistant 4.0.0.4 and Tools Release 9.2.2
Beginning with Version 4.0.0.4, Change Assistant supports the deployment of UDO packages and provides a Deployment Summary report after a successful deployment.
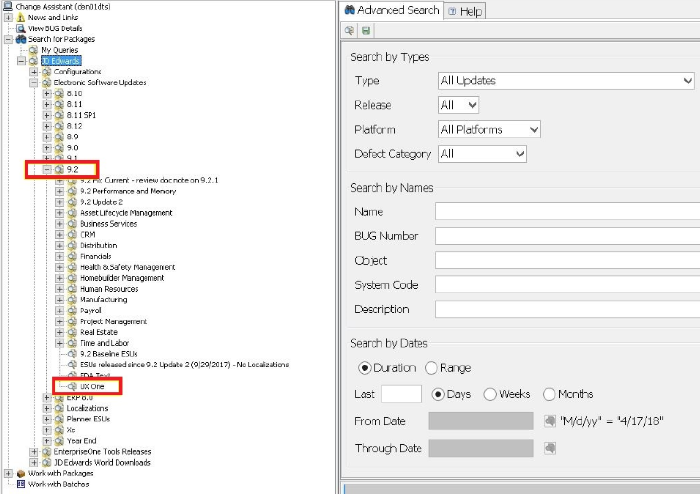
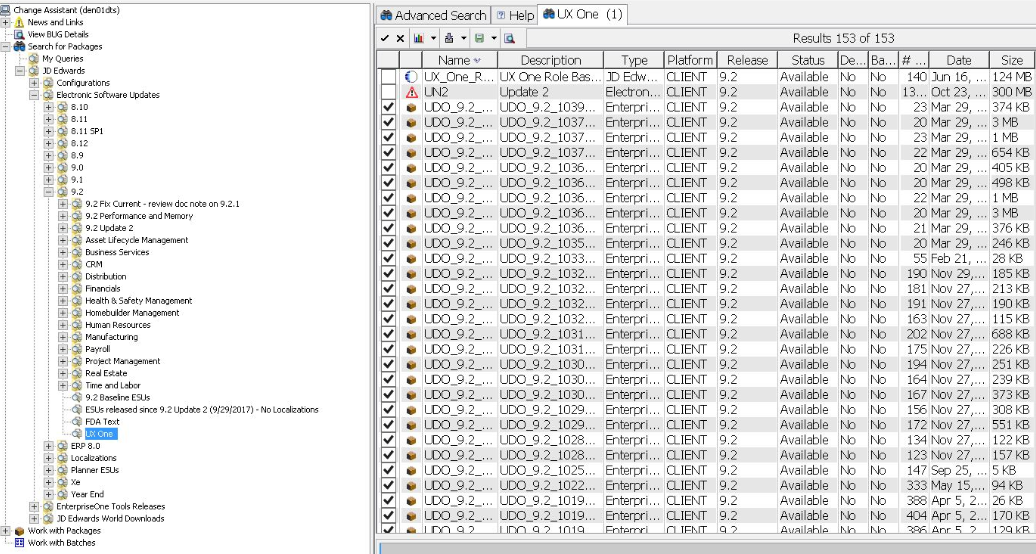
- Launch Change Assistant and navigate to the UX One query. Run the UX One query, as shown in the following example:
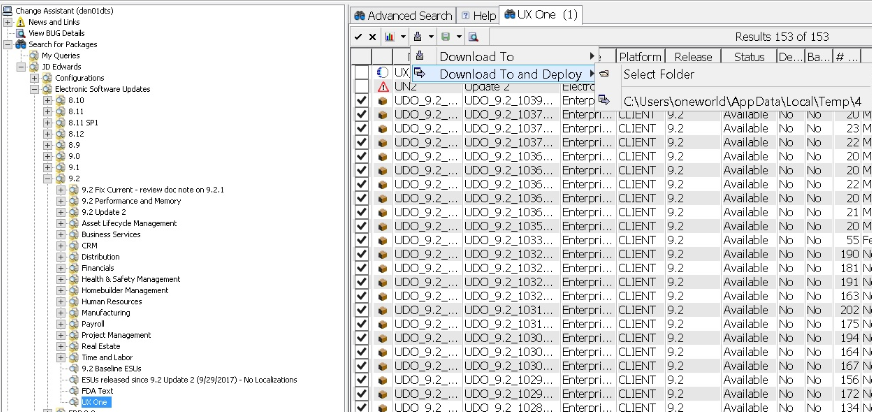
- Select the UDO packages listed under the UX One query, as shown in the following example:
- Click the Download icon, select the Download To and Deploy option, and then select the folder, as shown in the following example:
- Enter the required login credentials, and click OK.
- In the Environment Selection window,
select the environment, and click OK.
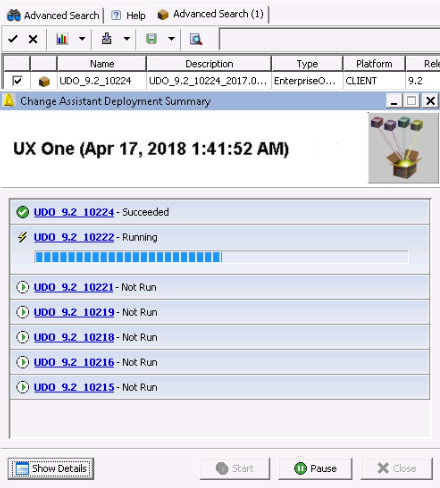
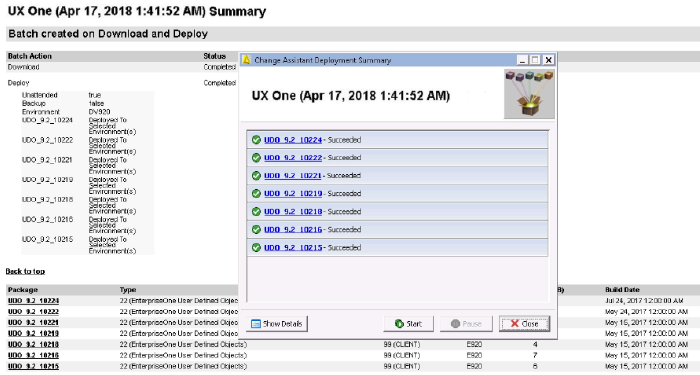
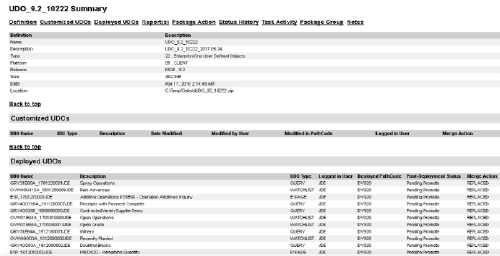
The deployment process starts. - Click the UDO package name to view the detailed User Defined Objects Summary report.
Import UDOs Using the Object Management Workbench
- Sign in to JD Edwards EnterpriseOne.
- Navigate to the Web Object Management Workbench application (P98220W).
- On the Object Management Workbench form, select Import from the Form menu.
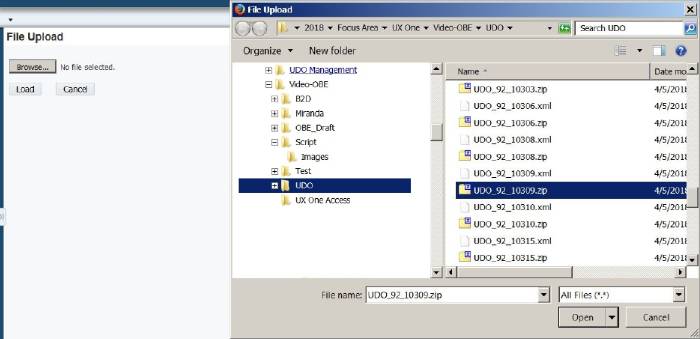
- In the File Upload form, click Browse
to navigate to the folder where you downloaded the UDO zip
files. For example,
D:/UDO/UDO_92_10309.zip. - Select the zip file, click Open, and then
click Load.
Repeat Step 3 through 5 for each UDO zip file.
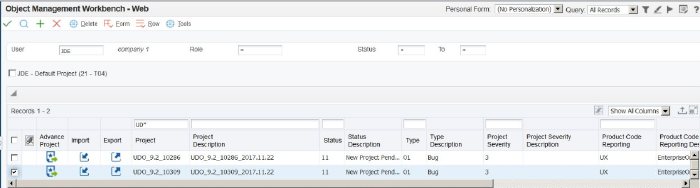
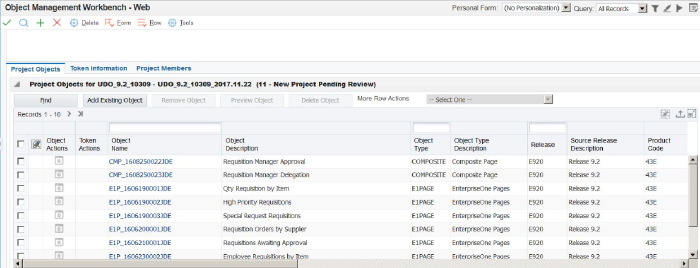
The import creates new projects at Status 11 with the name of the imported UDO files, as shown in the following example: - Select the project to view the list of UDOs contained in the project.
 Deploy
UDOs
Deploy
UDOs
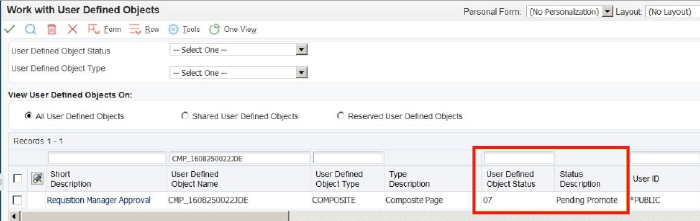
- Navigate to the User Defined Objects application (P98220U).
- On the Work with User Defined Objects
form, search for the UDOs using the UDO ID. For example, enter
CMP_1608250022JDEin the User Defined Object Name QBE field and click Find.
Note: Search for the UDOs by using the UDO/Springboard IDs, Query, and Composite Page IDs that you previously noted.
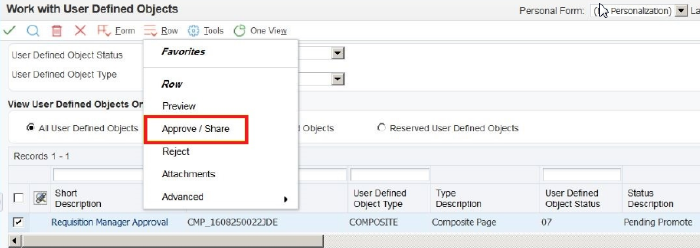
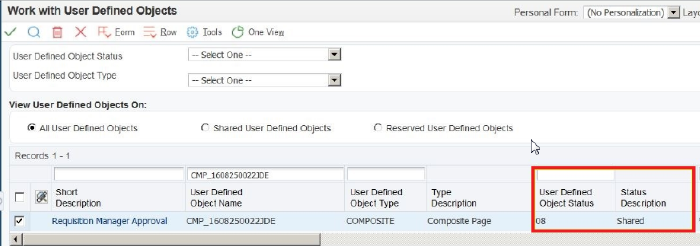
The objects are now displayed with Status 07 (Pending Promote), as shown in the following example: - Select the UDO and then select Approve/Share from the Row menu, as shown in the following example:
 Configure
the Requisition Manager Role
Configure
the Requisition Manager Role
In this section, you will perform a series of tasks to configure the Requisition Manager role.
Set Up View Security for UDOs
Set up view security for the UDOs associated with the
Requisition Manager role to provide access to the UDOs.
Note: This section describes how to set up View
security for one UDO. Repeat the steps to provide access to
additional UDOs.
- Navigate to the User Defined Objects application (P98220U).
- On the Work with User Defined Objects
form, search for the UDOs using the UDO ID. For example, enter
CMP_1608250022JDEin the User Defined Object Name QBE field and click Find.
Note: Search for the UDOs by using the
UDO/Springboard IDs, Query, and Composite Page IDs that you
previously noted.
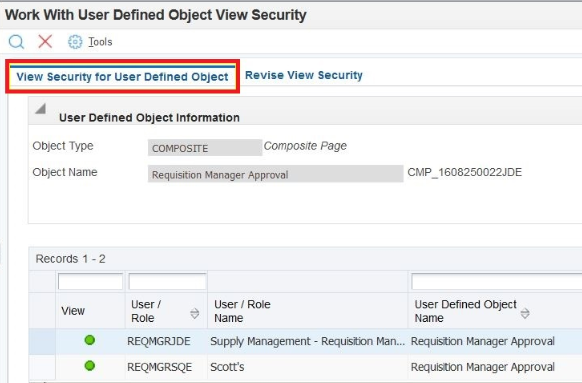
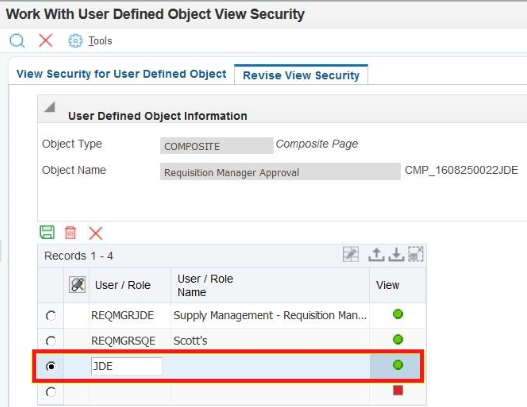
- Select the objects, select Advanced, and then Security from the Row menu, as shown in the following example:
- Review the security settings for the UDO in the View Security for User Defined Object tab, as shown in the following example:
- To provide security to a new user/role, click the Revise
View Security tab. Enter a value in the User/Role
field in the grid and select the View
option.
The View option turns green to indicate that the View security for this UDO is enabled for the user, as shown in the following example: - Click Save.
- Click Close.

Assign the Requisition Manager Role to a User
To enable users to use the roles delivered with UX One, you must associate the users with the roles.
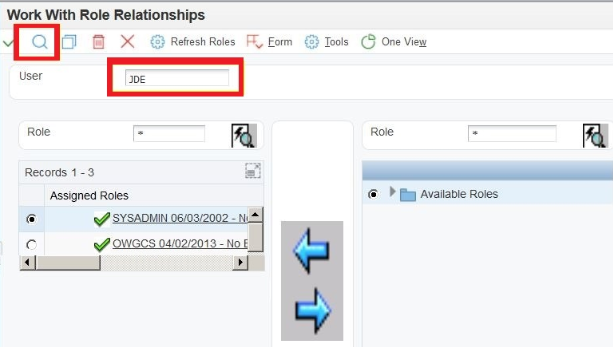
- Navigate to the Role Relationships application (P95921).
- In the Work With Role Relationships form, enter a valid User ID in the User field and then click Find, as shown in the following example:
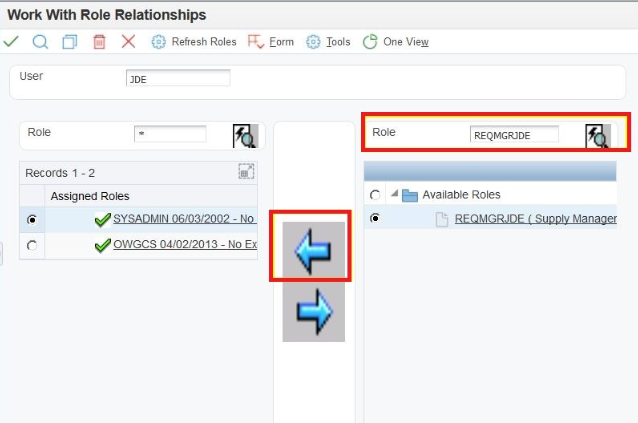
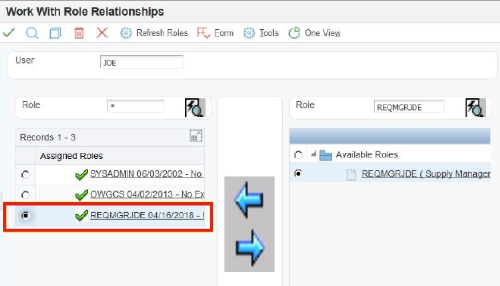
- In the Role field on the right side, enter
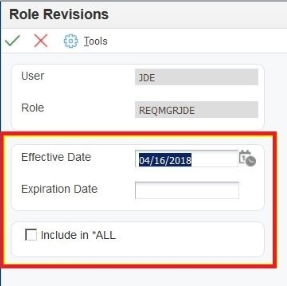
REQMGRJDEand then click the Find Role button. Select the REQMGRJDE role in the list of available roles and then click the Left arrow to move it to the list of assigned roles. - In the Role Revisions form, click OK.
Note: Deselect the Include in *ALL check box to ensure that the role is not included in *ALL.
Assign an Environment to the Requisition Manager Role
Users signing in to JD Edwards EnterpriseOne are presented with a list of valid roles and environments. The environment that the user wants to access with the Requisition Manager role must be assigned to the REQMGRJDE role in the User Profile Revisions application (P0092).
- Navigate to the User Profile Revisions application (P0092).
- From the Form menu, select Add Environments.
- In the User Role/Environment Revisions
form, enter a valid environment name in the Environment
Name field. For example,
JDV920. - In the User/Role QBE line, enter
REQMGRJDE, and then click Find. - Select the REQMGRJDE role and then click OK.

Build a Task Index
A springboard pane provides a collection of tasks comprising applications, batch programs, ADF applications, composite pages or EnterpriseOne pages available to a role. Menu indexing determines the correct set of task items to be displayed for a role in the springboard pane.
- Navigate to the Task Index Builds application (P90013).
- From the Form menu, select Build by Role.
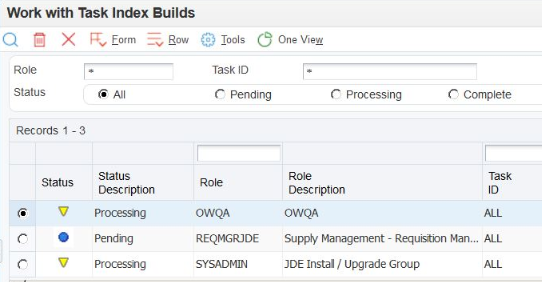
- In the Build Task Index by Role form, select the REQMGRJDE role, and then click Build Selected Rows.
- In the Build Request confirmation window,
click OK.
A new task index record is created for the REQMGRJDE role, as shown in the following example:
 Access
the Requisition Manager UX One Pages
Access
the Requisition Manager UX One Pages
- Log out of EnterpriseOne.
- Sign in to EnterpriseOne using the login credentials with access to the REQMGRJDE role.
- In the Select an Environment and Role window, select the environment that you assigned to the REQMGRJDE role (for example, JDV920), and then select the REQMGRJDE (Supply Management - Requisition Manager) role.
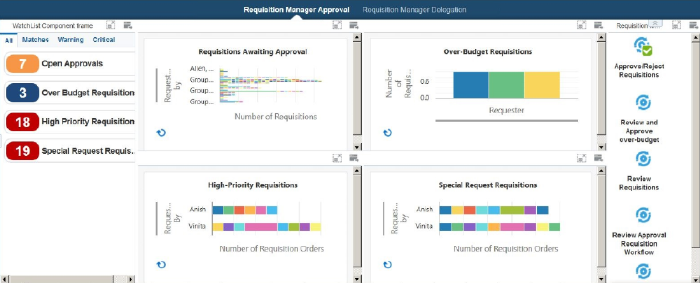
- Review the UX One page for the Requisition Manager role, which should look like this: