Before You Begin
Purpose
This tutorial shows how to deploy JD Edwards EnterpriseOne Release 9.2 Trial Edition on Oracle Cloud Infrastructure Compute Classic (OCI Classic) using this sequence of required tasks:
- Generate SSH key pairs on your local system and upload those keys to OCI Classic
- Upload the SSH Public Key
- Reserve a Public IP Address
- Download the VM Configuration Tool
- Use the VM Configuration Tool to Configure the Servers and Generate Configuration Files
- Upload and Run the Orchestration
- Create a JD Edwards EnterpriseOne Release 9.2 Trial Edition Instance
- Review the Instance that You Created
- Configure the Trial Edition Instance
- Upload the en-jdedwards.json to the Trial Edition Instance
- Log in to the Trial Edition Instance Using SSH
- Launch First Time Configuration
The tutorial also shows you how to perform these optional tasks:
- Check JD Edwards EnterpriseOne Services Status
- Configure Public IP Address/Internal Hostname on Client Machine
- Work with Security
Time to Complete
2-3 hours.
Note that this estimate completion time is not the
elapsed time. That is, it does not account for
machine runtime functions. For example, when you
click the Create button to create
an instance, it may take up to an hour for that
process to complete.
Background
You can use OCI Classic to rapidly provision an Oracle Linux environment containing the image for JD Edwards EnterpriseOne Tools Trial Edition with Release 9.2 and Applications Release 9.2. This single image is built using an Oracle VM Template containing these JD Edwards EnterpriseOne servers:
- Enterprise Server
- Database Server
- HTML Web Server
- Application Interface Services (AIS) Server
- Application Development Framework (ADF) Server
- Orchestrator Studio (IoT) Server
- BI Publisher (BIP) Server
Scenario
The JD Edwards EnterpriseOne Trial Edition with Tools Release 9.2 and OCI Classic Applications Release 9.2 on provides a fully functional suite of interconnected virtual machines. These virtual machines are deployed on a single OCI Classic instance. The virtual machines contain a snapshot of an EnterpriseOne server at a certain point in time and cannot be updated. That is, by definition the Trial Edition is for demonstration purposes only. You can use it to verify functionality and to investigate proofs of concept. The Trial Edition on OCI Classic only contains the Pristine (PS920) environment, which is one of the four standard JD Edwards EnterpriseOne environments.
The Trial Edition does not contain the following JD Edwards EnterpriseOne products:
- Deployment Server
- Development Client (neither creation or use)
- Server Manager (without which the included Tools Releases cannot be changed)
User Interface
The user interface for OCI Classic is evolving. As a result the screens depicted in this tutorial may not exactly coincide with the current release. This tutorial is routinely updated for functional changes to the JD Edwards EnterpriseOne implementation for OCI Classic, at which time any differences in the user interface will be reconciled.
What Do You Need?
To perform the steps in this tutorial, you must have:
- A subscription to OCI Classic. You must be a
user with the Compute_Operations role. For more
information, see
How to Begin with Compute Classic Subscriptions in Using Oracle Cloud Infrastructure Compute Classic
- Download the JD Edwards EnterpriseOne VM Configuration Tool from the Oracle Software Delivery Cloud
- One of the following tools for generating SSH key pairs on the client machine that you will use to connect to OCI Classic:
- On Microsoft Windows: PuTTY (http://www.putty.org)
- On UNIX: The ssh-keygen
utility. Note: Many UNIX
installations already include ssh-keygen. Run
the ssh-keygen command to verify that your
installation has this utility; otherwise, you
may obtain OpenSSH from this link:
http://www.openssh.com/portable.html
Note: All references to UNIX also apply to Linux.
Generating Secure Shell (SSH) Key Pairs on Your Local System
Warning: If you have previously uploaded SSH Keys to OCI Classic, it is not necessary to repeat this step. You should be aware that regenerating keys for the same user on the same machine may invalidate keys that are already used with any previous OCI Classic instances that use those keys. This may permanently block access to logging onto previously created OCI Classic instances using that SSH Key. Therefore, if you have already uploaded SSH keys, you should skip to the section of this tutorial entitled: Reserve a Public IP Address.
Tip: Best practice is to create at least two SSH Keys, because if for any reason a single SSH Key is no longer valid, access to the server would be lost permanently with no means to recover. There is no access to the server without using an SSH Key. Additional keys can be added manually after the instance is started, but this document will cover uploading two SSH public keys. Repeat the following steps for each SSH public key that is uploaded to OCI Classic.
Warning: Use caution if prompted to overwrite a previously generated SSH Key. If you overwrite a key previously used to connect to a prior OCI Classic instance, you may permanently lose access to (that is, the ability to log in to) any prior OCI Classic instance that used that key.
Generate an SSH Key Pair on UNIX
Run the ssh-keygen command, where the -b option
specifies the number of bits to use in the key,
and the -t option specifies the kind of key to
create:
$ ssh-keygen -b 2048 -t rsa
- Create your own strong passphrase when prompted. Note that the passphrase does not display when you type it in. A strong passphrase should not be easy to guess and should not be a dictionary word, like any strong password.
- When prompted, confirm the passphrase by
re-entering it.
Tip: Oracle recommends that you make a secure record of the passphrase, as it cannot be recovered if you forget it.
The command generates a SSH key pair consisting of a public key and a private key, and saves them both in the specified path. The public key is the name of the private key file appended with a .pub extension. For example, if the file name of the SSH private key is id_rsa, then the file name of the public key would be id_rsa.pub. - Note the path where you save the SSH key pair. It will be used in a later step, “Uploading the SSH Public Key to OCI Classic”. When you create instances, you must provide the SSH public key. When you log in to an instance, you must specify the corresponding private key and enter the passphrase when prompted.
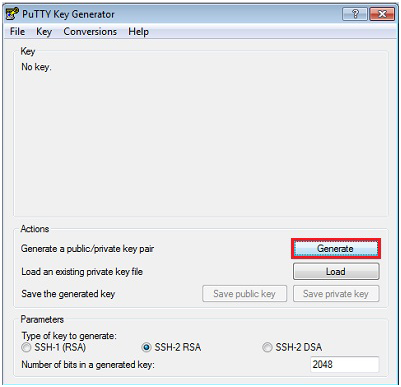
Generate an SSH Key Pair on Microsoft Windows using the PuTTY Key Generator
- Locate and run puttygen.exe in the PuTTY folder of your computer.
- On PuTTY Key Generator, accept the default key type, SSH-2 RSA, and set the Number of bits in a generated key to 2048, if it is not already set.
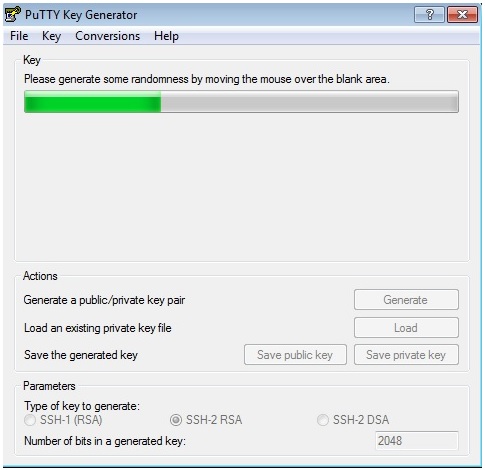
- Click the Generate button.
PuTTY Key Generator - After you have clicked the Generate
button, move your mouse around the blank area to
generate randomness for the SSH key pair you
generate.
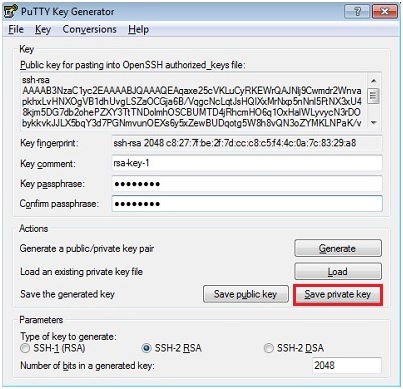
PuTTY Key Generator - Click the Save private key
button to save your private key.
- The Key comment is the name of the key. You may keep the generated key comment or create your own.
- Enter a passphrase in the Key
passphrase and the Confirm
passphrase fields.
Tip: Oracle recommends making a secure record of the passphrase, as it cannot be recovered if you forget it. If you forget the passphrase, you will have to re-create the instance from scratch. - To save the private key in the
PuTTY Private Key (PPK) format, click the Save
private key button.
Enter the same name as you used for the Key comment, so that you know which public key to use with this private key. You can use this key whenever you use PuTTY for SSH.
Note: The PuTTY Private Key (PPK) format works only with the PuTTY toolset.
PuTTY Key Generator
-
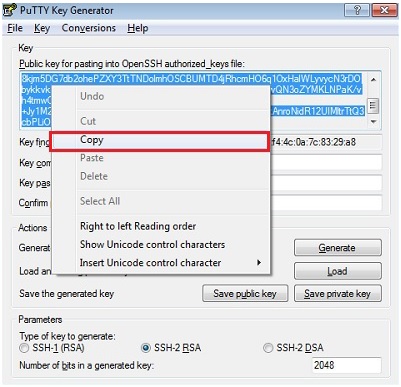
Save your SSH public key.
- In the PuTTY Key Generator
dialog, select all the characters in the Public
key for pasting into OpenSSH
authorized_keys file field.
Note: Be sure you select all the characters, not just the ones you can see in the narrow window. If a scroll bar appears next to the characters, scroll through the entire window to select all the characters. - On the selected text, right-click
to show the context menu and select Copy.
PuTTY Key Generator - Open a plain text editor (such as
vi on UNIX or Notepad on Microsoft Windows)
and paste in the characters you just copied.
Ensure that you paste the text at the first
character in the text editor, and do not
insert any line breaks.
Tip: You can leave this editor open to more easily locate and copy this key that you will use later when you set up your SSH keys in OCI Classic. - Click the Save public
key button to save the key to a
file using the same root name that you used
for the private key and add a .pub
extension.
Tip: You may give the file for the key any extension, but .pub is a useful convention to indicate that this is a public key. - Exit the PuTTY Key Generator.
- In the PuTTY Key Generator
dialog, select all the characters in the Public
key for pasting into OpenSSH
authorized_keys file field.
-
Make a note of the public and private key file names and where you saved them. When you create instances, you must specify the SSH public key. When you log in to an instance, you must provide the path to the corresponding SSH private key and enter the passphrase when prompted.
Upload the SSH Public Key
- Sign in to the Oracle Cloud Account application to display the My Services Dashboard page.
- Select the
 action tab at the
upper left corner of the page and select Oracle
Cloud Infrastructure Compute Classic to
the display Compute Classic console.
action tab at the
upper left corner of the page and select Oracle
Cloud Infrastructure Compute Classic to
the display Compute Classic console. - Select the Network tab , then
select SSH PublicKeys to display
the SSH Public Keys page.
- Select Create SSH Public Key
to add your SSH public key to OCI Classic.
- In the Add SSH Public Key
dialog box, enter a name and the value of the
SSH public key you generated.
Note: Paste the key value exactly as it was generated. Do not append or insert any extra characters, line breaks, or spaces. - Ensure the Enabled check box is checked.
- Click the Add button to add your SSH public key to OCI Classic.
- Repeat these steps for each of your
SSH Public Keys.
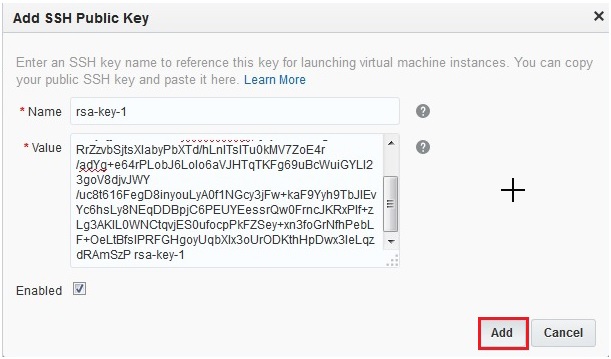
Add SSH Public Key
- In the Add SSH Public Key
dialog box, enter a name and the value of the
SSH public key you generated.
Reserve a Public IP Address
In this task you will create a public IP address reservation for the Trial Edition. This same IP address will be used for the ADF, AIS, and BIP Servers of Trial Edition. Later in this tutorial, you will associate the IP address to your Trial Edition instance when you create it.
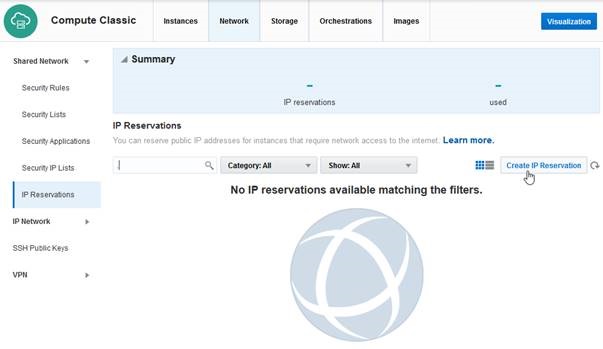
- On My Services, click the Network tile.
- In the left-most column of selections, locate
and expand the Shared Network
node.
Important: Depending on the version of OCI Classic which your domain is running, multiple nodes entitled "Network" may exist. You must use Shared Network.
- With Shared Network expanded, select the IP Reservations sub node.
- On IP Reservations, click the Create IP Reservation button.
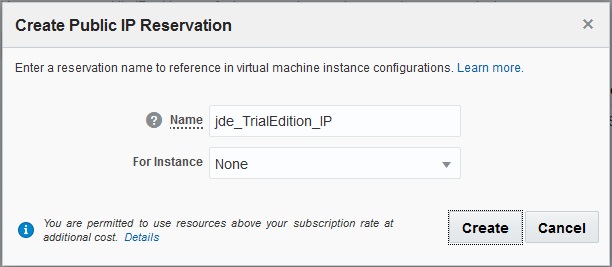
- On the Create Public IP Reservation dialog,
enter a reservation name for Trial Edition. For
example:
jde_TrialEdition_IP
- Click the Create button.
Download the JD Edwards EnterpriseOne VM Configuration Tool
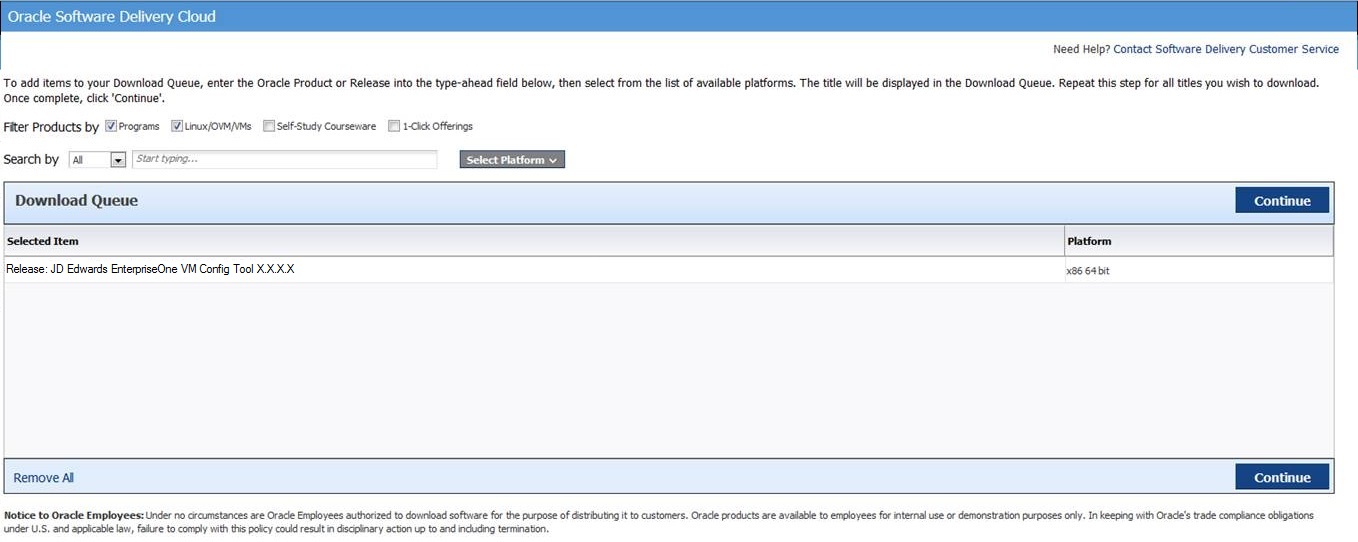
You must download the VM Configuration Tool from the Oracle Software Delivery Cloud. You must have an account in order to obtain any software from this site:
https://edelivery.oracle.com- On the Oracle Software Delivery Cloud for Filter
Products By, check these boxes:
- Programs
- Linux/OVM/VMs
- Search and then locate this product for the JD
Edwards EnterpriseOne VM Configuration Tool:
JD Edwards EnterpriseOne VM Config Tool
Oracle Software Delivery Cloud Download Page - After you accept the licensing agreement, enable
the checkbox for the zip file for the most current
version (which is the only version that will be
available) of the VM Config Tool (version) zip
file and click the Download
button:
<part_number> JD Edwards EnterpriseOne VM Config Tool vX.X.X.X
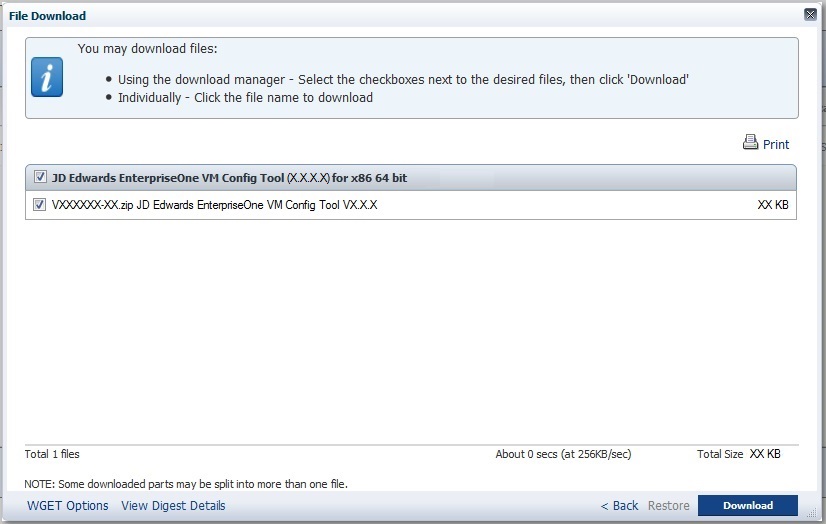
Example - File Download Dialog
Use the VM Configuration Tool to Configure the Servers
You must use the VM Configuration Tool to configure and generate two json files. You will use these json files to define machines, ports, database and application passwords, and other security aspects for OCI Classic and applications.
The VM Configuration Tool is a Java-based program that requires JRE 1.7 or higher.- From the location where you downloaded the VM
Configuration Tool, execute the JDEVMTool.jar
program.
Note: If you followed the recommendation, when you downloaded this program you placed it in a dedicated directory. This is recommended because by default this program saves files in the directory where it runs. - On Select Edition, choose the Trial
Edition radio button.
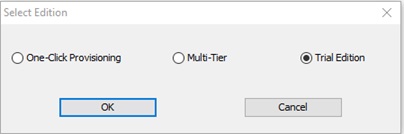
Select Edition - Trial Edition - Click the OK button.
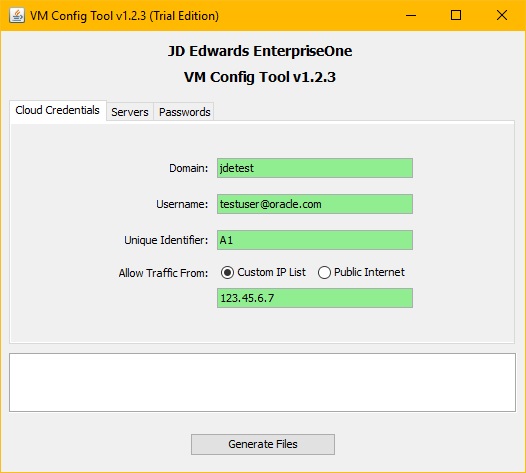
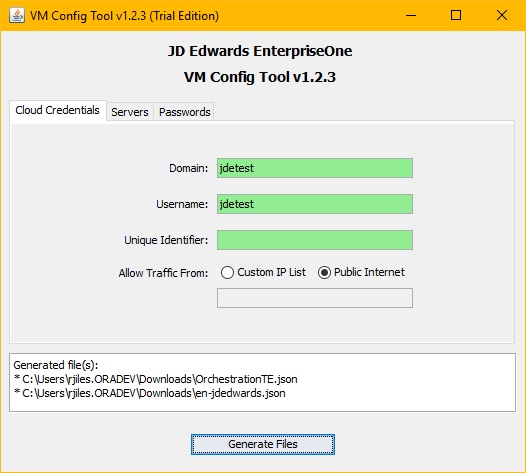
- On VM Config Tool, select the Cloud Credentials tab and complete these fields:
- Domain
Enter the domain name of your OCI Classic service. This field is required. - Username
Enter the user name of your OCI Classic service; this is usually your email address. This field is required. - Unique Identifier
Enter a string of alphanumeric characters (recommended to be a short string) to uniquely identify the Orchestration file that will be created. This field is optional and can be left empty. - Allow Traffic From:
Click the radio button to select the traffic pattern that you want to allow access to your Trial Edition: - Custom IP List
Choose this option if you want to restrict access to your Trial Edition to a specific set of IP addresses using Classless Inter-Domain Routing (CIDR) format. You can specific a single IP, multiple IPs (delimited with a comma), or a range of IPs (delimited with a slash). For example: - 123.45.6.7
Allow access only from a single IP (for example, a Microsoft Windows VM on OCI Classic) - 123.45.6.7, 123.45.6.8
Allow access from multiple IPs - 123.45.6.0/16
Allow access from an IP range - Public Internet
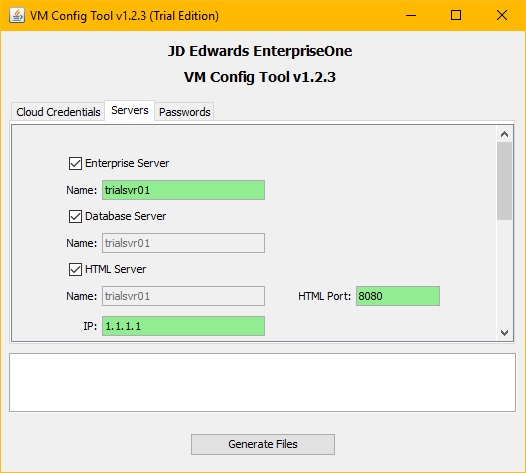
Choose this option if you want your Trial Edition accessible from any public IP address on the Internet. - On VM Config Tool, select the Servers tab and complete these fields:
- Enterprise Server
- Name
This is a mandatory selection. This is the only server name you need to enter for Trial Edition.
Enter a server name as a lower-case alphanumeric string from 1 to 15 characters.
The VM Configuration Tool uses this value to automatically populate the names of the others servers and cannot be changed.
- Database
Server
- HTML Server
This is a mandatory selection. Complete this field:
- HTML Port
Enter a port number in the range [1025, 65535] (inclusive).
You cannot specify any of the following ports which are blacklisted (and prohibited by the tool) for various technical reasons:
1521, 8001, 9702, 9704, 7001, 7002, 5500, 7070, 7071, 7075 - IP
Enter the IP address of your HTML Server. Enter the public IP address for Trial Edition. This must be a valid IPv4 address in the form such as xxx.xxx.xxx.xxx. This is the IP address that you previously reserved as described in the preceding section of this tutorial. This same IP address is used for the AIS and BIP Servers. The IP address you enter in this field is automatically populated to the IP address field of the AIS Server and BIP Publisher Server, and vice versa. Therefore, these IP addresses will always match.
- HTML Port
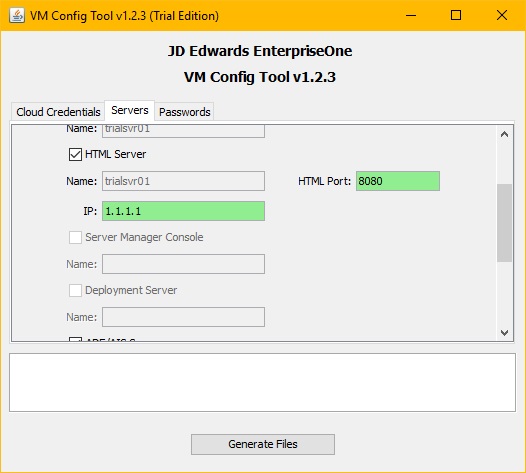
- Server
Manager Console
This selection is disabled because the Server Manager Console Server is not available with Trial Edition. - Deployment
Server
This selection is disabled because the Deployment Server is not available with Trial Edition. - ADF/AIS Server
This is a mandatory selection. The ADF and AIS servers are combined in the same virtual machine. Complete these fields:
- ADF Port (7071)
This selection is disabled and is populated by default. - AIS Port (7070)
This selection is disabled and is populated by default. - IP
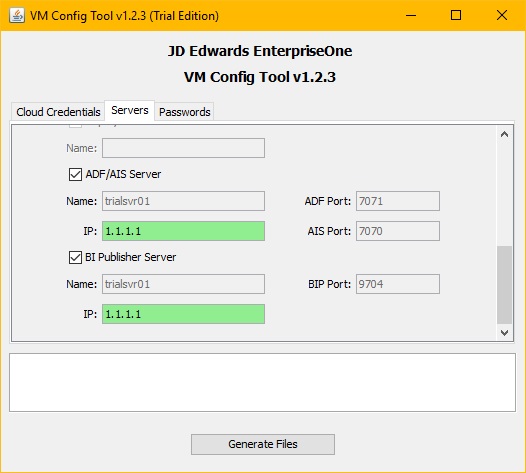
Enter the public IP address for Trial Edition. This must be a valid IPv4 address in the form such as xxx.xxx.xxx.xxx. This is the IP address that you previously reserved as described in the preceding section of this tutorial. This same IP address is used for the BIP Server. The IP address you enter in this field is automatically populated to the IP address field of the BIP Publisher Server, and vice versa. Therefore, these IP addresses will always match. - BI Publisher Server (9704)
This is a mandatory selection for this field (all other fields are disabled): - IP
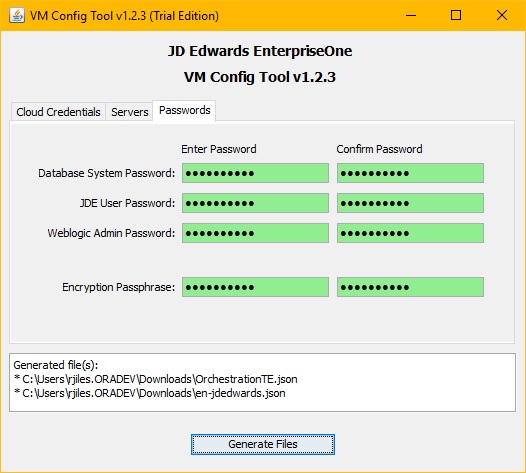
Enter the public IP address the BI Publisher server. This must be a valid IPv4 address in the form such as xxx.xxx.xxx.xxx. This is the IP address that you previously reserved as described in the preceding section of this tutorial. The IP address you enter in this field is automatically populated to the IP address field of the ADF/AIS Server, and vice versa. Therefore, these IP addresses will always match. - On VM Config Tool, select the Passwords
tab and complete these fields:
- Database
System Password
Enter and confirm the password for sys and system database users. The password must contain 8 to 30 characters and at least one letter and one number. - JDE User
Password
Enter and confirm the password for JDE user and all database user accounts. This password must contain 8 to 10 characters and at least one letter and one number. - WebLogic
Admin Password
Enter the password for the WebLogic Admin User (the user that signs on to the WebLogic Server admin console). This password must contain at least 8 characters and at least one letter and one number: - Encryption Passphrase
Enter a passphrase that will be used to encrypt the configuration JSON. This passphrase must contain 8 to 30 characters and at least one letter and one number.
Important: Be sure to keep an accurate record of all these passwords even though you may never need to directly access the WebLogic Server Administrator Console or the actual database. This is important because the Encryption Passphrase is required to decrypt the file for configuration, and the JDE user password is required to log in to JD Edwards EnterpriseOne as the JDE user. As such, these passwords are required to complete the functional setup and use of the JD Edwards EnterpriseOne Trial Edition.
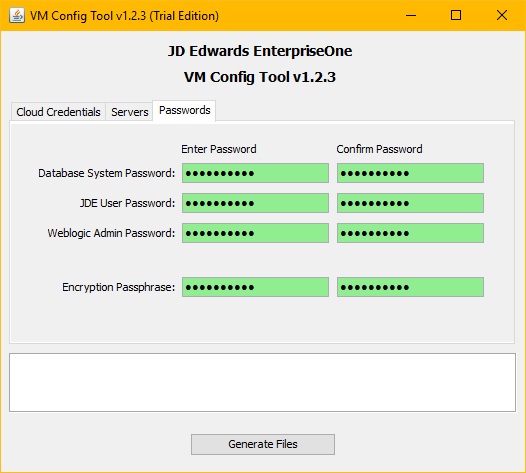
VM Configuration Tool (Trial Edition) - Passwords Tab - Database
System Password
- After the required fields have been completed on
all tabs of the VM Configuration Tool, click the Generate
Files button.
If you did not specify a Unique Identifier value on the Cloud Credentials tab, the following two files are created in the same directory from which the VM Configuration Tool was run. If you specified a Unique Identifier, the following two files are created in a subdirectory from where the VM Configuration Tool was run with a name that includes the Unique Identifier.
For example, if the VM Tool is located in a directory called "VM_TOOL", and you specify "A1" as the unique identifier, the VM Configuration Tool creates this directory structure in which is places the generated files:
/VM_TOOL/A1
The two generated files are:
- OrchestrationTE.json
This file is NOT encrypted because it does not contain sensitive password information. The name of this file is variable depending on several factors. The "TE" in the filename indicates Trial Edition. Because you can load multiple OCI Classic environments into your OCI Classic domain, each orchestration that you load must have a unique name/identifier. This unique identifier is not only a part of the name, but it is also embedded within the json information as part of the labels within the orchestration to differentiate the orchestration from another loaded in the same domain. For example, if you specify "A1" as the unique identifier, the generated filename would be: OrchestrationTE_A1.json.
- en-jdedwards.json
This file IS encrypted and will always have the same generated filename. If you specified a unique identifier, the generated file will be saved to a folder that is named with the unique identifier name; however it will not be a part of the actual file name or contents. This encrypted file will later be moved to the actual VMs where they will then be decrypted so that the configuration scripts can read the machine names, password, and port information to perform the configuration.
- OrchestrationTE.json
The VM Configuration Tool automatically fills this section with the name you entered for the Enterprise Server. Input to this section is disabled.
Upload and Run the Orchestration
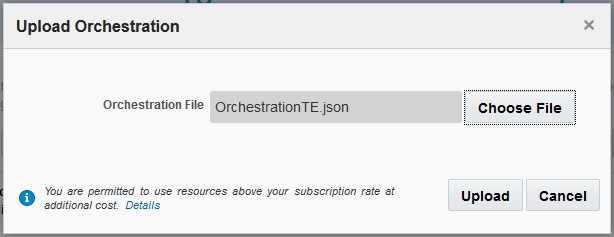
In this task you will upload OrchestrationTE.json (or if you specified a Unique Identifier use that file) for Trial Edition.
- On My Services, locate the name of your identity domain and your username on the top right hand of the screen. For example, the identity domain shown here is domainSample9999 and the username is the email address sample@samp.net:
- Select the action tab at the upper left corner of the page and select Compute Classic to display the My Services console.
- From My Services, select the Orchestration tab.
- Select the Upload Orchestration button.
- Browse to the OrchestrationTE.json (or if you specified a Unique Identifier use that file) that was generated in the previous section of this tutoral, and upload the orchestration.
- In the Orchestrations tab, an orchestration with a name similar to E1TEA1Security is displayed after upload. The name of the orchestration may change based on the use of the “unique identifier” in the VM Configuration tool. Click on the action tab to the right of the orchestration, and then select Start. As it runs, the orchestration creates a set of security configurations.
- Click the Refresh button to the right of the Orchestration menu until the status of the orchestration shows Status: Ready.


Create a JD Edwards EnterpriseOne Release 9.2 Trial Edition Instance
This section covers how to obtain the JD Edwards Trial Edition application from the Oracle Cloud Marketplace, and creating an instance on your OCI Classic domain.
- From the Oracle
Cloud Marketplace go to the listing for
Trial Edition that is labeled:
JDE 9.2 Trial Edition
- On the listing page, select the Get App button.
- Log in with your Oracle Single Sign-On. This allows Oracle to discover Oracle Compute Services associated with your user. If there are none, you will not be allowed to continue.
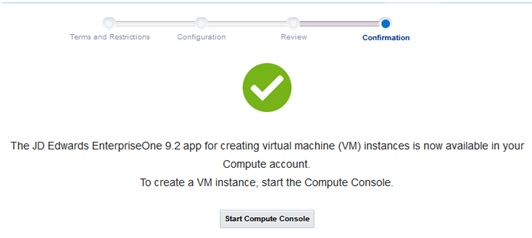
- Accept the Oracle Cloud Marketplace Terms of Service and select your domain for installation. A notification appears indicating that the JD Edwards EnterpriseOne Trial Edition image is now available in your account. The system also sends an email with a link that allows you to continue the application installation.
- On Confirmation, either select the Start Compute Console button or select the Sign in here link from the email to continue the application installation using the Compute Console.
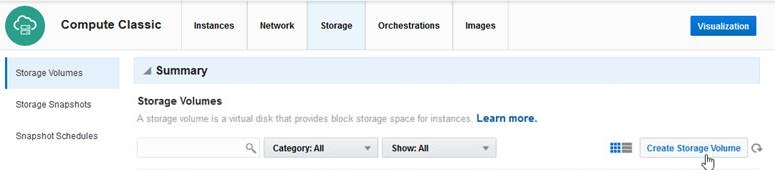
- After canceling out of the Create Instance workflow, on Oracle Compute Service select the Storage tab.
- With the Storage tab selected, click the Create Storage Volume button.
- On Storage Volume Details, complete the following fields:
- Name: Enter your choice of Storage Volume Name. This identifies your storage volume in the Storage Volume tile once the instance is started.
- Size:
Change the Size to 125 GB.
Note: The storage volume should be 15% larger than the image it holds. The image inside the JD Edwards EnterpriseOne Release 9.2 Trial Edition storage volume is 110 GB. The storage volume will show a size of 125 GB in this step, but the instance will only show 110 GB of disk space upon logging onto the server.
- Description: Enter your choice of description.
- Boot Image: Use the
pulldown list to select the Trial Edition image,
which will have a name similar to this:
JDE_TE9220_OL7u3_YYXXX_112GBwhere YYXXX is a unique date-driven value with YY being the last two digits of the year and XXX being the sequential calendar day in the year.
For example, the following value of 17285 would indicate the image was created in the year 2017 on the 285th calendar day of the year:
JDE_TE9220_OL7u3_17285_112GB
- Storage Property: Use the pulldown to select the default storage property: storage/default.
- Click the Create button to accept the detail values you entered and continue.
- In the Storage tab, click the refresh button (located immediately to the right of the Create Storage Volume button) until the status changes from Initializing to Online. This may take a while to complete.
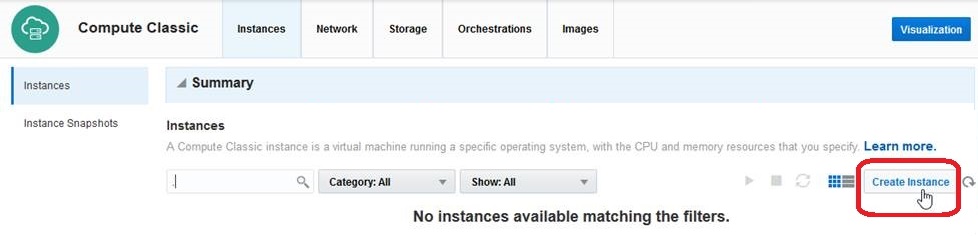
- Once the Storage Volume reaches the Online status, select the Instances tab.
- Select Create Instance to start defining the instance you want to create.
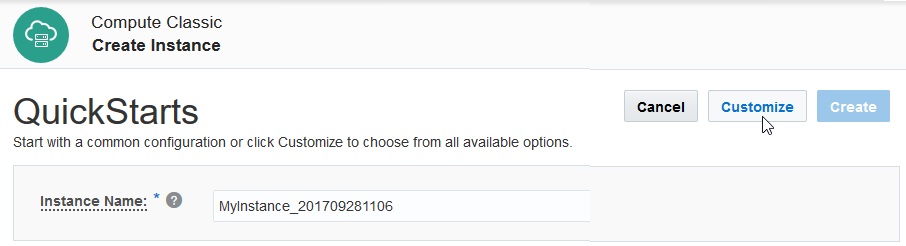
- On QuickStarts, click the Customize button.
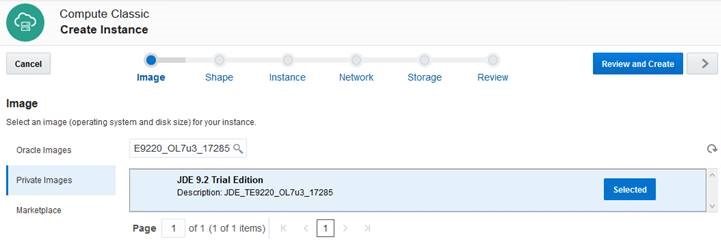
- On the Image page, search and select the Trial Edition image that was copied from the Marketplace.
- Select Private Images on the left hand tree.
- Populate the search window with text such as TE922 to filter and find the Trial Edition image.
- Once you find the desired image, click the Select button on the image line; the button text changes to Selected.
- Once the image is selected, click the arrow button in the upper right to move to the next page.
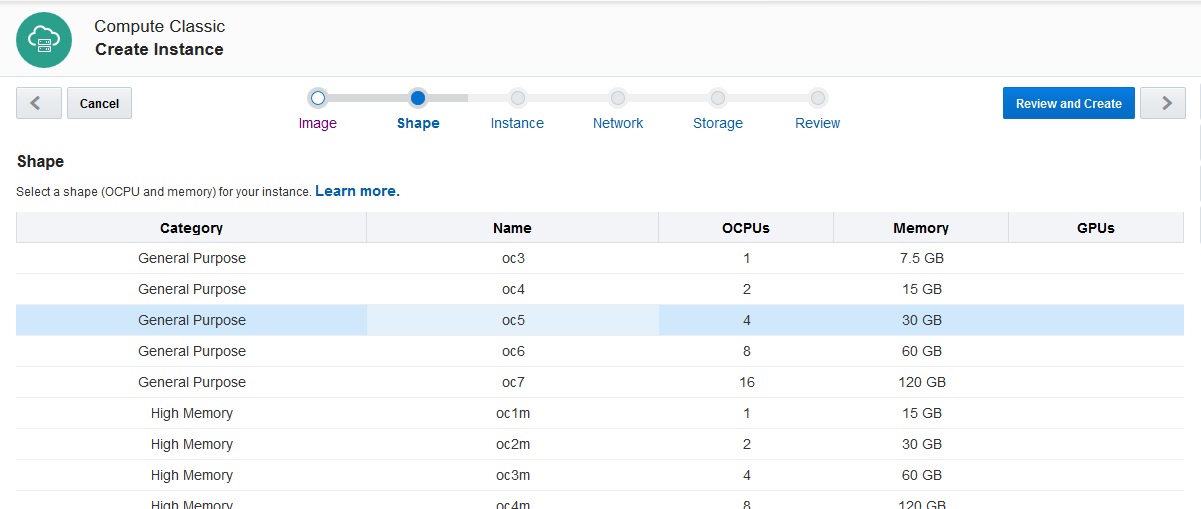
- You must pick a shape with a minimum of 4 OCPUs and 30 GB of memory. For example, the oc5 shape includes 4 OCPUs and 30 GB memory.
- Once you have highlighted your selection, click the arrow button in the upper right to continue to the next page.
Important: Either the button or link will take you to the Create Instance workflow. However, you will need to STOP and CANCEL out of this workflow in order to create persistent Storage Volume, which is a prerequisite.


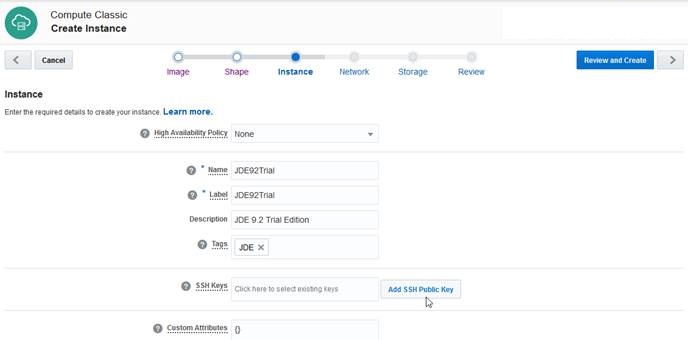
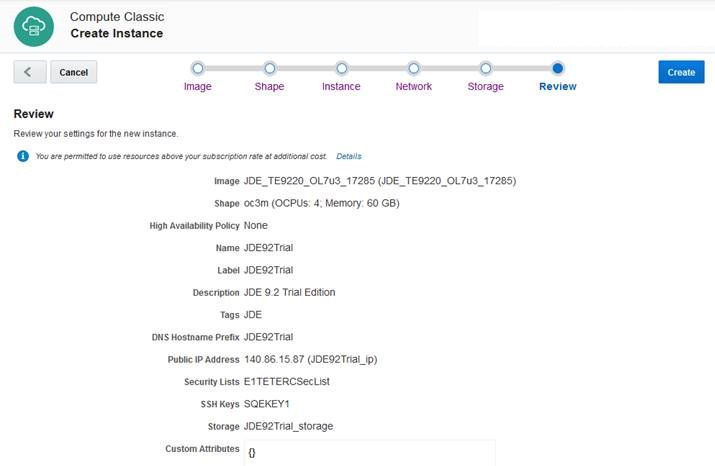
- High Availability Policy
Select this value: None - Name
Enter a name for your instance. For example: JDE92Trial - Label
Enter a label for your instance. For example: JDE92Trial - Description
Provide a meaningful description for your instance. - Tags
Enter common tag values that will be the same for all of the JD Edwards EnterpriseOne instances. This is used to quickly identify a group. For example: JDE - SSH Keys
Click in the box to display the available SSH keys. Select the keys you want to use. Perform this same function for each key that you would like to attach to the instance. - Custom Attributes
Leave this section blank.
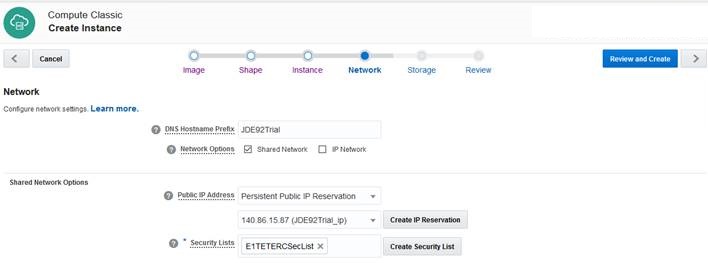
- DNS Hostname Prefix
Important: This value MUST match the name that you previously entered using the VM Configuration Tool for your primary Enterprise Server.
A hostname is required in the DNS Hostname Prefix field when creating a Trial Edition Release 9.2 instance. This will be the hostname, or machine name, of the instance. A maximum of a 15 character mixed case alphanumeric name is allowed for the hostname. Special characters are not allowed. Upper case letters convert to lower case.
- Network Option
Uncheck the IP Network option and keep the Shared Network checked.
- Public IP Address
Use the dropdown arrow to select: Persistent Public IP Reservation. In the second drop down list, find and select the IP reservation you previously created for this particular instance. - Security Lists
Click in the box and select the security list that was created when you imported the security list orchestration. This was created by the OrchestrationTE.json file that was described in a previous task in this tutorial entitled: Use the VM Configuration Tool to Configure the Servers and Generate Configuration Files.
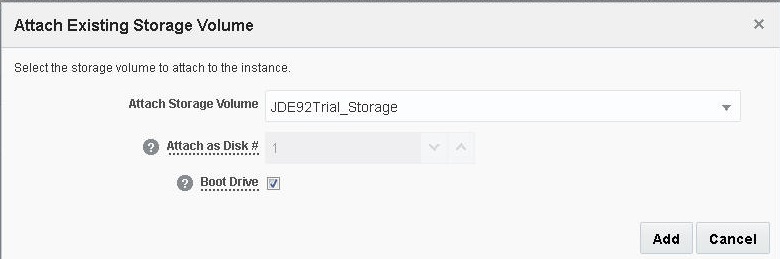
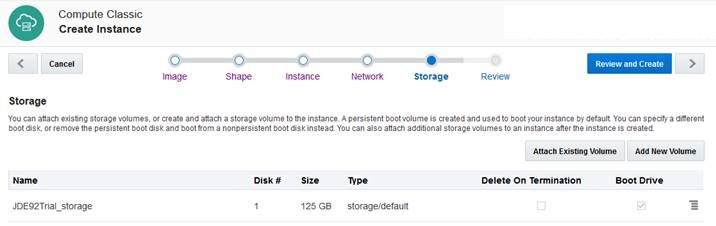
Note: Even if this name matches the name of the storage volume you want to use, it is a default storage volume and is not the specific storage volume you created for use with this instance.
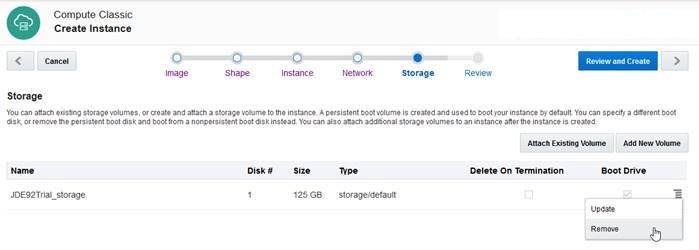
- Click the drop down list in the Attach Storage Volume and find your previously created storage volume for this instance of Trial Edition.
- Leave the value for Attach as Disk # 1.
- Click the check box to designate this as the Boot Drive.
- Click the Add button.
Review the Instance that You Created
- On the My Services console, select the Instances tab.
- When the instance has finished being created, it will show up with Status: Running. Refresh the screen until it reaches this status.
- Go to the instance that you just created, and
from the action tab, directly to the
right of the instance, and select View.
- Note the Public IP Address.
This is the address that will be used to connect
to the instance externally, through both ssh and
web browsers.
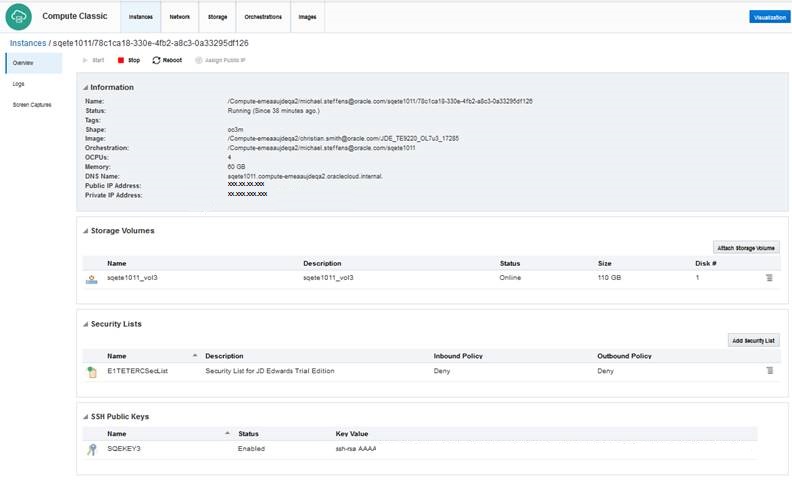
Instance Creation
Configure the Trial Edition Instance
In this task you will perform these tasks:
- Upload the en-jdedwards.json to the Trial Edition Instance
- Log into the Trial Edition Instance Using SSH
- Run the Orchestration for First Time
Configuration
Upload the en-jdedwards.json to the Trial Edition Instance
You can upload the encrypted JSON generated by the VM Config Tool (en-jdedwards.json) from your Windows machine to the Trial Edition instance using WinSCP, which can be downloaded from this link:
- Launch WinSCP and enter the following login
information:
- Host Name
Enter the public IP of the instance - User name
You must enter the literal value opc in this field. - Private key file
Browse to the location to select the key that you previously generated. - File Protocol
Use the pull-down to select SCP.
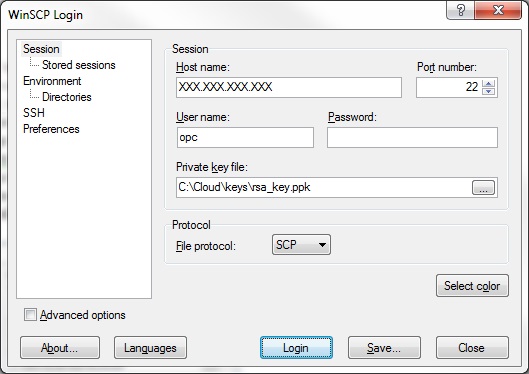
WinSCP Login Screen - Host Name
- Once you are logged in, on the right pane navigate to the /tmp location.
- On the left pane, navigate to the folder where the en-jdedwards.json file resides in your local machine.
- Drag and drop the file from the left pane to
the right pane to transfer the file. Make sure
it is uploaded to the root of /tmp and not to a
subdirectory.
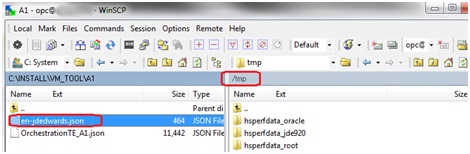
Transfer Window for WinSCP for Transfer of en-jdedwards.json
Log Into the Trial Edition Instance Using SSH
This section provides the procedures to log into the Trial Edition instance using SSH, either from a UNIX or UNIX-like host, or from a Microsoft Windows system.
Logging in From a UNIX or UNIX-like Host
- The format of this command can vary depending
upon your UNIX server. Enter one of the
following commands:
ssh -l opc <public_ip_address_of_the_instance>
-or-
ssh -i /path_to_private_key opc@<public_ip_address_of_the_instance>
Note: To determine the public IP address of your instance, go to the Instances tile on the OCI Classic console and select your instance to get to the details page. - If prompted with Are you sure you want to continue connecting (yes/no)?, enter yes.
- When prompted, enter the passphrase you had provided for your SSH key pair.
- On first login, you will be prompted for the
Public IP Address. Enter the IP address used in
Step 1 to connect to this server. This step is
only done once on the first login.
Note: If you are not prompted for the Public IP Address on the first login, log out and log back in after a few minutes.
Logging in From a Microsoft Windows System
- Start PuTTY. The PuTTY Configuration window is displayed, showing the Session panel.
- In the Host Name (or
IP address) field, enter the public
IP address of your instance.
Note: To determine the public IP address of your instance, go to the Instances tile on the OCI Classic console and select your instance to get to the details page. - In the Connection type:
field, ensure the SSH radio
is selected.
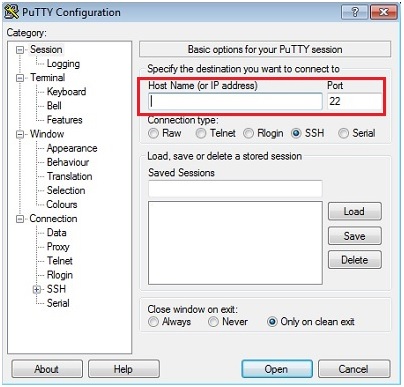
PuTTY Configuration - Host Name Field and SSH Radio Button - In the Category pane, expand the Connection node, and then select Data to display the Data to send to the server panel.
- In the Auto-login username field, enter opc.
Confirm that the When username is not
specified radio button is set to Prompt.
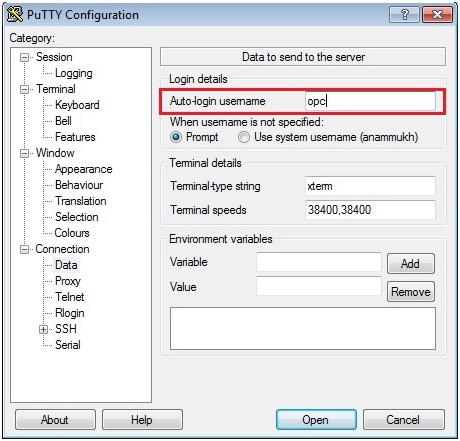
PuTTY Configuration - Auto-login username - In the Category pane, expand the SSH node, and then select Auth to display the Options controlling SSH authentication panel.
- In the Private key file for
authentication field, click the Browse
button and select the private key file that you
saved earlier.
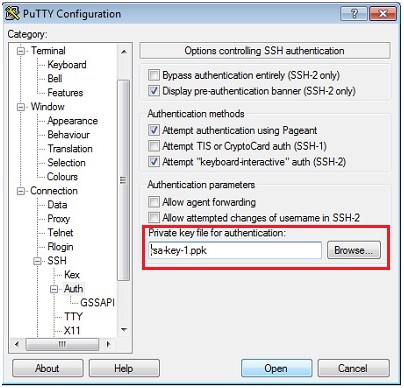
PuTTY Configuration - Private Key for Authentication - In the Category pane, select Session to display the Session panel.
- In the Saved Sessions field, enter a name for this connection configuration, then click the Save button.
- Click the Open button to open the connection. The PuTTY Configuration window is closes and the PuTTY window displays.
- Enter the passphrase you provided for your SSH key pair.
- The first time you connect to your instance, the PuTTY Security Alert window displays, prompting you to confirm the public key. Click the Yes button to continue.
Launch First Time Configuration
After you have logged into the Trial Edition instance as the user for OCI Classic, you will be prompted for the encryption passphrase. This is the passphrase entered when you ran the VM Configuration Tool as previously described in this tutorial.
Note: You may first be prompted for your SSH private key passphrase for access to the instance, then immediately prompted for your JD Edwards EnterpriseOne VM Configuration Tool encryption passphrase for configuration. It is important to understand that both passphrases will be required before the configuration scripts will be initialized.
Upon validation of both the SSH private key and the JD Edwards EnterpriseOne encryption passphrases, the configuration of the instance begins. This process may take an hour to finish. During this time you will see some information in the console output while the configurations are run. During this time it is normal to see output such as starting and stopping services as well as building and deploying ADF applications. The process is complete when the normal command prompt and cursor are displayed.
Check JD Edwards EnterpriseOne Services Status
This section describes how to confirm the services
have started, and the proper order to stop and start
services if required.
- From an ssh command line, login to opc and
then switch to the root user. For example, you
could use these commands:
ssh opc@<public_ip_address_of_the_instance>
sudo su - root - As the root user, check that each of the
services are running:
- service jde-db status
- service jde-ent status
- service jde-html status
- service jde-bip status
- service jde-adf status
- If the instance needs to be stopped and
restarted, or if the services need to be stopped
and restarted, the order of shutdown is
important. To stop services, the shutdown needs
to be in this order:
- service jde-adf stop
- service jde-bip stop
- service jde-html stop
- service jde-ent stop
- service jde-db stop
- service jde-adf stop
-
To start services, start in this order:
- service jde-db start
- service jde-ent start
- service jde-html start
- service jde-bip start
- service jde-adf start
-
Check the start and stop service logs, which are located in the following directories:
- /var/log
- /u01/jde920/e920/log
- Verify you can access the HTML Web Server at
this URL:
http://<Public IP:port>/jde
where port is the port number defined using the VM Configuration Tool
- Verify these Internet Of Things (IoT) URLs:
Orchestrator Studio: http://<Public IP>:7075/OrchestratorStudio/faces/index.jsf
Orchestrator Client: http://<Public IP>:7070/jderest/client/login.html
Configure Public IP Address/Internal Hostname on Client Machine (optional)
Without this step, the JD Edwards EnterpriseOne application websites can only be accessed using the Public IP Address in a browser. This step allows access using the hostname also as a convenience. The steps given below assume that you have not configured a public web entry point for the JD Edwards EnterpriseOne application tier. In that case you need to manually add the public IP address/Internal DNS hostname of the JD Edwards EnterpriseOne application tier in the hosts file of the client machine.
Alternatively, these steps can be replaced by contacting your site’s network administrator and having the address and hostname setup in DNS.
For Access From a UNIX host:
Modify the /etc/hosts file as shown below. For example:
- public IP: 129.144.000.999
- public hostname: demojde1.compute.oraclecloud.com
Using the above example values, the /etc/hosts file must contain this line:
- 129.144.000.999 demojde1 demojde1.compute.oraclecloud.com
For Access From a Microsoft Windows System:
Modify the C:\Windows\System32\drivers\etc\hosts file as shown below. For example:
- public IP: 129.144.000.999
- public hostname: demojde1.compute.oraclecloud.com
Using the above example values, the C:\Windows\System32\drivers\etc\hosts file must contain this line:
- 129.144.000.999 demojde1 demojde1.compute.oraclecloud.com