Creating Multi Data Set Data Models
Purpose
This tutorial covers how to create a BI Publisher that joins two data sets on a common dimension.
Time to Complete
Approximately 1 hour.
Overview
This tutorial is intended for users who want to create reports using Oracle BI Publisher in the Taleo Recruiting Embedded Reporting feature. The tutorial covers creating a BIP report with multiple data sets.
This tutorial is intended for users who already have an understanding of the principles of writing SQL, and/or who have previous experience with Oracle BI Publisher.
Requirements
Taleo Enterprise 14B or later is required to complete this training.
- The Oracle Business Intelligence Reporting product and the Recruiting Embedded Reporting feature must be enabled on your zone.
Prerequisites
Before starting this tutorial, you should have the proper user type permissions. The Author Content (BI Developer) and the Access Embedded Reports permissions are recommended. The Access Subject Area - Recruiting and Access Embedded Reporting Management permissions are also required.
Oracle BI Publisher MS Word plug-in is required. The plug-in can be downloaded at the Oracle BI Publisher download page (http://www.oracle.com/technetwork/middleware/bi-publisher/downloads/index.html ).
Note From the Author
The field values available, and the rows returned will vary as you are reporting on the information from your zone.
Creating a Multi Data Set BIP Report
Create Base Analyses in OBI Answers
This topic will cover how to use BI Answer analysis logical SQL as a base for your Data Set logical SQL.
. |
Navigate to the homepage of Oracle Business Intelligence.
|
|---|---|
. |
Create a new analysis using the Recruiting (Legacy) subject area.
|
. |
Add the following fields to the analysis:
Add the following filters to the analysis:
The analysis criteria should look like this:
|
. |
Navigate to the Advanced tab and copy the analysis sql into a notepad.
|
. |
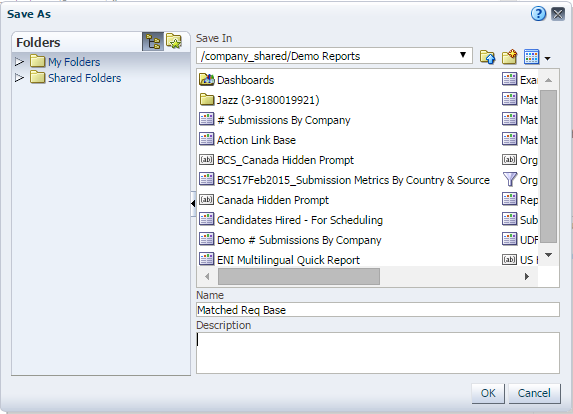
Save the analysis as Matched Req Base.
|
. |
Create a new analysis using the Recruiting (Legacy) subject area.
|
. |
Add the following fields to the analysis:
The analysis criteria should look like this:
|
. |
Add a filter for Requisition NO. Under Add More Options Select SQL Expression
|
. |
Paste the following expression into the SQL Expression text box. SELECT
Click OK |
. |
Create a new analysis using the Recruiting (Legacy) subject area.
|
. |
Navigate to the advance tab and copy the SQL Issued.
|
. |
Save the analysis as Matched Req Info.
|


Create the Data Model
We will now use the sql from the Answers analyses to create a multi data set data model.
. |
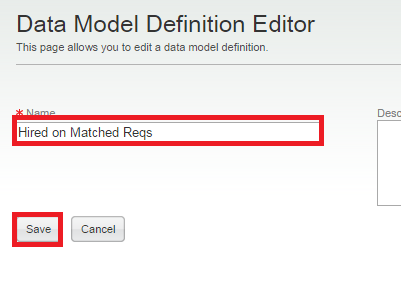
Access Embedded Reporting by going to the Taleo Enterprise Homepage and going to Configuration > [Recruiting] Administration > [Embedded Reporting] Administration > Data Model Definitions. Create a new data model definition.
|
|---|---|
. |
Name the Data Model Hired on Matched Reqs.
Click Save. |
. |
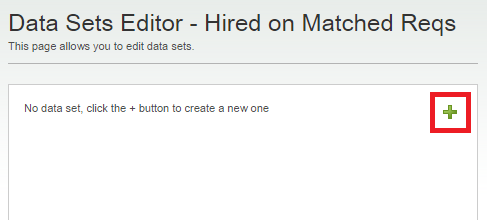
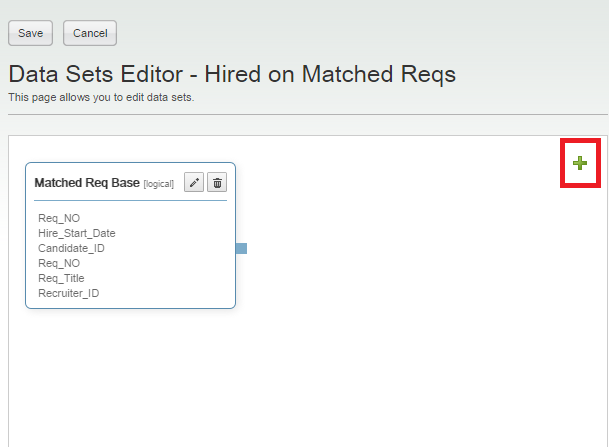
Edit the data sets.
|
. |
Add a new data set.
|
. |
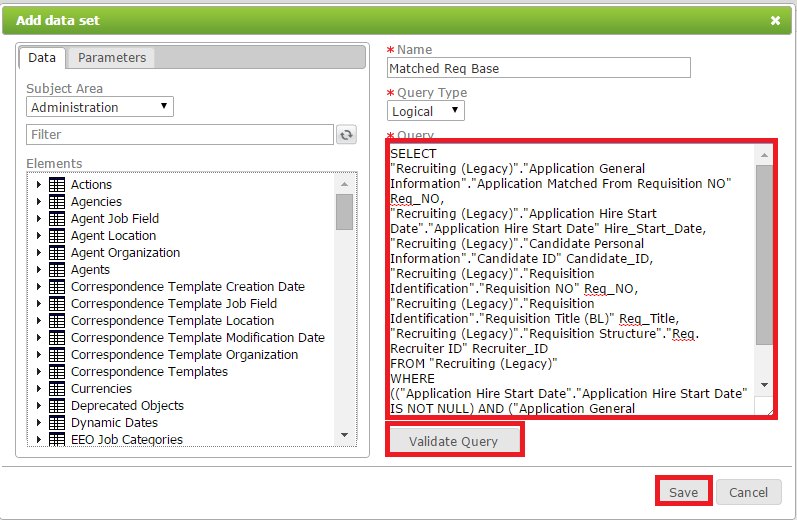
Name the data set Matched Req Base and paste the sql copied from the advanced tab of the Matched Req Base Report.
The sql in the editor should look like this: SELECT |
. |
Edit the sql. When modifying sql to create a data set you need to remove all elements in red and re-alias all fields in brown. The sql in the editor should look like this: SELECT |
. |
Make the following replacements. SELECT The sql in the editor should look like this:
Validate and save the query |
. |
Add a new data set.
|
. |
Name the data set Matched Req Info and paste the sql copied from the advanced tab of the Matched Req Info Report.
The sql in the editor should look like this: SELECT |
. |
Edit the sql. When modifying sql to create a data set you need to remove all elements in red and re-alias all fields in brown. The sql in the editor should look like this: SELECT |
. |
Make the following replacements. SELECT The sql in the editor should look like this:
Validate and save the query |
|
. |
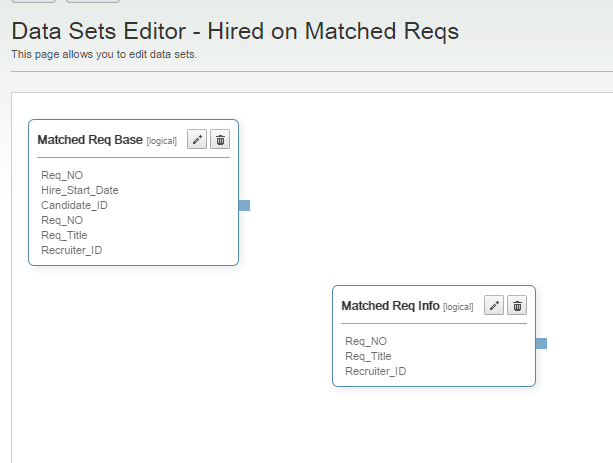
The data set editor should look like this:
|
|
. |
Connect the data sets by grabbing the handle in the Matched Req Base data set and dragging the arrow into the Matched Req Info data set.
|
|
. |
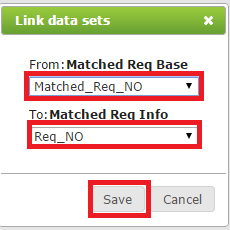
Link the data sets by choosing From: Matched_Req_NO from Matched Req Base To: Req_No from Matched Req Info
Save the link data sets. Save the Data Sets. |


Create the Template
. |
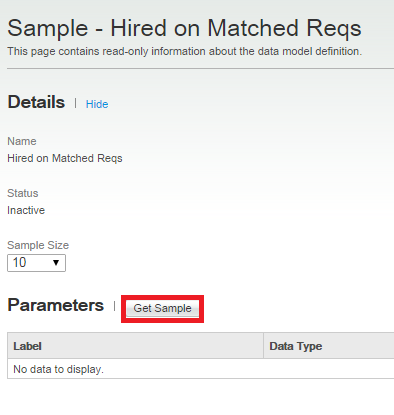
Return to the list of Data Model Definitions.
|
|---|---|
. |
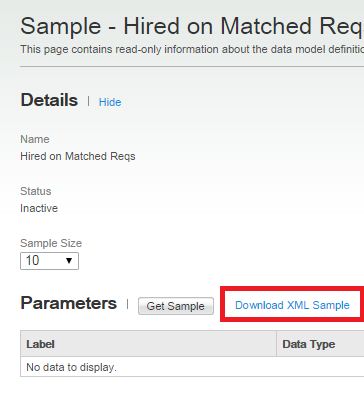
Get a sample of the Data Model XML.
|
. |
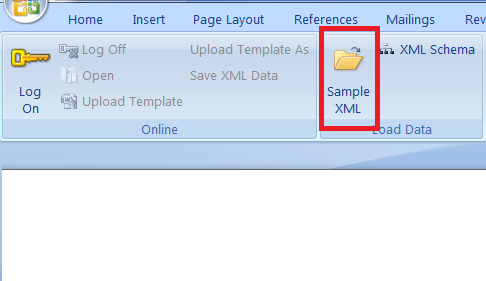
Open Microsoft Word and go to the BI Publisher Tab.
|
. |
Import the xml. a. Click the Sample XML icon.
b. Select the sample xml you downloaded previously.
You will get a message that the data loaded successfully.
|
|
. |
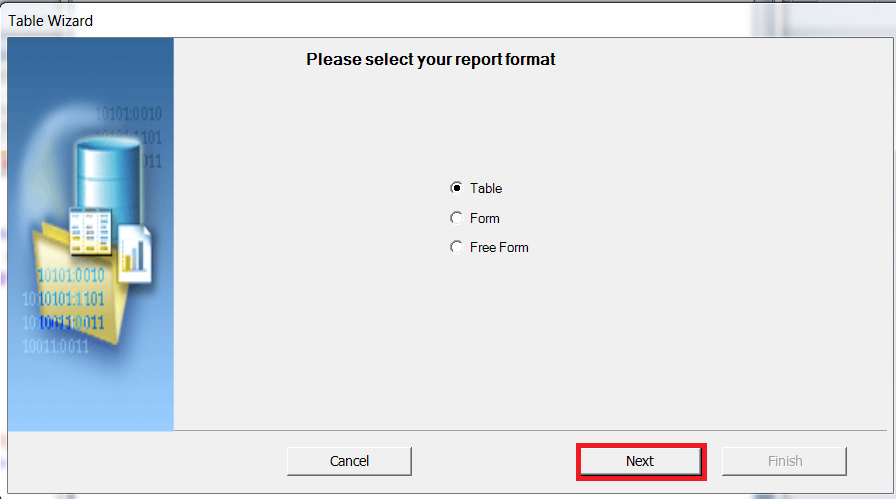
Click the table wizard..
|
|
. |
Table is selected, click Next.
|
|
. |
When prompted to choose a data set choose G_MATCHED_REQ_BASE. Click Next.
|
|
. |
Shuttle all fields into the right pane except the Matched Req No field.
Click Finish. |
|
. |
Save the template as a Rich Text File namedHired on Matched Reqs.
|
|
. |
Preview the report as a Rich Text File.
|


Summary
This tutorial has covered creating a data model definition with a linked data set..
Resources
Credits:
- Product Manager: Rachel Martorelli
![]()
|
|
Copyright © 2013, Oracle and/or its affiliates. All rights reserved |