Before You Begin
Purpose
This
tutorial shows you how to use the Bridge for
Active Directory to synchronize user accounts
between Oracle Fusion Applications and Active
Directory. Fusion Applications is configured as
the source of truth.
Time to Complete
Approximately 90 minutes
Background
The Bridge for Active Directory is a java client application (referred to as “the client” in this document) that can be used to synchronize users and groups/roles between the Oracle Fusion Applications (FA) and Active Directory (AD). User synchronization is required for setting up Single Sign-On (SSO) between Oracle Fusion Applications and Active Directory
The client synchronizes information between a source and a target
- The Source, also called the Source of Truth, refers to the system that contains the user and role information that will be copied to the target.
- The Target is the system that will be updated to contain the same user and role information as the Source.
In this exercise you will do the following
- Configure the client so that Fusion Applications will be the source and Active Directory will be the target.
- Create user accounts in Fusion Applications
- Synchronize these user accounts with Active Directory
- Log into Fusion Applications using Single Sign-On
What Do You Need?
- You will need to enable Single Sign-On between Fusion Applications and your Active Directory Instance. Details can be found here( Fusion Applications Technology: Master Note on Fusion Federation (Doc ID 1484345.1))
- A computer running the Windows operating system with Java Runtime Environment (JRE) installed. The client can be run on JRE versions 6,7, and 8. Ensure that this computer can connect to your Active Directory server
Configure Bridge for Active Directory
Setup Connection Information
-
Sign in to Oracle Fusion Applications with an account that has the "IT Security Manager" role.
-
Click on the Navigator icon.

-
Click on the Security Console menu option.
-
Click on the Administration tab.
-
Click on Bridge for Active Directory.
-
Go to Configuration tab
-
Expand the Base Configuration section
- Set Source of Truth to "Oracle Fusion Applications"
- Enter a password in Reset APPID Password. This password will be used by the client to connect to Fusion Applications
- Accept defaults for the remaining fields
-
Expand the Active Directory Configuration section.
-
Enter the host name and Port Number for your Active Directory Server
-
Check the Enable SSL box if needed.
-
Set the User Base DN field to the Distinguished Name of the location in your Active Directory where user accounts will be created by the Client
- Set the Search Base DN field to the same value as the User Base DN
-
Set the "User Search" filter to an LDAP query that will be used to fetch user accounts from your Active Directory server
- e.g. (&(objectClass=user)(!(objectClass=computer))).
-
Click Save.
-
Click OK on the Confirmation popup.


Download Bridge for Active Directory
You will now download the client to the computer which has access to your Active Directory Server
-
Click on Launch to download the client.
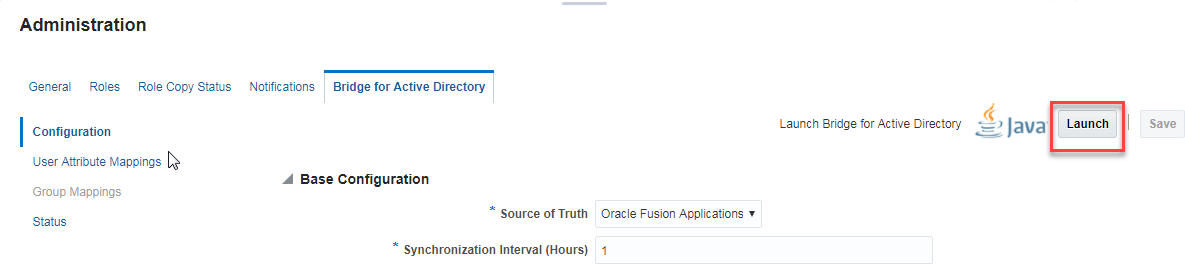
-
Click OK on the message - Launch Bridge for Active Directory. This will download the client installer (jnlp file)
-
Launch the downloaded file from your browser
-
Enter the Fusion Application credentials to log in to Fusion Applications
- Use an account which has the "IT Security Manager" role
- Upon successfully logging in, the client will be installed.
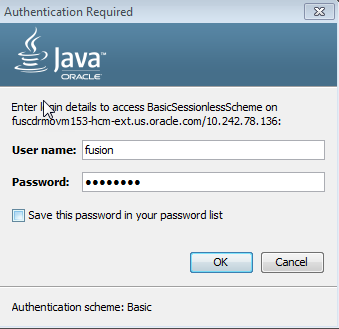
-
Click on Run to launch the client.
- Log in again using the account that has the "IT Security Manager" role
- Upon successfully logging in, the client will be installed.
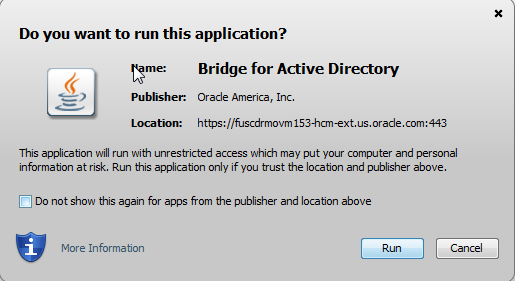
-
Click on the Configuration tab
- Under Active Directory, enter the username and password to connect to your Active Directory server
- Under Oracle Fusion Applications, enter the APPID password, you created in the previous section
- Click Save
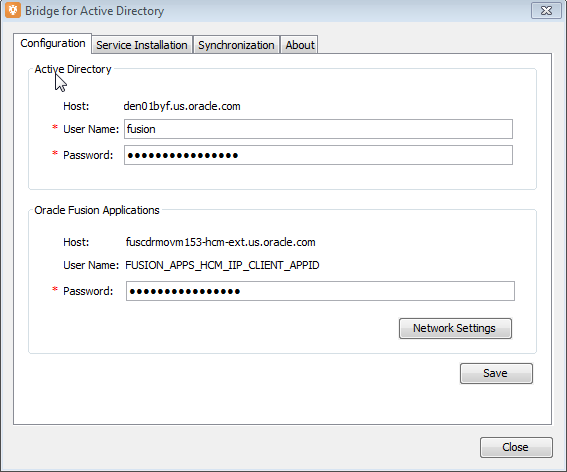
-
The client will now synchronize setup information from Active Directory to Fusion applications
- Click OK
Map Fusion Applications attributes to Active Directory attributes
-
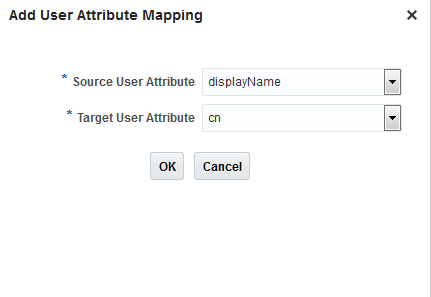
Click on User Attribute Mappings.
-
Click Add.
-
Map Fusion Application attribute to an Active Directory attribute - as needed.
-
Repeat steps 2 and 3 for as many mappings as required.
- A typical mapping looks as follows
- Click Save
- Click OK on the confirmation popup.
| Source (FA) | Target (AD) |
|---|---|
| email.value | |
| username | cn |
| displayName | displayName |
| name.familyName | sn |
| name.givenName | givenName |
| userName | userPrincipalName |
| userName | sAMAccountName |
Perform initial synchronization of users
-
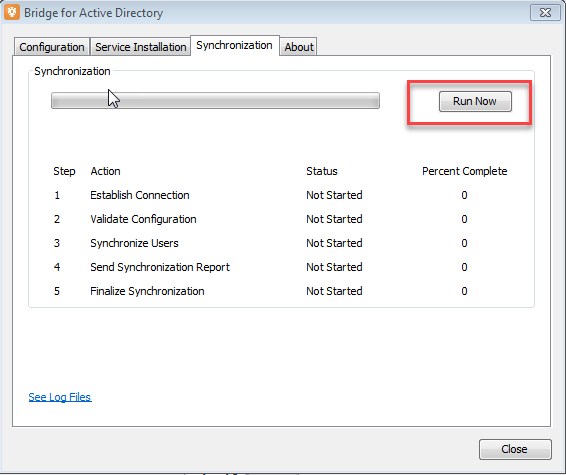
Go to the Synchronization tab on the client.
-
Click Run Now.
Configure policies for user name generation
Enable user name generation for persons
-
Sign in to Oracle Fusion Applications with an account that has a administrative privileges
-
Click on the Navigator.
-
Click on Setup and Maintenance.
-
Enter Manage Enterprise HCM Information in the search text box and click the search icon.

-
Click on the Manage Enterprise HCM task.
-
Click the Edit button and select Correct.
-
Expand the User and Role Provisioning Information section.
-
Set User Account Creation to "Both person and party users"
-
Set User Account Role Provisioning to "Both person and party users"
-
Set User Account Maintenance to "Both person and party users"

-
-
Click the Submit button.
-
Click Yes on the Warning pop-up message.
-
Click OK on the Confirmation message.
-
Click Done.
Set user name format
-
Click on the Navigator icon.
-
Click on the Security Console menu option.
-
Click on the Administration tab.
-
Click on the General tab.
-
Under User Preferences, set Generation Rule to FirstName.LastName.

Synchronize a newly created person to Active Directory - Oracle HCM Cloud
Use this section only if you create persons using the Oracle HCM Cloud
Hire an employee
-
Sign in to Oracle HCM Cloud with an account that has a role that allows you to create Persons
-
Click on the Navigator.
-
Click on New Person.
-
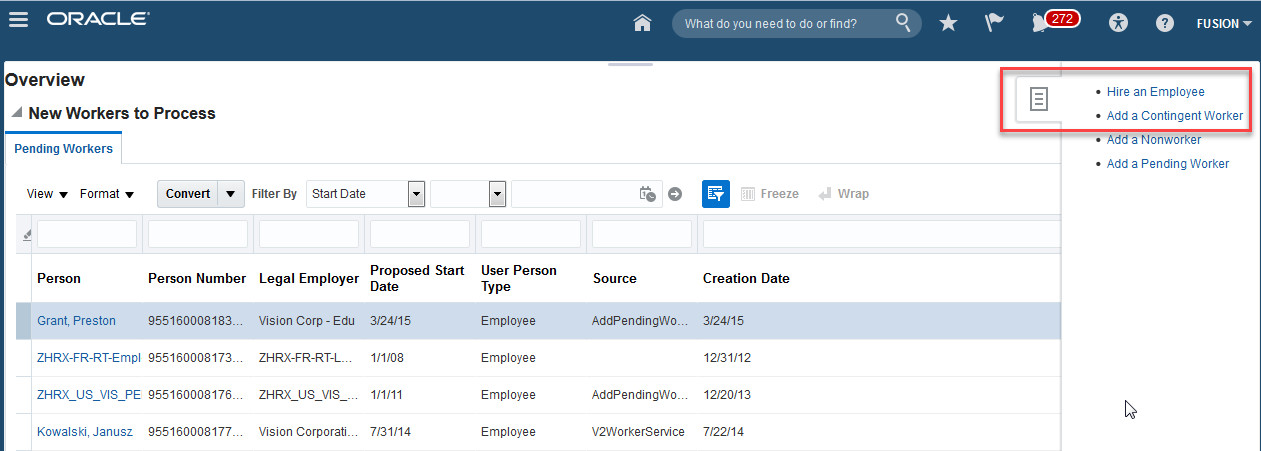
Click on the Panel Drawer on the right
-
Click on Hire Employee
-
Fill the required fields for Identification.
-
Enter Hire Date, Hire Action, Hire Reason, Legal Employer
-
Enter Last Name, First Name (e.g. Fielding, Victor)
-
Enter any other mandatory fields configured in your environment

-
- Click Next.
-
Fill the required fields for Person Information.
-
Enter Home Address
-
Create an email with the following attributes
- Primary - Checked
- Type - Work E-mail
- Email -victor.fielding@acme.com
-
Enter any other mandatory fields configured in your environment

-
- Click Next.
-
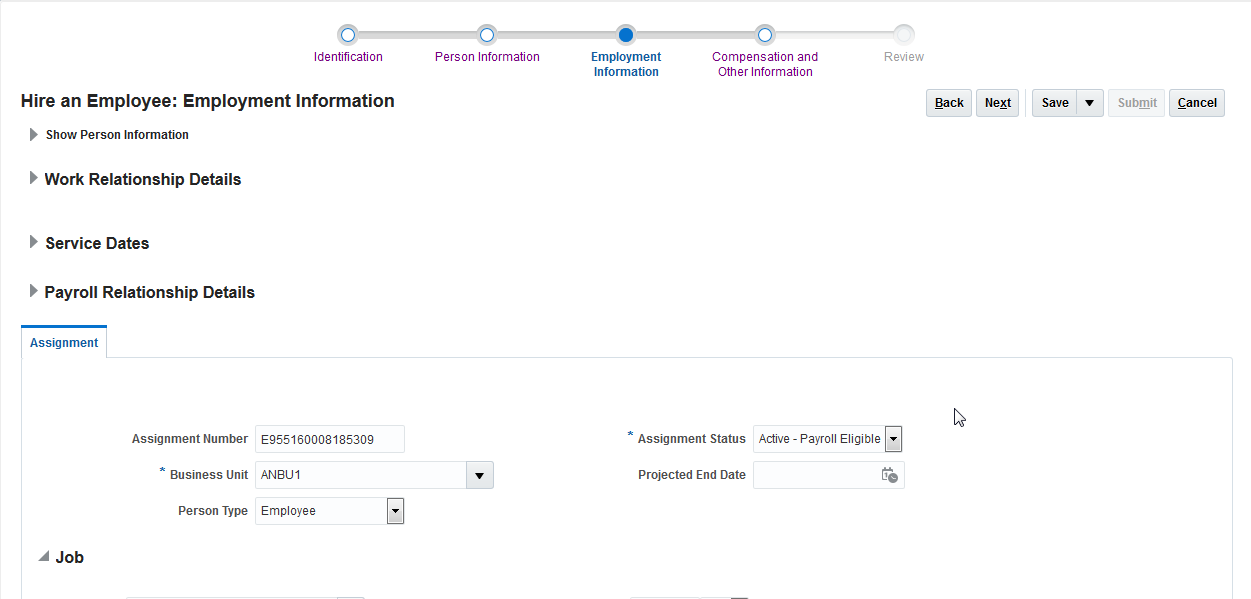
Fill the required fields for Employment Information.
-
Enter Business Unit, Assignment Status
-
Enter Manager Name, Manager Type
-
Enter any other mandatory fields configured in your environment

-
- Click Next.
- Click Next.
- Click Submit.
- Click Yes on the Warning popup.
- Click OK at the Confirmation popup.
Confirm that a user account has been created for the Person
-
Sign in to Oracle Fusion Applications with an account that has the "IT Security Manager" role.
-
Select the Navigator menu
-
Click on Security Console.
-
Click on the User Accounts tab
-
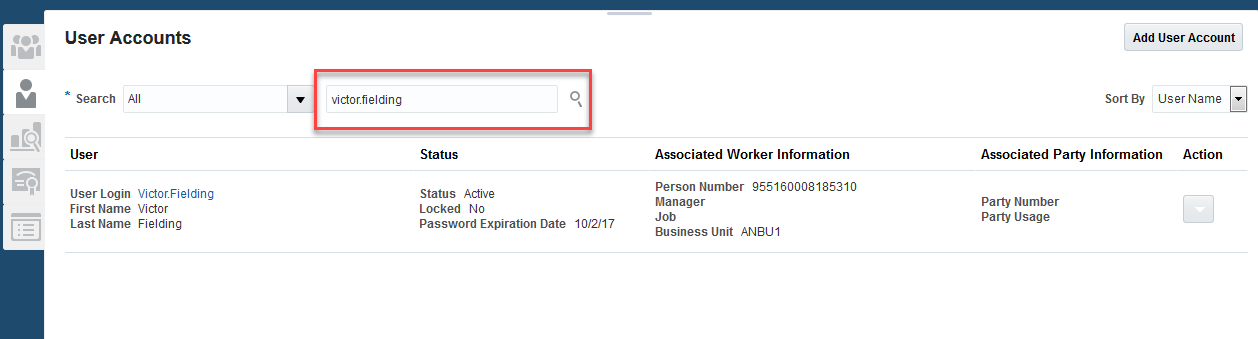
Search for the newly created User Account to confirm that it is created. The account will be FirstName.LastName (e.g. Victor.Fielding)
Synchronize user accounts
Run the client to synchronize the newly created Fusion Applications account to Active Directory
-
Click on the Synchronization tab. Click Run Now
Confirm that a user account is created in Active Directory
-
On your Active Directory server, launch Active Directory Users and Computers
-
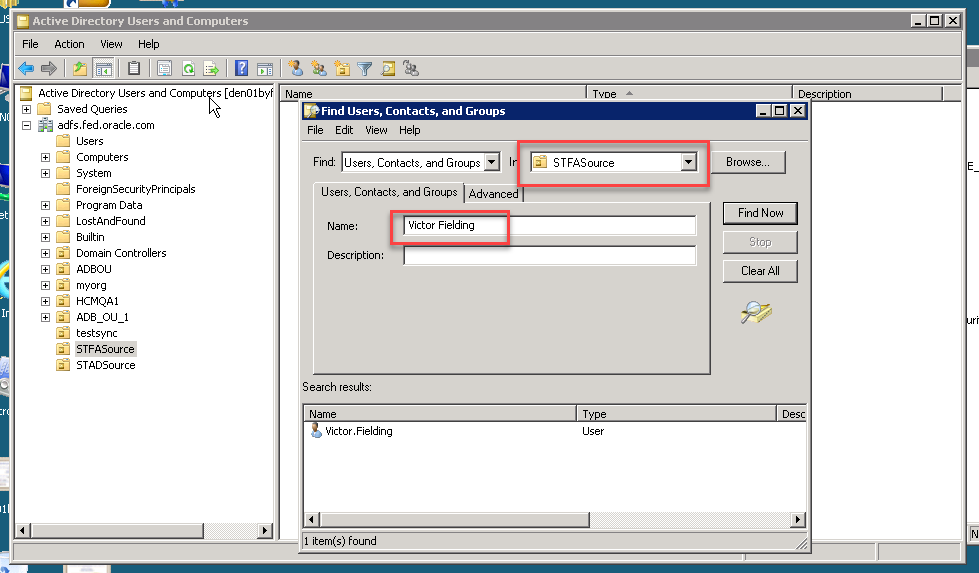
Search for the newly created account e.g. Victor Fielding
-
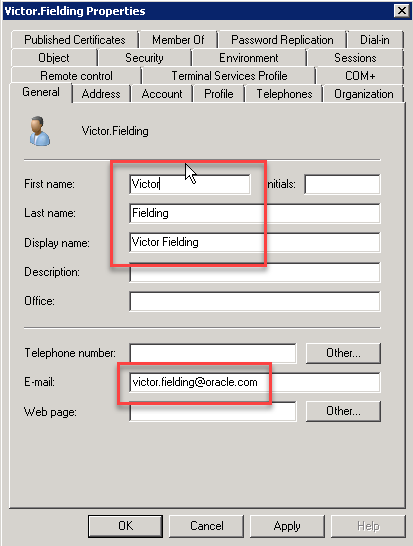
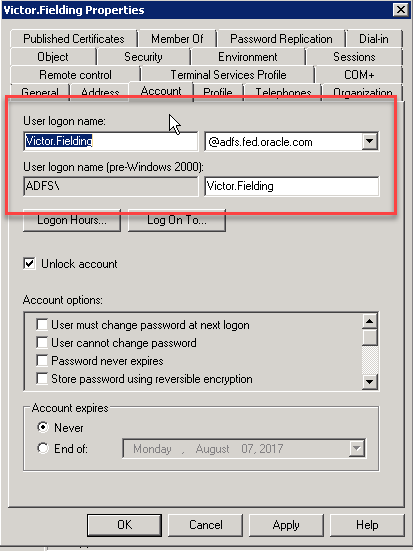
Confirm that all mapped attribute values are synchronized
-
Perform necessary administrative actions on this newly created account in Active Directory
- Set up the account password
- Enable the account
Log into Fusion Applications
-
Access your Fusion Applications homepage
- If SSO is set up, you will be redirected to your Active Directory login page
-
Log into Active Directory using the Active Directory credentials that were set up in the previous step
-
Upon successful login, you will be automatically redirected to the Fusion Applications homepage
Synchronize a newly created person to Active Directory - Oracle Sales Cloud. Oracle ERP Cloud
Use this section only if you create persons through Oracle Sales Cloud or Oracle ERP Cloud.
Manage Users
-
Sign in to Oracle Fusion Applications with an account that has a role that allows you to create Persons
-
Click on the Navigator.
-
Click on Manage Users.
-
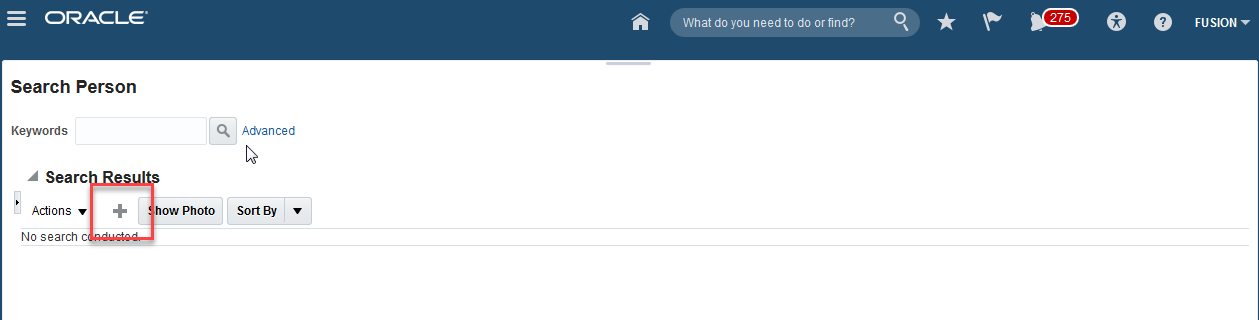
Click on the + icon to create a new person
-
Enter information about the person
-
Enter Last Name, First Name (e.g. Shandling, Michael), Email
-
Set Person Type to Employee
-
Select Legal Employer, Business Unit

-
Click Autoprovision Roles

-
- Click on Save and Close.
Confirm that a user account has been created for the Person
-
Sign in to Oracle Fusion Applications with an account that has the "IT Security Manager" role.
-
Select the Navigator menu
-
Click on Security Console.
-
Click on the User Accounts tab.
-
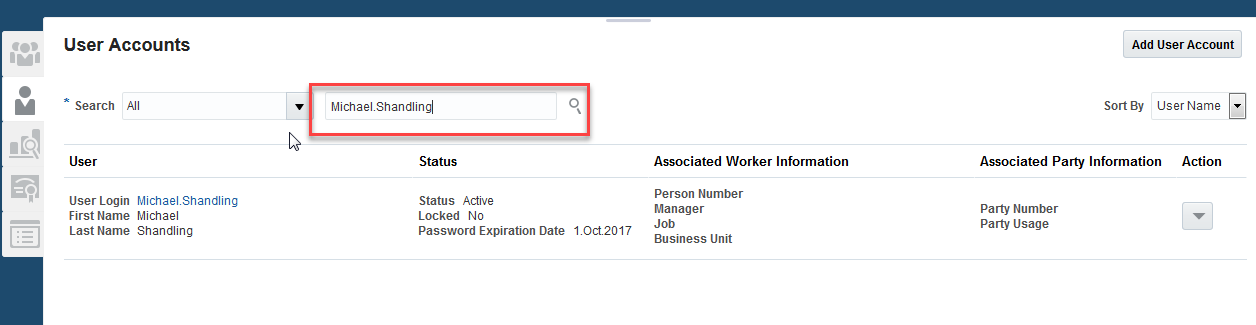
Search for the newly created User Account to confirm that it is created. (e.g Michael.Shandling)
Synchronize user accounts
Run the client to synchronize the newly created Fusion Applications account to Active Directory
-
Click on the Synchronization tab. Click Run Now
Confirm that a user account is created in Active Directory
-
On your Active Directory server, launch Active Directory Users and Computers
-
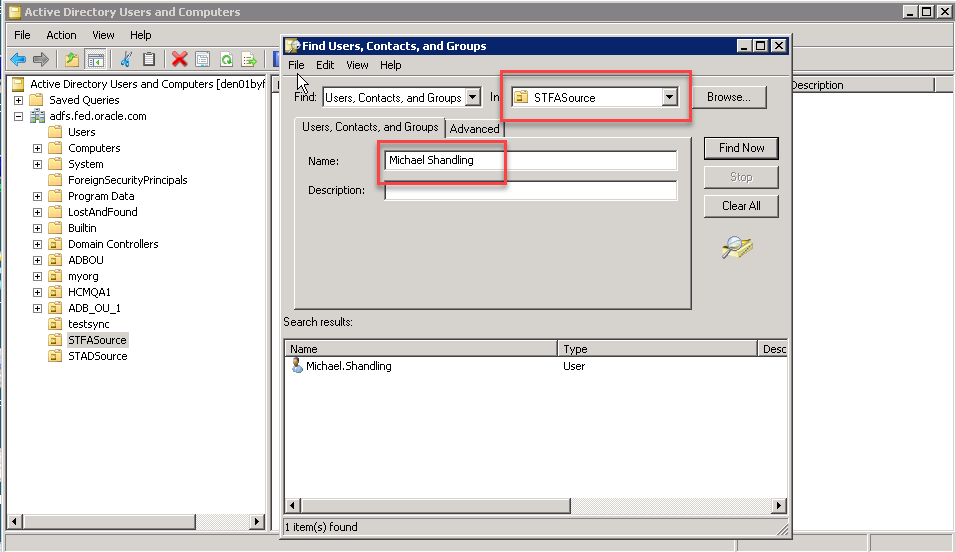
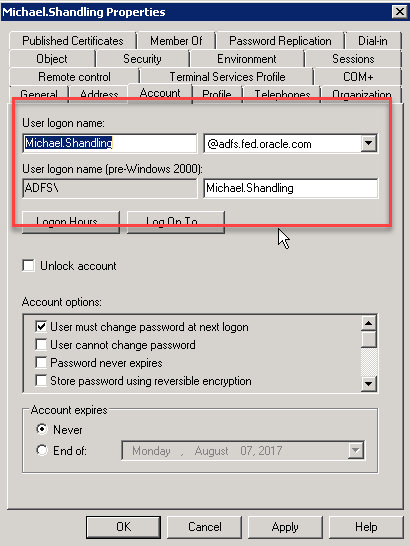
Search for the newly created account e.g. Michael Shandling
-
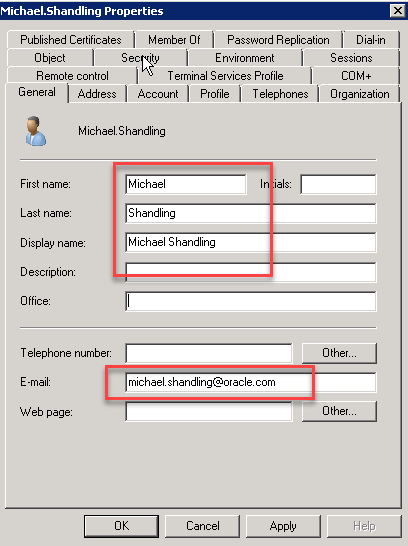
Confirm that all mapped attribute values are synchronized
-
Perform necessary administrative actions on this newly created account in Active Directory
- Set up the account password
- Enable the account
Log into Fusion Applications
-
Access your Fusion Applications homepage
- If SSO is set up, you will be redirected to your Active Directory login page
-
Log into Active Directory using the Active Directory credentials that were set up in the previous step
-
Upon successful login, you will be automatically redirected to the Fusion Applications homepage