 Performing
Verification and Backup of a Transactional Environment in Berkeley DB
Performing
Verification and Backup of a Transactional Environment in Berkeley DB Before You Begin
This is the second tutorial in the Getting Started with the Graphical User Interface in Berkeley DB series. Perform both these tutorials sequentially as there is a dependency to complete one before starting the other.
- Creating
a Transactional Environment in Berkeley DB
- Performing Verification and Backup of a Transactional Environment in Berkeley DB
In this tutorial, you will open an existing transactional environment, perform backup and recovery, verify data and log integrity, and remove an existing database using the new Graphical User Interface in Berkeley DB 18.1.
This tutorial takes approximately 15 minutes to complete.
Background
Berkeley DB is a family of embedded key-value database libraries providing scalable high-performance data management services to applications. It enables the development of custom data management solutions, without any overhead. You can configure Berkeley DB to address any application need from the hand-held device to the data center, from a local storage solution to a world-wide distributed one, and from kilobytes to petabytes.
The Oracle Berkeley DB Graphical User Interface (BDB GUI) is introduced in Berkeley DB 18.1 and provides a simple interface for interacting with the Berkeley DB environment.
What Do You Need?
- Install JDK 8 or higher version in your machine. This is required to build and run Berkeley DB GUI.
- Install Oracle Berkeley DB 18.1 from the Oracle Technology Network.
- For Windows only: Install Oracle Berkeley DB 18.1 Windows binary installer from the Oracle Technology Network.
- For Linux only:
- After installing, enable GUI with the --enable-gui flag while building Berkeley DB 18.1.
- Set the following environment variables. Replace [bdb-install_directory]
with the path to the directory where you have Berkeley DB
18.1 installed:
export CLASSPATH=[bdb-install_directory]/lib/db.jar;[bdb-install_directory]/lib/db_gui.jar;$CLASSPATH
export LD_LIBRARY_PATH=[bdb-install_directory]/lib;$LD_LIBRARY_PATH
 Open
an Existing Environment and a Database
Open
an Existing Environment and a Database
- To open up an existing Environment, click the Environment
Page button at the bottom left corner of the screen
to return to the Environment page.

Description of the illustration sect_1_01.jpg - Click the Open Environment tab.

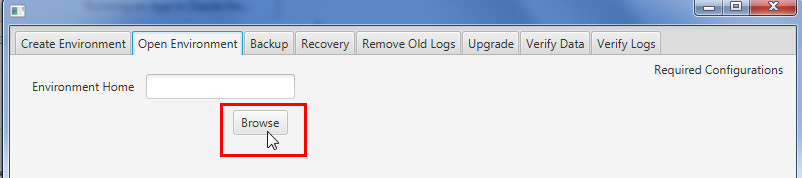
Description of the illustration sect_1_02.jpg - Click the Browse button, navigate to the
environment home directory, and select the environment that
you created at the beginning of this tutorial.
Description of the illustration sect_1_03.jpg - Enable a 25 megabyte cache by entering 26214400
for Cache Size and click the Open button.

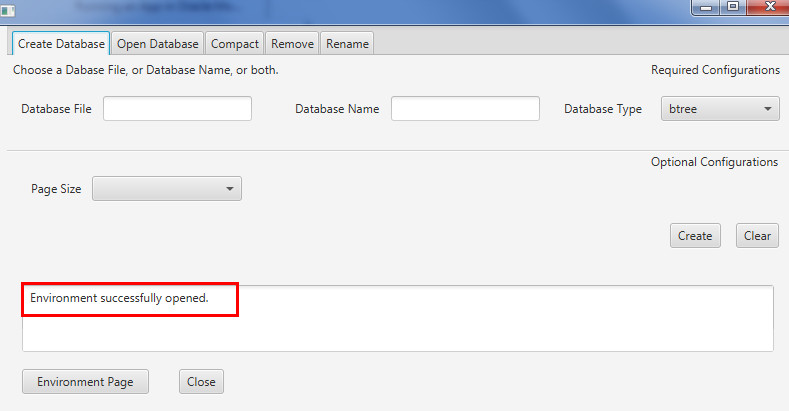
Description of the illustration sect_1_04.jpg - You see a "Environment successfully opened"
message at the bottom of the page, and the GUI will advance to
the Database Page.
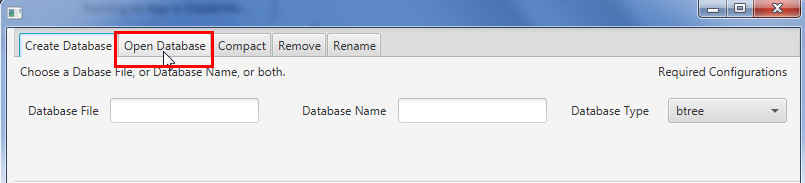
Description of the illustration sect_1_05.jpg - To open up an existing Database, after opening the
environment on the Database Access page, click the Open
Database tab.
Description of the illustration sect_1_06.jpg - Click the Browse button to select the
database file that we created in the previous sections called test.db and
click the Open button.

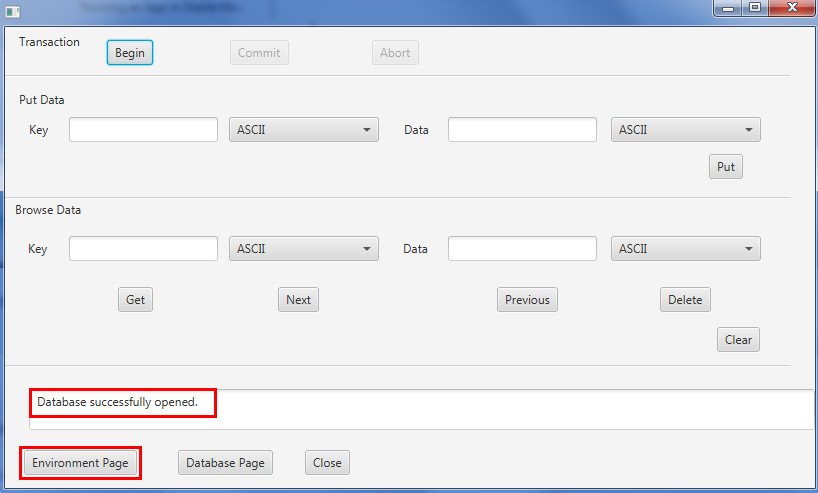
Description of the illustration sect_1_07.jpg - You see a "Database successfully opened"
message at the bottom of the page, and the GUI will advance to
the Data Access Page. Click the Environment Page
button.
Description of the illustration sect_1_08.jpg
 Backup
and Recover an Environment
Backup
and Recover an Environment
- In the Environment page, the Backup tab is used to create a
backup of all databases and logs in the environment. Backup
can be performed even while other threads are accessing the
environment. Note that the environment must be transactional,
or backup will fail with an error. Perform the following steps
to backup your environment:
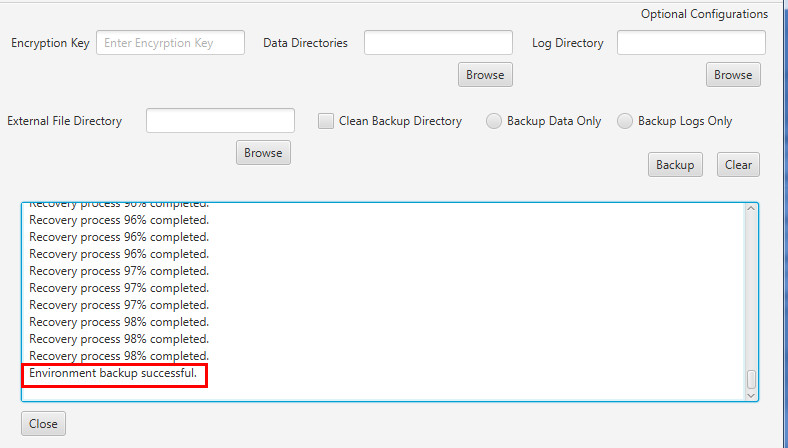
- Click the Browse button by Environment Home and select the environment that you created in this tutorial.
- Click the Browse button by Backup
Directory and select a directory in which you want to
create the backup of the environment. Click the Backup
button.

Description of the illustration sect_2_02.jpg - Various messages describing the backup process will
appear at the bottom of the page, ending with the message
"Environment backup successful."
Description of the illustration sect_2_03.jpg
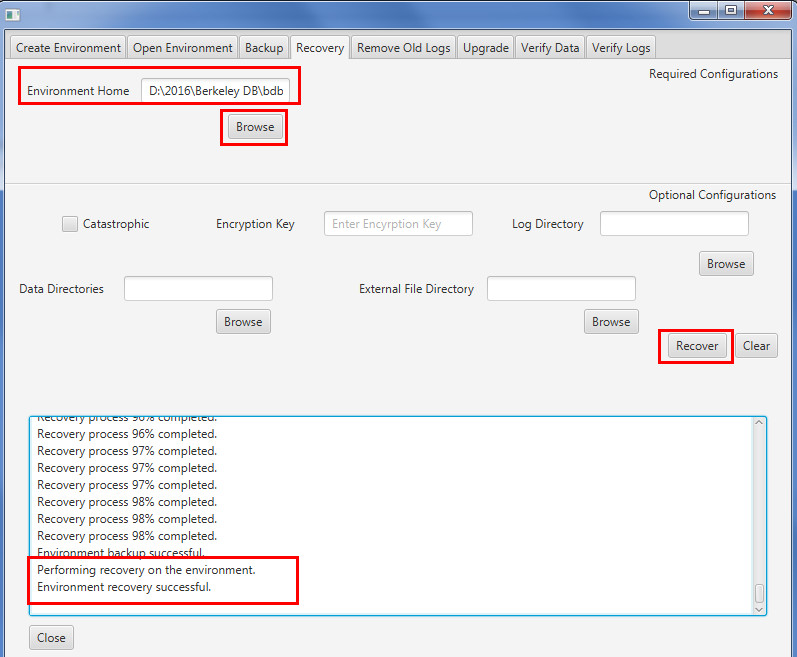
- Recovery is used to clean up a transactional environment
after an application crash. Recovery restores data consistency
and removes any resources left by the crashed application.
Perform the following steps to recover your environment.
Note: Do not perform recovery while other threads are accessing the environment.
- Click the Recovery tab.
- Click the Browse button by Environment Home to select the Environment Home directory.
- Click the Recover button.
- Messages describing the recovery process will appear at the bottem of the screen, ending in "Environment recovery successful."
Description of the illustration sect_2_04.jpg
 Verify
Data and Log Integrity
Verify
Data and Log Integrity
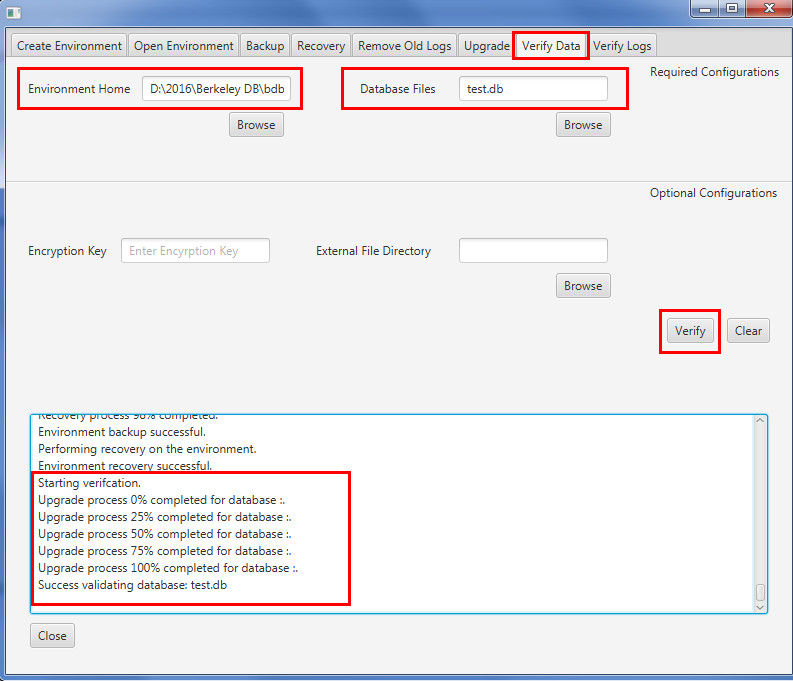
- Use the Verify Data tab to confirm data integrity. Do not
perform this process while other threads are accessing the
environment. To verify data integrity, perform the following
tasks:
- Select the Verify Data tab.
- Click the Browse button by Environment Home to select the environment we created.
- Click the Browse button and select the database file test.db.
- Click the Verify button.
- Various messages describing the verify process will appear at the bottom of the screen, ending with "Success validating database:test.db".
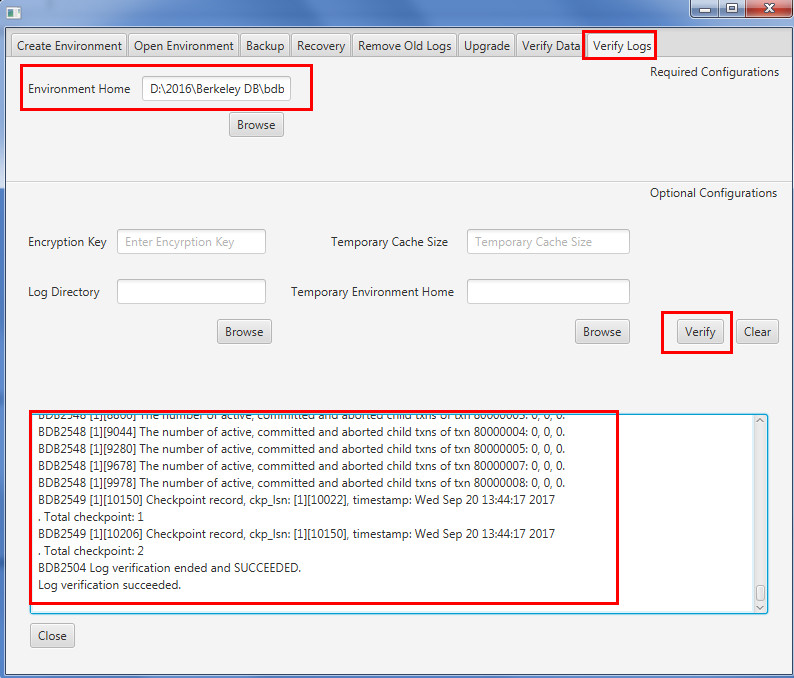
Description of the illustration sect_3_01.jpg - Use the Verify Logs tab to confirm that the integrity of the
logs. This process only works on transactional environments.
Do not perform this process while other threads are accessing
the environment.To verify log integrity, perform the following
steps:
- Select the Verify Logs tab.
- Click the Browse button by Environment Home to select the environment we created.
- Click the Verify button.
- Various messages describing the verify process will appear at the bottom of the screen, ending with "Log verification succeeded".
Description of the illustration sect_3_02.jpg
 Remove
a Database
Remove
a Database
- In the Environment page, click the Open Environment
tab, browse and select the environment home directory, and
click Open.

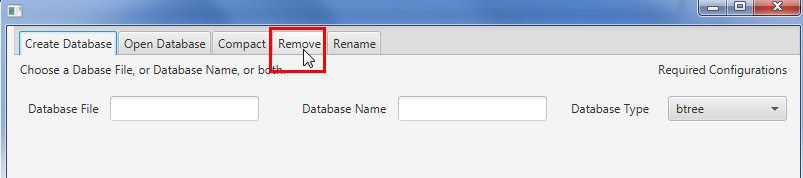
Description of the illustration sect_4_01.jpg - In the Database Access page, click the Remove
tab.
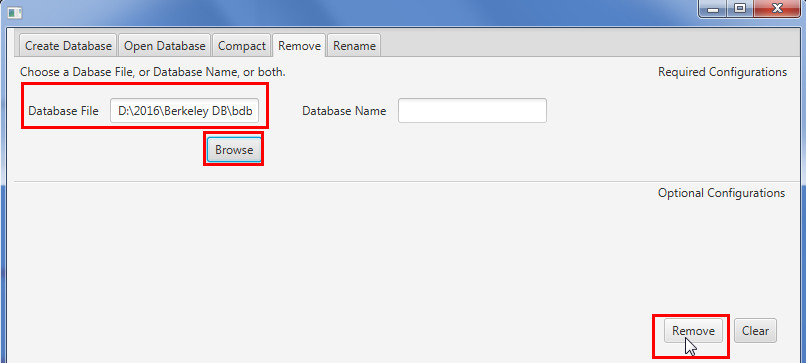
Description of the illustration sect_4_02.jpg - Click the Browse button to select the
database file test.db, and click the Remove
button.
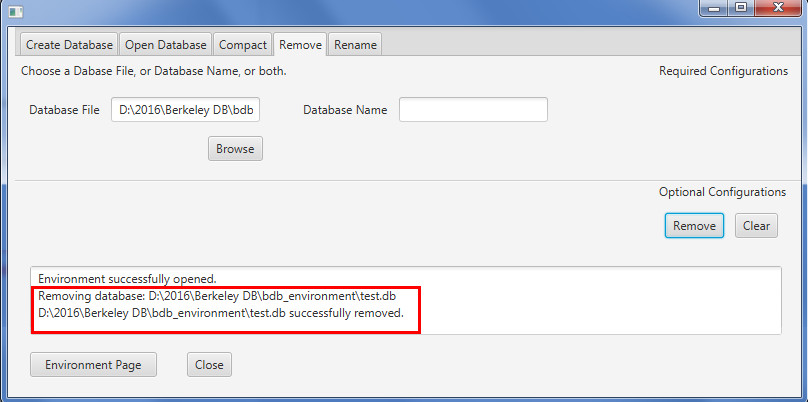
Description of the illustration sect_4_03.jpg - A message "test.db successfully removed"
should appear at the bottom of the screen.
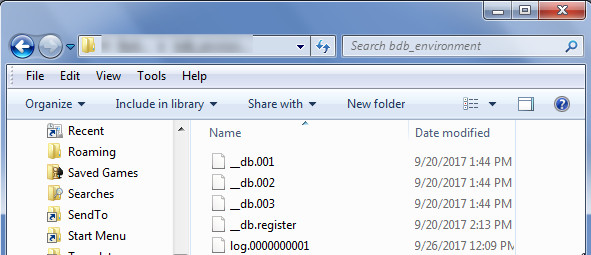
Description of the illustration sect_4_04.jpg - Open the environment home directory. The database file test.db
should have been deleted from the directory.
Description of the illustration sect_4_05.jpg