 Select a Load Balancing Policy
 Before You Begin
This 15-minute tutorial shows you how to select a load balancer policy to use in your application deployed in Oracle Application Container Cloud Service.
Background
This tutorial, shows you the difference between using the Round Robin and Hash IP load balancing policy using a sample application in Node.js. The application is a REST application developed with Express and it implements the GET method that increment a global variable and return the timestamp and the value of the counter. The purpose of the application is show how the counter is incremented with every request using the different load balancing policies supported by Oracle Application Container Cloud Service.
Load Balancing provides automated traffic distribution from one entry point to multiple servers, improves resource utilization, facilitates scaling, and helps ensure high availability. Oracle Application Container Cloud Service supports two primary policy types:
- Round Robin. Distributes incoming traffic sequentially to each server in a backend set list. After each server has received a connection, the load balancer repeats the list in the same order. Round Robin is the default load balancer policy.
- IP Hash. Uses an incoming request's source IP address as a hashing key to route non-sticky traffic to the same backend server. The load balancer routes requests from the same client to the same backend server as long as that server is available. IP Hash ensures that requests from a particular client are always directed to the same backend server, as long as it is available.
What Do You Need?
- An Oracle Cloud account with access to an instance of Oracle Application Container Cloud Service
- The sample-node-app.zip project file
 Deploy an Application with the Round Robin Load Balancing Policy
- Open the Oracle Application Container Cloud Service console.
- In the Applications list view, click Create Application.
- In the Create Application dialog box, click Node.
- In the Application section, enter
TestRoundRobinfor the name of your application. Click Browse. - In the File Upload dialog box, select
sample-node-app.zipand click Open. - Keep the default values in the Instances and Memory fields and click Create.
 Test the TestRoundRobin Application
- Click the URL of the application. Pay attention to the timestamp and the
countervalue.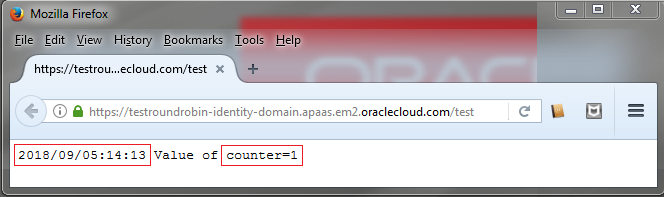
Description of the illustration round-robin-instance-1.png - In the browser, click Refresh
 .
.

Description of the illustration round-robin-instance-2.png
You created the TestRoundRobin application using the instances by default (2) that means there is a copy of your application running in each instance, so each instance has its own counter, that's the reason you saw counter=1 the two times you did a request.
The round robin load balancing policy lists all the instances and every time you execute a request, the next instance in the list process the request. We can assume that the first request was processed by the instance 1 and the second by the instance 2.
 Deploy an Application with the Hash IP Load Balancing Policy
- Extract the content of the
sample-node-app.zipfile. - Open the
manifest.jsonfile and add theloadBalancingPolicyparameter with theIP_HASHvalue:{ "runtime":{ "majorVersion":"8" }, "command": "node myapp.js", "release": {}, "notes": "Testing the load balancing policies", "home":"/test", "loadBalancingPolicy":"IP_HASH" } - Save the file and compress again all the files in the
sample-node-app.zipfile. - Open the Oracle Application Container Cloud Service console.
- In the Applications list view, click Create Application.
- In the Create Application dialog box, click Node.
- In the Application section, enter
TestHashIPfor the name of your application. Click Browse. - In the File Upload dialog box, select
sample-node-app.zipand click Open. - Keep the default values in the Instances and Memory fields and click Create.
 Test the TestHashIP Application
- Click the URL of the application. Pay attention to the timestamp and the
countervalue.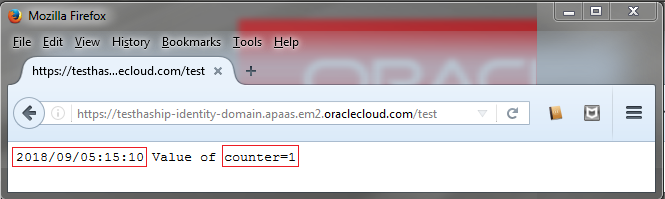
Description of the illustration hash-ip-instance-1.png - In the browser, click Refresh .
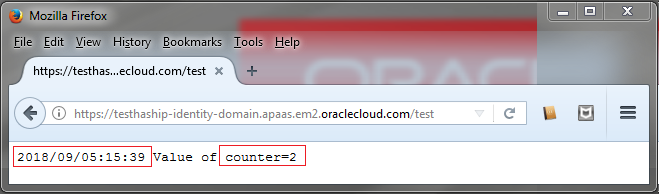
Description of the illustration hash-ip-instance-2.png
You can notice that the counter is incremented every time you execute a request to your application, this is because every request associated to the same IP is proceed by the same instance.