Before you Begin
Purpose
This tutorial shows you how to develop a standalone web service with Node.js and the Express framework, and how integrate the caching feature of Oracle Application Container Cloud Service using the REST API.
Time to Complete
30 minutes approximately
Background
The new caching capability of Oracle Application Container Cloud Service allows applications to accelerate access to data, share data among applications, and offload state management.
The caching feature of Oracle Application Container Cloud Service can be access from your application through the REST API. The REST API defines the following endpoints:
| Method | URL | Description |
|---|---|---|
| GET | /ccs/{cacheName}/{key} | Retrieves the value associated with the specified key. |
| PUT | /ccs/{cacheName}/{key} | Stores the value and associates it with the specified key. |
| POST | /ccs/{cacheName}/{key} | Issues one of the following: putIfAbsent, replace, or removeValue. |
| DELETE | /ccs/{cacheName}/{key} | Deletes a key/value pair from a cache. |
| GET | /ccs/{cacheName} | Returns the server-side metrics for the specified cache. |
| DELETE | /ccs/{cacheName} | Clears the specified cache. |
The caching REST API uses JSON as data exchange format.
Scenario
In this tutorial you create a REST service in Node.js using the Express framework. The application implements the CRUD (Create, Read, Update, and Delete) operations on a employee object. Each operation implements the caching feature of Oracle Application Container Cloud Service to store the employee data in memory. You test the REST service using an HTML client developed with Angular and Bootstrap. This tutorial doesn't cover how to implement the client, the client project is provided in the What do You Need? section.
What Do You Need?
- An Oracle Cloud account with Oracle Application Cloud Container Service
- Node.js 6.x
- Employee client HTML
- Complete project (optional)
Creating a Caching Service
-
Open the Oracle Application Container Cloud Service console.
-
Click
 and
select Application Cache.
and
select Application Cache. -
Click Create Service.
-
Enter the following information, and then click Next.
-
Service Name:
MyCachingService -
Service Description (optional)
-
Deployment Type:
Basic -
Cache Capacity (GB):
1
-
-
In the confirmation page, click Create.
You see the status: Creating service... and the hourglass icon.
-
Click the
 Refresh icon. The status and hourglass icon
disappear when the instance is ready. It could
take a few minutes.
Refresh icon. The status and hourglass icon
disappear when the instance is ready. It could
take a few minutes.Note: The cache won't be visible to any applications until it is ready.

Description of this image
Creating the REST Service
-
Open a console window and go to the folder where you want to store the Node.js application server.
-
Run
npm initto create thepackage.jsonfile. At the prompt, enter the following values, confirm the values, and then press Enter:- Name:
node-server - Version:
1.0.0(or press Enter.) - Description:
Employee RESTful application - Entry point:
server.js - Test command (Press Enter.)
- Git repository (Press Enter.)
- Keywords (Press Enter.)
- Author (Enter your name or email address.)
- License (Press Enter.)
The
package.jsonfile is created and stored in the current folder. You can open it and modify it, if needed. - Name:
-
In the console window, download, build, and add the Express framework dependency.
npm install --save express -
Install the
body-parserdependency.npm install --save body-parserThe
body-parserdependency is a Node.js middleware for handling JSON, Raw, Text and URL encoded form data. -
Install the
node-rest-clientdependency.npm install --save node-rest-client -
Create a
server.jsfile, open it in a text editor, and add the following require modules:var express = require('express'); var bodyParser = require('body-parser'); var Client = require("node-rest-client").Client; -
Create the
MYPORTvariable to store the port that your application will be listening on, and theCCSHOSTvariable to store the host name of the caching feature.The
PORTenvironment variable is set automatically by Oracle Application Container Cloud Service when you create an application. TheCACHING_INTERNAL_CACHE_URLis set when you add the caching cluster to your application.var MYPORT = process.env.PORT || '8080'; var CCSHOST = process.env.CACHING_INTERNAL_CACHE_URL; -
Create an
appvariable to use theexpressframework.var app = express(); -
Configure your application to use
bodyParser(), so that you can get the data from aPOSTrequest.app.use(bodyParser.urlencoded({ extended: true })); app.use(bodyParser.json({ type: '*/*' })); -
Enable the
publicdirectory to store the static content.app.use(express.static('public')); -
Set up a router for handling rest requests.
var router = express.Router(); -
Create a client to consume the caching REST API.
var client = new Client(); -
Create the
baseCCS_URLvariable to store the base URL of the caching REST API.var baseCCSURL = 'http://' + CCSHOST + ':8080/ccs'; -
Create the
cacheNamevariable to store the name of our cache.var cacheName = 'ccstest'; -
Create the
countEmployeesvariable and initialize it with 100. This variable help us to generate the employee ID.var countEmployees = 100; -
Create the
GETmethod to get the employee by ID:// GET router.route('/:keyString').get(function (request, response) { var keyString = request.params.keyString; // Issue the GET -- our callback function will return the response // to the user client.get(baseCCSURL.concat('/').concat(cacheName).concat('/').concat(keyString), function(valString, rawResponse){ var responseBody = { }; // If nothing there, return not found if(rawResponse.statusCode == 404){ responseBody['error'] = 'Key not found error.'; } else{ // Create the response to the caller. // Note: valString is a Buffer object. responseBody['key'] = keyString; responseBody['value'] = valString.toString(); } // Send the response response.json(responseBody).end(); }); }); -
Create the
POSTmethod to add new employees:// POST router.route('/').post(function (request, response) { var keyString = countEmployees++; var body = request.body; var employee ={ id: keyString, firstName: body.firstName, lastName: body.lastName, email: body.email, phone: body.phone, birthDate: body.birthDate, title: body.title, dept: body.dept}; // Build the args for the request var args = { data: employee, headers: { "Content-Type" : "application/json" } }; // Issue the PUT -- the callback will return the response to the user client.put(baseCCSURL.concat('/').concat(cacheName).concat('/').concat(keyString), args, function (employee, rawResponse) { // Proper response is 204, no content. var responseBody = { }; if(rawResponse.statusCode == 204){ responseBody['status'] = 'Successful.'; } else{ responseBody['error'] = 'PUT returned error '.concat(rawResponse.statusCode.toString()); } // Send the response response.json(responseBody).end(); }); }); -
Create the
PUTmethod to update the employee by ID:// PUT router.route('/:keyString').put(function (request, response) { // Get the key and value var keyString = request.params.keyString; var body = request.body; var employee ={ id: keyString, firstName: body.firstName, lastName: body.lastName, email: body.email, phone: body.phone, birthDate: body.birthDate, title: body.title, dept: body.dept}; // Build the args for the request var args = { data: employee, headers: { "Content-Type" : "application/octet-stream", "X-Method" : "replace"}//Important! specify the x-Method for replacing the value }; client.post(baseCCSURL.concat('/').concat(cacheName).concat('/').concat(keyString), args, function (employee, rawResponse) { // Proper response is 204, no content. var responseBody = { }; if(rawResponse.statusCode == 204){ responseBody['status'] = 'Successful.'; } else{ responseBody['error'] = 'PUT returned error '.concat(rawResponse.statusCode.toString()); } // Send the response response.json(responseBody).end(); }); }); -
Create the
DELETEmethod to remove employees by ID:// DELETE router.route('/:keyString').delete(function (request, response) { // Fetch the key to delete var keyString = request.params.keyString; client.delete(baseCCSURL.concat('/').concat(cacheName).concat('/').concat(keyString), function(valString, rawResponse){ var responseBody = { }; responseBody['status'] = 'Successful.'; response.json(responseBody).end(); }); }); -
Start the server:
app.use('/employees', router); app.listen(MYPORT); -
Save and close the file.
-
In the root project directory, create the
publicdirectory. -
Unzip the
employees-client.zipfile directly under thepublicdirectory.
Preparing the Node.js Server Application for Cloud Deployment
For your server application to run properly on Oracle Application Container Cloud Service, it must comply with the following requirements:
- The application must be bundled in a
.zipfile. - In addition to the
server.jsfile, the.zipfile must contain amanifest.jsonfile that specifies what command Oracle Application Container Cloud Service should run. - Your application must listen to requests on a
port provided by the
PORTenvironment variable. Oracle Application Container Cloud uses this port to redirect requests made to your application.
-
Create the
manifest.jsonfile. -
Open the
manifest.jsonfile in a text editor and add the following content:{ "runtime":{ "majorVersion":"6" }, "command": "node server.js", "isClustered":"true", "release": {}, "notes": "" }The
manifest.jsonfile contains the target platform and the command to be run. -
Compress all the project files together in a
.zipfile.Note: Make sure you include the
publicandnode_modulesdirectories in the zip file.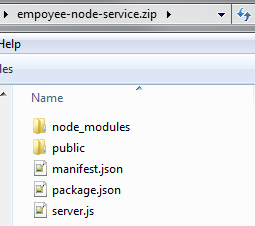
Description of this image
You'll use this .zip file to deploy
the application to Oracle Application Container
Cloud Service.
Deploying the Application to Oracle Application Container Cloud Service
To deploy the application to Oracle Application
Container Cloud Service you use the .zip
file that you created in the previous section. You
use the administration console to upload and deploy
the application.
-
Go back to the Oracle Application Container Cloud Service console.
-
Click Create Application and then select Node.
-
In the Application section, enter
NodeExampleCachefor the name of your application, and then click Browse. -
In the File Upload dialog box, locate the file that you created in the previous section; select it and click Open.
- Keep the default values in the Instances and Memory fields.
-
Click More Options. In the Application Cache field, select
MyCachingServiceand click Create. -
Wait until the application is deployed.

Description of this image The URL will be enabled when the creation process is completed.
Testing the Application
-
In the Oracle Application Container Cloud Service console, click the URL of your application.
-
Click Add New
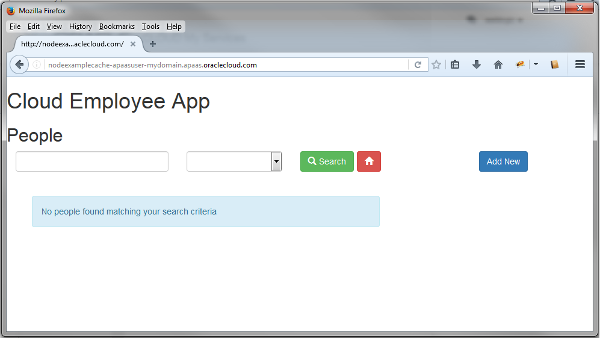
Description of this image -
Enter the First Name, Last Name, Email, Phone, Birthdate, Title, and Department values and click Save.

Description of this image Note: The default starting value of ID is 100 and will increment by 1 for each record.
-
Enter the ID of the new employee which is 100, select By ID, and click Search.
-
Click the employee card.
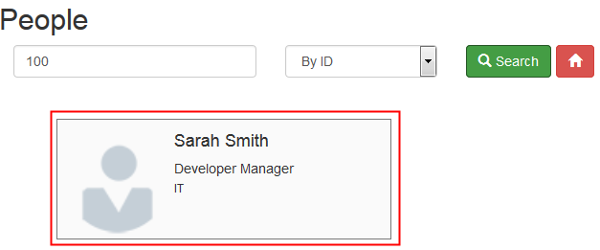
Description of this image -
Update the information of the employee and click Save.

Description of this image -
Search again the employee to confirm the data was updated.
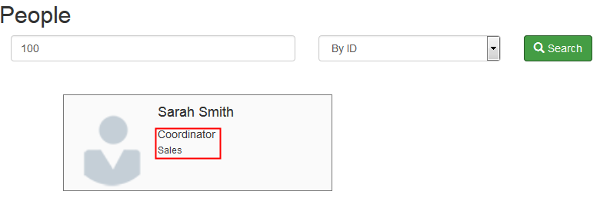
Description of this image -
Click the employee card, and then click Delete.

Description of this image -
Search again the employee to confirm the employee was deleted.
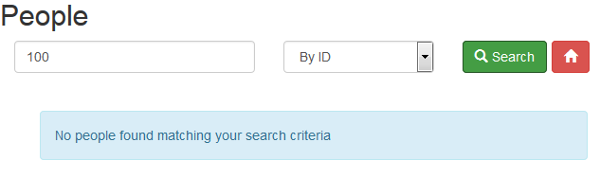
Description of this image
Want to Learn More?
- Node.js website nodejs.org
- Caching Capability for Your Application
- Create a Node.js Application Using a Cache and a Database
- Using Caches in Oracle Application Container Cloud Service in the Oracle Help Center