Before You Begin
Purpose
This tutorial shows you how to create a WebSocket server application with Node.js and a WebSocket client application with HTML5 and JavaScript. The result is a simple chat that sends messages to multiple clients.
Time to Complete
- Server Development: 30 minutes
- Client Development: 30 minutes
- Cloud Deployment: 40 minutes
Background
With WebSocket, connections made to an HTTP server can be full-duplex and real-time, allowing the server and the client to exchange messages at any time with any content. This is different from the common HTTP request and response mechanism. With WebSocket, a request from the client might not generate an inmediate response from the server, and the server can push data to the client without a previous request.
Scenario
You create two separate applications: a Node.js server and an HTML5 and JavaScript client. To keep your files sorted and prevent confusion, you create two different folders and put the files of each application inside:

The WebSocket client/server is a simple web chat project that stores and propagates messages sent. Simultaneously connected clients can follow the chat in real time. Messages sent are stored in the server memory.
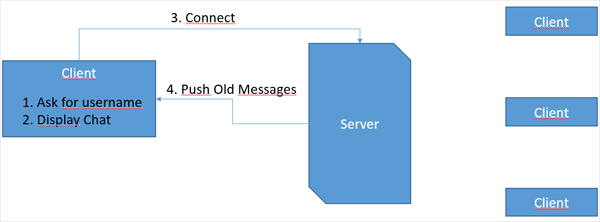
Before the client connects to the server, it asks the user for a user name. The client provides that user name when it connects to the server. The server then pushes all the previous messages to the newly connected client.
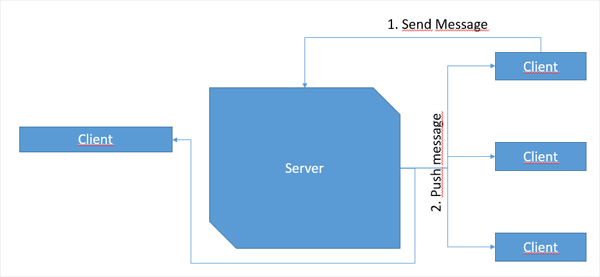
When a client sends a message, the server pushes the message to all clients, including the original sender.
Messages are sent and received in JavaScript Object Notation (JSON) format:
{user:"UserName",text:"Message Body"}The server doesn't process the actual message; it just propagates it to all the connected clients.
The message structure is used by the clients to format the message being displayed on the screen.
What Do You Need?
- Node.js v4.x
- A text editor
- A web browser that supports WebSockets
- To deploy the application in Oracle Application Container Cloud you need an active account.
Developing the Node.js WebSocket Server
To develop a Node.js application, you need only to
install Node.js and a text editor. NPM is bundled
with Node.js. NPM is a utility that downloads and
builds dependencies for your Node.js projects. NPM
uses a file called package.json to
store the dependency and project properties. NPM
also has build and testing capabilities.
Node.js is sometimes referred to simply as Node.
-
Open a console window and go to the folder where you want to store the Node WebSocket server.
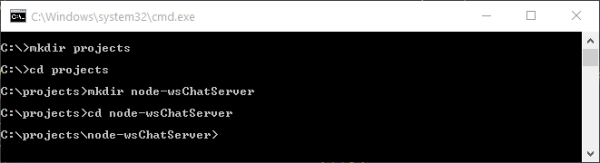
Description of this image -
Run
npm initto create thepackage.jsonfile. When you are prompted, enter the following:- name:
node-chat-server - version:
1.0.0(or press Enter). - description:
A simple node chat server - entry point:
server.js - test command: Press enter.
- git repository: Press enter.
- keywords: Press enter.
- author: Enter your name or email addess.
- License: Press enter.
You'll be asked to verify the information. If it's correct, then enter
yesor press Enter.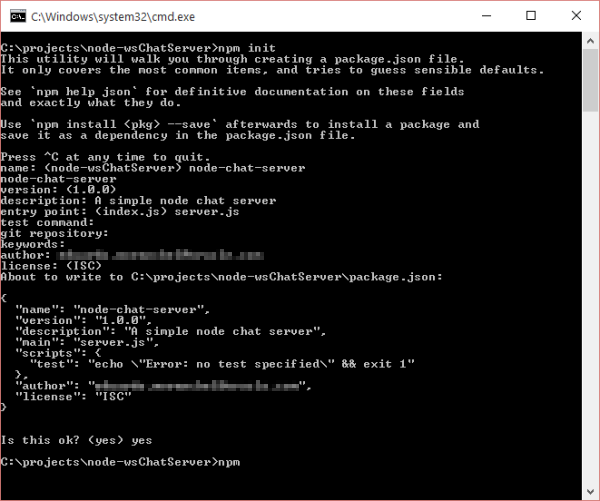
Description of this image The
package.jsonfile is created and stored in the current folder. You can open it and modify it if needed. - name:
-
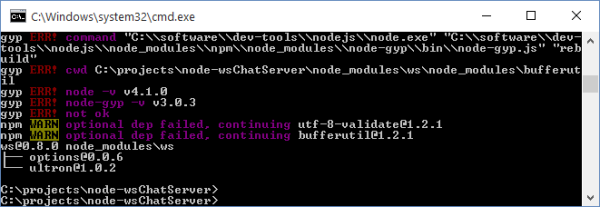
In the console window, install the web socket dependencies.
npm install --save ws
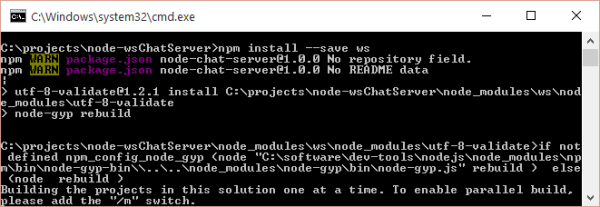
Description of this image Note: Don't worry about warnings or errors in the process caused by dependencies on native binaries that couldn't be built. The libraries being used often have a JavaScript fallback node library and native binaries are used only to optimize performance. You can figure this out by looking at the console and finding the output: optional dep failed, continuing
Description of this image -
Open the generated
package.jsonfile in a text editor, and verify its contents. It should look like this:{ "name": "node-chat-server", "version": "1.0.0", "description": "A simple node chat server", "main": "server.js", "scripts": { "test": "echo \"Error: no test specified\" && exit 1" }, "author": "anna.smith@example.com", "license": "ISC", "dependencies": { "ws": "^0.8.0" } } -
Create a new
server.jsfile and open it in a text editor. -
Add the following require statement to use the WebSocket Server component:
var WebSocketServer = require('ws').Server; -
Add a
PORTvariable:var PORT = 8087; -
Create a
WebSocketServerlistening to the port:var wss = new WebSocketServer({port: PORT}); -
Create a
messagesarray to store all sent messages:var messages = []; -
Add the connection event listener to the
wss:wss.on('connection', function (ws) { //add code here }); -
Inside the
wssconnection event handler, add the following code to send all the messages to the newly connected client:messages.forEach(function(message){ ws.send(message); }); -
Add the following code to add a listener to the client connection when a message is sent and to broadcast the messages to other clients:
ws.on('message', function (message) { messages.push(message); console.log('Message Received: %s', message); wss.clients.forEach(function (conn) { conn.send(message); }); });
The completed server.js file:
var WebSocketServer = require('ws').Server;
var PORT = 8087;
var wss = new WebSocketServer({port: PORT});
var messages = [];
wss.on('connection', function (ws) {
  messages.forEach(function(message){
	ws.send(message);
  });
  ws.on('message', function (message) {
	messages.push(message);
    console.log('Message Received: %s', message);
    wss.clients.forEach(function (conn) {
      conn.send(message);
    });
  });
});
Developing the HTML5 and JavaScript WebSocket Client
To develop an HTML5 application with JavaScript, CSS3, and HTML you only need a text editor and a web browser.
-
In a separate folder, create an empty
index.htmlfile and open it in a text editor. -
Add the following code to create a basic HTML5 page:
<!DOCTYPE html>
<html>
  <head>
    <title>MessageBoard</title>
    <meta charset="UTF-8">
    <meta name="viewport" content="width=device-width, initial-scale=1.0">
    <script>
    </script>
  </head>
  <body>
  </body>
</html>
Notice the empty script and body tags, you'll add JavaScript code to the
scripttag and the HTML layout to thebodytag. -
Above the
scripttag, add the followingstyletag to theheadelement to enable some simple styles for the chat window<style>#chatBox{width: 100%;height: 80%; position: absolute; top: 0; overflow: scroll;} #messageForm{width: 100%; height: 20%; position: absolute; bottom: 0;} html body{width: 100%; height: 100%}</style> -
Add the following HTML5 elements to the
bodyof the page to add the login and chat layout:<div id="welcome"> <h1>WebSocket Chat</h1> What is your name? <input type="text" id="name"> <input type="button" value="Join Chat" onclick="connectToChat();"> </div> <div id="chat"> <div id="chatBox"> </div> <div id="messageForm"> <input type="text" id="message"> <input type="button" value="send" onclick="sendMessage();"> </div> </div> -
In the following steps, you add JavaScript code to the
scripttag in theheadof the page to add WebSocket communication and user interaction.
-
Add a
urlvariable with the WebSocket server location. Remember that WebSocket uses thewsprotocol.var url = "ws://localhost:8087/"; -
Add empty variables named
userandsocket:var user; var socket; -
Add a function
connectToChat()you'll add socket connection and message handling logic here:function connectToChat() { } -
Inside the
connectToChatfunction, connect to the WebSocket:socket = new WebSocket(url); -
Inside the
connectToChatfunction, set theuservariable to the value of the'name'element:user = document.getElementById("name").value; -
Inside the
connectToChatfunction, add thesocketonmessagefunction to receive messages and add content to theinnerHTMLof the'chatBox'element:socket.onmessage = function (msg) { var chatBox = document.getElementById("chatBox"); var message = JSON.parse(msg.data); chatBox.innerHTML = "<b>" + message.user + "</b>:" + message.text + "<br>" + chatBox.innerHTML; }; -
Inside the
connectToChatfunction, add thesocketonopenfunction and send a"<b>Joined the chat</b>";message:socket.onopen = function () { var message = {}; message.user = user; message.text = "<b>Joined the chat</b>"; socket.send(JSON.stringify(message)); }; -
Inside the
connectToChatfunction, display the'chat'element by setting its style attribute to an empty string and hide the'welcome'element by setting its style attribute to'display:none'document.getElementById("chat").setAttribute("style", ""); document.getElementById("welcome").setAttribute("style", "display:none");This completes the
connectToChatfunction. -
Add a
sendMessagefunction.function sendMessage() { var message = {}; message.user = user; message.text = document.getElementById("message").value; socket.send(JSON.stringify(message)); document.getElementById("message").value = ""; } -
Add a
window.onloadevent handler and hide the'chat'element by setting its style property todisplay:none.window.onload = function () { document.getElementById("chat").setAttribute("style", "display:none"); }
The completed index.html file:
<!DOCTYPE html> <html> <head> <title>Chat Client</title> <meta charset="UTF-8"> <meta name="viewport" content="width=device-width, initial-scale=1.0"> <style>#chatBox{width: 100%;height: 80%; position: absolute; top: 0; overflow: scroll;} #messageForm{width: 100%; height: 20%; position: absolute; bottom: 0;} html body{width: 100%; height: 100%}</style> <script>var url = "ws://localhost:8087/"; var user; var socket; function connectToChat() { socket = new WebSocket(url); user = document.getElementById("name").value; socket.onmessage = function (msg) { var chatBox = document.getElementById("chatBox"); var message = JSON.parse(msg.data); chatBox.innerHTML = "<b>" + message.user + "</b>:" + message.text + "<br>" + chatBox.innerHTML; }; socket.onopen = function () { var message = {}; message.user = user; message.text = "<b>Joined the chat</b>"; socket.send(JSON.stringify(message)); }; document.getElementById("chat").setAttribute("style", ""); document.getElementById("welcome").setAttribute("style", "display:none"); } function sendMessage() { var message = {}; message.user = user; message.text = document.getElementById("message").value; socket.send(JSON.stringify(message)); document.getElementById("message").value = ""; } window.onload = function () { document.getElementById("chat").setAttribute("style", "display:none"); }</script> </head> <body> <div id="welcome"> <h1>WebSocket Chat</h1> What is your name? <input type="text" id="name"> <input type="button" value="Join Chat" onclick="connectToChat();"> </div> <div id="chat"> <div id="chatBox"> </div> <div id="messageForm"> <input type="text" id="message"> <input type="button" value="send" onclick="sendMessage();"> </div> </div> </body> </html>
Testing the WebSocket Chat
To test your chat application locally, you run the
Node.js server and then open the index.html
page in a browser.
-
Open a new console window and go to the folder where you saved the
server.jsfile. -
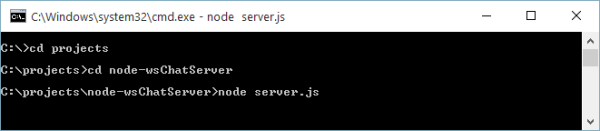
Start the Node.js server.
node server.js
The server start running. Keep the console window open.
Description of this image -
In a web browser, open the
index.htmlfile.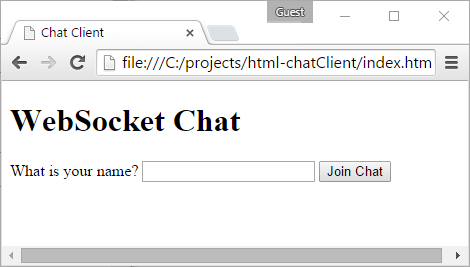
Description of this image -
Enter a name and click Join Chat. Enter a message in the text field and click send.

Description of this image -
In another web browser window, open the
index.htmlfile.
Description of this image -
Enter a different name and click Join Chat. Enter a message in the text field and click send. The message appears in both windows

Description of this image -
To stop the server, go to the console window where
server.jsis running and press Ctrl+C.
Description of this image
Preparing the Server Application for Cloud Deployment
For your server application to run properly in the cloud, it must comply with the following requirements:
- The application must be bundled in a
.zipfile that includes all dependencies
Note: Database drivers for Oracle Database Cloud must not be bundled. - The
.zipfile must contain amanifest.jsonfile that specifies what command Oracle Application Container Cloud should run. - Your application must listen to requests on a
port provided by the
PORTenvironment variable. Oracle Application Container Cloud uses this port to redirect requests made to your application.
-
Open the
server.jsfile in a text editor. -
Locate the
PORTvariable declaration and change it to a JavaScript conditional statement so that if theprocess.env.PORTvariable is set then that value is used; otherwise, a default port is used.var PORT = process.env.PORT || 8087;With this declaration, your application listens to the port that Oracle Application Container Cloud provides. Note that this port isn't necessarily the port where service will be located; the final address of your service is provided by the Oracle Application Container Cloud administration console.
-
Create a new
manifest.jsonfile. -
Open the
manifest.jsonfile in a text editor and add the following content:{ "runtime":{ "majorVersion":"4" }, "command": "node server.js", "release": {}, "notes": "" }The
manifest.jsonfile contains the target platform and the command to be run. -
Compress the
server.js,manifest.json, andpackage.jsonfiles and thenode_modulesfolder in a.zipfile.
You'll use this .zip file to deploy
this application to Oracle Application Container
Cloud.
Deploying the Application to Oracle Application Container Cloud
To deploy the application to Oracle Application
Container Cloud, you use the .zip file
that you created in the previous section. Use the
administration console to upload and deploy the
application.
-
Open the Oracle Application Container Cloud Service console.
-
Click Create Application and then Node.
-
In the Application section, enter
ChatServicefor the name of your application, click Browse. -
On the File Upload page, select the
zipfile, and click Open. -
Type any details for the application and click Create.
-
Copy the URL of your deployed application from the Oracle Application Container Cloud home page. you'll use it in the next section.

Description of this image
Connecting to the Deployed Service with the HTML5 and JavaScript Client
Now that the application is running on the Cloud, modify the client application to connect to the cloud server.
-
Open the
index.htmlfile, open it in a text editor. -
Locate the line where you define the server URL:
var url = "ws://localhost:8087/"; -
Replace
"ws://localhost:8087/"with the URL you copied in the previous section. Change the protocol fromhttptowsor fromhttpstowss.
Description of this image -
Open the
index.htmlfile in a web browser and test the application.
Your client HTML5 application is now connected to the Node.js service that you deployed in the Oracle Application Container Cloud.