Before You Begin
Purpose
This tutorial shows you how to configure rate-limiting, header validation, and resource-based routing policies in Oracle API Platform Cloud Service.
Time to Complete
45 minutes
Background
Oracle API Platform Cloud Service abstracts the complexity of your implementations and provides simpler interfaces so that you can easily protect your APIs. You can use the Management Portal of the Oracle API Platform Cloud Service to configure and apply as many policies as you need. For example, you can restrict the requests per minute that an API can handle, or narrow the access to a certain audience.
Scenario
Multiple requests are arriving every minute, which affects the performance of the Energy API. The development team is working on a solution to improve the performance, but until a solution is in place, they must limit the number of requests arriving per minute. To receive a response from the API, every request must include a custom header; otherwise, the request will be rejected.
Context
This is the seventh tutorial in a series of nine. This tutorial shows you how to configure rate-limiting, header validation, and resource-based routing policies for your APIs in Oracle API Platform Cloud Service. In previous tutorials, you learned how to implement and deploy the Energy API in Oracle API Platform Cloud Service.
What Do You Need?
- Access to an Oracle API Platform Cloud Service instance with the Deploy API or Manage API grant for the API, and the Deploy to Gateway grant issued for the gateway.
- A registered and active gateway node for which you have deployment rights in Oracle API Platform Cloud Service.
- The Energy API deployed in your Oracle API Platform Cloud Service instance. (See Implementing APIs in Oracle API Platform Cloud Service.)
- The implemented estimate API on Apiary. (See Implementing APIs in Oracle API Platform Cloud Service.)
- An installed client Postman
Logging In to the Portal
Learn how to log in to the API Platform Cloud Service Management Portal and how to navigate to the Energy API page.
-
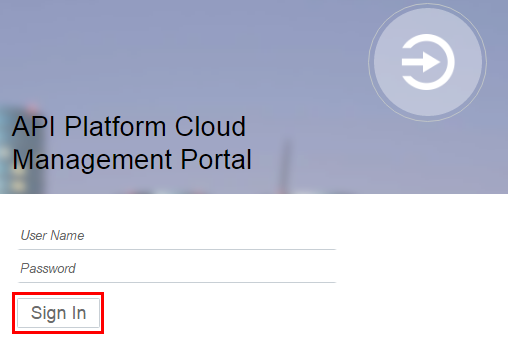
From a web browser, go to the API Platform Cloud Service Management Portal by entering the URL in this format:
http://hostname.domain:port/apiplatform -
On the API Platform Cloud Management Portal login page, enter your user name and password, and then click Sign In.
Description of this image -
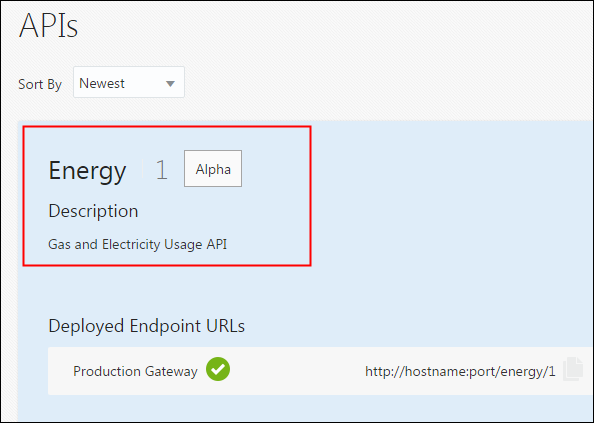
On the APIs page, click Energy.
Description of this image
Configuring a Traffic Management Policy
Adding an API Rate Limiting Policy
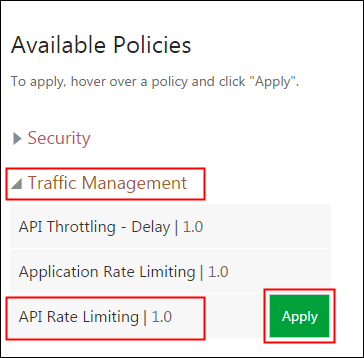
You can use an API Rate Limiting policy to control how many requests are routed to the Energy API during a given period of time.
-
On the API Implementation tab of the Energy API page, in the Available Policies panel, expand Traffic Management, hold the cursor over API Rate Limiting, and click Apply.
Description of this image -
On the Apply Policy page, click Next.

Description of this image -
On the Apply Policy page, enter
3in the API Rate Limit field, select Minute from the Time Interval list, and then click Apply.
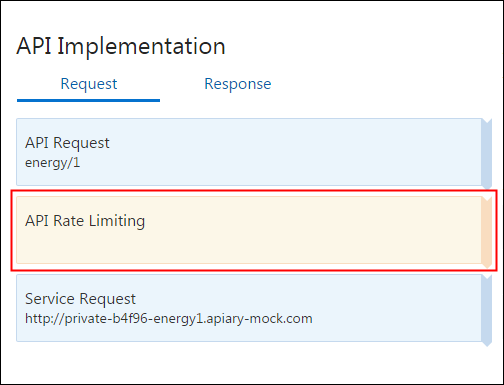
Description of this image The API Rate Limiting policy appears on the Request tab of the API Implementation panel.
Description of this image -
On the APIs page, click Save Changes.

Description of this image
Redeploying the API After Adding the API Rate-Limiting Policy
After you add the API rate-limiting policy to the Energy API, you must redeploy the API to activate the policy.
-
On the Deployments tab, hold the cursor over the gateway name where the API is deployed, and then click Redeploy.
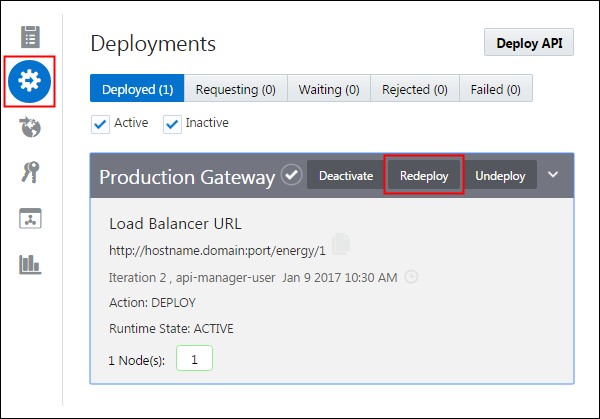
Description of this image -
On the Redeploy menu, click Latest Iteration.

Description of this image -
On the Deployment page, enter a comment about the reason to redeploy, and click Yes.

Description of this image -
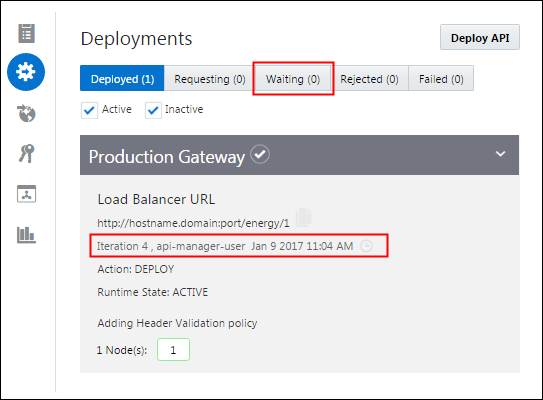
On the Deployments tab, wait until the deployment is complete before testing your API.

Description of this image Note: If the deployment isn't moved from the Waiting tab to the Deployed tab, then try refreshing the page.
The Waiting tab is automatically updated when the API is deployed, and the date is updated with a new deployment date.

Description of this image
Testing the API Rate-Limiting Policy
After the redeployment is complete, the API applies the API rate-limiting policy to the incoming requests.
-
Build your API URL using this format:
http://hostname.domain:port/api_endpoint_url/resource_path -
Open the Postman client, select the GET method, enter the API URL, and then click Send.

Description of this image -
Repeat Step 2 more than three times in less than a minute to trigger the API rate-limiting policy.
-
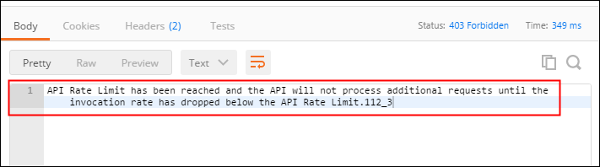
On the Body tab, verify that after the third execution, the API rate-limiting policy is triggered.
Description of this image
Configuring an Interface Management Policy
Adding a Header Validation Policy
Header validation policies are used to enforce the presence of values in the HTTP headers of the incoming requests. You use them to determine the API behavior by choosing the options to either reject or pass the requests under certain conditions.
-
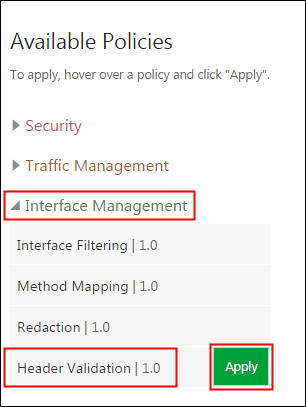
On the API Implementation tab of the Energy API page, in the Available Policies panel, expand Interface Management, hold the cursor over Header Validation, and click Apply.
Description of this image -
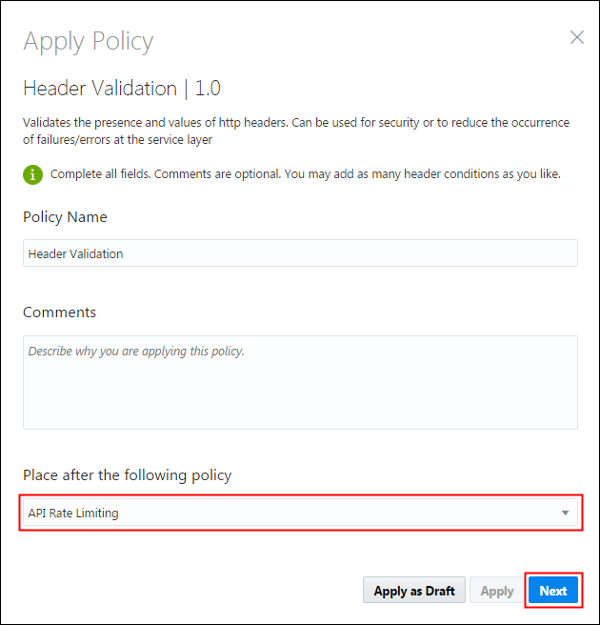
On the Apply Policy page, select API Rate Limiting from the Place after the following policy list, and then click Next.
Description of this image -
On the Apply Policy page, enter or select the following values, and then click Apply:
- Action:
PASS - Conditions:
ANY - Name:
tenant-id - Operator:
>= - Value:
1
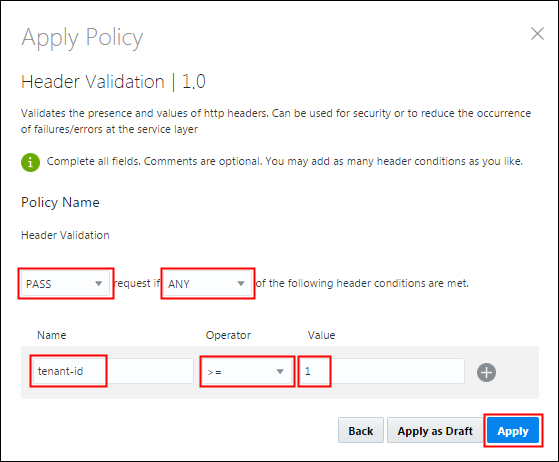
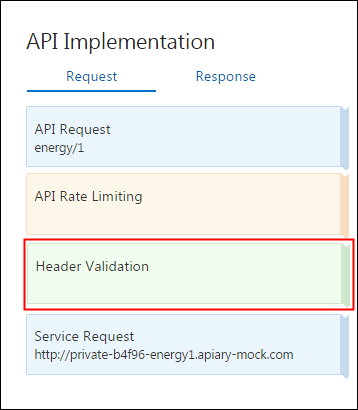
Description of this image The Header Validation policy appears on the Request tab of the API Implementation panel.
Description of this image - Action:
-
On the APIs page, click Save Changes.
Description of this image
Redeploying the API After Adding the Header Validation Policy
After you add the header validation policy to the Energy API, you must redeploy the API to activate the policy.
-
On the Deployments tab, hold the cursor over the gateway name where the API is deployed, and then click Redeploy.

Description of this image -
On the Redeploy menu, click Latest Iteration.

Description of this image -
On the Deployment page, enter a comment about the reason to redeploy, and click Yes.

Description of this image -
On the Deployments tab, wait until the deployment is complete before testing your API.
Description of this image Note: If the deployment isn't moved from the Waiting tab to the Deployed tab, then try refreshing the page.
The Waiting tab is automatically updated when the API is deployed, and the date is updated with a new deployment date.
Description of this image
Testing the Header Validation Policy
After the redeployment is complete, the API applies the header validation policy to the incoming requests.
-
Build your API URL using this format:
http://hostname.domain:port/api_endpoint_url/resource_path -
Open the Postman client, select the GET method, enter the API URL, and then click Send.
Description of this image The API response displays an error message because the header validation policy didn't find the required header values.
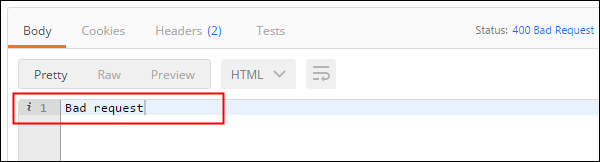
Description of this image -
In the Postman client, enter
tenant-idin the key field, enter0in the value field, and then click Send.
Description of this image The API response displays an error message because the header validation policy didn't allow the request with the sent header values.
Description of this image -
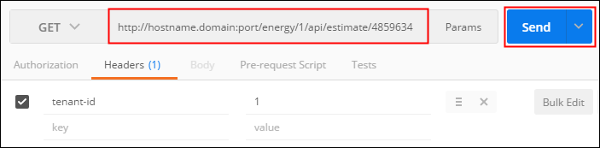
In the Postman client, enter
tenant-idin the key field, enter1in the value field, and then click Send.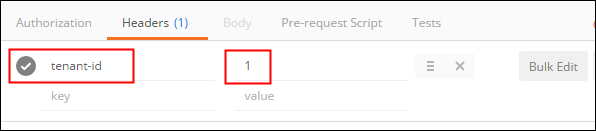
Description of this image The API response displays the expected result in JSON format.
Description of this image
Configuring a Routing Policy
Adding a Resource-Based Routing Policy
Resource-based routing policies are used to route the incoming requests to specific resource paths to different service response URLs. This policy allows you to combine two back-end services that return different implementation results.
-
On the API Implementation tab of the Energy API page, in the Available Policies panel, expand Routing, hold the cursor over Resource Based Routing, and click Apply.

Description of this image -
On the Apply Policy page, select Header Validation from the Place after the following policy list, and then click Next.

Description of this image -
On the Apply Policy page, enter or select the following values, and then click Apply:
- Resource Path(s):
*estimate* - Set Service Request URL To:
your_own_estimate_api_implementation - Otherwise:
Keep
                                        Default Service Request URL
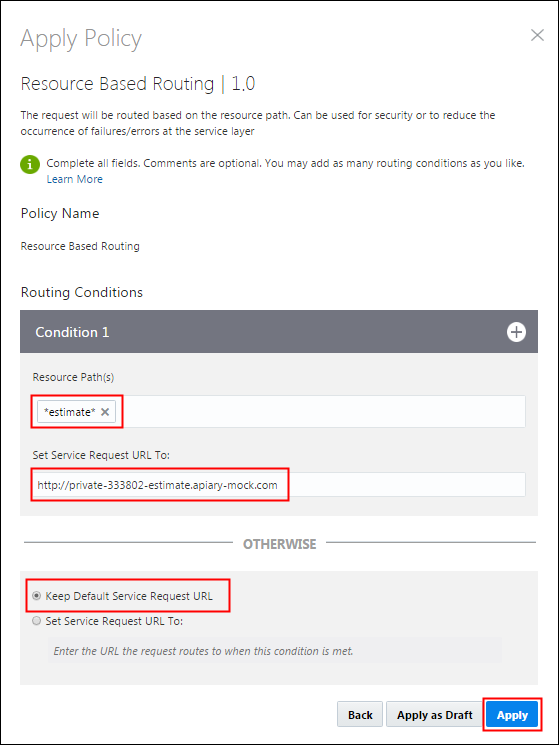
Description of this image Note: If you don't have your own implementation of the estimate API, then use this service request URL as an example:
http://private-333802-estimate.apiary-mock.com.The resource-based routing policy appears on the Request tab of the API Implementation panel.

Description of this image - Resource Path(s):
-
On the APIs page, click Save Changes.
Description of this image
Redeploying the API After Adding the Resource-Based Routing Policy
After you add the resource-based routing policy to the Energy API, you must redeploy the API to activate the policy.
-
On the Deployments tab, hold the cursor over the gateway name where the API is deployed, and then click Redeploy.
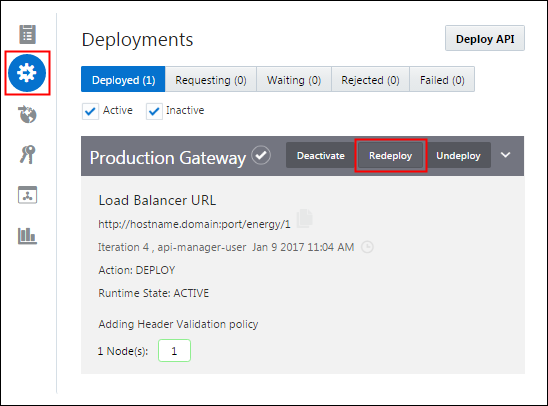
Description of this image -
On the Redeploy menu, click Latest Iteration.

Description of this image -
On the Deployment page, enter a comment about the reason to redeploy, and click Yes.

Description of this image -
On the Deployments tab, wait until the deployment is complete before testing your API.
Description of this image Note: If the deployment isn't moved from the Waiting tab to the Deployed tab, then try refreshing the page.
The Waiting tab is automatically updated when the API is deployed, and the date is updated with a new deployment date.

Description of this image
Testing the Resource-Based Routing Policy
After the redeployment is complete, the API applies the resource-based routing policy to the incoming requests.
-
Build your API URL using this format:
http://hostname.domain:port/api_endpoint_url/resource_path -
Open the Postman client, select the GET method, enter the estimate API URL, and then click Send.
Description of this image Note: The URL must point to the estimate API, and the tenant-id key/value pair must be included if the header validation policy is still applied.
-
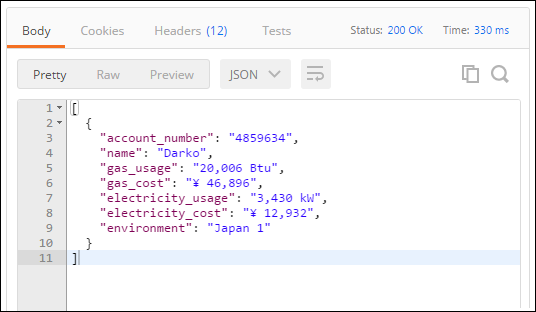
On the Body tab, verify that the response is from the estimate API.

Description of this image