 Connecting
SQL Developer to Autonomous Transaction Processing
Connecting
SQL Developer to Autonomous Transaction Processing Before You Begin
This tutorial shows you how to connect SQL Developer to a database in Oracle Autonomous Transaction Processing cloud service, and then create tables. This tutorial takes approximately 10 minutes to complete.
Oracle Autonomous Transaction Processing Cloud Service Tutorial Series
This is the second in a series of tutorials for the Oracle
Autonomous Transaction Processing cloud service. Perform the
tutorials sequentially.
- Provisioning
Autonomous Transaction Processing
- Connecting SQL Developer to Autonomous Transaction Processing
- Loading
Your Data Into Autonomous Transaction Processing
- Using Oracle Machine Learning with Autonomous Data Warehouse Cloud Service (set of additional tutorials)
Background
Oracle SQL Developer can connect to Oracle Autonomous Transaction Processing using a security credentials zip file that you created in the previous tutorial, or a credentials zip file provided by your Autonomous Transaction Processing administrator.
In this tutorial, you define a SQL Developer connection to a database in Autonomous Transaction Processing cloud service. You then use SQL Developer to create tables in the database.
What Do You Need?
- Access to an instance of Autonomous Transaction Processing
Cloud (see Using Autonomous
Transaction Processing)
- Completion of previous tutorial, Provisioning
Oracle Autonomous Transaction Processing, in which
the user
atpc_useris created and a client credentials wallet zip file is downloaded - The password for the data
warehouse user
atpc_userthat was created in the previous tutorial
- A client credentials zip file and its keystore password,
that you defined in the previous tutorial or obtained from
your Autonomous Transaction Processing administrator. This
file contains security credentials to connect SQL Developer to
your Autonomous Transaction Processing database.
Note: You will not need the keystore password if you are using SQL Developer 18.2 or newer versions. - Oracle SQL Developer (see Oracle
Technology Network download site). Version 18.3 or
later. Versions 18.2 or later contain enhancements for key
Autonomous Transaction Processing features.
Note:
If you are a Windows user on 64-bit platform, download the 'Windows 64-bit with JDK 8 included' distribution as it includes the files necessary to run SQL Developer and connect to your Autonomous Transaction Processing database.
If you are using a SQL Developer version earlier than 18.2, see the documentation topic Connecting with Oracle SQL Developer (earlier than Version 18.2).
 Define
a SQL Developer Connection
Define
a SQL Developer Connection
First, define a SQL Developer connection as the user atpc_user
to a database in your Autonomous Transaction Processing cloud
service.
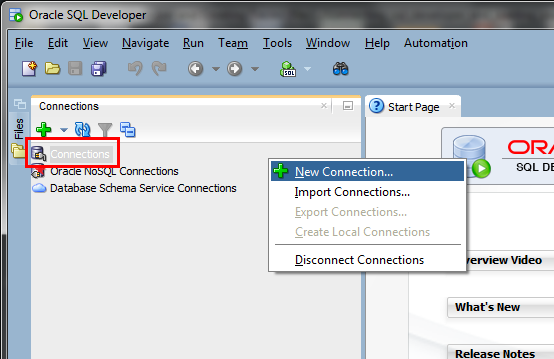
- Open SQL Developer on your local computer. In the
Connections panel, right-click Connections
and select New
Connection.
Note:
Do not right-click Database Schema Service Connections. That menu selection is for connecting to a different Oracle cloud service, the Oracle Database Schema Service.
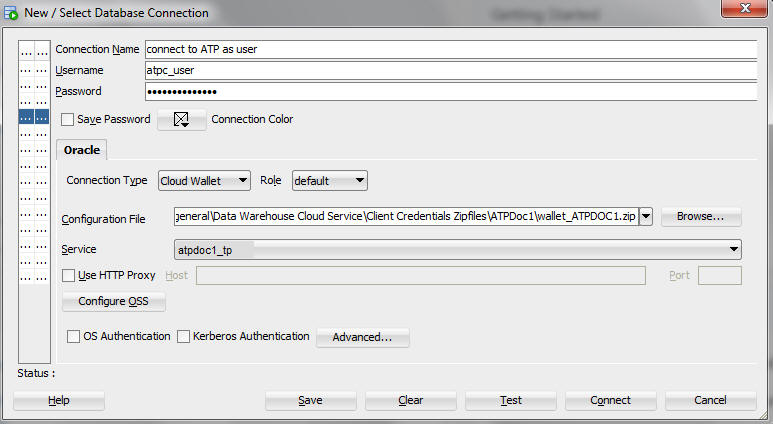
Description of the illustration select_new_connection - The New/Select Database Connection dialog appears. Enter the following information:
- Connection Name - Enter the name for this cloud connection.
- Username - Enter the database username . Use the
atpc_userdatabase account that you created in the previous tutorial. - Password - Enter the password that you specified when
creating the
atpc_userin the previous tutorial.
Note: as a reminder, the password you specified in the previous tutorial met the following requirements:
- The password must be between 12 and 60 characters long and must include at least one uppercase letter, one lowercase letter, and one numeric character.
- The password cannot contain the username.
- The password cannot be one of the last four passwords used for the same username.
- The password cannot contain the double quote (") character
- Connection Type - Select Cloud Wallet.
- Configuration File - Click Browse, and select the path to your local copy of the Client Credentials zip file, downloaded from the Autonomous Transaction Processing console by you, or given to you by your Autonomous Transaction Processing administrator.
- Keystore Password -
If using SQL Developer 18.2.0 or newer: Starting with version 18.2.0, SQL Developer does not require that you enter a Keystore Password and does not provide the Keystore Password field.
If using a version of SQL Developer older than 18.2.0: Enter the password that was generated when you or your Autonomous Transaction Processing administrator downloaded the Client Credentials zip file from the Autonomous Transaction Processing console. - Service - In the drop-down menu,
service selections are prepended with database names. Select
the tpurgent, tp, high, medium, or low menu item for
your database. These service levels map to the TPURGENT, TP,
HIGH, MEDIUM and LOW consumer groups, which provide
different levels of priority for your session.
Note: Earlier versions of SQL Developer may not support this feature. - Click Test.
Status: Success displays at the bottom left of the New/Select Database Connection dialog. - Click Connect.
An entry for the new connection appears under Connections.
 Create
SH Tables in your Autonomous Transaction Processing Database
Create
SH Tables in your Autonomous Transaction Processing Database
After you have connected SQL Developer to your Autonomous
Transaction Processing database, use a SQL Developer worksheet
to define CREATE TABLE statements to create the SH
tables (sales history tables from an Oracle
sample schema) in the atpc_user
schema. In the next tutorial, you will load data into these
tables from an object store.
- Copy and paste this
code snippet to a SQL Developer worksheet.worksheet.
Run the script to create the
SHtables.
Description of the illustration sql script to create sh tables
 Examine
the SH Tables that you Created
Examine
the SH Tables that you Created
Now that you have created the SH tables, take a
moment to examine them. In the next tutorial, you will load data
into these tables from an object store.
- The SQL Developer Script
Output panel shows the tables that have been created in the
user named atpc_user.

Description of the illustration script output showing created tables
- Note that the new tables also
appear in the SQL Developer Connections panel.
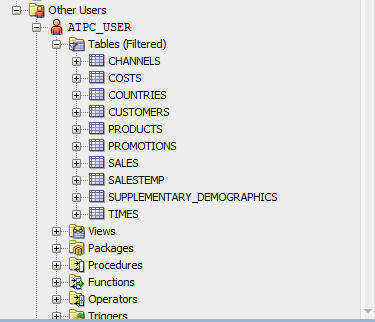
Description of the illustration list of new tables in atpc_user - Examine the details of each
column of the
CHANNELStable.
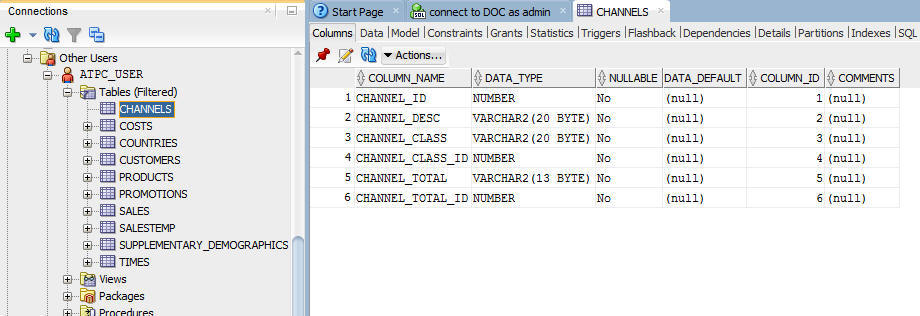
Description of the illustration details of the CHANNELS table
- Click the Data
tab of the CHANNELS table. Note that so far, you
have defined tables, but these tables are not yet populated
with Data.
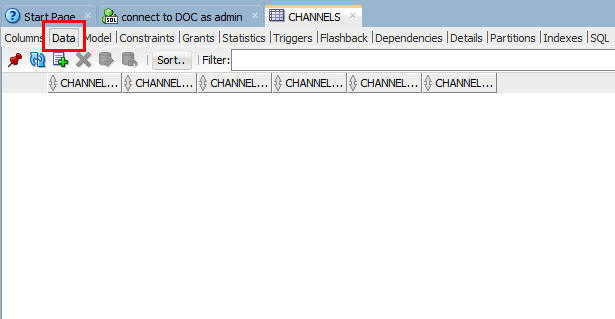
Description of the illustration no data yet in CHANNELS table
- In the next tutorial, "Loading
Your Data", you will load data from an object store into
these
SHtables.