Before You Begin
Purpose
This tutorial provides instructions for migrating your JD Edwards EnterpriseOne data from an on-premises system with Oracle database on Linux to Oracle Cloud.
Time to Complete
1-2 Hours
Note that this estimate completion time is not the
elapsed time. That is, it does not account for
machine runtime functions.
Background
Currently, the Oracle Cloud Migration Utility only
supports the migration of a single pathcode from
your on-premise environment to the Compute Service
instance environment. You can only run this process
a single time from end to end. However,
you do have the option to import from one on-premise
pathcode to a different pathcode on the Compute
Service instance. For example: you can
export your on-premise PD920 environment and import
to DV920 on the Compute Service instance. The
utility has scripts packaged within the database
migration that will synchronize the database records
accordingly.
Before starting the Migration process, make sure all
traditional objects are checked in for the pathcode
you plan to migrate. Project information will
not be migrated to the Compute Service instance.
User Defined Objects (UDOs) that are reserved to a
real project, will be moved to the users default
project at the end of the migration process.
The Oracle Cloud Migration Utility can only be used
if the on-premise environment is running at least
tools release 9.2.0.1 with applications 9.2 and
higher. Once the migration is complete,
your cloud compute instance will be running the same
applications release as your on premise environment.
Supported on-premise environment:
- Enterprise One Applications release 9.2 and higher
- Enterprise One Tools 9.2.0.1
- Oracle database on Linux
The Deployment Server migration will be performed by the Oracle Cloud Migration Utility and database scripts. The Oracle Cloud Migration Utility is deployed using Change Assistant. The migration has the following two parts:
- Export – execution on the on-premise Deployment Server and Database Server.
- Import – execution on the Deployment Server and
Database Server on the Compute Service instance.
The current deliverable is called JDE_9.2_Migration_Utility_3.1_for_Linux (JDE_OPC_Migration_3.0.par) and can be downloaded from the Oracle JD Edwards EnterpriseOne Update Center. To locate this deliverable in the Update Center, select JD Edwards EnterpriseOne from the Type field in the Search tab, and then enter the name of the migration utility in the Search for Name field.
In this tutorial you will:
- Execute Oracle Cloud Migration Utility on on-premise Deployment Server.
- Run export script on the on-premise Database Server.
- Execute Oracle Cloud Migration Utility on the Deployment Server on the Compute Service instance.
- Run import script on the Database Server on the
Compute Service instance.
What Do You Need?
To perform the steps in this tutorial, you must have:
- A subscription to Oracle Cloud. You must be a user with the Compute Operations role. For more information, see How to Begin with Oracle Compute Cloud Service Subscriptions in Using Oracle Compute Cloud Service.
- Verified the database size on the Compute Service instance is large enough for the import and that database configuration / parameters are validated or tuned for your business needs (for example: max extend and extend size parameters).
- Created a JD Edwards EnterpriseOne Multi Tier Deployment on Oracle Compute Cloud Instances. See the Multi Tier or One-Click Provisioning OBEs for more information.
- Installed the latest Change Assistant on the on-premise Deployment Server and the Deployment Server on the Compute Service instance.
- Downloaded the JDE_OPC_Migration_3.0.par from the Oracle JD Edwards EnterpriseOne Update Center.
- TLOPCV3_20_99.par (Move this file to the on-premise Deployment Server.)
- Export folder with export scripts (Move this folder to the on-premise Database Server.)
- Import folder with import scripts (Move this folder to the Database Server on the Compute Service instance.)
- Verified you can execute the following command
on the source and destination
machines;<dbuser>/<dbpass>@<netname>
.
Execute Oracle Cloud Migration Utility on On-Premise Deployment Server
The Deployment Server migration migrates pathcode files (source, include, res, java, Solution Explorer,and media objects) from the on-premise Deployment Server to the Deployment Server on the Compute Service instance.
- Start Change Assistant on the on-premise Deployment Server.
- Expand the Work with Packages tree node and select Downloads.
- Select Cloud Migration Utility (TLOPCV3_20_99.par) from within Change Assistant.
- Select New Batch Deploy.
- Verify the Batch Information dialog box and click OK.
- Sign in to the JDEPLAN environment.
- After reviewing the actions, click Next.

- On Object Path Search & Select, select a pathcode to export.
- On Deployment Synchronization Warning, select Synchronize CNC Data Now (R9840C/XJDE0002).

- Verify the Copy System/Plan Information Report (R9840C/XJDE0002) has Completed Normally in the Result column.

- On Work With Environment Data Sources, select the environment to copy from and click Add.
- Select Include
Pathcode Files and Include
System Data, and then click Next.

- Review the reports generated during the export of the system tables and ensure they were successful.
- The Save & Exit, Export dialog
box signals the end of the export process for
the On-premise Deployment Server. Review the
listed tasks and click Save and Exit.

- On the Confirm
dialog box, click Yes.
- Return to Change Assistant, select the Work with Batches tree node.
- Select your batch and click Export to jar.
- Indicate a name and location to save the .jar file, and click Save.
- On the Select Deployment Location dialog box, click Cancel.
- Transfer the .jar file to the Deployment Server on the Compute Service instance.
- Exit Change Assistant.
Run Export Script on On-Premise Database Server
The export.sh script exports data from the on-premise database into dump files, which can be moved to the Database Server on the Compute Service instance.
- Navigate to where you downloaded the export files on the on-premise Database Server (for example: /u01/scripts).
- Edit the exp_set file with your information.
- Save and close exp_set.
- Run export.sh.
- Verify “successfully completed” is found in all generated log files and .dmp files were successfully created in the specified location.
- Transfer the .dmp files to a folder on the Database Server on the Compute Service instance for importing in a later step.

| Field |
Description |
| PATHCODE_PREFIX | The pathcode to export. Valid values
are:PY, PD, DV, and PS. |
| PATHCODE_RELEASE | The patchode to export. Valid values are: 920 and above. |
| SHARED | Export data dictionary and object librarian schemas. YES, must be used for migration. |
| DUMP_DEST | The full path where you want the
database dump files created. *Ensure the directory exists* |
| DBUSER | The database user with privileges to the
tablespaces being exported (for
example:system). |
| DBPASS | The password for the DBUSER. |
| NETNAME | The TNS name for the database (for
example: orcl). |
Execute Oracle Cloud Migration Utility on Deployment Server in Oracle Compute Cloud Instances
Import the .jar file with Change Assistant on the Deployment Server on the Compute Service instance.
Note:
Verify that the ActivConsole is not running.
- Create a new folder on the Deployment Server on the Compute Service instance (for example: /Change Assistant/downloads/ new folder)
- Access Change Assistant from the Deployment Server on the Compute Service instance.
- In Change Assistant, select the Work with Batches tree node.
- On the tool bar click the Import from jar button.
- In the Import Batch From dialog box, navigate to your jar file and then click Open.
- On the Import Batch To dialog box, navigate to the Change Assistant downloads directory on the Deployment Server on the Compute Service instance, and then click Open.
- Verify the Batch Information dialog box and click OK.
- Sign in to the JDEPLAN environment.
- On the Save & Exit, Export dialog box, click Next.
- On Deployment
Server Import, read the tasks that will
be performed by the import and then click Next.
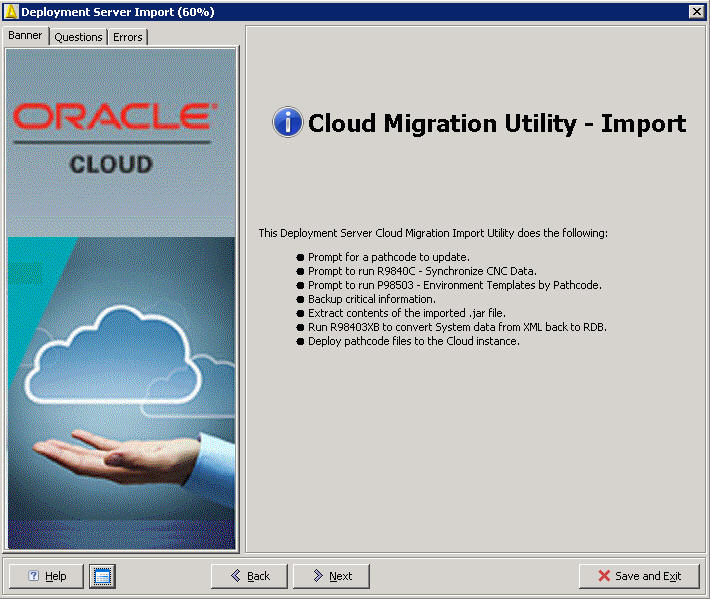
Deployment Server Import - On Object
Path Search & Select, select
the pathcode to import to. If the release
of the selected pathcode does not match the
release of the on-premise instance, you will get
the following error:
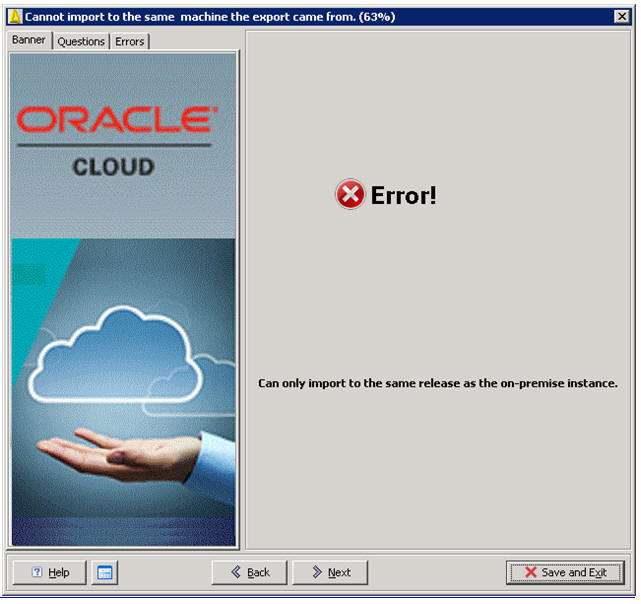
Pathcode Error - On Deployment Synchronization Warning, de-select Synchronize CNC Data Now (R9840C/XJDE0002) and Work with Environment Data Sources? (GH9611/P98503)?* then click Next.
- On Backup Options select Include Pathcode files and Include System Data, and then click Next.
- Review the backup reports for success.
- On Import Options select to Include Pathcode files and Include System Data, and then click Next.
- Review the import reports for success.
- Review the Cloud Server Tasks, and
then click Next.
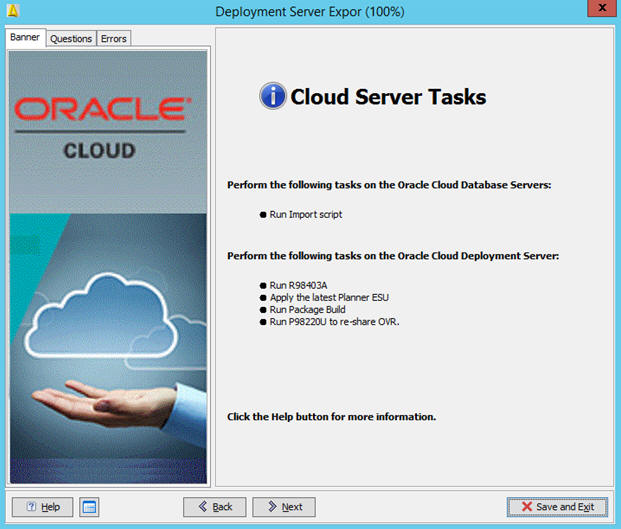
Run Import Script - On Deployment Succeeded click Finish.
Run Import Script on Oracle Cloud Database Server
The import.sh script imports data from the dump files generated by the export script into the Database Server on the Compute Cloud service.
- Navigate to where you uploaded the import scripts on the Database Server on the Compute Cloud service (for example: /u01/scripts).
- Edit the imp_set
file with your information.
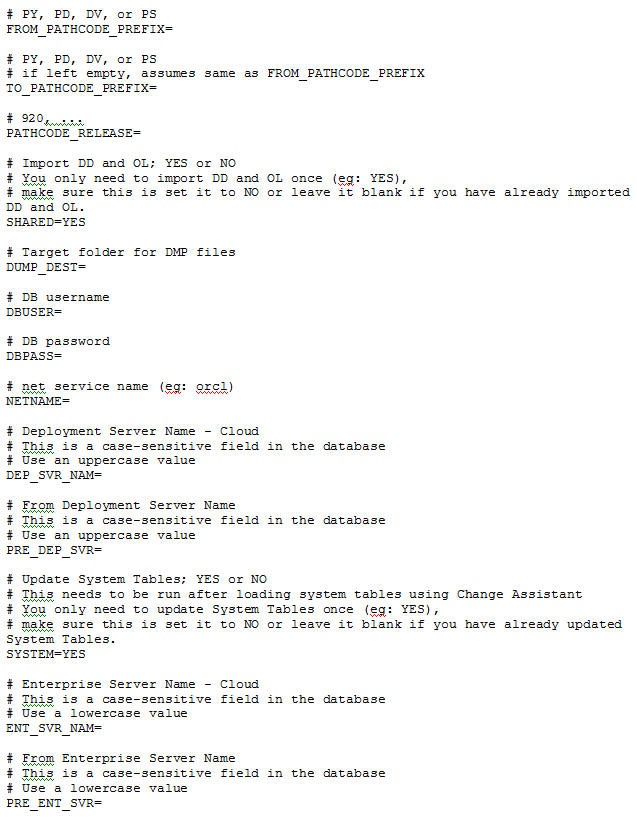
The imp_set file
| Field |
Description |
| FROM_PATHCODE_PREFIX | The pathcode to import from. Valid values
are: PY, PD, DV, and PS. |
| TO_PATHCODE_PREFIX | The pathcode to import to. Valid values
are: PY, PD, DV, and PS. If this is left
blank, it is the same as
FROM_PATHCODE_PREFIX. |
| PATHCODE_RELEASE | The pathcode to import from. Valid values are: 920 and above. |
| SHARED | Import data dictionary and object librarian schemas. YES, must be used for migration. |
| DUMP_DEST | Location where the dump files are located. |
| DBUSER | The database user with privileges to the tablespaces being imported (for example:system). |
| DBPASS | The password for the DBUSER. |
| NETNAME | The TNS name for the database (for example: orcl). |
| DEP_SVR_NAM | The name of the Deployment Server on the
Compute Service instance. This value is case-sensitive and should be uppercase. |
| PRE_DEP_SVR | The name of the on-premise Deployment
Server. This value is case-sensitive and should be uppercase. |
| SYSTEM | Update system tables. YES, must be used
for migration. |
| ENT_SVR_NAM | The name of the Enterprise Server on the
Compute Service instance. This value is case-sensitive and should be lowercase. |
| PRE_ENT_SVR | The name of the on-premise Enterprise
Server. This value is case-sensitive and should be lowercase. |
- If you have not done so, transfer the exported *.dmp files from the your On-premise Database Server to the DUMP_DEST folder on the Database Server on the Compute Cloud service.
Note: Verify the DUMP_DEST
already exists and the Oracle user has write
privileges.
- Save and close imp_set.
- Run ./import.sh as the Oracle user.
- Examine all of the created log files and ensure they were successful.
Post Tasks
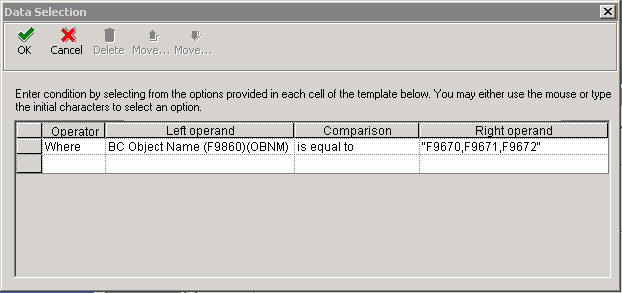
- Run R98403A on the Deployment Server on the Compute Cloud service to copy ESU tables (F9670, F9671, and F9672) with the following values:
- Data Selection Values: F9670, F9671, and F9672
- Processing Options:
| Processing Options | Value |
| Source Environment | Blank |
| Source Data Source | System - 920 |
| Target Environment | Blank |
| Target Data Source | System Local |
| Copy Table | 1 |
| Replace Duplicate Records | Y |
| Clear Target Table | Blank |
- Apply the latest planner ESU on the Deployment Server on the Compute Cloud service.
Registry location:
[HKEY_LOCAL_MACHINE\SOFTWARE\Wow6432Node\JDEdwards\OneWorldWindowsInstaller\install.ini]
"InstallPath"="C:\\JDEdwards\\E920" (or above)
- Build and deploy a new full package to your target environment.
- Run Work with User Defined Objects (P98220U) to re-share One View Reports (OVR), if you have an OVR server configured on the Oracle Cloud.
- Select Shared for User Defined Object Status.
- Select One View Reports for User Defined Object Type.
- Click Find.
- Select the applicable objects and click
Approve / Share on the Row
menu.
When the process completes the selected objects will be available on the BI Publisher Server.
Note: Only shared OVRs are migrated, if you need personal OVRs migrated please reference the My Oracle Support Document ID: 2158173.1
- Run R98222UDO on the html Server to add User
Defined Objects (UDO) to default projects.
Note: After the Oracle Cloud Migration Utility and Database Import, Personal and Reserved UDOs need to be placed on the user's default project. Since the OMW project data was not migrated, the default projects do not exist. R98222UDO creates the default project and adds the user's Personal or Reserved UDOs.