 Cloning an Instance with Persistent Boot Disk
 Before You Begin
This tutorial shows you how to clone an Oracle Cloud Infrastructure Compute Classic instance that uses a persistent boot disk. This tutorial takes approximately 5 minutes to complete.
You should have created an instance. For more information, see Single-Click Instance Creation in Oracle Cloud Infrastructure Compute Classic.
Background
If your instance has a nonpersistent boot disk, you can create an instance snapshot, which automatically adds the image to the Oracle Cloud Infrastructure Object Storage Classic account. Then, you must associate the image in your Compute Classic account to use it to create instances. For more information, see Cloning an Instance by Using Instance Snapshots.
If your instance has a persistent boot disk, you cannot create an instance snapshot. This tutorial provides the procedure to follow in such a scenario.
What Do You Need?
A subscription to Compute Classic. You must be a user
with the Compute_Operations role. See How to Begin with Compute
Classic Subscriptions in Using
Oracle Cloud Infrastructure Compute Classic.
 Create Storage Volume
Snapshot
Create Storage Volume
Snapshot
- In the My Services Dashboard page, click the Compute Classic service
 menu and select Open Service Console.
 - Click the Orchestrations tab.
- Identify the orchestration that you want to suspend to stop the instance and check if the instance is nonpersistent. If the instance is persistent, change it to nonpersistent.
- From the menu icon menu, select Suspend.
The status of the orchestration changes to Suspended. - Click the Storage tab.
- Click the storage volume that was associated with the suspended instance. The storage volume details page appears.
- On the storage volume details page, under the Storage Snapshots section, click Create Storage Snapshot. The Create Storage Snapshot dialog box is displayed.
- On the Create Storage Snapshot dialog box, select or enter the following:
- In the Name field, enter a name.
- Colocated:
- If you want to clone this storage volume across sites, do not select Colocated.
- If they want to clone the storage volume to the same site, then you can select Colocated. As the colocated snapshots are stored in the same physical location as the original storage volume the clones are created quickly.
- Click Create. The storage snapshot is created and listed in Storage Snapshots section.
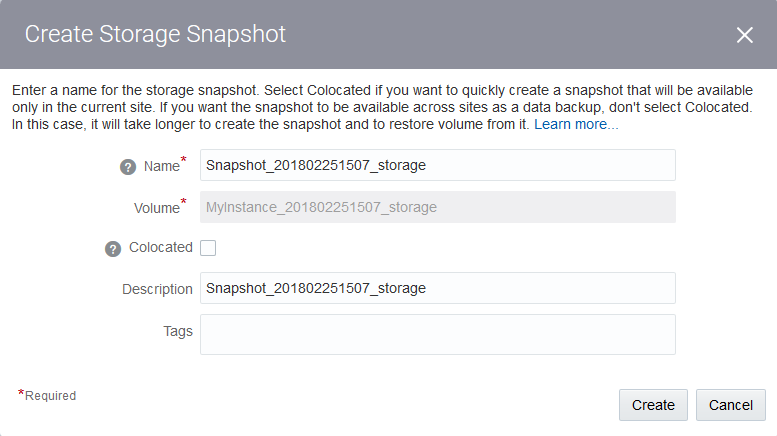
Description of the illustration snapshot_dialog.png

 Restore the Snapshot as a New Volume
- Go the Storage tab.
- In the storage drop-down list, select Storage Snapshots. The Storage Snapshots page appears.
- When creating the storage snapshot, did you select the Colocated option:
- Yes: Go to step 5.
- No: Continue with the next step.
- To restore the remote snapshot to the site, where you plan to create an instance, select or enter the following:
- Click the Site menu near the top of the page and select the site, where you plan to create an instance.
- In the Site filter, select the site where you created the storage snapshot.
- In the Show filter, select Remote. The remote snapshots are listed.
- Go to the snapshot that you want to create a storage volume from. From the menu, select Restore Volume.
- In the Restore Storage Volume dialog box, enter a name for the new storage volume.
- Click Restore.

 Create a new Instance and Attach the Storage Snapshot
- Click the Instances tab.
- Click Create Instance. The Create Instance QuickStarts page appears.
- From the Create Instance title strip, click Customize. The create instance wizard appears.
- On the Image page, select the image that you want to use. For the purpose of this tutorial, select OL_7.2_UEKR4_x86_64. Click the
 button to go to the next page.
Note: The image that you select here must be the same image that you selected earlier when creating the instance. You can go to the existing instance orchestration to view the exact name and version of the image it uses. - On the Shape page, select oc3 (OCPUs: 1, Memory: 7.5 GB), and then click the button to go to the next page.
- On the Instance page, you can select the appropriate values depending on your requirement, or
select/enter the following:
- In the Persistent field, select False.
- In the Placement field, select Auto.
- In the Name field, enter an appropriate name, or retain the default.
- In the Label field, enter a label to help identify the instance, or retain the default. The label is used to list the instance on the Instances page.
- In the SSH Keys field, click the field, and then either scroll to select your SSH public key or start typing to filter and select your SSH public key.
- Click the button to go to the next page.
- On the Network page, you can select the appropriate values depending on your requirement, or
select/enter the following:
- In the Network Options field, select IP Network.
- Click Configure Interface. The Configure IP Network Interface dialog box is displayed.
- In the Configure IP Network Interface dialog box, select or enter the following:
- In the Interface field, select eth1.
- For the vNIC Name field, retain the default vNIC name.
- In the IP Network field, specify the IP network that you want to add this interface to.
If you haven't created the IP network that you want to add your instance to, select or enter the following:- Click Create IP Network.
- Enter a name for the IP network. For this tutorial, enter IPnet1.
- Enter the required IP address prefix for the IP network, in CIDR format. For example, enter 192.168.0.1/24.
- You can select an IP exchange to add this IP network to. For this tutorial, select Not Set.
- Click Create. The IP network is created and selected in the IP Network field.
- In the Public IP Address field, select Auto Generated.
- Default Gateway: Don't select this option.
- Click Save.

Description of the illustration ip_network.png - Click the button to go to the next page.
- On the Storage page, do the following:
- Click the option and select Remove.
- Click Attach Existing Volume.
- In the Add New Storage Volume dialog box, enter or select the following:
- From the Attach Storage Volume drop-down list, select the storage volume that you created earlier.
- Select the Boot Drive option to use the specified storage volume as the boot disk.
The storage volume that you select here must have the same image as the image that you selected earlier when creating the instance. You won't be able to select the disk as the boot disk, if it doesn't have the same image as you selected in the Image page.
When you select this option, the disk number is automatically set to 1.
- Click the button to go to the next page.
- Click the
- On the Review page, verify the information that you've entered and then click Create.
After the instance is created, verify that it is a clone of the instance that you created at the begininig of this procedure.
 Want
to Learn More?
Want
to Learn More?
- Creating an Oracle Linux Instance Using the Compute Classic Web Console
- Creating Instances in Using Oracle Cloud Infrastructure Compute Classic