Before You Begin
Purpose
This tutorial shows you how to deploy a complete Siebel CRM 2017-20 application with a vanilla database environment containing seed data only using Docker image and an Oracle 12c database to a virtual machine in Oracle Cloud Infrastructure (OCI) Service (Dedicated).In this tutorial, you will set up Security Lists to enable HTTP access to your Siebel instance using ports 4430 and 8080. You will choose from the Oracle Cloud Marketplace the Siebel CRM Install Jenkins/Docker Instance image to install the Siebel Gateway, AI and Siebel Application Servers and connect to an Oracle database server containing vanilla data.
Note that the information presented here is based on Siebel CRM 2017-20, which is general availability since 2017.
Time to Complete
60 minutes
Background
Oracle Cloud Infrastructure Service enables you to rapidly provision virtual cloud machines (VCNs) on Oracle Cloud Infrastructure with the necessary storage and networking resources. After you’ve created your virtual machine instance, you can navigate and test out Siebel CRM IP2017/18/19 on the virtual machine.
What Do You Need?
A subscription to Oracle Cloud Infrastructure
Service (Dedicated) is mandatory and you must be a
user with the Compute_Operations and Storage
Read Write Group roles.
For more details on creating Oracle Cloud Infrastructure Service instances, see the following:
- How to Begin with Oracle Cloud Infrastructure Service (Dedicated) Subscriptions in Using Oracle Cloud Infrastructure Service (Dedicated)
- Creating a Single Instance Using the Oracle Cloud Infrastructure Service Web Console.
Process Overview
To create the required Oracle Cloud Infrastructure Service instance to deploy the Siebel CRM application, you will:
- Generate an SSH key pair on your local system. (Prerequisite)
- Create a Virtual Cloud Network (Prerequisite)
- Create a Subnet (Prerequisite)
- Open Ports (Prerequisite)
- Request DBaaS DB Instance and Plug Siebel PDB to DBaaS DB Instance
- Request DBaaS DB in OCI (Prerequisite for DBaaS DB)
- Add DBaaS DB Ports in Security Ingress Rule in VCN (Prerequisite for DBaaS DB)
- Attach PDB From OCIR DockerSidecar DBImage To DBaaS DB In OCI (Prerequisite for DBaaS DB)
- Automated: Run the script
- Manual: Get your own PDB and attach to DBaaS DB instance
- Get orclNetDescString information from DBaaS in OCI (Prerequisite for DBaaS DB)
- Launch Jenkins/Docker image from Oracle Marketplace to create your initial Siebel instance into your Tenancy
- Deploy Siebel CRM Application
- Generating Jenkins URL
- Deploying the Siebel Application
- Deploy using Docker DB
- Deploy using DBaaS DB
- Generating application domain URL
- Changing the SADMIN Password
- Upgrading Siebel DBaaS DB and Docker DB
- Restarting Siebel DBaaS and Docker Services
- Log into the Siebel application.
Generating an SSH Key Pair
This is the first prerequisite.
When you create your Oracle Cloud Infrastructure Service instance, you must provide an SSH public key that will be used for authentication when you log in to the instance. Generate your SSH key pair. You can save the SSH key pair to either paste or upload to the Oracle Cloud Infrastructure Tenancy before you start to create your instance.
Generating an SSH Key Pair on UNIX or UNIX-Like Systems Using ssh-keygen
- Run the
ssh-keygencommand.ssh-keygen -b 2048 -t rsa - The command prompts you to enter the path to
the file in which you want to save the key. A
default path and file name are suggested in
parentheses. For example:
/home/user_name/.ssh/id_rsa. To accept the default path and file name, press Enter. Otherwise, enter the required path and file name, and then press Enter. - The command generates an SSH key pair
consisting of a public key and a private key,
and saves them in the specified path. The file
name of the public key is created
automatically by appending
.pubto the name of the private key file. For example, if the file name of the SSH private key isid_rsa, then the file name of the public key would beid_rsa.pub. - Make a note of the path where you've saved
the SSH key pair.
When you create instances, you must provide the SSH public key. When you log in to an instance, you must specify the corresponding SSH private key.
Note: The key should be created without a passphrase.
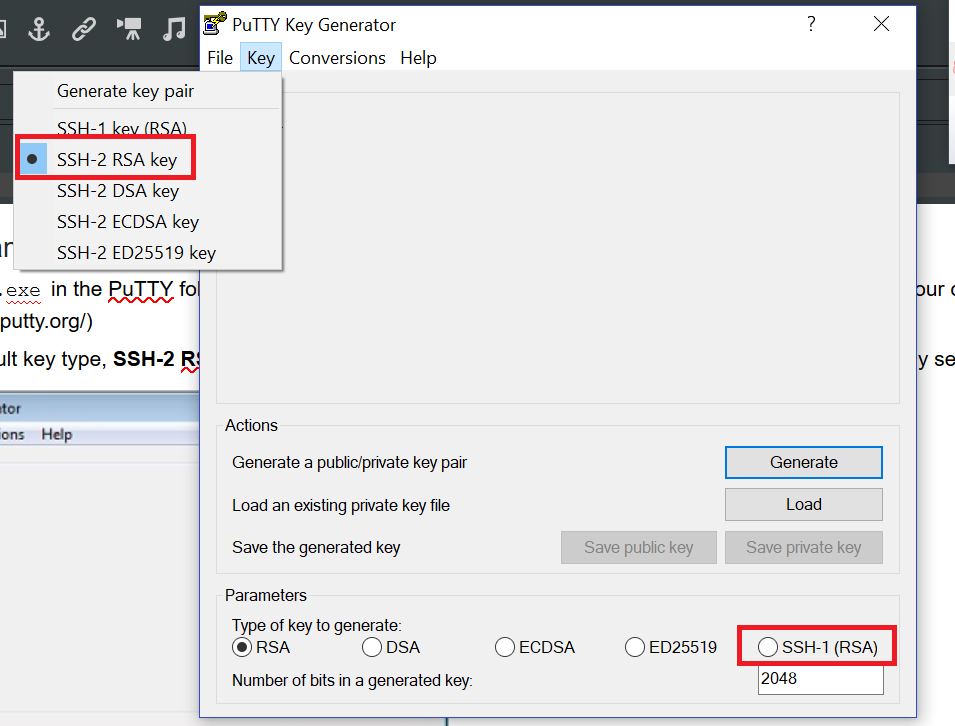
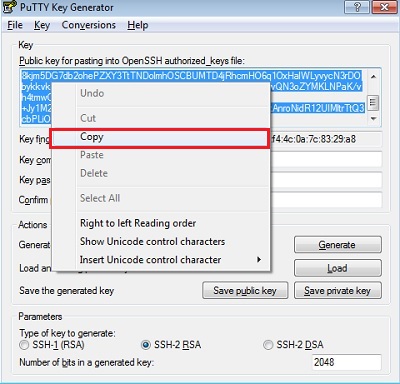
Generating an SSH Key Pair on Windows Using the PuTTY Key Generator
- Find
puttygen.exein the PuTTY folder on your computer and double-click it. (If you do not have PuTTY.exe on your computer you can find it on web here http://www.putty.org/) - Accept the default key type, SSH-2
RSA, and set the Number of
bits in a generated key to 2048,
if it is not already set. Then click Generate.
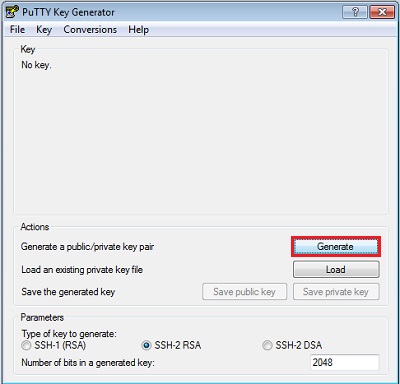
If you do not see the SSH-2 RSA in key type options, go to Key in the menu.
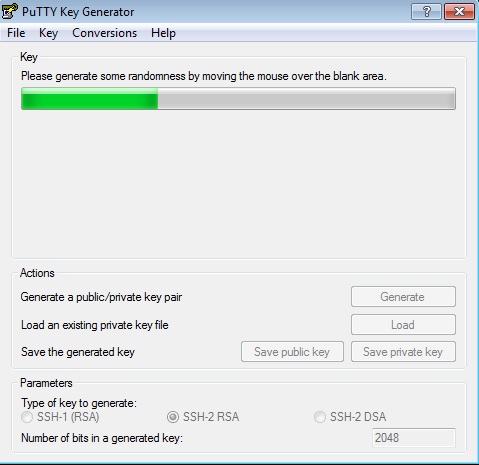
- Move your mouse around the blank area to
generate randomness. The SSH key pair is
generated.
- Save your private key.
- The key comment is the name of the key. You can keep the generated key comment or create your own.
Note: The key should be created without a passphrase.
- To save the private key in the PuTTY PPK
format, click Save private key.
Enter the same name as you used for the
key comment so that you know which public
key to use this private key with. The
private key is saved in PuTTY's Private
Key (PPK) format, which is a proprietary
format that works only with the PuTTY
toolset. You can use this key whenever you
use PuTTY for SSH.

- To save the public key, in the PuTTY Key
Generator, select all of the characters in
the Public key for pasting into
OpenSSH authorized_keys file
field.
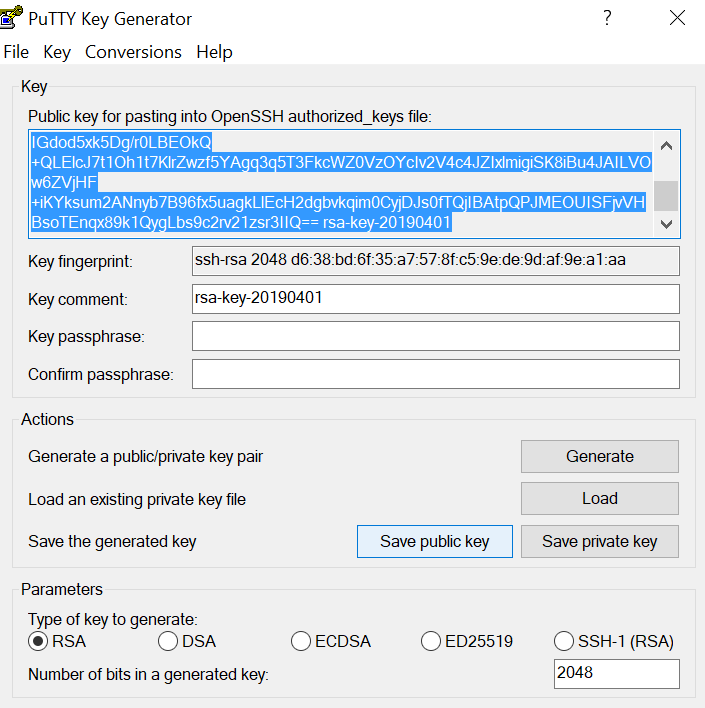
Note: Make sure you select all the characters, not just the ones you can see in the narrow window. If there is a scroll bar next to the characters, you aren't seeing all the characters.
- Right-click somewhere in the selected
text and select Copy
from the menu.
- Open a text editor and paste the characters. Ensure that you paste the text at the first character in the text editor, and don't insert any line breaks.
- Save the key using the same root name that you used for the private key. Add a .pub extension. You can give it any extension you want, but .pub is a useful convention to indicate that this is a public key.
- Exit PuTTY Key Generator.
When you create instances, you must specify the SSH public key. When you log in to an instance, you must provide the path to the corresponding SSH private key.
Creating a VCN
Creating a Sub-Compartment
- Log in to OCI, navigate to Identity, and then select Compartments.
The Compartments page appears.

- To create a sub-compartment, do any of the following:
- Click Create Compartment to go to Compartments page.
- Click the root Compartment name to go to Compartment Details page. Click Create Compartment in the Child Compartments section.

- In the Create Compartment window, fill in the following details:
- Name: Give a logical name to the sub-compartment.
- Description: Add description of the sub-compartment.
- Parent Compartment: Select the parent (root) compartment for the sub-compartment.
- Click Create Compartment.

The sub-compartment is created for the root compartment.

Opening Ports
Open the following two ports - 4430 and 8080 within the previously created Subnet.
- Navigate to Menu, Networking, and then Virtual Cloud Networks.
- Select the VCN you previously created.
- Select Security Lists from Resources in the left pane.

- In the Security Lists page, click the Default Security Lists for VCN_KS1 link.

- In your Default Security List, click Edit All Rules button.

The Edit Security List Rules pop up appears.
- To add port 4430, do the following:
- Scroll down to the Another Ingress Rule button and click. An Ingress Rule section is added.
- In Source CIDR, add 0.0.0.0/0.
- In Destination Port Range, add 4430.

The ports display in the security list page.

Requesting DBaaS DB Instance and Plugging Siebel PDB to DBaaS DB Instance
This feature is a part of Oracle DBaaS. You can create DBaaS DB from OCI, attach a Siebel PDB to DBaaS DB, and then create an OCI instance. You can deploy Siebel Docker instance using DBaaS DB and Docker DB.
For DBaaS DB, before you deploy, you must do the following:
Requesting DBaaS DB in OCI
- Login to OCI - https://login.us-phoenix-1.oraclecloud.com/v1/oauth2/authorize/changeTenant.
- Navigate to Bare Metal, VM, and Exadata.
- In the DB Systems in
Compartment page, click Create DB System. - To create a DB system, complete the following two sections:
- DB System Information. Enter the information in the following fields. For example,
Field Value Select a Compartment siebeldev (root) Name your DB system Enter a name Select a shape type Make sure Virtual Machine is selected Select a shape VM.Standard2.4 Available Storage 256 Add public SSH keys Upload SSH Keys generated from Putty. Virtual Cloud Network Select a VCN in the Siebeldev root compartment Client Subnet Select a subnet in the VCN selected previously Hostname prefix siebeldbp - Database Information. Click Next and enter the information in the following fields. For example,
Field Value Database name ORCL Database version 12.1 PDB name ORCLCDB Password Enter an appropriate password and confirm password. Available Storage 256 Enable automatic backups Select the option (Recommended) - Click Create DB Systems. The create process starts with the status of the DBS as Provisioning. When the DBS is created successfully, the status of the DBS is displayed as Running.

- DB System Information. Enter the information in the following fields. For example,

Adding DBaaS DB Port in Security Ingress rule in VCN
- Add DBaaS DB port 1521 in Ingress rule in the Security List in VCN. Refer to the topic Opening Ports to know how to add ports.
- Add the following ingress rules to your VCN:
- Ingress Rule 1
- Source: 0.0.0.0/0
- IP Protocol: ICMP
- Type and Code: 3, 4
- Ingress Rule 2
- Source: 0.0.0.0/0
- IP Protocol: TCP
- Source Port Range: All
- Destination Port Range: 1521
- Ingress Rule 3
- Source: 10.0.0.0/24
- IP Protocol: TCP
- Source Port Range: All
- Destination Port Range: 6200
- Ingress Rule 4
- Source: 10.0.0.0/16
- IP Protocol: TCP
- Source Port Range: All
- Destination Port Range: 6200
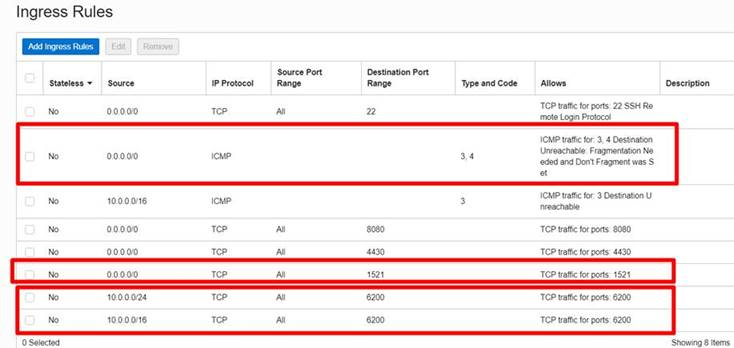
- Ingress Rule 1
Attaching PDB From OCIR DockerSidecar DBImage To DBaaS DB In OCI
- Log in to Putty and connect to the DBaaS DB Server.
- Choose one of the following two ways to get the PDB and attach it to DBaaS DB
- Automated: Run the script
- Manual: Get your own PDB and attach it to DBaaS DB instance
1. Logging in to Putty and connecting to the DBaaS DB Server.
- Log in to Putty using your SSH Key.
- In OCI, on your DBS page, scroll down to the Databases section and click Nodes and note the Public IP address.

- Configure the following Putty settings to connect to DBaaS DB as in the following example.
- Enter the following information.
- Host Name: Enter the Public IP Address noted in step 2.
- Connection type: SSH
- Saved Sessions: Select the saved session.
- Close window on exit: Only on clean exit.

- Scroll to SSH in the Category pane (on the left) and select the following:
- Preferred SSH protocol version: 2 only
- Permitted roles in the shared connection: Upstream and Downstream

- Scroll to Auth in the Category pane (on the left) and select the following:
- Options controlling SSH authentication: Display pre-authentication banner (SSH-2 only)
- Authentication methods: Attempt authentication using Pageant and Attempt “keyboard interactive” auth (SSH-2)
- Private key file for authentication: Upload the private key generated previously.

- Enter the following information.
2a. Automated: Run the script
- Ensure the DBaaS DB port 1521 is added to Ingress Rule in the Security List of VCN.
- Log in to DBaaS DB instance and run the following commands.
- sudo su
- mkdir -p /scripts;
- cd /scripts
- Download the following script retrieved from the command.
wget https://objectstorage.us-ashburn-1.oraclecloud.com/p/9uu1U6HJNsFryh0TAUi3X9naf6JQdrOM_xLuwe-9Qqs/n/siebeldev/b/siebeldev/o/SiebelDBaaSDeployPDB.sh
Run chmod -R 755 /scripts
- Run the following script in background to avoid putty timeout issue.
nohup sh /scripts/SiebelDBaaSDeployPDB.sh --siebelVer 20.7 --dbType vanilla --oracleHome /u01/app/oracle/product/12.2.0.1/dbhome_1 --dbConnectString 'sys/pasword@siebeldb12c-scan.sub03150707300.siebeldc.oraclevcn.com:1521/ORCL_iad1mt.sub03150707300.siebeldc.oraclevcn.com' >& /scripts/plugpdb.log &
Update the following input values based on your setup. For example:
- siebelVer 20.7
- dbType [accepted values vanilla or sample ]
- oracleHome /u01/app/oracle/product/12.2.0.1/dbhome_1 (This is the default value of DBaaS)
- dbConnectString 'sys/pasword@siebeldb12c-scan.sub03150707300.siebeldc.oraclevcn.com:1521/ORCL_iad1mt.sub03150707300.siebeldc.oraclevcn.com'(Update your connect string to DB)
- Use the following commend to monitor the Log during execution of script.
tail -f /scripts/plugpdb.log
If putty session times out when your script is running, log in again via putty and rerun the script.
- On completion, verify your PDB is created by running the following commands in SQLPLUS:
- [oracle@siebeldb12c opc]$ sudo su
- [oracle@siebeldb12c opc]$ sqlplus / as sysdba
- SQL > show pdbs
If your PDB shows restricted access NO, it was created correctly. Note down your Service Name displayed in the and DBaaS DB Long connect string. For more information, refer to Get orclNetDescString information from DBaaS in OCI.
Once you have both values, that is the Service Name and the DBaaS DB Long connect string, you need to replace Service Name value in the DBaaS DB Long connect string that will be used with the SiebelDeploywithDBaaS option in Jenkins when deploying Siebel instance.
You can now deploy your VM from Marketplace and attach to your PDB in DBaaS.
Verifying log
Verify the following values at the end of the log.

2b. Manual: Getting your own PDB and attaching it to DBaaS DB instance
- Log in to Putty using user "opc".
- In SQLPLUS, run the following commands.
- [oracle@siebeldb12c opc]$ sudo su
- [oracle@siebeldb12c opc]$ su oracle
- [oracle@siebeldb12c opc]$. /home/oracle/.bashrc
- [oracle@siebeldb12c opc]$ sqlplus / as sysdba
- Run the command - showpdbs
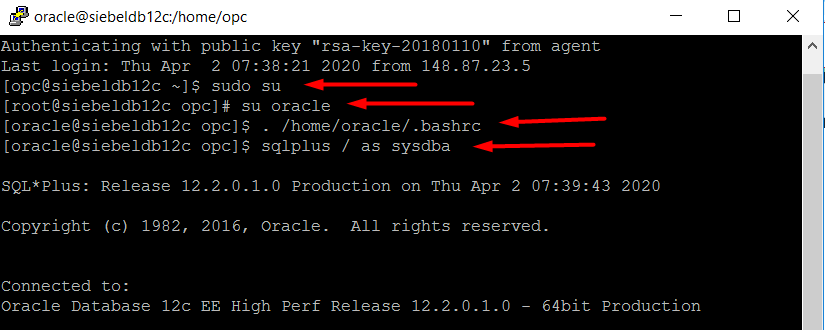

You will get the PDB list in the DB server.
- Exit SQLPLUS.
- Upload your PDB that is compressed to *.tar.gz to OCI Object storage.
- Download PDB from OCI object storage using the following steps:
- Run the following commands to login as Oracle user and source the .bashrc file.
- [oracle@siebeldb12c opc]$ sudo su
- [oracle@siebeldb12c opc]$ su oracle
- [oracle@siebeldb12c opc]$. /home/oracle/.bashrc
- Run the following commands in SQLPLUS.
- [oracle@siebeldb12c opc]$ cd/u01/app/oracle/oradata/ORCLCDB
- Then run the PDB link you received. For example, wget https://objectstorage.us-ashburn-1.oraclecloud.com/p/bbGkRMZe2AQ3Vg1QcNBdG-HDaPvK78pFUqP5sKkA7h0/n/siebeldev/b/siebeldev/o/SAMPLE_18.8_DBSAMPLE.tar.gz
- [oracle@siebeldb12c opc]$ sqlplus / as sysdba

- On file download, unzip the file using tar utility - [oracle@siebeldb12c opc]$ tar -zxvf SAMPLE_18.8_DBSAMPLE.tar.gz

- Run the following commands in SQLPLUS.
- [oracle@siebeldb12c opc]$ sudo su
- [oracle@siebeldb12c opc]$ su oracle
- [oracle@siebeldb12c opc]$. /home/oracle/.bashrc
- [oracle@siebeldb12c opc]$ mkdir -p /u02/app/oracle/oradata/ORCLCDB
- [oracle@siebeldb12c opc]$ chown -R oracle:oinstall /u02
- [oracle@siebeldb12c opc]$ cd /u02/app/oracle/oradata/ORCLCDB
- [oracle@siebeldb12c opc]$ ln -s /u01/app/oracle/oradata/ORCLCDB/SAMPLE SAMPLE
- [oracle@siebeldb12c opc]$ ls -la
- [oracle@siebeldb12c opc]$ sqlplus / as sysdba


- Run the following commands to create a PDB in SQLPLUS.
- SQL > create pluggable database SAMPLE using '/u01/app/oracle/oradata/ORCLCDB/SAMPLE/pdb_SAMPLE.xml' nocopy tempfile reuse ;
- SQL > alter pluggable database SAMPLE open read write;
- SQL > alter pluggable database SAMPLE open read write;
- SQL > commit;
- SQL > show pdbs

Note the PDB Restricted status. If it is NO, you need not do anything.
If it is YES, run the following command sets in SQLPLUS till the status returns NO.
Command set 1 to update SQL patch:
- [oracle@siebeldb12c opc]$ su oracle
- [oracle@siebeldb12c opc]$ su oracle
- [oracle@siebeldb12c opc]$ su oracle
- [oracle@siebeldb12c opc]$ su oracle
- SQL > exit;
- [oracle@siebeldb12c opc]$ cd $ORACLE_HOME/OPatch
- [oracle@siebeldb12c opc]$
- ./datapatch -verbose
Command set 2 to create PDB:
- [oracle@siebeldb12c opc]$ sqlplus / as sysdba
- SQL > alter pluggable database "SAMPLE" close IMMEDIATE ;
- SQL > alter pluggable database "SAMPLE" unplug into '/u01/app/oracle/oradata/ORCLCDB/SAMPLE/pdb_SAMPLE.xml';
- SQL > DROP PLUGGABLE DATABASE "SAMPLE" KEEP DATAFILES;
- SQL > commit;
- SQL > create pluggable database SAMPLE using '/u01/app/oracle/oradata/ORCLCDB/SAMPLE/pdb_SAMPLE.xml' nocopy tempfile reuse ;
- SQL > alter pluggable database SAMPLE open read write;
- SQL > alter pluggable database SAMPLE save state;
- SQL > show pdbs
Now the PDB should show Restricted Mode = NO.
- Run the following commands to login as Oracle user and source the .bashrc file.
Getting orclNetDescString information from DBaaS in OCI
- Navigate to Bare Metal, VM and Exadata and select the Database system to go to the DB System details page.

- Scroll down to the Databases section and click on ORCL database. The ORCL database details page appears.

- Click on DB Connection. The Database Connection window opens.

- Copy and save the long format of the connection string from DBaaS OCI.

In the connection string, replace the service name ORCL value with the service name of the attached PDB.
For example, (DESCRIPTION=(CONNECT_TIMEOUT=5)(TRANSPORT_CONNECT_TIMEOUT=3)(RETRY_COUNT=3)(ADDRESS_LIST=(LOAD_BALANCE=on)(ADDRESS=(PROTOCOL=TCP)(HOST=10.0.0.136)(PORT=1521))(ADDRESS=(PROTOCOL=TCP)(HOST=10.0.0.137)(PORT=1521))(ADDRESS=(PROTOCOL=TCP)(HOST=10.0.0.138)(PORT=1521)))(CONNECT_DATA=(SERVICE_NAME=sample.sub03150707300.siebeldc.oraclevcn.com)))
Launching Instance of Siebel from Marketplace
- Log in to Oracle Cloud Infrastructure.
- Navigate to Oracle Cloud Infrastructure Marketplace.
- Click on Siebel CRM install Jenkins/Docker Instance image.
- In the instance page, click Launch Instance.
- In the Launch Instance screen that appears, do the following:
- Select Compartment. For example, siebelDev
- Agree to the Terms of Use.
- Click Launch Instance.

- In the Create Compute Instance screen that appears, do the following:
- Name your Instance – Give a logical name to your instance.
- Select a domain.

- Go to Add SSH key section and select one of the following:
- Choose SSH key file – select and upload the SSH key file.
- Paste SSH keys – select this and paste the SSH key in the given space.

- In the Configure Networking section, select the VCN you created previously. Leave the other default selections.

- Click Create. The create process starts with the status of the instance as Provisioning.
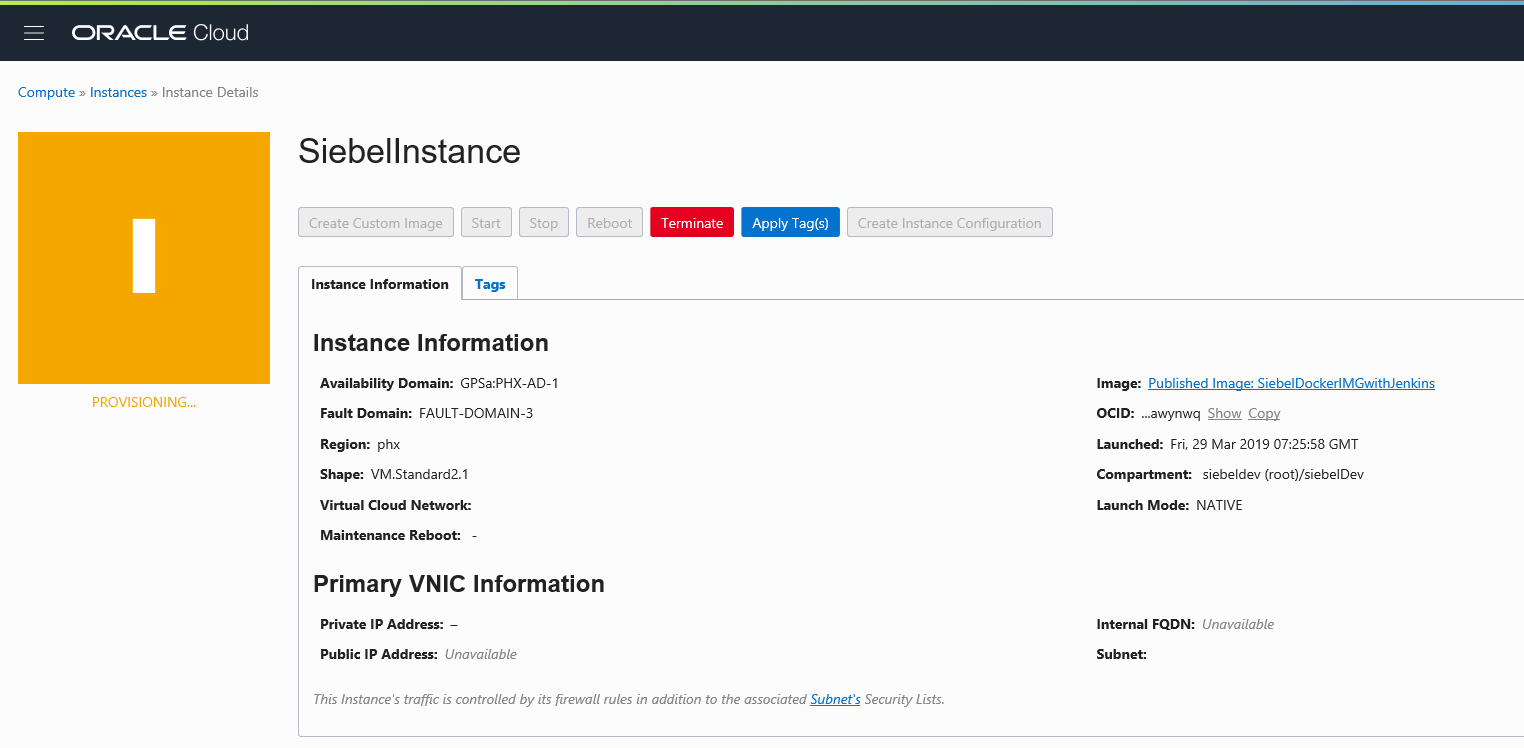
Then, when the instance is created successfully, the status of the instance is displayed as Running.

- Jenkins URL: To deploy Siebel application.
- Application domain URL: To create Siebel industry specific application.
- Copy the Public IP Address from your previously created Instance.
- Add the port 8080 preceded with a colon and paste the URL in a browser window to open the Jenkins application.
<public IP address>:<port number>For example:
129.146.133.76:8080 - Log in to the Jenkins application.
Note: Jenkins is a public domain. It is recommended to change the password. For more information, see here.
- Log in to Jenkins using the Public IP Address you got on creating DBS. The Pipelines screen opens.
- Click on SiebelDeploy.

- In the Pipeline SiebelDeploy screen, click on Open Blue Ocean.

- In the deployment screen, click on Run.

- In the Input required dialog box, enter the required input.
Choose the DB - Sample/Vanilla and click Run.

The deployment process starts.

This is another view of deployment process.

When the deployment is successfully completed, the screen displays as following.

Click on Logs to view build details.

- After you login to Jenkins, the Pipelines screen opens. Click on SiebelDeployWithDBaaS.

- In the Pipeline SiebelDeploy screen, click on Open Blue Ocean.

- In the deployment screen, click on Run.

- In the Input required dialog box, enter the required input.
Paste the DBaaS DB connect string you previously generated and click Run.

The deployment process starts.

When the deployment is successfully completed, the screen displays as following.
Click on Logs to view build details.
- For Service -
https:// <public IP address>:4430/siebel/app/callcenter/enu - For Siebel Management Console (SMC) -
https:// <public IP address>:4430/siebel/smc - In Jenkins application, navigate to siebel toolbar and select Configure.

- Drill down to Password section, change the password, and then click Save.

- Siebel Version Upgrade for DBaaS DB: DBaaS_SiebelVersionUpgrade
- Siebel Version Upgrade for Docker DB: SiebelVersionUpgrade
- Log in to Jenkins using the Public IP Address you got on creating DBS.
- Click on the DBaaS_SiebelVersionUpgrade pipeline.
- Click on Open Blue Ocean to open the pipeline deployment page.
- Click Run to open the Input required window.
- Enter the appropriate inputs.
- Select the current and upgrade Siebel versions
- Paste the DBaaS DB Connect String you previously generated.
- Click Run

The upgrade starts. On successful upgrade, the status displays green.
- Log in to Jenkins using the Public IP Address you got on creating DBS.
- Click on the SiebelVersionUpgrade pipeline.
- Click on Open Blue Ocean to open the pipeline deployment page.
- Click Run to open the Input required window.
- Enter the appropriate inputs.
- Select the current and upgrade Siebel versions
- Select the current Docker DB.
- Click Run

The upgrade starts. On successful upgrade, the status displays green.
- Restart of Siebel Services in DBaaS DB type of deployment: DBaaS_ SiebelBounceService
- Restart of Siebel Services in Docker DB type of deployment: SiebelBounceService and SiebelBounceServiceWithDB
- Log in to Jenkins using the Public IP Address you got on creating DBS.
- Click on the DBaaS_ SiebelBounceService pipeline.
- Click on Open Blue Ocean to open the pipeline deployment page.
- Click Run to open the Input required window.
- Enter the appropriate inputs.
- Paste the DBaaS DB Connect String you previously generated.
- Click Run

The services restart. On successful restart, the status displays green.
- Log in to Jenkins using the Public IP Address you got on creating DBS.
- Click on the SiebelBounceService or SiebelBounceServiceWithDB pipeline.
- Click on Open Blue Ocean to open the pipeline deployment page.
- Click Run to open the Input required window.
- Enter the appropriate inputs.
- Select the current Docker DB.
- Click Run
The services restart. On successful restart, the status displays green.
- Log in to the Oracle Enterprise Linux (OEL) instance on OCI using the public IP address or SSH key using the private IP address.
Use the following credentials:
- Username: opc
- Password: The SSH key generated from Putty
- Get the list of Docker containers running on this instance by entering the following command,
sudo su: This command switches to the root user.docker ps –a: This command initiates the list.
The Docker containers running on this instance are listed.

- Select the required Docker container name as displayed in the Names column in the list generated in step 2 to log in.
Use the following command to log in to the container.
docker exec –it –u siebel <containername> bash
- Enable the Web tools on Siebel environment using any one of the following:
- Command line
- SMC
To enable using command line:
- Log in to SES Docker container.
- Run
smgrcommand. This is an alias to connect to srvrmgr. - Enable the compgroups. Do the following in the smgr console,
- Run the
list servercommand to list the server names. - Run the
set server <server name>command. - Run the
enable compgroup siebelwebtoolscommand. - Exit the smgr console.
- Run the
To enable using SMC:
- Navigate to Administration - Server Configuration, then Enterprises – Component Groups.
- In the Enterprise Component Groups section, select Name, enter the name Siebel Web, and then click the Arrow button to search.
- In Components Group Assignments, click the Enable button.
- Restart the Siebel server using command line.
- Restart the following Siebel services using the corresponding commands on the Docker container.
- Tomcat Restart (On SES, SAI, and CGW containers)
stop_httpstart_http
- Siebel Server restart (Only on SES container)
stop_server allstart_server all
- Zookeeper, Gateway restart (Only on CGW container)
stop_nsstart_ns
For example, to restart only Siebel server,
- Stop tomcat on SAI, SES, and CGW containers.
- Stop Siebel server on SES container.
- Start tomcat on SAI, SES, and CGW containers.
- Start Siebel server.
For example, to restart Siebel Server with complete deployment after enabling components,
- Stop tomcat on SAI, SES, and CGW containers.
- Stop Siebel server on SES container.
- Stop Gateway and Zookeeper on CGW container.
- Start Tomcat on SAI, SES, and CGW containers.
- Start Gateway and Zookeeper on CGW container.
- Start Siebel server on SES container.
- Tomcat Restart (On SES, SAI, and CGW containers)
- (Optional) Get the container details such as, network, persistence storage detail, IP address, and so on, using the following command,
docker inspect <containername> -
Search for Siebel Bookshelf in My Oracle Support


Deploying the Siebel Application
After you have created the instance, you have to generate two URLs:
Generating Jenkins URL

Deploying the Siebel CRM Application
You can deploy the Siebel CRM application instance using the DBaaS DB And Docker DB, based on the DB you selected for deployment in Jenkins pipeline.
Deploying Siebel Docker Instance with Docker DB
Deploying Siebel Docker Instance using OpenLDAP with DBaaS DB
Generating application domain URL
Create the application URL using the port 4430, that you opened previously, and the industry you selected while deployment.
http:// <public IP address>:<port number>/siebel/app/<industry>/enu
For example, if you selected Automotive, your application URL for Automotive industry will be the following.
https://129.146.170.80:4430/siebel/app/eautomotive/enu
The application URL will be specific to the Industry you select while deployment, for example, the URL will be:
Changing the SADMIN Password
Upgrading Siebel Docker Images to the latest version
This supports upgrading the Siebel container CGW, SES, SAI to a higher version including the restart of Siebel services like Gateway, Zookeeper, Siebel Server, and Tomcat.
The database is not upgraded here.
Use the following two jobs for upgrade based on your database.
Siebel Version Upgrade for DBaaS DB: DBaaS_SiebelVersionUpgrade
Siebel Version Upgrade for Docker DB: SiebelVersionUpgrade
Restarting Siebel Services in DBaaS or Docker DB Type of Deployment
This supports restart of the Siebel container CGW, SES, SAI deployed on the machine along with restart of Siebel services like Gateway, Zookeeper, Siebel Server, and Tomcat.
Use the following to restart services based on your database.
Restart of Siebel Services in DBaaS DB type of deployment
Restart of Siebel Services in Docker DB type of deployment
Logging In to the Siebel Application
After the Siebel CRM Install Jenkins/Docker Instance configuration has completed, you can log in to the Siebel environment details page in a browser using the public IP address that you reserved earlier. See Generating application domain URL. This page contains list of Siebel applications and users.
Activating the Web Tools on a Siebel Environment
The following steps describe how to activate the Web Tools on Siebel Environment.