Before You Begin
Purpose
This tutorial shows you how to deploy a complete Siebel CRM IP2015 application with either a demo database environment or a base database environment containing seed data only using Siebel MidTier and an Oracle 12c database to two virtual machines in Oracle Compute Cloud Service (Dedicated).In this tutorial, you will set up security rules to enable HTTP access to your Siebel instance using port 7780. You will choose from the Oracle Cloud Marketplace the Siebel CRM IP2015 Mid tier image to install the Siebel Gateway, Web and Siebel Application Servers and connect to an Oracle database server containing either demo data or a vanilla base data.
Note that the information presented here is based on Siebel CRM IP2015, which is general availability since 2015.
Time to Complete
50 minutes
Background
Oracle Compute Cloud Service enables you to rapidly provision virtual machines (VMs) on Oracle Cloud with the necessary storage and networking resources. After you’ve created your virtual machine instance, you can navigate and test out Siebel CRM IP2015 on the VM.
What Do You Need?
A subscription to Oracle Compute Cloud Service
(Dedicated) is mandatory and you must be a user with
the Compute_Operations and Storage
Read Write Group roles.
For more details on creating Oracle Compute Cloud Service instances, see the following:
- How to Begin with Oracle Compute Cloud Service (Dedicated) Subscriptions in Using Oracle Compute Cloud Service (Dedicated)
- Creating a Single Instance Using the Oracle Compute Cloud Service Web Console.
Process Overview
To create the required Oracle Compute Cloud Service instance to deploy the Siebel CRM application, you will:
- Generate an SSH key pair on your local system.
- Upload the SSH public key to Oracle Compute Cloud Service.
- Enable SSH.
- Reserve a public IP address to associate with your instance.
- Move the required machine image into your Compute account.
- Configure your instance for HTTP access.
- Use the SSH key to log in and execute the Siebel CRM IP2015 MT Configure script from created instance. This will attach your Siebel mid tier instance to your Siebel Demo or Base database image instance.
- Execute a configuration script.
- Log into the Siebel application.
Generating an SSH Key Pair
When you create your Oracle Compute Cloud Service instance, you must provide an SSH public key that will be used for authentication when you log in to the instance. Generate your SSH key pair and upload the SSH public key to the Oracle Compute Cloud Service before you start to create your instance.
Generating an SSH Key Pair on UNIX or UNIX-Like Systems Using ssh-keygen
- Run the
ssh-keygencommand.ssh-keygen -b 2048 -t rsa - The command prompts you to enter the path to
the file in which you want to save the key. A
default path and file name are suggested in
parentheses. For example:
/home/user_name/.ssh/id_rsa. To accept the default path and file name, press Enter. Otherwise, enter the required path and file name, and then press Enter. - The command prompts you for a passphrase.
Enter a passphrase.
Note that the passphrase isn't displayed when you type it in. Remember the passphrase. If you forget the passphrase, you can't recover it. - When prompted, enter the passphrase again to
confirm it.
The command generates an SSH key pair consisting of a public key and a private key, and saves them in the specified path. The file name of the public key is created automatically by appending.pubto the name of the private key file. For example, if the file name of the SSH private key isid_rsa, then the file name of the public key would beid_rsa.pub. - Make a note of the path where you've saved
the SSH key pair.
When you create instances, you must provide the SSH public key. When you log in to an instance, you must specify the corresponding SSH private key and enter the passphrase when prompted.
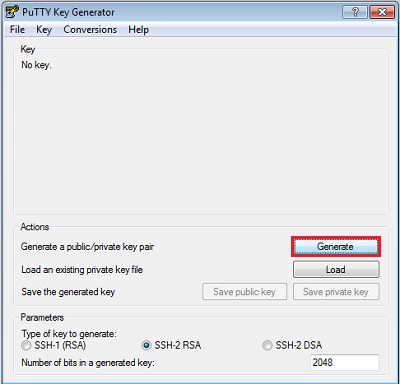
Generating an SSH Key Pair on Windows Using the PuTTY Key Generator
- Find
puttygen.exein the PuTTY folder on your computer and double-click it. (If you do not have PuTTY.exe on your computer you can find it on web here http://www.putty.org/) - Accept the default key type, SSH-2
RSA, and set the Number of
bits in a generated key to 2048,
if it is not already set. Then click Generate.
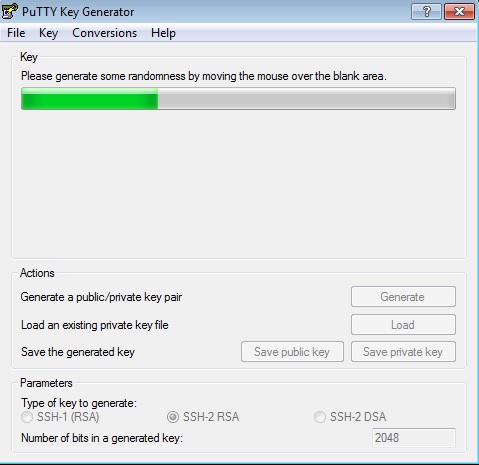
- Move your mouse around the blank area to
generate randomness. The SSH key pair is
generated.
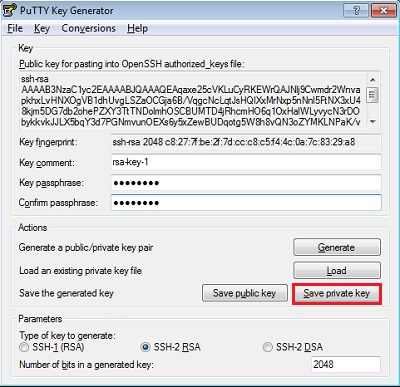
- Save your private key.
- The key comment is the name of the key. You can keep the generated key comment or create your own.
- Enter a passphrase in the Key
passphrase and the Confirm
passphrase fields.
Note: Remember the passphrase. You can't recover a passphrase if you forget it.
- To save the private key in the PuTTY PPK
format, click Save private key.
Enter the same name as you used for the
key comment so that you know which public
key to use this private key with. The
private key is saved in PuTTY's Private
Key (PPK) format, which is a proprietary
format that works only with the PuTTY
toolset. You can use this key whenever you
use PuTTY for SSH.
- Next, save your SSH public key.
- To save the public key, in the PuTTY Key
Generator, select all of the characters in
the Public key for pasting into
OpenSSH authorized_keys file
field.
Note: Make sure you select all the characters, not just the ones you can see in the narrow window. If there is a scroll bar next to the characters, you aren't seeing all the characters.
- Right-click somewhere in the selected
text and select Copy
from the menu.
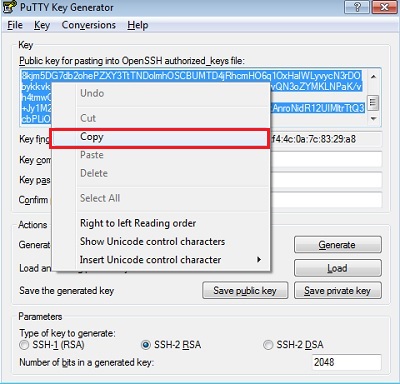
- Open a text editor and paste the characters. Ensure that you paste the text at the first character in the text editor, and don't insert any line breaks.
- Save the key using the same root name that you used for the private key. Add a .pub extension. You can give it any extension you want, but .pub is a useful convention to indicate that this is a public key.
- Exit PuTTY Key Generator.
- To save the public key, in the PuTTY Key
Generator, select all of the characters in
the Public key for pasting into
OpenSSH authorized_keys file
field.
- Make a note of the public and private key
names and where they are saved.
When you create instances, you must specify the SSH public key. When you log in to an instance, you must provide the path to the corresponding SSH private key and enter the passphrase when prompted.
Uploading the SSH Key
- Sign in to the Oracle Cloud My Services
application at https://cloud.oracle.com/sign_in.
The My Services Dashboard page is displayed. - Using the Cloud Account drop-down menu, choose your data center and then click My Services.
- Enter your Identity Domain, and click Go.
- Enter your User Name and Password, and click Sign In.
- Click the menu at the upper left corner of the page and select Oracle Compute Cloud Service.
The Oracle Compute Cloud Service console is displayed. - Click the Network tab.
- From the menu on the left, select SSH Public Keys.
The SSH Public Keys page is displayed. - Click Add SSH Public Key.
- In the Add SSH Public Key dialog box, enter a
name and the value of the SSH public key you
generated, and then click Add.
Note. Paste the key value exactly as it was generated. Don't append or insert any extra characters, line breaks, or spaces.
Your SSH public key is added to Oracle Compute Cloud Service.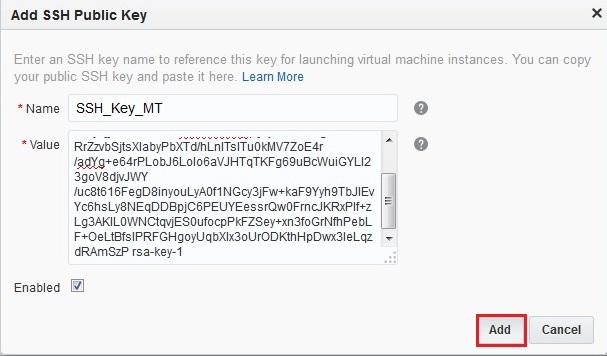
Enabling SSH
You must enable SSH to enable communications to the environment.
- If you are already signed into Oracle Cloud, skip to step 7, if you are not signed in, complete steps 2-6 below.
- Sign in to the Oracle Cloud My Services
application at https://cloud.oracle.com/sign_in.
The My Services Dashboard page is displayed. - Using the Cloud Account drop-down menu, choose your data center and then click My Services.
- Enter your Identity Domain, and click Go.
- Enter your User Name and Password, and click Sign In.
- Click the menu at the upper left corner of the
page and select Oracle Compute Cloud
Service.
The Oracle Compute Cloud Service console is displayed. - Click the Network tab.
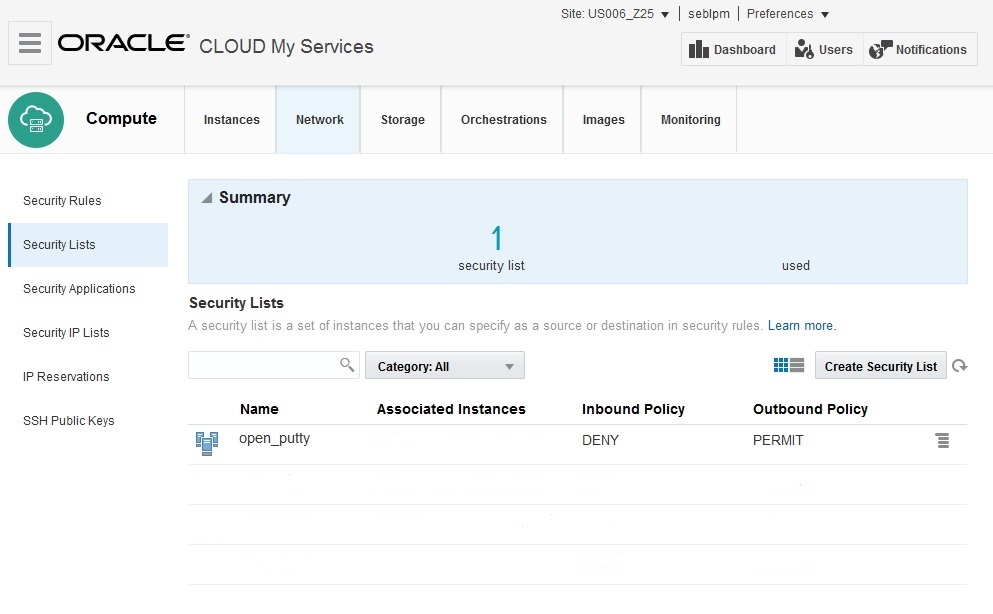
- From the menu on the left, select Security Lists.
The Security Lists page is displayed. - Click Create Security List.
- Fill in the following fields:
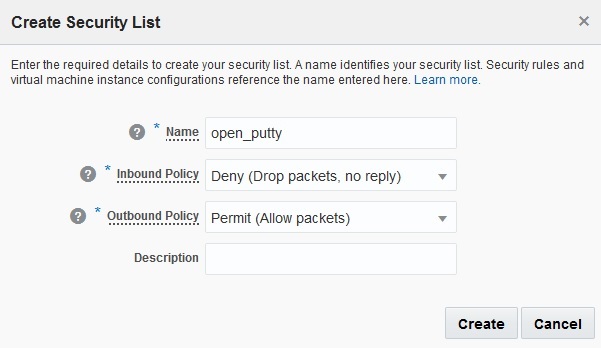
- Name: Enter a name for the new security list. For the purpose of this tutorial, enter open_putty. Note this name as you will use it later in this tutorial.
- Inbound Policy: Accept the default option, Deny (Drop packets, no reply).
- Outbound Policy: Select Permit (Allow packets).
- Description: Enter a description for the new security list if desired.
- Click Create.
- Click the Instances tab, and then click the Instances tile.
- From the list of instances displayed, click menu icon to the right of the SEBLMTVM1 instance name and choose View.
- On the resulting page, click Add to Security List. The Add to Security List dialog box appears.
- Select the open_putty security list that you created earlier and click Add. The instance is attached to the security list.
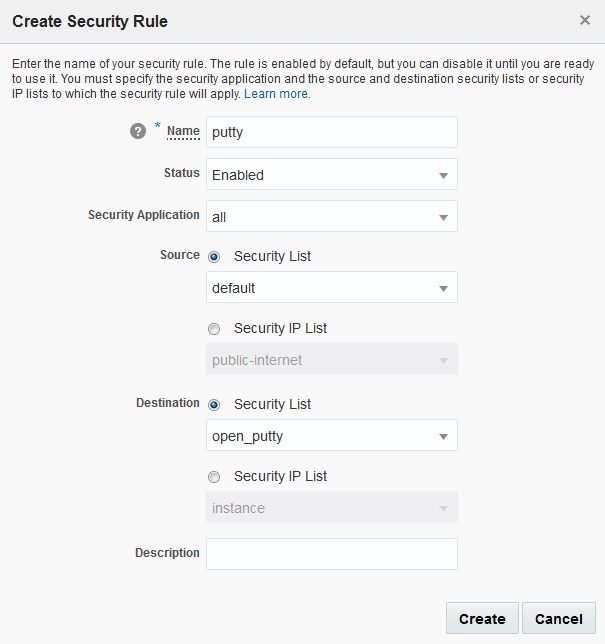
- Click the Network tab and then Security Rules.
- Click Create Security Rule.
- In the Create Security Rule dialog box, select or enter the following information:
- Name: Enter an appropriate name for the rule. For the purpose of this tutorial, enter putty.
- Status: Select Enabled.
- Security Application: Select all.
- Source: In the Security List drop-down menu, choose default. From the Security IP Lists drop-down menu, choose public-internet.
- Destination: Select the open_putty security list that you created earlier.
- Description: Enter a description for the rule (for example, Allow SSH traffic to instances on port 22).
- Click Create
When the screen re-draws, your new security list appears, but the Associated Instances field is blank.
Next, we must add the instance to the security list.
Now we must create a security Rule to enable port 22.
Note: Many of the commonly used protocol and port combinations are provided as predefined security applications in Oracle Compute Cloud Service. However, if you wish to specify a particular protocol-port mapping that is not in the list of predefined security applications, you can create the required security application by going to the Security Applications tile.
Creating an IP Address Reservation
Next, create an IP address reservation. Later in this tutorial, you'll associate this IP address to your instance when you create it.
- On the Oracle Compute Cloud Service web console, click the Network tab.
- Click the IP Reservations tile, and then click Create IP Reservation.
- In the Create Public IP Reservation dialog box,
enter a name for the IP address reservation, and
then click Create.
Note. Do not select an instance from the For Instance list. You'll use this IP address for the instance that you are about to create.
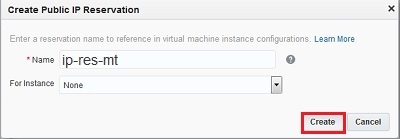
Note. Make a note of this public IP address. You'll use it to access your instance using SSH later on.
Move Required Machine Image Into Your Compute Account
- Go to the Oracle Cloud Marketplace at https://cloud.oracle.com/marketplace/.
- Click on the PRODUCTS drop-down menu and select INFRASTRUCTURE (IaaS) > Compute Cloud
- Enter 'siebel' in the search field and click Go.
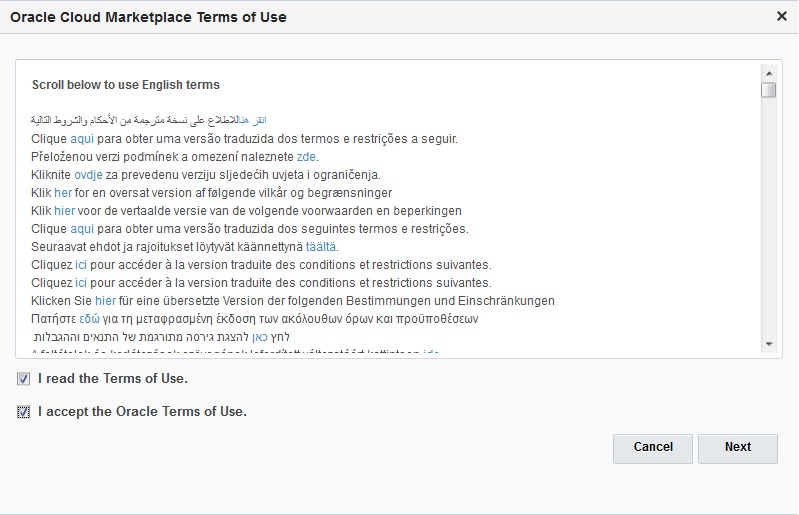
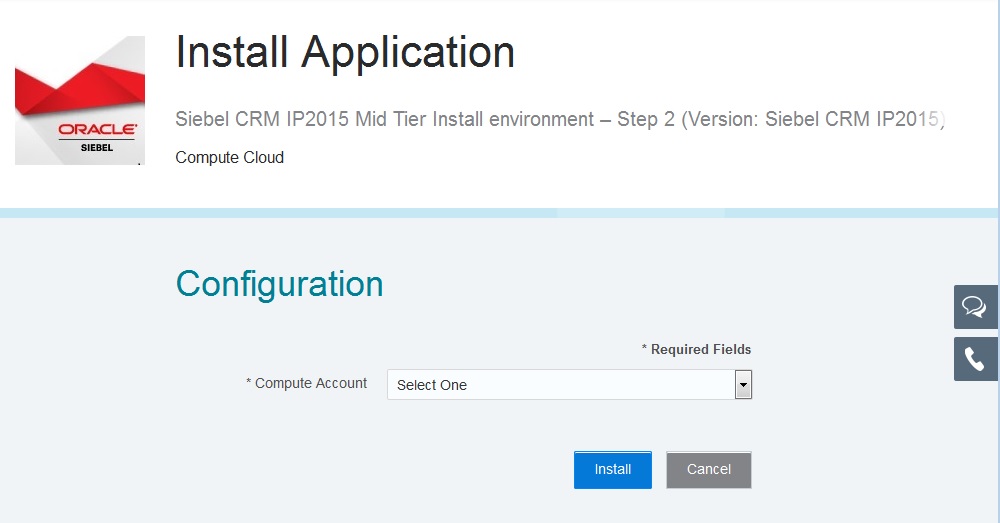
- Drill down on the Marketplace item Siebel IP2015 CRM Mid Tier Install and click the Get App button to start the flow that will move the associated machine image into your Compute account.
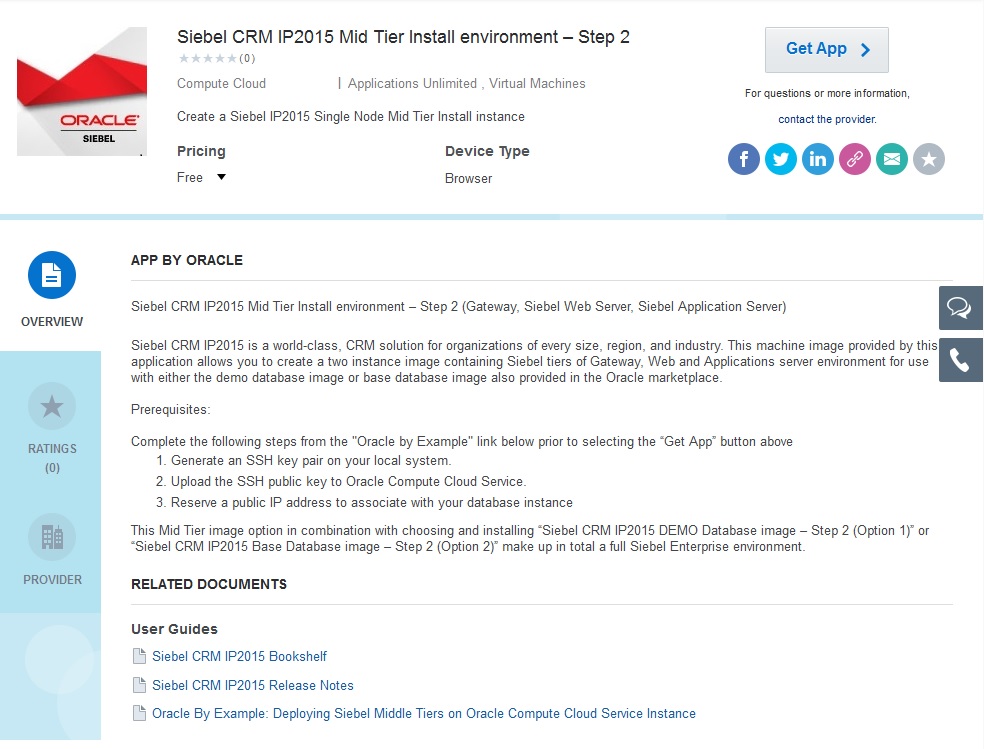
- Accept the terms and conditions.
- Specify your compute account name and click Install.
- A notification that the image is now available in your Compute account appears. Click on Start Compute Console.
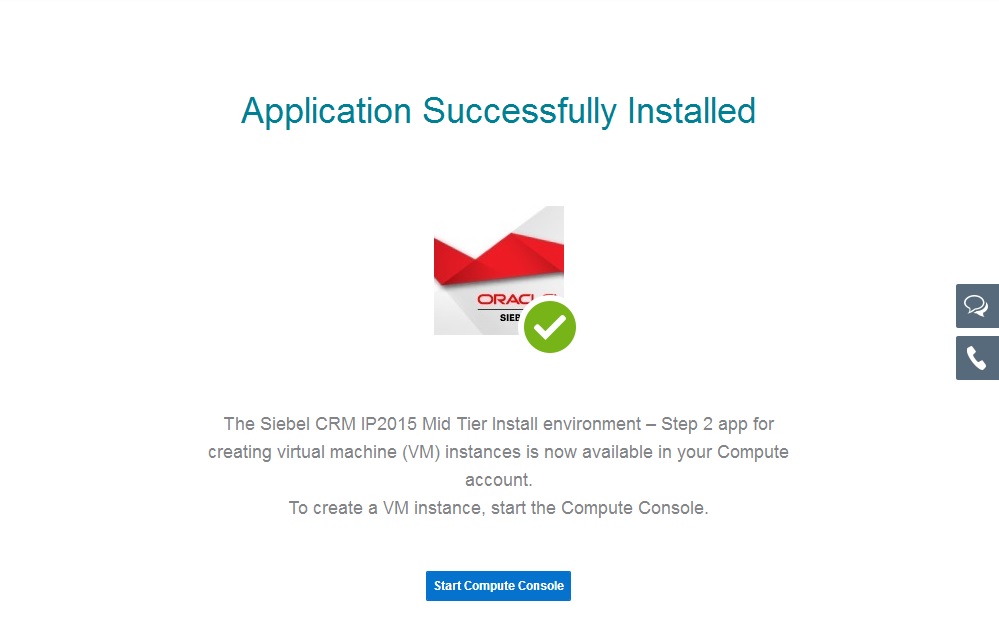
- Enter your compute account domain to which you moved your image and click Go.
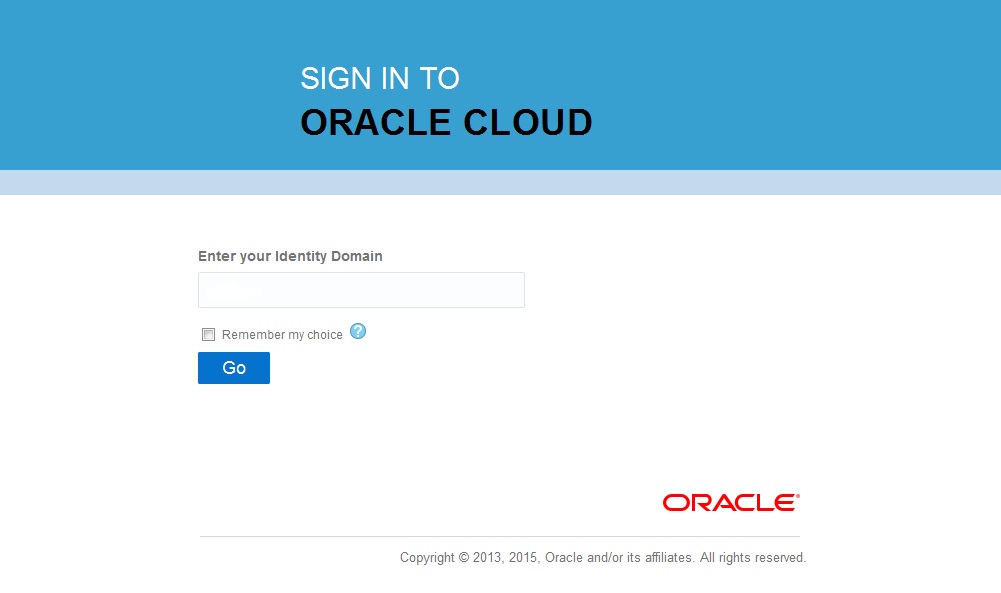
- Login with your credentials and proceed with instance creation

Creating an Instance
- On the Oracle Compute Cloud Service console, click the Overview tab.
- If you are not already on the Instances page, click the Instances tile.
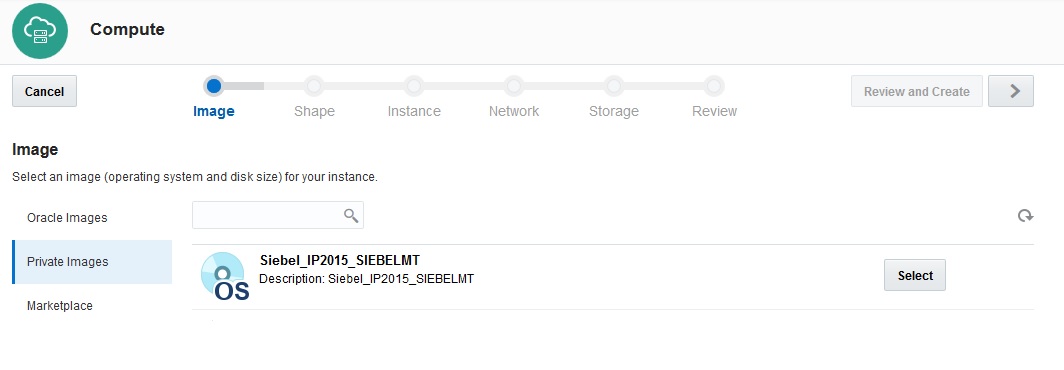
- Click Create Instance.The Compute screen appears. Click Private Images on the left edge of the page.
- Click Select to the right of your newly created image. The button text changes from Select to Selected to indicate your selection. Click the > button at the top right to continue creating the instance.
- Select a shape (number of CPUs and Memory). For the purpose of this tutorial, select oc3 (OCPUs: 1, Memory: 7.5 GB) and then click > to continue creating the instance.

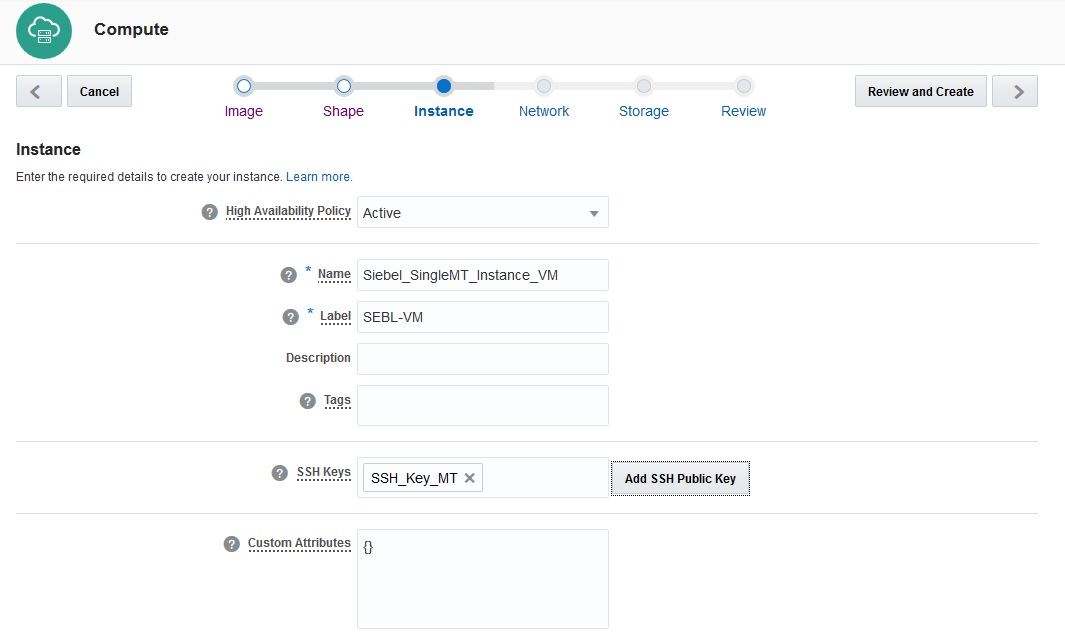
- Complete the Instance fields as described below.
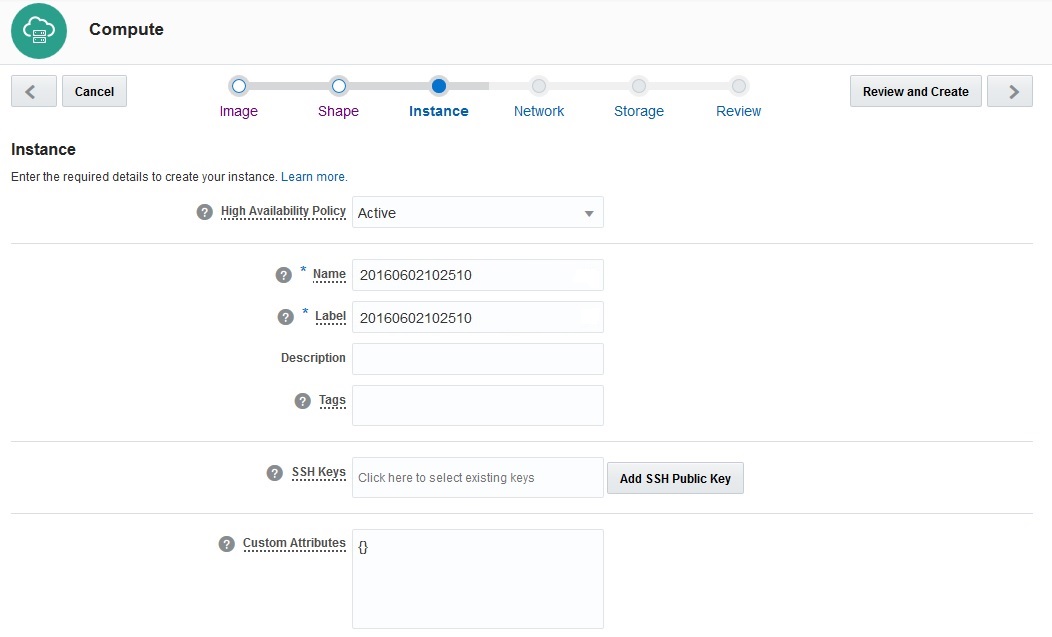
- In the Instance page, select or enter the
following information, and then click >:
- Name: Enter an appropriate name. If you don’t specify a name, the instance name will be generated automatically. For the purpose of this tutorial, enter Siebel_SingleMT_Instance_VM
- Label: Enter a description to help identify the instance, which is SEBL-VM in this example. If you provide a label, the label is used to list the instance on the Overview page.
- Description: Enter a description of this instance.
- Tags: If required, specify a tag to help identify your instance.
- SSH Keys: Select the key you created. If it is not on the list, click Add SSH Public Key to add it.
- Custom Attributes: If needed, add any custom attributes within the brackets (
- When done configuring the Instance page, it should resemble this:
- Click > to continue configuring the instance.
- In the Network page, select or enter the following information, and then click >:
- DNS Hostname Prefix: Enter a string that will be used as a prefix in the domain host name for your instance. For the purpose of this tutorial, enter a value for the DNS Hostname Prefix, such as SBLBMTVM1.
- Network Options: Check the box for Shared Network. Clear the check box for IP Network.
- Public IP Address: Select Persistent Public IP Reservation, and from the list, select the IP reservation that you created earlier, for example ip-res-1.
- Security Lists: Select a security list or if you need a custom security list, click Create Security List.

- In the Storage page, use only the volume for your instance. Use the Remove command (in the menu on the right side) on any other volumes. Click > to continue configuring the instance.

- In the Review page, verify the information that you've entered and then click Create.
Your instance is created.

- Check the status of the Compute Service
instance using the Instances list of the Overview
tab. In this example the status is Preparing
initially and changes to Initializing.
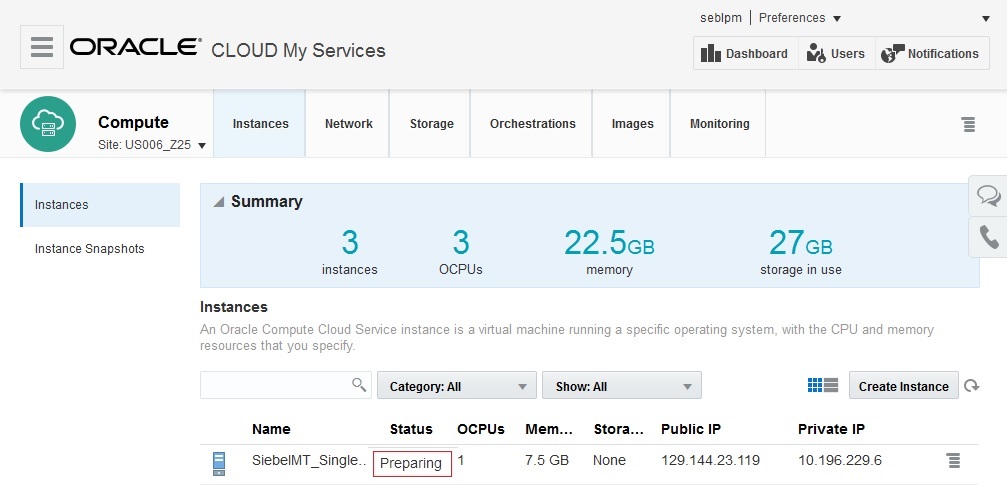

- When the Status has changed to Running, you can
click the view link to get details of the
instance.

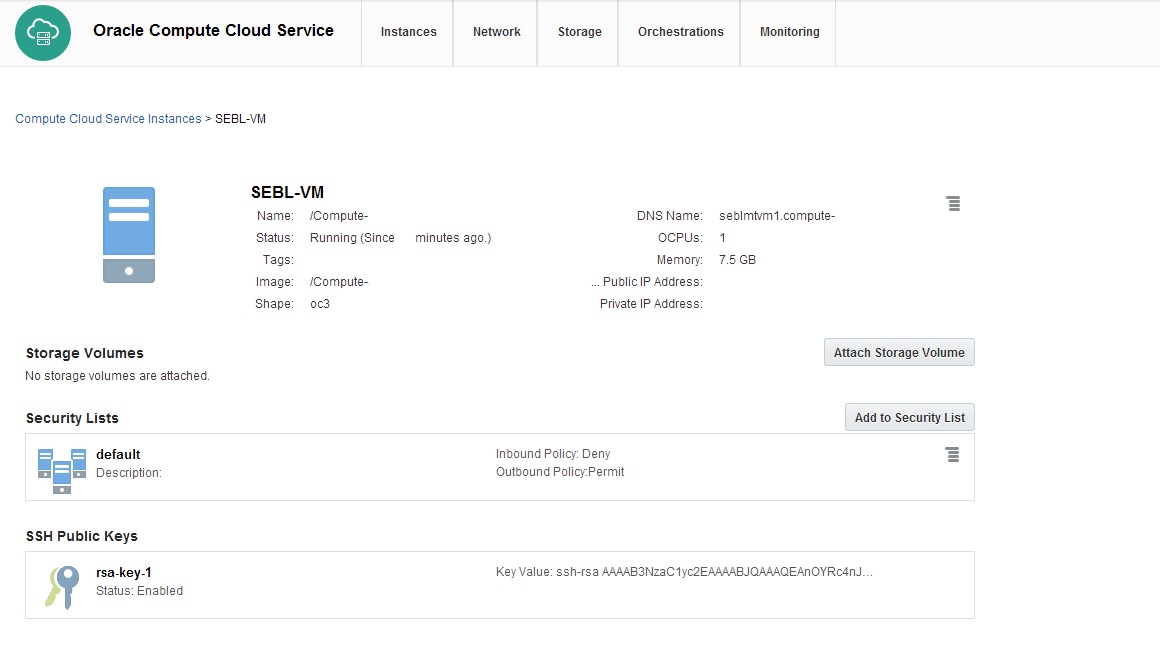
- Instance details.
Configuring Your Instance for HTTP Access
When you create your instance, by default it is configured to allow public access only over SSH, using the SSH key pair that you generated. If you need to enable access for your instance over other protocols, such as HTTP or HTTPS, then you must set up the appropriate security rules to enable access.The Siebel MidTier Configure script will configure the web server to listen for requests on port 7780 so this port must be opened to permit HTTP requests.
Creating a Security List
A security list is a set of instances that can communicate with each other across all protocols and ports. When you create a security rule, you specify a security list as a destination. This allows traffic from a specified source to access instances that are part of the destination security list over a specified protocol and port. To open port 7780 for a specific instance, you must first group those instances in a security list.
To create a security list:
- On the Oracle Compute Cloud Service console, click the Network tab.
- Click the Security Lists tile, and then click Create Security List.
- In the Create Security List dialog box,
select or enter the following information:
- Name: Enter a name for the new security list. For the purpose of this tutorial, enter sebl_webserver_seclist. Note this name. You'll use it later in this tutorial.
- Inbound Policy: Accept the default option, Deny (Drop packets, no reply).
- Outbound Policy: Select Permit (Allow packets).
- Description: Enter a description for the
new security list if desired.

- Click Create.
Adding Your Instance to the Security List
Next, you add the instances hosting your web server to the security list that you just created.
- Click the Overview tab and then the Instances tile.
- From the list of instances displayed, click the SEBLMTVM1 instance name.
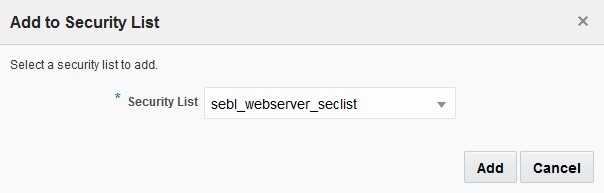
- On the resulting page, click Add to Security List. The Add to Security List dialog box is displayed.
- Select the sebl_webserver_seclist security list that you created earlier.
- Click Attach. The SEBLMTVM1 instance is attached to the security list.
Creating a Security Application
Next, create a security application for port 7780. A security application is a mapping between a port number and port type (TCP, UDP, or ICMP). To open port 7780, you must create a security application for that port.
- Click the Network tab and then the Security Applications tile.
- Click Create Security Application.
- In the Create Security Application dialog
box, select or enter the following
information:
- Name: Enter a name for the new security application. For the purpose of this tutorial, enter tcp_7780. Note this name. You'll use it later in this tutorial.
- Port Type: Select tcp.
- Port Range Start and Port Range End: In both of these fields, enter the port that you want to open, port 7780.
- Description: Enter a description for the new security application (for example, Allow TCP traffic to SBL web server on port 7780).
- Click Create.

Creating a Security Rule
When you create a security list, the instances in the security list are isolated from hosts outside the group. Security rules enable you to override the default access settings of security lists. Each security rule defines a specific communication path, which consists of a source, a destination, and a protocol-port combination over which communication is allowed. Next, create a security rule to allow TCP traffic from the Internet on port 7780.
To create a security rule:
- Click the Network tab.
- Click the Security Rules tile.
- Click Create Security Rule.
- In the Create Security Rule dialog box,
select or enter the following information:
- Name: Enter an appropriate name for the rule. For the purpose of this tutorial, enter allow_seblwebserver_tcp_7780.
- Status: Select Enabled.
- Security Application: Select tcp_7780,
which is the security application that you
created earlier.
Note: Many of the commonly used protocol and port combinations are provided as predefined security applications in Oracle Compute Cloud Service. However, if you wish to specify a particular protocol-port mapping that is not in the list of predefined security applications, you can create the required security application by going to the Security Applications tile.
- Source: From the Security IP Lists drop-down list, select public-internet.
- Destination: Select the sebl_webserver_seclist security list that you created earlier.
- Description: Enter a description for the
rule (for example, Allow TCP traffic to
web servers on port 7780).
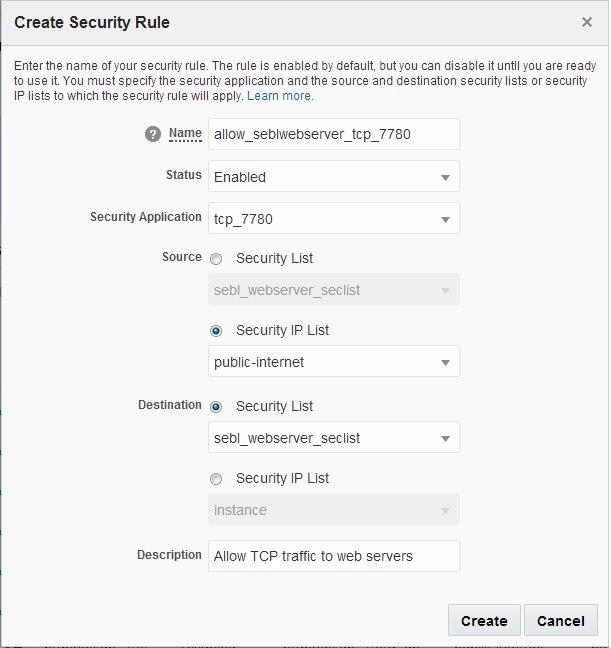
- Click Create.
Port 7780 on the instances in the sebl_webserver_seclist is now open to HTTP requests. At any time, you can temporarily suspend security rules by disabling them. You can also delete security rules that you no longer need.
Logging In to Your Instance Using SSH
Logging In From a UNIX or UNIX-Like System
- Enter the following command:
ssh -o ServerAliveInterval=5 -o ServerAliveCountMax=1 $HOST -i/path/to/<private_key_name> opc@<public ip address of instance>Note. If you don't know the public IP address of your instance, you can find it by going to the Instances tile on the Oracle Compute Cloud Service console and clicking your instance to get to the details page.
Important! The command text
ServerAliveInterval=5 –o
                                      ServerAliveCountMax=1 $HOST
is mandatory to prevent the SSH connection from receiving a timeout while running the Siebel DPK. - If you entered a passphrase when creating your SSH key pair, enter the passphrase when prompted.
- The first time you connect to your instance, the ssh utility prompts you to confirm the public key. In response to the prompt, enter yes.
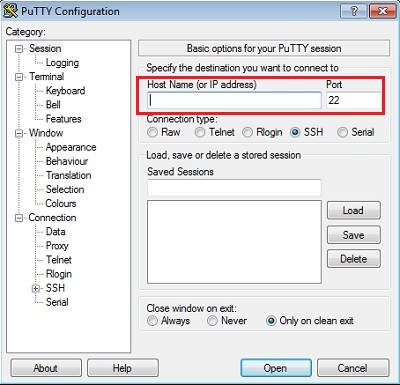
Logging In From a Windows System
- Start PuTTY. The PuTTY Configuration window is displayed, showing the Session panel.
- In the Host Name (or IP address)
field, enter the public IP address of your
instance.
Note. If you don't know the public IP address of your instance, you can find it by going to the Instances tile on the Oracle Compute Cloud Service console and clicking your instance to get to the details page.
- In the Connection type
field, select SSH if it is
not already selected.
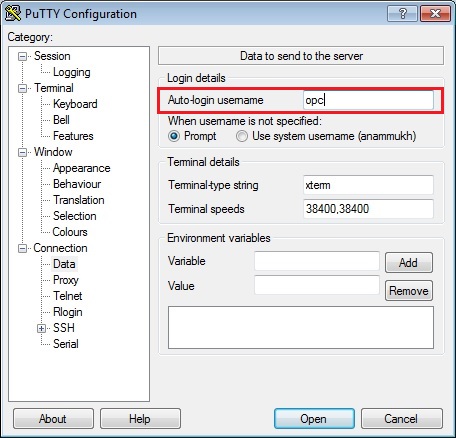
- In the Category pane, expand Connection, and then click Data. The Data panel is displayed.
- In the Auto-login username
field, enter opc. Confirm
that the When username is not
specified option is set to Prompt.
- In the Category pane,
click Connection. Enter 5
in the Seconds between keepalives (0
to turn off) text box.
Ensure that the Enable TCP keepalives (SO_KEEPALIVE option) check box is selected.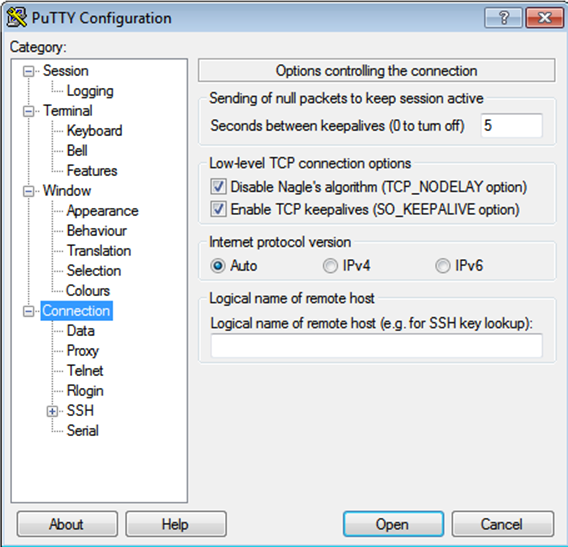
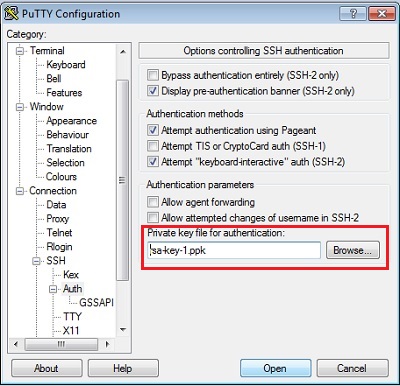
- In the Category pane, expand SSH, and then click Auth. The Auth panel is displayed.
- In the Private key file for
authentication field, click Browse
and select the private key file that you saved
earlier, rsa-key-1.ppk in
this example.
- In the Category tree, click Session.
The Session panel is displayed. - In the Saved Sessions field, enter a name for this connection configuration, and then click Save.
- Click Open to open the
connection.
The PuTTY Configuration window is closed and the PuTTY window is displayed. - Enter the passphrase you had provided for your SSH key pair.
- The first time you connect to your instance, the PuTTY Security Alert window is displayed, prompting you to confirm the public key. Click Yes to continue.
Execute the Siebel CRM IP2015 MT configure script from the created instance
After you login to the VM, execute the following commands:
sudo sumount /dev/xvdb4 /dataexit/app/scripts/Configure_MT.sh
This script will attach your Siebel mid tier instance to your Siebel Demo or Base database instance.
Following is the snapshot of a sample script execution

Following is the snapshot of the page where you can find details of your siebel environment
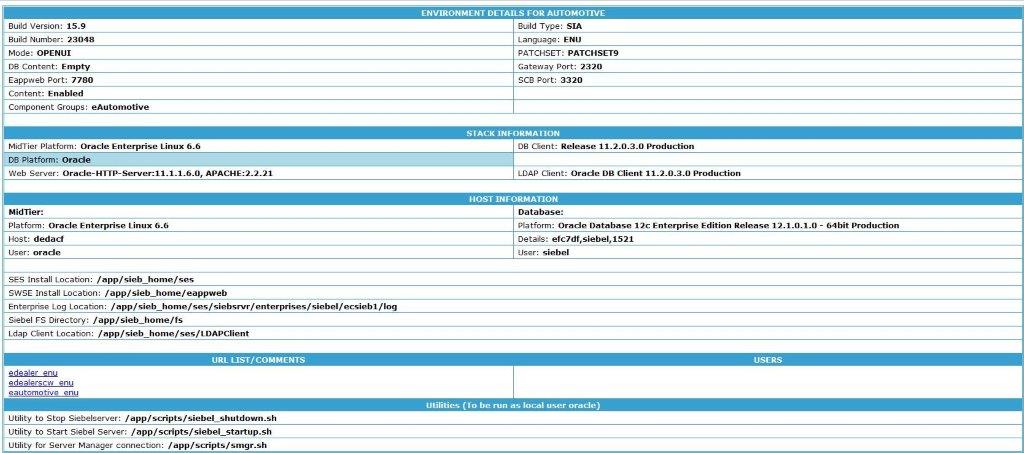
Logging In to the Siebel Application
After the Siebel Mid Tier configuration has completed, you can log in to the Siebel environment details page in a browser using the public IP address that you reserved earlier. This page contains list of Siebel applications and users
http://<public IP address>:<port number>/
For example, if your public IP address is 129.144.29.34 and your web server is listening on port 7780, use http://129.144.29.34:7780/ or http://oc-129-144-29-34.compute.oraclecloud.com:7780/ to log in to the Siebel environment details in your Oracle Public Cloud identity domain.
Want to Learn More?
-
Search for Siebel Bookshelf in My Oracle Support