Before You Begin
Purpose
This tutorial shows you how to deploy a complete PeopleSoft application demo database environment using PeopleSoft PeopleTools 8.55 and an Oracle 12c pluggable database to a single virtual machine in Oracle Compute Cloud Service.
In this tutorial, you will provision your virtual machine instance using an Oracle-provided Oracle Linux image and boot your instance from a persistent boot volume. You will set up security rules to enable HTTP access to your PeopleSoft instance using port 8000. You will also create an additional persistent storage volume from which you will stage and execute the PeopleSoft Deployment Package (DPK) to install the Web and Application Servers and Oracle database server.
Time to Complete
90 minutes
Background
Oracle Compute Cloud Service enables you to rapidly provision virtual machines (VMs) on Oracle Cloud with the necessary storage and networking resources. After you have created your virtual machine instance, you can install a PeopleSoft application database and run workloads on the VM.
What Do You Need?
A subscription to Oracle Compute Cloud Service is
mandatory and you must be a user with the Compute_Operations
and Storage Read Write Group roles.
For more details on creating Oracle Compute Cloud Service instances, see the following:
- How to Begin with Oracle Compute
Cloud Service Subscriptions in Using
Oracle Compute Cloud Service
- Creating a Single Instance Using the Oracle Compute Cloud Service Web Console.
Process Overview
To create the required Oracle Compute Cloud Service instance to deploy a PeopleSoft application, you will:
- Download the PeopleSoft Deployment Package (DPK) files.
- Generate an SSH key pair on your local system.
- Upload the SSH public key to Oracle Compute Cloud Service.
- Reserve a public IP address to associate with your instance.
- Create storage volumes to boot your instance and to stage and deploy the DPK.
- Create your instance, associate the reserved public IP address with it, configure it for SSH access and attach your storage volumes.
- Configure your instance for HTTP access.
- Use the SSH key to log in and mount the storage volumes on your Oracle Linux instance, transfer the zipped PeopleSoft DPK files to the attached staging volume and execute the DPK.
Downloading the DPKs
Download the PeopleSoft DPKs from My Oracle Support.
See PeopleSoft Update Manager Home Page, My Oracle Support, Doc ID 1641843.2, for information on accessing the PeopleSoft application DPKs.
Generating an SSH Key Pair
When you create your Oracle Compute Cloud Service instance, you must provide an SSH public key that will be used for authentication when you log in to the instance. Generate your SSH key pair and upload the SSH public key to the Oracle Compute Cloud Service before you start to create your instance.
Generating an SSH Key Pair on UNIX or UNIX-Like Systems Using ssh-keygen
- Run the
ssh-keygencommand.ssh-keygen -b 2048 -t rsa - The command prompts you to enter the path to
the file in which you want to save the key. A
default path and file name are suggested in
parentheses. For example:
/home/user_name/.ssh/id_rsa. To accept the default path and file name, press Enter. Otherwise, enter the required path and file name, and then press Enter. - The command prompts you for a passphrase.
Enter a passphrase.
Note that the passphrase isn't displayed when you type it in. Remember the passphrase. If you forget the passphrase, you can't recover it. - When prompted, enter the passphrase again to
confirm it.
The command generates an SSH key pair consisting of a public key and a private key, and saves them in the specified path. The file name of the public key is created automatically by appending.pubto the name of the private key file. For example, if the file name of the SSH private key isid_rsa, then the file name of the public key would beid_rsa.pub. - Make a note of the path where you've saved
the SSH key pair.
When you create instances, you must provide the SSH public key. When you log in to an instance, you must specify the corresponding SSH private key and enter the passphrase when prompted.
Generating an SSH Key Pair on Windows Using the PuTTY Key Generator
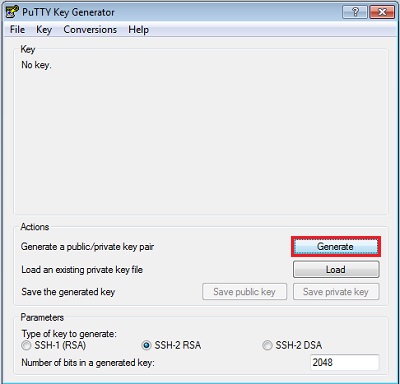
- Find
puttygen.exein the PuTTY folder on your computer and double-click it. - Accept the default key type, SSH-2
RSA, and set the Number of
bits in a generated key to 2048,
if it is not already set. Then click Generate.
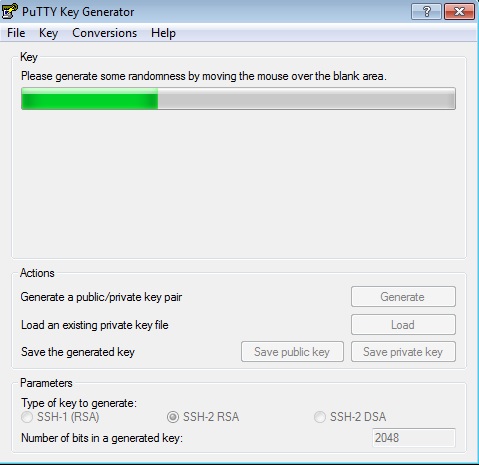
- Move your mouse around the blank area to
generate randomness. The SSH key pair is
generated.
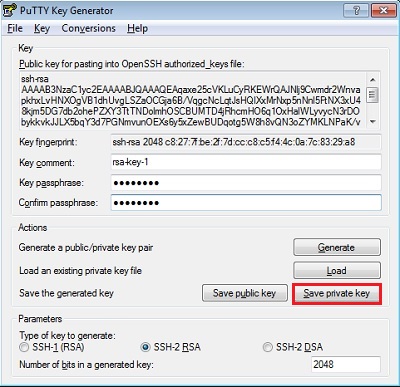
- Save your private key.
- The key comment is the name of the key. You can keep the generated key comment or create your own.
- Enter a passphrase in the Key
passphrase and the Confirm
passphrase fields.
Note: Remember the passphrase. You can't recover a passphrase if you forget it.
- To save the private key in the PuTTY PPK
format, click Save private key.
Enter the same name as you used for the
key comment so that you know which public
key to use this private key with. The
private key is saved in PuTTY's Private
Key (PPK) format, which is a proprietary
format that works only with the PuTTY
toolset. You can use this key whenever you
use PuTTY for SSH.
- Next, save your SSH public key.
- To save the public key, in the PuTTY Key
Generator, select all of the characters in
the Public key for pasting into
OpenSSH authorized_keys file
field.
Note: Make sure you select all the characters, not just the ones you can see in the narrow window. If there is a scroll bar next to the characters, you aren't seeing all the characters.
- Right-click somewhere in the selected
text and select Copy
from the menu.
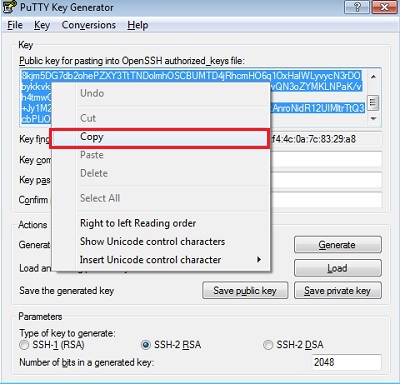
- Open a text editor and paste the characters. Ensure that you paste the text at the first character in the text editor, and don't insert any line breaks.
- Save the key using the same root name that you used for the private key. Add a .pub extension. You can give it any extension you want, but .pub is a useful convention to indicate that this is a public key.
- Exit PuTTY Key Generator.
- To save the public key, in the PuTTY Key
Generator, select all of the characters in
the Public key for pasting into
OpenSSH authorized_keys file
field.
- Make a note of the public and private key
names and where they are saved.
When you create instances, you must specify the SSH public key. When you log in to an instance, you must provide the path to the corresponding SSH private key and enter the passphrase when prompted.
Uploading the SSH Key
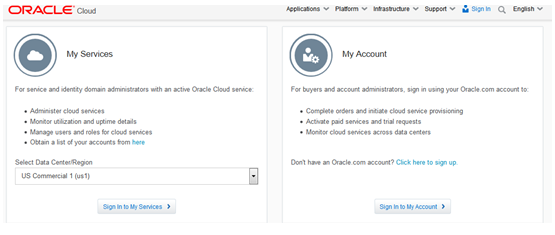
- Sign in to the Oracle Cloud My Services
application at https://cloud.oracle.com/sign_in.
- Select the Data Center/Region that hosts your
Oracle Cloud identity domain and click the Sign
In to My Services button:
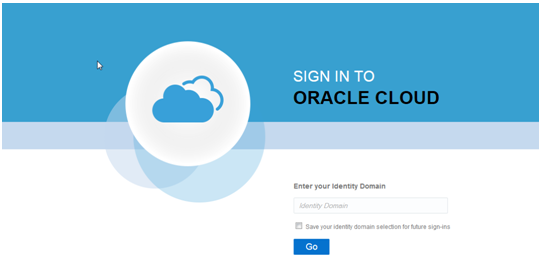
- Enter your identity domain on the Oracle Cloud
sign in page and then click the Go
button:
- Enter a valid user name and password for your
Identity Domain and then click Sign In:

- Select Oracle Compute Cloud Service
from the menu in the upper-left corner of the My
Services page:

- Select Manage SSH Keys from
the menu in the upper-right corner of the Oracle
Compute Cloud Service page.

The SSH Public Keys page is displayed. - Click Add SSH Public Key.
- In the Add SSH Public Key dialog box, enter a
name and the value of the SSH public key you
generated, and then click Add.
Note. Paste the key value exactly as it was generated. Don't append or insert any extra characters, line breaks, or spaces.
Your SSH public key is added to Oracle Compute Cloud Service.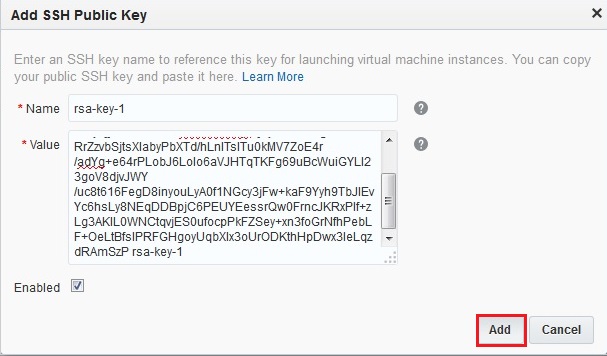
Creating an IP Address Reservation
Next, create an IP address reservation. Later in this tutorial, you'll associate this IP address to your instance when you create it.
- On the Oracle Compute Cloud Service web console, click the Network tab.
- Click the IP Reservations tile, and then click Create IP Reservation.
- In the Create Public IP Reservation dialog box,
enter a name for the IP address reservation, and
then click Create.
Note. Do not select an instance from the For Instance list. You'll use this IP address for the instance that you are about to create.
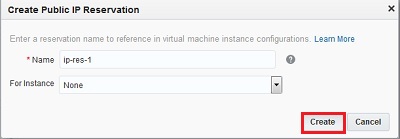
Note. Make a note of this public IP address. You'll use it to access your instance using SSH later on.
Creating Storage Volumes
When you create an Oracle Compute Cloud Service instance, by default, it is set up to boot from a non-persistent disk. To use a persistent boot disk, create a bootable storage volume. If you use a bootable storage volume as the boot disk for an instance, then any changes that you make to the boot disk aren't lost even when you delete the instance.
Creating a Bootable Storage Volume
For this tutorial, you will create a bootable storage volume.
To create a bootable storage volume:
- On the Oracle Compute Cloud Service console, click the Overview tab.
- Click the Storage tile,
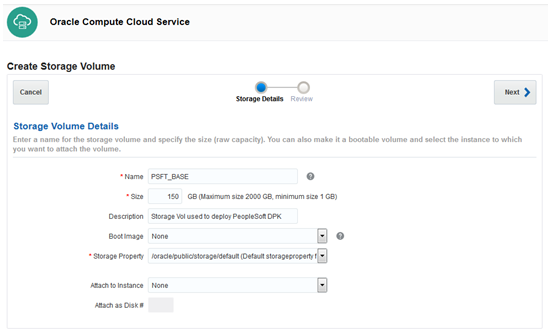
and then click Create Storage Volume.
The Create Storage Volume wizard starts, as
shown in these examples.

- In the Storage Details page, select or enter
the following and then click Next.
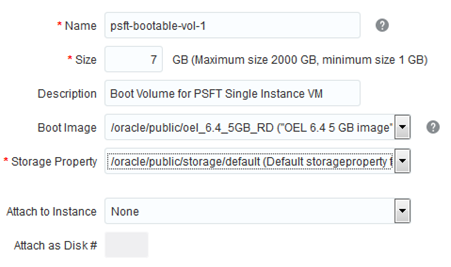
- Name: Enter an appropriate name. For the purpose of this tutorial, enter psft-bootable-volume-1.
- Size: Enter an appropriate size, in GB. For the purpose of this tutorial, enter 7. Note that the size of the storage volume must be at least 5% larger than the selected image size
- Description: Enter an appropriate description. For the purpose of this tutorial, enter Boot Volume for PSFT Single Instance VM.
- Boot Image: select oracle/public/oel_6.4_5 GB image.
- Storage Property: Select the default property for storage volumes, /oracle/public/storage/default.
- Attach to Instance: This is set to None or No instances found by default. Keep this default. You'll attach this storage volume to the instance that you are about to create.
- Attach as Disk #: This field is grayed
out when the Attach to Instance
field is set to None.
- Click Next. In the Review page, verify the information that you've entered and then click Create. Your storage volume is created.
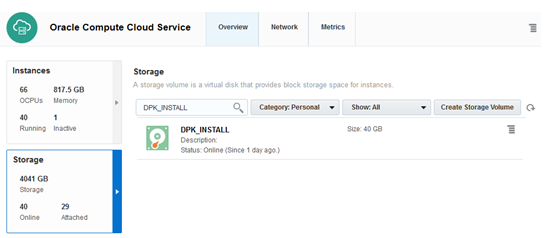
Creating a Separate Storage Volume to Stage the Downloaded DPK Zip Files
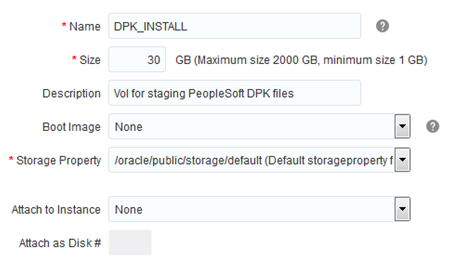
For this tutorial, in addition to the bootable storage volume, you will create a persistent storage volume on which to store the downloaded PeopleSoft DPK zip files. Repeat the steps in the preceding section, Creating a Bootable Storage Volume, using the following values. Do not select a boot image.

- Name: DPK_INSTALL
- Size: 30 GB
- Description: For example, Vol for staging PeopleSoft DPK Files
- Boot Image: None
- Storage Property: Select the default property for storage volumes, /oracle/public/storage/default.
- Attach to Instance: None
- Attach as Disk #: This field is grayed out
when the Attach to Instance
field is set to None.
Creating a Storage Volume to Deploy the PeopleSoft DPK
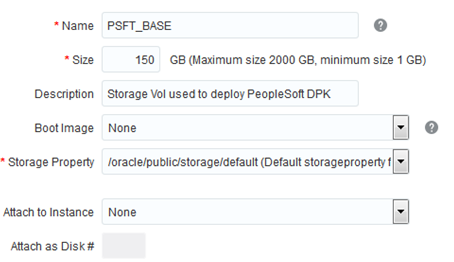
Next you will create a separate storage volume on which to deploy the DPK. Repeat the steps in the preceding section, Creating a Bootable Storage Volume, using the values below. Do not select a boot image.
- Name: PSFT_BASE
- Size: 150 GB
- Description: Storage Vol used to deploy PeopleSoft DPK.
- Boot Image: None
- Storage Property: Select the default property for storage volumes, /oracle/public/storage/default.
- Attach to Instance: None
- Attach as Disk #: This field is grayed out
when the Attach to Instance
field is set to None.
Creating an Instance
- On the Oracle Compute Cloud Service console, click the Overview tab.
- If you are not already on the Instances page, click the Instances tile.
- Click Create Instance. The
Create Instance wizard starts, as shown in the
example in this and the next step.
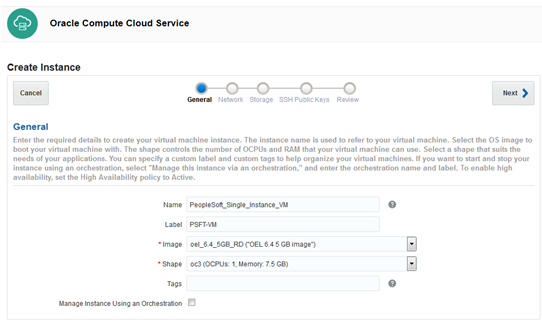
- In the General page, select or enter the
following information, and then click Next:
- Name: Enter an appropriate name. If you don’t specify a name, the instance name will be generated automatically. For the purpose of this tutorial, enter PeopleSoft_Single_Instance_VM.
- Label: Enter a description to help identify the instance, which is PSFT-VM in this example. If you provide a label, the label is used to list the instance on the Overview page.
- Image: Select the image that you want to use. For the purpose of this tutorial, select one of the OEL 6.4 images, for example oel_6.4_5GB_RD.
- Shape: Select an appropriate shape for your instance. The shape determines the number of CPUs and RAM that your instance will have. For the purpose of this tutorial, select oc3 (OCPUs: 1, Memory: 7.5 GB).
- Tags: If required, specify a tag to help identify your instance.
- Manage Instance Using an Orchestration: If
required, you can use an orchestration to
create, manage, and stop this instance. For
the purpose of this tutorial, you don't need
to select this option.

- In the Network page, shown in these examples,
select the following, and then click Next:

- DNS Hostname Prefix: Enter a string that will be used as a prefix in the domain host name for your instance. For the purpose of this tutorial, enter a value for the DNS Hostname Prefix, such as PSFTOPCVM1.
- Public IP Address: Select Persistent Public IP Reservation, and from the list, select the IP reservation that you created earlier, for example ip-res-1.
- Configure Instance for Public SSH
Access: To enable public SSH access
to your instance, select this option.

- In the Storage page, select the following, and
then click Next:
- Select the psft-bootable-volume-1 bootable
storage volume that you created earlier from
the Available Storage Volumes
list and move it to the Selected
Storage Volumes list. The storage
volume that you want to boot from must be the
first volume in the Selected Storage
Volumes list.
Note: You can select only storage volumes that are not already attached to an instance. Storage volumes that have been attached are displayed but grayed out.
- If you want your instance to boot from a
bootable storage volume other than the default
(non-persistent) volume, then from the Boot
Volume list, select the appropriate
bootable storage volume, in this case psft-bootable-volume-1.
Click Next.

- Select the psft-bootable-volume-1 bootable
storage volume that you created earlier from
the Available Storage Volumes
list and move it to the Selected
Storage Volumes list. The storage
volume that you want to boot from must be the
first volume in the Selected Storage
Volumes list.
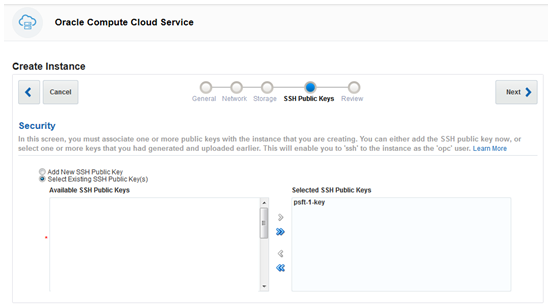
- In the SSH Public Keys page, select the
following, and then click Next:
- Select the Select Existing SSH Public Key(s) option.
- From the Available SSH Public Keys
list, select the SSH public key that you
uploaded earlier, psft-1.key
in this example, and move it to the Selected
SSH Public Keys list.
- In the Review page, verify the information that you've entered and then click Create. Your instance is created.
Attaching the Staging (DPK_INSTALL) and Deployment (PSFT_BASE) Storage Volumes to the New PeopleSoft Instance
Now you will attach the persistent DPK_INSTALL and PSFT_BASE storage to the instance. Storage volumes that are attached to a running instance, rather than attached at the time that the instance is created, can subsequently be detached and attached to a different instance.
- Click the Overview tab and then click the Storage tile.
- Find the DPK_INSTALL storage volume.
- From the
 menu, select Attach Instance.
 - Select the PSFTOPCVM1 instance.
The Attach as Disk # field is filled automatically with the next available index at which the volume can be attached. You can leave this field at the automatically selected disk number or enter a higher number up to 10. The disk number that you specify here determines the device name. The disk attached at index 1 is named /dev/xvdb, the disk at index 2 is /dev/xvdc, the disk at index 3 is /dev/xvdd, and so on. Make a note of the disk number. You’ll need it later when you mount the storage volume on the instance. - Click Attach.
- Find the PSFT_BASE storage volume.
- From the
menu, select Attach Instance.
- Select the PSFTOPCVM1 instance.
- Click Attach.

Configuring Your Instance for HTTP Access
When you create your instance, by default it is configured to allow public access only over SSH, using the SSH key pair that you generated. If you need to enable access for your instance over other protocols, such as HTTP or HTTPS, then you must set up the appropriate security rules to enable access.The PeopleSoft DPK will configure the web server to listen for requests on port 8000 so this port must be opened to permit HTTP requests.
Creating a Security List
A security list is a set of instances that can communicate with each other across all protocols and ports. When you create a security rule, you specify a security list as a destination. This allows traffic from a specified source to access instances that are part of the destination security list over a specified protocol and port. To open port 8000 for a specific instance, you must first group those instances in a security list.
To create a security list:
- On the Oracle Compute Cloud Service console, click the Network tab.
- Click the Security Lists tile, and then click Create Security List.
- In the Create Security List dialog box,
select or enter the following information:
- Name: Enter a name for the new security list. For the purpose of this tutorial, enter psft_webserver_seclist. Note this name. You'll use it later in this tutorial.
- Inbound Policy: Accept the default option, Deny (Drop packets, no reply).
- Outbound Policy: Select Permit (Allow packets).
- Description: Enter a description for the
new security list if desired.
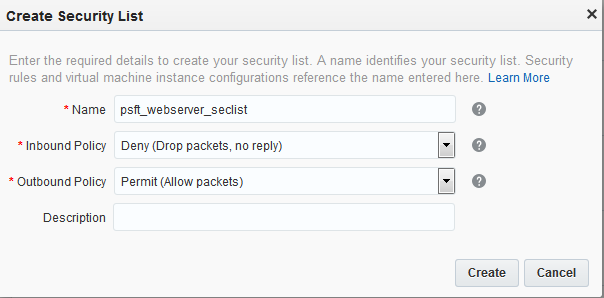
- Click Create.
Adding Your Instance to the Security List
Next, you add the instances hosting your web server to the security list that you just created.
- Click the Overview tab and then the Instances tile.
- From the list of instances displayed, click the PSFTOPCVM1 instance name.
- On the resulting page, click Add to Security List. The Add to Security List dialog box is displayed.
- Select the psft_webserver_seclist security list that you created earlier.
- Click Attach. The PSFTOPCVM1 instance is attached to the security list.
Creating a Security Application
Next, create a security application for port 8000. A security application is a mapping between a port number and port type (TCP, UDP, or ICMP). To open port 8000, you must create a security application for that port.
- Click the Network tab and then the Security Applications tile.
- Click Create Security Application.
- In the Create Security Application dialog
box, select or enter the following
information:
- Name: Enter a name for the new security application. For the purpose of this tutorial, enter tcp_8000. Note this name. You'll use it later in this tutorial.
- Port Type: Select tcp.
- Port Range Start and Port Range End: In both of these fields, enter the port that you want to open, port 8000.
- Description: Enter a description for the new security application (for example, Allow TCP traffic to PSFT web server on port 8000).
- Click Create.

Creating a Security Rule
When you create a security list, the instances in the security list are isolated from hosts outside the group. Security rules enable you to override the default access settings of security lists. Each security rule defines a specific communication path, which consists of a source, a destination, and a protocol-port combination over which communication is allowed. Next, create a security rule to allow TCP traffic from the Internet on port 8000.
To create a security rule:
- Click the Network tab.
- Click the Security Rules tile.
- Click Create Security Rule.
- In the Create Security Rule dialog box,
select or enter the following information:
- Name: Enter an appropriate name for the rule. For the purpose of this tutorial, enter allow_psftwebserver_tcp_8000.
- Status: Select Enabled.
- Security Application: Select tcp_8000,
which is the security application that you
created earlier.
Note: Many of the commonly used protocol and port combinations are provided as predefined security applications in Oracle Compute Cloud Service. However, if you wish to specify a particular protocol-port mapping that is not in the list of predefined security applications, you can create the required security application by going to the Security Applications tile.
- Source: From the Security IP Lists drop-down list, select public-internet.
- Destination: Select the psft_webserver_seclist security list that you created earlier.
- Description: Enter a description for the
rule (for example, Allow TCP traffic to
web servers on port 8000).

- Click Create.
Port 8000 on the instances in the psft_webserver_seclist is now open to HTTP requests. At any time, you can temporarily suspend security rules by disabling them. You can also delete security rules that you no longer need.
Logging In to Your Instance Using SSH
Logging In From a UNIX or UNIX-Like System
- Enter the following command:
ssh -o ServerAliveInterval=5 -o ServerAliveCountMax=1 $HOST -i/path/to/<private_key_name> opc@<public ip address of instance>Note. If you don't know the public IP address of your instance, you can find it by going to the Instances tile on the Oracle Compute Cloud Service console and clicking your instance to get to the details page.
Important! The command text
ServerAliveInterval=5 –o
                                      ServerAliveCountMax=1 $HOST
is mandatory to prevent the SSH connection from receiving a timeout while running the PeopleSoft DPK. - If you entered a passphrase when creating your SSH key pair, enter the passphrase when prompted.
- The first time you connect to your instance, the ssh utility prompts you to confirm the public key. In response to the prompt, enter yes.
Logging In From a Windows System
- Start PuTTY. The PuTTY Configuration window is displayed, showing the Session panel.
- In the Host Name (or IP address)
field, enter the public IP address of your
instance.
Note. If you don't know the public IP address of your instance, you can find it by going to the Instances tile on the Oracle Compute Cloud Service console and clicking your instance to get to the details page.
- In the Connection type
field, select SSH if it is
not already selected.

- In the Category pane, expand Connection, and then click Data. The Data panel is displayed.
- In the Auto-login username
field, enter opc. Confirm
that the When username is not
specified option is set to Prompt.

- In the Category pane,
click Connection. Enter 5
in the Seconds between keepalives (0
to turn off) text box.
Ensure that the Enable TCP keepalives (SO_KEEPALIVE option) check box is selected.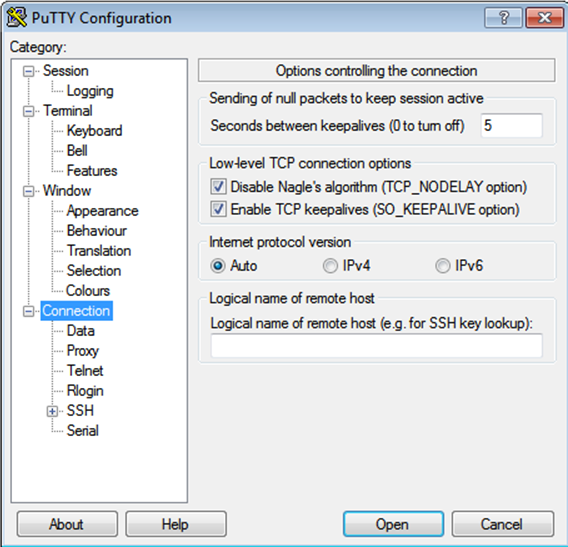
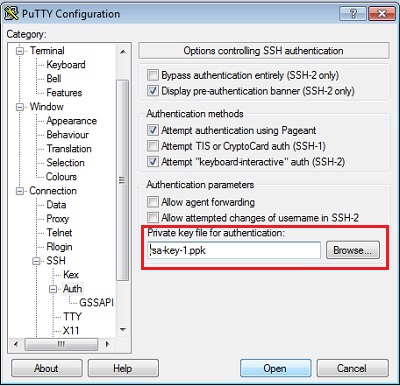
- In the Category pane, expand SSH, and then click Auth. The Auth panel is displayed.
- In the Private key file for
authentication field, click Browse
and select the private key file that you saved
earlier, psa-key-1.ppk in
this example.
- In the Category tree, click Session.
The Session panel is displayed. - In the Saved Sessions field, enter a name for this connection configuration, and then click Save.
- Click Open to open the
connection.
The PuTTY Configuration window is closed and the PuTTY window is displayed. - Enter the passphrase you had provided for your SSH key pair.
- The first time you connect to your instance, the PuTTY Security Alert window is displayed, prompting you to confirm the public key. Click Yes to continue.
Mounting Storage Volumes on Your Oracle Linux Instance
A storage volume is a virtual disk that provides persistent block storage space for instances in Oracle Compute Cloud Service. To access a storage volume, you must attach it to your instance and mount it.
Note. When an instance is re-created, storage volumes that were attached manually (that is, not attached automatically through the orchestration that was used to create the instance) must be attached again.
When an instance that’s set up to boot from a non-persistent boot disk is re-created, all the storage volumes attached to the instance must be mounted again.
After attaching a storage volume to an instance, (see Attaching a Storage Volume to an Instance) mount it as follows:
- Identify the disk number of the storage volume that you want to mount. See Viewing Details of a Storage Volume.
- Log in to the instance using SSH. See Logging In to an Oracle-Provided Oracle Linux Instance.
- List the devices available on your instance with
the following command:
ls /dev/xvd*Device names start from
/dev/xvdband are determined by the index number that you assign while attaching a storage volume. For example, if you attached a storage volume at index 1, the volume gets the device name,/dev/xvdb. The storage volume at index 2 would be/dev/xvdc, the storage volume at index 3 would be/dev/xvdd, and so on. - Identify the device name corresponding to the
disk number that you want to mount.
For example, if you want to mount the storage volume that you had attached at index 3, the device name would be
/dev/xvdd. - Use a tool such as mkfs to create file systems
on the two non-bootable storage volumes. For
example, to create an ext3 file system on
/dev/xvdc and /dev/xvdd, run the following
commands:
sudo mkfs -t ext3 /dev/xvdc

sudo mkfs -t ext3 /dev/xvdd - Create mount points on your instance for the
DPK_INSTALL and PSFT_BASE volumes. Run the
following commands as the opc user:
sudo mkdir /DPK_INSTALL

sudo mkdir /PSFT_BASE - Mount the storage volume on the mount point that
you created on your instance. For example, to
mount the device /dev/xvdc at the /DPK_INSTALL
directory and /dev/xvdd at the /PSFT_BASE
directory, run the following commands:
sudo mount /dev/xvdc /DPK_INSTALL

sudo mount /dev/xvdd /PSFT_BASE
If you prefer, you can specify the disk UUID instead of the device name in the mount commands. To find out the UUID of the disks attached to your instance, run the
blkidcommand.
Copying the DPK Files to Oracle Cloud
Copy the downloaded PeopleSoft DPK zip files to the Oracle Linux instance. If you have copied the downloaded PeopleSoft DPK zip files to a local Linux server, you can copy them to the staging directory (DPK_INSTALL) on your Oracle Cloud Linux instance using sftp or scp.
Here is an example using scp from Linux:
scp -i /path/to/private_ssh_key_name  /path_to_DPK_zip_file/DPK_file_name.zip
opc@public_ip_address_of_instance:DPK_INSTALL/DPK_file_name.zip
Consider running the scp as a background process using the screen command.
Running the PeopleSoft DPK
After you have copied the DPK files to your Oracle Compute Cloud Service Linux instance, you will use the PeopleSoft Bootstrap DPK to set up a complete PeopleSoft environment, including a PeopleSoft application database and the mid-tier components.
- Extract the first DPK zip file (Filename.1ofn.zip) in the DPK_INSTALL directory on the Linux VM. This will create a directory called setup in DPK_INSTALL.
- Open a command prompt and run the
psft-dpk-setup.shscript from DPK_INSTALL/setup as follows.
Thefulltieroption sets up a complete PeopleSoft environment.-bash-4.1$ sudo sh psft-dpk-setup.sh -env_type fulltier - The script displays messages indicating the
steps in the setup process.
The success or failure of each step is indicated by
[ OK ]or[ FAILURE ]. - Specify the /PSFT_BASE that you created earlier
when prompted for the base directory to extract
the DPKs.
PeopleSoft base Filesystem is used to extract the PeopleSoft DPKs as well as for deploying PeopleSoft Components. This Filesystem should be accessible on the VM and must have write permission. Please Enter the PeopleSoft Base Filesystem [/opt/oracle/psft]: Are you happy with your answer? [y|n|q]: - Provide the following information at the
prompts. The bootstrap script provides information
on the requirements for each item:
- Database name: For example, HCM92
- PeopleSoft Connect ID: For example, people
- PeopleSoft Connect ID password
- Application Server Domain password (optional)
- Oracle WebLogic admin password
Logging In to the PeopleSoft Application
After the DPK deployment has completed, you can log in to the PeopleSoft application in a browser using the public IP address that you reserved earlier:
http://<public IP address>:<port number>/ps/signon.html
For example, if your public IP address is 192.0.2.34 and your web server is listening on port 8000, use http://192.0.2.34:8000/ps/signon.html to log in to the PeopleSoft application in your Oracle Compute Cloud Service identity domain.
Want to Learn More?
-
Managing Storage Volumes in Using Oracle Compute Cloud Service