Before You Begin
Purpose
This tutorial shows you how to manually migrate a virtual machine (VM) running Oracle Linux 6.7 64-bit from VMware to Compute Classic.
Time to Complete
Approximately 2 hours (dependent on the size of the image)
Background
You're running an Oracle Linux 6.7 64-bit VM on VMware, and you want to move it to Compute Classic.
Scenario
During this tutorial you will:
- Prepare the VM for export.
- Export the VM as .ovf and .vmdk files.
- Convert the .vmdk file to RAW image format and package as a tarball.
- Upload the tarball to Oracle Cloud Infrastructure Object Storage Classic.
- Create a new Compute Classic image from the uploaded tarball.
- Create a new instance using the uploaded image.
- Create a new security rule to allow incoming SSH traffic.
- Verify SSH access.
The source VM you want to migrate:
- must be running Oracle Linux 6.7 64-bit (note that only 64-bit is supported)
- must have only a single disk, which must not exceed 2 TB
- must not use shared storage
- must not use networked storage
- must not use GUID Partition Table (GPT) partitioned volumes
- must be connected to a flat network (a single virtual switch/router that makes up the entire network), as opposed to a hierarchical network
- must have a single network interface (when the VM is deployed in Oracle Public Cloud, it will have a virtual NIC with a public IP address assigned to it (NAT IP))
- will not be reachable using IPv6 (even if it currently has IPv6 enabled), because Oracle Public Cloud does not support IPv6
Note that you're responsible for obtaining the appropriate licenses required by the VM that you're migrating to Oracle Public Cloud.
What Do You Need?
To successfully migrate the VM, the VMware source environment must be configured as follows:
| Software/Hardware: | Version or configuration: |
|---|---|
| Hypervisor | VMware ESX6i |
| Guest OS | Oracle Linux 6.7 64-bit |
| Kernel Version | Both the following are supported:
|
| Memory | 1024MB (or larger) RAM |
| Storage Configuration | Single 4 GB (or larger, but not to exceed 2 TB) SCSI disk |
| SCSI Controller Type | LSI Logic Parallel |
| Networking Configuration | VMXNET 3 adapter, MAC address assignment assigned to ‘automatic’ |
| CD/DVD Drive | Remove any ISO attached to drive before exporting |
| ssh daemon | Must start automatically when the VM is
re-booted. Tip: If you're not sure, run sudo chkconfig --list sshd to
confirm that sshd will start automatically for
levels 3 and 5. If sshd is not currently set
to start automatically, run sudo
chkconfig sshd on |
You'll need a number of resources and tools as follows:
| Resource/Tool: | Required to: | How to obtain: |
|---|---|---|
| Host running Oracle Linux 6.x | Export and convert VM images | Request from your system administrator. |
| VMware OVF tool installed on the Oracle Linux host | Export the VM as .ovf and .vmdk files | Download from https://www.vmware.com/support/developer/ovf/ |
| qemu-img tool installed on the Oracle Linux host | Convert the .vmdk file to RAW image format | The qemu-img tool comes pre-installed in Oracle Linux distributions. Alternatively, you can download the QEMU source code from http://qemu-project.org/Hosts/Linux and compile it to generate the qemu-img binary. |
| Remote console access to the VM | Log on to the VM when preparing the VM for export (typically using the ESXi Web UI, the vSphere Web Client, or VMware Remote Console) | Download VMware Remote Console from www.vmware.com/go/download-vmrc |
1. Prepare the VM for Export
- Start a remote console session on the VM you're going to migrate.
-
Enable console logging so that the VM's boot.log file is displayed in the Instance Logs tab of the Compute Classic web console. To enable console logging, open
/etc/grub.confin a text editor and addconsole=tty0 console=ttyS0to the default kernel entry, as shown in the example: -
Ensure that there are no hard-coded MAC addresses:
-
Replace
/etc/udev/rules.d/70-persistent-net.ruleswith an empty file, by typing:cat /dev/null > /etc/udev/rules.d/70-persistent-net.rules -
Replace
/lib/udev/rules.d/75-persistent-net-generator.ruleswith an empty file, by typing:cat /dev/null> /lib/udev/rules.d/75-persistent-net-generator.rules
-
-
Open
/etc/sysconfig/network-scripts/ifcfg-eth0in a text editor, and remove all the lines in it except the following:DEVICE=eth0 BOOTPROTO=dhcp ONBOOT=yesAfter this change, verify that the content in
/etc/sysconfig/network-scripts/ifcfg-eth0is exactly as shown above. -
Open
/etc/sysconfig/networkin a text editor, and edit it to contain only the following lines:NETWORKING=yes HOSTNAME=localhost.localdomain IPV6_AUTOCONF=no NOZEROCONF=yesAfter this change, verify that the content in
/etc/sysconfig/networkis exactly as shown above. - If the VM is running a UEK Release 3 kernel, optimize disk I/O performance:
- Update the UEK kernel to the latest version by
typing:
yum update kernel-uek -y - Open
/etc/grub.confin a text editor and add thexen-blkfront.max=8andxen-blkfront.max_ring_page_order=4kernel configuration parameter settings, as shown in the example:kernel /vmlinuz-3.8.13-118.9.1.el6uek.x86_64 ro root=/dev/mapper/VolGroup-lv_root rd_NO_LUKS LANG=en_US.UTF-8 rd_NO_MD rd_LVM_LV=VolGroup/lv_swap SYSFONT=latarcyrheb-sun16 crashkernel=auto rd_LVM_LV=VolGroup/lv_root KEYBOARDTYPE=pc KEYTABLE=us rd_NO_DM rhgb quiet console=tty0 console=ttyS0 xen-blkfront.max=8 xen-blkfront.max_ring_page_order=4 - Update the VM's block storage tunables by
creating a file called
71-block-storage-tunables.rulesin the/etc/udev/rules.ddirectory and adding the following content to the file:
ACTION=="add|change", SUBSYSTEM=="block", RUN+="/bin/sh -c '/bin/echo 32 > /sys%p/queue/max_sectors_kb'" ACTION=="add|change", SUBSYSTEM=="block", RUN+="/bin/sh -c '/bin/echo 4096 > /sys%p/queue/nr_requests'" - Shut down the VM, as you're now ready to migrate it.
# grub.conf generated by anaconda
#
# Note that you do not have to rerun grub after making changes to this file
# NOTICE:  You have a /boot partition.  This means that
#          all kernel and initrd paths are relative to /boot/, eg.
#          root (hd0,0)
#          kernel /vmlinuz-version ro root=/dev/mapper/VolGroup-lv_root
#          initrd /initrd-[generic-]version.img
#boot=/dev/sda
default=0
timeout=5
splashimage=(hd0,0)/grub/splash.xpm.gz
hiddenmenu
title Oracle Linux Server Unbreakable Enterprise Kernel (3.8.13-118.9.1.el6uek.x86_64)
        root (hd0,0)
        kernel /vmlinuz-3.8.13-118.9.1.el6uek.x86_64 ro root=/dev/mapper/VolGroup-lv_root rd_NO_LUKS LANG=en_US.UTF-8 rd_NO_MD rd_LVM_LV=VolGroup/lv_swap SYSFONT=latarcyrheb-sun16 crashkernel=auto rd_LVM_LV=VolGroup/lv_root  KEYBOARDTYPE=pc KEYTABLE=us rd_NO_DM rhgb quiet console=tty0 console=ttyS0
initrd /initramfs-3.8.13-118.9.1.el6uek.x86_64.img2. Export the VM as .ovf and .vmdk Files
On the Oracle Linux host on which the VMware OVF and qemu-img tools have been installed:
-
Export the VM as .ovf and .vmdk files by typing:
ovftool -tt=ovf "vi://username:password@ip_address/vm_name"
                                  target_directory
where:
-
username:passwordare the credentials to log on to the VMware ESX6i host on which the VM is currently deployed -
ip_addressis the IP address of the VMware ESX6i host on which the VM is currently deployed -
vm_nameis the name of the VM -
target_directoryis the location in which to create the .ovf and .vmdk files
For example:
ovftool -tt=ovf
                                  "vi://root:Welcome1@203.0.113.127/OEL6.7x64"
                                  /usr/tmp
-
The output from running the above example command will typically be:
Opening VI source: vi://root@203.0.113.127/OEL6.7x64
Opening OVF target: /usr/tmp
Writing OVF package: /usr/tmp/OEL6.7x64/OEL6.7x64.ovf
Transfer Completed
Completed successfully
Note that both an .ovf and a .vmdk file are created, although the migration process will only use the .vmdk file.
3. Convert the .vmdk file to RAW Image Format and Package as a Tarball
On the Oracle Linux host on which the VMware OVF and qemu-img tools have been installed:
-
Navigate to the directory containing the .vmdk file (the directory will have been given the VM name that was used for the export). For example, by typing:
cd /usr/tmp/OEL6.7x64 - Run the qemu-img tool to convert the .vmdk file
to RAW image format by typing:
qemu-img convert -f vmdk vm_name-disk1.vmdk
                                  -O raw vm_name.img
For example:
qemu-img convert -f vmdk OEL6.7x64-disk1.vmdk -O raw OEL6.7x64.img - Create a tarball of the RAW image by typing:
tar -czvSf vm_name.img.tar.gz
                                  vm_name.img
For example:
tar -czvSf OEL6.7x64.img.tar.gz
                                  OEL6.7x64.img
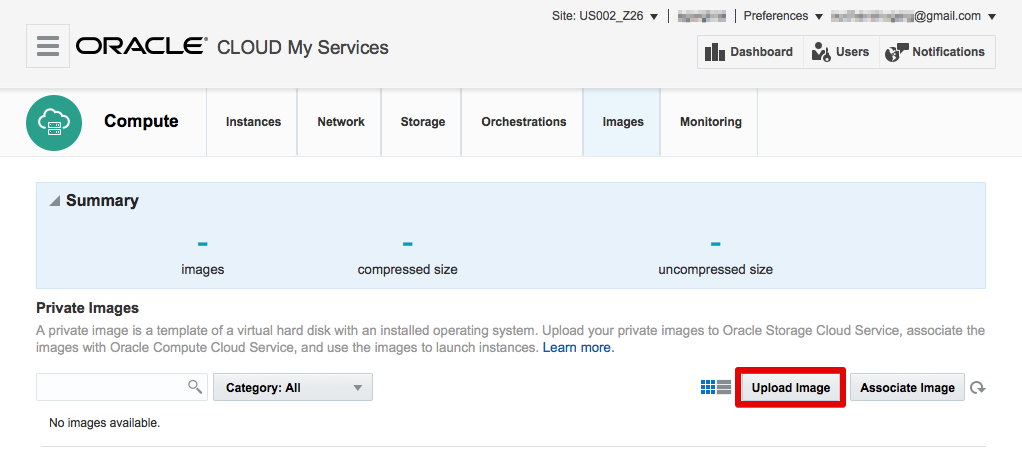
4. Upload the Tarball to Oracle Cloud Infrastructure Object Storage Classic
-
Log in to Compute Classic at https://computeui.us.oraclecloud.com
-
On the Images page of the Compute Classic web console, click Upload Image.
Description of this image -
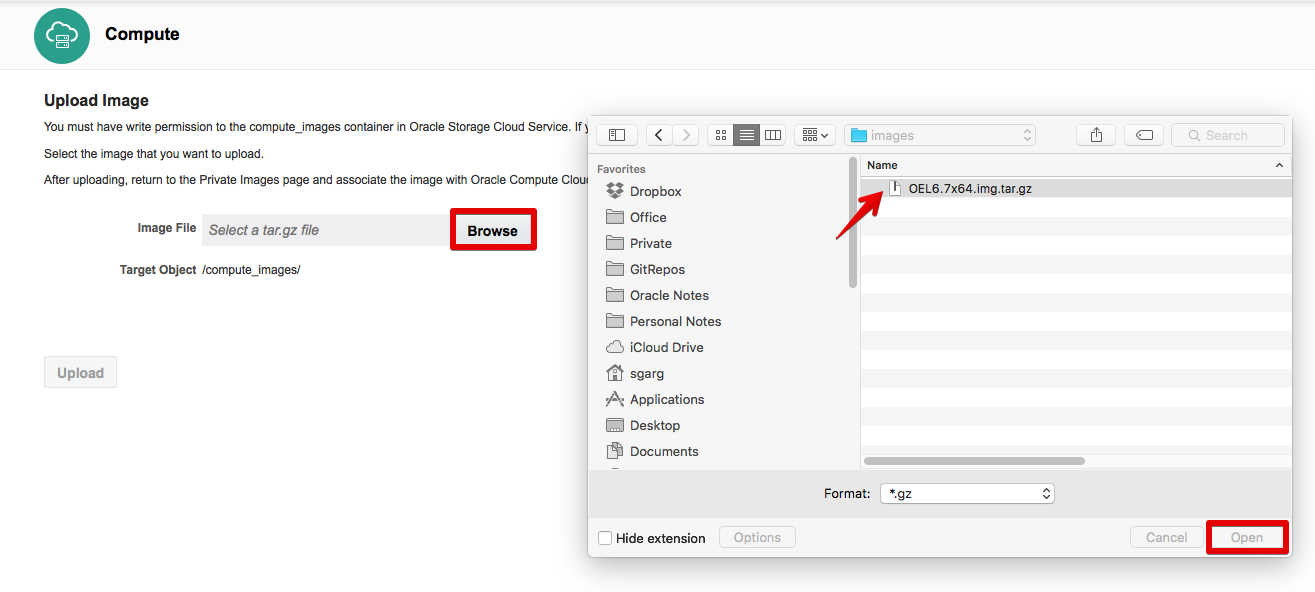
When prompted, re-enter your password.
-
In the Upload Image window, click Browse and select the vm_name.img.tar.gz file that you created in the previous section.
Description of this image -
Click Upload.
-
When the file has been uploaded, close the Upload Image window.
5. Create a New Compute Classic Image from the Uploaded Tarball
-
On the Images page of the Compute Classic web console, from the Site drop down list beside the identity domain at the top of the page, select a site that has sufficient resources to host the VM you're migrating.
-
Click Associate Image.
-
In the Associate Image window:
-
Specify a name and description for the image that is being created.
- Click Select File and
select the vm_name.img.tar.gz file
that you uploaded in the previous section.
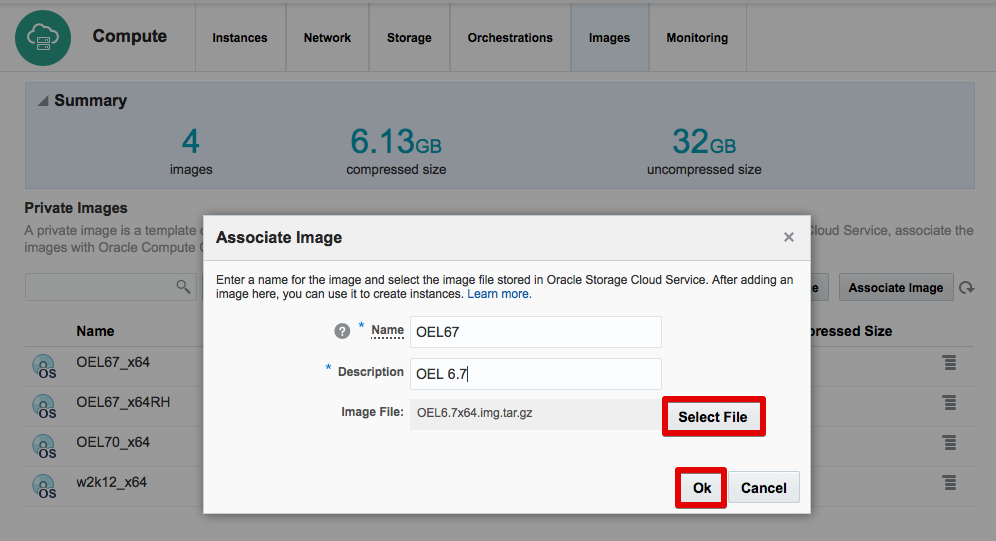
Description of this image - Click OK to associate the new image with the file
-
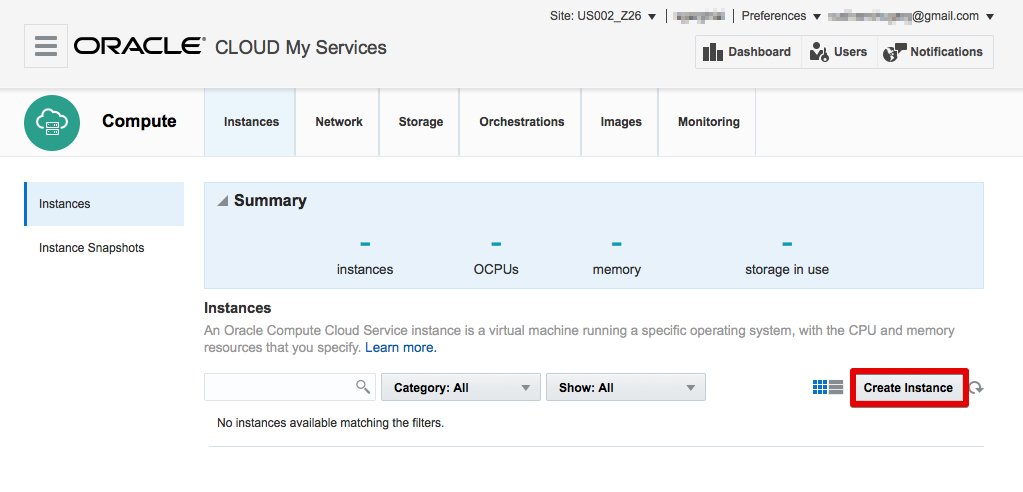
6. Create a New Instance from the New Compute Classic Image
-
On the Instances page of the Compute Classic web console, click Create Instance to display the Create New Instance Wizard.
Description of this image -
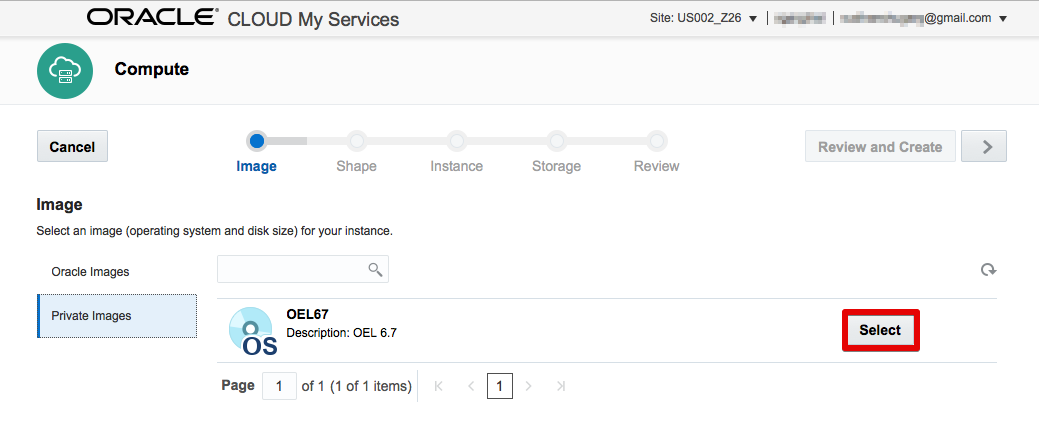
On the wizard's Image page, click Private Images, select the image you associated with the vm_name.img.tar.gz file in the previous section, and click > to go to the next page.
Description of this image -
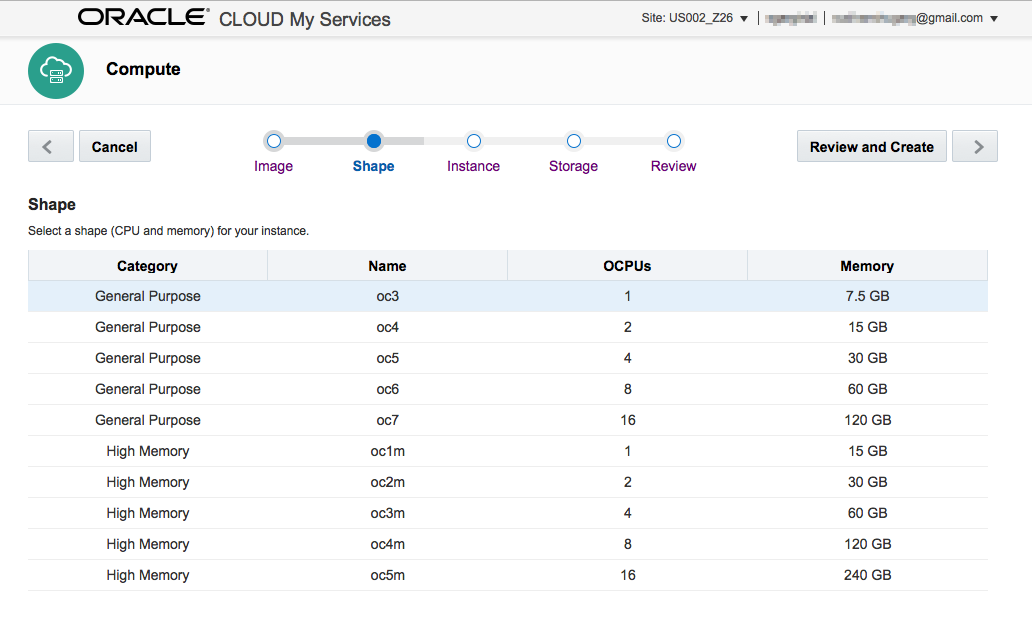
On the wizard's Shape page, select a compute shape to use for the new instance and click > to go to the next page.
Description of this image -
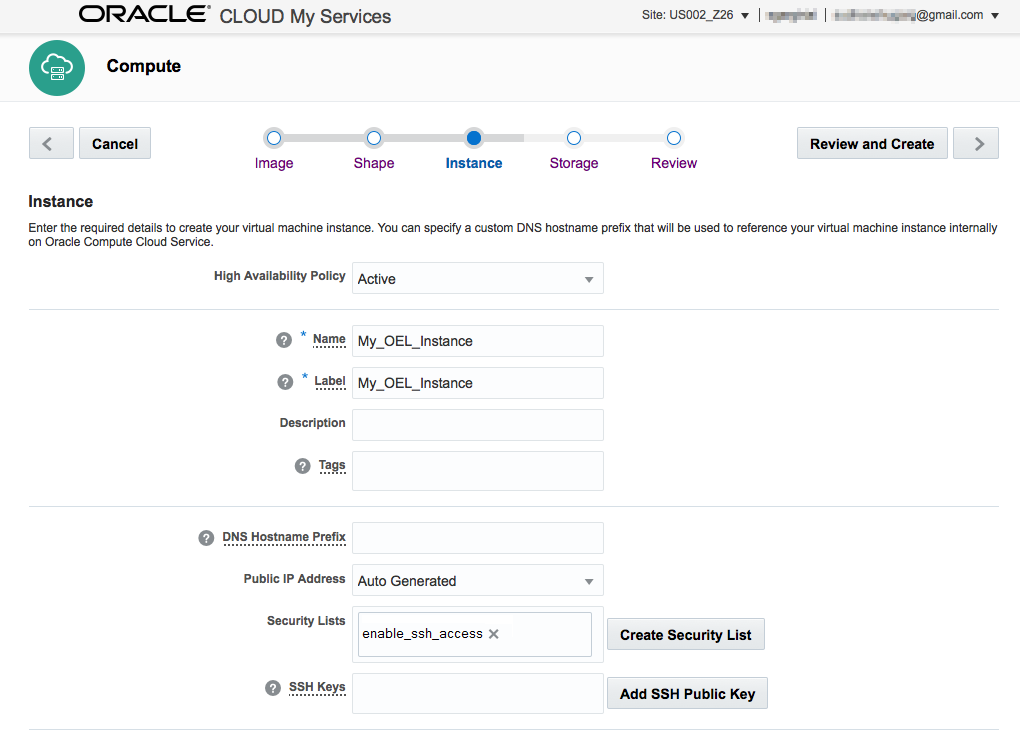
On the wizard's Instance page:
-
Enter a name and label for the new instance (for example, My_OEL_Instance).
- Click Create Security List to create a new security list to enable SSH traffic to the new instance and:
- specify a name (for example, enable_ssh_access) and description for the new list
- select 'Deny (Drop packets, no reply)' from the Inbound Policy list
- select 'Permit (Allow packets)' from the Outbound
Policy list
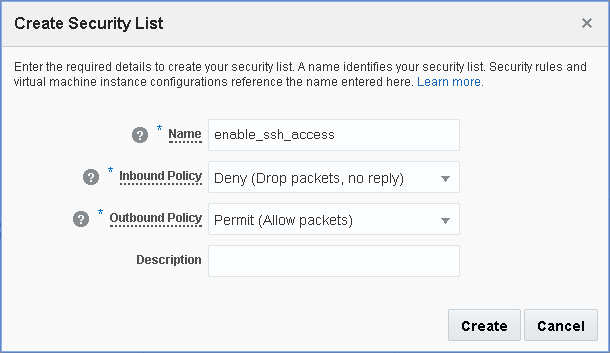
Description of this image - Click Create to create the
new security list.
Tip: Once you've created a security list to allow incoming SSH traffic for one VM, you can specify the same security list for other VMs that have the same requirement.
- Optionally specify values for other fields on the Instance page, and click > to go to the next page.
Description of this image -
-
On the wizard's Storage page, accept the default values and click > to go to the next page.
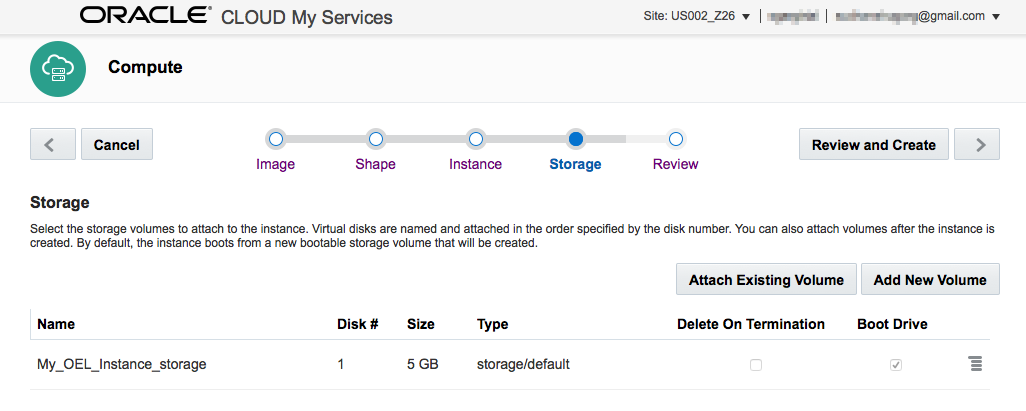
Description of this image -
On the wizard's Review page, confirm you've entered the properties of the new instance as described in the earlier steps in this section, and click Create.
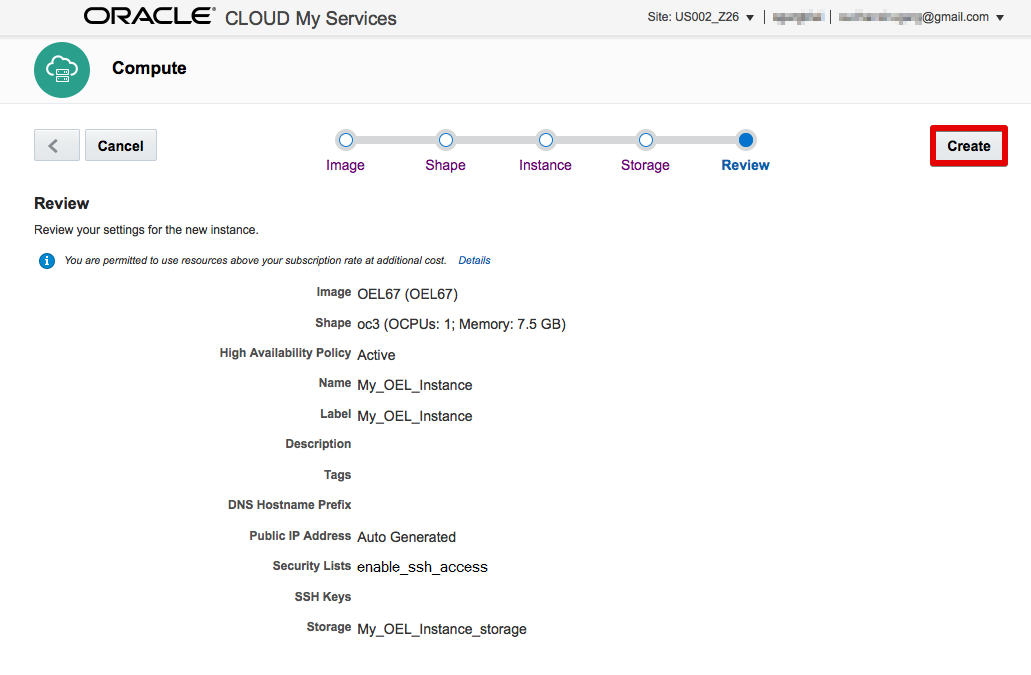
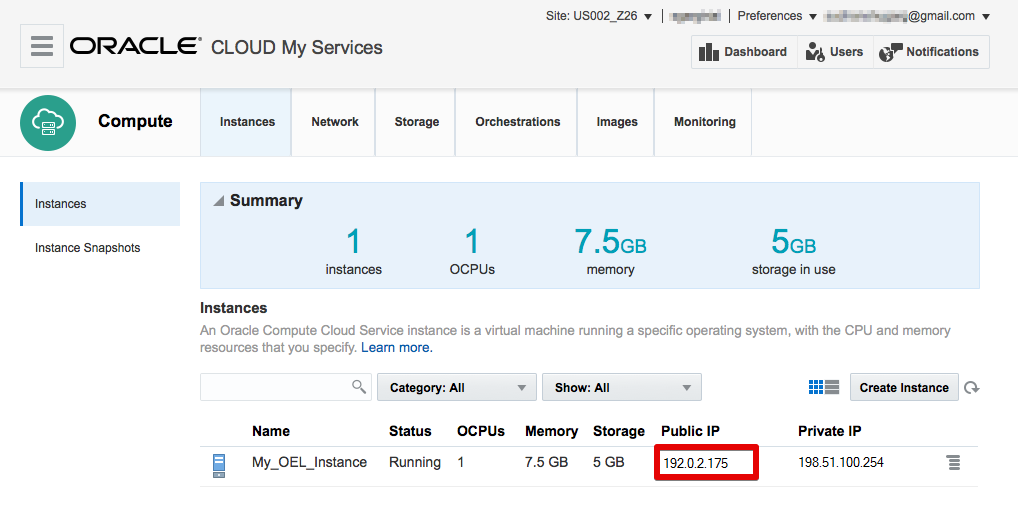
Description of this image - On the Instances page, wait for the status of
the instance to be shown as Running, and then take
note of the Public IP value.
Description of this image
7. Create a New Security Rule to Allow Incoming SSH Traffic
When you created the new instance, you also defined a new security list to which to add the instance. You must now associate that new security list with a security rule that allows incoming SSH traffic from a list of external host IP addresses (known as the 'Security IP List').
- On the Network page of the Compute Classic web console, click Create Security Rule to display the Create Security Rule window.
- In the Create Security Rule window:
- Enter a name for the new rule (for example, ssh_rule).
- Select 'ssh' from the Security Application list.
- Select 'public-internet' from the Source - Security IP List list.
- Select the security list you created earlier (for example, enable_ssh_access) from the Destination - Security List list.
- Click Create.

8. Verify SSH Access
-
From another machine, connect to the new instance using SSH and the credentials of a user that existed on the original VM by typing:
ssh username@ip_addresswhere:
usernameis a username that existed on the original VMip_addressis the public IP address you noted down in the earlier section
For example:
ssh opc@192.0.2.175 -
When prompted, enter the password of the user that existed on the original VM.
You're now logged in to the new VM deployed on Compute Classic.
Congratulations! You have successfully migrated the VM from VMware to Compute Classic.
Want to Learn More?
-
Uploading Image Files to Oracle Cloud Infrastructure Object Storage Classic in Using Oracle Cloud Infrastructure Compute Classic
-
Registering a Machine Image in Compute Classic in Using Oracle Cloud Infrastructure Compute Classic