Before You Begin
Purpose
This tutorial describes the process to migrate an on-premises (installation at your site) PeopleSoft environment and host it on Oracle Compute Cloud Service.
Time to Complete
3 hours
Additional time, approximately 5 hours or more, is required for uploading. The time required for uploading will vary depending upon file sizes and network speed.
Background
Customers need to be able to quickly bring up
multiple PeopleSoft environments for various
development and QA projects and manage them. This
typically involves procuring hardware and
configuring hardware, and often results in not using
hardware optimally. The use of Oracle Compute
Cloud Service (Oracle Cloud), with the deep
integration of PeopleSoft Cloud Architecture and
other PeopleSoft utilities, helps customers to
optimize the process and make it less time
consuming.
The first step in this process is to move the
PeopleSoft on-premises environment into Oracle
Cloud. This document explains the steps involved in
doing this.
Context
This tutorial is part of the following set of tutorials, which describe how to migrate a PeopleSoft environment to Oracle Compute Cloud Service:
- Generating an SSH Key Pair for Oracle Compute
Cloud Service Instances
- Migrating PeopleSoft Applications to Oracle Compute Cloud Service
- Installing Micro Focus COBOL Compiler and License on an Oracle Compute Cloud Service Instance (optional)
- Compiling PeopleSoft COBOL Programs on an Oracle Compute Cloud Service Instance (optional)
- Performing PeopleTools-Only Upgrade on PeopleSoft Environments Running in Oracle Cloud (optional)
- Performing a PeopleTools Patch Update on a PeopleSoft Environment Running in Oracle Cloud (optional)
- Cloning a PeopleSoft Environment in Oracle Cloud (optional)
- Scaling Existing PeopleSoft Environments on Oracle Cloud (optional)
What Do You Need?
- A subscription to Oracle Compute Cloud Service
is mandatory and you must be a user with the
Compute_OperationsandStorage Read Write Grouproles. - You must have an Oracle Storage Cloud Service account.
- If you want to host your database on Oracle Database Cloud - Database as a Service (DBCS), you need an account for DBCS with sufficient resources.
- Complete the procedures in the tutorial Generating an SSH Key Pair before beginning this tutorial.
- The minimum PeopleSoft PeopleTools release supported for this migration is PeopleTools 8.55.
- The minimum PeopleSoft application release supported for this migration is PeopleSoft 9.2.
- PeopleSoft on Oracle Cloud will be provisioned on Oracle Linux 6+ x-86 64-bit based virtual machines (VMs).
- If you use COBOL, you need to obtain a license
for Micro Focus COBOL Server Express on Linux
x86-64.
See the tutorial Installing Micro Focus COBOL Compiler and License on an Oracle Compute Cloud Service Instance. - The on-premises PeopleSoft environment requires
a Linux host that:
- Can access the PeopleSoft Deployment Packages (DPKs)
- Can sign on with SSH to Oracle Cloud provisioned VMs
- Has enough free storage for migrating the environment and packaging into various DPKs, such as 1.5 times the database size or more.
Other Considerations
- If you need a load balancer for PeopleSoft Pure
Internet Architecture (PIA), consider Oracle
Traffic Director.
See Configuring Oracle Traffic Director (OTD) in a PeopleSoft Environment, My Oracle Support, Doc ID 1624905.1. - If you do not want your Web sites to be public,
investigate alternatives provided by Oracle Cloud.
See the information on network settings in the Oracle Compute Cloud Service documentation. - Your existing SSL certificates might not work with Oracle Cloud, so you may need to request new ones due to changes in the domain and machine names.
- Oracle Cloud environments will not have access to customer network resources (for example, shared drives, db-links, print servers, or branding image repositories). You should rethink any integration or scripts which depend on these resources.
- Plan the frequency of migrating your on-premises environments to Oracle Cloud.
- We currently do not recommend using Microsoft Windows-based Process Schedulers on Oracle Cloud.
- You can also evaluate the possibility of cloning on-premises (local installation) databases into DBCS using (Oracle Enterprise Manager (EM)) or various other techniques.
- All third-party integrations will need to be reviewed and removed manually.
- If you need access to reports from older releases in the Report Repository, you must plan separately for it.
- As environments will now be hosted on Oracle Linux 6+ x86 64-bit OS, any custom scripts which are OS dependent must be re-evaluated.
Process Overview
- Generate SSH keys for each user who needs access.
- Download required PeopleSoft PeopleTools DPKs, the Oracle Cloud DPK, and Oracle SES image files from My Oracle Support.
- Convert the on-premises database into an Oracle
pluggable database (PDB) and create a database
deployment package (DPK).
- Create application DPK using on-premises
database using PS_APP_HOME and PS_CUST_HOME.
- Create a compressed attachment repository (optional).
- Upload the DPKs to Oracle Cloud Storage.
- Define the topology and provision the PeopleSoft
environment.
- Download the DPKs from Oracle Cloud Storage into the file server.
- Provision the database in a VM (db-tier).
- Provision the Microsoft Windows VM for PeopleTools Client deployment.
- Perform a PeopleTools-only upgrade if the migrated (lifted) database is on an earlier PeopleTools release.
- Provision the SES VM (optional).
- Provision the middle tier (mid-tier) VM.
- Install COBOL and update other configurations.
Generating SSH Key Pairs
For each user who needs access, generate SSH key pairs.
See the tutorial Generating SSH Key Pairs for Oracle Compute Cloud Service Instances.
Downloading the Required Software
- Create a folder on the on-premises file server
for the downloaded software.
The folder should be accessible to other on-premises machines. The examples in this tutorial use /ds1/pt/cloud_files. We also refer to the folder as PSFT_DPK_DIR. - Download the following software into
/ds1/pt/cloud_files.
- PeopleTools Oracle Cloud DPK
One zip file, PT-OCLD-DPK-LNX_1of1.zip
Search My Oracle Support, Patches & Updates, for the latest PeopleSoft PeopleTools release. - PeopleSoft PeopleTools 8.55 Patch DPKs
Four zip files, PEOPLETOOLS-LNX-<Release>-#ofn.zip
For example:
PEOPLETOOLS-LNX-8.55.02-1of4.zip
PEOPLETOOLS-LNX-8.55.02-2of4.zip
PEOPLETOOLS-LNX-8.55.02-3of4.zip
PEOPLETOOLS-LNX-8.55.02-4of4.zip
See PeopleSoft PeopleTools Patches Home Page, My Oracle Support, Doc ID 2062712.2, for the links to download these DPKs. - The PeopleTools Oracle Cloud SES custom
image if using Oracle SES (optional)
Four zip files, OPC_EL5U10_X86_64_SES_<Release>_PVM_#ofn.zip
For example:
OPC_EL5U10_X86_64_SES_11.2.2.2_BP4_PVM_1of4.zip
OPC_EL5U10_X86_64_SES_11.2.2.2_BP4_PVM_2of4.zip
OPC_EL5U10_X86_64_SES_11.2.2.2_BP4_PVM_3of4.zip
OPC_EL5U10_X86_64_SES_11.2.2.2_BP4_PVM_4of4.zip
Search My Oracle Support, Patches & Updates, for the latest PeopleSoft PeopleTools release. - Micro Focus Server Express software media
files
Download from Oracle Software Delivery Cloud, http://edelivery.oracle.com.
Note. The procedures in this tutorial add application-created DPKs on-premises to the same location.
- PeopleTools Oracle Cloud DPK
Migrating the PeopleSoft Environment
Extracting the Cloud Migration Utilities
Unzip the Oracle Cloud DPK, PT-OCLD-DPK-LNX.zip, into a location, /ds1/pt/ocutils in this example, with enough disk space for the downloaded files. This directory is referred to later in this tutorial as LAS_TOOL_DIR.
unzip PT-OCLD-DPK-LNX_1of1.zip -d /ds1/pt/ocutils
This will create the following four directories:
- las — migration script along with a sample INI file used for the migration of PeopleSoft Application Home (PS_APP_HOME), PeopleSoft Customer Home (PS_CUST_HOME), and the PeopleSoft application database.
- puppet — PeopleSoft-developed Puppet modules
used to set up a PeopleSoft environment.
- python2.7.9 — Python run-time software, used for executing the utility scripts.
- db — DPK containing Oracle 12c database software, along with run-time scripts to automate the process of plugging a PeopleSoft database PDB (created using the migration tool) into an Oracle 12c container database (CDB).
- scripts — various run-time scripts used to generate PeopleSoft orchestration files and to bootstrap PeopleSoft instances after the orchestration file creates the instances
Editing the Migration Utility Configuration File
- On the file server, change directory to /ds1/pt/ocutils/las.
- Open the configuration file
las_setup.ini for editing, and modify it
for your environment.
The file includes four sections. - Review and modify the [DEFAULT]
section, which includes the following
attributes:
- tools_patch — specify the version of PeopleSoft PeopleTools used; for example, 8.55.01.
- app_type — specify the application
Pillar name. Valid values are: HR,
HCM, FSCM, CRM,
ELM, ELS, PS
Note. Both uppercase and lowercase values are allowed. - app_release — specify the PeopleSoft application release; for example, 92
- env_type — specify the type of PeopleSoft environment that is being migrated. Valid values are: both (if both mid-tier and database are running on the same host); app (if the host is running mid-tier), and db (if the host is running database).
-
Review and modify the [ps_app_home] section.
Note. This section is not needed when migrating a database only.
install_location — specify the full path of the PS_APP_HOME location -
Review and modify the [ps_cust_home] section.
Note. This section is not needed when migrating a database only.
install_location — specify the full path of the PS_CUST_HOME location -
Review and modify the [ps_app_database] section.
Note. This section can be removed or left blank if you are not migrating a database.- oracle_user — specify the Oracle system user name
- cdb_name — specify the name of the CDB
- db_name — specify the name of the PDB that is being migrated
- oracle_home — specify the full path for the Oracle home
- is_db_pdb — if the database already has a pdb, specify YES.
Creating a DPK from a PeopleSoft Database
This section assumes that an Oracle CDB and PDB
are created using the on-premises database.
- Copy the las_setup.ini file to a file for
the database attributes:
cd /ds1/pt/ocutils/las
cp las_setup.ini las_setup_db.ini - Open the las_setup_db.ini file for editing,
and modify it for your database; for example:
[DEFAULT]
tools_patch = 8.55.01
app_type = HCM
app_release = 92
env_type = db

[ps_app_database]
oracle_user = oracle
cdb_name = oowdemo.cdb
db_name =  oowdemo.pdb
oracle_home = /ds1/11.2.0.4/DB
is_db_pdb = yes
- On the machine containing the database, log
in as root, and change directory to
LAS_TOOL_DIR.
cd /ds1/pt/ocutils
- Use this command to create the database DPK:
Note. The script uses su permissions as oracle_user and SQL*Plus to get the information needed to package the database into a DPK.
./python2.7.9/python las/lift_psft_app.py -f /ds1/pt/ocutils/las_setup_db.ini -o /ds1/pt/cloud_files
Creating an Application Deployment Package
To create the Customer Application DPK with PS_APP_HOME (Application Home) and PS_CUST_HOME (Customer Home):
- Copy the las_setup.ini file to a file for
the application attributes:
cd /ds1/pt/ocutils/las
cp las_setup.ini las_setup_app.ini - Open the las_setup_app.ini file for editing,
and modify it for your environment; for
example:
[DEFAULT]
tools_patch = 8.55.01
app_type = HCM
app_release = 92
env_type = app

[ps_app_home]
install_location = /ds1/pt/app_home

[ps_cust_home]
install_location = /ds1/pt/cust_home
- Change directory to LAS_TOOL_DIR.
cd /ds1/pt/ocutils
- Create the Customer Application DPK with
this command:
./python2.7.9/python las/lift_psft_app.py -f /ds1/pt/ocutils/las_setup_app.ini -o /ds1/pt/cloud_files
Creating the Attachment Repository DPK (Optional)
If the attachments are stored in the database this step can be skipped.
Perform this step on a machine that can access the attachments.
tar -czvf /ds1/pt/cloud_files/attach_repo.tgz /ds1/pt/attach_repo
Uploading DPKs to Oracle Cloud Storage
Understanding the Upload Script
The PeopleSoft migration files include a python utility, upload_opc.py, for uploading PeopleSoft DPKs to Oracle Cloud Storage.
The script requires the following input:
- Cloud User name – The user who has access to the Oracle Cloud account. This user should also have appropriate permissions to upload to Oracle Cloud Storage
- Cloud User password – The User password. This password is prompted when the upload script is run.
- Container name – This is an optional parameter. The default is ‘compute_images’.
- Domain name – The name of the user’s identity domain.
- Source directory – The local directory where the DPKs are located
Use one of the following formats to run the utility:
LAS_TOOL_DIR/python2.7.9/python upload_opc.py -u <Cloud User name> -d <Domain name> -s <Source directory>
LAS_TOOL_DIR/python2.7.9/python upload_opc.py -u <Cloud User name> -d <Domain name> -s <Source directory> -c <Container name>
Note. The PeopleSoft DPKs are quite large. Depending on the network connectivity between your on-premises network and Oracle Cloud, the upload process will take a very long time – probably many hours. Please account for this delay while planning the whole migration process from the on-premises environment to Oracle Cloud.
Uploading the DPKs
Perform these steps from a machine with access to Oracle Cloud and the DPK location:
- If you are using Oracle SES, merge the
downloaded Oracle SES VM portions into one by
running the following script:
assemble_ses_images.sh -p OPC_EL5U10_X86_64_SES_11.2.2.2_BP4_PVM
- Move all the required PeopleSoft DPKs (and
the Oracle SES file, if using) into a single
directory; for example:
- PT-OCLD-DPK-LNX_1of1.zip (downloaded from My Oracle Support)
- PEOPLETOOLS-LNX-8.55.02-1of4.zip (downloaded from My Oracle Support)
- PEOPLETOOLS-LNX-8.55.02-2of4.zip (downloaded from My Oracle Support)
- PEOPLETOOLS-LNX-8.55.02-3of4.zip (downloaded from My Oracle Support)
- PEOPLETOOLS-LNX-8.55.02-4of4.zip (downloaded from My Oracle Support)
- APP-DPK-<Application Name>-LNX-92-8.55.02-1of2.zip (generated as part of this tutorial)
- APP-DPK-<Application Name>-LNX-92-8.55.02-2of2.zip (generated as part of this tutorial)
- OPC_EL5U10_X86_64_SES_11.2.2.2_BP4_PVM (downloaded and assembled)
- Run the upload script.
Note. The script prompts for the user password twice.
cd /ds1/pt/ocutils/scripts
../python2.7.9/python upload_opc.py -u a.b@example.com -d psftoowdemo -s /ds1/pt/cloud_files
Creating PeopleSoft Environment Definitions as a Puppet YAML File
Understanding the psftconfig.yaml File
The Oracle Cloud DPK is delivered with YAML files which should be used as a starting point. To avoid errors, copy and paste the values exactly as given. Modify for your environment, being sure to retain the indentation given here.
The psftconfig.yaml file used in this section has four major sections:
- image_list — List of OS-version images offered by Oracle Cloud on which to install the PeopleSoft system
- sshkey_list — List of ssh keys to identify the users who can access these machines
- identitydomains — List of identity domains where you want to create the VMs
- instance_list — List of the VM types with configurations
- In LAS_TOOL_DIR/scripts, make a
backup copy of psftconfig.yaml; for example:
cp psftconfig.yaml psftconfig_bkup.yaml
- Open psftconfig.yaml in a text editor, and modify it for your environment. The major sections of the file to be modified are described in the following sections.
Editing the image_list Section
Modify the image_list section with the OS-version images offered by Oracle Cloud on which to install the PeopleSoft system.
image_list:
  image_1:
    os_type:    linux
    image_name:  /oracle/public/oel_6.6_20GB_x11_RD
    image_index: 0

  image_2:
    os_type:    linux
    image_name:  /oracle/public/oel_6.4_5GB_RD
    image_index: 1

  image_3:
    os_type:    windows
    image_name: /Compute-$Domain/$username/win_image
    image_index: 2
In this section:
os_typeis linux or windowsimage_nameis the location of the image file location.
In the sample given here, "/Compute-psftoowdemo/a.b@example.com/ses11222" is an example for a custom image that was uploaded to Oracle Storage Cloud Service.image_indexis a user-defined number used for later reference.
To see a list of available images, sign in to the Oracle Compute Cloud Service console, and select Create Instance. Access the Image drop-down list, as shown in this example:

Editing the sshkey_list Section
Modify the sshkey_list section with a list of ssh keys which identify the users generated in the previous section, Generating SSH Keys, who can access these machines.
sshkey_list:
  ssh_key_0:
    key: /Compute-psftoowdemo/a1.b1@c1.com/ssh-key-1
    sshkey_index: 0
  ssh_key_1:
    key: /Compute-psftoowdemo/a2.b2@c1.com/psft-key-1
    sshkey_index: 1
  ssh_key_2:
    key: /Compute-psftoowdemo/a3.b3@example.com/psft-key-2
    sshkey_index: 2
  ssh_key_3:
    key: /Compute-psftoowdemo/a.b@example.com/psft-key-3
    sshkey_index: 3
In this section:
keyis comprised of the following parts:
- identity domain name, for example Compute-psftoowdemo
- user name, for example a1.b1@c1.com
- key name given when importing the public key into Oracle Compute Cloud Service; for example, psft-key-1.
sshkey_indexis a user-defined number used for later reference
Editing the identitydomain Section
Edit the identitydomain section with the list of identity domains where you want to create the VMs.
identitydomains:
    domain_1:
      name: psftoowdemo
      pswd: password
      rest_endpoint: 'https://api-z27.compute.us6.oraclecloud.com'
      user: a.b@example.com
In this section:
nameis identity domain name, for example psftoowdemopswdis the password for each domainrest_endpointis the API end point URL which can be retrieved from Oracle Compute Cloud Service, as shown below.iddomain_indexis a user-defined number used for later reference.
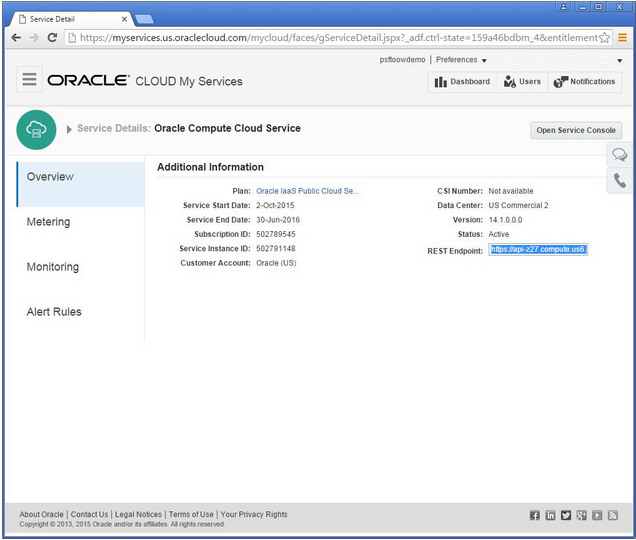
To view the API end point URL, sign in to the
Oracle Compute Cloud Service console, and select
Service Details. On the Service Details
page, the API end point URL is found in the REST
Endpoint field. In this example, the
REST Endpoint is
https://api-z27.compute.us6.oraclecloud.com.
Editing the instance_list Section
Use the instance_list section to list the VMs, resources for the VMs, along with the components to be deployed on the host, such as application server domain, web server domain, and Process Scheduler domain. This section also includes features to be enabled and configurations that need to be set.
instance_list:
  instance_1:
    label:       "PSFT File Server"
    shape:       oc4
    os_type:     linux
    image_index: 0

    storage_attachments:
      storage_1:
         size:      500G

    hostname:    psft-file-server
    env_type:    fileserver
    features:    nfs
    psft_base:   /u01/app/oracle/product

  instance_2:
    label:       "PSFT HCM Test # Win 1"
    shape:       oc2m
    os_type:     windows
    image_index: 2

    storage_attachments:
      storage_1:
         size: 40G

    hostname:    psfthcmstwin1
    env_type:    psftclient
    app_type: hcm
    psft_base:   /u01/app/oracle/product
    features:    pia,appsrv,batch
    tools_version: 8.55.01
    db_name: HR92P16
    db_service_name: HR92P16
    db_host: psftdblnx1
    db_port: 1521
    connect_id: people
    connect_pwd: people
    domain_boot_user: PS
    domain_boot_user_pwd: **

  instance_3:
    label:       "PSFT HCM DB-Tier Linux 1"
    shape: oc2m
    os_type:     linux
    image_index: 0

    storage_attachments:
      storage_1:
         size: 150G

    hostname: psftdblnx1
    env_type: dbtier
    app_type: hcm
    psft_base: /u01/app/oracle/product
    db_name: HR92P16
    db_port: 1521
    connect_id: people
    connect_pwd: ******

  instance_4:
    label:       "PSFT HCM Mid-Tier Linux 1"
    shape:       oc2m
    os_type:     linux
    image_index: 0

    storage_attachments:
      storage_1:
         size: 150G

    hostname:    psftmtlnx1
    env_type:    midtier
    app_type: hcm
    psft_base:   /u01/app/oracle/product
    features:    pia,appsrv,batch
    tools_version: 8.55.01
    pia_http_port: 8000
    pia_https_port: 8443
    wsl_port: 7000
    jolt_port: 9000
    db_name: HR92P16
    db_service_name: HR92P16
    db_host: psftdblnx1
    db_port: 1521
    connect_id: people
    connect_pwd: ******
    domain_boot_user: PS
    domain_boot_user_pwd: **
    weblogic_admin_user: system
    weblogic_admin_pwd: **********
    webprofile_user_pwd: ***********
    gw_admin_user: administrator
    gw_admin_user_pwd:  ********

instance_5:
    label:       "PSFT HCM Full-Tier Linux 1"
    shape:       oc2m
    os_type:     linux
    image_index: 0

    storage_attachments:
      storage_1:
         size: 200G

    hostname:    psftftlnx1
    env_type:    fulltier
    app_type: hcm
    psft_base:   /u01/app/oracle/product
    tools_version: 8.55.01
    pia_http_port: 8000
    pia_https_port: 8443
    wsl_port: 7000
    jolt_port: 9000
    db_name: HR92P16
    db_service_name: HR92P16
    db_host: psftdblnx1
    db_port: 1521
    connect_id: people
    connect_pwd: ******
    domain_boot_user: PS
    domain_boot_user_pwd: **
    weblogic_admin_user: system
    weblogic_admin_pwd: **********
    webprofile_user_pwd: ***********
    gw_admin_user: administrator
    gw_admin_user_pwd: ********
    setup_ses: false

  instance_6:
    label:       "PSFT SES"
    shape:       oc4
    os_type:     linux
    image_index: 3

    hostname:    psftses112225
    env_type:    ses

    storage_attachments:
      storage_1:
         size: 200G
    ses_port: 7777
Note. All of these properties will be common across all instances.
In this section:
labelis a name for this VMstorage_attachments: storage_1: sizedefines the block storage created for this VM.hostnameis the internal machine name for this VM.env_typedefines the software that needs to be installed on this machine. Other env_type options are described below.featuresdefines the configurations that need to be performed on this VM.
psft_baseis the location of the share file system.shapecan be any shape supported by Oracle Cloud that defines the number of CPUs and memory. To see the list of supported shapes, sign in to the Oracle Compute Cloud Service console, and select Create Instance.
Access the Image drop-down list, as shown in this example:

The env_types in this sample include:
- File server
In the example, instance_1 (env_type: fileserver) defines the file server for shared storage. - Windows client
In the example, instance_2 (env_type: psftclient) defines the Microsoft Windows client. - Database server
In the example, instance_3 (env_type: dbtier) defines the database tier. The database tier refers to the Oracle Database server, Oracle Database Client, and PeopleSoft application database. - Middle tier system
In the example, instance_4, (env_type: midtier) defines the mid-tier environment. A PeopleSoft mid-tier environment includes the Application Server, Process Scheduler, and web server domains, and the software required to deploy them, such as Oracle Tuxedo and Oracle WebLogic.
For the env_type midtier additional properties are passed to the PeopleSoft DPK Puppet software to configure this environment. These names are self-explanatory for PeopleSoft administrators. For more information, see the PeopleSoft PeopleTools documentation on PeopleSoft Information Portal. - Full tier system
In the example, instance_5 (env_type: fulltier) defines a PeopleSoft full tier environment, which includes the Oracle database server and PeopleSoft application database along with PeopleSoft Application Server, Process Scheduler, and web server. - SES
In the example, instance_6 (env_type: ses) defines the Oracle SES configuration. - Additional instances
Include additional instances as needed, Process Scheduler, additional web servers, and so on.
Creating the VMs
Oracle delivers a PeopleSoft utility called psocgen that uses a psftconfig.yaml configuration file to create the VM instances.
The files extracted from the Oracle Cloud DPK include the Python run-time software and the PeopleSoft-delivered psocgen.py script.These steps use the psocgen.py script to generate orchestrations.
- Change directory to the location of the Python
scripts.
cd /ds1/pt/las
- Run the following command to create all the
instances defined in the psftconfig.yaml file:
../python2.7.9/python psocgen.py -o /ds1/pt/output -p /ds1/pt/scripts/psconfig.yaml
To create only selected instances, use the-l <instance host name>option for thepsocgen.pycommand. For example, to create an instance that is defined in psftconfig.yaml with the host name psft-file-server, use this command:
../python2.7.9/python psocgen.py -o /ds1/pt/output -p /ds1/pt/scripts/psconfig.yaml -l psft-file-server
This command reads the YAML file /ds1/pt/scripts/psconfig.yaml and generates JSON files needed for Oracle Cloud to create VMs in /ds1/pt/output. It also creates a manifest file which has the list of all files.
Here is a sample manifest file created from the
command run for all instances (that is, without the
-l option):
ex:manifest file psft_manifest_20151223205959.txt

-------------------------------------------------------

Oracle PeopleSoft Orchestration Manifest

Please execute orchestrations in the order listed

Entries for different hosts can be executed in parallel

-------------------------------------------------------

Common Security Lists:

/ds1/pt/output/psftoowdemo_psft_seclist_orch_01.json

-------------------------------------------------------

psfthcmdbsrvr3:

/ds1/pt/output/psfthcmdbsrvr3_01_orch_secapp.json

/ds1/pt/output/psfthcmdbsrvr_02_orch_secrules.json

/ds1/pt/output/psfthcmdbsrvr_03_orch_storage.json

/ds1/pt/output/psfthcmdbsrvr_04_orch_instance.json

-------------------------------------------------------

psfthcm3:

/ds1/pt/output/psfthcm_01_orch_secapp.json

/ds1/pt/output/psfthcm3_02_orch_secrules.json

/ds1/pt/output/psfthcm3_03_orch_storage.json

/ds1/pt/output/psfthcm3_04_orch_instance.json

-------------------------------------------------------

psft-file-server:

/ds1/pt/output/psft-file-server_01_orch_storage.json

/ds1/pt/output/psft-file-server_02_orch_instance.json

-------------------------------------------------------
Here is a sample manifest file, created from the command run with the
-l option for a
single instance: -------------------------------------------------------
psft-file-server:
/ds1/pt/output/psft-file-server_01_orch_storage.json
/ds1/pt/output/psft-file-server_02_orch_instance.json
-------------------------------------------------------
Verifying Instance Creation
To verify that the instance creation was successful:
- Sign in to Oracle Compute Cloud Service.
- On the Oracle Compute Cloud Service console, select the Overview tab and then the Instances tile.
- From the list of instances, identify the instance and click the instance name.
psocgen.py with the
configurations as defined in the psftconfig.yaml Provisioning PeopleSoft Environment Components
Understanding File Transfer Commands
This section uses scp and ssh
file transfer commands. The scp
command is used to transfer files between
systems. The ssh command is used
to connect to a system or execute a command and
return.
The scp and ssh
commands given here assume that the private key
is located under the on-premises user’s
$HOME/.ssh directory and the public SSH keys are
set up on the target machine. For this tutorial,
the public key was added as part of the VM
creation.
Note. If the private key is
not in $HOME/.ssh the location can be specified
using the option -i <identity_file>,
where <identity_file> is the path to the
file in which the SSH key pair was saved in the
section Generating an SSH Key Pair on UNIX or
UNIX-Like Systems Using ssh-keygen.
Use one of these formats for the scp command:
scp <file_to_upload> opc@<instance_ip_address>:/home/opc/<file_to_upload>
scp <file_to_upload> -i <identity_file> opc@<instance_ip_address>:/home/opc/<file_to_upload>
Use one of these formats for the ssh command:
ssh –t opc@<instance_ip_address>
ssh –t opc@<instance_ip_address> sudo sh <script_to_run>
ssh -i <identity_file> –t opc@<instance_ip_address>
ssh -i <identity_file> –t opc@<instance_ip_address> sudo sh <script_to_run>
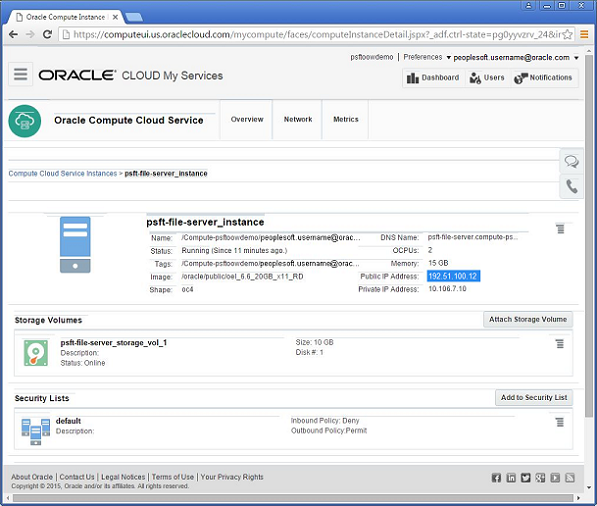
To find the value for the instance IP address:
- Log in to the Oracle Compute Cloud Service Console.
- Select the Overview tab and then the Instances tile.
- From the list of instances, identify the instance and click the instance name.
- Note the Public IP address, which is
192.51.100.120 in this example.
Provisioning the File Server
- Upload the psft_opc_setup.sh and
download_opc.sh scripts to the Oracle Cloud VM
with the
scpcommand.
/ds1/pt/cloud_files
scp psft_opc_setup.sh opc@:192.51.100.120::/home/opc/psft_opc_setup.sh
scp download_opc.sh opc@:192.51.100.120::/home/opc/download_opc.sh - Connect to the Oracle Cloud instance and
provision the file server with the
sshcommand.
ssh –t opc@192.51.100.120 sudo sh /home/opc/psft_opc_setup.sh
Downloading DPKs from Oracle Cloud Storage to the File Server
- Use the
sshcommand to connect to the Oracle Cloud instance, using the IP address you noted in the section Understanding File Transfer Commands.
ssh –t opc@192.51.100.120
- Run the psft_opc_setup.sh utility.
sudo sh /home/opc/psft_opc_setup.sh
- Download the DPKs with the download_opc.sh
utility.
Note. The-loption refers to a space-separated list of files.
cd /u01/app/oracle/product
/home/opc/download_opc.sh –u a.b@example.com -d psftoowdemo -l "PT-DPK-LNX-8.55.01-1of2.zip PT-DPK-LNX-855.01-2of2.zip APP-DPK-HCM-LNX-92-8.55.01-1of2.zip APP-DPK-HCM-LNX-8.55-01-2of2.zip ODS-DPK-LNX-12.1.0.2-1of1.zip attach_repo.tgz" - To verify that the files were downloaded correctly, after the downloading is complete, go to the directory where the DPKs are downloaded and compare the DPK sizes with the sizes of the DPKs from the Linux host.
Deploying and Configuring PeopleSoft Components
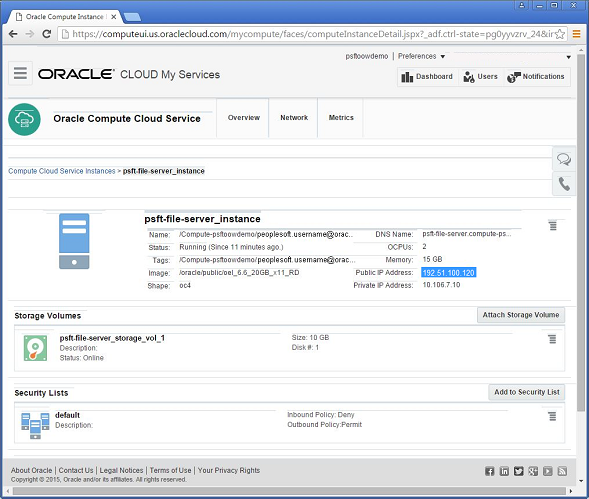
For each VM instance in Oracle Compute Cloud Service:
- Sign in to Oracle Compute Cloud Service.
- On the Oracle Compute Cloud Service console, select the Overview tab and then the Instances tile.
- From the list of instances, identity the
instance you want to work with, click the instance
name, and select View.

- On the instance page, note the Public IP Address
for the VM, which is 192.51.100.120 in this
example.
- Upload the Oracle Cloud DPK setup script
psft_opc_setup.shusing thescpcommand with the IP address you obtained in the previous step:
scp psft_opc_setup.sh opc@192.51.100.120:/home/opc/psft_opc_setup.sh
Note. This step can be skipped for Microsoft Windows OS and SES VMs.
- Execute the script
psft_opc_setup.sh:
ssh -t opc@192.51.100.120 sudo sh /home/opc/psft_opc_setup.sh
Alternatively, use the following format:
ssh opc@192.51.100.120
sudo sh /home/opc/psft_opc_setup.sh - Repeat these steps for all of the VMs.
Carry out the steps in this section for each instance in this order:
- File Server
- Database tier
- If the migrated (lifted) database is on an
earlier PeopleTools release, carry out the
following tasks:
- Set up network security to open the Oracle
Database ports.
To access the Oracle Database that is setup on the Linux VM in Oracle Compute Cloud Service as part of PeopleSoft full-tier, mid-tier, or db-tier deployment, set up the network security to access the Oracle Database port.
See the tutorial Permitting Access for Oracle Database Ports in Oracle Compute Cloud Service Instance. - Download the PeopleTools Client DPK from the file server VM to the Windows Client VM.
- Carry out a PeopleTools-only upgrade.
Deploy PeopleTools Client and perform a PeopleTools-only upgrade.
See the tutorial Performing PeopleTools-only Upgrade on PeopleSoft Environments Running in Oracle Cloud.
- Set up network security to open the Oracle
Database ports.
- Follow steps 1 through 6 in this section for
these instances:
- Oracle SES
- Mid-tier
Adding a New VM
- Modify the YAML file to include the new VM as
described.
See the tutorial Defining Topology and Provisioning PeopleSoft Environments for Oracle Compute Cloud Service. - Run the psocgen, but specify a new (different)
output directory, as described in the section
Creating VMs.
See the tutorial Defining Topology and Provisioning PeopleSoft Environments for Oracle Compute Cloud Service. - Using the new files generated for the new VM, follow the steps in the section Deploying and Configuring the PeopleSoft System to create new VMs.
- If the new VM is a new application server that
will be used by a web server, perform these steps:
- Access the web server machine with ssh.
- Change directory; for example, for a default
PeopleSoft installation:
cd <PS_PIA_HOME>/webserv/peoplesoft/applications/peoplesoft/PORTAL.war/WEB-INF/psftdocs/ps
- Open the configuration.properties for editing, for example with vi.
- Add the new application server to the
psserver list.
The format ispsserver=<AppSrvr>:<JSLport>where AppSrvr is your fully qualified domain name. Multiple domains should be separated by commas.
For example, before editing:
psserver=server1.example.com:25045
After editing:
psserver=server2.example.com:9033,server1.example.com:25045
Completing Additional Tasks
Installing COBOL (Optional)
COBOL is not required for PeopleSoft PeopleTools. For information on whether your PeopleSoft application requires COBOL, see PeopleSoft Enterprise Frequently Asked Questions about PeopleSoft and COBOL Compilers, My Oracle Support, Doc ID 747059.1.
See the tutorial Installing Micro Focus COBOL Compiler and License on an Oracle Compute Cloud Service Instance.Compiling and Linking COBOL (Optional)
See the tutorial Compiling PeopleSoft COBOL Programs on an Oracle Compute Cloud Service Instance.
Configuring URLIDs (Optional)
The file server can act as an sftp server where the sftp users can be defined in the Oracle Compute Cloud Server.
- Run the following command to extract the
attachments on the file server, which were
created in the section Creating the Attachment
Repository DPK (Optional), and uploaded in the
section Uploading DPKs to Oracle Cloud
Storage.
tar -xvfz attach_repo.tgz
- Identify the URL which needs to be changed
using this SQL query:
SELECT URL_ID,URL from PSURLDEFN
- Log in to the PeopleSoft application.
- Select PeopleTools, Administration, URLs.
- Modify the identified URLs.