 Single-Click
Instance Creation in Oracle Cloud Infrastructure Compute Classic
Single-Click
Instance Creation in Oracle Cloud Infrastructure Compute Classic Before You Begin
This tutorial shows you how to quickly create an instance for Oracle Cloud Infrastructure Compute Classic from the My Services Dashboard. This tutorial takes approximately 5 minutes to complete.
Background
A Compute Classic instance is a virtual machine running a specific operating system and with CPU and memory resources that you specify. An instance is defined by its machine image and shape. A machine image is a template of a virtual hard disk that has a specific operating system installed.
When you create an instance using the steps in this tutorial, the instance is created with the following configuration:
- Uses the smallest applicable shape.
- Uses the default name and label, unless you specify a name.
- Uses a persistent boot disk. You won’t be able to create an instance snapshot of this instance.
- In sites which support public IP address reservations, security rules, and access control lists in IP networks, the instance:
- Has an autogenerated public IP address and an autogenerated cloud IP address.
- Is added to an IP network. An IP network is created with the same name as the instance name. The networking objects required to enable SSH access are created automatically.
- Doesn't have an interface on the shared network.
- In sites which don’t support public IP address reservations, security rules, and access control lists in IP networks, the instance:
- Has a temporary public IP address.
- Has an interface on the shared network.
- Is added to the default security list. The networking objects required to enable SSH access are created automatically.
- Doesn’t have a description, tags, a DNS host name prefix, or custom attributes (unless specified in the image).
- Has an SSH key associated with it, if required. If you select a Windows image, an SSH key isn't required. You must specify an administrator password instead.
- Has persistence specified as true for all objects.
What Do You Need?
- A subscription to Compute Classic. You must be a user
with the
Compute_Operationsrole. See How to Begin with Compute Classic Subscriptions in Using Oracle Cloud Infrastructure Compute Classic.
 Create
the Instance
Create
the Instance
- Sign in to the Oracle Cloud My Services application at https://cloud.oracle.com/sign-in. My Services Dashboard page is displayed.
- Click Create Instance. The Create Instance dialog box is displayed.
- In the Compute Classic section, click Create. The
Create Instance QuickStarts page appears.
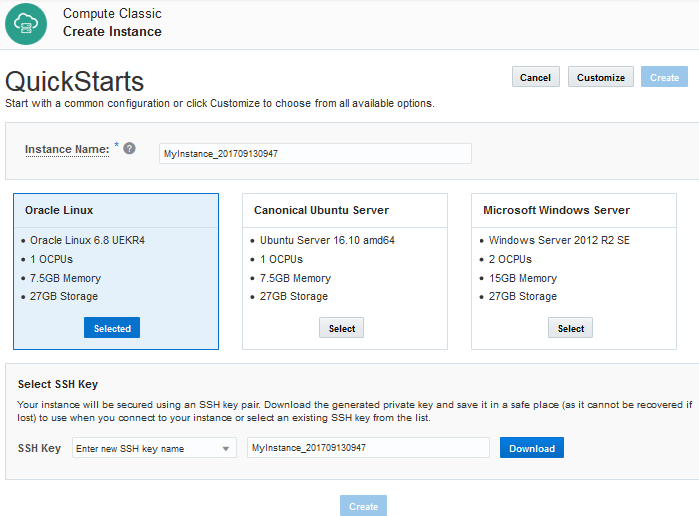
Description of the illustration create_instance.png - In the Instance Name field, enter a name.
- Select an image. For example, select Oracle Linux.
- If you select the Oracle Linux or the Canonical Ubuntu Server image, you must create an SSH key pair. In the Create SSH Key Pair section:
- In the SSH Key Name field, enter a name or accept the default name.
- Click Download to download the SSH key. Save the SSH private key to a location on your local system. You'll need it later, to log in to your instance.
- If you select Microsoft Windows Server, enter the administrator password and then enter the same password a second time to confirm it. You'll need this password to authenticate your RDP session later.
- Click Create. The Instances page is shown, listing all of the instances in your account. When the instance is created, it is listed on this page. Click the Refresh button to refresh the display.
 View
Instance Details
View
Instance Details
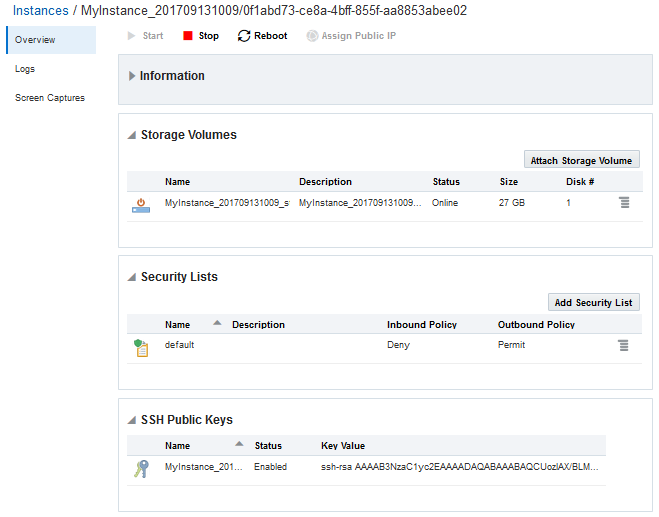
- On the Instances page, click the instance you just created. The instance details page appears.
- You can start, stop, and reboot the instance, as well as attach additional storage volumes and add security lists.
 Want
to Learn More?
Want
to Learn More?
- Creating an Oracle Linux Instance Using the Compute Classic Web Console
- Creating Instances in Using Oracle Cloud Infrastructure Compute Classic