Before You Begin
Purpose
This tutorial shows you how to extend an existing development process by taking an application's source files currently stored in GitHub and building and deploying the application as a Docker container using Oracle Container Cloud Service.
Time to Complete
30 minutes
Background
This tutorial shows you how to:
- set up Docker Hub to automatically build a new Docker image whenever application source files are updated in GitHub
- use Oracle Container Cloud Service to manually deploy a new service as a Docker container based on the Docker image
Scenario
During this tutorial you will:
- Prepare by linking your Docker Hub account with your GitHub account (if they're not already linked).
- Fork the docker-hello-world application from the Oracle Container Cloud Service account in GitHub to a new repository in your own GitHub account.
- Set up Docker Hub to automatically build a new Docker image from the docker-hello-world application whenever its source files change.
- Build a new Docker image from the docker-hello-world source files in GitHub by manually triggering the automated build in Docker Hub.
- Create a service in Oracle Container Cloud Service based on the new Docker image.
- Deploy the service as a Docker container.
- Verify the docker-hello-world app is working within the running Docker container.
What Do You Need?
| Required Resource/Tool: | Details: |
|---|---|
| Web browser | A web browser is required for working with
Oracle Cloud services. These are the minimum
requirements:
|
| Subscription to Oracle Container Cloud Service | Before you can use Oracle Container Cloud
Service:
For more information, see Using Oracle Container Cloud Service in the Oracle Help Center. |
| GitHub account | If you don't already have a GitHub account,
go to https://github.com/
to sign up for one. |
| Docker Hub account | If you don't already have a Docker Hub
account, go to https://hub.docker.com/
to sign up for one.
Your Docker Hub account must be linked to your GitHub account. If the two aren't yet linked (or you're not sure), follow the steps in Prepare for the Tutorial to link them together. |
1. Prepare for the Tutorial
To follow this tutorial, your Docker Hub account must already be linked with your GitHub account. If the two aren't yet linked (or you're not sure), follow the steps below. If the two accounts are already linked, skip straight to the next section.
Link your Docker Hub account with your GitHub account
- Log into your Docker Hub account at https://hub.docker.com/login.
- Click your username in the menu bar and select Settings to display the Account Settings page.
- Display the Linked Accounts & Services tab.
- Click Link Github to link
your Docker Hub account with your GitHub
account.
Tip: If your Docker Hub account is already linked with your GitHub accout, you'll see the Unlink GitHub button. If that's the case, skip straight to the next section. If your Docker Hub account is not yet linked with your GitHub account, you'll see the Link GitHub button.
2. Fork the docker-hello-world application in GitHub
During this tutorial, you'll be building and deploying the docker-hello-world app. The app's source files are already in a GitHub repository called docker-images. You just need to take a copy of them by forking the docker-images repository into your own GitHub account.
- Log into your GitHub account at https://github.com/login.
-
Go to https://github.com/oracle/docker-images/tree/master/ContainerCloud/images/docker-hello-world.
- Click the Fork button in the menu at the top of the repository page.
You now have your own copy of the docker-images repository.
3. Create a Docker Hub Automated Build
- Log into your Docker Hub account at https://hub.docker.com/login.
- Choose Create Automated Build from the Docker Hub Create menu.
- Click Create Auto-build GitHub to indicate that your GitHub account contains the repository for which you're going to create the automated build.
- Select the docker-images repository that you forked to your own GitHub account.
- On the Create Automated build page:
- Enter the following values:
- Name: docker-hello-world
- Short Description: Simple Hello World Example
- Click Create.
- Navigate to the Build Settings
tab.

Description of this image - built automatically whenever updates are pushed to GitHub
- built using the master GitHub branch
- built using a master build rule in a Dockerfile in the repository's root directory
- given the tag
latestin Docker Hub - Change the value in the Dockerfile
Location field to
/ContainerCloud/images/docker-hello-world/
The other default settings are fine for this tutorial. However, as you're not going to push updates to the docker-hello-world app to GitHub, you'll be triggering the build manually as described in the next section.
- Click Save Changes.


When the automated build has been created, the Repo Info tab of the Automated Build screen is displayed.

The build rules you define on the Build Settings tab specify how and when images are built. By default, images are:
4. Trigger the Build Manually
You've set up an automated build in Docker Hub so that a new Docker image will be built whenever changes to the docker-hello-world app are pushed to the docker-images repository in GitHub. However, in this tutorial you won't be changing the docker-hello-world source files in GitHub. So instead, to create the Docker image, you're going to trigger the build manually.
- On the Build Settings tab, click Trigger beside the master branch to build the image with the default build settings.
- Navigate to the Build Details page for the Docker Hub repository.
- Navigate to the Repo Info tab.

Description of this image You can see that the README.md file from the GitHub repository has now been included in the Full Description field for the Docker repository.
- Navigate to the Dockerfile
tab.

Description of this image You can see that the Dockerfile from the GitHub repository has been included for the Docker repository.

The build you just triggered now appears on the Build
Details page. Because of the build
settings you specified, the image will be built
using the master GitHub branch and will be given
the tag latest in Docker Hub.
When the image has been built successfully, it
appears on the Build Details page with the tag latest.
Tip: You might need to refresh your browser to see the image status change to Success.

5. Create a New Service with Oracle Container Cloud Service
- Log in to the Oracle Container Cloud Service Container Console at the URL and using the credentials you’ve received from your administrator.
-
On the Services page, click New Service to display the Service Editor and:
- Enter the following values:
- Service Name: Hello World Demo
- Image: YourAccount/docker-hello-world:latest (the image from your Docker Hub account)
- Ports: setup a mapping from host port 8080 to container port 80 using TCP protocol (you'll use port 8080 later to verify the deployed application is running)
- Click Save to create the new service and close the Service Editor.

The Hello World Demo service is now ready to be deployed.
6. Deploy the New Service with Oracle Container Cloud Service
- On the Services page of the Container Console, click the Deploy button beside the Hello World Demo service that you just created.
- the deployment's name
- the pool of hosts on which to run the deployment
- the number of containers to deploy, and how to choose the hosts on which to deploy them
- In the Deploy dialog, click Deploy to accept the default values and deploy and start the service.
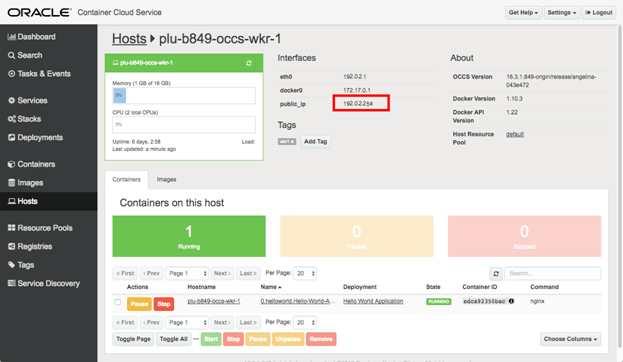
- Click on the name of the host in the Hostname column to see details of the host running the container.
- On the Host page, copy the value in the public_ip field.

The Deploy dialog appears, containing default values for:

The Deployments page appears, showing progress details of the deployment you just created.
To begin with, the docker-hello-world image is pulled from Docker Hub. After the image has been downloaded, it's started as a container. The Deployments page shows the status of the container as "Running", and the name of the host on which the container is running.


The Host page appears, showing details of the host running the container.
7. Verify the Deployment
- Open a new browser window.
- Enter the url to access the docker-hello-world
app running inside the Hello World Demo container,
in the form
http://<public_ip>:8080where: -
<public_ip>is the value you copied from the public_ip field on the Host page (for example,192.0.2.254) - 8080 is the host port you mapped earlier to container port 80
For example, the full url might look like http://192.0.2.254:8080
When your browser loads the page, the page shows a message like:
Hello world from
                                0.Hello-World-Demo.Hello-World-Demo-20160829-120946!

Congratulations! You have successfully built the docker-hello-world application from Docker Hub and deployed it inside a running Docker container using Oracle Container Cloud Service.
Want to Learn More?
- Get Started with Oracle Container Cloud Service in the Oracle Help Center
- Using Oracle Container Cloud Service in the Oracle Help Center
- Information about building Oracle Container Cloud Service stacks on GitHub
- Oracle Container Cloud Service video