Before You Begin
Purpose
In this tutorial, you learn how to quickly create a database deployment in Oracle Database Cloud Service, use SQL Developer to perform operations on the data in your cloud database, and use DBaaS Monitor to check the status of your database.Last Updated
August 2016, Release 16.3.3
Please note that Oracle develops its cloud services in an agile manner and makes rapid changes to meet our users' needs. Therefore this tutorial may not reflect all of the changes since the last update to this service. For the very latest information see Oracle Database Cloud Service on Oracle Help Center.
Time to Complete
Approximately 90 minutes.
Background
Oracle Database Cloud Service provides a platform to create full Oracle database instances in a virtual machine (VM). It's the same familiar Oracle Database – now in a cloud.You have full access to the features and operations available with Oracle Database, but with Oracle hosting the VM and cloud storage, and (optionally) performing certain database maintenance and management operations automatically. You have full OS root access and SYS database access, so you have full administrative control of your VM and your database via SSH, SQL Developer, Data Pump, SQL*Plus and other tools.
Scenario
In this tutorial, you create a database deployment using a wizard interface, use SQL Developer to perform some simple operations against the data in your cloud database, and use DBaaS Monitor to check your database status and parameters.
What Do You Need?
Before starting this tutorial, you should:- Have already procured and activated a trial or paid subscription for Oracle Database Cloud Service. Don't have a subscription? Go to Oracle Store or https://cloud.oracle.com/database
- Have installed the latest version of Oracle SQL Developer from http://www.oracle.com/technetwork/developer-tools/sql-developer/downloads/index.html
- Have one of the supported browsers:
- Microsoft Internet Explorer: version 9 or 10; set Browser Mode to IE9 or IE10
- Mozilla Firefox: version 24 and later
- Google Chrome: version 29 and later
- Apple Safari: version 6
Creating a Database Deployment
Invoking the Create Database Cloud Service Wizard
Log in to the Oracle Database Cloud Service console using the credentials provided by your Oracle Cloud account administrator. For details on accessing the console, see the documentation on Accessing the Oracle Database Cloud Service Console.
- Your administrator may provide you a link to the My Services console, from which you can choose Oracle Database Cloud Service.
- Or, your administrator may provide you a direct link to the Oracle Database Cloud Service console.
-
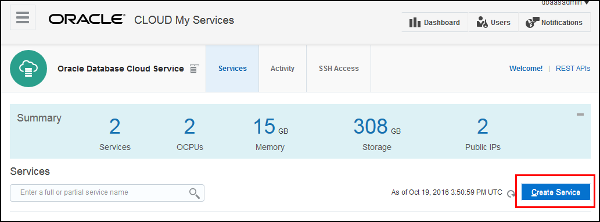
To create a new database deployment, in the Database Cloud Service console click Create Service.
-
The Create Database Cloud Service Instance wizard is invoked, displaying the Subscription Type page.

Description of this image
Defining the Subscription Type
Use the Subscription Type page to select the service level and billing frequency.
-
The two types of service level are Oracle Database Cloud Service and Oracle Database Cloud Service - Virtual Image.
- You can choose the Oracle Database Cloud Service service level to have the wizard create a database deployment for you, using configuration options provided in the wizard. This service level also makes additional cloud tooling available for backup, recovery and patching.
- You can choose the Oracle Database Cloud Service - Virtual Image
service level to define a database instance manually or by using the Oracle Database Creation Assistant (DBCA).
For this tutorial, select Oracle Database Cloud Service (not the Oracle Database Cloud Service - Virtual Image service level).

Description of this image -
On the Subscription Type page, you also select the billing frequency. For this tutorial, select Monthly. Then click Next.

Description of this image
Selecting the Software Release
For this tutorial, select Oracle Database 12c Release 1. Then click Next.

Selecting the Software Edition
For this tutorial, select Enterprise Edition. Then click Next.

Configuring the Database Deployment
The Service Details page appears. On this page, you configure details in three areas:
- Service configuration
- Database configuration
- Backup and recovery configuration
-
First, you fill the fields in the Service Configuration section.
Note: Several fields have Help icons to assist you. For example, the Help message for the Service Name field explains that the service name of your choice can have up to 50 characters, must start with a letter, and can contain only letters, numbers, and hyphens (-).

Description of this image
-
Enter a service name.
Note: The Service Name is the name by which this database deployment will be listed among potentially multiple database deployments in your DBCS service. It is not the database SID or service name, which you will provide in the Database Configuration section of this page.
Optionally enter a description of the database deployment.
Note: You can use the description to show reminders, such as the public key you used and the storage size. If you create multiple database deployments in your DBCS service, the description of each deployment will help distinguish them in the list of deployments.
Select a compute shape from the drop-down menu.
Note: The compute shape specifies the number of Oracle Compute Units (OCPUs) and amount of memory (RAM) for the virtual machine (VM) hosting the new database deployment. Database Cloud Service offers several OCPU/RAM combinations.
Select a timezone for the database deployment to use from the drop-down menu.
Note: The default is Coordinated Universal Time (UTC).Click Edit to create an SSH key pair.

Description of this image - Select Create a New Key and click Enter to generate the SSH key pair.

Description of this image
The SSH Key pair is created. Click Download.

Description of this image
Select Save File and click OK.

Description of this image
After downloading the zip file, click Done.

Description of this image
The generated SSH key appears in the SSH Public Key field.

Description of this image
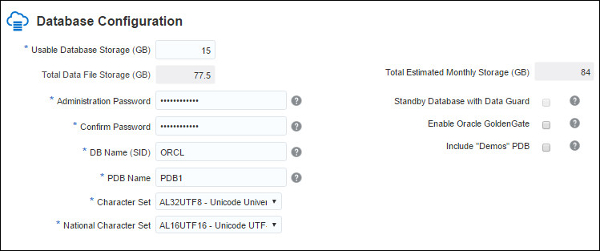
Configuring the Database
Next, you fill the fields in the Database Configuration section.
Enter the following: the amount of storage in GB for actual database data, the administration password, the database name (SID), and the PDB pluggable database name (if you have selected Oracle 12c).
Note: The administration password you provide is used for the SYS and SYSTEM database users, and for the admin Oracle Application Express user. Make note of this password, as you will need it later when defining a SQL Developer connection.
You may change the default character set and national character set for the database.
The Total Estimated Monthly Storage field displays a computed estimate, including data files and backup storage.
Standby Database with Data Guard controls whether Data Guard is to be configured.
You may enable Oracle GoldenGate, to configure the database for use as the replication database of an Oracle GoldenGate Cloud Service instance.
You may include the "Demos" PDB in the database, which contains demos for many new features of 12c such as in-memory and multitenant.
Configuring Backup and Recovery
Next, you fill the fields in the Backup and Recovery Configuration section.
Typically, for backup and recovery, you would enter your choice of destinations: cloud storage container name, cloud storage user name and user password for an Oracle Storage Cloud container (if backing up to cloud storage, or to both cloud storage and local storage on the VM).You can create the container beforehand and provide the wizard with information about it, or you can have the wizard create the container for you.
When specifying the name of the container, use the format: instance-id_domain/container, where instance is the name of the Oracle Storage Cloud Service instance, id_domain is the name of the identity domain, and container is the name of the container.
Example for Cloud Storage Container: storagesvc999-usoracleaccoutrial00999/backup_container
However, for this tutorial, select None. Then click Next.

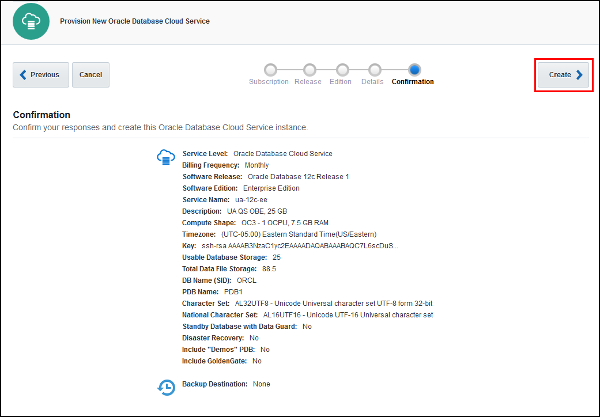
Confirming Your Database Instance Definition
On the Confirmation page, review your database definition choices.
When you are satisfied with the information, click Create.
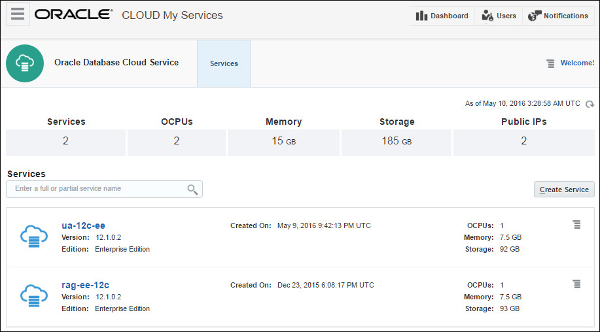
When you return to the Database Cloud Service console, you will see your new database deployment listed. It will have a status of "In Progress" until the service creation is completed. Database deployment creation will take a number of minutes; possibly 30 or more.

Finding the Connection Details for your Database Instance
Before you can use Oracle SQL Developer to connect to your database, you need to find the IP address and SID of your database for connecting to the database with SQL Developer.
-
Log in to the Oracle Database Cloud Service console using the credentials provided by your Oracle Cloud account administrator.
- Your administrator may provide you a link to the My Services console, from which you can choose Oracle Database Cloud Service.
- Or, your administrator may provide you a direct link to the Oracle Database Cloud Service console.
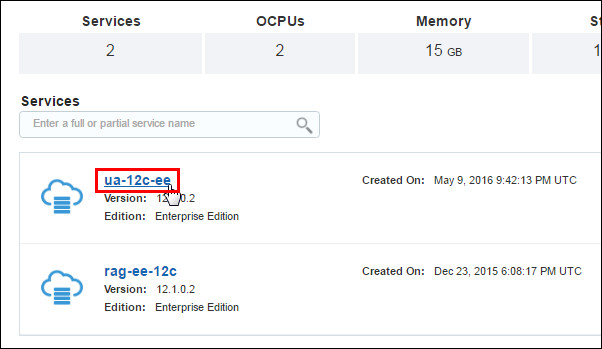
Description of this image -
Click the name of the database to which you want to connect.
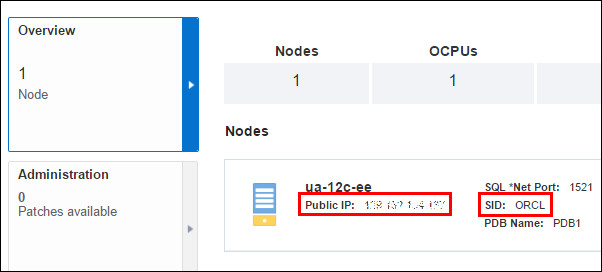
Description of this image -
Write down the Public IP address and SID name. You will need these later when you define your SQL Developer connection.
Description of this image
Enabling Secure Network Access to your Database Instance
When a database service instance is created, a number of Oracle Compute Cloud Service access rules are created, but set to a disabled status. When you enable one of these predefined access rules, the given port on the compute node is opened to the public internet.
In order to use SQL Developer and the Oracle Cloud on-instance database monitor (DBaaS Monitor) in this tutorial, you will enable two predefined rules:
ora_p2_dblistener, which controls access to port 1521, the port used by SQL*Net, and therefore SQL Developer.ora_p2_httpssl, which controls access to port 443, the port used for HTTPS connections to the instance, including DBaaS Monitor.
-
To enable these two automatically created Oracle Compute Cloud access rules from the Database Cloud Service console, click the menu
 beside the service name.
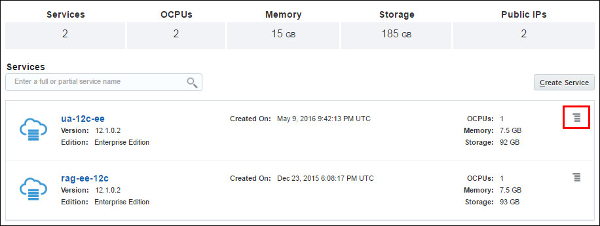
Description of this image -
Select Access Rules from the drop-down menu.
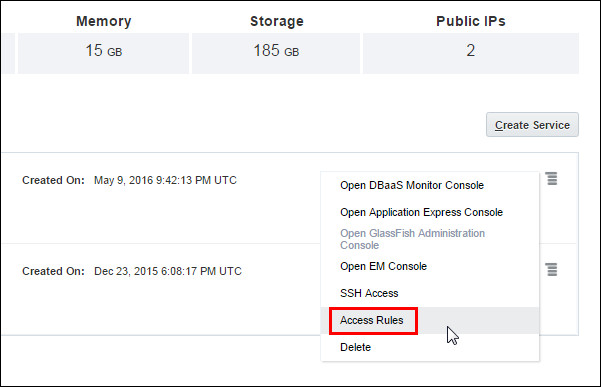
Description of this image -
The Access Rules page is displayed. A list of access rules and their enabled status is displayed. You can create, delete, and update access rules from this page. By default, only the
ora_p2_sshandora_trusted_hosts_dblisteneraccess rules are enabled.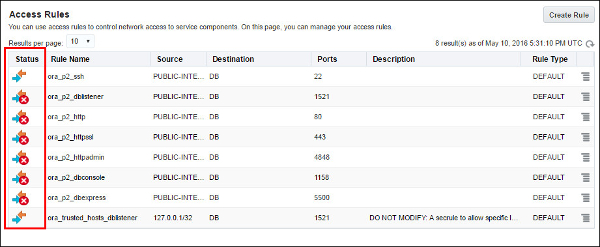
Description of this image -
To enable SQL Developer access, click the menu
 beside the
 ora_p2_dblisteneraccess rule, and select Enable.
Description of this image -
The Enable Access Rule window is displayed. Click Enable.
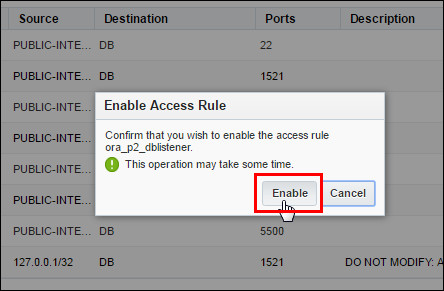
Description of this image -
The Enable Access Rule window closes, and the Status column indicates that you successfully updated the access rule. To enable DBaaS Monitor access, click the menu
beside the ora_p2_httpsslaccess rule, and select Enable.
In the Enable Access Rule window, click Enable.

Description of this image -
You may exit the Access Rules page.
.
Note: As an alternative to the steps shown here, if you are not signed in to the Database Cloud Service console, sign in to the My Services application by clicking the link in your welcome email or by going to http://cloud.oracle.com, clicking Sign In and selecting your My Services Data Center from the drop-down menu. The Platform Services Dashboard is displayed. In the entry for Oracle Compute Cloud Service, click Open Service Console.Then in the Compute console, click the Network tab to access the security rules that are the same as these access rules.
Connecting SQL Developer to your Cloud Database
Now let's define an Oracle SQL Developer connection to your database in the cloud.
-
Open SQL Developer. Right-click Connections and select New Connection.
Note: If you are using a version of SQL Developer in which the Connections panel shows both "Connections" and "Cloud Connections", do not right-click Cloud Connections, which is for Oracle Database Cloud - Schema Service.
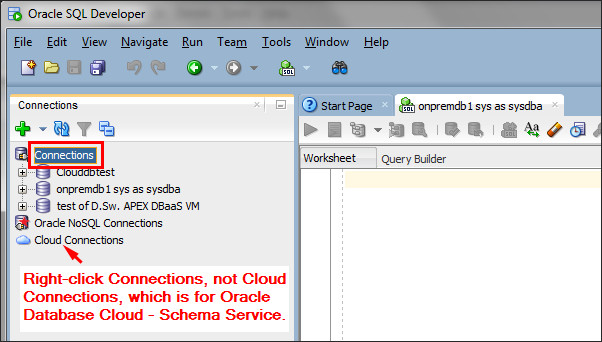
Description of this image -
The New / Select Database Connection dialog appears. Provide the following information:
Connection Name: Create a name for this connection.
Username: For simplicity, since we have not yet defined users, let's just connect with thesystemuser.
Password: Provide the "Administration" password that you specified when you created the database service instance.
Hostname: Provide the Public IP address for the service instance you are connecting to. You made note of the Public IP address and SID in the tutorial's "Finding the Connection Details for your Database Instance" section.
Port: 1521
SID: Your SID
or
Service Name: If you are connecting to an Oracle 12c pluggable database (PDB), provide the service name instead of the SID, as shown in the second screen of this step.
Click Test. You should receive a success status.
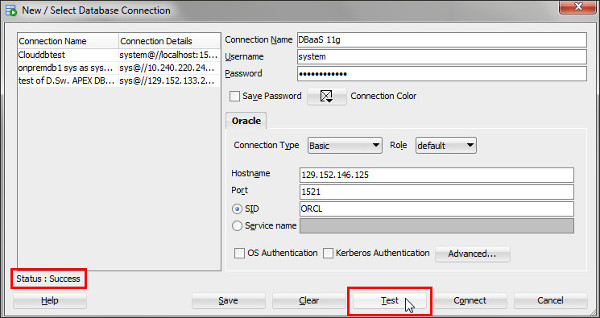
Description of this image
To connect to an Oracle 12c pluggable database, provide the service name instead of the SID, as shown in the following screen.
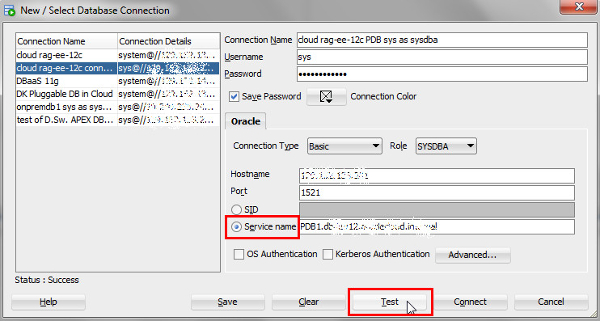
Description of this image -
If your test results show success, click Connect.
Note: If you had not enabled theora_p2_dblisteneraccess rule in the previous section, you could have defined an SSH connection using a copy of the private key that you created when generating the private/public key pair in an earlier section of this tutorial. To learn about SSH tunneling, use the link to the documentation in the "Want to Learn More?" section at the end of the tutorial.
Performing Operations on Data in your Cloud Database
You have connected SQL Developer to your database service instance in Oracle Database Cloud Service. Now you can use SQL Developer as you normally would with an on-premises database. Perform some simple operations on the sample schema that comes with your database service instance in the cloud.
Adding a Row to a Table
-
Your connection is displayed in the Connections tab on the left side and a SQL worksheet is opened automatically. Expand the connection you just defined.

Description of this image -
Expand Other Users > HR > Tables. Select COUNTRIES. The panel on the right will display table information, with the Columns tab open.
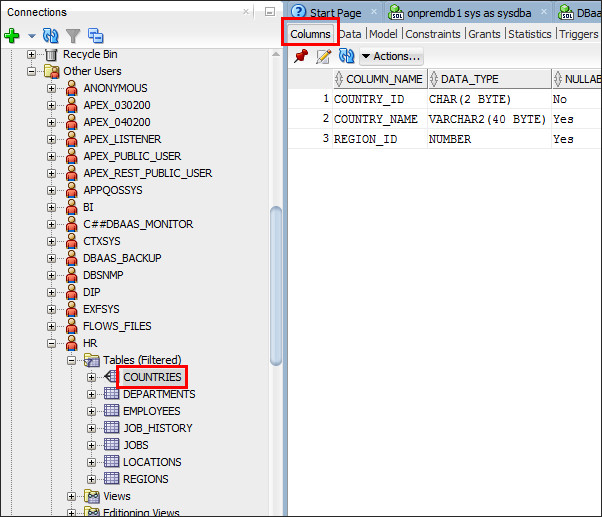
Description of this image -
Click the Data tab to see data from the COUNTRIES table in your cloud database.
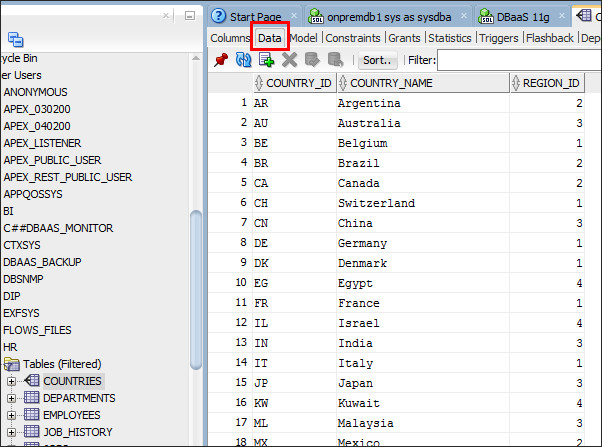
Description of this image -
Click the Insert Row toolbar button to Insert a row of data. Specify a country ID of
NZ, country name ofNew Zealand, and region ID of3. Click the Commit Changes button. You have added a small bit of data to your cloud database from your local computer. See the links below for tutorials on migrating large data sets.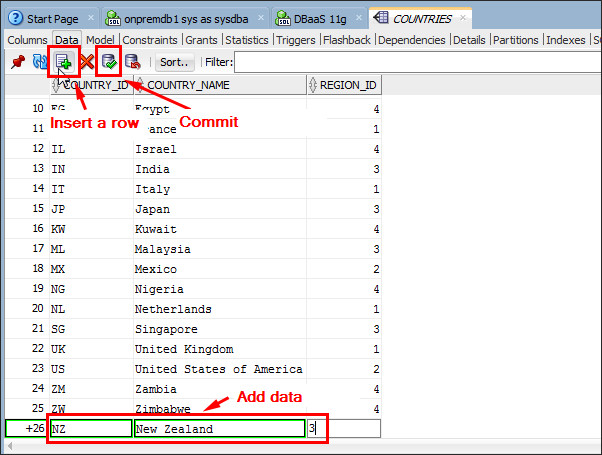
Description of this image
Querying the HR Schema
-
Click the SQL Worksheet icon under the menu bar.
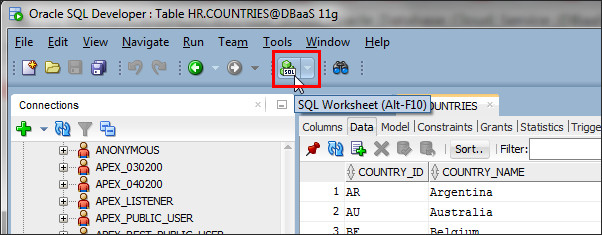
Description of this image -
The Select Connection dialog appears. If you are still connected to the database from the previous topic, click OK.

Description of this image -
The SQL Worksheet appears. You can use the SQL Worksheet to enter and execute SQL, PL/SQL, and SQL*Plus statements as you would with your non-cloud, on-premises databases. You can specify any actions that can be processed by the database connection associated with the worksheet, such as creating a table, inserting data, creating and editing a trigger, selecting data from a table, and saving that data to a file.
You can display all columns of data in a table by entering an asterisk (*) after the SELECT keyword. Execute the following statement to view all rows and columns in theDEPARTMENTStable of theHRuser. The results appear in the Query Result tab:SELECT * FROM HR.DEPARTMENTS;

Description of this image -
You can display specific columns of data in a table by specifying the column names in the SELECT statement. Execute the following statement to view the JOB_ID and JOB_TITLE columns in the JOBS table:
SELECT job_id, job_title FROM HR.JOBS;

Description of this image -
You can use the WHERE clause to restrict data. Execute the following query to restrict the number of rows to DEPARTMENT_ID 60:
SELECT * FROM HR.DEPARTMENTS WHERE department_id=60;
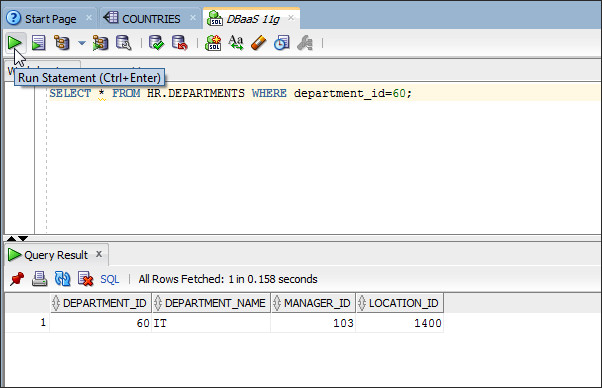
Description of this image -
Execute the following SELECT statement to retrieve the LAST_NAME, JOB_ID, and HIRE_DATE columns of employees who belong to the SA_REP job ID. Sort the rows in ascending order based on the HIRE_DATE column:
SELECT last_name, job_id, hire_date

                                    FROM HR.EMPLOYEES

                                    WHERE job_id='SA_REP'

                                    ORDER BY hire_date;
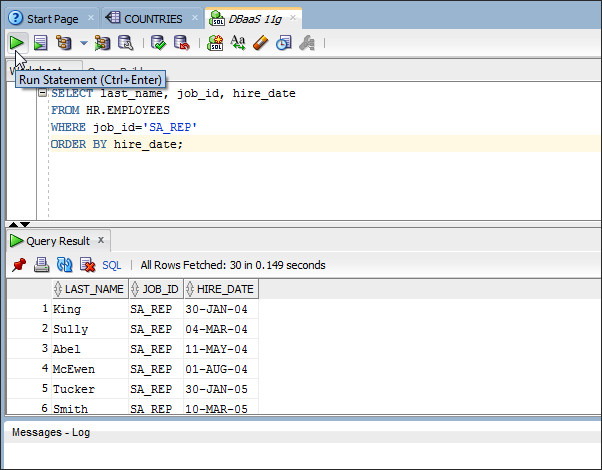
Description of this image
Monitoring Your Database Service Instance with DBaaS Monitor
Use DBaaS Monitor to monitor your Oracle Database Cloud Service, and the database instances in it. You connect to the Monitor via Port 443 of your DBaaS VM. You opened this port in a previous section of the tutorial, ''Enabling Secure Network Access to your Database Instance".
-
From the My Services console, return to the Database Cloud Service console.
Click the menu next to the database instance you wish to monitor, and note the variety of console choices.
Click Open DBaaS Monitor Console.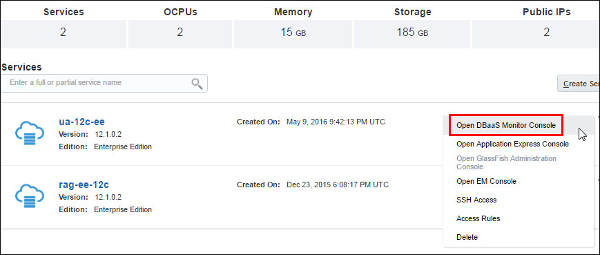
Description of this image -
If your browser warns that your connection is not private, click Advanced, and then click the link to proceed to the Public IP address shown. The log in dialog appears. Enter dbaas_monitor as the user name. For the password, use whatever password was specified when your database instance was created. Click Log In.
Description of this image -
The DBaaS Monitor home appears, displaying generic information about the database instance. The Database area contains sections showing snapshot information about database status, listener status, online database storage, alerts, sessions, and wait events. The Operating System area contains sections showing snapshot information about memory, CPU, file system storage, and processes.
You can click each section to drill down to a more detailed view of the monitored area.
Alternatively, you can access the same detailed views using the Database and OS drop-down menus.
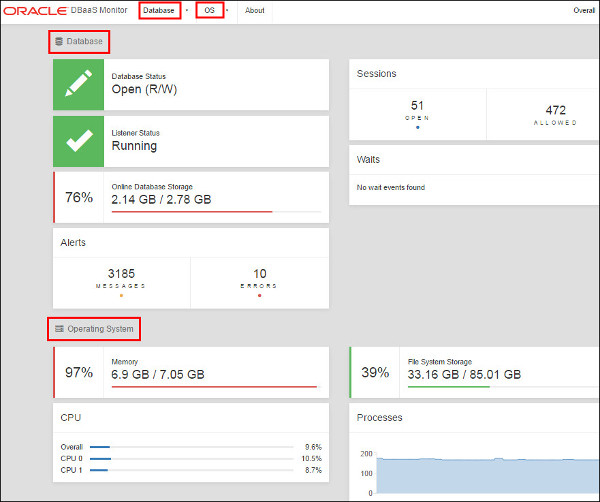
Description of this image -
In the Database area, click Online Database Storage.
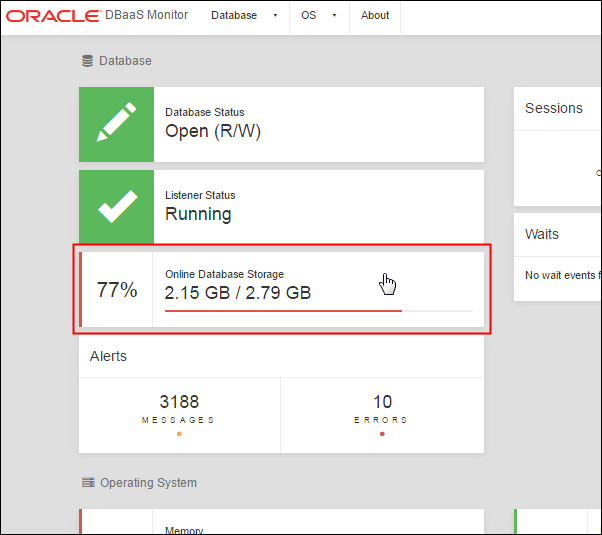
Description of this image -
The Storage page displays a breakdown of the storage currently allocated to the database. It shows the overall database storage, followed by the storage for each PDB. For each PDB, you can show or hide storage information about its tablespaces.
InCDB$ROOTandPDB1, click show tablespaces.
InPDB1, click the SYSTEM tablespace.

Description of this image -
The tablespace detailed page provides an interactive report on the segments that exist within the tablespace. Most segments are user objects, and they include tables, large objects, and indexes.
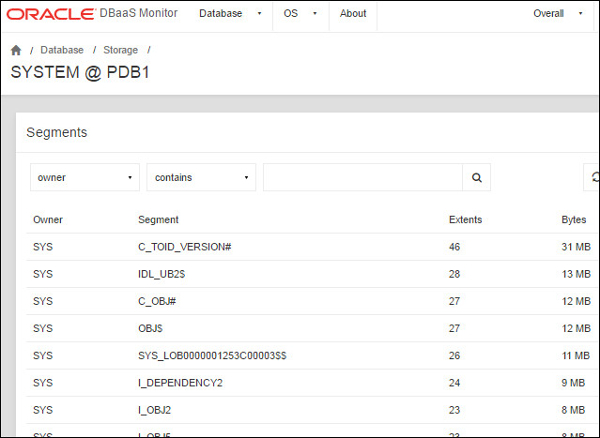
Description of this image -
From the Database drop-down menu, click Alerts. An interactive report displays the entries in the database's alert log. The alert log is a chronological log of messages and errors commonly used to learn whether the background processes have encountered errors.
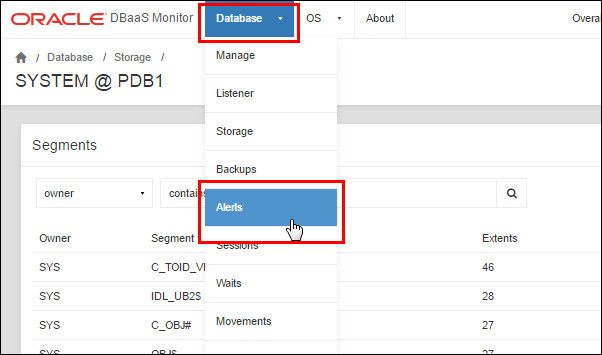
Description of this image
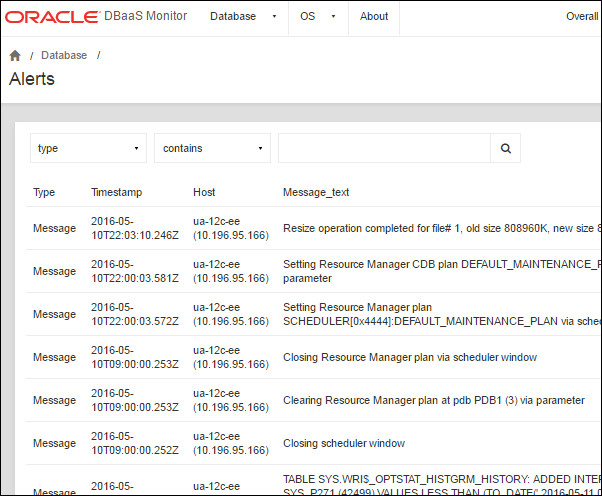
Description of this image -
From the Database drop-down menu, click Sessions to view open user sessions. An interactive report displays information about all currently opened sessions in the database. The top-most table shows summarized data about each open session. If you click certain rows in this table, you can scroll down to the bottom of the window to see more detailed information about that session.

Description of this image
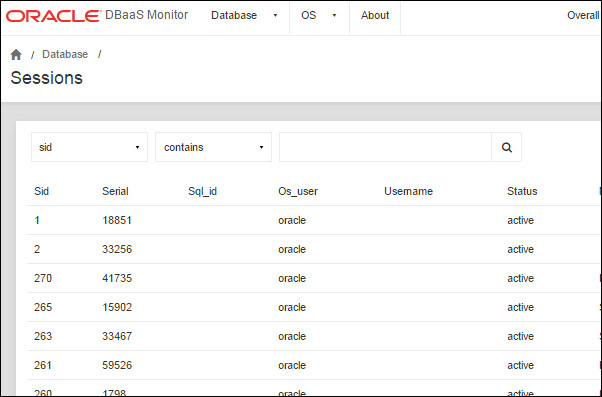
Description of this image
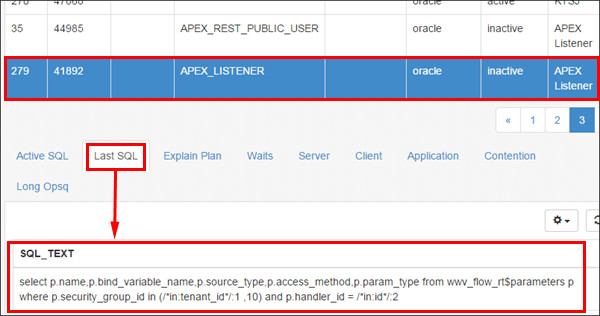
Description of this image
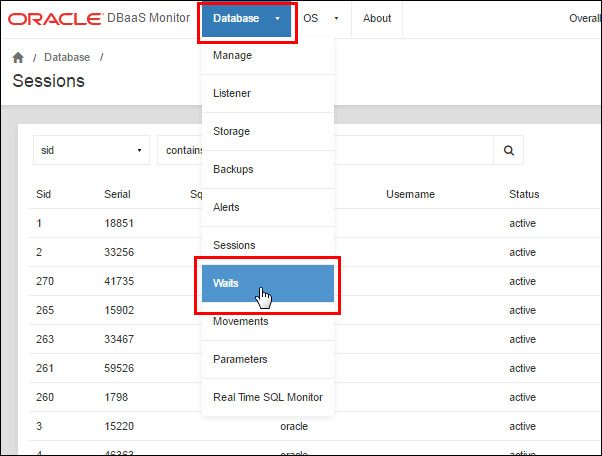
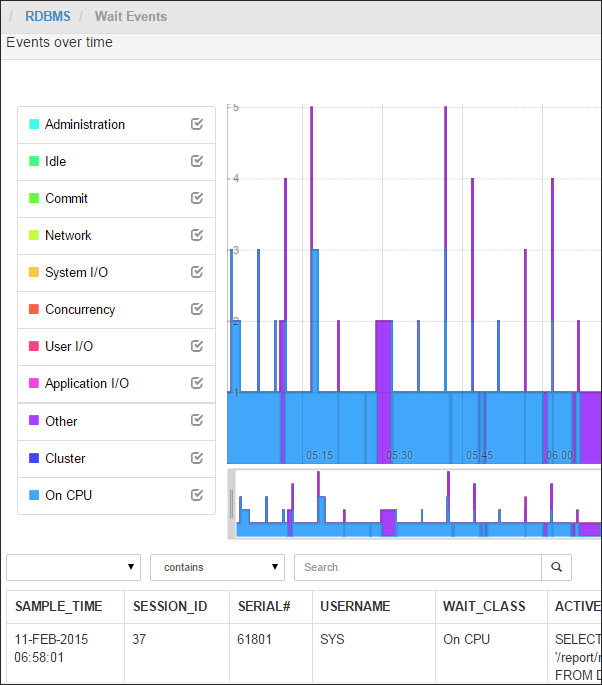
- From the Database drop-down menu, click Waits to view the wait events in real time. Your database may not show wait events. In this example, the wait events are essentially of CPU consumption, plus a little bit of system I/O, and various waits categorized as "Other".
Description of this image
Description of this image
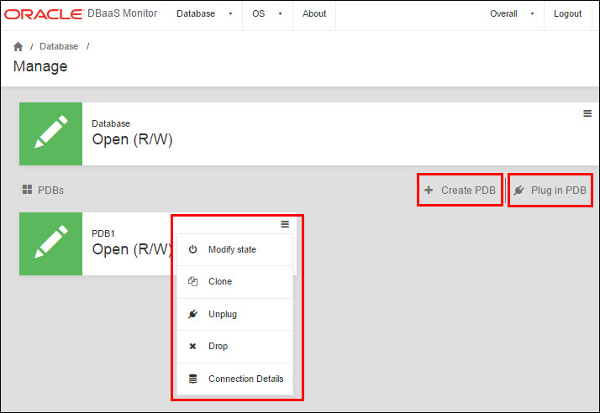
- From the Database drop-down menu, click Manage. The Manage page allows you to see the status of the database and allows you to turn the database on and off. In 12c databases, the status of individual PDBs is also displayed. On this page you can also create, clone, plug, unplug or modify PDBs.
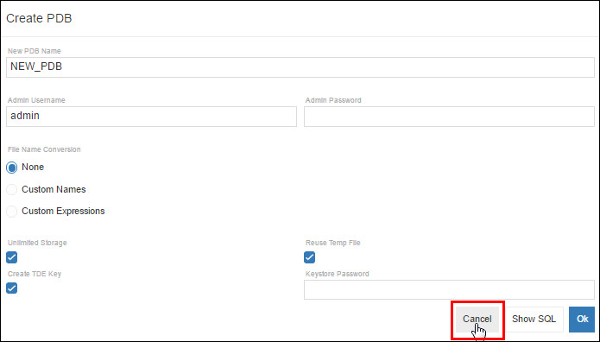
Click Create PDB and examine the Create PDB dialog. Then cancel out of the dialog.
Description of this image
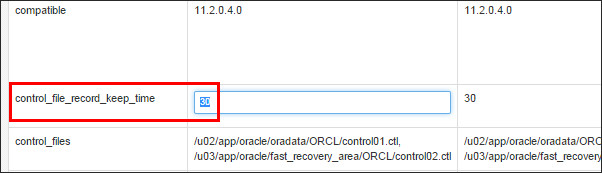
Description of this image - From the Database drop-down menu, click Parameters to view or modify current parameter values.

Description of this image
The Database Parameters page appears. To modify the value of a parameter, select the parameter, change its value, and click the Save changes button at the top. You will have an opportunity to review your change before applying it. Changes that are saved to memory will take effect immediately across all sessions, but will be lost upon the next database instance shutdown. Changes that are saved to the PFILE will take effect upon the next database instance startup and are persistent.
- From the Database
drop-down menu, click Real Time SQL Monitor to view the SQL statements that are being monitored in the database.

Description of this image
The Real Time SQL Monitor page appears for viewing, in real time, the SQL statements that are being monitored in the database. This tool provides two major functions - a general view of monitored statements, and a view of execution details.
The general view is provided in a table containing: status, duration, SQL ID, session ID, session serial number, instance degree of parallelism, CPU time, I/O time, start time, and the SQL statement being monitored.
When a SQL statement is drilled down from the main monitor table, a detailed view is shown. The detailed view shows general information about the query execution, general statistics of the SQL statement, and detailed information about the statement (SQL text, plan statistics, parallelism details, activity line chart for the CPU usage).

Want to Learn More?
- For more detailed information about creating Oracle Database instances in Oracle Database Cloud Service, see Creating a Database Deployment in Using Oracle Database Cloud Service.
- To learn more about Oracle Database Cloud Service, visit Database Cloud Service.
- For training on the Oracle Cloud platform-as-a-service (PaaS) Services, visit the Oracle Learning Library.
- To learn about migrating data from on-premises databases to Oracle Database Cloud Service, see these OBE tutorials:
- For a high-level overview of creating and connecting to database instances in Oracle Database Cloud Service, see these videos:
- For a quick non-cloud introduction to Oracle Database 12c, see this OBE tutorial:
Credits
- Lead Curriculum Developer: Rick Green