Administering Your Database Cloud Service
Overview
Purpose
This tutorial covers how to administer your Oracle Database Cloud Service environment and databases.Last Updated
March 2016, Release 16.1.5
Please note that Oracle develops its cloud services in an agile manner and makes rapid changes to meet our users' needs. Therefore this tutorial may not reflect all of the changes since the last update to this service. For the very latest information see Oracle Database Cloud Service on Oracle Help Center.
Time to Complete
Approximately 40 minutes.
Introduction
After you create database instances in Oracle Database Cloud Service, you can administer and monitor the databases and your Oracle Database Cloud Service using a variety of provided tools.For detailed information on using Oracle Database Cloud Service, including connecting to database instances, see Oracle Database Cloud Service on Oracle Help Center.
Scenario
In this tutorial, you explore the tools provided for administering your Oracle Database Cloud Service and your database instances. You will:
- Access the Database Cloud Service console for:
- Creating and deleting database instances
- Scaling up a database
- Patching a database
- Access the Compute console for:
- Creating a storage volume
- Enabling access rules
- Locating SSH public keys
- Updating users
- Access the DBaaS Monitor console for:
- Checking database status, storage, user sessions, wait events, alert logs
- Configuring database parameters
- Access the Enterprise Manager console for:
- Monitoring a database
- Access the GlassFish Administration console for:
- Restarting and stopping the Oracle GlassFish Server
Software Requirements
- You need one of the supported browsers listed in the following table:
| Browser | Version |
| Microsoft Internet Explorer | 9 or 10; set Browser Mode to IE9 or IE10 |
| Mozilla Firefox | 24 and later |
| Google Chrome | 29 and later |
| Apple Safari | 6 |
Prerequisites
Before starting this tutorial, you should:
- Have already procured and activated a trial or paid subscription to the Oracle Database Cloud Service. Don't have a subscription? Go to Oracle Store or https://cloud.oracle.com/database
- Have generated a secure shell (SS private/public key pair, with copies of the private and public key files on your local computer. You will point to the SSH public key when you create the database instance. For details on generating an SSH private/public key pair, refer to Generating a Secure Shell (SSH) Private/Public Key Pair in Using Oracle Database Cloud Service.
- Have created a database instance in your Oracle Database Cloud Service. For details on creating a database instance, see the tutorial Creating a Database Cloud Service Instance or the video Creating a Database Instance.
Logging In to the Database Cloud Service Console
Log in to the Oracle Database Cloud Service console using the credentials provided by your Oracle Cloud account administrator. For details on accessing the console, see Accessing the Oracle Database Cloud Service Console.
- Your administrator may provide you a link to the My Services console, from which you can choose Oracle Database Cloud Service.
- Or, your administrator may provide you a direct link to the Oracle Database Cloud Service console.
-
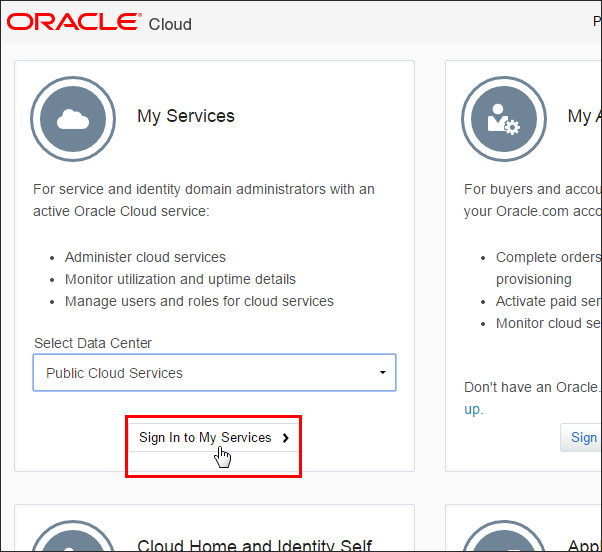
At the cloud.oracle.com sign-in page, in the Select Data Center drop-down menu, select Public Cloud Services.

-
Click Sign In to My Services.
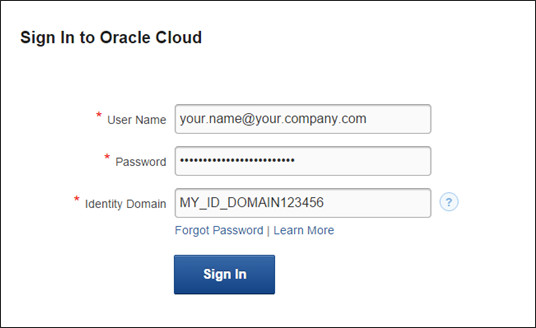
- You are prompted to sign in. Enter your user name and password, and the identity domain for your Oracle Database Cloud Service. Click Sign In.
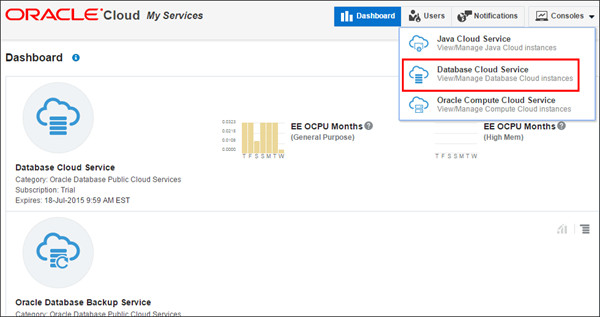
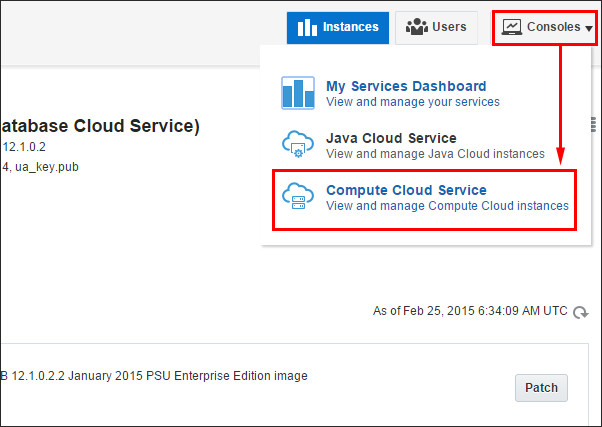
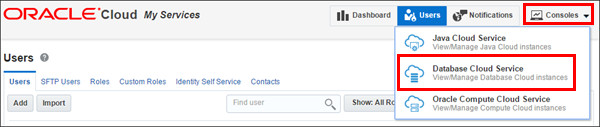
- The My Services dashboard lists the services for which you have subscriptions. From the Consoles drop-down menu, select Database Cloud Service.
- The Database Cloud Service console is displayed.

Examining the Database Cloud Service Console
The Database Cloud Service console presents an interface for creating, deleting, and managing database instances. You can click an instance to examine the details of the instance and perform patching and scaling of resources for the instance.
-
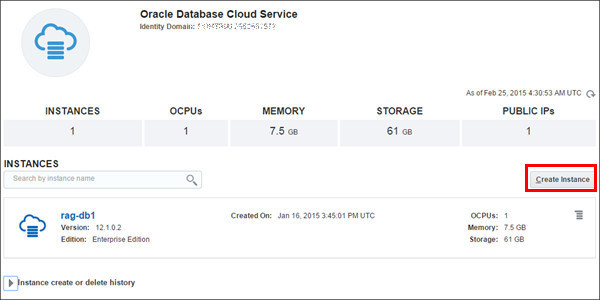
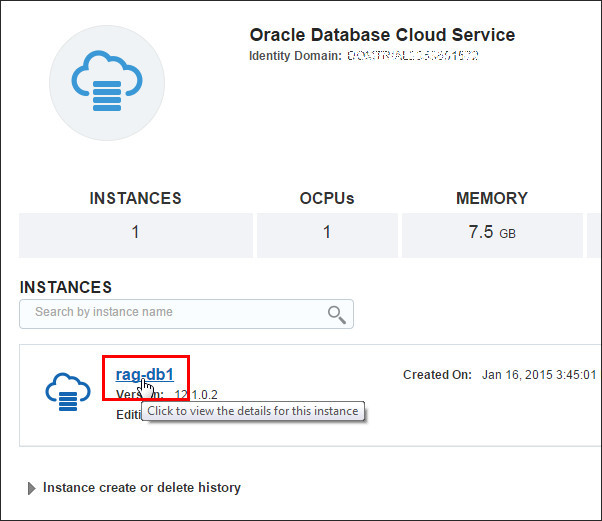
Across the top of the console is a summary display of the amount of database instances, OCPUs, memory, storage, and public IPs in your Oracle Database Cloud Service. Below that is a list of your database instances. To create a database instance, you would click Create Instance.
-
To view the details of a database instance and perform patching and scaling of that database, click the name of the instance.
-
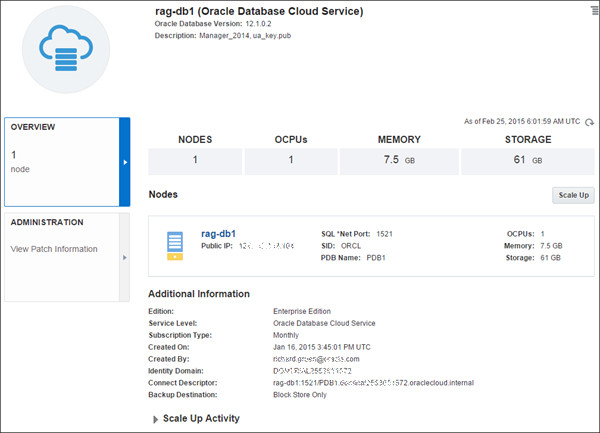
The database details page presents details using two tiles along the left of the page: OVERVIEW and ADMINISTRATION. The details page opens at the OVERVIEW tile. Examine the information listed, including the public IP address, SID, pluggable database name, and more.
-
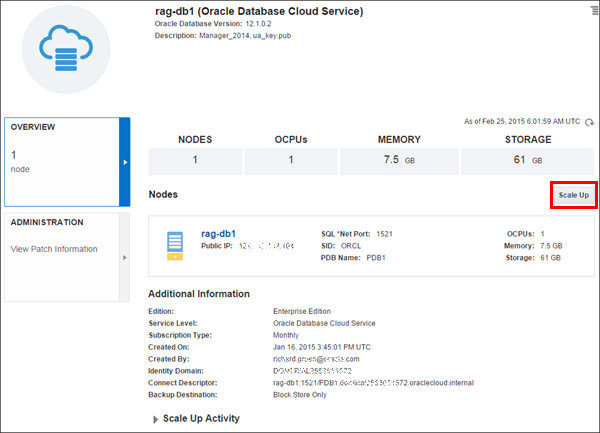
You may need to scale up your Oracle Database Cloud Service instance compute shape to improve performance, add storage, or switch to a high-memory option. To scale up the compute shape of your service instance, click Scale Up.
-
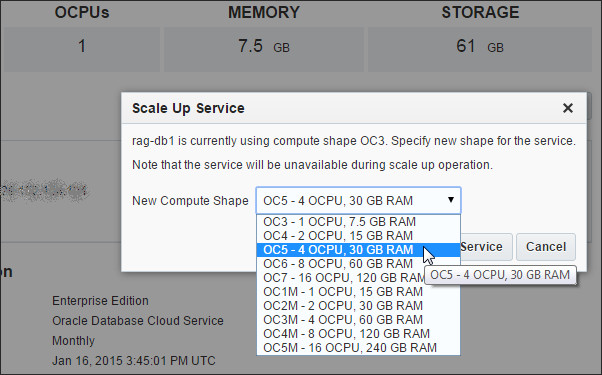
The Database Cloud Service Scaling overlay is displayed. Note that the overlay includes information about the instance's current compute shape. You can use the drop-down menu to select a new compute shape. Click Cancel.
Note: Currently, there is no support for scaling down a service.
-
Returning to the database details page, click the ADMINISTRATION tile to manage patching. If any patches are available, they will be listed in the Available Patches section. You can apply a patch by clicking Patch.
Note: See Patching Database Cloud Servicefor details about prerequisites for patching, and alternatively using the dbpatchm subcommand of the dbaascli utility on the service instance’s VM.

Examining the Compute Console
You use the Compute console to create storage volumes, manage access rules, locate SSH public keys, and manage users. You can access the Compute console from My Services or the Database Cloud Service console.
-
From the Consoles drop-down menu, select Compute Cloud Service.
-
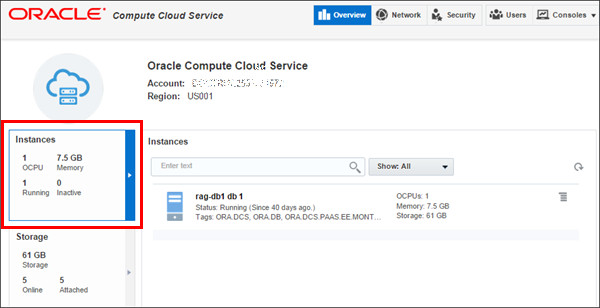
The Compute console Overview page presents information using two tiles along the left of the page: Instances and Storage. The console opens at the Instances tile, which displays a list of your instances.
-
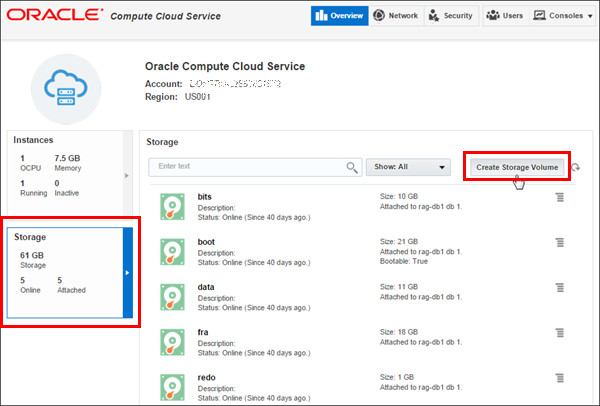
Click the Storage tile to see a list of your storage volumes. Click Create Storage Volume to see how to create a new storage volume.
-
You define a new storage volume by providing the name, size in gigabytes, a description, the storage property (choose /oracle/public/storage/default), and the name of the instance to which you want to attach this storage volume.
Note: When you create a database instance using the Database Cloud Service wizard, a storage volume is automatically created, partitioned, formatted and mounted for you. However, if you wish to add additional storage, you will need to create, partition, format, and mount the additional storage volumes. For details, see Scaling a Database Deployment.
Examine the drop-down fields and click Cancel.

-
Next, let's look at the facilities for controlling network access between your instances and the Internet.
Note: for details on managing network access to your database instances, see Enabling Access to a Compute Node Port in Using Oracle Database Cloud Service.
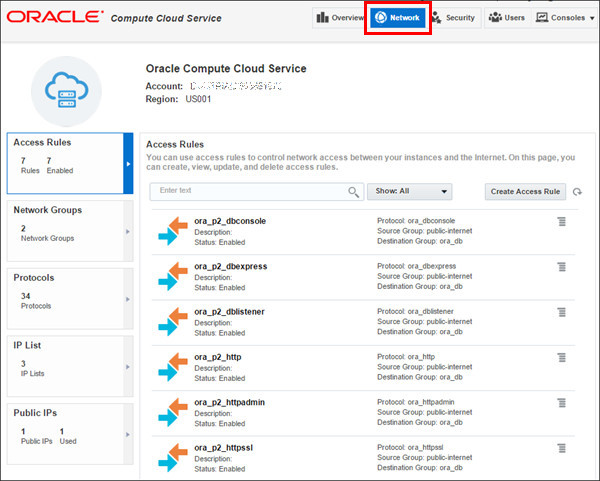
Click the Network tab at the top of the page. A set of tiles appear vertically along the left side of the page: Access Rules, Network Groups, Protocols, and IP Lists.
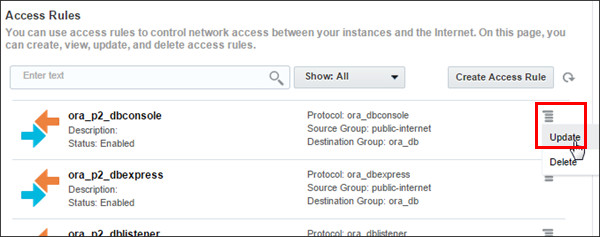
By default, the Access Rules tile is opened. A list of access rules and their enablement status is displayed. You can create, delete, and update access rules from this page.
-
Click the menu to the right of one of the access rules, and select Update.
-
The Update Access Rule window is displayed. Observe how you can toggle the status between Enabled and Disabled.
Note: enabling the rule allows the protocol to be initiated from the source to the destination, thus overriding the network group policies.
Click Cancel.

-
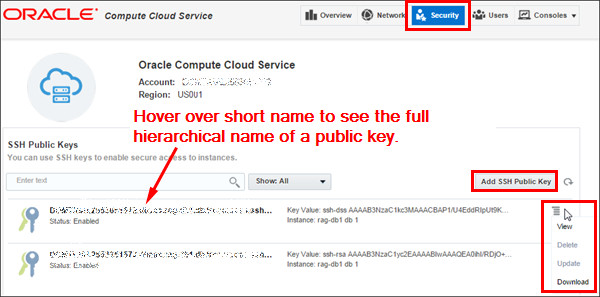
Click the Security tab at the top of the page. Use the Security page to view the keys associated with your services.
When you create a database instance, you need to specify a public key, either by uploading a key file or by entering the name of a key that was uploaded earlier, using the full hierarchical name of the key. To discover the full hierarchical name of a key, hover over the short name of the key in the Security page.
-
Click the Users tab at the top of the page. This brings you out of the Compute console and into the My Services console's Users page. Here you can add, import, and modify users, as well as reset passwords and manage roles.
Note that the Users page opens at the Users tab. There are also tabs for managing SFTP Users, Roles, Custom Roles, Identity Self Service, and Contacts.
From the menu to the right of one of your users, select Manage Roles.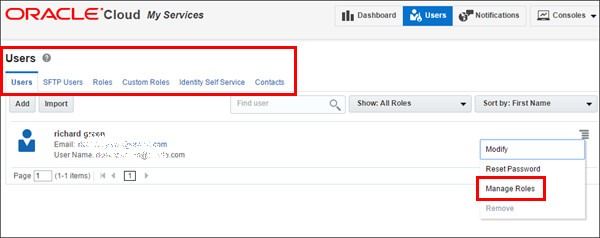
-
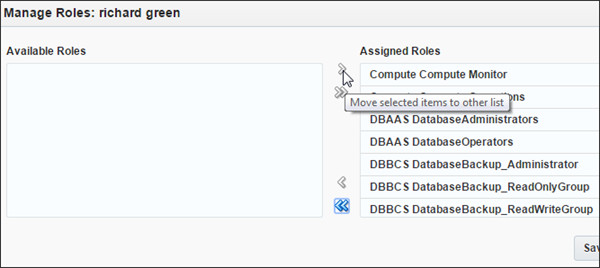
The Manage Roles window lets you assign or remove roles for a user.
Note: these roles grant privileges in specific service consoles and are unrelated to database roles.
Click Cancel.
-
At the top right corner of the My Services console, click Consoles and select Database Cloud Service to return to the Database Cloud Service console.
Examining DBaaS Monitor
Use DBaaS Monitor to monitor your Oracle Database Cloud Service and the database instances in it. You connect to the Monitor via Port 443 of your Database Cloud Service VM. For detailed information about either opening Port 443 or creating an SSH tunnel to Port 443, see either the documentation topic Accessing Oracle DBaaS Monitor or the video Monitoring a Database Instance in the Oracle Database Cloud Service.
-
At the end of the previous section, you returned from the My Services console to the Database Cloud Service console.
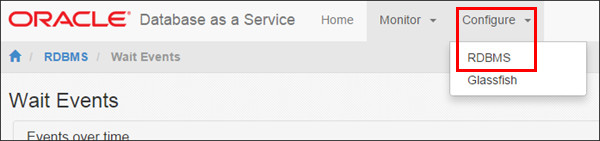
To the right of the database instance you wish to monitor, click the menu and note the four choices: Open DBaaS Monitor Console, Open Application Express Console, Open GlassFish Administration Console, and Open EM Console.
Click Open DBaaS Monitor Console.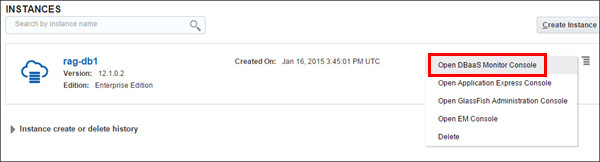
-
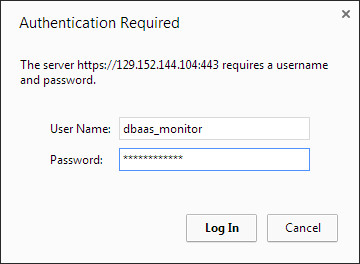
At the prompt, enter dbaas_monitor as the user name. For the password, use whatever password was specified when your database instance was created. Click Log In.
-
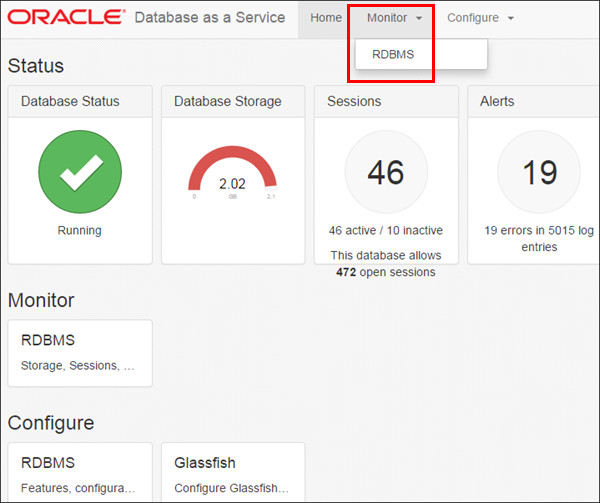
The Monitor home appears, displaying generic information about the database status, storage, sessions, and alerts.
To access the Monitor page, click Monitor at the top of the page and select RDBMS.
-
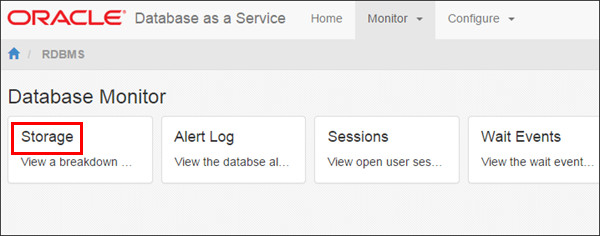
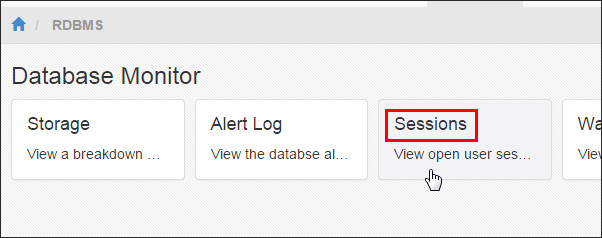
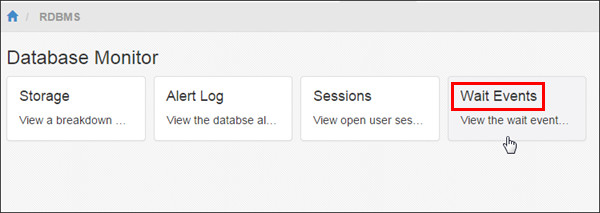
The Database Monitor page contains four sections: Storage, Alert Log, Session, and Wait Events. Each section links to a more detailed view of the monitored area.
Click Storage and wait a few seconds for the diagram to appear.
-
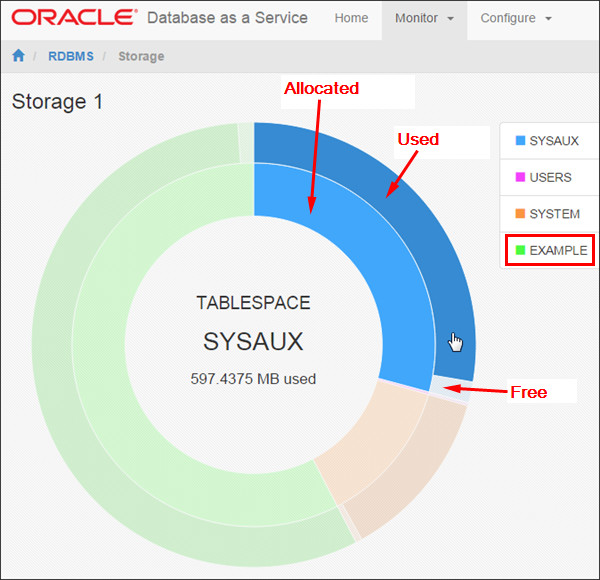
The Storage page displays a breakdown of the storage currently allocate to the database. The inner ring shows the distribution of the allocated space among the different tablespaces, while the outer ring represents the used space in each tablespace. The outer ring also shows the free space in a tablespace.
To get details about the segments that use space in one of the tablespaces, click the tablespace name on the right of the page. Click Example.
-
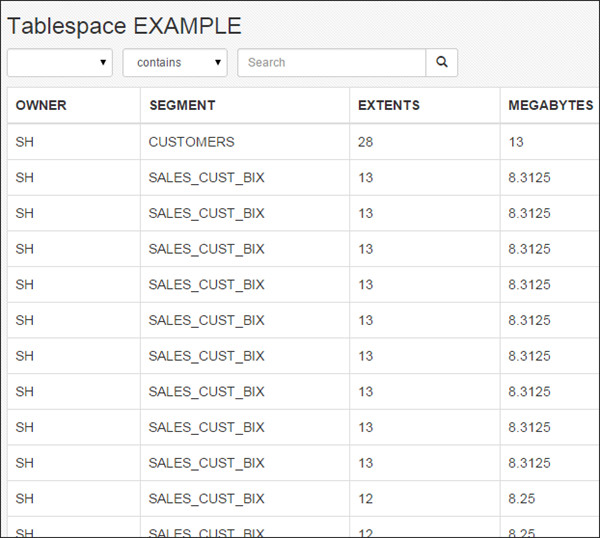
The tablespace detailed page provides an interactive report on the segments that exist within the tablespace. Most segments are user objects, and they include tables, large objects, and indexes.
-
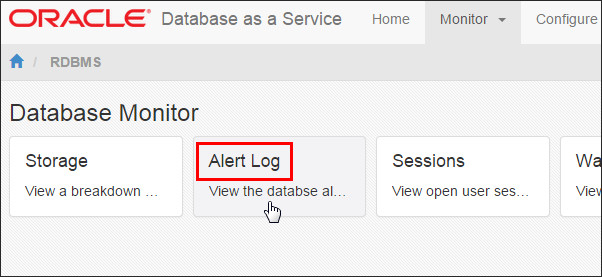
Returning to the Database Monitor page, click Alert Log. An interactive report displays the entries in the database's alert log. The alert log is a chronological log of messages and errors commonly used to learn whether the background processes have encountered errors.

-
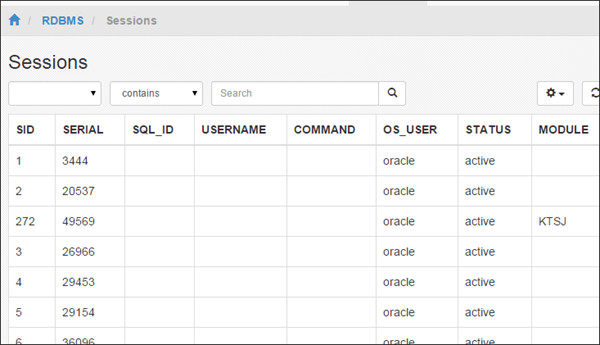
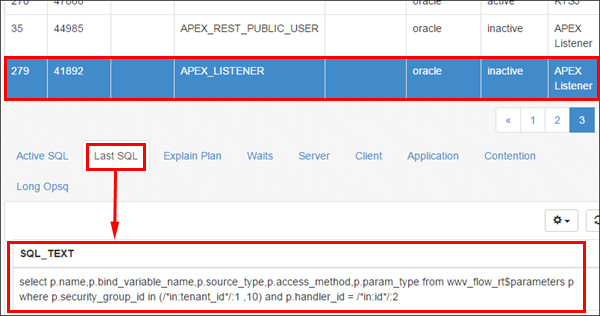
Returning to the Database Monitor page, click Sessions to view open user sessions. An interactive report displays information about all currently opened sessions in the database. The top-most table shows summarized data about each open session. If you click certain rows in this table, you can scroll down to the bottom of the window to see more detailed information about that session.
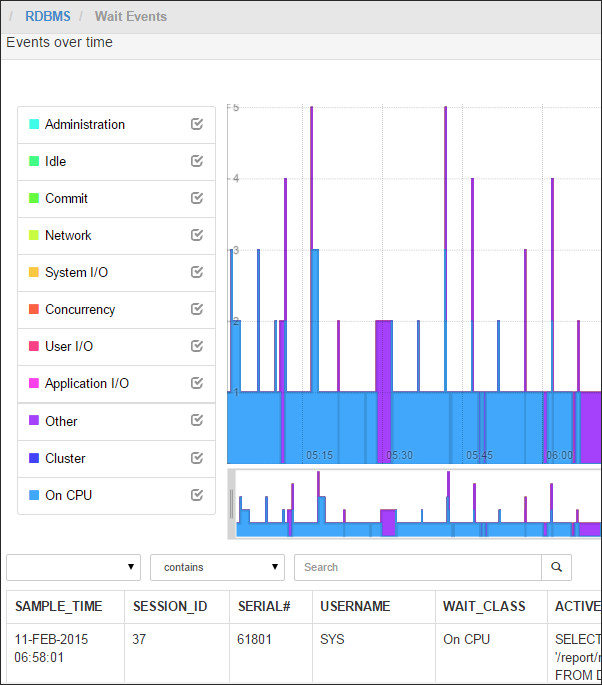
- Returning to the Database Monitor page, click Wait Events to view the wait events in real time. Your database may not show wait events. In this example, the wait events are essentially of CPU consumption, plus a little bit of system I/O, and various waits categorized as "Other".
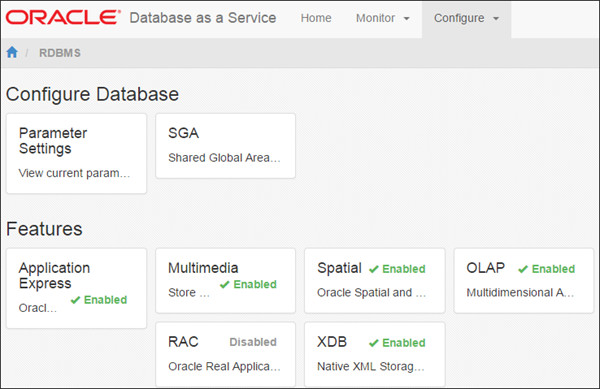
- Returning to the Database Monitor page,click the Configure tab at the top of the page, and select RDBMS. The Database Configuration page displays two sections: Configure Database and Features. The Features section reports the enablement status of major Oracle database features. In this example, RAC is disabled, while Application Express, Multimedia, Spatial, OLAP, RAC, and XDB are enabled.
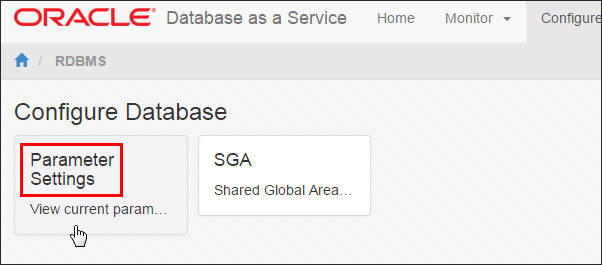
- In the Configure Database section, click Parameter Settings to view or modify current parameter values.

Summary
In this tutorial, you learned to:
- Access the tools provided in the Oracle Database Cloud Service to administer the service and your database instances
Resources
- For more detailed information about administering the Oracle Database Cloud Service, see Oracle Database Cloud Service on Oracle Help Center.
- To learn more about Oracle Database Cloud Service, visit the Database Cloud Service.
- For training on the Oracle Cloud platform-as-a-service (PaaS) Services, visit the Oracle Learning Library
- Look at these videos on working with the Oracle Database Cloud Service:
Credits
- Lead Curriculum Developer: Rick Green
- Other Contributors: Brian Spendolini, Jim Spiller, Mike Fitch
To navigate this Oracle by Example tutorial, note the following:
- Topic List:
- Click a topic to navigate to that section.
- Expand All Topics:
- Click the button to show or hide the details for the sections. By default, all topics are collapsed.
- Hide All Images:
- Click the button to show or hide the screenshots. By default, all images are displayed.
- Print:
- Click the button to print the content. The content that is currently displayed or hidden is printed.
To navigate to a particular section in this tutorial, select the topic from the list.