Before You Begin
Purpose
In this tutorial, you learn how to migrate and upgrade an on-premises Oracle 11gR2 database to a 12c pluggable database in the Oracle Database Cloud Service (DBaaS).
Last Updated
April 2015, Release 15.2.1
Please note that Oracle develops its cloud services in an agile manner and makes rapid changes to meet our users' needs. Therefore this tutorial may not reflect all of the changes since the last update to this service. For the very latest information see Oracle Database Cloud Service on Oracle Help Center.
Time to Complete
Approximately 40 minutes.
Background
A variety of methods exist for migrating data from on-premises databases to databases in the Oracle Database Cloud Service (DBaaS). These include Data Pump export and import of transportable tablespaces, exporting to external tables, remote cloning, and uplugging and plugging databases. Some of these methods support migrating on-premises 11gR2 to cloud 11gR2, some support migrating on-premises 12c to cloud 12c, and some methods (shown in this tutorial) support migrating and upgrading on-premises 11gR2 to cloud 12c.
Scenario
You have an on-premises Oracle 11gR2 database. You want to not only migrate it to the Oracle Public Cloud Service, but at the same time you want also to upgrade it from 11gR2 to a 12c pluggable database in the Oracle Database Cloud Service (DBaaS). In this tutorial, you will use Data Pump export/import with a transportable tablespace to perform both the migration and upgrade. You will:
- Create data on an on-premises Oracle 11gR2 database:
- Create a tablespace.
- Create a user in the tablespace.
- Create a table and insert data into it.
- Prepare the tablespace in the on-premises database for transport to the cloud database:
- Create a Data Pump export directory.
- Set permissions on the Data Pump export directory.
- Change the tablespace to READ ONLY.
- Run the export command to create a dump file from the tablespace.
- Copy the export dump file and tablespace file from the on-premises database to the cloud database instance:
- Use the scp program to copy the dump file from the on-premises database to the cloud database.
- Use the scp program to copy the tablespace file from the on-premises database to the cloud database.
- Prepare the Oracle 12c pluggable database in the Oracle Database Cloud Service (DBaaS):
- Create a Data Pump export directory in the pluggable database.
- Set permissions on the Data Pump export directory.
- Create a user in the database.
- Import the tablespace into the pluggable database.
- Use SQL*Plus to change the tablespace to READ WRITE.
What Do You Need?
- An on-premises Oracle 11gR2 database instance:
- Preferably created with passphrase-protected
SSH keys for secure access (use of
passphrase--protected SSH keys might also best
ensure the
scpcommand to copy files successfully from on-premises to cloud in all environments) - Created with Unicode (AL32UTF8) character set (to match the AL32UTF8 character set used by database instances created in DBaaS)
- The migration method used in this tutorial, “Data Pump Transportable Tablespace”, requires matching character sets or the prior use of Database Migration Assistant for Unicode (DMU) to convert the source database character set to Unicode)
- To use the migration method used in this tutorial, do not attempt to use an on-premises database created with WE8MSWIN1252 or other character sets.
- To migrate on-premises 11gR2 databases with character sets other than AL32UTF8, see the Oracle Database Cloud Service (DBaaS) documentation. One alternative is to migrate non-matching character set databases using the conventional Data Pump export/import method (see Oracle Database Administrator's Guide).
- An Oracle 12c pluggable database in the Oracle Database Cloud Service (DBaaS)
- During the data pump import step, you will be prompted for a password. You will need the "Administration" password that was specified when the DBaaS database instance was created.
Creating Data in an On-premises Oracle 11gR2 Database
This tutorial assumes that you do not have data in an on-premises 11gR2 database. If you already have data to migrate, you can skip this step.
-
Log in to SQL*Plus as
syswithsysdbaprivileges. Create a tablespaceupgrade_mein your on-premises 11gR2 database.
Note: The example code in this tutorial is for a database namedonpremdb1. Substitute the path in this example with your actual database name and location.
CREATE SMALLFILE TABLESPACE UPGRADE_ME

                                      DATAFILE

                                          '/u01/app/oracle/database/oradata/onpremdb1/upgrademe01.dbf'
                                  SIZE 52428800 AUTOEXTEND ON NEXT 1 MAXSIZE
                                  104857600

                                      BLOCKSIZE 8192

                                      NOLOGGING

                                      DEFAULT NOCOMPRESS

                                      ONLINE

                                      SEGMENT SPACE MANAGEMENT
                                  AUTO

                                      EXTENT MANAGEMENT LOCAL
                                  AUTOALLOCATE;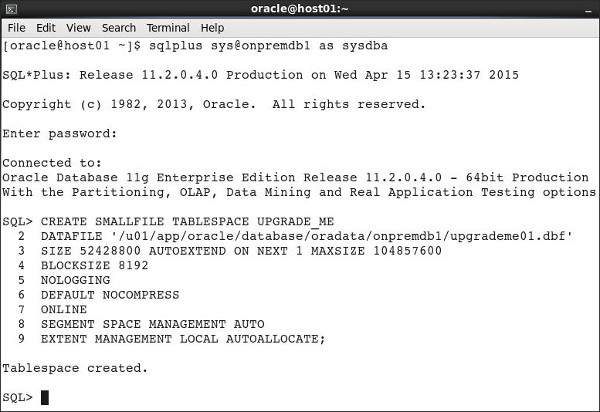
Description of this image -
Create the user
bobin the tablespace.
CREATE USER bob IDENTIFIED BY bob

                                  DEFAULT TABLESPACE "UPGRADE_ME"

                                  TEMPORARY TABLESPACE "TEMP";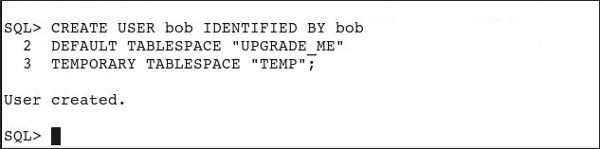
Description of this image -
Specify unlimited quota for bob.
ALTER USER bob QUOTA UNLIMITED ON
                                  upgrade_me;
Description of this image -
Grant
CONNECTandRESOURCEto bob.
GRANT CONNECT, RESOURCE to bob;
Description of this image -
Create the table
testin bob.
CREATE TABLE bob.test (id number, name
                                  varchar2(100));
Description of this image -
Insert a record in the table.
INSERT INTO bob.test (ID, NAME) VALUES
                                  ('1', 'Bob');
Description of this image
Preparing the Tablespace in the On-premises Database for Transport
Perform the following steps on the on-premises
11gR2 database.
-
Define a Data Pump export directory,
data_pump_exp, in the on-premises database.
Note: For speed and simplicity of this tutorial, we are defining this database directory to point to the pre-existingdpdumpdirectory in the operating system. As a best practice, you may wish to first use themkdircommand to create a new operating system directory and then point the database directory to that new directory.
CREATE OR REPLACE DIRECTORY DATA_PUMP_EXP
                                  as
'/u01/app/oracle/database/admin/onpremdb1/dpdump/';
Description of this image -
Set permissions on the Data Pump export directory, granting
READandWRITEtosys.
GRANT READ, WRITE ON DIRECTORY
                                  DATA_PUMP_EXP to sys;
Description of this image -
Change the tablespace to
READ ONLY.
ALTER TABLESPACE UPGRADE_ME READ ONLY;
Description of this image -
Exit SQL*Plus. At the command line prompt, run the Data Pump Export utility
expdpassystem.
expdp system@onpremdb1 dumpfile=export.dmp
                                  logfile=export.log directory=DATA_PUMP_EXP
                                  transport_tablespaces=upgrade_me
                                  transport_full_check=y
When the export process is done, you will see a message similar to this:
Dump file set for
                                  SYSTEM.SYS_EXPORT_TRANSPORTABLE_01 is:


                                  /u01/app/oracle/database/admin/onpremdb1/dpdump/export.dmp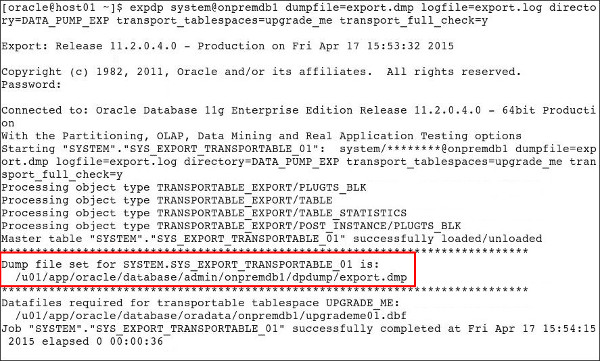
Description of this image
Copying the Dump File and Tablespace File to the Cloud Database Instance
Next, use the scp command in your
on-premises environment, to copy the dump file and
tablespace file from the on-premises 11gR2 database
to the Cloud virtual machine (VM) hosting the 12c
database.
The datafile required for your transportable
tablespace UPGRADE_ME is located (in
this tutorial example) in:
/u01/app/oracle/database/oradata/onpremdb1/upgrademe01.dbf
-
Before using the
scpcommand to copy the export file to the cloud instance, prepare the SSH private key that is paired with the SSH public key that was used to create your target cloud database instance. If you will be running thescpcommand from your Oracle home directory, you can place your SSH private key file in that directory. In a command shell, use thechmod 600command to set the file permissions of the private key file so that only you have access to it.
Note: For the following example, you need to swap in your SSH private key name; this example uses a private key named ua_key_openssh.
chmod 600
                                      ua_key_openssh

Description of this image -
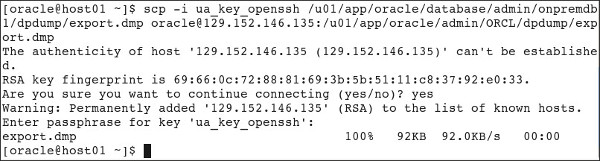
Use the
scpcommand to copy the export file to the cloud instance.
Note: For the following example, you need to swap in your SSH private key name, your directory paths, and your public cloud IP address. If this is your first time connecting via SSH, you may get the warning asking if you wish to continue connecting. If so, replyyes.
scp –i private_key.ppk
                                      /u01/app/oracle/database/admin/onpremdb1/dpdump/export.dmp
                                      oracle@PUBLIC_CLOUD_IP_ADDRESS:/u01/app/oracle/admin/ORCL/dpdump/export.dmp
Description of this image -
Use the
scpcommand to copy the tablespace file to the cloud instance.
Note: Remember to replaceLOCAL_PDB_NAMEwith your pluggable database (PDB) name, usuallyPDB1with a default cloud instance.
Note: By default, the directory path on the Cloud instance uses UPPER CASE for the names of the container database (CDB) and PDB.
scp –i private_key.ppk
                                  /u01/app/oracle/database/oradata/onpremdb1/upgrademe01.dbf
                                  oracle@PUBLIC_CLOUD_IP_ADDRESS:/u02/app/oracle/oradata/ORCL/LOCAL_PDB_NAME/upgrademe01.dbf

Description of this image
Preparing the Oracle 12c Pluggable Database in the Cloud
Perform the following steps in your Oracle Database Cloud Service (DBaaS) account.
-
Start a SQL*Plus session, and create a Data Pump export directory,
DATA_PUMP_EXP, in the pluggable database.
Note: Remember to replace our genericCLOUD_PDB_NAMEwith your actual pluggable database name, andCLOUD_CDB_NAMEwith your container database name. (In this example, the pluggable database name isPDB1and the container database name isORCL.)
Note: For speed and simplicity of this tutorial, we are defining this database directory to point to the pre-existingdpdumpdirectory in the operating system. As a best practice, you may wish to first use themkdircommand to create a new operating system directory and then point to that new directory.
ALTER SESSION SET CONTAINER =
                                  CLOUD_PDB_NAME;


                                  CREATE OR REPLACE DIRECTORY DATA_PUMP_EXP as
                                  '/u01/app/oracle/admin/CLOUD_CDB_NAME/dpdump/';
Description of this image -
Set permissions on the
DATA_PUMP_EXPexport directory, grantingREADandWRITEtosys.
GRANT READ, WRITE ON DIRECTORY
                                  DATA_PUMP_EXP to sys;
Description of this image -
Create the user
bobin the cloud database instance.
CREATE USER bob IDENTIFIED BY bob;
Description of this image -
Grant
CONNECTandRESOURCEto bob.
GRANT CONNECT, RESOURCE to bob;
Description of this image -
Exit SQL*Plus, and Import the tablespace
upgrademe01.dbfinto the pluggable database, using theimpdpData Pump import command.
Note: Remember to replaceLOCAL_PDB_NAMEwith your 12c cloud pluggable database name.
Note: When you invoke theimpdpcommand, you are prompted for a password. Provide the "Administrator" password that was used to create the Oracle Database Cloud Service database instance.
impdp system@LOCAL_PDB_NAME
                                  dumpfile=export.dmp directory=data_pump_exp
                                  transport_datafiles=/u02/app/oracle/oradata/ORCL/
LOCAL_PDB_NAME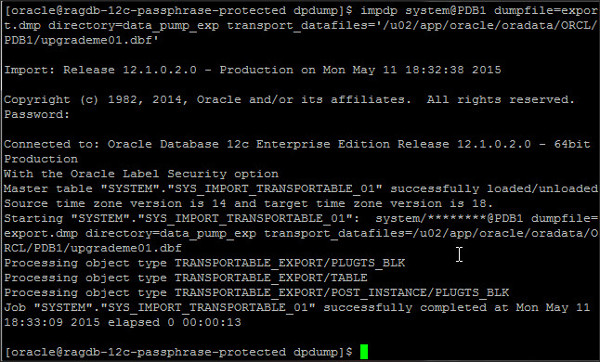
Description of this image -
Log in again to SQL*Plus as
sys. Set the container to your pluggable database.
Note: Remember to replaceLOCAL_PDB_NAMEwith your pluggable database name. This example uses the default namePDB1.
ALTER SESSION SET CONTAINER =LOCAL_PDB_NAME;

Description of this image -
Grant
READandWRITEto theupgrade_metablespace.
ALTER TABLESPACE upgrade_me READ WRITE;
Description of this image
Verifying that the 11gR2 Data Migrated to the 12c Cloud Database
Verify that the table with data from the 11gR2 on-premises database migrated successfully to the 12c cloud pluggable database.
-
Log in to SQL*Plus in the 12c cloud pluggable database, to verify that the data from the on-premises 11gR2 database has been imported into the DBaaS 12c pluggable database. The
bob.testschema table and record should now be accessible in the DBaaS pluggable database.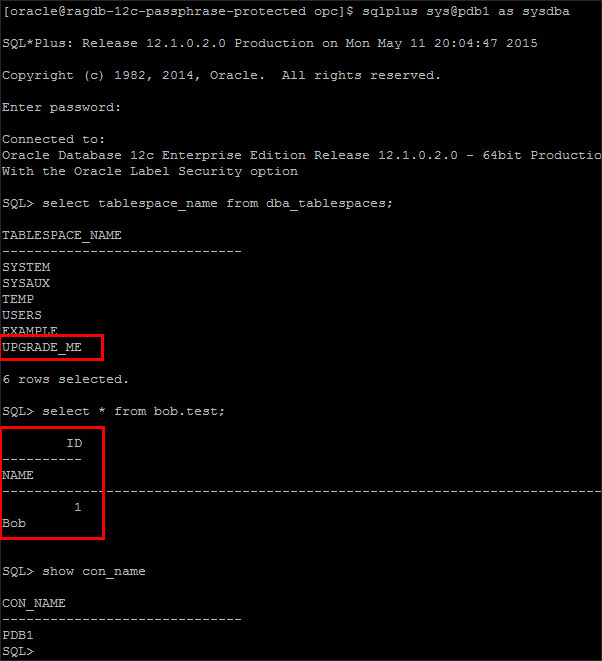
Description of this image
Want to Know More?
- For more detailed information about administering Oracle Database Cloud Service, see Oracle Database Cloud Service on Oracle Help Center.
- To learn more about Oracle Database Cloud Service, visit the Database Cloud Service.
- For training on the Oracle Cloud platform-as-a-service (PaaS) Services, visit the Oracle Learning Library
- Look at these videos on working with the Oracle Database Cloud Service:
Credits
-
Lead Curriculum Developer: Rick Green
-
Other Contributors: Brian Spendolini, Jim Spiller, Donna Keesling, Dominique Jeunot