Before You Begin
Purpose
This tutorial shows you how to create and start a service for Data Integration Platform Cloud.
Time to Complete
Approximately 30 minutes, not including wait time for service activations.
Background
Data Integration Platform Cloud (DIPC) is an Oracle cloud service that offers a single platform to connect to hundreds of on-premises and cloud data sources. From this platform you extract, load and transform (ELT) data entities of any shape and format, synchronize or replicate selected data sources, integrate with big data technologies, perform data analytics and maintain data quality.
When you create an Oracle Data Integration Platform Cloud service instance, you create a Data Integration environment in the cloud. Data integration applications are installed for you on one or more VMs which offer you consoles to perform all your data integration needs..
For Data Integration Platform Cloud, you can select one of the following editions:
- Standard Edition: For a bulk copy of your data sources to the cloud, or to extract, load and transform your data.
- Enterprise Edition: For a selective copy or real time replication of your data sources, or to extract, load and transform your data.
- Governance Edition: To extract, load, transform, manage, replicate, and Data Quality.
For this tutorial, we are using Enterprise Edition.
What Do You Need?
- The link, username and password to My Services page for your Oracle cloud services. (When you requst for Oracle cloud services, you get an email with this information.)
- A web browser
1. Find Your Services and Backup Location
- In your web browser, paste the link you received in email for Oracle cloud's My Services page.
- Enter your user name and password, then click Sign In.
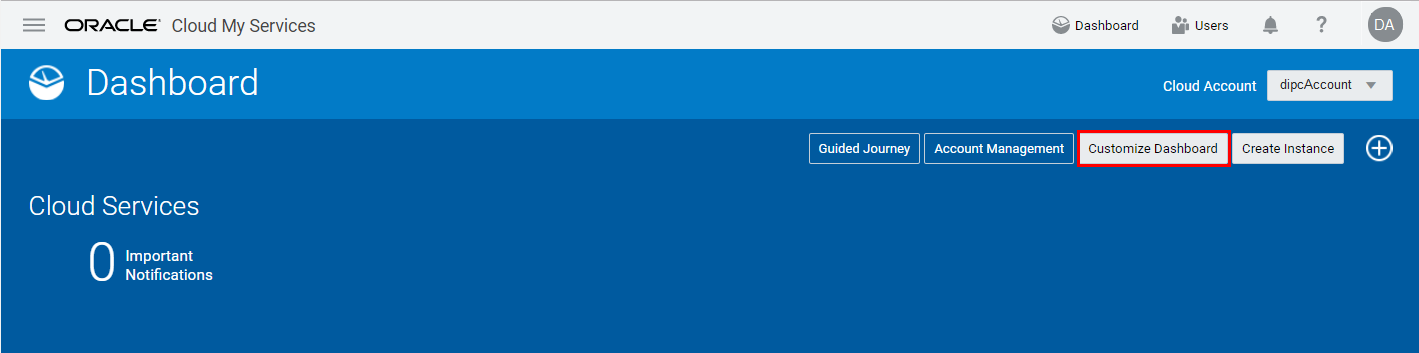
- Click Customize Dashboard
- Click Show for the following three services:
- Infrasructure > Storage Classic
- Data Management > Database
- Integration > Data Integration Platform Cloud
- Confirm that these three services appear as three tiles on your dashboard.

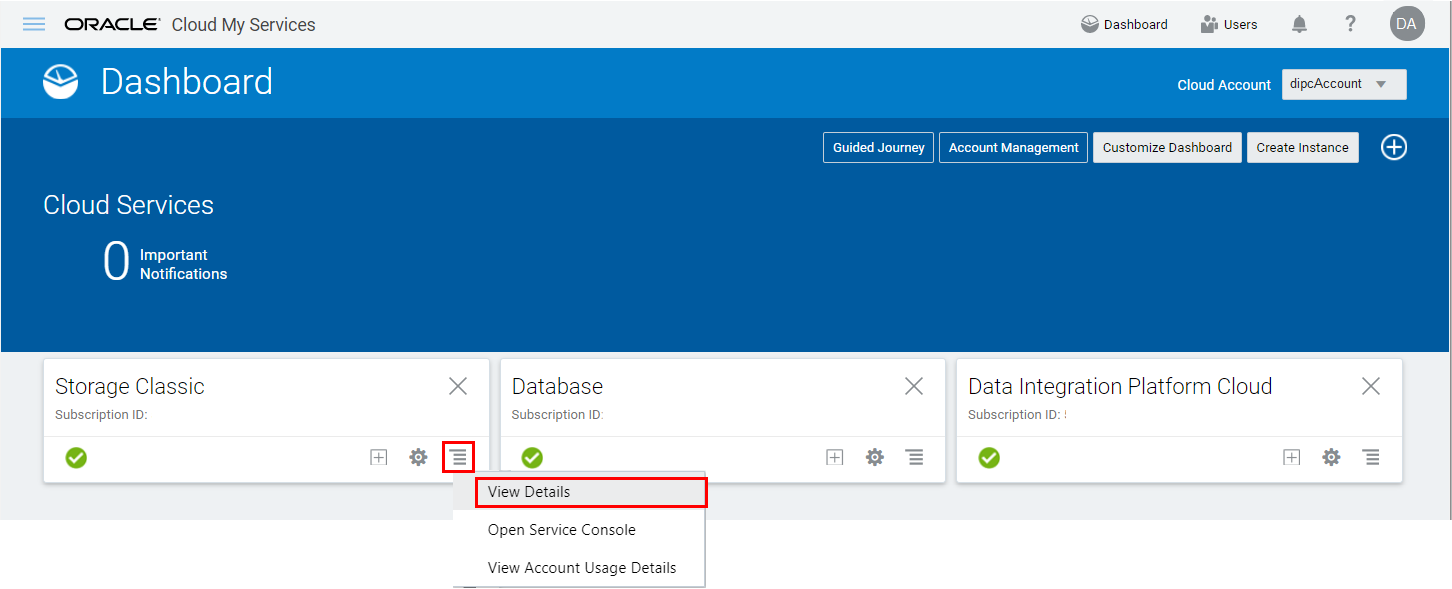
Description of this image - Click the action menu of the Storage Classic tile and then click View Details.
Description of this image - In the Additional Information section, copy the URL displayed in the REST Endpoint field and paste it into a notepad, ready for the other sections which require the Storage Conatainer information.
Example for REST Endpoint URL:https://dipcDomain.storage.oraclecloud.com/v1/Storage-dipcDomain

Description of this image
2. Create an Oracle Database Cloud Deployment
You create a database cloud service deployment, (a database cloud service instance) to host the schemas of the Data Integration Platform Cloud server, in the next section. You can later use this deployemnt to store other data such as tables from synchronization tasks in here too, but you don't have to. You create this deployment, merely to host the schemas. When you associate this database to your Data Integation Platform Cloud service in the next section, your DIPC server, will "see" this database and later you can easily connect to it for other purposes.
-
Locate Database in your list of services, then select Open Service Console from the Action menu.
Description of this image - If you get a welcome page, click Go to Console.
- On the Services page, click Create Service to launch a create a database cloud service wizard
-
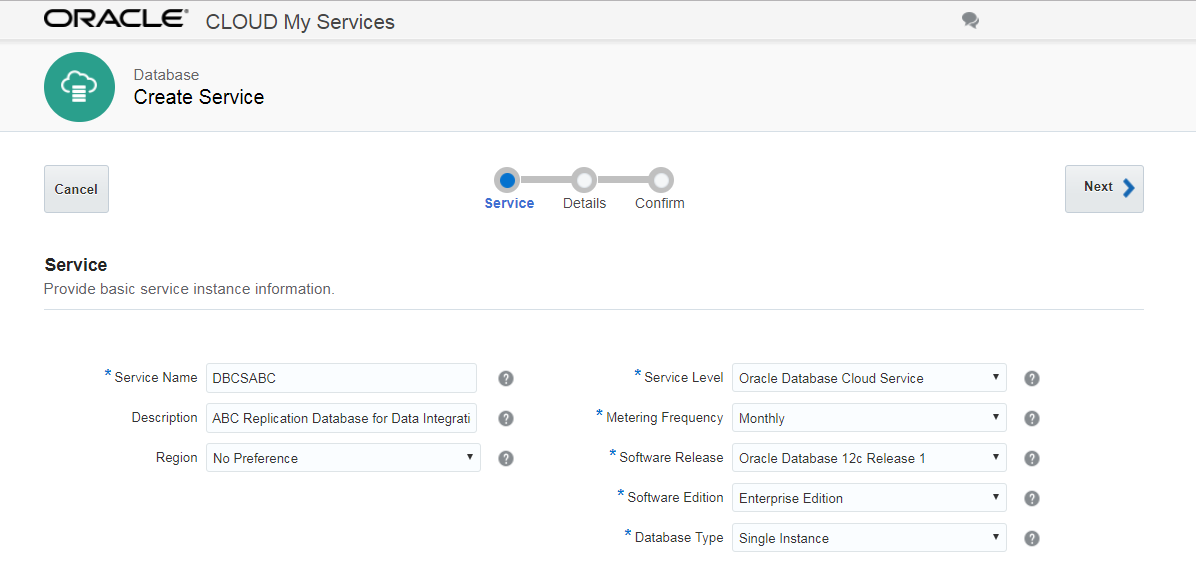
Complete the Service page as follows and then click Next:
-
Service Name:
DBCSABC - Description:
ABC Replication Database for Data Integration Platform Cloud - Region: No Preference
- Service Level: Oracle Database Cloud Service
- Metering Frequency: Monthly
- Software Release: Oracle Database 12c Release 1
- Software Edition: Enterprise Edition
- Database Type: Single Instance
Description of this image -
Service Name:
-
On the Details page, complete the Database Configuration fields as follows and then click Next:
- DB Name (SID):
ORCL - Pluggable Database (PDB) name:
PDB1 - Administration Password and Confirm Password fields:
Welcome_123# - Usable Database Storage:
25Based on your entry for Usable Database Storage, the Total Data File Storage (GB) field updates to reflect the amount of storage that will be allocated to your instance, including space for operating system and product binaries, supporting files, database data and configuration files, and so on. After you create the service instance, you can add more data storage as needed.
- Compute Shape: OC3
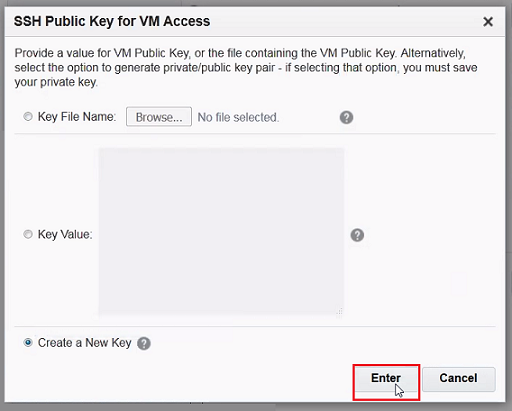
- Click Edit for SSH Public Key.
In the SSH Public Key for VM Access dialog, select Create a New Key, then click Enter.
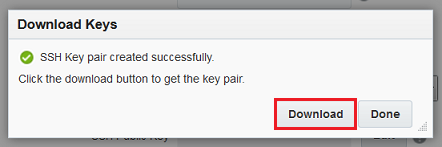
Description of this image Click Download in the Download Keys dialog box.
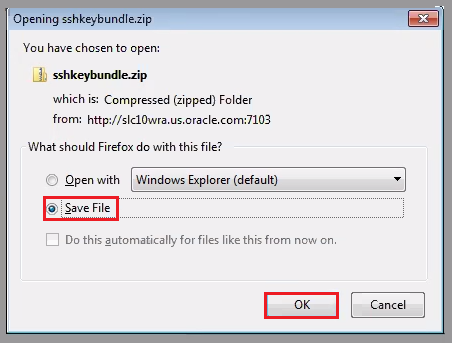
Description of this image Save the sshkeybundle.zip file to your computer.
Description of this image Confirm that the SSH Public Key field now contains a public key value.

Description of this image - DB Name (SID):
-
Expand Advanced Settings, and then complete the fields as follows:
- Listener Port:
1521 - Select your timezone from the Timezone menu.
- Select Enable Oracle GoldenGate.
- Deselect Include "Demos" PDB to save database space.
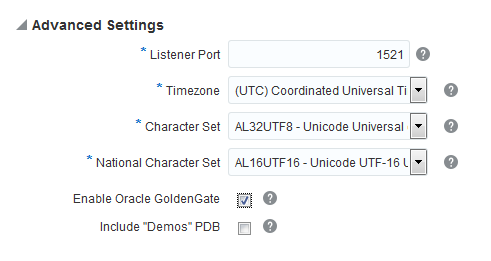
Description of this image - Listener Port:
-
Complete the Backup and Recovery Configuration fields as follows, and then click Next:
- Backup Destination: Both Cloud Storage and Local Storage
- Cloud Storage Container: Enter the name of your storage container in the format,
rest_endpoint_url/<new container name to be created>. For example, enter the following URL to create a conatiner named dbcsABC
https://dipcDomain.storage.oraclecloud.com/v1/Storage-dipcDomain/dbcsABC. (Find therest_endpoint_urlfrom Section 1-7 of this tutorial.) - Username: Enter your username to log in to MyServices page
- Password: Enter your password to log in to MyServices page
- Select Create Cloud Storage Container to create a new container. For this example, it will be
dipcABC.
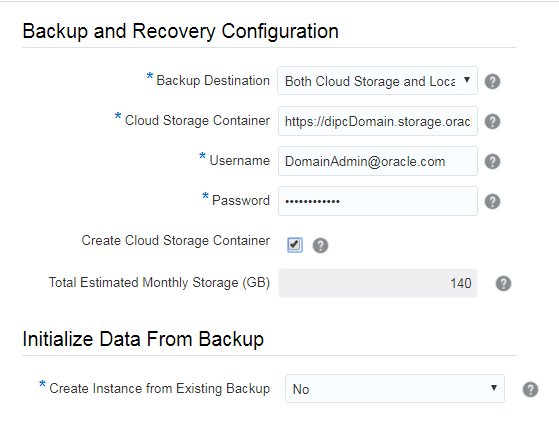
Description of this image - Review the Service Details for your database cloud instance. If you need to make changes, click Previous or use the navigation train to go back. Otherwise, click Create.
- Click the DBCSABC instance and refresh the page until the status displays Ready.

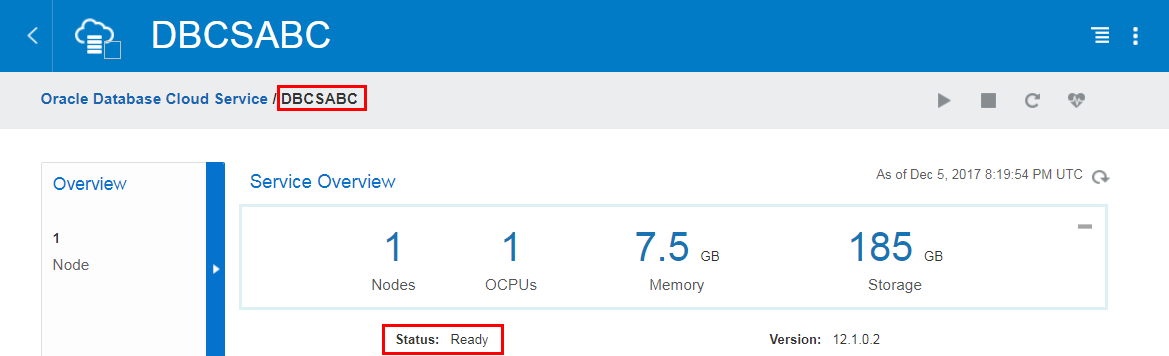
The instance creation process can take some time.Wait until the instance is ready, before you move on to the next section.
3. Create an Oracle Data Integration Platform Cloud Instance
In this section, you create an Oracle Data Integration Platform Cloud instance using the instance creation wizard.
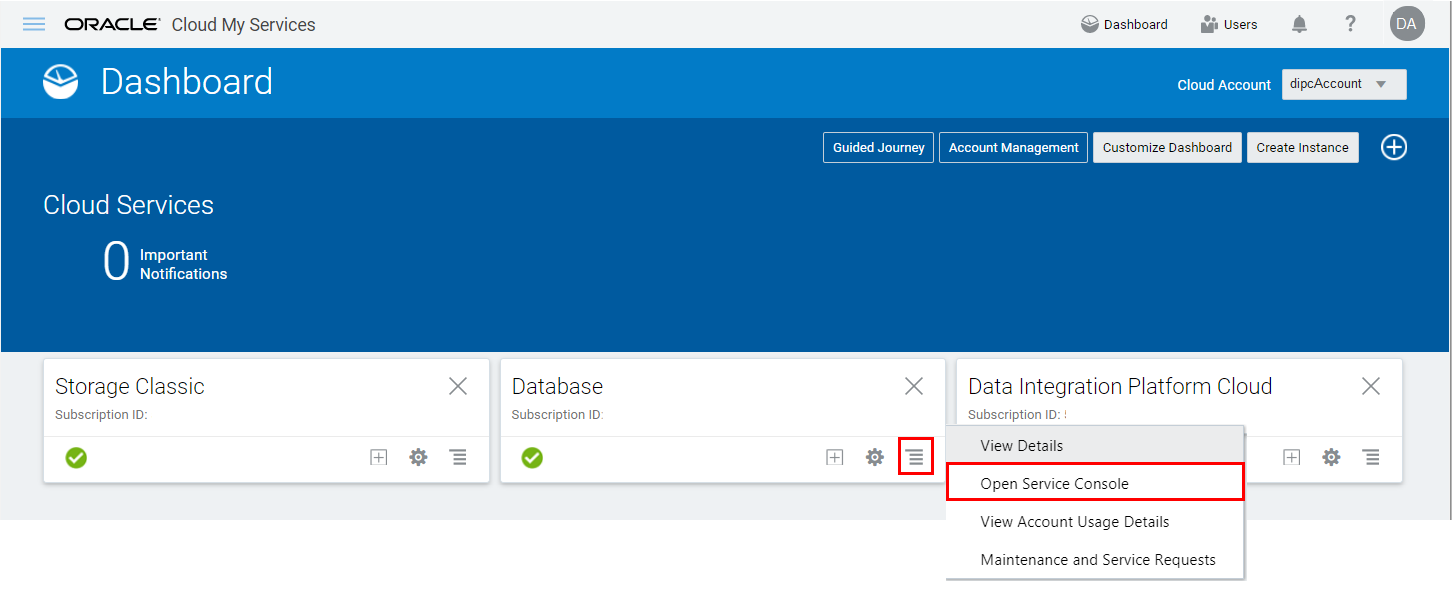
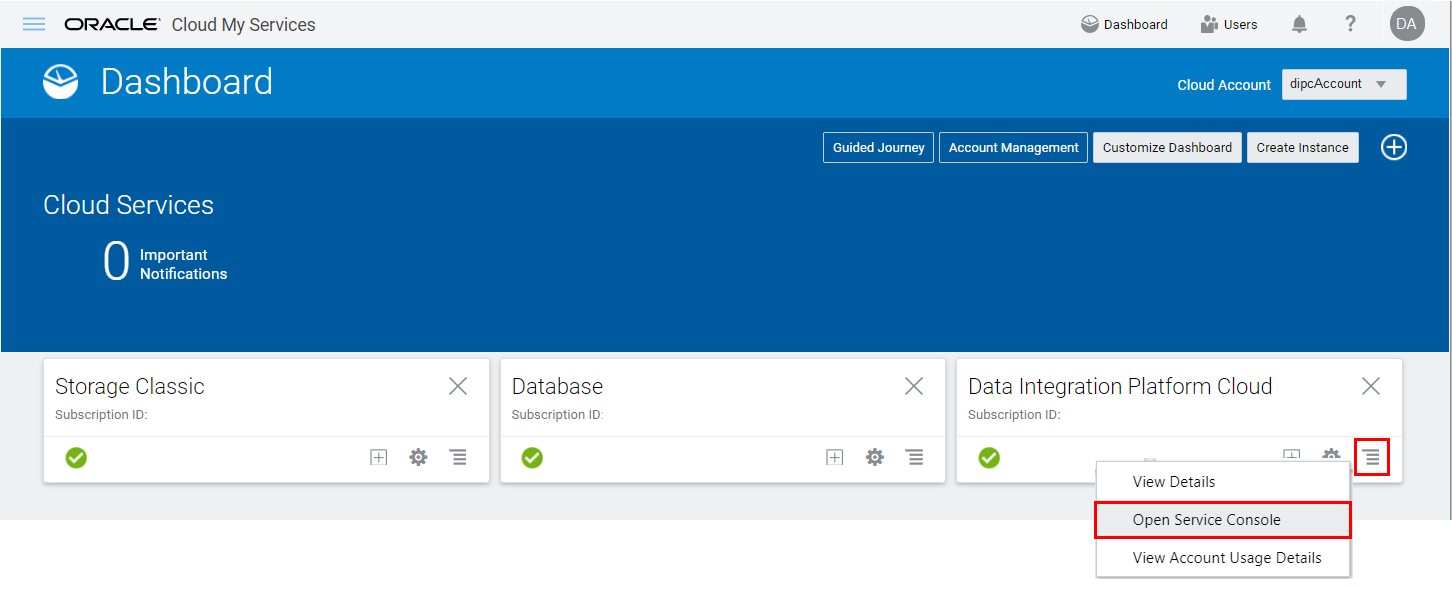
- Locate Data Integration Platform Cloud in your list of services, then select Open Service Console from the Actions menu.
- If you get a welcome page, click Go to Console.
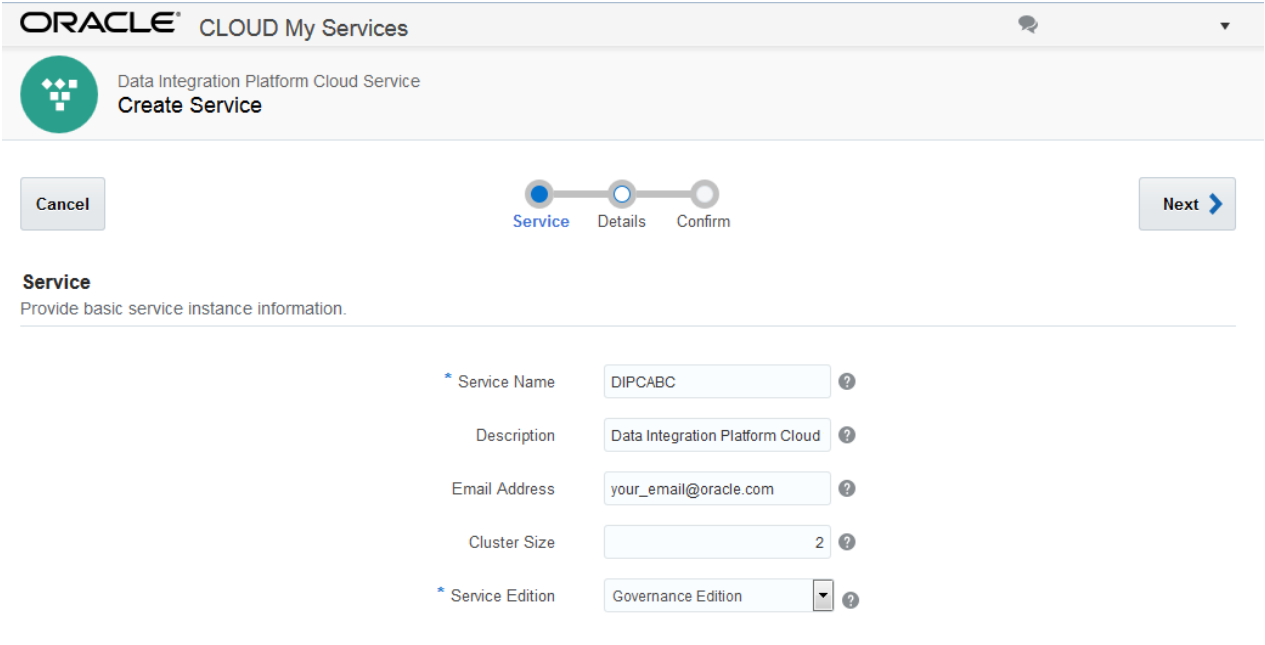
- In the Services page, click Create Service.
-
Complete the Service fields as follows, and hen click Next:
Service Name:
DIPCABCDescription:
Data Integration Platform Cloud for ABC instanceEmail Address:
<a valid email address to receive provisioning status>Cluster Size:
2Service Edition: Governance Edition
Description of this image -
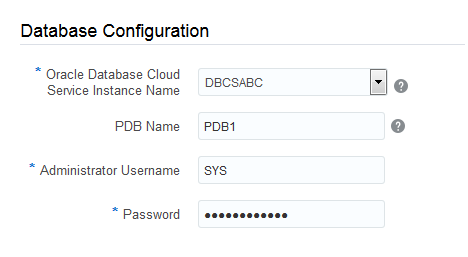
Complete the Database Configuration fields as follows:
Oracle Database Cloud Service Instance Name: DBCSABC
PDB Name:
PDB1Administration Username:
SYSPassword:
Welcome_123#
Description of this image -
Complete the Backup and Recovery Configuration fields as follows:
- Cloud Storage Container: Enter the name of your storage container in the format,
rest_endpoint_url/<new container name to be created>. For example, enter the following URL to create a conatiner named dipcABC
https://dipcDomain.storage.oraclecloud.com/v1/Storage-dipcDomain/dipcABC. (Find therest_endpoint_urlfrom Section 1-7 of this tutorial.) - Cloud Storage Username: Enter your username to log in to MyServices page
- Cloud Storage Password: Enter your password to log in to MyServices page
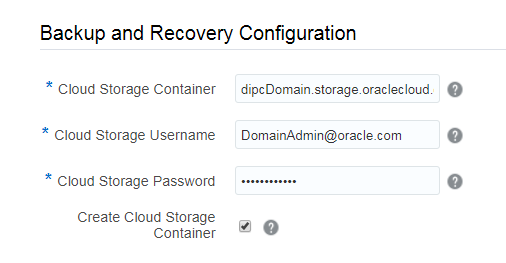
Description of this image - Cloud Storage Container: Enter the name of your storage container in the format,
-
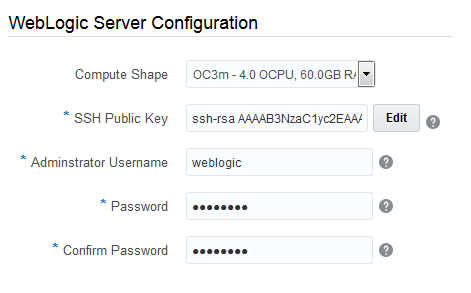
Complete the Weblogic fields as follows:
Compute Shape: OC3m - 4.0 OCPU, 60.0GB RAM
SSH Public Key:
Click Edit.
In the SSH Public Key for VM Access dialog, select Create a New Key and then click Enter.
In the Download Keys dialog, click Download and save your SSHkeybundle.zip to your local machine.
Administrator Username:
weblogicAdmin Password: Enter the admin password that you'll use later to login to all the consoles for this service instance, with the correspondent username you have had specified. For example welcome1
Confirm Admin Password: Reenter the admin password
Description of this image -
Click Next and review your Data Integration Platform Cloud instance configuration details. If you need to make any changes, click Previous use the navigation train to go back. Otherwise, click Create.

The instance creation process can take up to 30 minutes. Wait until in the instance detail page of DIPCABC, the status displays Ready..