Before You Begin
Purpose
Create a one-way replication from one Oracle Database Cloud Service to another using Oracle Data Integration Platform Cloud.
Time to Complete
Approximately 45 minutes.
Background
Oracle Data Integration Platfrom Cloud's Enterprise edition offers Oracle GoldenGate on a VM.
Use the Public IP address of the Data Integration Platform Cloud VM and connect to it and access GoldenGate.
Oracle GoldenGate Cloud Service (GGCS) migrates and replicates on-premises and cloud data in the cloud. This tutorial walks you through an example of creating a real-time one way data replication from one Oracle Database Cloud Service (DBCS) instance to another by using Oracle GoldenGate on Oracle Data Integratio Platform Cloud.
Because source and target are both Oracle Databases version 12c, you can use Integrated Capture and Delivery.
In Integrated Capture mode, the Oracle GoldenGate Extract process interacts directly with the database log mining server which mines or reads the database redo log files and captures the changes in the form of Logical Change Records (LCRs.) LCRs are written to the GoldenGate trail files.
In integrated Delivery mode, the Replicat process leverages the apply processing functionality that is available within the Oracle database. In this mode, Replicat:
- Reads the Oracle GoldenGate trail.
- Performs data filtering, mapping, and conversion.
- Constructs logical change records (LCR) that represent source database DML transactions (in committed order). DDL is applied directly by Replicat.
- Attaches to a background process in the target database known as a database inbound server by means of a lightweight streaming interface.
- Transmits the LCRs to the inbound server, which applies the data to the target database.
In this tutorial, you configure data capture using Integrated Extract and the data delivery by using Integrated Replicat.
What Do You Need?
Cloud Source:
- An Oracle Database Cloud Service 12.1 instance, referred to as DBCSABC with a PDB called PDB1 in this tutorial
- A related Oracle Data Integration Platform Cloud service instance, referred to as DIPCABC with IP address 11.111.111.111 in this tutorial
Cloud Target:
- An Oracle Database Cloud Service 12.1 instance, referred to as DBCSDEF with a PDB called PDB2
- A related Oracle Data Integration Platform Cloud service instance, referred to as DIPCDEF wit IP address 22.222.222.222
Software on Local Machine::
- A terminal emulator such as PuTTy to connect to the VM's
- An SFTP client such as WinSCP to transfter keys to VM's
Note: If you don't have a Database or a Data Integration Platform Cloud service instance, then follow the steps in Get Started with Oracle Data Integration Platform Cloud to create them before starting this tutorial. Ensure that you select Enable GoldenGate when you create your database instances.
Note: DBCS 12.2 is only certified for delivery, you shouldn't use it for the source. This tutorial uses 12.1 for source and target.
Setup the Target
Setup the Target Database
As a best practice, create two users in the target database's PDB2. One user, oggtrg is the application user who creates data and is not privileged. Then, the other user, oggadmin, is not sys, but is a privileged user and can setup GoldenGate for replication and can see the schema objects of the target.
A tablespace quota defines how much space to provide for a user's tablespace. In Oracle12c, by default, users are not allowed to write in the tablespaces assigned to them. In other words a user has no quota on any tablespace in the database. At a minimum, you assign users a quota for the default tablespace, which is USERS for this tutorial. So after you create the user oggtrg, add unlimited quota on the USERS tablespace for the user oggtrg. For oggadmin, because you grant the dba privilege, you don't need to add unlimited quota to any tablespace. This privilege automatically comes with the dba privilege.
When you login to the target database, use sqlplus to do the following steps: These commands can be run both through the command line or through Oracle SQL developer. This example uses SQL Developer.
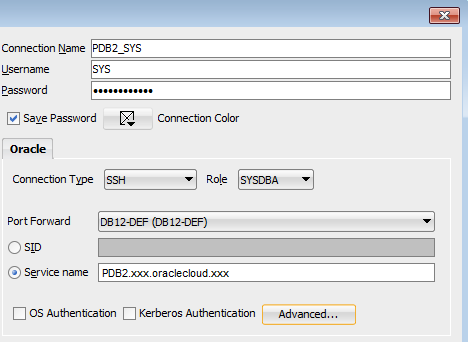
Using Oracle SQL Developer, create a connection to the target database, DBCSDEF. Complete the New/Select Database Connection dialog fields as follows:
- Connection Name:
PDB2_SYS - Username:
SYS - Password:
enter password for sys user - Connection type: SSH
- Role type: SYSDBA
- Service Name:
Enter PDB2's connection string
If you need help, refer to Connect to a Database Cloud Service with Oracle SQL Developer.
Description of this image. - Connection Name:
Find the default tablespace.
desc dba_users;
In the results find how the default tablespace is written:
Default_Tablespace NOT NULL VARCHAR2 (30)
Enter the following:
Select username, default_tablespace from dba_users;
Find the user,
SCOTTin thedba_users column,and its value fordefault_tablespace,which isUSERS. Create the useroggtrgand use the same tablespace.create user oggtrg identified by oracle default tablespace USERS temporary TABLESPACE temp; grant connect, resource to oggtrg; alter user OGGTRG quota unlimited on USERS; create user oggadmin identified by oracle default tablespace USERS temporary TABLESPACE temp; grant dba to oggadmin; exec dbms_goldengate_auth.grant_admin_privilege('oggadmin','apply');Confirm that you get the following output:
User OGGTRG created.
Grant succeeded.
User OGGTRG altered.
User OGGADMIN created.
Grant succeeded.
PL/SQL procedure successfully completed.
Create a new connection in SQL developer for the user oggtrg, connect with password
oracleto the service name that contains PDB2. Save the connection asPDB2_oggtrg.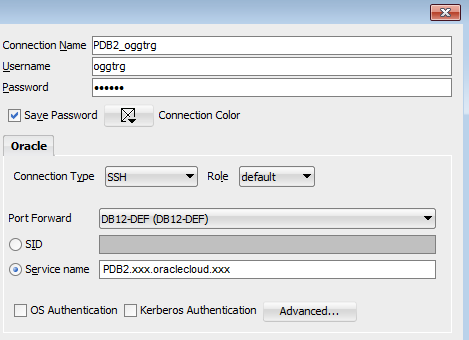
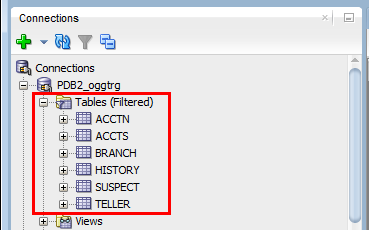
Description of this image. Run the following sql script. It's OK to get error messages for dropping tables that don't exist, because it's the first time this user is creating these tables.
DROP TABLE ACCTN;
CREATE TABLE ACCTN
(
   ACCOUNT_NO                     NUMBER       (10,0)     NOT NULL
,  BALANCE                        NUMBER       (8,2)      NULL
,  PREVIOUS_BAL                   NUMBER       (8,2)      NULL
,  LAST_CREDIT_AMT                NUMBER       (8,2)      NULL
,  LAST_DEBIT_AMT                 NUMBER       (8,2)      NULL
,  LAST_CREDIT_TS                 TIMESTAMP               NULL
,  LAST_DEBIT_TS                  TIMESTAMP               NULL
,  ACCOUNT_BRANCH                 NUMBER       (10,0)     NULL
,  CONSTRAINT PK_ACCTN
   PRIMARY KEY
   (
     ACCOUNT_NO
   )
    USING INDEX
);

DROP TABLE ACCTS;
CREATE TABLE ACCTS
 (
   ACCOUNT_NO                     NUMBER       (10,0)     NOT NULL
,  FIRST_NAME                     VARCHAR2     (25)       NULL
,  LAST_NAME                      VARCHAR2     (25)       NULL
,  ADDRESS_1                      VARCHAR2     (25)       NULL
,  ADDRESS_2                      VARCHAR2     (25)       NULL
,  CITY                           VARCHAR2     (20)       NULL
,  STATE                          VARCHAR2     (2)        NULL
,  ZIP_CODE                       NUMBER       (10,0)     NULL
,  CUSTOMER_SINCE                 DATE                    NULL
,  COMMENTS                       VARCHAR2     (30)       NULL
,  CONSTRAINT PK_ACCTS
   PRIMARY KEY
   (
    ACCOUNT_NO
   )
   USING INDEX
);
DROP TABLE BRANCH;
CREATE TABLE BRANCH
(
   BRANCH_NO                      NUMBER       (10,0)     NOT NULL
,  OPENING_BALANCE                NUMBER       (8,2)      NULL
,  CURRENT_BALANCE                NUMBER       (8,2)      NULL
,  CREDITS                        NUMBER       (8,2)      NULL
,  DEBITS                         NUMBER       (8,2)      NULL
,  TOTAL_ACCTS                    NUMBER       (10,0)     NULL
,  ADDRESS_1                      VARCHAR2     (25)       NULL
,  ADDRESS_2                      VARCHAR2     (25)       NULL
,  CITY                           VARCHAR2     (20)       NULL
,  STATE                          VARCHAR2     (2)        NULL
,  ZIP_CODE                       NUMBER       (10,0)     NULL
,  CONSTRAINT PK_BRANCH
   PRIMARY KEY
   (
    BRANCH_NO
   )
    USING INDEX
);
DROP TABLE HISTORY;
CREATE TABLE HISTORY
(
   SEQUENCE_NO                    NUMBER       (10,0)     NOT NULL
,  ACCOUNT_NO                     NUMBER       (10,0)     NOT NULL
,  TELLER_NO                      NUMBER       (10,0)     NULL
,  BRANCH_NO                      NUMBER       (10,0)     NULL
,  BALANCE                        NUMBER       (8,2)      NULL
,  DELTA                          NUMBER       (8,2)      NULL
,  TRANS_DATE                    timestamp                NULL
,  CONSTRAINT PK_HISTORY
   PRIMARY KEY
   (
    SEQUENCE_NO
   )
   USING INDEX
);
DROP TABLE TELLER;
CREATE TABLE TELLER
(
   TELLER_NO                      NUMBER       (10,0)     NOT NULL
,  BRANCH_NO                      NUMBER       (10,0)     NOT NULL
,  OPENING_BALANCE                NUMBER       (8,2)      NULL
,  CURRENT_BALANCE                NUMBER       (8,2)      NULL
,  CREDITS                        NUMBER       (8,2)      NULL
,  DEBITS                         NUMBER       (8,2)      NULL
,  CONSTRAINT PK_TELLER
   PRIMARY KEY
   (
    TELLER_NO
   )
    USING INDEX
);
DROP TABLE SUSPECT;
CREATE TABLE SUSPECT
(
   SEQUENCE_NO                    NUMBER       (10,0)     NOT NULL
,  ACCOUNT_NO                     NUMBER       (10,0)     NOT NULL
,  TELLER_NO                      NUMBER       (10,0)     NULL
,  BRANCH_NO                      NUMBER       (10,0)     NULL
,  AMOUNT                         NUMBER       (8,2)      NOT NULL
,  TRANS_DATE                     timestamp               NOT NULL
,  CONSTRAINT PK_SUSPECT
   PRIMARY KEY
   (
    SEQUENCE_NO
   )
   USING INDEX
);
In SQL Developer, expand the Tables node for the PDB2_oggtrg and confirm that six tables are created.
- ACCTN
- ACCTS
- BRANCH
- HISTORY
- SUSPECT
- TELLER
Description of this image.
Find Target Database Information
Connect with PuTTy to the target database VM, DBCSDEF. Use the username,
oracle, for the connection. If you need help, follow these three short tutorials:In PuTTY, display the information for the
$ORACLE_HOME/network/admin/tnsnames.orafile and copy the information regarding PDB2 and save it for the next section.Using username "oracle". Authenticating with public key "key_DEF" [oracle@DBCSDEF ~]$ cat /u01/app/oracle/product/12.1.0/dbhome_1/network/tnsnames.ora ORCL = (DESCRIPTION = (ADDRESS = (PROTOCOL = TCP)(HOST = DBCSDEF.compute-xxx.oraxxx)(PORT = 1521)) (CONNECT_DATA = (SERVER = DEDICATED) (SERVICE_NAME = ORCL.xxx.oraclecloud.xxx) ) ) PDB2 = (DESCRIPTION = (ADDRESS = (PROTOCOL = TCP)(HOST = DBCSDEF.compute-xxx.oraxxx)(PORT = 1521)) (CONNECT_DATA = (SERVER = DEDICATED) (SERVICE_NAME = pdb2.xxx.oraclecloud.xxx) ) )The following description is what you should save:
PDB2 =
  (DESCRIPTION =
    (ADDRESS = (PROTOCOL = TCP)(HOST = DBCSDEF.compute-xxx.oraxxx)(PORT = 1521))
    (CONNECT_DATA =
      (SERVER = DEDICATED)
      (SERVICE_NAME = pdb2.xxx.oraclecloud.xxx)
    )
  )
Update Database Information
Each Data Integration Platform Cloud service instance is associated with a Database Cloud Service instance that you specify when you create the instance. The database connection information is saved in the Data Integration Platform VM's tnsnames.ora file and is labeled as target. For this tutorial, target should be sufficient, but for you to become familiar with the procedure of updating the database information, you add information regarding PDB2 to the tnsnames.ora file. In this tutorial target is defined for PDB2, because you selected PDB2 in the creation wizard so it is the same. But you could be replicating into PDB3 for example, and your target is defined for PDB2, so you can add information regarding PDB3 to this tnsnames.ora file. Here is how:
-
Connect to the DIPCABC instance with PuTTy with the username
opc.If you need help, refer to the Connect to a Cloud VM on Windows with PuTTY tutorial. Use
sudoto run your commands as the useroracle.First check to see if you are the useroracle.[oracle@DIPCDEF-ggcs-1 opc]$ whoami opc
If you are not
oracle,then run the following command:[oracle@DIPCDEF-ggcs-1 opc]$ sudo su oracle
Navigate to the
tnsnames.orafolder.[oracle@DIPCDEF-ggcs-1 admin]$ cd /u01/app/oracle/oci/network/admin [oracle@DIPCDEF-ggcs-1 admin]$ ls tnsnames.ora
Display the information of
tnsnames.ora[oracle@DIPCDEF-ggcs-1 admin]$ cat tnsnames.ora #GGCS generated file target = (DESCRIPTION = (ADDRESS_LIST = (ADDRESS = (PROTOCOL = TCP)(HOST = DBCSABC)(PORT = 1521)) ) (CONNECT_DATA = (SERVICE_NAME = PDB2.xxx.oraclecloud.xxx) ) )Open
tnsnames.oraand edit it.[oracle@DIPCDEF-ggcs-1 admin]$ vi tnsnames.ora
Copy your saved information regarding PDB2 and ensure that you don't replace target, in case other system variables in your VM are using target. Instead, append PDB2 to the end of the file.
Save the
tnsnames.orafile which now has two sets of descriptions, one for target and one for PDB2.#GGCS generated file target = (DESCRIPTION = (ADDRESS_LIST = (ADDRESS = (PROTOCOL = TCP)(HOST = DBCSDEF)(PORT = 1521)) ) (CONNECT_DATA = (SERVICE_NAME = PDB2.xxx.oraclecloud.xxx) ) ) PDB2 = (DESCRIPTION = (ADDRESS = (PROTOCOL = TCP)(HOST = DBCSDEF.compute-xxx.oraxxx)(PORT = 1521)) (CONNECT_DATA = (SERVER = DEDICATED) (SERVICE_NAME = pdb2.xxx.oraclecloud.xxx) ) )Test the connection from GGCS:
[oracle@DIPCDEF-ggcs-1 admin]$ cd $GGHOME [oracle@DIPCDEF-ggcs-1 gghome]$ sqlplus oggadmin/oracle@PDB2 SQL*Plus: Release 12.1.0.2.0 Production Copyright (c) 1982, 2014, Oracle. All rights reserved. Connected to: Oracle Database 12c Enterprise Edition Release 12.2.0.1.0 - 64bit Production SQL> select table_name from dba_tables where owner='OGGTRG'; TABLE_NAME -------------------------------------------------------------------------------- ACCTN ACCTS BRANCH HISTORY TELLER SUSPECT 6 rows selected. SQL> exit
Start GGSCI
In the same PuTTy window that you created for DIPCDEF in the previous section, continue performing the following tasks:
- Confirm that you are
oracle.[oracle@DIPCDEF-ggcs-1 gghome]$ whoami oracle
- If you're not
oracle,then run the following command:$ sudo su oracle
- Before you run
ggsci,source the setup:$ source ~/.ggsetup
- Go to $GGHOME and run the ggsci command. If you want to know the full path of ggsci, enter
which ggsci.$ which ggsci alias ggsci='/u01/app/oracle/suite/gghome/ggsci' /u01/app/oracle/suite/gghome/ggsci $ ./ggsci Oracle GoldenGate Command Interpreter for Oracle Version 12.2.0.1.170221 25926287_FBO Linux, x64, 64bit (optimized), Oracle 12c on May 3 2017 16:53:05 Operating system character set identified as UTF-8. Copyright (C) 1995, 2017, Oracle and/or its affiliates. All rights reserved. - Write down the version of GoldenGate from the information provided when GGSCI starts. In this tutorial it's 12.2.0. Later, you'll compare it to the source version.
Setup Manager
- Use the sh command when you're in GGSCI to do your regular Linux commands. Find out what templates come with the Data Integration Platform Cloud VMs. These templates are in the dirprm directory.
Save a copy of the
MGR.prmtemplate for your reference.GGSCI > sh cp ./dirprm/MGR.prm ./dirprm/MGR.prm.copy GGSCI > sh ls ADD_EXTRACT.oby ADD_REPLICAT.oby EXTIN.prm MGR.prm MGR.prm.copy PUMP.prm REPCO.prm REPIN.prm
Open the MGR parameter file to edit it.
GGSCI> edit param mgr
-
Review and then remove the information in your mgr file. Copy the following lines in there and then save it. Remember to replace the IP address below with your own Data Integration Platform VM's IP address.
-- Manager port number PORT 7809 DynamicPortList 7740-7760 -- For IPADDR, enter IP ADDRESS of this Data Integration Platform Cloud VM ACCESSRULE, PROG COLLECTOR, IPADDR 22.222.222.222, ALLOW PURGEOLDEXTRACTS ./dirdat/* USECHECKPOINTS, MINKEEPHOURS 2 AUTORESTART Extract *, WaitMinutes 1, Retries 3
-
Stop (if running) and start mgr and confirm that it's started.
GGSCI > stop mgr Manager process is required by other GGS processes. Are you sure you want to stop it (y/n)?y Sending STOP request to MANAGER ... Request processed. Manager stopped GGSCI > start mgr Manager started. GGSCI > info mgr Manager is running
GGSCI > sh ls dirprm ADD_EXTRACT.oby ADD_REPLICAT.oby EXTIN.prm MGR.prm PUMP.prm REPCO.prm REPIN.prm
Note: Use these files to guide you on your setups. For this tutorial, you'll use the manager file, MGR.prm and the integrated replicat, REPIN.prm on this target VM.
Create a Useridalias
Set up a useridalias for the oggadmin user that you created in the Setup the Target Database section.
Note: Ensure that you use oggadmin@PDB2 in the following commands.
GGSCI > add credentialstore
Credential store created in ./dircrd/.
GGSCI > alter credentialstore add user oggadmin@PDB2 PASSWORD oracle ALIAS oggadmin
Credential store in ./dircrd/ altered.
GGSCI > dblogin useridalias oggadmin
Successfully logged into database PDB2.
Troubleshooting: When you're in GGSCI, if dblogin doesn't work for the oggadmin user that you created in the Setup the Target Database section, you may have forgotten to run the dbms_goldengate_auth.grant_admin_privilege command for this user. Use the example below:
GGSCI > dblogin userid oggadmin@PDB2 password oracle ERROR: Unable to connect to database using user oggadmin@PDB2. Please check privileges. ORA-00942: table or view does not exist.
Answer: Login as SYS either in SQL Developer with the PDB2_SYS connection you made or connect with PuTTY to the Oracle Database Cloud Service VM and run the following command:
exec dbms_goldengate_auth.grant_admin_privilege('oggadmin','apply');
Also ensure that PDB2 is defined in tnsnames.ora of DIPCDEF in
/u01/app/oracle/oci/network/admin/u01
#GGCS generated file
target =
      (DESCRIPTION =
          (ADDRESS_LIST =
              (ADDRESS = (PROTOCOL = TCP)(HOST = DBCSDEF)(PORT = 1521))
      )
      (CONNECT_DATA =
      (SERVICE_NAME = PDB2.xxx.oraclecloud.xxx)
    )
 )

PDB2 =
  (DESCRIPTION =
    (ADDRESS = (PROTOCOL = TCP)(HOST = DBCSDEF.compute-xxx.oraxxx)(PORT = 1521))
    (CONNECT_DATA =
      (SERVER = DEDICATED)
      (SERVICE_NAME = pdb2.xxx.oraclecloud.xxx)
    )
  )
Setup Replicat
Make a copy of the REPIN template which is created for the integrated replicat.
GGSCI> sh cp $GGHOME/dirprm/REPIN.prm $GGHOME/dirprm/REPIN.prm.copy
GGSCI > sh ls dirprm
ADD_EXTRACT.oby  ADD_REPLICAT.oby  EXTIN.prm  MGR.prm  MGR.prm.copy  PUMP.prm  REPCO.prm  REPIN.prm  REPIN.prm.copy
-
Edit parameter REPIN.
GGSCI > edit param REPIN
-
Review and then replace the existing file with the following lines. Instead of deleting all the lines, you can also comment out the lines that you're not using with a double dash in the beginning of the lines.
REPLICAT REPIN
useridalias oggadmin
DBOPTIONS INTEGRATEDPARAMS(parallelism 6)
ASSUMETARGETDEFS
DISCARDFILE ./dirrpt/REPIN.dsc, Purge
REPORTCOUNT EVERY 5 records, RATE
-- MAP <source schema name>.<table name>, TARGET <table name>;
MAP PDB1.oggsrc.*, TARGET oggtrg.*;
-
Note: You'll create another user called
oggsrc, when you get to setting up the source in this tutorial. This user will have the same privileges asoggtrgand will load the same tables into the source database. That's why the last line of theREPINparameter maps all the tables thatoggsrchas created to the ones thatoggtrghas created.Important: Don't use PDB2 in the target section of
MAP PDB1.oggsrc.*, TARGET oggtrg.*;.For example, don't use
TARGET PDB2.oggtrg.*;because the Replicat process doesn't work at the root level and is already working inside the PDB2 container. -
Save the REPIN File.
Check if the
mgris running. If not, startmgr.GGSCI> info all Program Status Group Lag at Chkpt Time Since Chkpt MANAGER RUNNING JAGENT STOPPED
In an Integrated Replicat, GoldenGate has to talk to the Oracle Database and create some structures in the Oracle database. Otherwise, it's not integrated. So from GGSCI, use
USERIDALIASto login to the database to add the Replicat.GGSCI> dblogin useridalias oggadmin Successfully logged into database PDB2. GGSCI (oggadmin@ORCL/PDB2) > add replicat repin integrated exttrail ./dirdat/pn REPLICAT (Integrated) added.
Note: Later, when you define the data pump in the source, remember that this pump will send the data to the trail file on the target, here in
./dirdat/pn.Don't start the Replicat process just yet.
Note: The command info all displays that JAGENT is stopped. JAGENT is for GoldenGate Cloud Control and is not covered in this tutorial.
Setup the Source
Setup the Source Database
This section is similar to setting up the users for the target database. Now, you'll create an application user, oggsrc who creates data and is not privileged. However, you'll setup the privileged admin user for the source GoldenGate in the next section.
Instead of using SQL developer, you can login to the DBCSABC VM, as sysdba and create the oggsrc user. This example uses SQL Developer.
- With Oracle SQL Developer, connect to the source database, DBCSABC as
sysdbawith an SSH Connection Type. If you need help, refer to Connect to a Database Cloud Service with Oracle SQL Developer and follow the instructions to add an SSH Host. For the new connection, enter PDB1's connection string for the Service Name.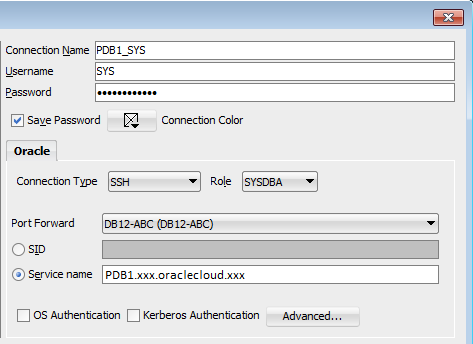
Description of this image. -
Find the default tablespace.
desc dba_users;
-
In the results find how the default tablespace is written:
Default_Tablespace NOT NULL VARCHAR2 (30)
-
The default tablespace is called,
default_tablespace,so enter the following:Select username, default_tablespace from dba_users;
-
Find the user,
SCOTT, in thedba_userscolumn, and then its value fordefault_tablespacewhich isUSERS. Create the useroggsrcand use the same tablespace.create user oggsrc identified by oracle default tablespace USERS temporary TABLESPACE temp; grant connect, resource to oggsrc; alter user OGGSRC quota unlimited on USERS;
-
Confirm that you get the following output:
User OGGSRC created.
Grant succeeded.
User OGGSRC altered.
-
Create a new connection in SQL developer for the user
oggsrc.Connect with passwordoracleto the service name that contains PDB1. You can find the service name in thetnsnames.orafile or in the instance detail page of the DBCSABC displayed as part of the Connect String.Save the connection as
PDB1_oggsrc.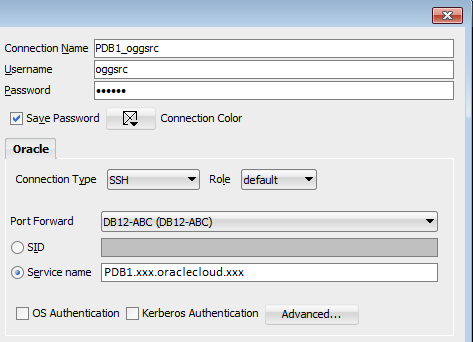
Description of this image. -
Run the following SQL script. It's OK to get error messages for dropping tables that don't exist, because it's the first time this user is creating these tables.
DROP TABLE ACCTN; CREATE TABLE ACCTN ( ACCOUNT_NO NUMBER (10,0) NOT NULL , BALANCE NUMBER (8,2) NULL , PREVIOUS_BAL NUMBER (8,2) NULL , LAST_CREDIT_AMT NUMBER (8,2) NULL , LAST_DEBIT_AMT NUMBER (8,2) NULL , LAST_CREDIT_TS TIMESTAMP NULL , LAST_DEBIT_TS TIMESTAMP NULL , ACCOUNT_BRANCH NUMBER (10,0) NULL , CONSTRAINT PK_ACCTN PRIMARY KEY ( ACCOUNT_NO ) USING INDEX ); DROP TABLE ACCTS; CREATE TABLE ACCTS ( ACCOUNT_NO NUMBER (10,0) NOT NULL , FIRST_NAME VARCHAR2 (25) NULL , LAST_NAME VARCHAR2 (25) NULL , ADDRESS_1 VARCHAR2 (25) NULL , ADDRESS_2 VARCHAR2 (25) NULL , CITY VARCHAR2 (20) NULL , STATE VARCHAR2 (2) NULL , ZIP_CODE NUMBER (10,0) NULL , CUSTOMER_SINCE DATE NULL , COMMENTS VARCHAR2 (30) NULL , CONSTRAINT PK_ACCTS PRIMARY KEY ( ACCOUNT_NO ) USING INDEX ); DROP TABLE BRANCH; CREATE TABLE BRANCH ( BRANCH_NO NUMBER (10,0) NOT NULL , OPENING_BALANCE NUMBER (8,2) NULL , CURRENT_BALANCE NUMBER (8,2) NULL , CREDITS NUMBER (8,2) NULL , DEBITS NUMBER (8,2) NULL , TOTAL_ACCTS NUMBER (10,0) NULL , ADDRESS_1 VARCHAR2 (25) NULL , ADDRESS_2 VARCHAR2 (25) NULL , CITY VARCHAR2 (20) NULL , STATE VARCHAR2 (2) NULL , ZIP_CODE NUMBER (10,0) NULL , CONSTRAINT PK_BRANCH PRIMARY KEY ( BRANCH_NO ) USING INDEX ); DROP TABLE HISTORY; CREATE TABLE HISTORY ( SEQUENCE_NO NUMBER (10,0) NOT NULL , ACCOUNT_NO NUMBER (10,0) NOT NULL , TELLER_NO NUMBER (10,0) NULL , BRANCH_NO NUMBER (10,0) NULL , BALANCE NUMBER (8,2) NULL , DELTA NUMBER (8,2) NULL , TRANS_DATE timestamp NULL , CONSTRAINT PK_HISTORY PRIMARY KEY ( SEQUENCE_NO ) USING INDEX ); DROP TABLE TELLER; CREATE TABLE TELLER ( TELLER_NO NUMBER (10,0) NOT NULL , BRANCH_NO NUMBER (10,0) NOT NULL , OPENING_BALANCE NUMBER (8,2) NULL , CURRENT_BALANCE NUMBER (8,2) NULL , CREDITS NUMBER (8,2) NULL , DEBITS NUMBER (8,2) NULL , CONSTRAINT PK_TELLER PRIMARY KEY ( TELLER_NO ) USING INDEX ); DROP TABLE SUSPECT; CREATE TABLE SUSPECT ( SEQUENCE_NO NUMBER (10,0) NOT NULL , ACCOUNT_NO NUMBER (10,0) NOT NULL , TELLER_NO NUMBER (10,0) NULL , BRANCH_NO NUMBER (10,0) NULL , AMOUNT NUMBER (8,2) NOT NULL , TRANS_DATE timestamp NOT NULL , CONSTRAINT PK_SUSPECT PRIMARY KEY ( SEQUENCE_NO ) USING INDEX ); -
In SQL Developer, expand the Tables node for PDB1_oggsrc and confirm that six tables are created.
- ACCTN
- ACCTS
- BRANCH
- HISTORY
- SUSPECT
- TELLER
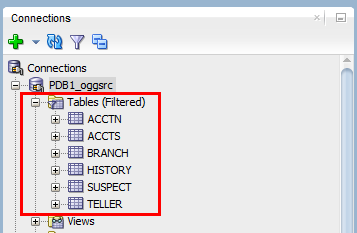
Description of this image.
Find Source Database Information
Connect with PuTTy to source database, DBCSABC. Use the username, oracle for the connection. If you need help, follow these three short tutorials:
- Find the IP address of an Oracle Cloud Service VM
- Change Private Key Format to Use with PuTTY
- Connect to a Cloud VM on Windows with PuTTY
-
In PuTTY, connect to the source database as
sysdba.Using username "oracle". Authenticating with public key "ABC_key" [oracle@DBCSABC ~]$ sqlplus / as sysdba SQL*Plus: Release 12.2.0.1.0 Production Copyright (c) 1982, 2016, Oracle. All rights reserved. Connected to: Oracle Database 12c Enterprise Edition Release 12.2.0.1.0 - 64bit Production
-
Display all the usernames that are already created to ensure that
C##GGADMINis one of them. This user gets created when you select the Enable GoldenGate option of a Database Cloud Service instance in the Create Service Wizard's Service step. This user can log in at the root level, instead of the container level to register the database and setup GoldenGate for data capture, which is the requirement for the source.SQL> select username from dba_users order by username; USERNAME -------------------------------------------------------------------------------- ... ... ... C##DBAAS_BACKUP C##DBAAS_MONITOR C##GGADMIN ... ... ... 46 rows selected.
If you don't have the C##GGADMIN user, then create it. Otherwise, skip only this step.
SQL> create user C##GGADMIN identified by Welcome_123# default tablespace USERS quota unlimited on USERS;
SQL> grant dba, resource, unlimited tablespace, create session, alter session, connect to C##GGADMIN;
-
To ensure that the user C##GGADMIN has the correct privilages to administer GoldenGate, run the following two commands and then exit SQL.
SQL> grant dba to C##GGADMIN container=all; Grant succeeded. SQL> exec dbms_goldengate_auth.grant_admin_privilege('C##GGADMIN',container=>'ALL'); PL/SQL procedure successfully completed. SQL> exit Disconnected from Oracle Database 12c Enterprise Edition Release 12.2.0.1.0 - 64bit Production -
Test the connection to the database with the C##GGADMIN user and then exit SQL. The password for this user is what you setup for SYS when you created the DBCSABC. For this tutorial, it's
Welcome_123#.[oracle@DBCSABC ~]$ sqlplus C##GGADMIN/Welcome_123# SQL*Plus: Release 12.2.0.1.0 Production Copyright (c) 1982, 2016, Oracle. All rights reserved. Connected to: Oracle Database 12c Enterprise Edition Release 12.2.0.1.0 - 64bit Production SQL> exit Disconnected from Oracle Database 12c Enterprise Edition Release 12.2.0.1.0 - 64bit Production
-
Now, display the information for the
$ORACLE_HOME/network/admin/tnsnames.orafile and copy the information regarding ORCL and save it for the next section.[oracle@DBCSABC ~]$ cat /u01/app/oracle/product/12.1.0/dbhome_1/network/tnsnames.ora ORCL = (DESCRIPTION = (ADDRESS = (PROTOCOL = TCP)(HOST = DBCSABC.compute-xxx.oraxxx)(PORT = 1521)) (CONNECT_DATA = (SERVER = DEDICATED) (SERVICE_NAME = ORCL.xxx.oraclecloud.xxx) ) ) PDB1 = (DESCRIPTION = (ADDRESS = (PROTOCOL = TCP)(HOST = DBCSABC.compute-xxx.oraxxx)(PORT = 1521)) (CONNECT_DATA = (SERVER = DEDICATED) (SERVICE_NAME = pdb1.xxx.oraclecloud.xxx) ) )The following description is what you should save:
ORCL =
  (DESCRIPTION =
    (ADDRESS = (PROTOCOL = TCP)(HOST = DBCSABC.compute-xxx.oraxxx)(PORT = 1521))
    (CONNECT_DATA =
      (SERVER = DEDICATED)
      (SERVICE_NAME = ORCL.xxx.oraclecloud.xxx)
    )
  )
Update Database Information
-
Connect to the DIPCABC instance with PuTTy with the username opc. If you need help, refer to Connect a Cloud VM on Windows with PuTTY.
Because you are connected to the VM with the user
opc, usesudoto run your commands as the useroracle. First check to see if you are the useroracle.[oracle@DIPCABC-ggcs-1 opc]$ whoami opc
If you are not oracle, then run the following command:
[oracle@DIPCABC-ggcs-1 opc]$ sudo su oracle
Navigate to the folder with
tnsnames.ora.[oracle@DIPCABC-ggcs-1 opc]$ cd /u01/app/oracle/oci/network/admin [oracle@DIPCDEF-ggcs-1 admin]$ ls tnsnames.ora
Display the information of tnsnames.ora
[oracle@DIPCABC-ggcs-1 admin]$ cat tnsnames.ora
#GGCS generated file
target =
      (DESCRIPTION =
          (ADDRESS_LIST =
              (ADDRESS = (PROTOCOL = TCP)(HOST = DBCSABC)(PORT = 1521))
      )
      (CONNECT_DATA =
      (SERVICE_NAME = PDB1.xxx.oraclecloud.xxx)
    )
 )
Open the
tnsnames.orafile to edit it.[oracle@DIPCABC-ggcs-1 admin]$ vi tnsnames.ora
Copy the ORCL information that you saved from the Find Source Database section, and ensure that you don't remove target information, in case other system variables in your VM are using it. Instead, append the information to the end of the file.
Save the
tnsnames.orafile which now has two sets of descriptions, one for target and one for ORCL. You won't use the target information in this tutorial.#GGCS generated file target = (DESCRIPTION = (ADDRESS_LIST = (ADDRESS = (PROTOCOL = TCP)(HOST = DBCSABC)(PORT = 1521)) ) (CONNECT_DATA = (SERVICE_NAME = PDB1.ggcs1612paid.oraclecloud.internal) ) ) ORCL = (DESCRIPTION = (ADDRESS = (PROTOCOL = TCP)(HOST = DBCSABC.compute-xxx.oraxxx)(PORT = 1521)) (CONNECT_DATA = (SERVER = DEDICATED) (SERVICE_NAME = ORCL.xxx.oraclecloud.xxx) ) )Test the connection from GGCS
[oracle@DIPCABC-ggcs-1 gghome]$ cd $GGHOME
[oracle@DIPCABC-ggcs-1 gghome]$ sqlplus C##GGADMIN/Welcome_123#@ORCL

SQL*Plus: Release 12.1.0.2.0 Production
Copyright (c) 1982, 2014, Oracle.  All rights reserved.

Connected to:
Oracle Database 12c Enterprise Edition Release 12.2.0.1.0 - 64bit Production


SQL> select table_name from dba_tables where owner='OGGSRC';

TABLE_NAME
--------------------------------------------------------------------------------
ACCTN
ACCTS
BRANCH
HISTORY
TELLER
SUSPECT

6 rows selected.

SQL> exit
Setup Manager
-
In the DIPCABC VM window of PuTTy, go to $GGHOME and run the GGSCI command.
$ cd $GGHOME
[oracle@DIPCABC-ggcs-1 gghome]$ ./ggsci

Oracle GoldenGate Command Interpreter for Oracle
Version 12.2.0.1.170221 25926287_FBO
Linux, x64, 64bit (optimized), Oracle 12c on May  3 2017 16:53:05
Operating system character set identified as UTF-8.

Copyright (C) 1995, 2017, Oracle and/or its affiliates. All rights reserved.
Write down the version of GoldenGate from the information provided when GGSCI starts. In this tutorial it's 12.2.0.1.
Note: If your source and target GoldenGates have different versions, then you need to perform a couple of extra steps. For this tutorial, you should have the latest cloud services for your instances which provide you the same GoldenGate version. If for any reason you have different versions, you'll be guided in the relevant steps on what to do.
Now check to see if manager is running, and stop all ER groups if any.
GGCSI > info mgr
GGSCI > info all
GGSCI > stop er *
Save a copy of the mgr parameter file before you edit it.
GGCSI > sh cp ./dirprm/MGR.prm ./dirprm/MGR.prm.copy
GGSCI > sh ls dirprm
ADD_EXTRACT.oby  ADD_REPLICAT.oby  EXTIN.prm  MGR.prm  MGR.prm.copy  PUMP.prm  REPCO.prm  REPIN.prm
Open the manager file to edit it.
GGCSI > edit param mgr
Review and then remove the information in your
mgr.file.Copy the following lines in there and then save it. Remember to replace the IP address below with your own IP address.PORT 7809 Dynamicportlist 7740-7760 -- For IPADDR, enter IP ADDRESS of this GoldenGate Cloud Service VM ACCESSRULE, PROG COLLECTOR, IPADDR 11.111.111.111, ALLOW PurgeOldExtracts ./dirdat/*, UseCheckPoints, MinKeepHours 2 AUTORESTART Extract *, WaitMinutes 1, Retries 3
Restart the manager and confirm that it's running.
GGSCI > stop mgr
Manager is already stopped.

-- Or you may get:
GGSCI > stop mgr
Manager process is required by other GGS processes.
Are you sure you want to stop it (y/n)?y
Sending STOP request to MANAGER ...
Request processed.
Manager stopped.

GGSCI > start mgr
Manager started.

GGSCI > info mgr
Manager is running
Create a Useridalias
Setup a useridalias for the C##GGADMIN user and ensure that you have the C##GGADMIN@ORCL in the following commands.
GGSCI > add credentialstore
Credential store created in ./dircrd/.

GGSCI > alter credentialstore add user C##GGADMIN@ORCL password Welcome_123# alias oggadmin
Credential store in ./dircrd/ altered.

GGSCI > info credentialstore

Reading from ./dircrd/:
Default domain: OracleGoldenGate

  Alias: oggadmin
  Userid: C##GGADMIN@ORCL

GGSCI> dblogin useridalias oggadmin
Successfully logged into database CDB$ROOT.
Troubleshooting: When you're in GGSCI, if dblogin doesn't work for the oggadmin alias, then first run the info credentialstore to ensure that the alias is pointing to ORCL. Or you may have forgotten to run the dbms_goldengate_auth.grant_admin_privilege command for the C##GGADMIN user. Run the following commands in the DBCSABC VM and test the connection.
[oracle@DBCSABC ~]$ sqlplus / as sysdba
SQL> grant dba to C##GGADMIN container=all;
Grant succeeded.

SQL> exec dbms_goldengate_auth.grant_admin_privilege('C##GGADMIN',container=>'ALL');
PL/SQL procedure successfully completed.

SQL> exit
Disconnected from Oracle Database 12c Enterprise Edition Release 12.2.0.1.0 - 64bit Production

[oracle@DBCSABC ~]$ sqlplus C##GGADMIN/Welcome_123#@ORCL
SQL*Plus: Release 12.1.0.2.0 Production
Copyright (c) 1982, 2014, Oracle.  All rights reserved.
Oracle Database 12c Enterprise Edition Release 12.2.0.1.0 - 64bit Production

SQL> exit
Now test the connection in the DIPCABC VM.
GGSCI > exit
[oracle@DIPCABC-ggcs-1 gghome]$ cd $GGHOME
[oracle@DIPCABC-ggcs-1 gghome]$ sqlplus C##GGADMIN/Welcome_123#@ORCL

SQL*Plus: Release 12.1.0.2.0 Production
Copyright (c) 1982, 2014, Oracle.  All rights reserved.
Oracle Database 12c Enterprise Edition Release 12.2.0.1.0 - 64bit Production

SQL> exit
[oracle@DIPCABC-ggcs-1 gghome]$ ./ggsci
Add Trandata
ADD TRANDATA enables GoldenGate to get information from the database transaction records. From GGSCI, login to the database first and then apply this command to all the columns of all the tables in the oggsrc schema.
GGSCI> dblogin useridalias oggadmin
Successfully logged into database CDB$ROOT.
GGSCI (C##GGADMIN@ORCL/CDB$ROOT) > add trandata PDB1.oggsrc.* allcols
Logging of supplemental redo data enabled for table PDB1.OGGSRC.ACCTN.
TRANDATA for scheduling columns has been added on table 'PDB1.OGGSRC.ACCTN'.TRANDATA for all columns has been added on table 'PDB1.OGGSRC.ACCTN'.
TRANDATA for instantiation CSN has been added on table 'PDB1.OGGSRC.ACCTN'.
Logging of supplemental redo data enabled for table PDB1.OGGSRC.ACCTS.
...
TRANDATA for instantiation CSN has been added on table 'PDB1.OGGSRC.TELLER'
Setup the Primary Extract
-
Before you add the primary extract, delete the running extract and replicat processes, if any, so you can work on a clean slate. Of course, ask others if it's OK to delete them, if they don't belong to you.
For example, there's a running extract called
OldExtractand a replicat calledOldReplicaton the source Data Integration Platform Cloud.GGSCI > dblogin useridalias oggadmin Successfully logged into database CDB$ROOT . GGSCI (C##GGADMIN@ORCL/CDB$ROOT) > info all MANAGER RUNNING EXTRACT RUNNING OLDEXTRACT 00:00:10 00:00:05 REPLICAT RUNNING OLDREPLICAT 00:00:00 00:25:04 GGSCI (C##GGADMIN@ORCL/CDB$ROOT) > stop extract oldextract GGSCI (C##GGADMIN@ORCL/CDB$ROOT) > delete extract oldextract GGSCI (C##GGADMIN@ORCL/CDB$ROOT) > stop replicat oldreplicat GGSCI (C##GGADMIN@ORCL/CDB$ROOT) > delete replicat oldreplicat GGSCI (C##GGADMIN@ORCL/CDB$ROOT) > info all MANAGER RUNNING
Create a copy and then open the existing parameter template file, EXTIN to edit it. EXTIN is a template for Integrated Extract.
GGSCI (C##GGADMIN@ORCL/CDB$ROOT) > sh cp ./dirprm/EXTIN.prm ./dirprm/EXTIN.prm.copy
GGSCI (C##GGADMIN@ORCL/CDB$ROOT) >sh ls dirprm
ADD_EXTRACT.oby  ADD_REPLICAT.oby  EXTIN.prm EXTIN.prm.copy MGR.prm  MGR.prm.copy  PUMP.prm  REPCO.prm  REPIN.prm
GGSCI (C##GGADMIN@ORCL/CDB$ROOT) > edit param EXTIN
Review the template file for your information. Then remove all the information and only keep the following information for this parameter file. Then save and close the EXTIN parameter file.
EXTRACT EXTIN
useridalias  oggadmin
TranlogOptions IntegratedParams (max_sga_size 256)
EXTTRAIL ./dirdat/in
DISCARDFILE ./dirrpt/EXTIN.dsc, APPEND Megabytes 50
LOGALLSUPCOLS
UPDATERECORDFORMAT COMPACT
REPORTCOUNT EVERY 2 HOURS, RATE
Table PDB1.OGGSRC.*;
Note: If your source has a higher version than the target GoldenGate, add a FORMAT RELEASE parameter to the Primary Extract. For example, if the source version is 12.2 and the target is 12.1, you use FORMAT RELEASE to change the data format to the 12.1 release, before the data is sent to the target. So for example, you would replace this line:
Exttrail ./dirdat/in
With this one:
Exttrail ./dirdat/in FORMAT RELEASE 12.1
In this tutorial, both instances have the latest GoldenGate Cloud Service which gives them the same release and that's why you don't need the FORMAT RELEASE command.
Register the primary extract with the database.GGSCI > dblogin useridalias oggadmin Successfully logged into database CDB$ROOT. GGSCI (C##GGADMIN@ORCL/CDB$ROOT) > register extract extin DATABASE CONTAINER (PDB1) Extract EXTIN successfully registered with database at SCN xxx.
Add the primary extract to the extract group in GoldenGate.
GGSCI (C##GGADMIN@ORCL/CDB$ROOT) > add extract extin, integrated tranlog, begin now
EXTRACT (Integrated) added.
Add the exttrail, which is the local file in the dirdat directory.
GGSCI (oggadmin@orcl) > add exttrail ./dirdat/in, extract extin, megabytes 10
EXTTRAIL added.
Confirm that extract extin is in the extract group now.
GGSCI (oggadmin@orcl) > info all
MANAGER   RUNNING
JAGENT    STOPPED
EXTRACT   STOPPED   EXTIN
Don't start the Primary Extract just yet.
Setup SOCKS5 Proxy
When the Pump on the source sends data to the Replicat on the target, you use SOCKS5 Proxy, so no one can tell where the data is coming from. In the proxy setup you need the IP address and the private key to connect to the target, which is DIPCDEF.
Transfer Key
First, transfer the private key from your local machine to the DIPCABC VM. Make sure you are saving the Data Integration Platform target private key on the source DIPC.
For example, start WinSCP and enter the following information:
File Protocol: SFTP
Host Name:
<IP address to source, DIPCABC, 11.111.111.111>User name:
opc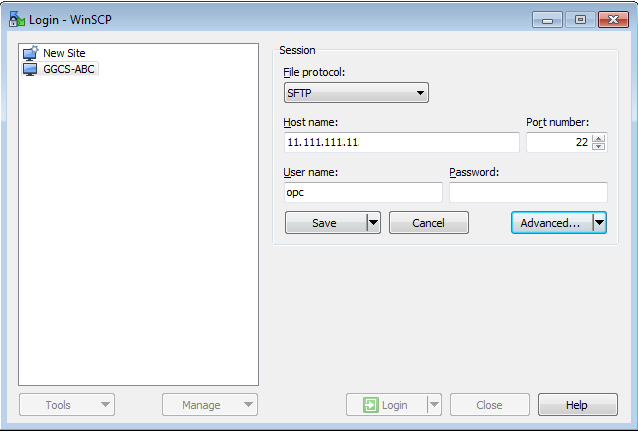
Description of this image.
Instead of password, you should provide the public key to the DIPCABC VM. Click Advanced.
Navigate Authentication under SSH in the left panel, and then browse and find your private key file in the ppk format, for the Private key file field.
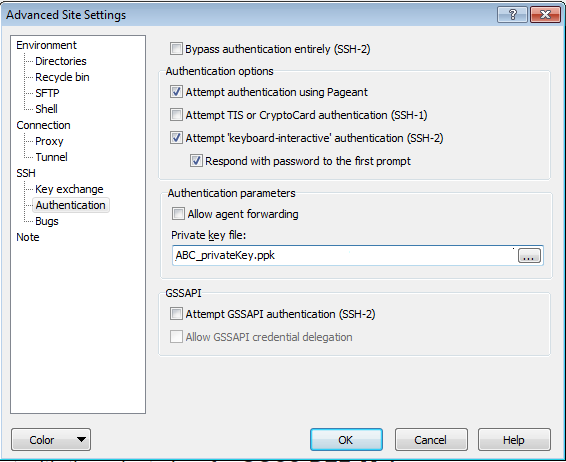
Description of this image. Click OK.
Click Login.
In WinSCP, on the DIPCABC VM side, without navigating to any other folders, at the top level:
- Create a folder with all possible read write permissions called keys.
- Copy DEF_Key/privateKey to the keys folder. Use the private key file that is not in the ppk format. (In this example, the privateKey is saved on the local machine in the DEF_Key folder.)
Note: If your private key file is in a ppk format such as privateKey.ppk, the ssh command will ask for its passphrase. If you didn't set a passphrase for the privateKey.ppk file, then, you won't be able to use the SOCKS5 Proxy. That's why you use the privateKey file that the Oracle Cloud Service wizard created to match the public key of your VM, and you won't be asked for a passphrase.
Change Permissions
-
Start a New Session in PuTTy dedicated to the SOCKS5 Proxy, so you can keep the commands running and to observe the connection and data transfer messages in this window.
Before you can use the private key, you should change some permissions. In the new DIPCABC connection, perform the following tasks in the following order and replace the path to privateKey with your own path. In this example, the privateKey is located in /keys/DEF_Key/privateKey folder when you start the VM with the opc user login.
Using username "opc".
Authenticating with public key "ABC_key"
[opc@DIPCABC-ggcs-1 ~]$ ls -ltr
total 4
drwxrwxrwx 3 opc opc 4096 Feb 16 14:42 keys
[opc@DIPCABC-ggcs-1 ~]$ sudo cp -R keys /u01/app/oracle/tools/home/oracle
[opc@DIPCABC-ggcs-1 ~]$ sudo chown -R oracle:oracle /u01/app/oracle/tools/home/oracle/keys
[opc@DIPCABC-ggcs-1 ~]$ sudo su - oracle
[oracle@DIPCABC-ggcs-1 ~]$ ls -tlr
total 28
drwxr-x--- 2 oracle oracle  4096 Feb 16 05:45 output
-rw-r----- 1 oracle oracle 13136 Feb 16 05:45 output.cfg
drwxr-x--- 3 oracle oracle  4096 Feb 16 05:48 oradiag_oracle
drwxr-xr-x 3 oracle oracle  4096 Feb 16 14:44 keys
[oracle@DIPCABC-ggcs-1 ~]$ cd keys/
[oracle@DIPCABC-ggcs-1 keys]$ ls -tlr
total 4
drwxr-xr-x 2 oracle oracle 4096 Feb 16 14:44 DEF_key
[oracle@DIPCABC-ggcs-1 keys]$ cd DEF_key/
[oracle@DIPCABC-ggcs-1 DEF_key]$ ls -tlr
total 12
-rw-r--r-- 1 oracle oracle  380 Feb 16 14:44 publicKey
-rw-r--r-- 1 oracle oracle 1675 Feb 16 14:44 privateKey
-rw-r--r-- 1 oracle oracle 1451 Feb 16 14:44 DEF_privateKey.ppk
[oracle@DIPCABC-ggcs-1 DEF_key]$ cd ~
[oracle@DIPCABC-ggcs-1 ~]$ ls -la
total 76
drwx------ 9 oracle oracle  4096 Feb 16 14:44 .
...
drwxr-xr-x 3 oracle oracle  4096 Feb 16 14:44 keys
...
drwx------ 2 oracle oracle  4096 Feb 16 05:41 .ssh
Copy the private key into the ssh folder.
[oracle@DIPCABC-ggcs-1 ~]$ cp /u01/app/oracle/tools/home/oracle/keys/DEF_key/privateKey  ~/.ssh
[oracle@DIPCABC-ggcs-1 ~]$ cd .ssh
[oracle@DIPCABC-ggcs-1 .ssh]$ ls
privateKey
In the .ssh folder, change the permission of the privateKey file, so it's not accessible by others.
[oracle@DIPCABC-ggcs-1 .ssh]$ chmod 600 privateKey
[oracle@DIPCABC-ggcs-1 .ssh]$ ls -l
total 12
-rw------- 1 oracle oracle ... privateKey
For security, only keep the private key to DIPCDEF in the ssh folder and delete the private key from all other locations in your VM.
By using SOCKS5 proxy, rather than providing the private key every time you connect to the Data Integration Platform Cloud VM, you're providing a local port which behind the scenes, this local port connects to a remote host which is the Data Integration Platform Cloud VM.
Enter the command below in the terminal you've dedicated for the SOCKS5 Proxy. The designated local port on your localhost will be
9000.Replace22.222.222.222with the IP address of your Data Integration Platform VM.[oracle@DIPCABC-ggcs-1 .ssh]$ ssh -i ~/.ssh/privateKey -v -N -D 127.0.0.1:9000 opc@22.222.222.222 > & ./dirrpt/ggcs_socksproxy.log
This command uses:
-i:Private Key File-v:Verbose Mode-N:No execution command on remote system-D:Dynamic Port ForwardingFor more ssh options use the
mancommand
$ man ssh
Observe the messages and answer
yesto connect when the authenticity of the host can't be established.debug1: Reading configuration data /etc/ssh/ssh_config The authenticity of host '22.222.222.222 (22.222.222.222)' can't be established. Are you sure you want to continue connecting (yes/no)? yes
Confirm that there is a message for authentication succeeded with the public key.
debug1: read PEM private key done: type RSA
debug1: Authentication succeeded (publickey).
debug1: Local connections to 127.0.0.1:9000 forwarded to remote address socks:0
debug1: Local forwarding listening on 127.0.0.1 port 9000.
Troubleshooting: If you get an error message: Cannot assign requested address; that means that the port you assigned, 9000 in this example, is already taken. To confirm that a port is taken, enter the following command on the target VM to see who's using this port. for port 9000 enter:
$ netstat -na | grep 9000
If the port is taken, then use another port for the SOCKS5 proxy.
Don't close this PuTTy window for the entire tutorial, because the SSH command is running in the foreground.
For future, you can add -f to your SSH command to run the proxy process in the background.
If you don't know the IP address of your Data Integration Platform Cloud VM, then refer to the Find the IP address of your Data Integration Platform Cloud VM tutorial.
Set up the Pump
In the PuTTy window that you were running GGSCI for the Primary Extract, create a copy and then open the existing parameter template file, PUMP to edit it.
GGSCI (C##GGADMIN@ORCL/CDB$ROOT) > sh cp ./dirprm/PUMP.prm ./dirprm/PUMP.prm.copy

GGSCI (C##GGADMIN@ORCL/CDB$ROOT) > sh ls dirprm

ADD_EXTRACT.oby   EXTIN.prm       MGR.prm       PUMP.prm       REPCO.prm
ADD_REPLICAT.oby  EXTIN.prm.copy  MGR.prm.copy  PUMP.prm.copy  REPIN.prm

GGSCI (C##GGADMIN@ORCL/CDB$ROOT) > edit param pump
The PUMP will read the trail files locally created by the Primary Extract in ./dirdat/in and send them to the target in a folder called /dirdat/pn.
Note: Add the socksproxy 127.0.0.1:9000 section for the RMTHOST line and you have the correct manager port for the target database. Confirm that you used 9000 in your SOCKS5 Proxy. If you used a different port number, change 9000 to the port number the SSH tunnel on source is using.
Replace the remote host IP address with your target GGCS IP address.
EXTRACT PUMP
UserIdAlias oggadmin
RMTHOST 22.222.222.222,  MGRPORT 7744, socksproxy 127.0.0.1:9000
RMTTRAIL ./dirdat/pn
discardfile ./dirrpt/pump.dsc, APPEND Megabytes 50
REPORTCOUNT EVERY 2 HOURS, RATE
PASSTHRU
Table PDB1.OGGSRC.*;
Note: If the source GoldenGate has a higher version than the target GoldenGate, for example, the source version is 12.2 and the target is 12.1, then the format of the data should chage to the 12.1 release, before data is sent to the target. In this case, add the FORMAT RELEASE 12.1 to the pump in the RMTTRAIL line:
RMTTRAIL ./dirdat/pn FORMAT RELEASE 12.1
Add the data pump to the Extract group.
GGSCI (C##GGADMIN@ORCL/CDB$ROOT) > add extract pump, exttrailsource ./dirdat/in
EXTRACT added.

GGSCI (C##GGADMIN@ORCL/CDB$ROOT) > add rmttrail ./dirdat/pn, extract pump, megabytes 10
RMTTRAIL added.

GGSCI (C##GGADMIN@ORCL/CDB$ROOT) > info all

Program     Status      Group       Lag at Chkpt  Time Since Chkpt

MANAGER     RUNNING
JAGENT      STOPPED
EXTRACT     STOPPED     EXTIN       00:00:00      00:03:31
EXTRACT     STOPPED     PUMP        00:00:00      00:00:12
Replicate Data
Start Extract and Replicat
On DIPCABC, login with the alias oggadmin and then start the Primary Extract, EXTIN. Wait until its status is running, before you start the PUMP.
GGSCI (C##GGADMIN@ORCL/CDB$ROOT) > dblogin useridalias oggadmin
Successfully logged into database CDB$ROOT.

GGSCI (C##GGADMIN@ORCL/CDB$ROOT) > start extract extin

Sending START request to MANAGER ...
EXTRACT EXTIN starting


GGSCI (C##GGADMIN@ORCL/CDB$ROOT) > info all

Program     Status      Group       Lag at Chkpt  Time Since Chkpt

MANAGER     RUNNING
JAGENT      STOPPED
EXTRACT     RUNNING     EXTIN       00:04:39      00:00:09
EXTRACT     STOPPED     PUMP        00:00:00      00:01:30
Start the pump and check to see its status.
Note: Ensure that the SOCKS5 proxy is running. Otherwise, your PUMP will abend.
GGSCI (C##GGADMIN@ORCL/CDB$ROOT) > start extract pump

Sending START request to MANAGER ...
EXTRACT PUMP starting


GGSCI (C##GGADMIN@ORCL/CDB$ROOT) > info all

Program     Status      Group       Lag at Chkpt  Time Since Chkpt

MANAGER     RUNNING
JAGENT      STOPPED
EXTRACT     RUNNING     EXTIN       unknown       00:00:09
EXTRACT     RUNNING     PUMP        00:00:00      00:00:01
On the target VM, DIPCDEF, start the Replicat.
$ sudo su oracle
$ cd $GGHOME
$ ./ggsci
GGSCI > dblogin useridalias oggadmin
Successfully logged into database PDB2.

GGSCI (oggadmin@ORCL/PDB2) > start replicat repin
Sending START request to MANAGER ...
REPLICAT REPIN starting
Confirm that the Replicat started
GGSCI (oggadmin@ORCL/PDB2) > info repin

REPLICAT   REPIN     Last Started 2017-02-16 16:32   Status RUNNING
INTEGRATED
Checkpoint Lag       00:00:00 (updated 00:00:14 ago)
Process ID           59459
Log Read Checkpoint  File ./dirdat/pn000000000
                     First Record  RBA 0


GGSCI (oggadmin@ORCL/PDB2) > info all

Program     Status      Group       Lag at Chkpt  Time Since Chkpt

MANAGER     RUNNING
JAGENT      STOPPED
REPLICAT    RUNNING     REPIN       00:00:00      00:00:04
Confirm that the SOCKS5 proxy terminal displays a request to connect to the target from port 9000.
debug1: Connection to port 9000 forwarding to socks port 0 requested.
Insert Data into Source
-
Connect to SQL Developer with the PDB1_oggsrc connection.
Run the following script to ensure that all tables are empty.
select count(*) from ACCTN, ACCTS, BRANCH, HISTORY, SUSPECT, TELLER;
The result for count(*) should be zero. If it's not zero, run the following script and then test their count(*) again.
truncate table ACCTN;
truncate table ACCTS;
truncate table BRANCH;
truncate table HISTORY;
truncate table TELLER;
truncate table SUSPECT;
Perform the same two scripts for the
PDB2_oggtrgconnectionEnter the following data in the source to test to see if it replicates in the target. Don't enter any data in the target. Run the following script for the
PDB1_oggsrc.SET DEFINE OFF; Insert into BRANCH (BRANCH_NO,OPENING_BALANCE,CURRENT_BALANCE,CREDITS,DEBITS,TOTAL_ACCTS,ADDRESS_1,ADDRESS_2,CITY,STATE,ZIP_CODE) values (1,2000,2000,2000,0,2000,'100, Main Road',null,'Baltimore','MD',21215); Insert into BRANCH (BRANCH_NO,OPENING_BALANCE,CURRENT_BALANCE,CREDITS,DEBITS,TOTAL_ACCTS,ADDRESS_1,ADDRESS_2,CITY,STATE,ZIP_CODE) values (2,1730,1730,1730,0,1730,'12, Governor St',null,'Ellicott City','MD',21042); Insert into TELLER (TELLER_NO,BRANCH_NO,OPENING_BALANCE,CURRENT_BALANCE,CREDITS,DEBITS) values (1,1,2000,2000,2000,0); Insert into TELLER (TELLER_NO,BRANCH_NO,OPENING_BALANCE,CURRENT_BALANCE,CREDITS,DEBITS) values (2,2,1730,1730,1730,0); Insert into ACCTN (ACCOUNT_NO,BALANCE,PREVIOUS_BAL,LAST_CREDIT_AMT,LAST_DEBIT_AMT,LAST_CREDIT_TS,LAST_DEBIT_TS,ACCOUNT_BRANCH) values (1,2000,1456,1789,345,to_timestamp('07-SEP-16 12.23.27.000000000 AM','DD-MON-RR HH.MI.SSXFF AM'),to_timestamp('15-SEP-16 12.23.32.000000000 AM','DD-MON-RR HH.MI.SSXFF AM'),1); Insert into ACCTN (ACCOUNT_NO,BALANCE,PREVIOUS_BAL,LAST_CREDIT_AMT,LAST_DEBIT_AMT,LAST_CREDIT_TS,LAST_DEBIT_TS,ACCOUNT_BRANCH) values (2,1730,1560,450,200,to_timestamp('16-SEP-16 12.24.15.000000000 AM','DD-MON-RR HH.MI.SSXFF AM'),to_timestamp('04-SEP-16 12.24.22.000000000 AM','DD-MON-RR HH.MI.SSXFF AM'),2); Insert into ACCTS (ACCOUNT_NO,FIRST_NAME,LAST_NAME,ADDRESS_1,ADDRESS_2,CITY,STATE,ZIP_CODE,CUSTOMER_SINCE,COMMENTS) values (1,'John ','Taylor','6490 Dobbin Road',null,'Columbia','MD',21045,to_date('06-SEP-16','DD-MON-RR'),'Good Customer'); Insert into ACCTS (ACCOUNT_NO,FIRST_NAME,LAST_NAME,ADDRESS_1,ADDRESS_2,CITY,STATE,ZIP_CODE,CUSTOMER_SINCE,COMMENTS) values (2,'Emily','Bryce','6601 Ritchie Highway N.E.',null,'Glen Burnie','MD',21062,to_date('09-AUG-16','DD-MON-RR'),'Recent overdraft'); Insert into HISTORY (SEQUENCE_NO,ACCOUNT_NO,TELLER_NO,BRANCH_NO,BALANCE,DELTA,TRANS_DATE) values (1,1,1,1,2000,560,to_timestamp('13-SEP-16 12.24.59.000000000 AM','DD-MON-RR HH.MI.SSXFF AM')); Insert into HISTORY (SEQUENCE_NO,ACCOUNT_NO,TELLER_NO,BRANCH_NO,BALANCE,DELTA,TRANS_DATE) values (2,2,2,2,1730,340,to_timestamp('13-SEP-16 12.25.23.000000000 AM','DD-MON-RR HH.MI.SSXFF AM')); Insert into SUSPECT (SEQUENCE_NO,ACCOUNT_NO,TELLER_NO,BRANCH_NO,AMOUNT,TRANS_DATE) values (1,2,2,2,800,to_timestamp('13-SEP-16 12.26.11.000000000 AM','DD-MON-RR HH.MI.SSXFF AM')); commit;Remember, GoldenGate only transmits transactions that are commited. Ensure you commit.
This time, in the PDB1_oggsrc connection. run the following script again to ensure that the tables have some data in them.
select count(*) from ACCTN, ACCTS, BRANCH, HISTORY, SUSPECT, TELLER;
The result for count(*) should be 32 now.
Run the same command for for the PDB2_oggtrg connection.
The result for count(*) should be 32 as well.
Observe Replication
On the DIPCABC VM, view stats for the Primary Extract, EXTIN.
GGSCI > stats extract extin
Sending STATS request to EXTRACT EXTIN ...
Start of Statistics at 2017-02-16 16:36:10.
Output to ./dirdat/in:
Extracting from PDB1.OGGSRC.BRANCH to PDB1.OGGSRC.BRANCH:
*** Total statistics since 2017-02-16 16:34:31 ***
        Total inserts                                      2.00
...

Extracting from PDB1.OGGSRC.TELLER to PDB1.OGGSRC.TELLER:
*** Total statistics since 2017-02-16 16:34:31 ***
        Total inserts                                      2.00

Extracting from PDB1.OGGSRC.SUSPECT to PDB1.OGGSRC.SUSPECT:
*** Total statistics since 2017-02-16 16:34:31 ***
        Total inserts                                      1.00
...
On the DIPCABC VM, view stats for PUMP.
GGSCI > stats extract pump
Sending STATS request to EXTRACT PUMP ...
Start of Statistics at 2017-02-16 16:36:19.
Output to ./dirdat/pn:

...

Extracting from PDB1.OGGSRC.BRANCH to PDB1.OGGSRC.BRANCH:
*** Total statistics since 2017-02-16 16:34:32 ***
        Total inserts                                      2.00

...
On the DIPCABC VM, view stats for replicat REPIN and observe that the mapping is from each column of the PDB1.OGGSRC table to a column in the PDB2.OGGTRG table.
GGSCI > stats replicat repin
Sending STATS request to REPLICAT REPIN ...
Start of Statistics at 2017-02-16 16:35:31.

...

Integrated Replicat Statistics:

        Total transactions                                 1.00
        Redirected                                         0.00
        DDL operations                                     0.00

...


Replicating from PDB1.OGGSRC.BRANCH to PDB2.OGGTRG.BRANCH:

*** Total statistics since 2017-02-16 16:34:37 ***
        Total inserts                                      2.00
...