Print
PrintBefore you begin
This 30-minute tutorial shows you how to implement Groovy scripts to work with data grids and data grid iterators. You use conditional logic to set the background colors in a data grid, implement performance bechmarking, and set default data values in a grid.
Background
A data grid interface provides access to the POV/Row/Column header cells and provides various iterators to iterate over the data cells.
What do you need?
An EPM Enterprise Cloud Service instance allows you to deploy and use one of the supported business processes. To deploy another business process, you must request another EPM Enterprise Cloud Service instance or remove the current business process.
- Have Service Administrator access to EPM Enterprise Cloud Service. The instance should not have a business process created.
- If you haven't already, register for a free Oracle Cloud Customer Connect account so you can access the required files. Upload and import this Planning snapshot into your environment. If you've previously uploaded the snapshot for another Groovy tutorial, you can continue using the same snapshot.
For more information on uploading and importing snapshots, refer to the Administering Migration for Oracle Enterprise Performance Management Cloud documentation.
The scripts you need for this tutorial are linked as text files within each section.
Setting background color by using conditional logic
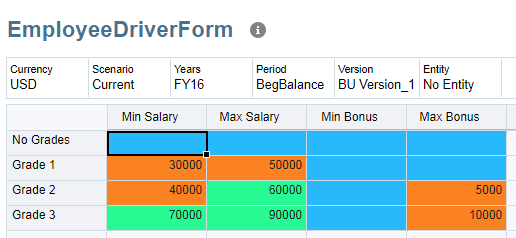
In this section, you implement a Groovy script to set the background color for cells with data value of #MISSING to color █ (0x00BFFF), cells with data value less than or equal 50000 to color █ (0xFF8C00), and cells with data values more than 50000 to color █ (0x00FA9A).
After you define a Groovy script it can be associated with any form, unlike Data Validation rules, which need to be defined in the context of each form.
- Open Calculation Manager and create a rule named Groovy Set Backgroud Color in the Plan1 cube.

- In the Rule Editor, change the Designer option to Edit Script and set the Script Type to Groovy Script.

- Copy this script and paste it into the editor:
operation.grid.dataCellIterator.each { if(it.missing) {
  it.bgColor = 0x00BFFF
  } else if(it.data <= 50000)
  it.bgColor = 0xFF8C00
  else if(it.data > 50000)
it.bgColor = 0x00FA9A
else if(it.data > 50000)
it.bgColor = 0x00FA9A  } The script iterates over each data cell in the current data grid,
 operation.grid, returned bydataCellIterator.The implicit “it” variable refers to the current item being iterated over. In this case the “it” variable refers to the current data cell returned by
dataCellIterator.You can also use an explicitly named variable such as “cell”as shown in the example below:
operation.grid.dataCellIterator.each { cell ->

  if(cell.missing) {

    cell.bgColor = 0x00BFFF

  }

}
For the current data cell, the script checks for a missing value.Note that
cell.datareturns 0 (zero) for cells that are #MISSING or zero. To check a cell for #MISSING and not zero, you can use thecell.missingproperty. To check a cell for zero value and not #MISSING, you can use a condition such ascell.data == 0 && !cell.missing. If TRUE, the script sets the cell's background color to 0x00BFFF( █ ). The script checks for the data value to be less than or equal to 50000. If TRUE, the script sets the cell's background color to 0xFF8C00( █ ) If the cell's data value is more than 50000, then the script sets the cell's background color to 0x00FA9A( █ ). - On the toolbar, click
 (Save) to save the script and then click
  (Validate and Deploy) to validate and deploy the script. Click OK when prompted. Close Calculation Manager.

- From the Navigator, open the Form Manager and select the EmployeeDriverForm form.
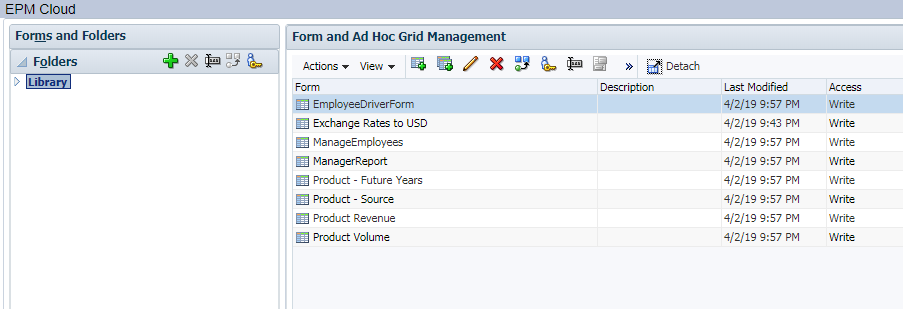
- Edit the form and associate the rule Groovy Set Background Color to be run After Load. Save the form and close the Form Manager window.

- Click Data. Open the EmployeeDriverForm form and verify that the script highlights the cells as designed.
Profiling and debugging the script
In this section, you learn how to use iterators provided by the DataGrid interface, profile the code, and add debugging statements to the job console.
- Open Calculation Manager and create a rule named Groovy Iterator Performace in the Plan1 cube.

- In the Rule Editor, change the Designer option to Edit Script and set the Script Type to Groovy Script.

- Copy this script and paste it into the editor:
def benchmark(GridIterator itr) {
    def start = currentTimeMillis()
    itr.each { println "$it.memberNames, cell data: $it.data, $it.formattedValue" }
    def elapsed = currentTimeMillis() - start
    println "\nTime taken by iterator: $elapsed"
}

println "Iterate over all data cells in this data grid...\n"
benchmark operation.grid.dataCellIterator()

println "Iterate over edited data cells in this data grid...\n"
benchmark operation.grid.dataCellIterator({DataCell cell -> cell.edited})

println "Iterate over Min Salary and Min Bonus data cells in this data grid...\n"
benchmark operation.grid.dataCellIterator('Min Salary', 'Min Bonus')
println "Iterate over Min Salary and Min Bonus data cells in this data grid...\n"
benchmark operation.grid.dataCellIterator('Min Salary', 'Min Bonus')  Define a utility method called
 benchmark()that uses the specifiedGridIteratorto iterate over its cells and prints the list of member names from all dimensions that the cell represents along with its data. It also prints the time taken by the iterator. Start a timer. Iterate over each cell using the specified GridIteratorand print the list of member names from all dimensions that the cell represents along with its data value and formatted value.$it.datareturns the numeric value for the cell and$it.formattedValuereturns non numeric values such as Text, Smart List, or Date as entered by the user. Print the time taken by the iterator to the job console. Log a debugging message to job console. Call the benchmark()method with an iterator to iterate over each cell in the current data grid. Call the benchmark() method with an iterator to iterate over the edited cells in the current data grid.This iterator can be used with any property on the DataCell object that returns a boolean such as locked, missing, valid, readOnly, validIntersection, and so on.
Call the benchmark()method with an iterator to iterate over the Min Salary and Min Bonus data cells in the current data grid. - On the toolbar, click (Save) to save the script, then click (Validate and Deploy) to validate and deploy the script. Click OK when prompted. Close Calculation Manager.
- From the Navigator, open the Form Manager and select the EmployeeDriverForm form.
- Edit the form and associate the rule Groovy Iterator Performance to be run After Save. Save the form and close the Form Manager window.

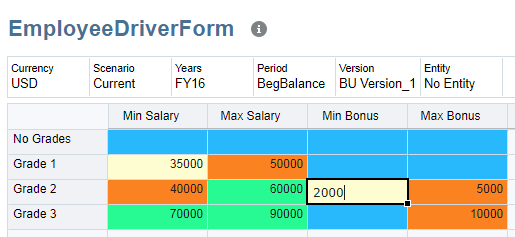
- Click Data. Open the EmployeeDriverForm form and change the Min Salary for Grade 1 to 35000 and Min Bonus for Grade 2 to 2000.
-
Save and close the form. Navigate to the Jobs console.

-
Click Groovy Iterator Performance to display the job details. Click the Completed status to see the log messages printed by the Groovy script.

The first iterator prints all cells and the data values, the second iterator prints only the two cells that were edited, and the third iterator prints only the cells for Min Salary and Min Bonus columns.
Setting default data values
In this section, you learn how to set the default data values in the grid using the DataGridBuilder interface.
- Open Calculation Manager and create a rule named Groovy Reset Grade Data in the Plan1 cube.
- In the Rule Editor, change the Designer option to Edit Script and set the Script Type to Groovy Script.
- Copy this script and paste it into the editor:
Cube cube = operation.application.getCube("Plan1")
DataGridBuilder builder = cube.getDataGridBuilder("MM/DD/YYYY")
builder.addPov('FY16', 'Current', 'USD', 'BegBalance', 'BU Version_1', 'No Entity')
builder.addColumn('Min Salary', 'Max Salary', 'Min Bonus', 'Max Bonus')
builder.addRow(['Grade 1'], [30000, 50000, '#missing', '#missing'])
builder.addRow(['Grade 2'], [40000, 60000, '#missing', 5000])
builder.addRow(['Grade 3'], [70000, 90000, '#missing', 10000])
DataGridBuilder.Status status = new DataGridBuilder.Status()
builder.build(status).withCloseable { DataGrid grid ->
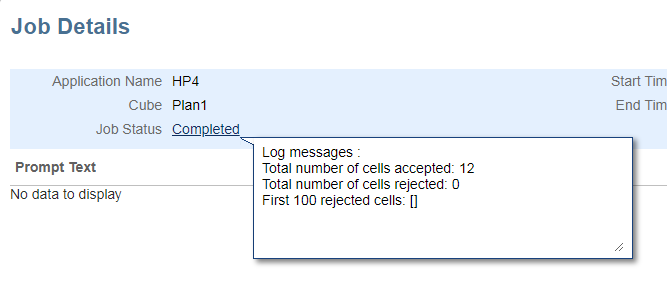
println("Total number of cells accepted: $status.numAcceptedCells")
println("Total number of cells rejected: $status.numRejectedCells")
println("First 100 rejected cells: $status.cellsRejected")
cube.saveGrid(grid)
} Build a cube object for the Plan 1 cube. Get a DataGridBuilder for the cube; define the format in which the script provides the date values.The DataGridBuilder also supports saving data on behalf of a system user by accepting
ExecuteAsUseras the second parameter. Saving data as a system user allows data to be saved without applying the current user's security. Valid values forExecuteAsUserareCURRENT_USER(the default) andSYSTEM_USER, as in the following example:
DataGridBuider builder = cube.dataGridBuilder("MM/DD/YYYY", SYSTEM_USER) Construct a data grid by adding the POV members, column members and rows with data values. Build a status object for the DataGrid object created in the next step. Build the DataGrid object with the withCloseable construct. The construct closes the the DataGrid object when the block of code completes execution. This is important to make sure that the rule does not leave the DataGrid object open in memory after operations are completed. Print the number of cells accepted or rejected by the builder to the job console. Any read-only cells are rejected. Save the data grid. The grid is automatically closed. - On the toolbar, click (Save) to save the script, then click (Validate and Deploy) to validate and deploy the script. Click OK when prompted. Close Calculation Manager.
- From the Navigator, open the Form Manager and associate the rule Groovy Reset Grade Data with the EmployeeDriverForm form. Save the form and close the Form Manager window.
- On the Planning Home page, click Data. Open the EmployeeDriverForm form, click Actions, and select Business Rules from the drop-down menu. Click Groovy Reset Grade Data to run the rule.
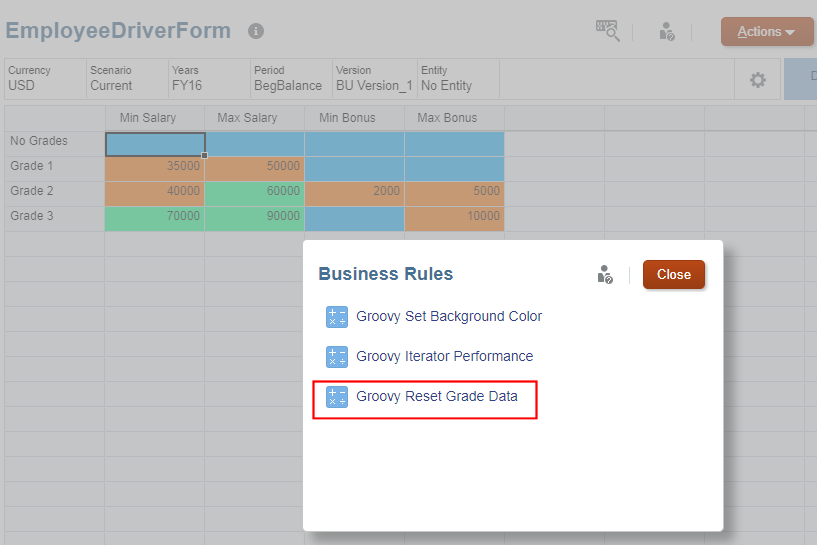
- After the rule runs successfully, click OK in the Information dialog box and verify that the grid data has been reset.
-
Close the form and navigate to open the Jobs console.

-
Click Groovy Reset Grade Data to display the job details. Click the Completed status to see the details of how many cells were accepted and/or rejected.