Before you begin
This 15-minute hands-on tutorial shows you how to create scenarios in Strategic Modeling, a solution provided by Oracle EPM Enterprise Planning. First, you see how to view data for selected scenarios. Then you review the choices for creating scenarios such as whether the scenario inherits its values and logic from another scenario. You enter values into your new scenario and evaluate how those values and other values are calculated. The sections build on each other and should be completed sequentially.
Background
With Strategic Modeling, you can model different business outcomes that are calculated based on different sets of forecast assumptions. You do this by creating scenarios. When you define your scenarios, you specify the accounts to include – the entire chart of accounts, a subset of accounts or a single account.
The Base scenario contains every account. You add an account to a scenario because you want the values to come from your new scenario rather than from the Base scenario or other standalone scenario.
You can create additional scenarios to conduct What-If analysis. For example, you can have one forecast in a High Growth scenario with optimistic assumptions, and another forecast in a Low Growth scenario with a more pessimistic set of assumptions.
You can create these on-the-fly scenarios within each model to quickly evaluate data based on your assumptions. You can then combine scenarios from different models to create a blended consolidation scenario which is called a business case.
What do you need?
An EPM Cloud Service instance allows you to deploy and use one of the supported business processes. To deploy another business process, you must request another EPM Enterprise Cloud Service instance or remove the current business process.
- Have Service Administrator access to EPM Enterprise Cloud Service. The instance should not have a business process created.
- If you haven't already, register for a free Oracle Cloud Customer Connect account so you can access the required files. Upload and import this snapshot into your Planning instance.
For more information on uploading and importing migration snapshots, refer to the Administering Migration for Oracle Enterprise Performance Management Cloud documentation.
Reviewing data for scenarios
In this section, we'll look at a report and evaluate the data within different scenarios.
Opening a model
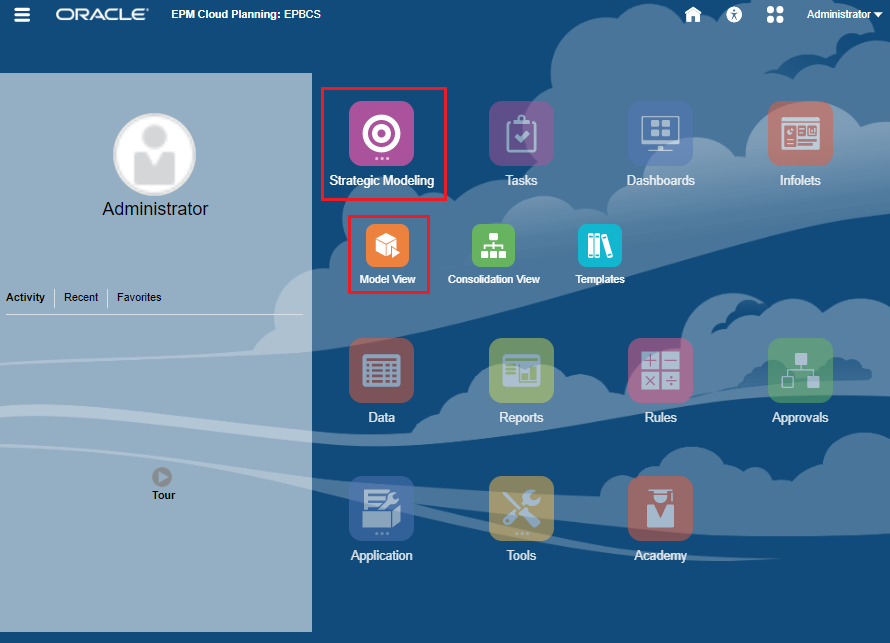
- On the Planning home page, click Strategic Modeling and then Model View.
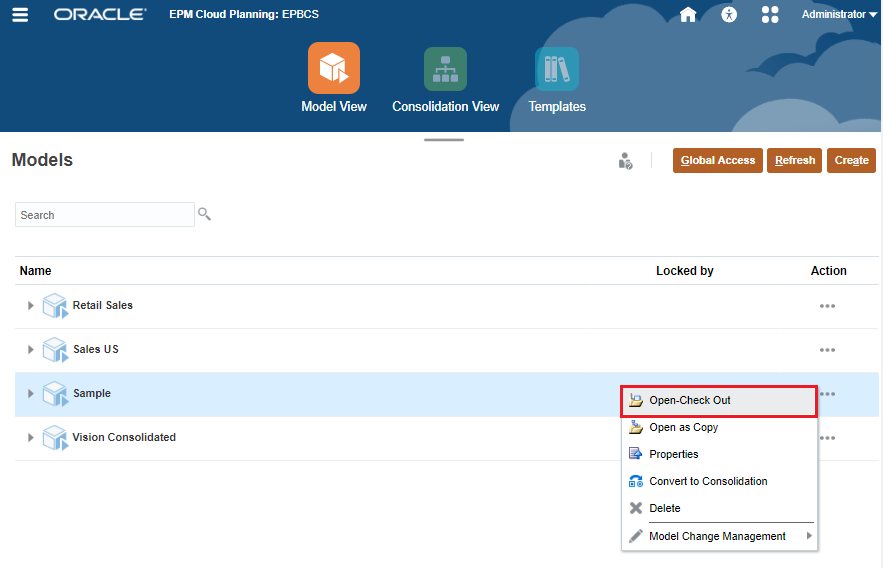
- For Sample, click (...) Action and select Open–Check Out.
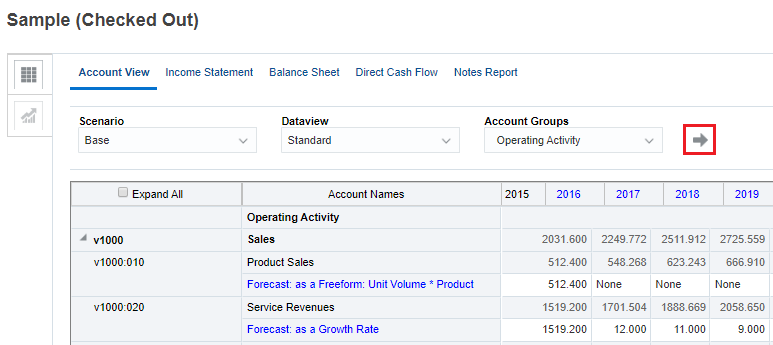
- On the Account View tab, set the POV to Scenario: Base, Dataview: Standard, and Account Groups: Operating Activity, and click
 (Refresh).
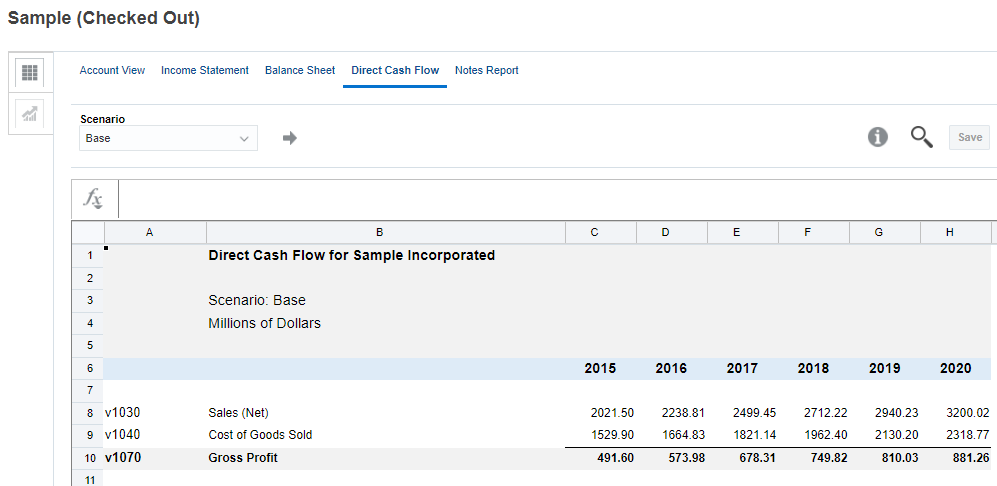
Opening the Direct Cash Flow report
In this section, you'll use the Direct Cash Flow report to evaluate the data within different scenarios.
- Click the Direct Cash Flow tab and ensure that the Scenario is set to Base. Review the Gross Profit metric.
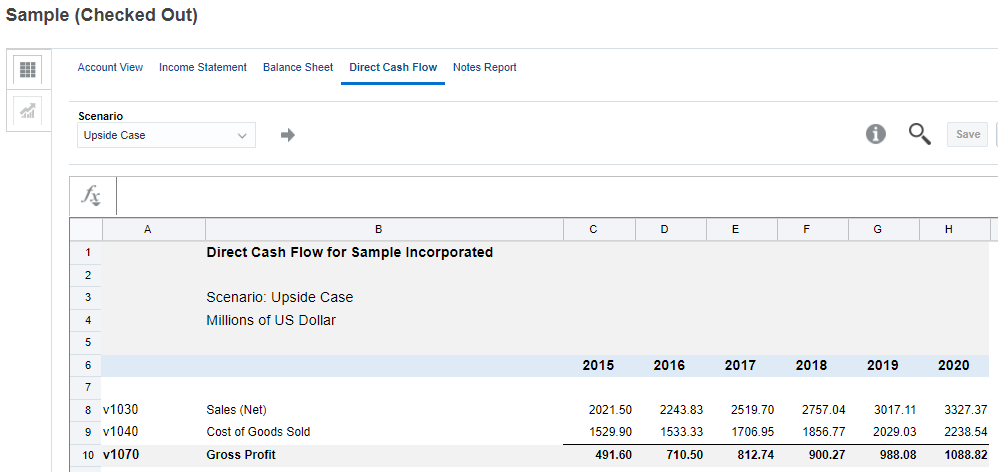
- From the Scenario drop-down list, select Upside Case and click (Refresh). Review the Gross Profit metric again. Notice how assumptions in the Upside Case scenario impact the Gross Profit metric.
Creating a scenario
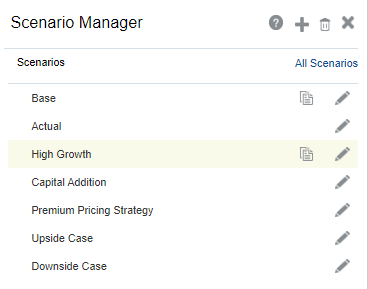
When you create a scenario, you create it from an existing scenario. By default, Strategic Modeling includes two default scenarios:
- The Base scenario includes all accounts and contains the original inputs of each account. It does not inherit any values from any other scenario.
- The Actual scenario contains actual data.
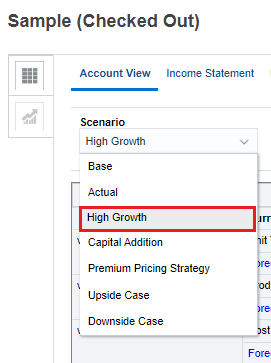
- From the Scenario drop-down list, select Base, and click (Refresh).
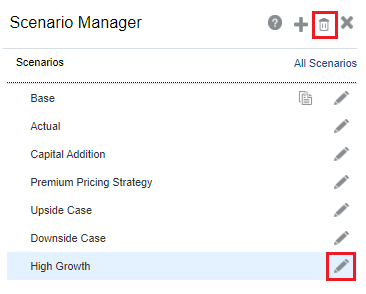
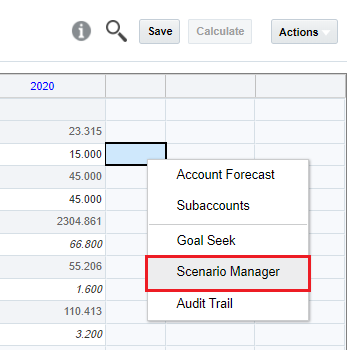
- Click Actions, and select Scenario Manager.
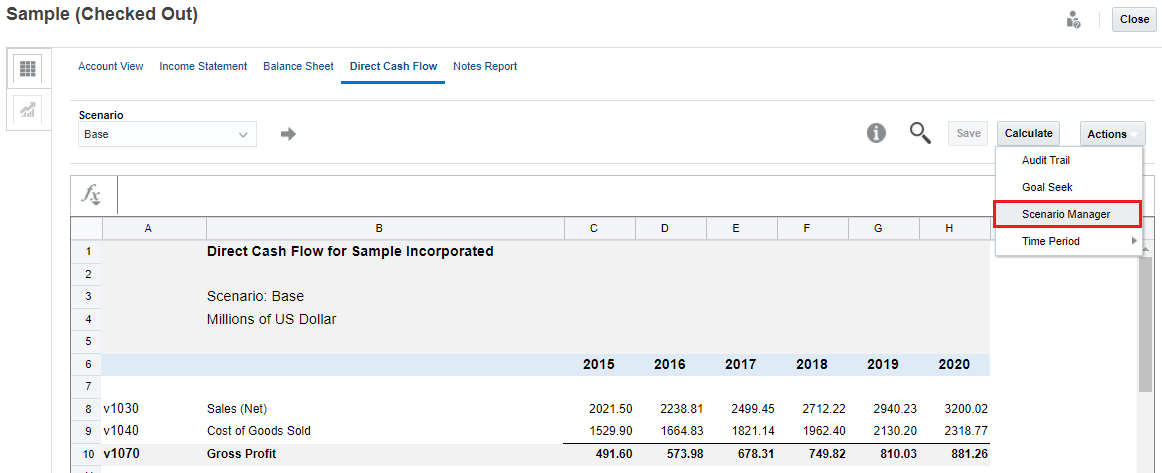
- In Scenario Manager, click
 (New Scenario) to create a scenario as a copy of the Base scenario.

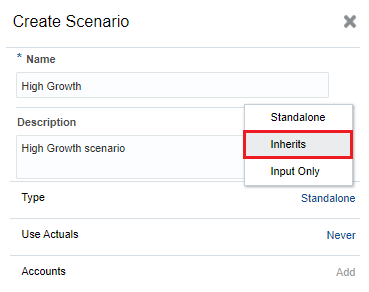
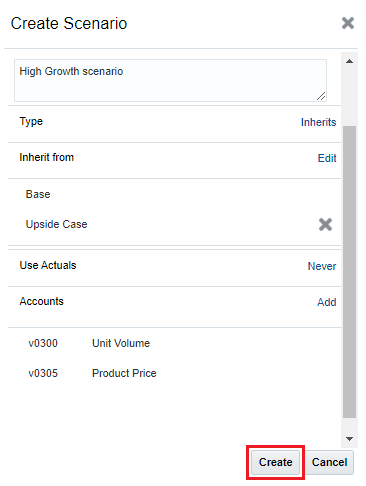
- In Name, enter High Growth. In description, enter High Growth scenario.
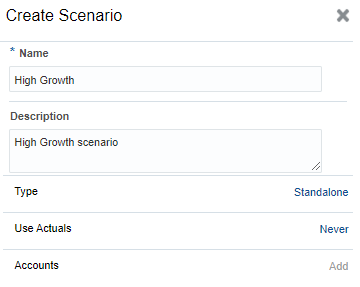
- The new scenario can be an inheriting scenario or a standalone scenario. Create an inheriting scenario that inherits values and forecast methods from the Upside Case scenario.
For Type, click Standalone and select Inherits.
-
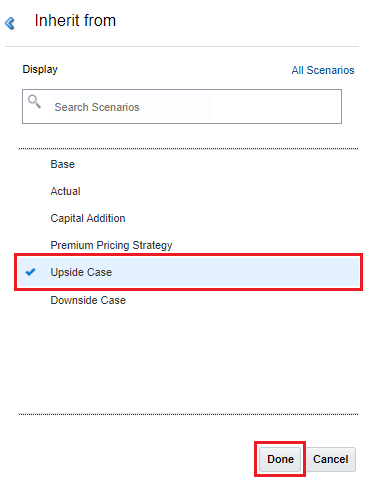
In Inherit from, click Select and select Upside Case and click Done.
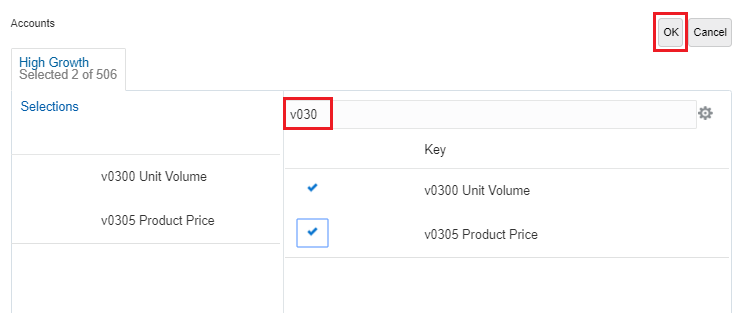
- All scenarios inherit the input values from the accounts in the Base scenario or another standalone scenario, unless you specify an input value in that scenario. Add some accounts to the High Growth scenario.
For Accounts, click Add.

- In Accounts, select the following accounts: v0300 (Unit Volume), v0305 (Product Price) and click OK.
Search for those accounts by entering v030.
Values for accounts that are not selected are inherited from the Base scenario.
- Click Create.
- Click
 (Close) to close Scenario Manager.
To change a scenario’s characteristics, edit it by selecting its Edit icon (![]() ). If you no longer need a scenario, you can delete it by selecting the scenario and clicking the Delete icon (
). If you no longer need a scenario, you can delete it by selecting the scenario and clicking the Delete icon (![]() ). When you delete a scenario, all the data for that scenario is also deleted.
). When you delete a scenario, all the data for that scenario is also deleted.
Reviewing and modifying data for the scenario
-
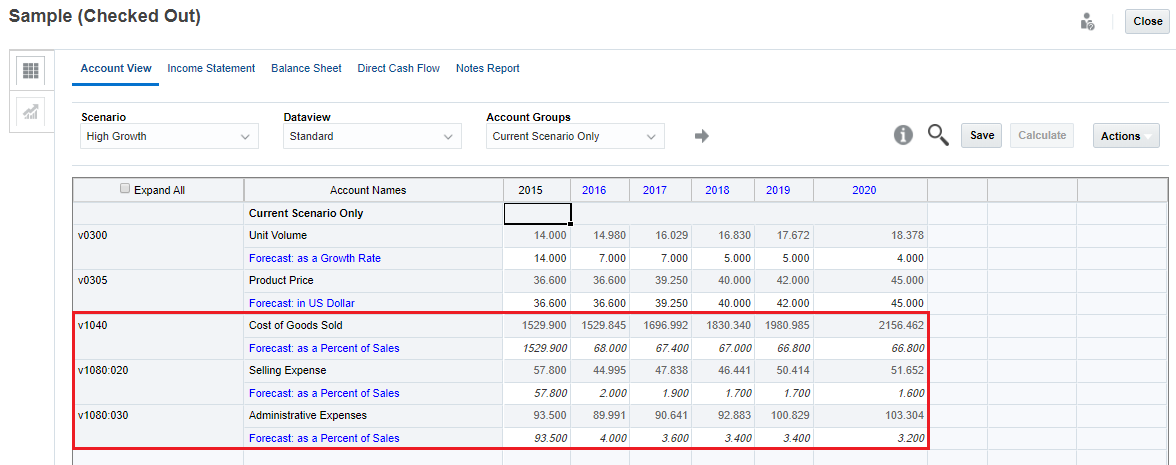
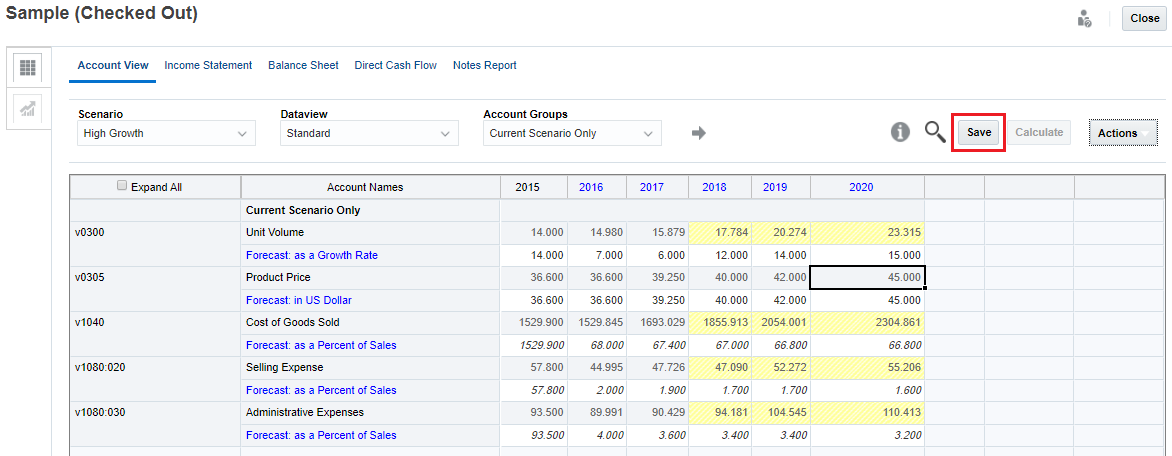
Click the Account View tab, change the scenario to High Growth and the Account Groups to Current Scenario Only and click
(Refresh).Notice that accounts from the Upside Case scenario (Cost of Goods Sold, Selling Expense, and Administrative Expenses) are also displayed because Upside Case is the scenario from which High Growth inherits. The logic and data for those inherited accounts is also in the High Growth scenario. Data for the Unit Volume and Product Price accounts is the same as the data for these accounts in the Base scenario.
-
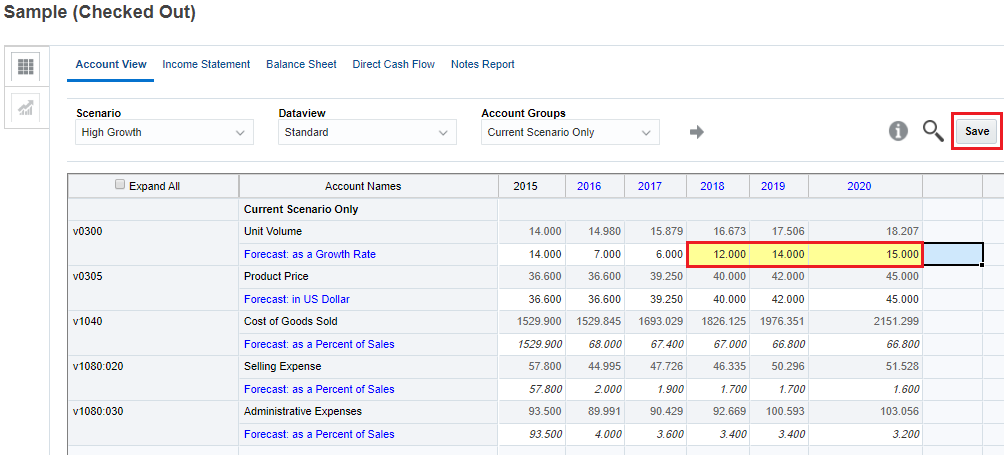
You can change the data for Unit Volume or Product Price within the High Growth scenario to see the impact on other accounts (for example, Cost of Goods Sold).
For Unit Volume 2018, 2019 and 2020, enter 12, 14 and 15, and click Save.
-
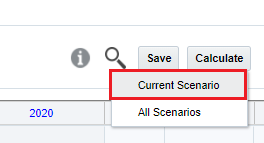
Click Calculate and select Current Scenario.
-
Review the data. Notice accounts that were impacted by the data change for Unit Volume (highlighted in yellow). Click Save.
Changing the scenario order
You can make it easier to find commonly used scenarios by changing the scenario order.- Right-click on any cell and select Scenario Manager from the menu.
- Drag High Growth and drop it after Actual so that it is listed close to the top. This also changes the order in the Point of View bar.
Base and Actual cannot be reordered and are always the first and second scenarios in the list.
- Click the Close icon () to close Scenario Manager.
- In the POV bar, click Scenario to verify the changed scenario order.