 Loading Data to an Essbase Target Using Data Sync
 Before You Begin
This 15-minute tutorial shows you how to load data to an Oracle Analytics Cloud - Essbase target using Data Sync. You also import a spreadsheet file to create an application, cube, and rules file in Oracle Analytics Cloud - Essbase.
Background
To use Data Sync to load data to an Essbase target, you must create an application and cube in Oracle Analytics Cloud - Essbase. In this tutorial, you import a spreadsheet file and create the required application and cube, and then you use Data Sync to load data to the Essbase application and cube.
What Do You Need?
- Access to Oracle Analytics Cloud - Essbase
- Download and install Data Sync V2.4
- Download the following files to your computer:
- You must have an existing application and cube to use for this tutorial in Essbase.
Before installing Data Sync, you must install Java Development Kit (JDK) V1.8.x.
You can use the Creating an Oracle Analytics Cloud Essbase Application and Cube tutorial to prepare your Essbase environment. This tutorial uses the sample_basic_dynamic.xlsx file to create the application and cube.
 Create a Data Sync Project
Before performing this step, you must configure Data Sync. You should log on to verify your access to Essbase. Resolve any configuration and sign on issues before beginning this tutorial.
- From the directory where you installed Data Sync, run
datasync.baton Windows ordatasync.shon Linux/UNIX. - In Enter Password, enter your password, click Remember password, and then click Login.
- Click Create a New Project, enter a name for the project, and then click OK.
- In Data Sync, click Connections, and click New.
- In New Connection, in Name, enter
Essbase. From the Type list, select Essbase, and then click OK. - In Edit, enter your User name and Password for your Oracle Analytics Cloud - Essbase instance. In the URL field, click the check
 .
. - In URL, enter the URL for your Oracle Analytics Cloud - Essbase instance, for example,
http://myEssbasehost.com:9000/, and then click OK.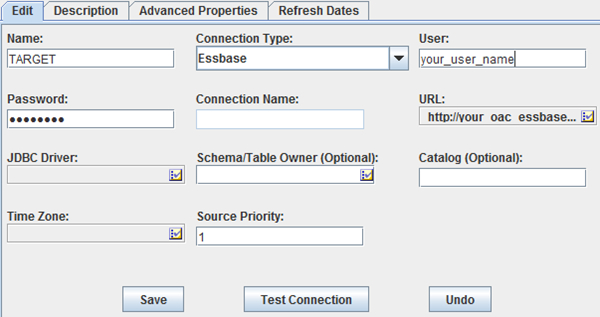
Description of the illustration target_connection_essbase.jpg - Click Test Connection.
- In Connection Successful, click OK.
- In the Edit tab, click Save.
- In Sources/Target, click New.
- In New Connection, in Name, enter
File Source. From the Type list, select File Source, and then click OK. - On the Edit tab, click Save.

Description of the illustration file_source_connection.jpg
 Select the Dimension File Source
- Click the Project tab.
- On the Source Data tab, click Data From Objects. In the Select Source list, click File Source, and then click OK.
- In New Source File, in the File Location field, click the check , navigate to and select the
dim_market.txtfile, and click Next. - In Import Options, remove the check from First line contains headers check box, and then click Next.
- In Configure Target, in the Create new field, enter
Market_Dimas the target name. From the Choose output format list, select Essbase, and click Next. - In Select New Source File: Map Columns, click OK.
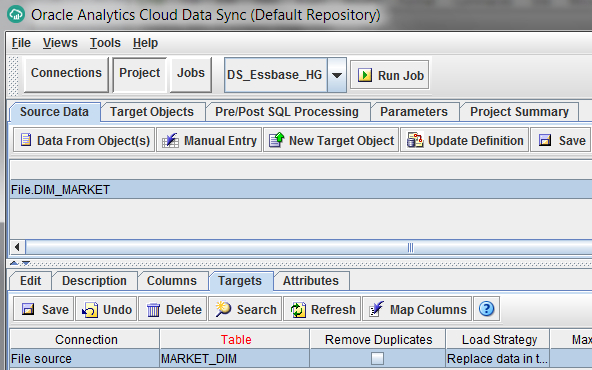
Description of the illustration files_source_market.jpg
 Specify Attributes for the MARKET_DIM Target
In this section, you specify the attributes of the Essbase application and cube in Data Sync. You can view the values for these attributes on the Outline page for the application in the Essbase data target. You can find the rules file name on the Scripts page for the application in Essbase.
- Click Target Objects. In the Target Objects tab, click Attributes.
- In the Application Name row, double-click the Value column. In Value, enter the name of your Essbase application.
- In the Cube Name row, double-click the Value column. In Value, enter the name of your Essbase cube.
- In the Object Name row, double-click the Value column. In Value, enter the name of the Essbase object.
If you used the
sample_basic_dynamic.xlsxfile to create the application and cube, the Object Name is Market. - In the Load Type (Dimension Build/Load Data) row, double-click the Value column. In Value, enter
Dimension Build. - In the Rules File Name row, double-click the Value column. In
Value, enter the name of the Essbase rules file. If you used the
sample_basic_dynamic.xlsxfile to create the application and cube, the Rules File Name is Dim_Market. - In Target Object Attributes, click Save.
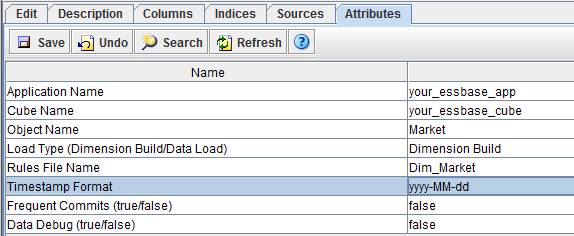
Description of the illustration market_dim_attributes.jpg
 Select the Measures File Source
- Click the Source Data tab, and click Data From Object(s). From the Select Source list, choose File Source, and then click OK.
- In New Source File, in the File Location field, click the check , navigate to and select the
data_basic.txtfile, and click Next. - In Import Options, remove the check from First line contains headers check box, and then click Next.
- In Configure Target, in the Create new, enter
Data_Measureas the target name. From the Choose output format list, select Essbase, and click Next. - In Select New Source File: Map Columns, click OK.
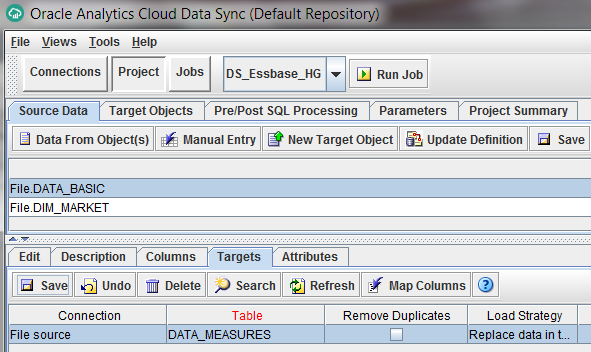
Description of the illustration source_file_measures.jpg
 Specify Attributes for the DATA_MEASURES Target
- Click Target Objects. In the Target Objects tab, click Attributes.
- In the Application Name row, double-click the Value column. In Value, enter the name of your Essbase application.
- In the Cube Name row, double-click the Value column. In Value, enter the name of your Essbase cube.
- In the Object Name row, double-click the Value column. In Value, enter the name of the Essbase object.
If you used the
sample_basic_dynamic.xlsxfile to create the application and cube, the Object Name is Measures. - In the Load Type (Dimension Build/Load Data) row, double-click the Value column. In Value, enter
Dimension Build. - In the Rules File Name row, double-click the Value column. In Value, enter the name of the Essbase rules file.
If you used the
sample_basic_dynamic.xlsxfile to create the application and cube, the Rules File Name is Dim_Measures. - In Target Object Attributes, click Save.

Description of the illustration dim_measures_attributes.jpg
 Define Groups for Loading Data
In this section, you define the order for loading the file source data defined in the project. You must load dimension tables serially before loading the measures (facts data). In Data Sync, create one group per cube. You can create a group using your preferred naming conventions.
- Click the Project Summary tab. In the Data_Measures row, click the Group Name column, and enter
MyGroup.In the Market_Dim row, click the Group Name column, and enterMyGroup. - In the Market_Dim row, in the Group Order column, enter
1, and then in the Edit tab, click Save. - In the Data_Measures row, in the Group Order column, enter
2, and then in the Edit tab, click Save.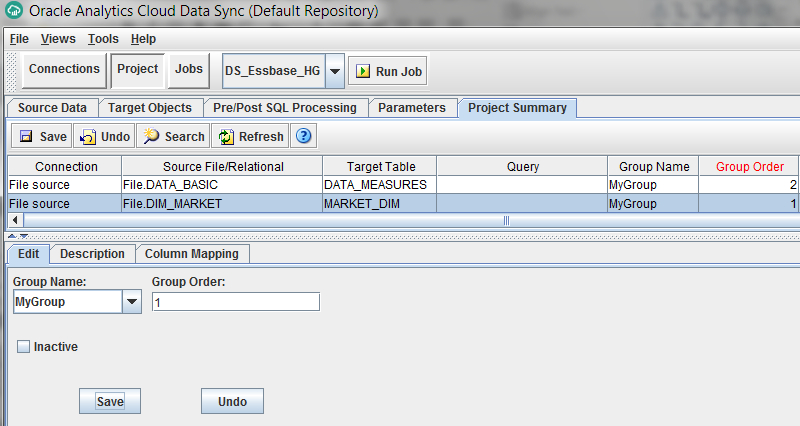
Description of the illustration mygroup_order.jpg
 Run the Load Data Job
- Click Run Job.
- In Do you want to run the job "your job name"?, click OK.
- In Request successfully submitted, click OK.
- Click the Jobs tab. Click Current Jobs to see the data loading progress.
- Click History. Click Tasks to review the job.

Description of the illustration history_tasks_details.jpg
 Want to Learn More?
- Creating a Cube from Tabular Data in Oracle Help Center
- Specifying Connection Details for Essbase in Oracle Help Center
- Setting Up Data Loads to Essbase in Oracle Help Center
- Loading Data and Dimensions from Data Sync to Essbase in Oracle Help Center