Before You Begin
Purpose
This tutorial shows you how to create a database application using Oracle Application Express in Oracle Exadata Express Cloud Service.
Time to Complete
Approximately 80 minutes.
Overview
Oracle Application Express (Oracle APEX) is a rapid web application development tool for the Oracle database. Using only a web browser and limited programming experience, you can develop and deploy professional applications that are both fast and secure. Oracle Application Express is available with the Oracle Database, whether it's on-premises or in the Oracle Cloud.
In this tutorial, you use Oracle Application Express Release 5.0 to create and run a database application in the Oracle Cloud, using Oracle Exadata Express Cloud Service.
Please keep in mind the following while running this tutorial:
- Logging into your Oracle Application
Express workspace in the Exadata Express Cloud
Service: Reference the Oracle
Help Center for your Oracle Database Cloud
Service. To do this, go to the Oracle Help Center
for Cloud, and select Platform and Infrastructure.
From here, select your Database Cloud Service and
the Get Started page will appear.
- Application ID: Screenshots in this tutorial show a blurred Application ID. Your Application ID can be any value assigned automatically while creating the application.
- Note: If you access the workspace in an on-premises Oracle database, rather than in the Exadata Express Cloud Service showcased in this tutorial, you may have more than one schema assigned to your workspace by the Oracle Application Express Instance Administrator.
What Do You Need?
Before starting this tutorial, you should:
- Have access to an Oracle Database 11g or later release on your local, non-cloud computer.
- Download and unzip the files.zip file into your working directory.
- Configure the database environment by performing the following:
- Execute the following environment setup steps in the specified sequence:
- Create an Oracle Application Express user looking at the instructions in Creating New User Accounts in Oracle Application Express Administration Guide.
- Download the files.zip to your working directory.
- From the Oracle Application Express home page, click the down arrow next to the SQL Workshop tab and select SQL Scripts.
- Upload and run the
deinstall_database_obj.sqlto reset the application environment. - Upload and run the
install_database_obj.sqlto create tables and data used for these labs.
Creating a Database Application
-
From the Oracle Application Express home page, click the down arrow next to the Application Builder tab and select Database Applications.

Description of this image -
Click the Create icon.

Description of this image -
Select Desktop, and click Next >.

Description of this image -
For Name, enter Project Tasks Application, and click Next >.

Description of this image -
By default, a Home page gets created. To add another page, click Add Page.
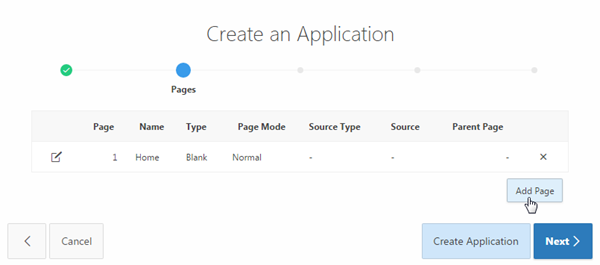
Description of this image -
Select Master Detail for Page Type. Master Detail builds a two page report and form combination. Select Home(1) for Parent Page, OBE_PROJECTS for Master Table Name, and OBE_TASKS for Detail Table Name. Click Add Page.

Description of this image -
The Master Detail pages are created. Click Next >.

Description of this image -
Accept the defaults, and click Next >.
Description of this image -
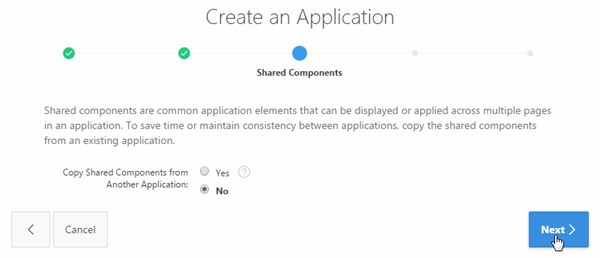
You want to specify the type of authentication used to access this application. For Authentication Scheme, select Application Express Accounts.

Description of this image -
You can also define a date format to be used throughout your application. This date format will be used to alter the
NLS_DATE_FORMATdatabase session setting prior to showing or submitting any page within the application. This format is used by all reports showing dates and is also picked up by form items of type 'Date Picker (use Application Date Format)'. Select an DD-MON-YYYY as Application Date Format for your Application, and click Next >.
Description of this image - Click Create Application.

Description of this image -
Project Tasks Application is created successfully with 4 pages. Click the Run Application icon.

Description of this image -
If a Log In screen appears, enter your Oracle Application Express credentials, and click Log In.
Note: You can add an Application Express user by selecting Manage Users and Groups from the Administration drop-down menu in the Application Express home page.
Description of this image -
Project Tasks Application home page displays with the navigation menu on the left side of the page. Click Obe Projects.

Description of this image -
A report with the list of projects displays. Select the Edit icon next to one of the projects to view the Master detail Form.

Description of this image -
The Master Detail Form is shown. This page allows a user to edit the details of the Project as well as the details of the Tasks associated with the Project. It also allows users to add new tasks to the current project.
In the master region, you can use the backward and forward buttons to move to previous and next projects. For example, if you have clicked the edit icon next to the Public Website project in the previous step, you see a backward button here.
In the detail region, you see an Add Row button. This button saves any pending changes and then adds another row so that a new task can be added to the project. You should also have a Delete Checked button. This button is used in conjunction with the check boxes to the left of each Task. When you click the Delete Checked button, any tasks that have been "checked" are deleted. If you use this feature, you notice that a deletion confirmation has been built in. This asks you to confirm your deletion before proceeding.
Change the name of the project and click Save.
Description of this image
Editing Application Objects
Although the Master-Detail form is fully functional, the presentation can be improved. In this topic, you change the names of the Page Title, Region Title, and change the format of an item on the Master Report. Lastly, you change the sequence of items in the Projects and Tasks page using the Drag and Drop feature. Perform the following steps:
-
You see that the name of the project last edited is modified. Click the Edit Page<n> link on the developer toolbar.

Description of this image -
Expand Columns under Content Body in the Rendering tab.

Description of this image -
Click PROJECT_DEADLINE column to open its properties in the property editor on the right side of the page.
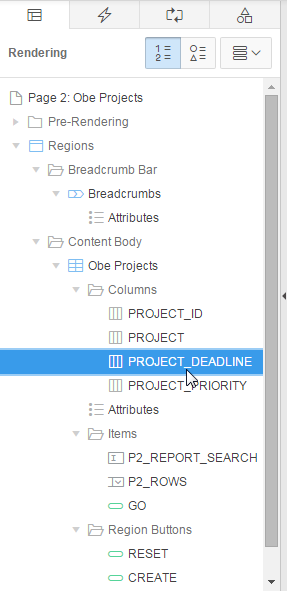
Description of this image -
To change the format of PROJECT_DEADLINE, click the List of Values icon for Format Mask, under Appearance, .

Description of this image -
Select 12-JAN-2004.
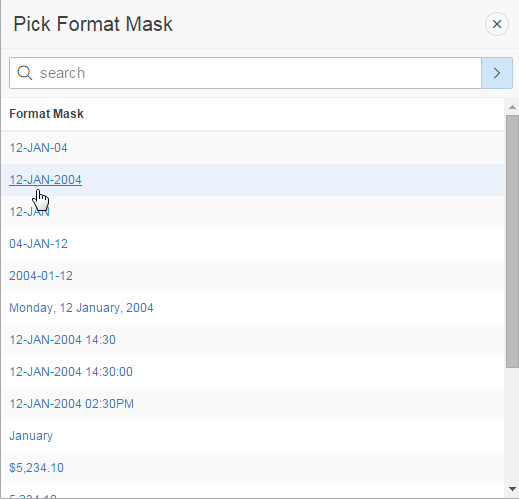
Description of this image -
Now, you want to change the title of the page to PROJECTS. Select Page 2: obe Projects in the Rendering tab.

Description of this image -
Under Identification, enter Projects for Name and Title. Click the Save and Run Page icon.

Description of this image -
Notice that the date format of the PROJECT_DEADLINE has changed. But, the Region title is still set to Obe Projects. Click Quick Edit in the developer toolbar.

Description of this image -
Select the Obe Projects region for quick editing.
Description of this image -
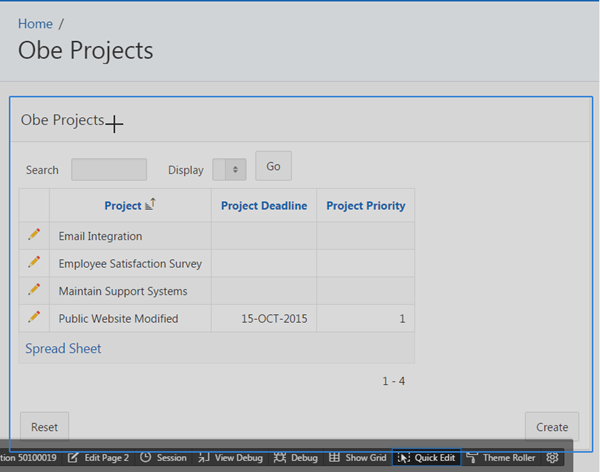
You notice that the region title is not changed. Under Identification, enter Projects for Title. Click the Run and Save Page icon.

Description of this image -
You notice that the title is now changed to Projects. You can search projects by entering a key word in the search text box. Enter email for Search, and click Go.

Description of this image -
Observe that the associated row text is highlighted in red color. Click Reset.
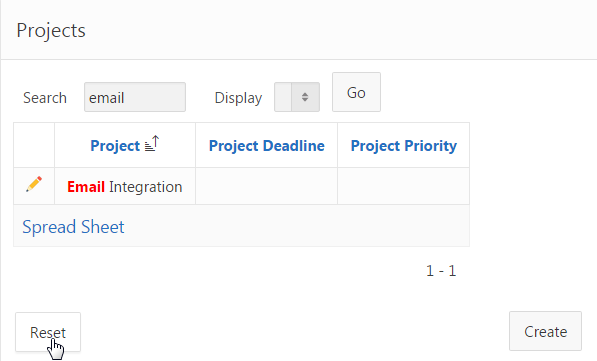
Description of this image -
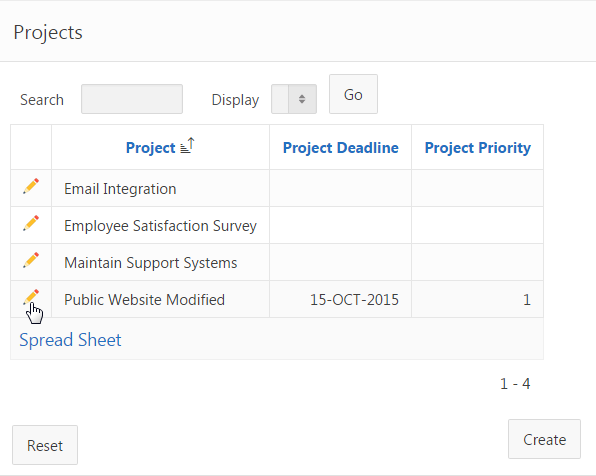
All the records are displayed again. Click the edit icon in front of the row for Public Website Modified project.
Description of this image -
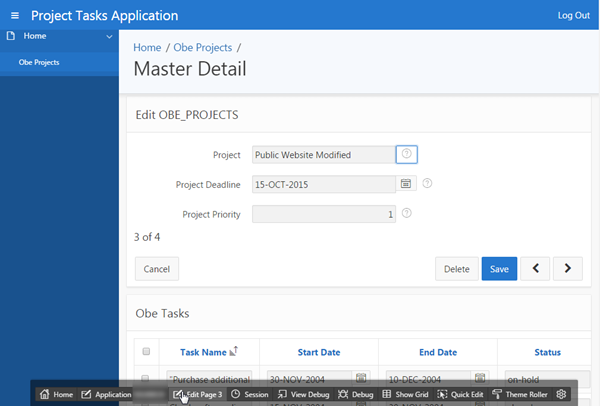
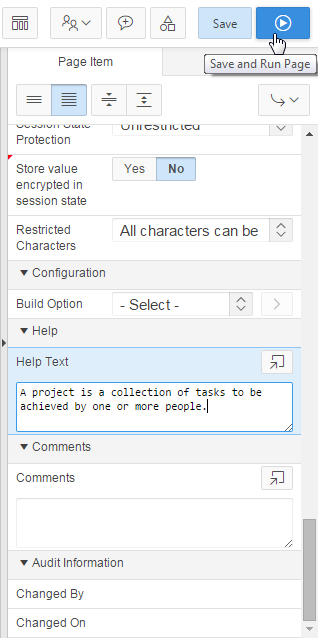
You notice a small encircled question mark beside Project, Project Deadline, and Project Priority item labels. Click encircled question mark beside Project. You see a help window. You can add help text by editing it. Close the Help Window.

Description of this image -
Click the Edit Page<n> link on the developer toolbar.
Description of this image -
In the Rendering tab, under Items, select P3_PROJECT.

Description of this image -
In its property editor, under Help, enter some text in Help Text. Click the Save and Run Page icon.
Description of this image -
Click the encircled question mark beside Project. A Help window opens with the help text you entered in the previous step.

Description of this image - You
can reorder the items on your page. Click
Edit Page<n> on the
developer toolbar.

Description of this image -
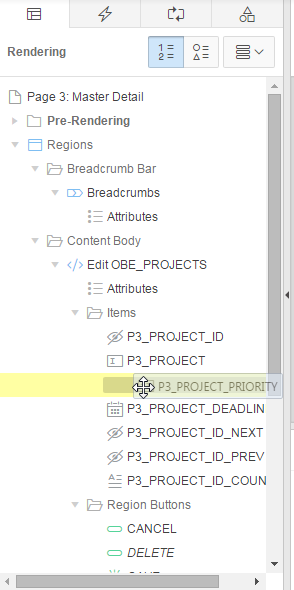
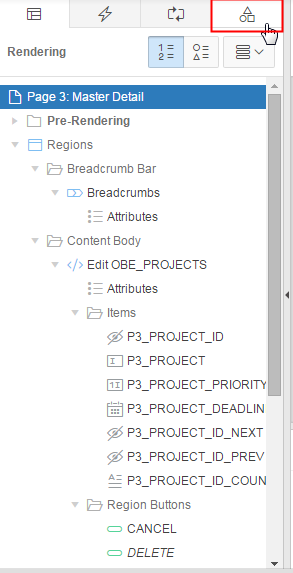
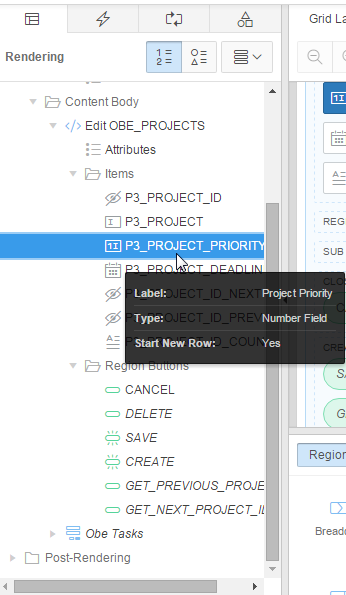
To reorder the sequencing of items in this page, you can drag and drop an item to a new location under the Rendering tab or in the Grid Layout. Drag the P3_PROJECT_ PRIORITY item and drop it above the P3_PROJECT_ DEADLINE item in the Rendering tab.
Description of this image -
Click the Save and Run Page icon.
Description of this image -
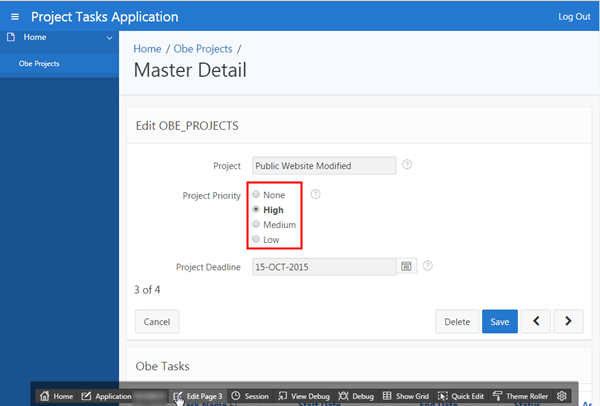
Notice that Project Priority appears before Project Deadline in the Master Detail page. Click the Application<n> link in the developer toolbar.

Description of this image
Creating Lists of Values (LOVs)
Another way to improve the presentation of the application is to create a List of Values. In this topic, you create the following LOVs:
| EMPLOYEES | A Dynamic LOV to show the list of Employees. This LOV is then associated with the Assigned To column in the List of Tasks. |
| STATUSES | A Static LOV to show the list of Statuses. This LOV is then associated with the Status column in the List of Tasks. |
| PRIORITIES | A Static LOV to show the list of Priorities. This LOV is then associated with the Priority column in the Projects Master area. |
-
Click the 3 - Master Detail page.

Description of this image -
Click the Page Shared Components tab in the tree view of the page.
Description of this image -
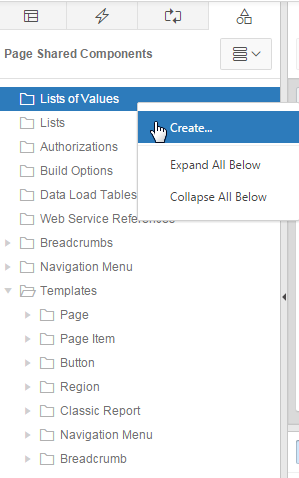
Right-click Lists of Values and select Create...

Description of this image -
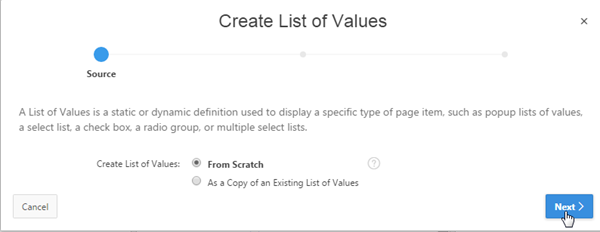
For Create List of Values, retain the default value, From Scratch, and click Next >.

Description of this image -
Enter EMPLOYEES for Name, select Dynamic for Type, and click Next >.

Description of this image -
For a dynamic LOV, you need to enter the SQL query to be executed when the page is rendered. To build the SQL query, click the Create Dynamic List of Values link.

Description of this image -
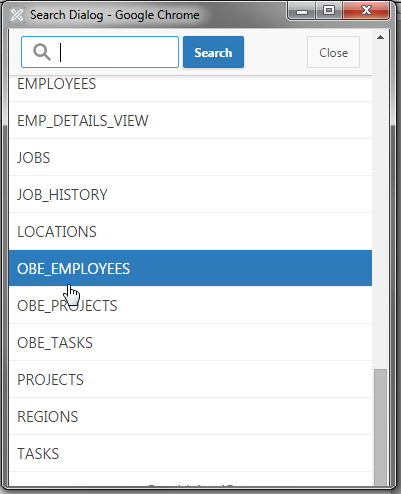
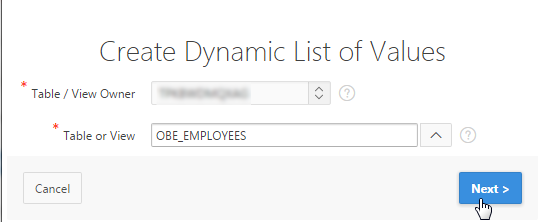
The Create Dynamic List of Values dialog window appears. Click the List of Values icon for Table or View.

Description of this image -
Select OBE_EMPLOYEES.
Description of this image -
Click Next >.
Description of this image -
The Display column in a dynamic list of values is the column displayed to the user. The Return column is the corresponding value to be stored in the database. They can both be the same value when appropriate.
Select FIRST_NAME (Varchar2) for Display Column, EMPLOYEE_ID (Number) for Return Value, and click Next >.
Description of this image -
The SQL query is built. Click Finish.

Description of this image -
You want to display the employee name as first name followed by last name. Modify the SQL query as given below, and click Create List of Values.
select FIRST_NAME || ',' || LAST_NAME as
                                  display_value,

                                  EMPLOYEE_ID as return_value

                                  from OBE_EMPLOYEES

                                  order by 1
Description of this image -
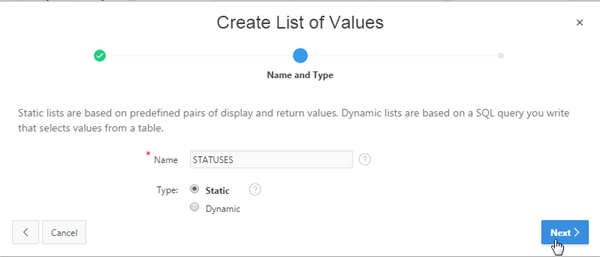
Your LOV is created, but it does not appear under Lists of Values in the Page Shared Components tab. This is because, you have not associated the newly created LOV with this page. Before associating it with this page, you want to create two more static LOVs. Right-click Lists of Values, and Click Create...

Description of this image -
Click Next >.

Description of this image -
Enter STATUSES for Name, select Static for Type, and click Next >.
Description of this image -
Enter the following entries for static values, and click Create List of Values.
Display Value Return Value Closed
closed
Open
open
On Hold
on-hold 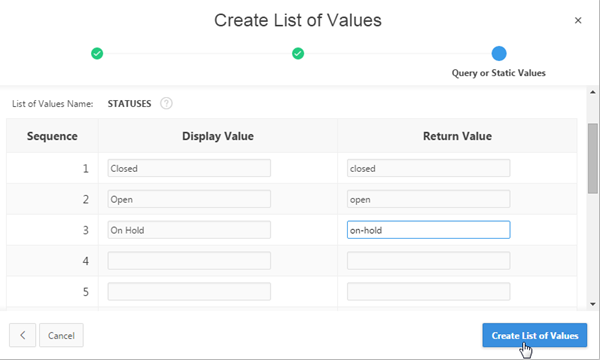
Description of this image -
To create another static LOV, right-click Lists of Values, and Click Create...
Description of this image -
Click Next >.
Description of this image -
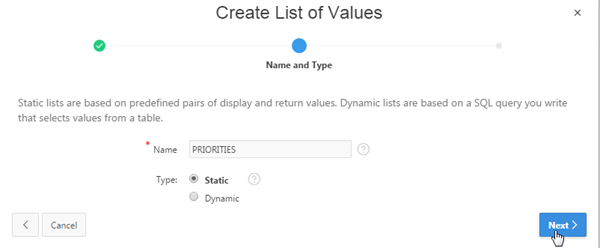
Enter PRIORITIES for Name, select Static for Type, and click Next >.
Description of this image -
Enter the following entries for static values, and click Create List of Values.
Display Value Return Value High
1
Medium
2
Low 3 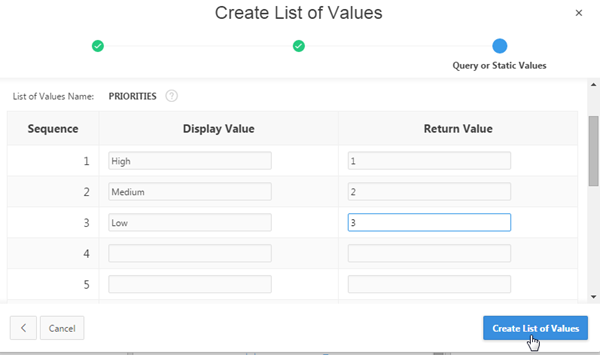
Description of this image -
Now you can associate the LOVs with the page. Expand Columns under Obe Tasks in the Rendering tab.
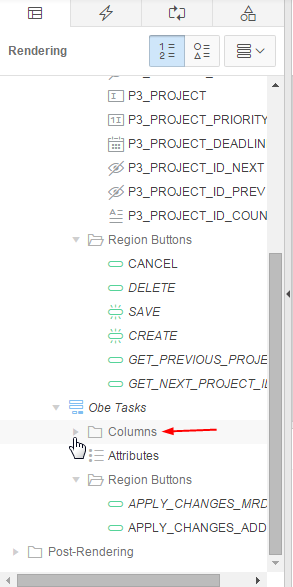
Description of this image -
Select ASSIGNED_TO under columns in the Rendering tab.
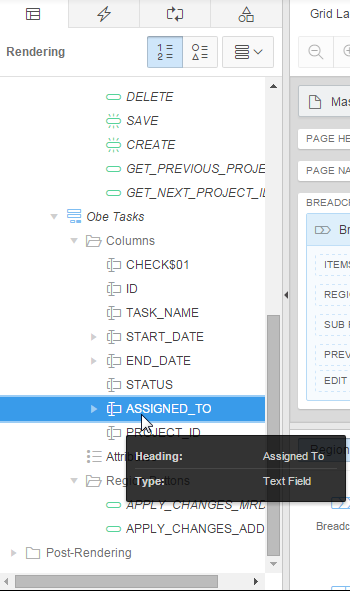
Description of this image -
Under Identification, select Select List for Type. Under List of Values, select Shared Component for Type and EMPLOYEES for List of Values.

Description of this image -
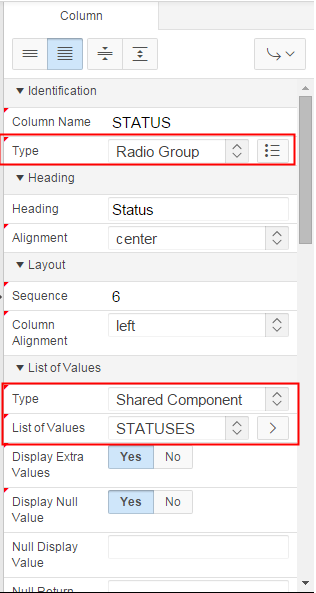
Select STATUS under columns in the Rendering tab.
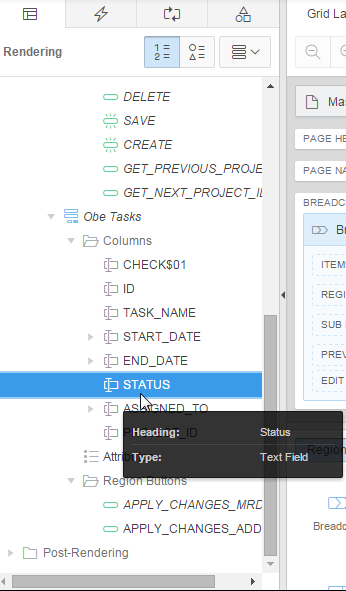
Description of this image -
Under Identification, select Radio Group for Type. Under List of Values, select Shared Component for Type and STATUSES for List of Values.
Description of this image -
Notice the two LOVs are listed under Lists of Values in the Page Shared Components tab. Click the Save and Run Page icon.

Description of this image -
Select the drop down list for Assigned To. You see that the dynamic LOV executes and shows the list of Employees. Also, a radio group is created for Status with the static LOV values.

Description of this image -
Next, you need to assign the the PRIORITIES LOV to the Priority item in the Master area of the page. Click the Edit Page<n> link in the developer toolbar.

Description of this image -
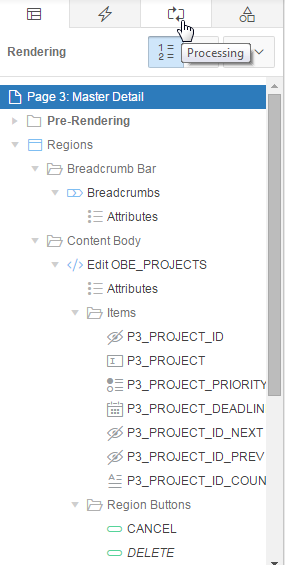
In the Rendering tab, select P3_PROJECT_PRIORITY under Columns in the Edit OBE_PROJECTS region.
Description of this image -
Under Identification, select Radio Group for Type. Select the following values for properties under List of Values, and click the Save and Run Page icon.
Property Value Type Shared Component
List of Values PRIORITIES
Display Extra Values No
Null Display Value None 
Description of this image -
The Priority field is now a radio group populated with the static LOV values. Click the Edit Page<n> link in the developer toolbar.
Description of this image
Adding an Item Validation
You do not want a user entering a date prior to today's date. This type of check can be done through an item validation. Perform the following steps:
-
Click the Processing tab.
Description of this image -
Right-click Validations, and select Create Validation.

Description of this image -
Select the new validation in the Rendering tab, and update the properties in its property editor as follows:
Property Group Property Value Identification Name P3_PROJECT_DEADLINE greater than today Validation Type SQL Expression Validation SQL Expression TO_DATE(:P3_PROJECT_DEADLINE,'DD-MM-YYYY') >= SYSDATEValidation Always Execute No 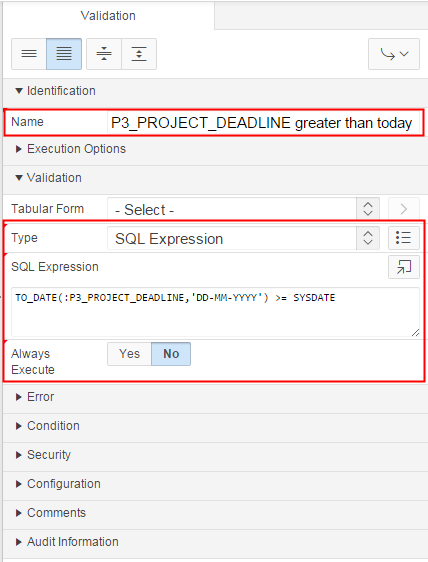
Description of this image -
Under Error, enter Date needs to be greater than today! for Error Message, select the Inline with Field and in Notification for Display Location, and P3_PROJECT_DEADLINE for Associated Item. Click the Save and Run Page icon.

Description of this image -
Change the Project Deadline to a date before today, and click Save.

Description of this image -
Notice that you receive an item (or field) error message as well as a page notification message. This is because you specified that you wanted both when you created the validation.

Description of this image -
Click the Application<n> link in the developer toolbar.

Description of this image
Summary
In this tutorial, you have learned how to:
- Create a database application
- Edit application objects
- Create List of Values (LOVs)
- Create and test a validation
Want to Learn More?
- Other tutorials on Oracle Database Cloud Service - Database Schema Service
Credits
-
Curriculum Developer: Richard Green
- Other Contributors: Anjani Pothula, Drue Swadener