Before You Begin
Purpose
This tutorial covers how to sign up for an Oracle Database Exadata Express Service subscription in the Oracle Cloud, and how to create a service instance.
Time to Complete
Approximately 20 minutes
Overview
Exadata Express provides your own Oracle Database Enterprise Edition running the latest database release on Exadata for a full Oracle experience. It’s a fully managed service packed with features for modern application development and great for small to medium sized data.
For the Oracle Database Exadata Express Service, there are three main components:
- Oracle Application Express: Used to develop and deploy beautiful, responsive, database-driven web applications in the cloud.
- RESTful Web Services: Used to publish interfaces for data in the cloud.
- Packaged applications: Pre-built, easily installed productivity applications for use in the Exadata Express Service.
In this tutorial, you perform the steps to sign up for an Exadata Express Service subscription.
Context
There are 7 steps in requesting, activating, and setting up a subscription to an Oracle Cloud Service. This tutorial focuses on the first 3 steps:
- You order a subscription to an Oracle Cloud
service. Oracle automatically assigns you the
role of Account Administrator for the service.
The user who buys the subscription is also assigned the roles of Service Administrator and Identity Domain Administrator. - Account Administrator receives a notification email to activate the service.
- Account Administrator activates the service.
- Identity Domain Administrator manages user accounts, roles, and passwords.
- Service Administrator develops and administers the service, and assigns roles to users.
- Service Administrator provides URLs to Cloud Service users, to access their Cloud Services.
- You create and connect to Exadata Express service instances.

What Do You Need?
Before starting this tutorial, you should have an Oracle.com account. To get an account, see Getting an Oracle.com Account.
Buy an Exadata Express Service Subscription
To purchase an Exadata Express Service subscription, you need to select the service you want and sign in to your Oracle.com account. If you do not have an account, you need to create one first. See Getting an Oracle.com Account.
Perform the following steps:
-
Open a browser and enter the following URL:
https://cloud.oracle.com/database/exadata-express/pricingClick Buy NOW.
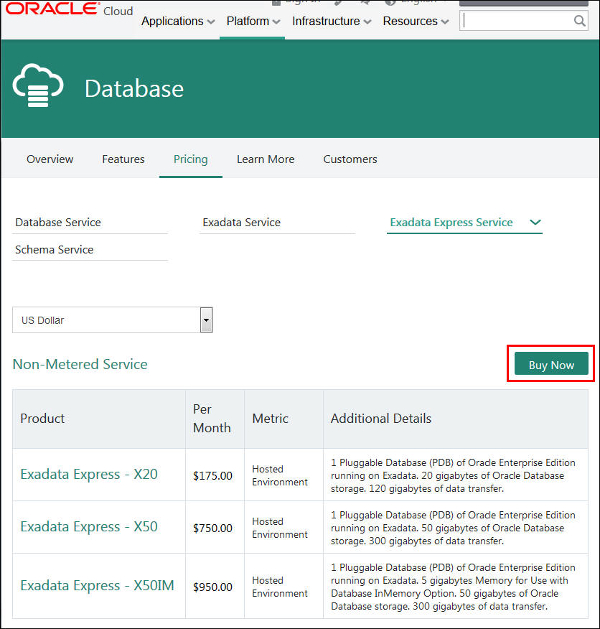
Description of this image -
The Oracle Store page for Exadata Express Cloud Service opens. Select one of the three service levels and click Buy Now.

Description of this image -
Select the term of your subscription purchase, and the quantity. Click Add to Cart.

Description of this image -
Your selection has been added to the Oracle Store cart. Click the cart symbol in the upper right corner of the page to open the cart.

Description of this image -
Click View Cart.
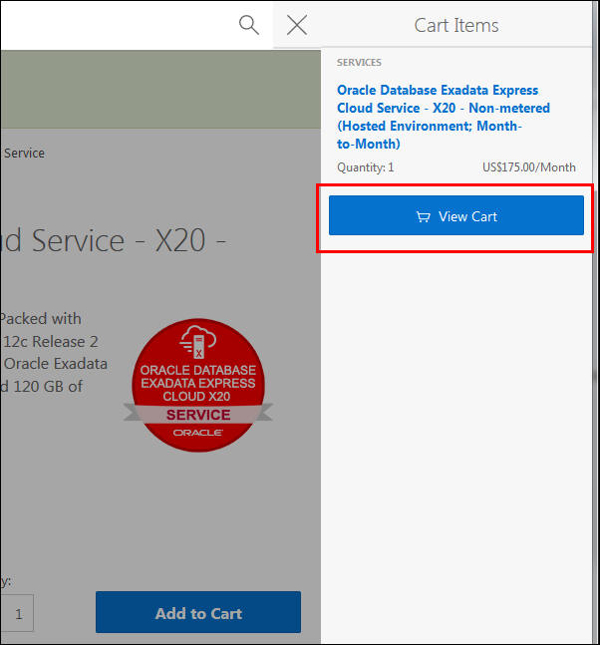
Description of this image -
Click Checkout to begin the steps for completing your subscription order.
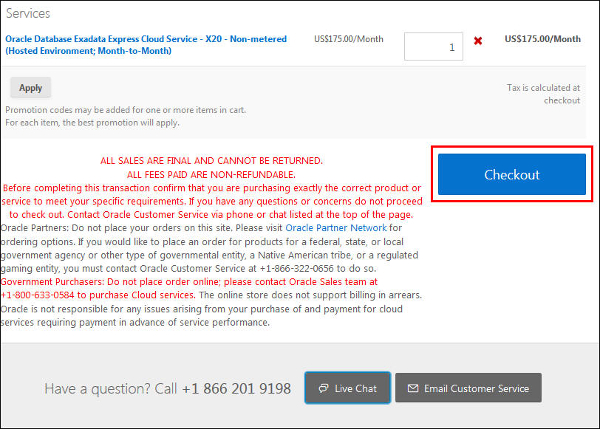
Description of this image
Finish the Oracle Store Checkout Process
In this section, you fill several screens to complete the process for ordering your Exadata Express subscription from the Oracle Store. Perform the following steps:
-
The Sign In dialog opens. Enter your Oracle.com user id and password. Then, click Sign In.

Description of this image -
Enter your company information. You can add a new Cloud Account Administrator, other than you who are placing the subscription order. Then, click Save and Continue.
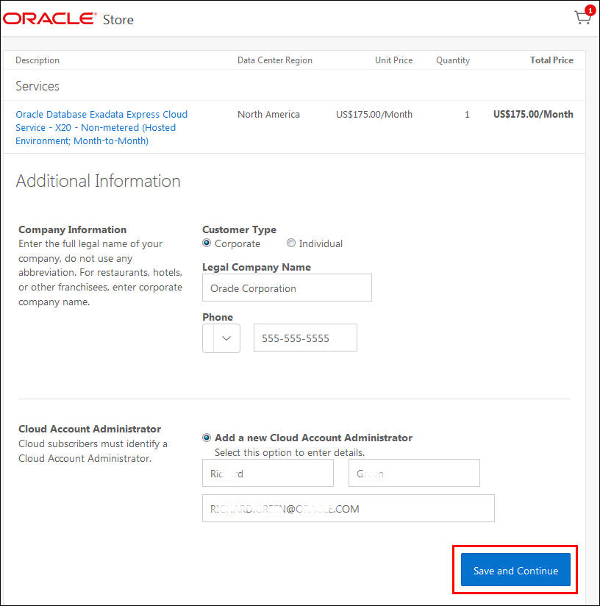
Description of this image -
Provide the name, address, and contact information for your online account profile. Click Save and Continue.
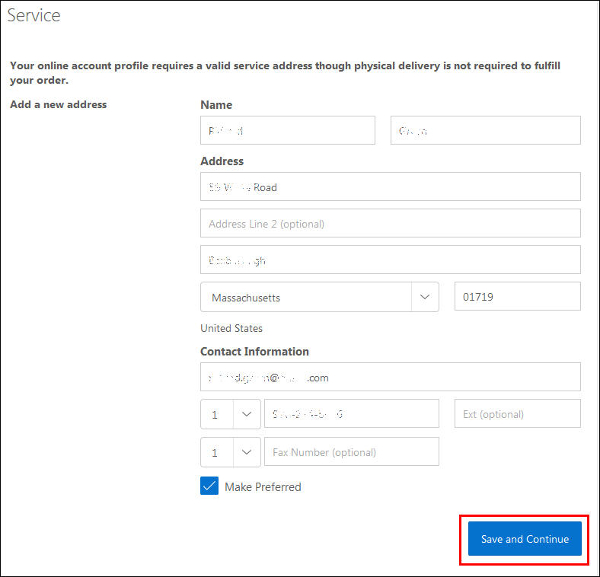
Description of this image -
You will be prompted to verify the address. Edit the information, or click Use Standardized.

Description of this image -
Click Save and Continue. Then, finish the checkout process by completing the pages for payment, tax exemptions, and terms and conditions. An initial email will be sent to the person you specified (you or another person) as the Account Administrator.

Description of this image
Sign In to My Services
In this section, you sign in to My Services for the first time. Perform the following steps:
-
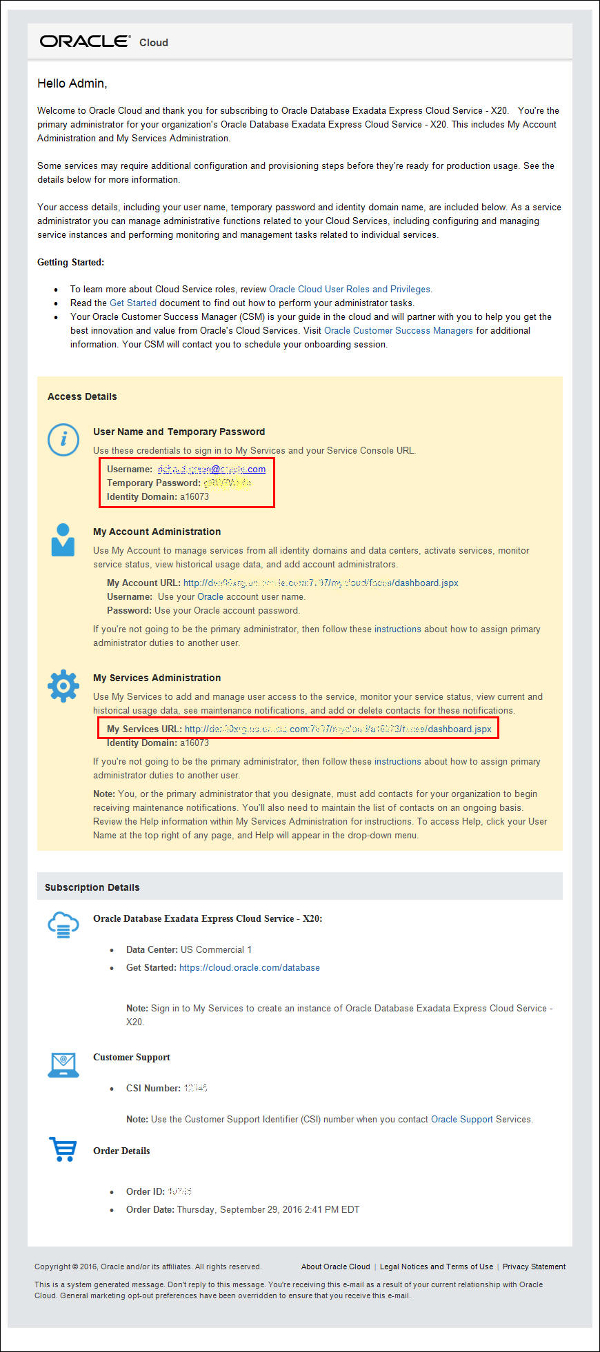
Open the email you receive and read through the access information carefully. In the Getting Started section of the email, you may wish to use the links to learn about assigning user roles and privileges, and performing administrator tasks. Make note of the username, temporary password, and Identity Domain, which you will use shortly.
Description of this image -
Click the email's My Services URL link. Your browser opens to a sign in dialog. Enter your Identity Domain as mentioned in the email for your service and click Go.

Description of this image -
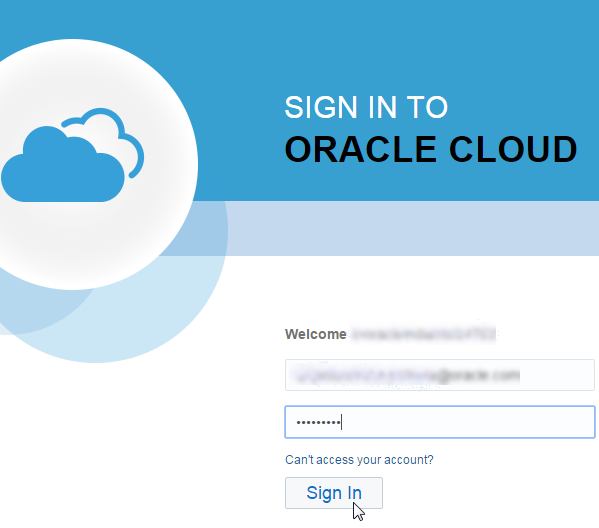
Your browser opens to another sign in dialog. Enter your User Name and Temporary Password as mentioned in the email and click Sign In.
Description of this image -
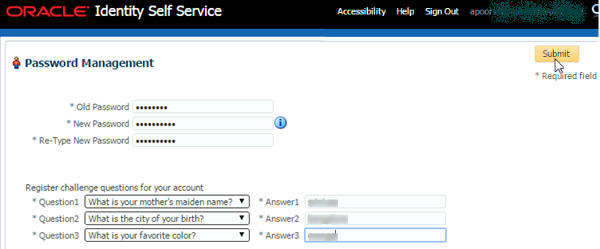
The first time you sign In to the Oracle Cloud, you are prompted to change your temporary password. Enter your temporary password for the Old Password and then enter your New Password based on the Password Policy for the New Password and Re-Type New Password fields. In addition, choose 3 challenge questions and provide answers for each one and click Submit.
Description of this image
Create the Exadata Express Instance
The next task is to create your Exadata Express instance. An Exadata Express instance is a Pluggable Database (PDB). Perform the following steps:
-
Your password and challenge questions were set successfully and you are logged into your service. The Oracle Cloud My Services dashboard opens. From the Create Instance drop-down menu, click Exadata Express.
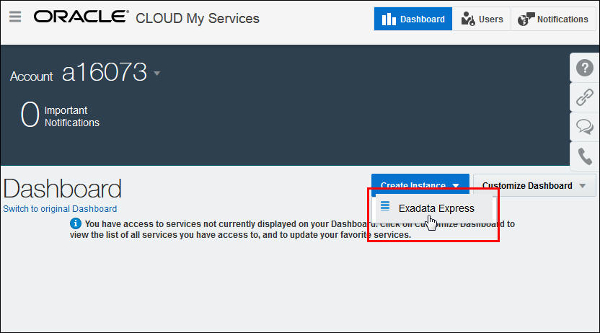
Description of this image -
In the Instance Details page, provide a name for the instance. You can mark the checkbox to use your email address as the user name. Click Next.
Note: Instance name must start with a letter, and can have up to 25 lower case letters and numbers. You cannot use spaces and special characters.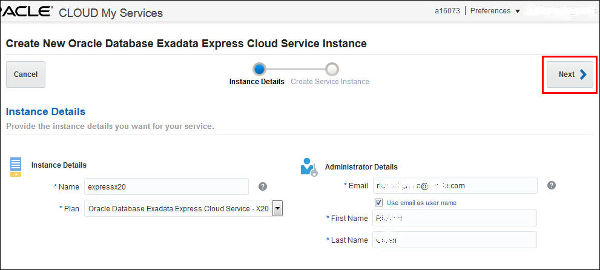
Description of this image -
Review the information in the Confirmation page. Click Create Service Instance.
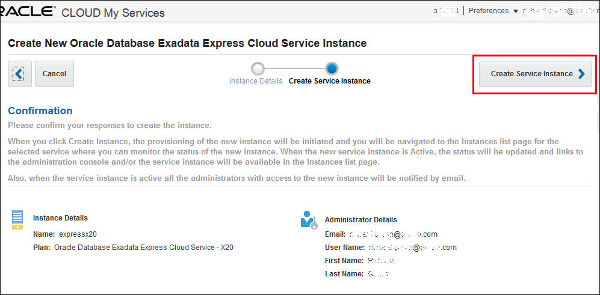
Description of this image -
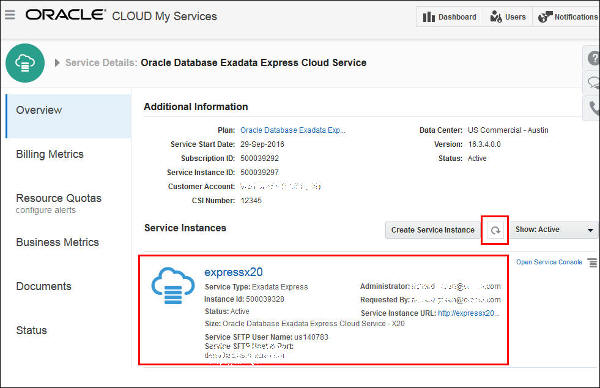
You will be brought to the My Services service details page for your Exadata Express service. Initially, the Service Instances section will indicate "No instances yet". By default, the filter shows only Active service instances. Change the filter to show all service instances. The service instance you just requested will be shown as being initialized.
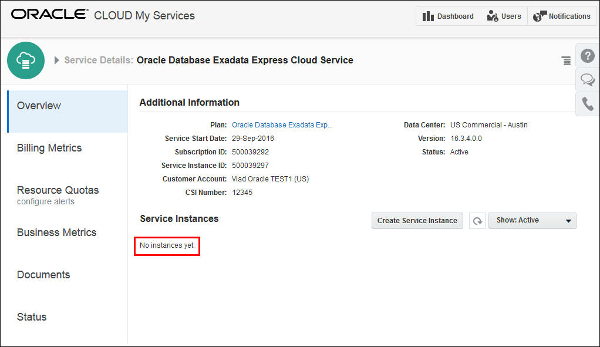
Description of this image -
After a short time, your service will become activated. At that time, you can click the refresh button, and your new instance appears in the list.
Description of this image
Access Your Service
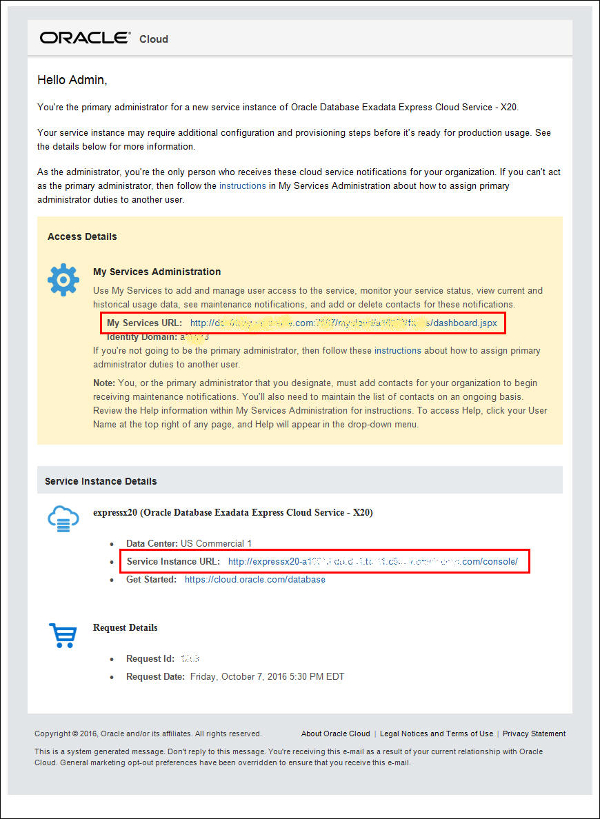
You or your designated primary service administrator will receive another email once the service is activated. That person is now ready to access your Exadata Express Service and set up other users. Perform the below step:
-
The email sent to your primary service administrator contains a My Services URL link to for the administrator to access My Services. The email contains another link to the Service Instance URL, that the service administrator can provide to his or her users to access the Exadata Express Service Console.
Description of this image -
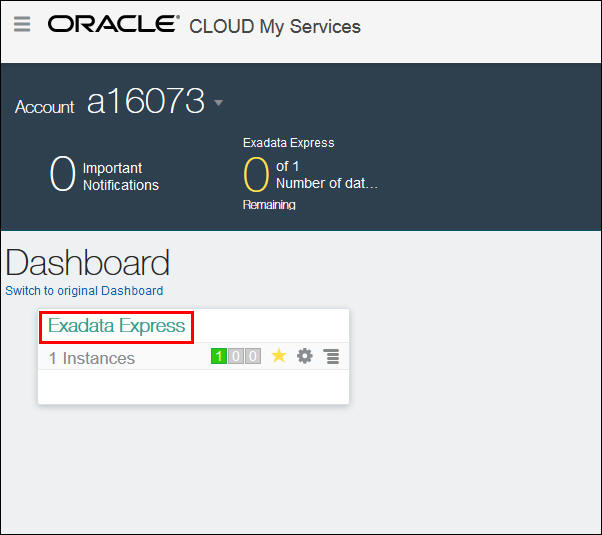
If the service administrator clicks the email's My Services URL link, he or she will be brought to the My Services Dashboard.
Description of this image -
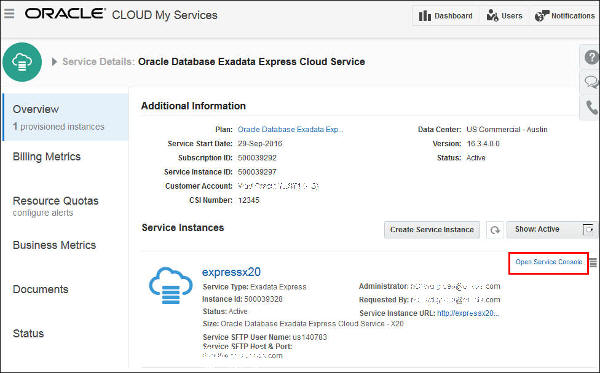
From the My Services dashboard, if the service administrator clicks Exadata Express, they will be brought to the Service Details page, from which they can click Open Service Console to access the Service Console.
Description of this image -
This is the Service Console, from which Application Express, SQL Workshop, and other utilities and features can be accessed.
Note: In the Client Access section of this page, an administrator will click Enable Client Access to enable client SQL*Net access to the Exadata Express database. Click here for more information about the Service Console in the Using Guide.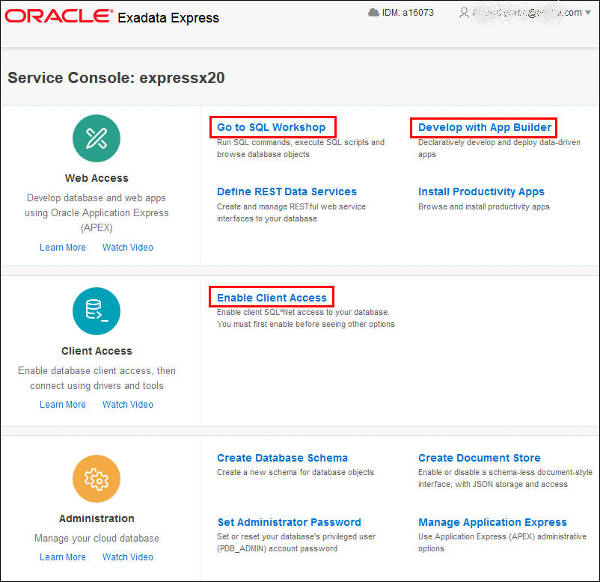
Description of this image -
If the service administrator provides his email's Service Instance URL to his users, that link will bring them directly to the Service Console. If they click Develop with App Builder, they will be brought to the Application Builder of Oracle Application Express.

Description of this image -
In the Service Console, if users click SQL Workshop, they will be brought to the SQL Workshop of Oracle Application Express.

Description of this image
Summary
In this tutorial, you have learned how to:
- Submit your service request for the Exadata Express Cloud Service
- Activate your service
- Change your service password
- Sign In and access your service
- Create and connect to service instances
Want to Learn More?
- Documentation on Oracle
Database Exadata Express Cloud Service
-
Other tutorials on Oracle Database Exadata Express Cloud Service
- Oracle Cloud Home Page
Credits
-
Curriculum Developer: Rick Green
-
Other Contributors: Vladislav Uvarov, Tim St. Hilaire, Anjani Pothula, Drue Swadener