 Create a GoldenGate Cloud Instance on Oracle Cloud Infrastructure Classic
 Before You Begin
This tutorial shows you how to create a GoldenGate Cloud instance on Oracle Cloud Infrastructure (OCI) Classic and it takes approximately 30 minutes to complete. These 30 minutes don't include waiting times for instances to be created. (And there are a lot of screenshots here, otherwise, the tutorial is not that long.)
Background
Oracle GoldenGate Cloud Service (GGCS) is offered as Infrastructure as a Service (IaaS) on Oracle Cloud Infrastructure (OCI) and as Platform as a Service (PaaS) referred to as OCI Classic. OCI Classic has all the features of a cloud service such as availability, elasticity and security, so you can easily add instances and grow your environments whenever you need to. On another level, for extreme performance of highly scalable and available environments, there's OCI. It's built on a whole new infrastructure. Both OCI and OCI classic provide instances with either one or four OCPUs. This tutorial gives an example to setup and start a GGCS instance on OCI Classic.
GGCS instances come in two editions, Standard and Enterprise. Standard is for legacy users and Enterprise is for users creating new instances. For Enterprise edition, there are no prerequisites to create an instance. However, if you want to a GoldenGate Cloud Control installed on your VM, which offers a Cloud Control console, to monitor and manage your GoldenGate replications, then you must create an Oracle Database Cloud deployment first, to save the schemas of the Cloud Control server. You may later use this same database for replication purposes. This tutorial goes through the steps to create an Oracle Cloud Database deployment, before creating the GGCS instance.
What Do You Need?
- The link, username and password to My Services page for your Oracle cloud services. (When you requst for Oracle cloud services, you get an email with this information.)
- A web browser
 Find Your Services and Backup Location
- In your web browser, paste the link you received in email for Oracle cloud's My Services page.
- Enter your user name and password, then click Sign In. (You'll need to reset your password, if it's your first time visiting this page.)
- Click Customize Dashboard.
- Click Show for the following three services:
- IaaS > Storage Classic
- Data Management > Database (If there's an existing database deplyment, then this tile will already be in the Services section.)
- Integration > GoldenGate
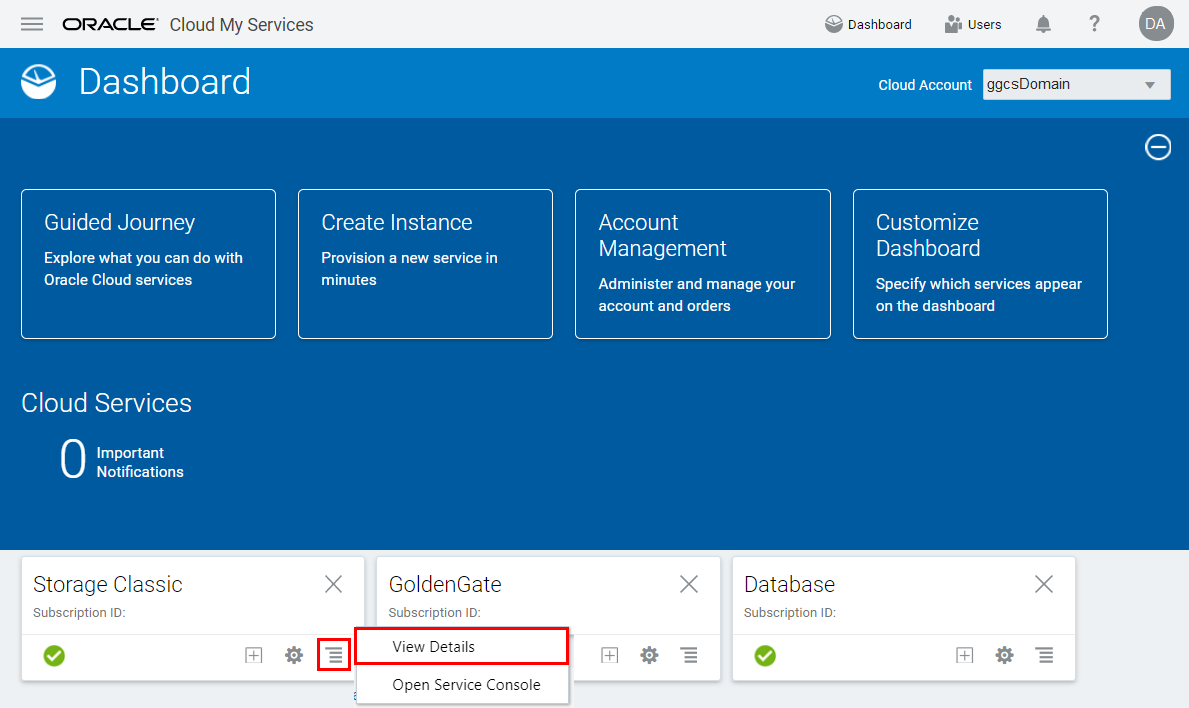
- Confirm that these three services appear as three tiles on your dashboard.

Description of the illustration 001.005.png - Click the action menu of the Storage Classic tile and then click View Details.
Description of the illustration 001.006.png - In the Additional Information section, copy the URL displayed in the REST Endpoint field and paste it into a notepad, ready for the other sections which require the Storage Conatainer information.
Example for REST Endpoint URL:https://ggcsDomain.storage.oraclecloud.com/v1/Storage-ggcsDomain
Description of the illustration 001.007.png - Click Open Service Console.

Description of the illustration 001.008.png - A replication policy defines your primary data center (dc) and whether your data should be replicated to a geographically distant (secondary) data center. If it's your first time, then you'll get a Set a Georeplication Policy before Continuing dialog box. Read the instructions and select a policy from the dropdown menu and click Set Policy. You'll only have to set this policy once and you can't change it later. If your policy is already set, then go to the next section.

Description of the illustration 001.009.png

 Create a Database Deployment
- Locate Database in your list of services, then select Open Service Console from the Action menu.
- If you get a welcome page, click Go to Console.
- In the Instances page, click Create Instance.
- Complete the Instance page as follows and then click Next:
- Service Name:
DBCSDEF - Description:
DEF Replication Database for GoldenGate Cloud Service - Notification Email:
<a valid email address to receive provisioning status>For this tutorial, it's ggcsAdmin@oracle.com - Region: No Preference (If you select a region, then you'll get a deployment on OCI instead of OCI classic, so you can't use it for the GGCS instance in the next section.)
- Service Level: Oracle Database Cloud Service
- Metering Frequency: Monthly
- Software Release: Oracle Database 12c Release 1
- Software Edition: Enterprise Edition
- Database Type: Single Instance
- Service Name:
- On the Details page, complete the Database Configuration fields as follows:
- DB Name:
ORCL - PDB Name:
PDB1 - Administration Password and Confirm Password fields:
Welcome_123# - Usable Data Storage (GB):
25 - Total Data File Storage (GB):
88.5 - Compute Shape: OC3 - 1.0 OCPU, 7.5 GB RAM
- Click Edit for SSH Public Key.
- In the SSH Public Key for VM Access dialog, select Create a New Key, then click Enter.
- Click Download in the Download Keys dialog box.
- Save the sshkeybundle.zip file to your computer.
- Confirm that the SSH Public Key field now contains a public key value.
- Expand Advanced Settings, and then complete the fields as follows:
- Listener Port: 1521
- Select your timezone from the Timezone menu.
- Select Enable Oracle GoldenGate.
- Deselect Include "Demos" PDB to save database space.
- Complete the Backup and Recovery Configuration fields as follows, and then click Next:
- Backup Destination: Both Cloud Storage and Local Storage
- Cloud Storage Container:
Enter the URL of a new or existing container in the format of the REST Endpoint URL you found in step 2-6 and append it with a slash and then the container name. If you want a new container created for you, just append a new name, instead of an existing container name, and then select the checkbox to create a container.
Format:rest_endpoint_url/containerName
Example:https://ggcsDomain.storage.oraclecloud.com/v1/Storage-ggcsDomain/dbcsDEF
- Username: Enter the username for My Services which applies to Storage Classic, Database and GoldenGate. If you don't know it, refer to the What Do You Need section of this tutorial.
- Password: Enter the password for My Services. Use your latest password. If you don't know it, refer to the What Do You Need section of this tutorial.

Description of the illustration 002.007.png - Ensure that you get a message that the container was created.

Description of the illustration 002.008.png - Review the details for your database cloud deployment. If you need to make changes, click Previous or use the navigation train to go back. Otherwise, click Create.
- Click the DBCSDEF instance and refresh the Service Overview page until the status displays Ready.


The entry for Usable Database Storage, populates the Total Data File Storage (GB) field to reflect the amount of storage for your instance, such as space for operating system and product binaries, supporting files, database data and configuration files. After you create the instance, you can add more data storage later.


 Create a GoldenGate Cloud Instance
- Locate GoldenGate in My Services dashboard and, then select Open Service Console from the Actions menu.
- If you get a welcome page, click Go to Console.
- In the Instances page, click Create Instance.
- Complete the Instance fields as follows, and then click Next:
- Service Name:
GGCSDEF - Service Description:
GoldenGate Cloud for DEF instance - Notification Email:
<a valid email address to receive provisioning status>For this tutorial, it's ggcsAdmin@oracle.com - Region: No Preference (if you have this field, then ensure that you select No Preference, otherwise, you'll get an instance on OCI instead of OCI Classic.)
- GoldenGate Components selection: Replication and Cloud Control (With the Cloud Control option, you get a dashboard for monitoring your transactions and setting up alerts for your replications, and because of this option, in the Details page, you'll associate a database deployment to store the schemas of the Cloud Control server.)
- GoldenGate Version: 12.3 (The 12.2 offers the classic architecture and 12.3 offers classic and microservices architecture.)
- Software Edition: Enterprise Edition (Standard is for legacy users and Enterprise is for users creating new instances.)
- Complete the Backup and Recovery Configuration fields as follows:
- Backup Destination: Both Cloud Storage and Local Storage
- Cloud Storage Container:
Enter the URL of a new or existing container in the format of the REST Endpoint URL you found in step 2-6 and append it with a slash and then the container name. If you want a new container created for you, just append a new name, instead of an existing container name, and then select the checkbox to create a container.
Format:rest_endpoint_url/containerName
Example:https://ggcsDomain.storage.oraclecloud.com/v1/Storage-ggcsDomain/ggcsDEF - Username: Enter the username for My Services which applies to Storage Classic, Database and GoldenGate. If you don't know it, refer to the What Do You Need section of this tutorial.
- Password: Enter the password for My Services. Use your latest password. If you don't know it, refer to the What Do You Need section of this tutorial.
- Complete the Replication Node Configuration fields as follows:
- Node Description:
Replicating from the XYZ database to the DEF database. - Click Edit for SSH Public Key.
- Separately, in your computer's file browser, find the zipped folder containing the system generated key for the database deployment, called sshkeybundle.zip and unzip it. (Refer to section 2-5 of this tutorial. You can also create a new key for this section.)
- In the SSH Public Key for VM Access dialog box, select Key File Name and then browse to sshkeybundle folder and select publicKey. Then click Enter.
- Compute Shape: OC5 - 4.0 OCPU, 30 GB RAM
- Complete the Database Service Details for Cloud Control Schemas fields as follows and then click Next: (You only get this section if you select the Cloud Control option in the Service page. Otherwise, you don't need to associate this GoldenGate Cloud service to a database.)
- Database Service: DBCSDEF (You will have the database deployment from section 2 of this tutorial, if your database was created on OCI classic, is currently running and it is in the same domain (same My Services page) as this GoldenGate Cloud service instance.)
- PDB Name:
PDB1 - Username:
SYS - Password:
Welcome_123# - Complete the WebLogic Server Administration Console Access fields as follows: (In this section, you setup a username and password to log in to Cloud Control console and WebLogic Server Administration console. You use Weblogic Server to manage users and roles, and start and stop the GoldenGate Cloud Control services.)
- Username:
weblogic - Password and Confirm Password fields:
Welcome_123# - Review the details for your GoldenGate Cloud instance. If you need to make changes, click Previous or use the navigation train to go back. Otherwise, click Create.
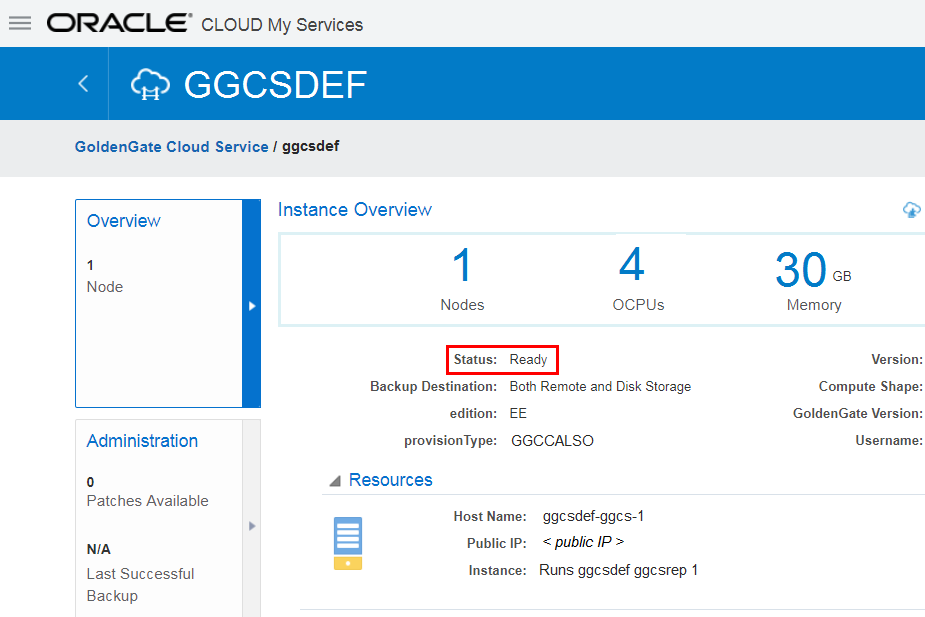
- Click the GGCSDEF instance and refresh the Instance Overview page until the Status displays Ready.
Description of the illustration 003.010png - If you have Cloud Control and would like to view details about the database associated to this instance, then click DBCSDEF in the Associations section.
- Use the Public IP address displayed in the Resources section to connnect to your instance with PuTTy. For more information, follow instructions in the Prepare your Oracle GoldenGate Cloud Service section of the GGCS tutorials.


 Want to Learn More?
- GoldenGate Cloud on Oracle Help Center
- GoldenGate Cloud on Oracle Cloud Website
- Oracle Database Cloud on Oracle Help Center