Before You Begin
Purpose
Create a one-way replication from on-premises to cloud by using Oracle GoldenGate Cloud Service.
Time to Complete
Approximately 45 minutes.
Background
Oracle GoldenGate Cloud Service (GGCS) migrates and replicates on-premises data to the cloud. This tutorial walks you through an example of creating a real-time data replication from on-premises to Oracle Database Cloud Service (DBCS) using Oracle GoldenGate Cloud Service.
What Do You Need?
On-Premises Source:
- On-Premises Oracle GoldenGate 12.2
- Oracle Database 12c installed on the same machine as GoldenGate
- Oracle SQL Developer Version 4.1 or later
- PuTTY on Windows
Cloud Target:
- An Oracle Database Cloud Service 12c instance, referred to as - in this tutorial, DB12C-ABC with a PDB called PDB1
- An Oracle GoldenGate Cloud Service instance; any version will do - in this tutorial, the instance is GGCService-ABC
Note: If you don't have a Database or a GoldenGate Cloud Service instance, then follow the steps in the Get Started with Oracle GoldenGate Cloud Service tutorial to create them and then start this tutorial.
Setup the Target
Setup the Target Database
As a best practice, create two users in the target database's PDB1. One user, oggtrg is the application user who creates data and is not privileged. Then, the other user, oggadmin, is not sys, but is a privileged user and can setup GoldenGate for replication and can see the schema objects of the target.
A tablespace quota defines how much space to provide for a user's tablespace. In Oracle12c, by default, users are not allowed to write in the tablespaces assigned to them. In other words a user has no quota on any tablespace in the database. At a minimum, you assign users a quota for the default tablespace, which is USERS for this tutorial. So after you create the user oggtrg, add unlimited quota on the USERS tablespace for the user oggtrg. For oggadmin, because you grant the dba privilege, you don't need to add unlimited quota to any tablespace. This privilege automatically comes with the dba privilege.
When you login to the target database, use sqlplus to do the following steps: These commands can be run both through the command line or through Oracle SQL developer. This example uses SQL Developer.
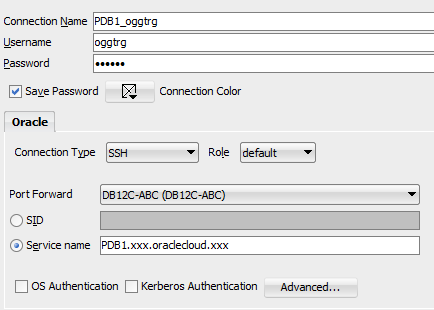
- With Oracle SQL Developer, connect to DB12C-ABC as sysdba with SSH Connection Type. If you need help, refer to Connect to a Database Cloud Service with Oracle SQL Developer and ensure you follow the instructions to add an SSH Host and for the new connection, you enter PDB1's connection string for the Service name.
- Find the default tablespace.
desc dba_users;
3. In the results find how the default tablespace is written:
Default_Tablespace NOT NULL VARCHAR2 (30)
4. So now that you know the default tablespace is called, default_tablespace, enter the following:
Select username, default_tablespace from dba_users;
5. Find the user, SCOTT in the dba_users column, and then its value for default_tablespace which is USERS; Create the user oggtrg and use the same tablespace.
create user oggtrg identified by oracle default tablespace USERS temporary TABLESPACE temp;
grant connect, resource to oggtrg;
alter user OGGTRG quota unlimited on USERS;
create user oggadmin identified by oracle default tablespace USERS temporary TABLESPACE temp;
grant dba to oggadmin;
exec dbms_goldengate_auth.grant_admin_privilege('oggadmin','apply');
6. Confirm that you get the following output:User OGGTRG created. Grant succeeded. User OGGTRG altered. User OGGADMIN created. Grant succeeded. PL/SQL procedure successfully completed.Create a new connection in SQL developer for the user oggtrg; connect with password oracle to PDB1. Save the connection as PDB1_oggtrg.
Run the following sql script. It's OK to get error messages for dropping tables that don't exist, because it's the first time this user is creating these tables.
DROP TABLE ACCTN;
CREATE TABLE ACCTN
(
   ACCOUNT_NO                     NUMBER       (10,0)     NOT NULL
,  BALANCE                        NUMBER       (8,2)      NULL
,  PREVIOUS_BAL                   NUMBER       (8,2)      NULL
,  LAST_CREDIT_AMT                NUMBER       (8,2)      NULL
,  LAST_DEBIT_AMT                 NUMBER       (8,2)      NULL
,  LAST_CREDIT_TS                 TIMESTAMP               NULL
,  LAST_DEBIT_TS                  TIMESTAMP               NULL
,  ACCOUNT_BRANCH                 NUMBER       (10,0)     NULL
,  CONSTRAINT PK_ACCTN
   PRIMARY KEY
   (
     ACCOUNT_NO
   )
    USING INDEX
);

DROP TABLE ACCTS;
CREATE TABLE ACCTS
 (
   ACCOUNT_NO                     NUMBER       (10,0)     NOT NULL
,  FIRST_NAME                     VARCHAR2     (25)       NULL
,  LAST_NAME                      VARCHAR2     (25)       NULL
,  ADDRESS_1                      VARCHAR2     (25)       NULL
,  ADDRESS_2                      VARCHAR2     (25)       NULL
,  CITY                           VARCHAR2     (20)       NULL
,  STATE                          VARCHAR2     (2)        NULL
,  ZIP_CODE                       NUMBER       (10,0)     NULL
,  CUSTOMER_SINCE                 DATE                    NULL
,  COMMENTS                       VARCHAR2     (30)       NULL
,  CONSTRAINT PK_ACCTS
   PRIMARY KEY
   (
    ACCOUNT_NO
   )
   USING INDEX
);                         DROP TABLE BRANCH;
CREATE TABLE BRANCH
(
   BRANCH_NO                      NUMBER       (10,0)     NOT NULL
,  OPENING_BALANCE                NUMBER       (8,2)      NULL
,  CURRENT_BALANCE                NUMBER       (8,2)      NULL
,  CREDITS                        NUMBER       (8,2)      NULL
,  DEBITS                         NUMBER       (8,2)      NULL
,  TOTAL_ACCTS                    NUMBER       (10,0)     NULL
,  ADDRESS_1                      VARCHAR2     (25)       NULL
,  ADDRESS_2                      VARCHAR2     (25)       NULL
,  CITY                           VARCHAR2     (20)       NULL
,  STATE                          VARCHAR2     (2)        NULL
,  ZIP_CODE                       NUMBER       (10,0)     NULL
,  CONSTRAINT PK_BRANCH
   PRIMARY KEY
   (
    BRANCH_NO
   )
    USING INDEX
);                         DROP TABLE HISTORY;
CREATE TABLE HISTORY
(
   SEQUENCE_NO                    NUMBER       (10,0)     NOT NULL
,  ACCOUNT_NO                     NUMBER       (10,0)     NOT NULL
,  TELLER_NO                      NUMBER       (10,0)     NULL
,  BRANCH_NO                      NUMBER       (10,0)     NULL
,  BALANCE                        NUMBER       (8,2)      NULL
,  DELTA                          NUMBER       (8,2)      NULL
,  TRANS_DATE                    timestamp                NULL
,  CONSTRAINT PK_HISTORY
   PRIMARY KEY
   (
    SEQUENCE_NO
   )
   USING INDEX
);                   DROP TABLE TELLER;
CREATE TABLE TELLER
(
   TELLER_NO                      NUMBER       (10,0)     NOT NULL
,  BRANCH_NO                      NUMBER       (10,0)     NOT NULL
,  OPENING_BALANCE                NUMBER       (8,2)      NULL
,  CURRENT_BALANCE                NUMBER       (8,2)      NULL
,  CREDITS                        NUMBER       (8,2)      NULL
,  DEBITS                         NUMBER       (8,2)      NULL
,  CONSTRAINT PK_TELLER
   PRIMARY KEY
   (
    TELLER_NO
   )
    USING INDEX
);        DROP TABLE SUSPECT;
CREATE TABLE SUSPECT
(
   SEQUENCE_NO                    NUMBER       (10,0)     NOT NULL
,  ACCOUNT_NO                     NUMBER       (10,0)     NOT NULL
,  TELLER_NO                      NUMBER       (10,0)     NULL
,  BRANCH_NO                      NUMBER       (10,0)     NULL
,  AMOUNT                         NUMBER       (8,2)      NOT NULL
,  TRANS_DATE                     timestamp                    NOT NULL
,  CONSTRAINT PK_SUSPECT
   PRIMARY KEY
   (
    SEQUENCE_NO
   )
   USING INDEX
);
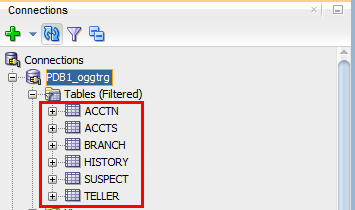
7. In SQL Developer, expand the Tables node for the PDBI_try and confirm that six tables are created.
- ACCTN
- ACCTS
- BRANCH
- HISTORY
- SUSPECT
- TELLER
Start GGSCI
- In Oracle Cloud's My Services Dashboard, click the GGCS menu and then click Open Service Console.
- Click the name of the GoldenGate Cloud Service instance to be used for the replication service to go to the instance detail page. In this tutorial, it's GGService-ABC.
- Expand More Information and in the GGCSRep section, confirm that the PDB Name and Database Service values are your target database information. For example, PDB Name: PDB1 and Database Service: DB12C-ABC.
- Copy the IP address from the Nodes section's Public IP field and save it for your PuTTY connection.
- Open PuTTY and create a connection with the user opc to your VM. Don't forget to provide the private key in a ppk format. If you need help, refer to Connect a Cloud VM on Windows with PuTTY tutorial.
- Because you are connected to the VM with the user opc, use sudo to run your commands as the user oracle.
- Go to $GGHOME and run the GGSCI command.
-
Write down the version of GoldenGate from the information provided when GGSCI starts. In this tutorial it's 12.1.2.1.10
$ sudo su oracle
$ cd $GGHOME
$ ./ggsci
Oracle GoldenGate Command Interpreter for Oracle
Version 12.1.2.1.10 21604177 21427144_FBO
Linux, x64, 64bit (optimized), Oracle 12c on Nov 17 2015 12:08:59
Operating system character set identified as UTF-8.
Setup Manager
- Use the sh command when you're in GGSCI to do your regular Linux commands. Find out what templates come with the GoldenGate Cloud Service VMs. These templates are in the dirprm directory.
-
Remove the information in your mgr file; copy the following lines in there and then save it. Remember to replace the IP address below with your own GGCS VM's IP address.
-
Stop and start mgr and confirm that it's started
GGSCI > sh ls dirprm
extract_classic.prm extract_intregrated.prm extract_obey.oby jagent.prm mgr.prm pump_extract.prm REPCO.prm REPIN.prm replicat_obey.oby
Note: Use these files to guide you on your setups. You'll have Integrated Extract in this tutorial.
Save a copy of the mgr.prm template for your reference.
Open the mgr parameter file to edit it.
GGSCI> edit param mgr
-- Manager port number
PORT 7744
Dynamicportlist 7740-7760
ACCESSRULE, PROG COLLECTOR, IPADDR <the IP address of your GGCS> VM, ALLOW
PURGEOLDEXTRACTS ./dirdat/* USECHECKPOINTS, MINKEEPHOURS 2
AUTORESTART REPLICAT *, RETRIES 3, WAITMINUTES 2, RESETMINUTES 120
GGSCI > stop mgr
Manager process is required by other GGS processes.
Are you sure you want to stop it (y/n)?y

Sending STOP request to MANAGER ...
Request processed.
Manager stopped

GGSCI > start mgr
Manager started.

GGSCI > info mgr
Manager is running
Create a Useridalias
- Create a wallet and set up a useridalias for the oggadmin user that you created with Oracle SQL Developer in the previous section.
Note: Ensure that you use oggadmin@target in the following commands. GoldenGate Cloud Service has setup tnsnames to use the word target. - To learn more about the GGCS generated target in tnsnames open tnsnames.ora
- (Optional step) To validate the database connection from GGCS, perform the following commands.
-
Troubleshooting: If you can't connect with the user oggadmin when you're in GGSCI, you may have forgotten to run the dbms_goldengate_auth.grant_admin_privilege command for this user. Use the example below:
GGSCI > create wallet
Created wallet at location 'dirwlt'.
Opened wallet at location 'dirwlt'.

GGSCI > add credentialstore
Credential store created in ./dircrd/.

GGSCI > alter credentialstore add user oggadmin@target password oracle alias oggadmin
Credential store in ./dircrd/ altered.

GGSCI > dblogin useridalias oggadmin
Successfully logged into database PDB1.
GGSCI > sh more /u01/app/oracle/oci/network/admin/tnsnames.ora

#GGCS generated file
target =
    (DESCRIPTION =
        (ADDRESS_LIST =
             (ADDRESS = (PROTOCOL = TCP)(HOST = DB12C-ABC)(PORT = 1521))
    )
        (CONNECT_DATA =
        (SERVICE_NAME = PDB1.xxx.oraclecloud.xxx)
              )
    )
GGSCI > exit
$ pwd
/u01/app/oracle/gghome

$ sqlplus oggadmin/oracle@target
SQL*Plus: Release 12.1.0.2.0 Production on Wed Sep 21 15:31:57 2016
Copyright (c) 1982, 2014, Oracle.  All rights reserved.
Last Successful login time: Wed Sep 21 2016 15:31:35 -04:00
Connected to: Oracle Database 12c Enterprise Edition Release 12.1.0.2.0 - 64bit Production

SQL > select table_name from dba_tables where owner='OGGTRG';

TABLE_NAME
--------------------------------------------------------------------------------
ACCTN
ACCTS
BRANCH
HISTORY
TELLER
SUSPECT

6 rows selected.

SQL> exit
Disconnected from Oracle Database 12c Enterprise Edition Release 12.1.0.2.0 - 64bit Production>
$ ./ggsci
GGSCI > dblogin userid oggadmin@target password oracle
ERROR: Unable to connect to database using user oggadmin@target. Please check privileges.
ORA-00942: table or view does not exist.
Answer: Login as SYS either in SQL Developer with the PDBI_SYS connection you made or connect with PuTTY to the Oracle Database Cloud Service VM and run the following command:
exec dbms_goldengate_auth.grant_admin_privilege('oggadmin','apply');Setup a Replicat Parameter File
- Save a copy of the REPIN template and then update.
GGSCI> edit param REPIN
Replace the existing file with the following lines.Before you change this file, you can either keep a copy of this template for your future use, comment out the lines you are not using with a double dash in the beginning of the lines that you're not using.
REPLICAT REPIN
useridalias oggadmin
DISCARDFILE ./dirrpt/REPIN.dsc, APPEND Megabytes 50
REPORTCOUNT EVERY 2 HOURS, RATE
ASSUMETARGETDEFS
-- MAP <source schema name>.<table name>, TARGET <target schema name>.<tablename>;
MAP oggsrc.*, TARGET oggtrg.*;
Note: You'll create another user called oggsrc, when you get to setting up the source in this tutorial. This user will have the same privileges as oggtrg and will load the same tables into the source database. That's why the last line of the REPIN parameter maps all the tables that oggsrc has created to the ones that oggtrg has created.
-
Save the REPIN file.
Check if the mgr is running. if not start mgr.
-
In an Integrated Replicat, GoldenGate has to talk to the Oracle Database and create some structures in the Oracle database; otherwise, it's not Integrated. So from GGSCI, login to the database to add the Replicat.
GGSCI> dblogin useridalias oggadmin Successfully logged into database PDB1. GGSCI (oggadmin@ORCL/PDB1) > add replicat repin integrated exttrail ./dirdat/pn REPLICAT (Integrated) added.
Note: Later, when we define the data pump in the source, we should remember that this data pump will send the data to the trail file on the target, here in ./dirdat/pn
-
Start the replicat
-
Confirm that the Replicat started and then exit GGSCI.
GGSCI> info all
Program Status  Group  Lag at Chkpt  Time Since Chkpt
MANAGER     RUNNING
GGSCI (oggadmin@ORCL/PDB1) > start replicat repin
Sending START request to MANAGER ...
REPLICAT REPIN starting
GGSCI (oggadmin@ORCL/PDB1) > info repin
REPLICAT   REPIN     Last Started 2016-09-08 22:25   Status RUNNING
INTEGRATED
Checkpoint Lag
00:00:00 (updated 00:01:42 ago)
Process ID
63967
Log Read Checkpoint
File ./dirdat/pn000000000
First Record  RBA 0
GGSCI (oggadmin@ORCL/PDB1)> exit
Setup the Source
Setup the Source Database
As you did for the target database, create two users for the source. One user, oggsrc, the application user who creates data and is not privileged. And the other user, oggadmin, the privileged user who can setup GoldenGate for replication and see the schema objects of the source.
The source database is on-premises, so you don't need to connect with SSH. On your Linux machine, login as sysdba to sqlplus .
sqlplus / as sysdba
Create users, oggsrc and oggadmin and then exit sqlplus.
SQL > create user oggsrc identified by oracle default tablespace USERS temporary TABLESPACE temp;
User created.
SQL > grant connect, resource to oggsrc;
Grant succeeded.
SQL > alter user oggsrc quota unlimited on USERS;
User altered.
SQL> create user oggadmin identified by oracle default tablespace USERS temporary TABLESPACE temp;
User created.
SQL > grant dba to oggadmin;
Grant succeeded.
SQL > exec dbms_goldengate_auth.grant_admin_privilege('oggadmin','apply');
PL/SQL procedure successfully completed.
SQL > exit
Find out the name of the source database from tnsnames.ora. For example, in this tutorial, it's located in $TNSADMIN which is /scratch/rdbms/product/12.1.0/dbhome/network/admin/$ cat $TNSADMIN/tnsnames.ora
# tnsnames.ora Network Configuration File: /scratch/rdbms/product/12.1.0/dbhome_1/network/admin/tnsnames.ora
# Generated by Oracle configuration tools.
LISTENER_ORCL =
(ADDRESS = (PROTOCOL = TCP)(HOST = localhost)(PORT = 1521))
ORCL =
(DESCRIPTION =
(ADDRESS = (PROTOCOL = TCP)(HOST = localhost)(PORT = 1521))
(CONNECT_DATA =
(SERVER = DEDICATED)
(SERVICE_NAME = orcl.us.oracle.com)
)
)
Validate that oggadmin can connect to the source database name you found in tnsnames.ora. In this tutorial it's ORCL.
$ sqlplus oggadmin/oracle@orcl
SQL*Plus: Release 12.1.0.2.0 Production on Wed Sep 21 15:31:57 2016
Copyright (c) 1982, 2014, Oracle.  All rights reserved.
Last Successful login time: Wed Sep 21 2016 15:31:35 -04:00
Connected to: Oracle Database 12c Enterprise Edition Release 12.1.0.2.0 - 64bit Production
SQL> exit
Disconnected from Oracle Database 12c Enterprise Edition Release 12.1.0.2.0 - 64 bit Production
Find the IP address for the source database from ifconfig's inet addr value.
$ /sbin/ifconfig
...inet addr:xx.xxx.xx.xx...
Create a new connection called Source_oggsrc in SQL Developer with a basic connection, for the user oggsrc, password oracle, port 1521, and service name from the tnsnames.ora file. (The service name is described tnsnames.ora, in what is defined for SERVICE_NAME) And for the hostname, enter the IP address you found from the /sbin/ifconfig and use it for the Hostname.
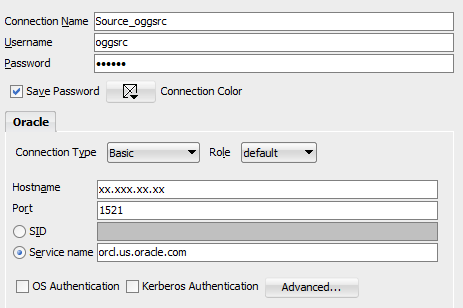
Test the connection; when successful, save it and then click Connect.
In a SQL worksheet for Source_oggsrc connection, run the following sql script to create the same tables as target, here in the source.
DROP TABLE ACCTN;
CREATE TABLE ACCTN
(
   ACCOUNT_NO                     NUMBER       (10,0)     NOT NULL
,  BALANCE                        NUMBER       (8,2)      NULL
,  PREVIOUS_BAL                   NUMBER       (8,2)      NULL
,  LAST_CREDIT_AMT                NUMBER       (8,2)      NULL
,  LAST_DEBIT_AMT                 NUMBER       (8,2)      NULL
,  LAST_CREDIT_TS                 TIMESTAMP               NULL
,  LAST_DEBIT_TS                  TIMESTAMP               NULL
,  ACCOUNT_BRANCH                 NUMBER       (10,0)     NULL
,  CONSTRAINT PK_ACCTN
   PRIMARY KEY
   (
     ACCOUNT_NO
   )
    USING INDEX
);
DROP TABLE ACCTS;
CREATE TABLE ACCTS
(
   ACCOUNT_NO                     NUMBER       (10,0)     NOT NULL
,  FIRST_NAME                     VARCHAR2     (25)       NULL
,  LAST_NAME                      VARCHAR2     (25)       NULL
,  ADDRESS_1                      VARCHAR2     (25)       NULL
,  ADDRESS_2                      VARCHAR2     (25)       NULL
,  CITY                           VARCHAR2     (20)       NULL
,  STATE                          VARCHAR2     (2)        NULL
,  ZIP_CODE                       NUMBER       (10,0)     NULL
,  CUSTOMER_SINCE                 DATE                    NULL
,  COMMENTS                       VARCHAR2     (30)       NULL
,  CONSTRAINT PK_ACCTS
PRIMARY KEY
   (
   ACCOUNT_NO
   )
   USING INDEX
);
DROP TABLE BRANCH;
CREATE TABLE BRANCH
(
   BRANCH_NO                      NUMBER       (10,0)     NOT NULL
,  OPENING_BALANCE                NUMBER       (8,2)      NULL
,  CURRENT_BALANCE                NUMBER       (8,2)      NULL
,  CREDITS                        NUMBER       (8,2)      NULL
,  DEBITS                         NUMBER       (8,2)      NULL
,  TOTAL_ACCTS                    NUMBER       (10,0)     NULL
,  ADDRESS_1                      VARCHAR2     (25)       NULL
,  ADDRESS_2                      VARCHAR2     (25)       NULL
,  CITY                           VARCHAR2     (20)       NULL
,  STATE                          VARCHAR2     (2)        NULL
,  ZIP_CODE                       NUMBER       (10,0)     NULL
,  CONSTRAINT PK_BRANCH
PRIMARY KEY
   (
   BRANCH_NO
   )
   USING INDEX
);
DROP TABLE HISTORY;
CREATE TABLE HISTORY
(
   SEQUENCE_NO                    NUMBER       (10,0)     NOT NULL
,  ACCOUNT_NO                     NUMBER       (10,0)     NOT NULL
,  TELLER_NO                      NUMBER       (10,0)     NULL
,  BRANCH_NO                      NUMBER       (10,0)     NULL
,  BALANCE                        NUMBER       (8,2)      NULL
,  DELTA                          NUMBER       (8,2)      NULL
,  TRANS_DATE                    timestamp                NULL
,  CONSTRAINT PK_HISTORY
PRIMARY KEY
   (
   SEQUENCE_NO
   )
   USING INDEX
);
DROP TABLE TELLER;
CREATE TABLE TELLER
(
   TELLER_NO                      NUMBER       (10,0)     NOT NULL
,  BRANCH_NO                      NUMBER       (10,0)     NOT NULL
,  OPENING_BALANCE                NUMBER       (8,2)      NULL
,  CURRENT_BALANCE                NUMBER       (8,2)      NULL
,  CREDITS                        NUMBER       (8,2)      NULL
,  DEBITS                         NUMBER       (8,2)      NULL
,  CONSTRAINT PK_TELLER
PRIMARY KEY
   (
   TELLER_NO
   )
   USING INDEX
);
DROP TABLE SUSPECT;
CREATE TABLE SUSPECT
(
   SEQUENCE_NO                    NUMBER       (10,0)     NOT NULL
,  ACCOUNT_NO                     NUMBER       (10,0)     NOT NULL
,  TELLER_NO                      NUMBER       (10,0)     NULL
,  BRANCH_NO                      NUMBER       (10,0)     NULL
,  AMOUNT                         NUMBER       (8,2)      NOT NULL
,  TRANS_DATE                     timestamp               NOT NULL
,  CONSTRAINT PK_SUSPECT
PRIMARY KEY
   (
   SEQUENCE_NO
   )
   USING INDEX
);
In SQL Developer, expand the Tables node for Source_oggsrc and confirm that six tables are created.
- ACCTN
- ACCTS
- BRANCH
- HISTORY
- SUSPECT
- TELLER
Setup Manager
$ cd $GGHOME
$ pwd
/scratch/ogg
$ ./ggsci
Oracle GoldenGate Command Interpreter for Oracle
Version 12.2.0.1.2 OGGCORE_12.2.0.1.0_PLATFORMS_160310.1305_FBO
Linux, x64, 64bit (optimized), Oracle 12c on Mar 11 2016 02:33:13
Operating system character set identified as UTF-8.
Copyright (C) 1995, 2016, Oracle and/or its affiliates. All rights reserved.
Write down the version of GoldenGate from the output from the ggsci command. In this tutorial, it's 12.2.0.1.2. Because it doesn't match the target GoldenGate installation, you need to add some formatting commands to your parameter files.
Now check to see if manager is running, and stop all ER groups if any.
GGCSI > info mgr
GGSCI > info all
GGSCI > stop er *
Open the manager file to edit it.
GGSCI > edit param mgr
Replace the following lines in the manager parameter file then save it.
PORT 7809
DynamicPortList 20000-20099
PurgeOldExtracts ./dirdat/*, UseCheckPoints, MinKeepHours 2
Autostart Extract E*
AUTORESTART Extract *, WaitMinutes 1, Retries 3
Restart the manager and confirm that it's running.
GGSCI > stop mgr
Manager process is required by other GGS processes.
Are you sure you want to stop it (y/n)?ySending STOP request to MANAGER ...
Request processed.
Manager stopped.GGSCI > start mgr
Manager started.GGSCI > info mgr
Manager is running
Create a Useridalias
- Validate that oggadmin can connect to the source database name you found in tnsnames.ora. In this tutorial it's orcl; and verify that oggsrc has six tables.
GGSCI > exit $ sqlplus oggadmin/oracle@orcl SQL*Plus: Release 12.1.0.2.0 Production on Wed Sep 21 15:31:57 2016 Copyright (c) 1982, 2014, Oracle. All rights reserved. Last Successful login time: Wed Sep 21 2016 15:31:35 -04:00 Connected to: Oracle Database 12c Enterprise Edition Release 12.1.0.2.0 - 64bit Production SQL> select table_name from dba_tables where owner='OGGSRC'; TABLE_NAME -------------------------------------------------------------------------------- ACCTN ACCTS BRANCH HISTORY TELLER SUSPECT 6 rows selected. SQL> exit Disconnected from Oracle Database 12c Enterprise Edition Release 12.1.0.2.0 - 64 bit Production $ cd $GGHOME $ ./ggsci - Create a wallet and setup a useridalias for the oggadmin user and ensure that you have the oggadmin@orcl in the following commands.
GGSCI> create wallet
Created wallet at location 'dirwlt'.
Opened wallet at location 'dirwlt'.GGSCI> add credentialstore
Credential store created in ./dircrd/.GGSCI> alter credentialstore add user oggadmin@orcl password oracle alias oggadmin
Credential store in ./dircrd/ altered.GGSCI> dblogin useridalias oggadmin
Successfully logged into database.
Troubleshooting: If you can't connect with the user oggadmin when you're in GGSCI, you may have forgotten to run the dbms_goldengate_auth.grant_admin_privilege command for this user. For example:
GGSCI > dblogin userid oggadmin@target password oracle
ERROR: Unable to connect to database using user oggadmin@orcl. Please check privileges.
ORA-00942: table or view does not exist.
Answer: Login as SYS in the database and run the following command:
exec dbms_goldengate_auth.grant_admin_privilege('oggadmin','apply');
Add Trandata
ADD TRANDATA enables GoldenGate to get information from the database transaction records. From GGSCI, login to the database first and then apply this command to all the columns of all the tables in the oggsrc schema.
GGSCI> dblogin useridalias oggadmin
Successfully logged into database.
GGSCI (oggadmin@orcl) > add trandata oggsrc.* allcols
Logging of supplemental redo enabled for table OGGSRC.ACCTN.
TRANDATA for scheduling columns has been added on table 'OGGSRC.ACCTN'. TRANDATA for all columns has been added on table 'OGGSRC.ACCTN'
TRANDATA for instantiation CSN has been added on table 'OGGSRC.ACCTN'.
...
TRANDATA for instantiation CSN has been added on table 'OGGSRC.TELLER'.
Setup the Primary Extract
Before you add the primary extract delete the running extract and replicat processes, if any, so you can work on a clean slate. Of course, ask others if it's OK to delete them, if they don't belong to you.
For example, there's a running extract called OldExtract and a replicat called OldReplicat on the source GoldenGate.
GGSCI > dblogin useridalias oggadmin
Successfully logged into database.
GGSCI (oggadmin@orcl) > info all
MANAGER   RUNNING
EXTRACT   RUNNING   OLDEXTRACT      00:00:10    00:00:05
REPLICAT  RUNNING   OLDREPLICAT     00:00:00    00:25:04
GGSCI (oggadmin@orcl) > stop extract oldextract
GGSCI (oggadmin@orcl) > delete extract oldextract
GGSCI (oggadmin@orcl) > stop replicat oldreplicat
GGSCI (oggadmin@orcl) > delete replicat oldreplicat
GGSCI (oggadmin@orcl)> info all
MANAGER RUNNING
Now create a parameter file called einta (extract integrated a)
GGSCI (oggadmin@orcl) > edit param einta
Copy the following information for this parameter, replace the Oracle_SID with information you get from your tnsnames.ora. Then save and close the einta parameter file.
Extract einta
SETENV (ORACLE_SID='orcl')
UserIdAlias oggadmin
TranlogOptions IntegratedParams (max_sga_size 256)
Exttrail ./dirdat/in FORMAT RELEASE 12.1
LOGALLSUPCOLS
UPDATERECORDFORMAT COMPACT
Table OGGSRC.*;
Note: Only add the FORMAT RELEASE 12.1 to the primary extract, if the source GoldenGate has a higher version than the target GoldenGate. Here, the source version is 12.2 and the target is 12.1, so the format is being changed to the 12.1 release , before the data is sent to the target.
If you have the latest GoldenGate Cloud Service or upgraded your instances, then most likely you have version 12.2 for GoldenGate on the target and you don't need the FORMAT RELEASE command.
Register the primary extract with the database.
GGSCI (oggadmin@orcl) > dblogin useridalias oggadmin
Successfully logged into database.
GGSCI (oggadmin@orcl) > register extract einta database
Extract EINTA successfully registered with database at SCN xxx.
Add the primary extract to the extract group in GoldenGate.
GGSCI (oggadmin@orcl) > add extract einta, integrated tranlog, begin now
EXTRACT (Integrated) added.
Add the exttrail, which is the local file in the dirdat directory.
GGSCI (oggadmin@orcl) > add exttrail ./dirdat/in, extract einta, megabytes 10
EXTTRAIL added.
Confirm that extract einta is in the extract group now.
GGSCI (oggadmin@orcl) > info allDon't start the primary extract just yet.
MANAGER RUNNING
EXTRACT STOPPED EINTA
Setup SOCKS5 Proxy
When the pump on the source sends data to the replicat on the target, you use SOCKS5 Proxy, so no one can tell where the data is coming from.
Open a new terminal, so you can keep the commands running for the SOCKS5 Proxy separately.
On this terminal, confirm that you have a .ssh folder and first copy the private key to connect to the GGCS VM to the on-premises .ssh folder.
Note: If your private key file is in a ppk format such as privateKey.ppk, the ssh command will ask for its passphrase. If you didn't set a passphrase for the privateKey.ppk file, then, you won't be able to use the SOCKS5 Proxy. Instead you can use the privateKey file that the Oracle Cloud Service wizard created with the matching public key and you won't be asked for a passphrase. This tutorial uses privateKey.
$ cd ~
$ ls -la
(confirm that .ssh folder is here)
$ cp  (location of your private key)/privateKey  ~/.ssh
$ cd .ssh
$ ls
privateKey
In the .ssh folder, change the permission of the privateKey file, so it's not accessible by others.
$ chmod 600 privateKey
$ ls -l
-rw------- 1  .......  privateKey
By using SOCKS5 proxy, rather than providing the private key every time you connect to the GoldenGate Cloud Service VM, you're providing a local port which behind the scenes, this local port connects to a remote host which is the GoldenGate Cloud Service VM.
If you don't know the IP address of your GoldenGate Cloud Service VM, then refer to the Find the IP address of your GoldenGate Cloud Service VM tutorial.
Enter the command below in the terminal you've dedicated for the SOCKS5 Proxy. The designated local port on your localhost will be 9000. Replace 11.111.111.111 with the IP address of your GGCS VM.
ssh -i ~/.ssh/privateKey -v -N -D 127.0.0.1:9000 opc@22.222.222.222 >
& ./dirrpt/ggcs_socksproxy.log
This command uses:
-i: Private Key File
-v: Verbose Mode
-N: No execution command on remote system
-D: Dynamic Port Forwarding
You can add -f to run the proxy process in the background, but don't do it for this tutorial, so you can have the messages running in front of you. you can also check the log file ./dirrpt/ggcs_socksproxy.log for both standard output and standard errors.
For more ssh options use the man command
$ man ssh
Confirm that the ssh command is running successfully. For example, in the outputs you'll have:
debug1: Connection established.
debug1: Found key in /scratch/gguser/.ssh/known_hosts:2
debug1: SSH2_MSG_SERVICE_ACCEPT received
...
Troubleshooting: If you get an error message: Cannot assign requested address; that means that the port you assigned, 9000 in this example, is already taken. To confirm that a port is taken, enter the following command to see who's using this port. for port 9000 enter:
$ netstat -na | grep 9000
If the port is taken, then use another port for the SOCKS5 proxy.
Set up the Pump
Create a parameter called pump.
GGSCI (oggadmin@orcl) > edit param pump
The pump will read the trail files locally created by the primary extract in ./dirdat/in and send them to the target in a folder called /dirdat/pn.
Copy the following information for this parameter, replace the Oracle_SID with information you get from your tnsnames.ora. Then save and close the einta parameter file.
Note: Ensure you add the socksproxy 127.0.0.1:9000 section for the RMTHOST line and you have the correct manager port for the target database. Confirm that you used 9000 in your SOCKS5 Proxy. If you used a different port number, change 9000 to the port number the SSH tunnel on source is using.
Note: Only add the FORMAT RELEASE 12.1 to the pump, if the source GoldenGate has a higher version than the target GoldenGate. Here, the source version is 12.2 and the target is 12.1, so the format is being changed to the 12.1 release , before the data is sent to the target.
EXTRACT pump
RMTHOST <The IP address of your GGCS VM>,  MGRPORT 7744, socksproxy 127.0.0.1:9000
discardfile ./dirrpt/pumgdop.dsc, purge
RMTTRAIL ./dirdat/pn FORMAT RELEASE 12.1
REPORTCOUNT EVERY 2 HOURS, RATE
PASSTHRU
Table oggsrc.*;
Note: There is a sample pump_extract.prm file available in your GGCS vm, in the dirdat directory, for your convenience. Use it for future guidance.
Add the data pump to the extract group.
GGSCI (oggadmin@orcl) > add extract pump, exttrailsource ./dirdat/in
EXTRACT added.
GGSCI (oggadmin@orcl) > add rmttrail ./dirdat/pn, extract pump, megabytes 10
RMTTRAIL  added.
GGSCI (oggadmin@orcl) > info all

Program     Status      Group       Lag at Chkpt  Time Since Chkpt
MANAGER     RUNNING
EXTRACT     STOPPED     EINTA       00:00:00      00:00:39
EXTRACT     STOPPED     PUMP        00:00:00      00:00:16
Replicate Data
Start Extract Group
Start the primary extract, einta, and wait until its status is running, before you start the pump.
GGSCI (oggadmin@orcl) > start extract einta
Sending START request to MANAGER ...
EXTRACT EINTA starting
GGSCI (oggadmin@orcl) > info all
Program     Status      Group       Lag at Chkpt  Time Since Chkpt
MANAGER     RUNNING
EXTRACT     STARTING    EINTA       00:00:00      00:07:26
EXTRACT     STOPPED     PUMP        00:00:00      00:07:03
GGSCI (oggadmin@orcl) > info all
Program     Status      Group       Lag at Chkpt  Time Since Chkpt
MANAGER     RUNNING
EXTRACT     RUNNING     EINTA       00:07:31      00:00:02
EXTRACT     STOPPED     PUMP        00:00:00      00:07:10
Start the pump and check to see its status.
Note: Ensure that the SOCKS5 proxy is running. Otherwise, your pump will abend.
GGSCI (oggadmin@orcl) > start extract pump
Sending START request to MANAGER ...
EXTRACT PUMP starting
GGSCI (oggadmin@orcl) > info all
Program     Status      Group       Lag at Chkpt  Time Since Chkpt
MANAGER     RUNNING
EXTRACT     RUNNING     EINTA       00:00:09      00:00:00
EXTRACT     RUNNING     PUMP        00:00:00      01:21:21
Confirm that the SOCKS5 proxy terminal displays a request to connect to the target from port 9000.
debug1: Connection to port 9000 forwarding to socks port 0 requested.
On the target side, ensure that replicat repin is still running.
$ sudo su oracle
$ cd $GGHOME
$ ./ggsci
GGSCI >  info all
Program     Status      Group       Lag at Chkpt  Time Since Chkpt
MANAGER     RUNNING
REPLICAT    RUNNING     REPIN       00:00:00      00:00:09
Insert Data into Source
Connect to SQL Developer with the Source_oggsrc connection.
Run the following script to ensure that all tables are empty.
select count(*) from ACCTN, ACCTS, BRANCH, HISTORY, SUSPECT, TELLER;
The result for count(*) should be zero. If it's not zero, run the following script and then test their count(*) again.
truncate table ACCTN;
truncate table ACCTS;
truncate table BRANCH;
truncate table HISTORY;
truncate table TELLER;
truncate table SUSPECT;
Perform the same two scripts for the PDB1_oggtrg connection.
Enter the following data in the source to test to see if it replicates in the target. Don't enter any data in the target. Run the following script for the Source_oggsrc.
SET DEFINE OFF;
Insert into BRANCH (BRANCH_NO,OPENING_BALANCE,CURRENT_BALANCE,CREDITS,DEBITS,TOTAL_ACCTS,ADDRESS_1,ADDRESS_2,CITY,STATE,ZIP_CODE) values (1,2000,2000,2000,0,2000,'100, Main Road',null,'Baltimore','MD',21215);
Insert into BRANCH (BRANCH_NO,OPENING_BALANCE,CURRENT_BALANCE,CREDITS,DEBITS,TOTAL_ACCTS,ADDRESS_1,ADDRESS_2,CITY,STATE,ZIP_CODE) values (2,1730,1730,1730,0,1730,'12, Governor St',null,'Ellicott City','MD',21042);
Insert into TELLER (TELLER_NO,BRANCH_NO,OPENING_BALANCE,CURRENT_BALANCE,CREDITS,DEBITS) values (1,1,2000,2000,2000,0);
Insert into TELLER (TELLER_NO,BRANCH_NO,OPENING_BALANCE,CURRENT_BALANCE,CREDITS,DEBITS) values (2,2,1730,1730,1730,0);
Insert into ACCTN (ACCOUNT_NO,BALANCE,PREVIOUS_BAL,LAST_CREDIT_AMT,LAST_DEBIT_AMT,LAST_CREDIT_TS,LAST_DEBIT_TS,ACCOUNT_BRANCH) values (1,2000,1456,1789,345,to_timestamp('07-SEP-16 12.23.27.000000000 AM','DD-MON-RR HH.MI.SSXFF AM'),to_timestamp('15-SEP-16 12.23.32.000000000 AM','DD-MON-RR HH.MI.SSXFF AM'),1);
Insert into ACCTN (ACCOUNT_NO,BALANCE,PREVIOUS_BAL,LAST_CREDIT_AMT,LAST_DEBIT_AMT,LAST_CREDIT_TS,LAST_DEBIT_TS,ACCOUNT_BRANCH) values (2,1730,1560,450,200,to_timestamp('16-SEP-16 12.24.15.000000000 AM','DD-MON-RR HH.MI.SSXFF AM'),to_timestamp('04-SEP-16 12.24.22.000000000 AM','DD-MON-RR HH.MI.SSXFF AM'),2);
Insert into ACCTS (ACCOUNT_NO,FIRST_NAME,LAST_NAME,ADDRESS_1,ADDRESS_2,CITY,STATE,ZIP_CODE,CUSTOMER_SINCE,COMMENTS) values (1,'John ','Taylor','6490 Dobbin Road',null,'Columbia','MD',21045,to_date('06-SEP-16','DD-MON-RR'),'Good Customer');
Insert into ACCTS (ACCOUNT_NO,FIRST_NAME,LAST_NAME,ADDRESS_1,ADDRESS_2,CITY,STATE,ZIP_CODE,CUSTOMER_SINCE,COMMENTS) values (2,'Emily','Bryce','6601 Ritchie Highway N.E.',null,'Glen Burnie','MD',21062,to_date('09-AUG-16','DD-MON-RR'),'Recent overdraft');
Insert into HISTORY (SEQUENCE_NO,ACCOUNT_NO,TELLER_NO,BRANCH_NO,BALANCE,DELTA,TRANS_DATE) values (1,1,1,1,2000,560,to_timestamp('13-SEP-16 12.24.59.000000000 AM','DD-MON-RR HH.MI.SSXFF AM'));
Insert into HISTORY (SEQUENCE_NO,ACCOUNT_NO,TELLER_NO,BRANCH_NO,BALANCE,DELTA,TRANS_DATE) values (2,2,2,2,1730,340,to_timestamp('13-SEP-16 12.25.23.000000000 AM','DD-MON-RR HH.MI.SSXFF AM'));
Insert into SUSPECT (SEQUENCE_NO,ACCOUNT_NO,TELLER_NO,BRANCH_NO,AMOUNT,TRANS_DATE) values (1,2,2,2,800,to_timestamp('13-SEP-16 12.26.11.000000000 AM','DD-MON-RR HH.MI.SSXFF AM'));
commit;
Remember, GoldenGate only transmits transactions that are commited. Ensure you commit.
This time, in the Source_oggsrc connection. run the following script again to ensure that the tables have some data in them.
select count(*) from ACCTN, ACCTS, BRANCH, HISTORY, SUSPECT, TELLER;
The result for count(*) should be 32 now.
Run the same command for for the PDB1_oggtrg connection.
The result for count(*) should be 32 as well.
Observe Replication
On the on-premises GGSCI, view stats for the primary extract.
GGSCI > stats extract einta
Sending STATS request to EXTRACT EINTA ...
Start of Statistics at 2016-09-25 17:34:35.
Output to ./dirdat/in:
Extracting from OGGSRC.ACCTN to OGGSRC.ACCTN:
*** Total statistics since 2016-09-25 16:25:29 ***
	Total inserts                                    2.00
...

Extracting from OGGSRC.BRANCH to OGGSRC.BRANCH:
*** Total statistics since 2016-09-25 16:25:29 ***
	Total inserts                                    2.00

Extracting from OGGSRC.SUSPECT to OGGSRC.SUSPECT:
*** Total statistics since 2016-09-25 16:25:29 ***
	Total inserts                                    1.00
...
On the on-premises GGSCI, view stats for the pump.
GGSCI > stats extract pump
Sending STATS request to EXTRACT PUMP ...
Start of Statistics at 2016-09-25 17:44:48.
Output to ./dirdat/pn:
...
On the target, run ggsci and observe the stats for Replicat repin.
GGSCI > stats replicat repin
...
Replicating from OGGSRC.BRANCH to PDB1.OGGTRG.BRANCH:
...