Oracle by Example brandingCreating a New Integration in Oracle Integration

section 0Before You Begin

This 15-minute tutorial shows how to integrate the Oracle Service Cloud (RightNow) and Oracle Sales Cloud connections and map data so that data can flow from Oracle Service Cloud (RightNow) to Oracle Sales Cloud.

In this series, you learn how to create an integration using Oracle Integration. This is the second tutorial in the Creating an End-to-End Integration series. Read the tutorials sequentially.

Scenario

In this series of  tutorials, you will create an integration flow that synchronizes customer information between Oracle Service Cloud (RightNow) and Oracle Sales Cloud in real time - that is, whenever an Organization is created in Oracle Service Cloud (RightNow), an AccountService is created in Oracle Sales Cloud in real time.

The following figure illustrates the scenario.

Process for Oracle Service Cloud integration
Description of the illustration whatisics.png

Background

Now that you've created connections, you need to integrate the connections so that data can flow from one (the trigger) to the other (the invoke). In this tutorial the Oracle Service Cloud (RightNow) application is the trigger and the Oracle Sales Cloud application is the invoke.

Watch "Create Integrations in Integration" to see it before you do it.

What Do You Need?

Completion of the tutorial Creating Connections in Oracle Integration.


section 1Create the Integration

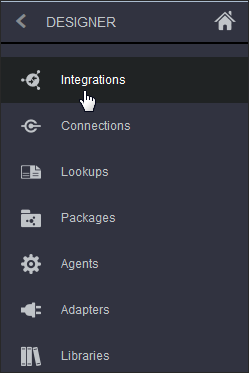
  1. In the Designer pane on the left of the Integration page, select Integrations.
    designer_integrations
    Description of the illustration designer_integrations.png
  2. On the Integrations page, click Create.
    create
    Description of the illustration create.png
  3. In the Create Integration - Select a Style/Pattern dialog, select App Driven Orchestration.
    style-pattern-select
    Description of the illustration style-pattern-select.png
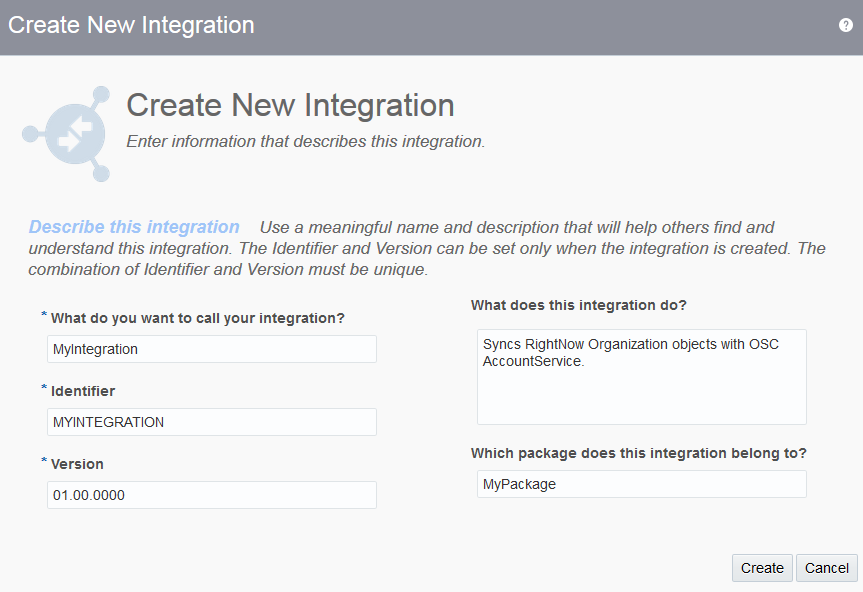
  4. Enter the following integration information in the Create New Integration dialog:
    Field Enter
    What do you want to call your integration? MyIntegration
    Identifier MYINTEGRATION
    (Note: The default value is entered for you automatically.)
    Version Nothing to enter.
    Use the default value of 01.00.0000.
    What does this integration do? Syncs Service Cloud (RightNow) Organization objects with OSC AccountService.
    Which package does this integration belong to? MyPackage
    (Note: Packages enable you to group integrations into a single structure that makes them easy to import and export.)
    new_integration
    Description of the illustration new_integration.png
  5. Click Create.

section 2Configure the Oracle Service Cloud (RightNow) Connection (Trigger)

  1. On the integration canvas page, click Triggers to expand the panel.
    rightnow-trigger
    Description of the illustration rightnow-trigger.png
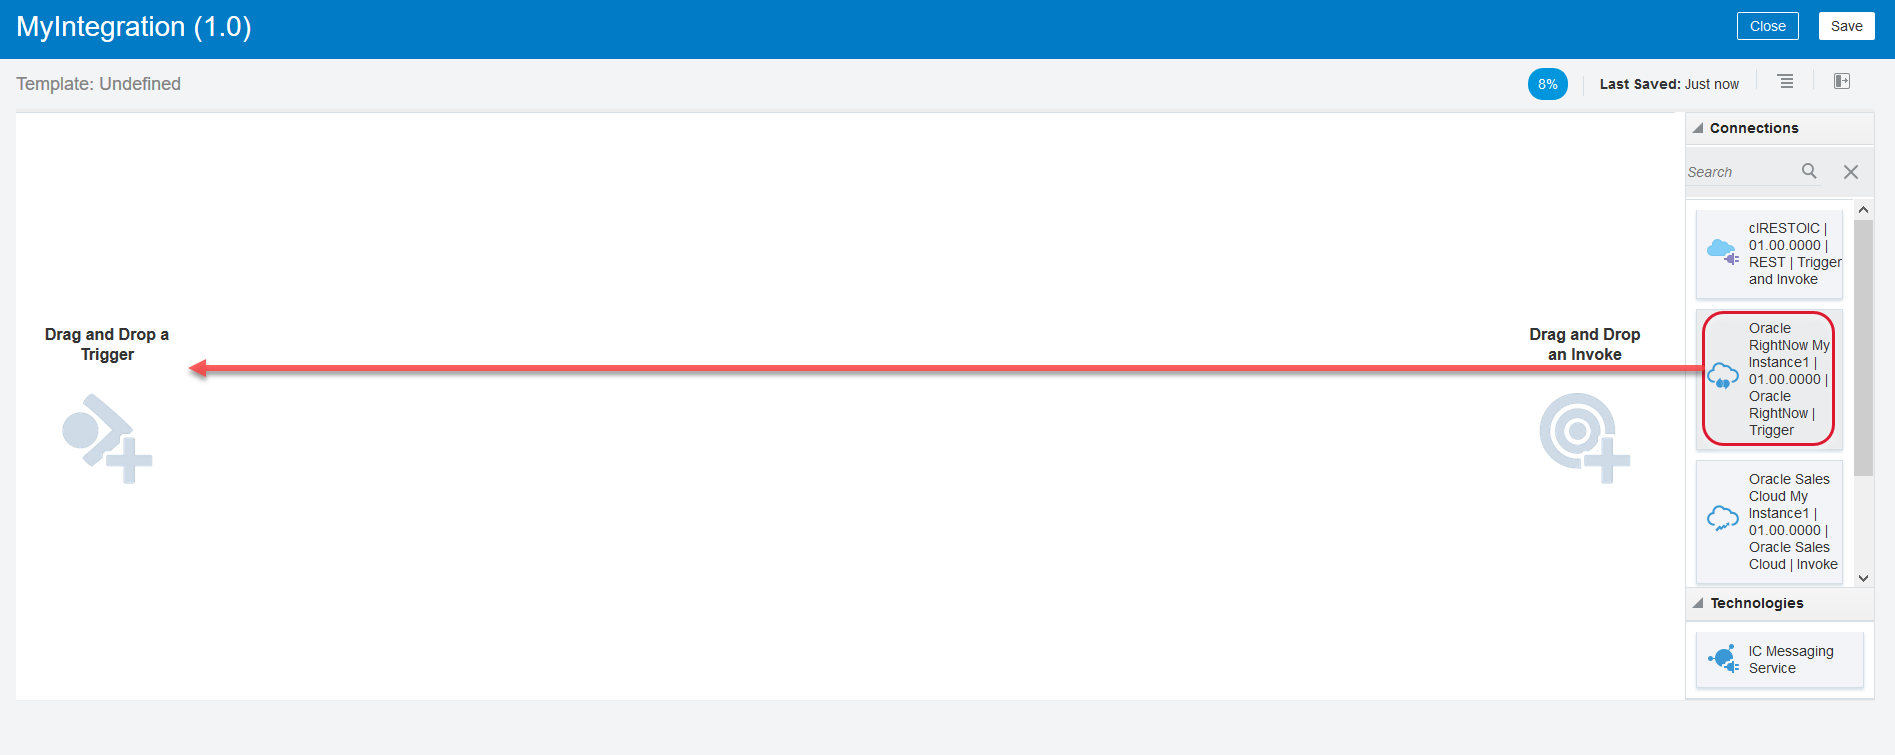
  2. Drag your Oracle Service Cloud (RightNow) connection to the Trigger area. This invokes the configuration wizard.
    integrate_rightnow
    Description of the illustration integrate_rightnow.png
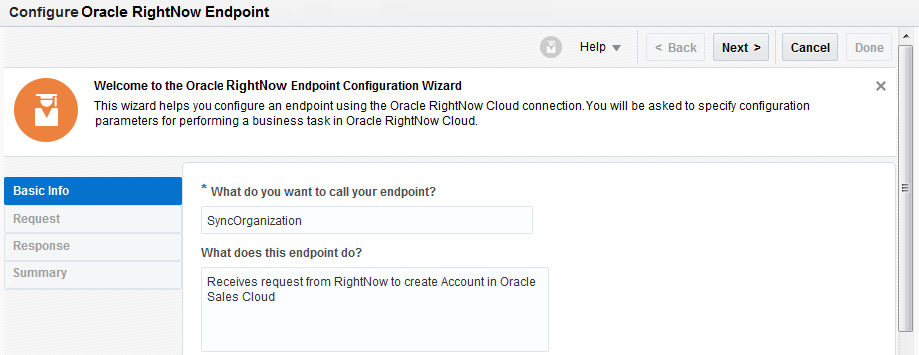
  3. Fill in the wizard Basic Info page with the following information:
    Field Enter
    What do you want to call your endpoint? SyncOrganization
    What does this endpoint do? Receives request from Oracle Service Cloud (RightNow) to create Account in Oracle Sales Cloud
    wizard_rightnow
    Description of the illustration wizard_rightnow.png
  4. Click Next to advance to the Request page.
  5. Select Event Subscription and select Organization created from the list. Alternatively, you can type Organization in the the Select Event text box to filter the event.
    configure_rightnow_request
    Description of the illustration configure_rightnow_request.png
  6. Click Next to advance to the Response page.
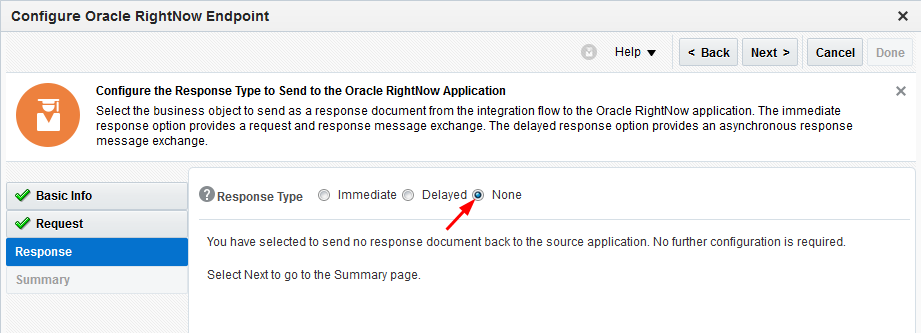
  7. Because this is a one-way process, there is no response. Select the None response type.
    send_checkbox
    Description of the illustration send_checkbox.png
  8. Click Next.
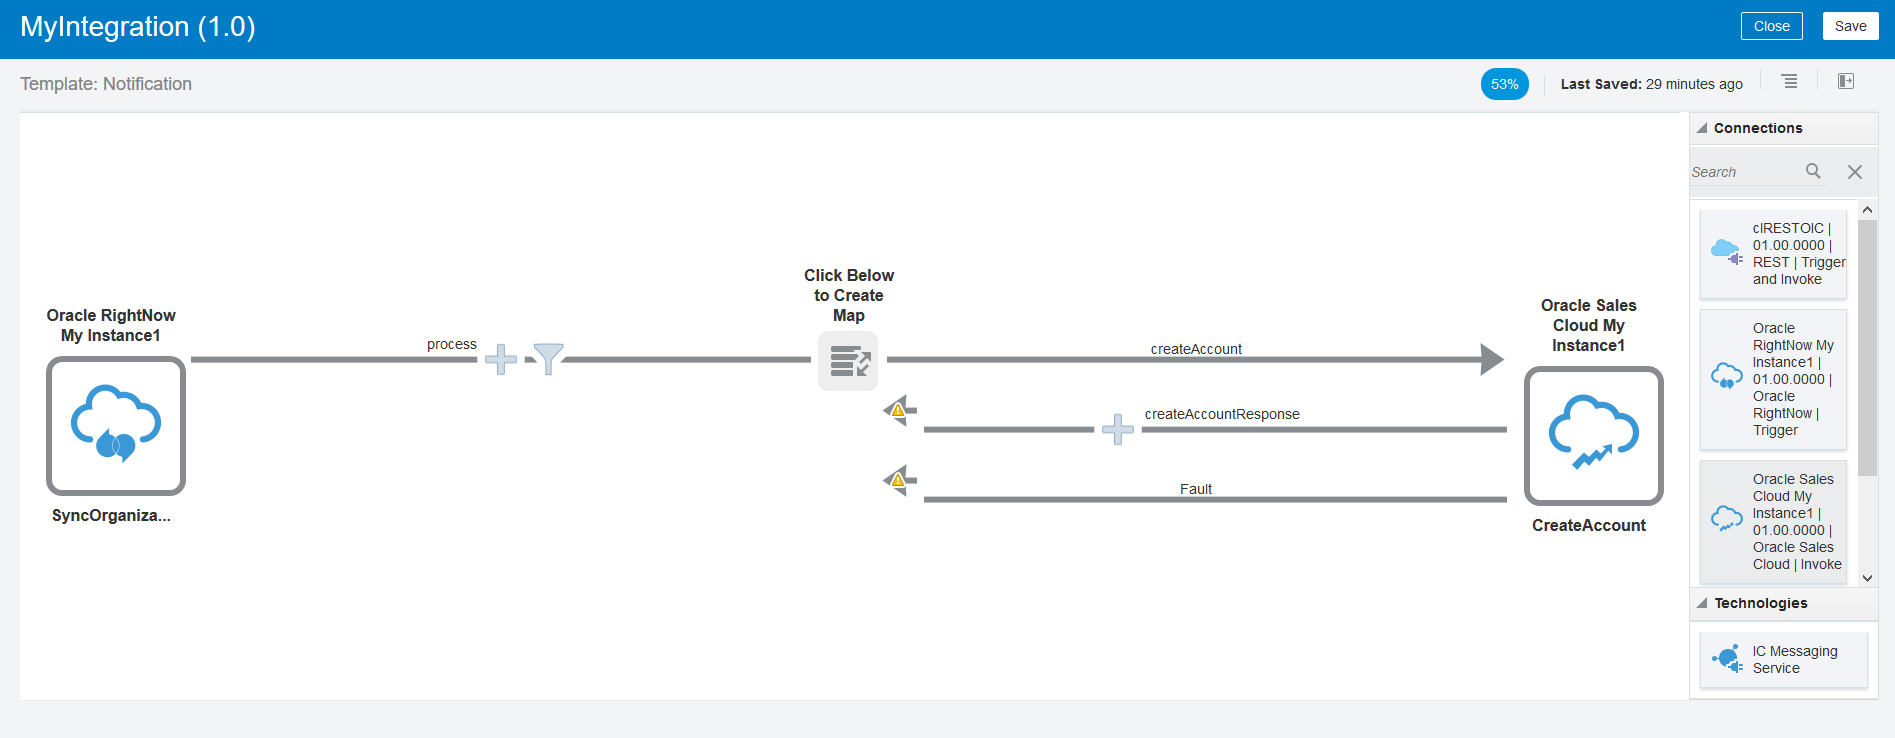
  9. Verify the details in the Summary page and click Done. The Oracle Service Cloud (RightNow) connection appears on the integration canvas.
    dnd_rightnow
    Description of the illustration dnd_rightnow
  10. Click Save on the integration canvas to save your work.

section 3Configure Oracle Sales Cloud Connection (Invoke)

  1. On the integration canvas page, click Invokes to expand the panel and drag your Oracle Sales Cloud connection to the Invoke area. This invokes the configuration wizard.
    integrate_sales
    Description of the illustration integrate_sales.png
  2. Fill in the wizard Basic Info page with the following information:
    Field Enter
    What do you want to call your endpoint? CreateAccount
    What does this endpoint do? Create Account in Oracle Sales Cloud
    wizard_salescloud
    Description of the illustration wizard_salescloud.png
  3. Click Next to advance to the Operations page.
  4. Select Services from the Browse by drop-down menu.
  5. Select AccountService from the scrolling list of business services. Alternatively, you can type AccountService in the the Filter By object name text box to filter the object.
  6. Select createAccount from the drop-down menu beneath the scrolling list.
    salescloud_wizard
    Description of the illustration salescloud_wizard.png
  7. Click Next.
  8. Verify the details in the Summary page and click Done. The Oracle Sales Cloud connection appears on the integration canvas.
    dnd_salescloud
    Description of the illustration dnd_salescloud.png
  9. Click Save on the integration canvas to save your work.

section 4Map the Data

One of the key tasks in creating an integration is defining how data is transferred, or mapped, between two applications. You will now map the fields of the Oracle Service Cloud (RightNow) Organization object (trigger) to the fields of the Oracle Sales Cloud AccountService (invoke). The Oracle Integration visual mapper enables you to map fields between applications by dragging trigger fields onto invoke fields. When you open the mapper for a request or response message in an integration, the data structures are automatically populated with the information pulled from the trigger and invoke connections.

Watch "Map Data in Oracle Integration" to see it before you do it.

  1. Click the mapping icon between the trigger and the invoke icons and click the Edit icon.
    mapper_button
    Description of the illustration mapper_button.png
  2. Click the Create icon when prompted. This opens the mapper.
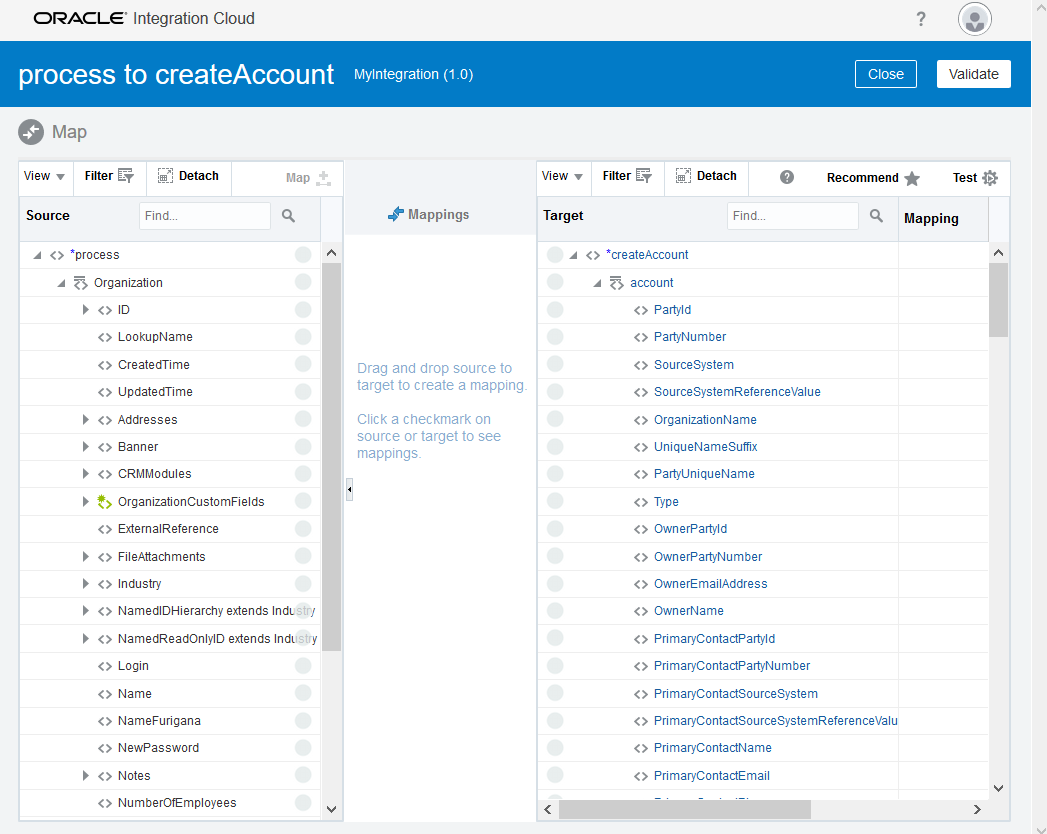
    mappernew
    Description of the illustration mappernew.png
    The source data structure is on the left of the mapper and the target data structure is on the right. Collapse the top-level nodes to make it easier to see the fields with which you want to work.
  3. Drag the source to the target, as listed in the table. Drop the source in the empty field next to the target. As shown in the image, the green check mark icon and the line connecting them indicate that these fields have been mapped. You can use the search option to find the source and target objects.
    Source Target
    process / Organization / Name createAccount / account / OrganizationName
    process / Organization / NumberOfEmployees createAccount / account / EmployeesTotal
    process / Organization / SalesSettings / TotalRevenue / Currency / Name createAccount / account / CurrencyCode
    mapper
    Description of the illustration mapper.png
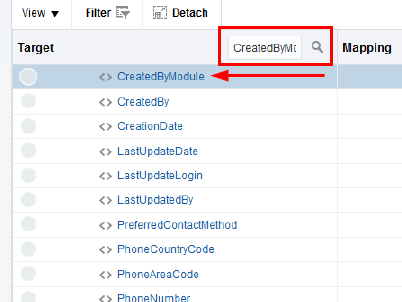
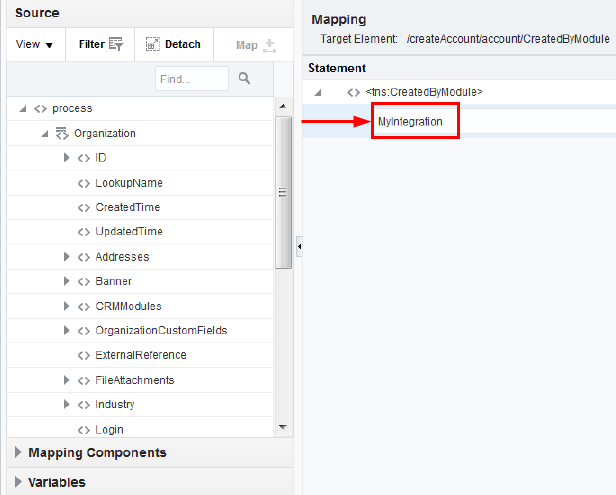
  4. After you have mapped the three items in the table, on the target side, search for the CreatedByModule field and then click it to invoke the Build Mappings page.
    createdbymodule
    Description of the illustration createdbymodule.png

  5. In the Drag and Drop or Type here text box, enter the identifier that was associated with this integration when it was created. Type MyIntegration.
    mapping_builder
    Description of the illustration mapping_builder.png
  6. Click Save, then click Close.
    mapping_validate
    Description of the illustration mapping_validate.png
  7. Click Validate to validate the mapping, then click Close.
    mapping_validate
    Description of the illustration mapping_validate.png

section 5Add Business Identifiers for Tracking

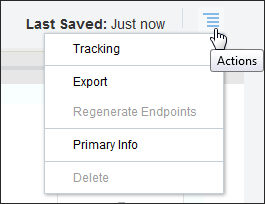
  1. On the integration canvas page, click Actions, then select Tracking from the Actions menu.
    configurations
    Description of the illustration configurations.png
  2. Drag the LookupName field from the Source section into the Tracking Field column. This lets you track the status of that payload field during runtime.
    tacking_assign_field
    Description of the illustration tacking_assign_field
  3. Click Save.
  4. Note that the mapping icon turns green and the Flow Progress Indicator shows that the integration is 100% complete.
    100_percent
    Description of the illustration 100_percen.png
  5. Click Save.
  6. Click Close to exit the canvas.

section 6Activate the Integration

  1. Find MyIntegration in the Integrations list and click the Activate slider.
    deployment
    Description of the illustration deployment
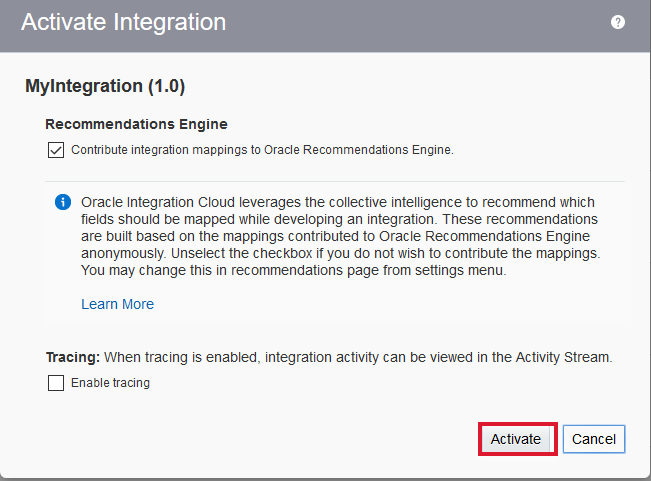
  2. Click Activate when prompted to confirm. Note: Do not select Enable tracing.
    confirmation
    Description of the illustration confirmation.png
  3. Verify that the integration is Active.
    integration_active
    Description of the illustration integration_active.png
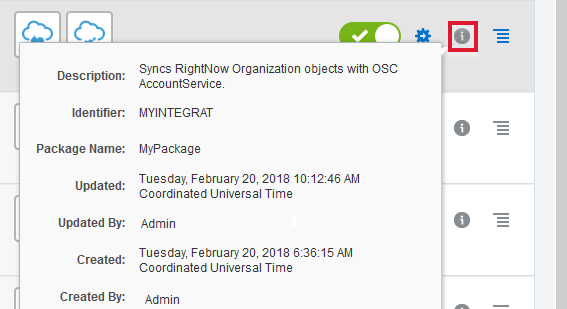
  4. Click Details icon to view integration information.
    active_status
    Description of the illustration active_status.png

next stepNext Tutorial

Verifying Your Integration