Before You Begin
Purpose
In this tutorial, you learn to integrate a custom NodeJS application with Oracle Identity Cloud Service using PassportJS, a flexible and modular authentication middleware.
Time to Complete
90 minutes
Scope
In this tutorial, you implement SSO between Oracle Identity Cloud Service and a NodeJS application following the conceptual architecture below:
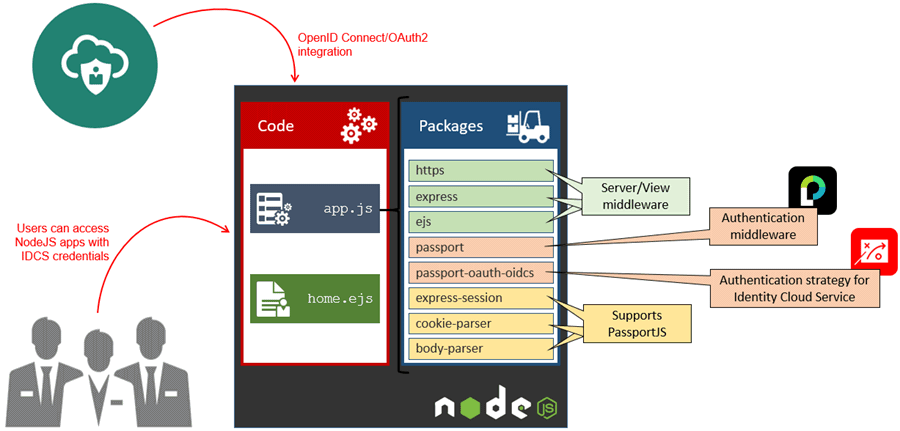
In this integration:
- Identity Cloud Service acts as OAuth 2.0 and OpenID Connect authorization server, providing Single Sign-On for the NodeJS application.
- The NodeJS application acts as a OAuth client.
- The NodeJS application is build using the following packages:
- https, express, and ejs: Provides a middleware framework (express), view (ejs), and encryption (https) for the application.
- passport: Provides an authentication middleware on top of the express framework, facilitating the access control for the application. Passport supports multiple ways of authenticating your applications through modular strategies.
- passport-oauth-oidcs: This passport strategy, created by Indranil Jha, provides passport the ability to integrate authentication with Oracle Identity Cloud Service via OAuth2 and OpenID Connect. The strategy works based on your identity cloud service settings and insulates you from the OpenID and OAuth2 authentication process.
- express-session, cookie-parser, and body-parser: Provides supporting services for the passportjs middleware. This includes the ability to keep user sessions on the node server (express-session), provide cookies to logged users (cookie-parser), and get information from the http body (body-parser).
What Do You Need?
- Access to Oracle Identity Cloud Service with authorization to manage applications
(Identity Domain Administrator, Security Administrator, or Application Administrator). - Experience developing in Node and Express.
- Node installed and configured in your desktop.
Important: The sample code, packages, and strategy explored in this tutorial are provided “AS IS” with no express or implied warranty for accuracy or accessibility. The sample code is intended to demonstrate the basic integration between Oracle Identity Cloud Service and custom applications and does not represent, by any means, the recommended approach nor is it intended to be used in development or productions environments.
Register a Client Application in Identity Cloud Service
In this task, you configure and activate the Node Client application in Oracle Identity Cloud Service.
During configuration, you define how Oracle Identity Cloud Service integrates with your application.
- In the Identity Cloud Service console, expand the Navigation Drawer
 , click Applications, and then click Add.
 -
Select Trusted Application.
Tip: The UI provides information about each type of application supported by Oracle Identity Cloud Service. - Enter
Node Clientas the Name,Node app for testingas the Description, and then click Next. -
Select Configure this application as a client now.
- On the Authorization page, select Authorization Code and enter the information according to the table. Then click Next.
- Click Finish.
- Save the Client ID and the Client Secret, and then click Close.
- Click Activate, and then click Activate Application. Oracle Identity Cloud Service displays a confirmation message.
| Attribute | Value |
| Redirect URL | https://localhost/return |
| Logout URL | https://localhost/logout |
| Post Logout Redirect URL | https://otn.oracle.com |
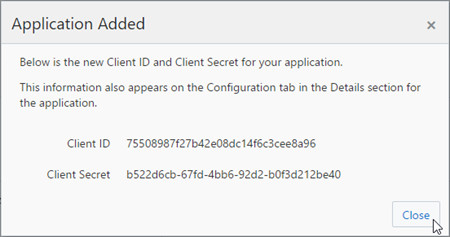
At this point, you have the Node application registered in Identity Cloud Service with its respective client ID and a client secret.
In the next steps, you develop your Node application.
Develop a Node Application
In this task, you develop a node application. Later, you will integrate this app with Identity Cloud Service.
Important: The sample code, packages, and strategy explored in this tutorial are provided “AS IS” with no express or implied warranty for accuracy or accessibility. The sample code is intended to demonstrate the basic integration between Oracle Identity Cloud Service and custom applications and does not represent, by any means, the recommended approach nor is it intended to be used in development or productions environments.
Create the Application
- Launch your terminal, create your application folders and then install the node modules that are going to be used in this tutorial:
- Create the
views/home.ejsfile with the following content: - Create the
app.jsfile with the following content: - Launch the application:
- Open your browser and access
http://localhost/. The home page will be displayed:
mkdir passport-idcs
cd passport-idcs
mkdir views
npm i express
npm i ejs
<!DOCTYPE html>
<html>
<head>
	<title>Node JS - Integration with Identity Cloud Service</title>
</head>
<body>
	<h1>Home Page</h1>
	<% if(!isAuthenticated) { %>
		<a href="/auth/idcs">Log In with Oracle Identity Cloud Service</a>
	<% }else{ %>
		<p>Hello, <%= user.name %></p>
		<a href="logout">Logout</a>
	<% } %>
</body>
</html>//BEGIN: LOAD EXPRESS AND EJS
var express = require('express');
var app = express();
app.set('view engine', 'ejs');
//END: LOAD EXPRESS AND EJS
//BEGIN: ENDPOINTS
app.get('/', function(req, res) {
res.render('home', {
isAuthenticated: req.isAuthenticated()
});
});
//END: ENDPOINTS
//BEGIN: LOAD APP LISTENER
var port = process.env.PORT || 80;
server.listen(port, function() {
console.log('https://localhost:' + port + '/');
});
//END: LOAD APP LISTENERcd passport-idcs
node app
http://localhost:80/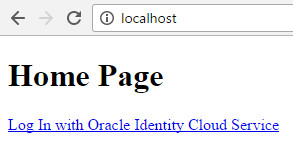
In the next section, you implement SSL/TLS in your application.
Configure SSL/TLS
In this section, you configure encryption in your application using a self-signed certificate.
Note: Encrypted communication is considered a good security practice and a requirement for OAuth 2.0 communications.
- Launch your terminal, and create a certificate as follows: Tip: When prompted for certificate information (such as country, state, or common name), enter a dummy data.
- Move the
myapp.crtandmyapp.keyunder thepassport-idcsfolder. - Open the
app.js. - Add the following code after the
//END: LOAD EXPRESS AND EJSline: - Change the
portvariable to443: - Launch the application:
- Open your browser, access
https://localhost/, and then accept the certification exception. The home page will be displayed:
openssl req -x509 -nodes -days 365 -newkey rsa:1024 -out myapp.crt -keyout myapp.key//BEGIN: LOAD FILE SYSTEM (TO OPEN CERTIFICATES) AND HTTPS
var fs = require('fs');
var https = require('https');
var server = https.createServer({
cert: fs.readFileSync('myapp.crt'),
key: fs.readFileSync('myapp.key')
}, app);
//END: LOAD FILE SYSTEM (TO OPEN CERTIFICATES) AND HTTPSvar port = process.env.PORT || 443;cd passport-idcs
node app
http://localhost:443/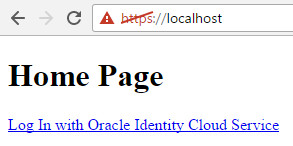
Integrate Node Application with PassportJS and Identity Cloud Service
In this task, you integrate your node application with PassportJS and Identity Cloud Service.
- Launch your terminal, and install the node modules required to use passport with Identity Cloud Service:
- Open the file
node_modules/oauth/lib/oauth2.jsfile, and comment the following lines:
Tip: You are commenting these lines because Identity Cloud Service passes the client id and secret variables in the request header (instead of the request body).
- Open the
app.js. - Add the following code between the
//END: LOAD FILE SYSTEM (TO OPEN CERTIFICATES) AND HTTPSand//BEGIN: ENDPOINTSlines: - Load dependencies required by passport to parse body information (
body-parser), generage cookies (cookie-parser), and support sessions on server side (express-session). - Load the passport engine.
- Define the Identity Cloud Service settings on the
idcsInfoobject. - Load the Identity Cloud Service strategy with the alias
idcs. - Define the user serialization (required by Passport JS to save user information in the session).
- Define endpoints for trigger the user authentication in IDCS (
auth/idcs), and to receive the Authorization code from IDCS (auth/idcs/callback). - Update the
idcsInfodiscoveryURL,clientID,clientSecret, andprofileURLwith the values from your environment. For the clientID and clientSecret, use the variables obtained during the Node Application registration in Identity Cloud Service. - Update the
block as follows: - After all modifications, your
app.jsshould look like follows:
cd passport-idcs
#For pulling information from request body
npm i body-parser
#For storing sessions (app-side)
npm i express-session
#For setting cookies (user-side)
npm i cookie-parser
#PassportJS module
npm i passport
#PassportJS strategy for Identity Cloud Service
npm i passport-oauth-oidcs//params['client_id'] = this._clientId;
//params['client_secret'] = this._clientSecret;//BEGIN: LOAD PASSPORT DEPENDENCIES
//body-parser: to read credentials from request body
var bodyParser = require('body-parser');
app.use(bodyParser.urlencoded({ extended: false }));
//cookie-parser: to support cookies and hold session in user's browser
var cookieParser = require('cookie-parser');
app.use(cookieParser());
//express-session: to support sessions on server side
var expressSession = require('express-session');
app.use(expressSession({ secret: process.env.SESSION_SECRET || 'Welcome1', resave: false, saveUninitialized: false }));
//END: LOAD PASSPORT DEPENDENCIES
//BEGIN: LOAD PASSPORT ENGINE
var passport = require('passport');
app.use(passport.initialize());
app.use(passport.session());
//END: LOAD PASSPORT ENGINE
//BEGIN: IDCS INFORMATION
var idcsInfo = {
discoveryURL: 'https://examplez.idcs.internal.oracle.com:8943/.well-known/idcs-configuration',
clientID: 'd6c249fbbf0c437cb6990a9533691987',
clientSecret: 'd91ec9ad-3055-4bd9-97b7-2e32a006626c',
callbackURL: 'https://localhost/auth/idcs/callback',
profileURL: 'https://examplez.idcs.internal.oracle.com:8943/admin/v1/Me',
passReqToCallback: true
};
//END: IDCS INFORMATION
//BEGIN: LOAD IDCS STRATEGY
var OIDCSStrategy = require('passport-oauth-oidcs').Strategy;
var oidcsstrgt = new OIDCSStrategy(idcsInfo,
function(req, accessToken, refreshToken, profile, done) {
req.session.idcsAccessToken = accessToken;
return done(null, profile);
}
);
passport.use('idcs', oidcsstrgt);
//END: LOAD IDCS STRATEGY
//BEGIN: USER SERIALIZATION (REQUIRED BY PASSPORTJS)
passport.serializeUser(function(user, done) { done(null, user); });
passport.deserializeUser(function(user, done) { done(null, user); });
//END: USER SERIALIZATION (REQUIRED BY PASSPORTJS)
//BEGIN: PASSPORT ENDPOINTS FOR AUTHENTICATION AND CALLBACK (LINKED TO IDCS STRATEGY)
app.get('/auth/idcs', passport.authenticate('idcs'));
app.get('/auth/idcs/callback', passport.authenticate('idcs', { successRedirect: '/', failureRedirect: '/' }));
//END: PASSPORT ENDPOINTS FOR AUTHENTICATION AND CALLBACK (LINKED TO IDCS STRATEGY)//BEGIN: ENDPOINTS
app.get('/', function(req, res) {
res.render('home', {
isAuthenticated: req.isAuthenticated(),
user: req.user
});
});
app.get('/logout', function(req, res) {
req.logout();//method added by passport to support logout
res.redirect('/');
});
//END: ENDPOINTS//BEGIN: LOAD EXPRESS AND EJS
var express = require('express');
var app = express();
app.set('view engine', 'ejs');
//END: LOAD EXPRESS AND EJS
//BEGIN: LOAD FILE SYSTEM (TO OPEN CERTIFICATES) AND HTTPS
	var fs = require('fs');
	var https = require('https');
	var server = https.createServer({
		cert: fs.readFileSync('myapp.crt'),
		key: fs.readFileSync('myapp.key')
	}, app);
//END: LOAD FILE SYSTEM (TO OPEN CERTIFICATES) AND HTTPS
//BEGIN: LOAD PASSPORT DEPENDENCIES
//body-parser: to read credentials from request body
var bodyParser = require('body-parser');
app.use(bodyParser.urlencoded({ extended: false }));
//cookie-parser: to support cookies and hold session in user's browser
var cookieParser = require('cookie-parser');
app.use(cookieParser());
//express-session: to support sessions on server side
var expressSession = require('express-session');
app.use(expressSession({ secret: process.env.SESSION_SECRET || 'Welcome1', resave: false, saveUninitialized: false }));
//END: LOAD PASSPORT DEPENDENCIES
//BEGIN: LOAD PASSPORT ENGINE
var passport = require('passport');
app.use(passport.initialize());
app.use(passport.session());
//END: LOAD PASSPORT ENGINE
//BEGIN: IDCS INFORMATION
var idcsInfo = {
discoveryURL: 'https://examplez.idcs.internal.oracle.com:8943/.well-known/idcs-configuration',
clientID: 'd6c249fbbf0c437cb6990a9533691987',
clientSecret: 'd91ec9ad-3055-4bd9-97b7-2e32a006626c',
callbackURL: 'https://localhost/auth/idcs/callback',
profileURL: 'https://examplez.idcs.internal.oracle.com:8943/admin/v1/Me',
passReqToCallback: true
};
//END: IDCS INFORMATION
//BEGIN: LOAD IDCS STRATEGY
var OIDCSStrategy = require('passport-oauth-oidcs').Strategy;
var oidcsstrgt = new OIDCSStrategy(idcsInfo,
function(req, accessToken, refreshToken, profile, done) {
req.session.idcsAccessToken = accessToken;
return done(null, profile);
}
);
passport.use('idcs', oidcsstrgt);
//END: LOAD IDCS STRATEGY
//BEGIN: USER SERIALIZATION (REQUIRED BY PASSPORTJS)
passport.serializeUser(function(user, done) { done(null, user); });
passport.deserializeUser(function(user, done) { done(null, user); });
//END: USER SERIALIZATION (REQUIRED BY PASSPORTJS)
//BEGIN: PASSPORT ENDPOINTS FOR AUTHENTICATION AND CALLBACK (LINKED TO IDCS STRATEGY)
app.get('/auth/idcs', passport.authenticate('idcs'));
app.get('/auth/idcs/callback', passport.authenticate('idcs', { successRedirect: '/', failureRedirect: '/' }));
//END: PASSPORT ENDPOINTS FOR AUTHENTICATION AND CALLBACK (LINKED TO IDCS STRATEGY)
//BEGIN: ENDPOINTS
app.get('/', function(req, res) {
res.render('home', {
isAuthenticated: req.isAuthenticated(),
user: req.user
});
});
app.get('/logout', function(req, res) {
req.logout();//method added by passport to support logout
res.redirect('/');
});
//END: ENDPOINTS
//BEGIN: LOAD APP LISTENER
var port = process.env.PORT || 443;
server.listen(port, function() {
console.log('https://localhost:' + port + '/');
});
//END: LOAD APP LISTENERTesting the Integration
- Launch the application:
- Open your browser, access
https://localhost/, and then accept the certification exception. The home page will be displayed: - Click Log In with Oracle Identity Cloud Service. The Identity Cloud Service login page is displayed.
- Authenticate with your credentials.
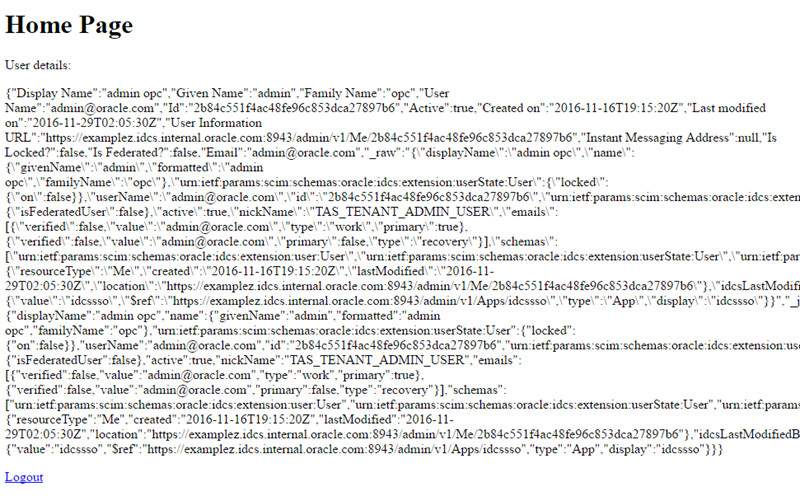
- After a successful authentication, Oracle Identity Cloud Service redirects you back to the sample application, which displays a welcome message with the user details in JSON format.
cd passport-idcs
node app
http://localhost:443/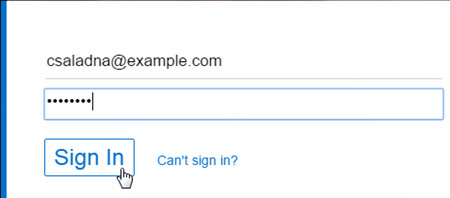
Optional Display application for users in Identity Cloud Service
In this task, you can make Oracle Identity Cloud Service to display the Customer Quotes application under My Apps page for specific users.
- In the Identity Cloud Service console, expand the Navigation Drawer , click Applications, and then click Node Client.
- Update the fields as follows and click Save.
- In the Identity Cloud Service console, click Users.
- Search and select the user that you want to give access to the Node Client application. Under Access , Click Assign , select Node Client application, and then click OK. Tip: Users assigned in this page will have the Customer Quotes application exposed under My Apps.
| Attribute | Value |
| Application Icon | Upload an image of 95x95 pixels |
| Application URL | https://localhost |
| Display in My Apps | selected |
Want to Learn More?
To learn more about how integrate Oracle Identity Cloud Service with Java Client and Resource Server applications, try the tutorials:
To learn more about the Identity Cloud Service REST APIs, explore the following tutorials and documents:
Credits
- Developer(s): Frederico Hakamine.
- Contributor(s): Indranil Jha and Todd Elwood.